- Professional Development
- Medicine & Nursing
- Arts & Crafts
- Health & Wellbeing
- Personal Development
Vectorworks Basics to Intermediate Training
By London Design Training Courses
Why learn Vectorworks Basics to Intermediate Training Course? Course Link Vectorworks skills with our course! Led by certified expert tutors, this course takes you from basics to intermediate level, enabling you to create plans and sections. The course will cover 2D and 3D modeling, rendering, and visualization. Duration: 16 hrs. Method: 1-on-1, Personalized attention. Schedule: Tailor your own schedule by pre-booking a convenient hour of your choice, available from Mon to Sat between 9 am and 7 pm. At London Design Training Course, we offer a range of Vectorworks training options to meet your specific needs and those of your business. Explore the links below for detailed information about the various training types and their content. On-Site Training: London Design Training Course comes to your location, eliminating the need for you to travel. This approach allows us to fully understand your business culture and requirements. Training can be conducted in your studio or conference room, with scheduling flexibility tailored to your preferences. In-House Training: Our studio in London SW96DE, hosts In-House Vectorworks training for both individuals and groups. During the sessions, we provide the necessary software and hardware to ensure a seamless learning experience. Vectorworks Basic to Intermediate Course Course Duration: 16 hours The Vectorworks Basic to Intermediate Course is tailored for individuals with basic Vectorworks knowledge, aiming to master advanced 2D and 3D techniques, including modeling and rendering. Participants will customize Vectorworks to their needs, create custom tools, and automate tasks with scripting. I. Review of Basic Concepts (1 hour) - Vectorworks interface and navigation - Creating and editing 2D and 3D geometry - Working with layers and classes - Utilizing views and viewports II. Advanced 2D Drawing Techniques (2 hours) - Creating complex geometry using advanced drawing tools - Editing and modifying intricate geometry - Customizing line types and hatches - Utilizing advanced annotation tools III. Advanced 3D Modeling (3 hours) - Creating 3D forms and custom 3D objects - Exploring advanced 3D tools such as Solid Modeling - Converting 2D plans into 3D models IV. Visualization and Rendering (3 hours) - Setting up cameras and lights for visualization purposes - Utilizing the Renderworks engine for rendering - Enhancing visuals with the visualization palette - Creating and editing textures and materials V. Customizing Vectorworks (3 hours) - Personalizing the interface to suit specific preferences - Creating custom tools and automating tasks using the scripting language - Developing custom object styles and resources - Creating custom plug-ins and scripts VI. Collaboration and Sharing (2 hours) - Importing and exporting data from other software - Collaborating with others on the same project - Utilizing cloud-based collaboration tools VII. Conclusion and Next Steps (1 hour) - Review of course content and key skills learned - Tips for further learning and available resources - Q&A and feedback session Free 30-day, BIM & CAD Software Trial Request | Vectorworks https://www.vectorworks.net/trial Vectorworks Trial Version Request. Please fill out the following form. We will provide you with an evaluation serial number to activate your trial copy. Learning Outcomes of the Vectorworks Basics to Intermediate Training Course: Proficiency in Vectorworks interface, tools, and navigation. Master 2D drafting and 3D modeling skills. Efficiently manage workflows using layers, classes, and views. Spotlighting techniques for lighting design and stage productions. Advanced object manipulation with solid modeling and Boolean operations. Utilize the symbol library for enhanced productivity. Create professional presentation drawings using viewports and annotations. Integrate with other software and CAD/BIM workflows. Apply skills to real-world projects for practical application. Upon completing the course, participants will have essential skills to effectively use Vectorworks, advancing their proficiency to an intermediate level.

3ds Max Basic to Fundamentals Training
By London Design Training Courses
Why Learn 3ds Max Basic to Fundamentals Training Course? Course Info Unlock your 3D potential with our transformative 3ds Max Basic to Intermediate Training Course. Whether you're a beginner or aiming to enhance your skills, certified tutors and industry experts will guide you through mastering 3D modeling and animation. Duration: 16 hrs Method: 1-on-1, Personalized attention. Schedule: Tailor your own schedule by pre-booking a convenient hour of your choice, available from Mon to Sat between 9 am and 7 pm. 3ds Max Training Course Explore the core skills of 3ds Max, empowering you to create 3D models, rendered images, animations, and games. Used across various industries, 3ds Max is a valuable tool for architects, interior designers, engineers, and professionals in gaming, film, and television. Our 3ds Max Essentials course covers key functionality, principles, and techniques to effectively utilize the application. Set up projects efficiently Create 3ds Max models Apply materials and use maps Utilize lighting and materials for realism Work with cameras Produce rendered images and desktop animations Course Title: 3ds Max Fundamentals - Mastering 3D Modeling and Animation Course Length: 16 hours Course Outline: Part 1: Introduction to 3ds Max - Familiarizing with the 3ds Max Interface - Setting up the workspace for optimal workflow - Mastering navigation within 3ds Max's environment Part 2: 3D Modeling - Creating simple shapes as a foundation - Employing modifiers for advanced designs - Unleashing creativity with complex 3D modeling techniques - Understanding the art of polygonal modeling - Crafting organic and inorganic models with finesse Part 3: Texturing Techniques - Applying and refining textures to enhance visual appeal - Grasping the concept of UVW mapping for precise texture application - Utilizing the material editor for versatile material creation - Crafting custom materials to bring uniqueness to your designs Part 4: Illuminating Your Scenes - Embracing the art of lighting to set the mood - Exploring various light types for different effects - Mastering light properties for the perfect ambiance - Setting up lights to complement the scene's narrative Part 5: Animation Essentials - Delving into the captivating world of animation - Setting keyframes to breathe life into objects - Understanding animation curves for seamless motion - Animating objects in 3D space with creativity and finesse Part 6: Rendering Magic - Unveiling the power of rendering for visual perfection - Configuring rendering parameters for breathtaking results - Exploring render elements to refine post-processing effects - Rendering final images and animations to showcase your creations Part 7: Real-World Projects - Synthesizing all skills to create captivating projects - Designing a simple and stunning interior scene - Crafting a character model and animating its journey Course Requirements: - A computer with 3ds Max installed (a trial version is available on the Autodesk website) - Basic knowledge of computer operations - A passion for 3D modeling and animation Course Goals: By the course's conclusion, you will have gained a solid grasp of 3ds Max, capable of crafting your own 3D models, textures, and animations. You will possess the skills needed to continue your learning journey, refining and elevating your 3D modeling and animation prowess. https://www.autodesk.co.uk › products › free-trialDownload a free 30 day trial of 3ds Max, 3D modelling and rendering software for design visualisation, games and animation to create with full artistic renders.

Revit and 3dsMax V-Ray Visualization Basic to Advance Training
By London Design Training Courses
Why Learn Revit and 3dsMax V-Ray Visualization Basic to Advance Training Course? Course info Master architectural visualization and photorealistic renderings. In-person or live online options available. Learn Revit and 3dsMax, V-Ray rendering, and advanced techniques. Hands-on projects for real-world experience. Duration: 40 hrs Method: 1-on-1 - Individual support. Schedule: Tailor your own schedule by pre-booking a convenient hour of your choice, available from Mon to Sat between 9 am and 7 pm. Comprehensive Training: Master Revit, 3dsMax, and advanced visualization techniques for exceptional results. V-Ray Rendering: Explore realistic rendering with V-Ray, including advanced techniques and materials. Real-World Projects: Work on industry-relevant projects for a professional portfolio. Flexible Learning: Choose in-person or live online sessions for an engaging experience. Lesson Recordings: Access recorded classes to reinforce your understanding. Lifetime Email Support: Get guidance and assistance from experienced instructors beyond the course duration. Autodesk Certified Instructors. Comprehensive Training: Master Revit, 3dsMax, and advanced visualization techniques for exceptional results. V-Ray Rendering: Explore realistic rendering with V-Ray, including advanced techniques and materials. Real-World Projects: Work on industry-relevant projects for a professional portfolio. Flexible Learning: Choose in-person or live online sessions for an engaging experience. Lesson Recordings: Access recorded classes to reinforce your understanding. Lifetime Email Support: Get guidance and assistance from experienced instructors beyond the course duration. Autodesk Certified Instructors. Part 1: Revit (16 hours) Module 1: Introduction to Revit Familiarizing with the Revit interface and workspace Embracing the Building Information Modeling (BIM) workflow Creating a fundamental building model as a starting point Module 2: Basic Modeling in Revit Working with essential elements such as walls, doors, and windows Constructing floors and roofs to complete the building structure Crafting functional and visually appealing stairs and railings Module 3: Advanced Modeling in Revit Delving into the creation and manipulation of families Utilizing parameters and constraints to enhance modeling efficiency Exploring intricate geometries for complex designs Module 4: Annotation and Documentation in Revit Enhancing project documentation by adding text and dimensions Generating informative schedules for better project management Mastering the printing and exporting processes for professional output Part 2: 3ds Max (16 hours) Module 1: Introduction to 3ds Max Navigating the 3ds Max interface and workspace Understanding the 3D modeling workflow for design visualization Initiating the creation of basic 3D models Module 2: Basic Modeling in 3ds Max Working with primitive shapes to build foundational models Creating and refining splines to form versatile shapes Advancing to complex 3D model development for intricate designs Module 3: Materials and Textures in 3ds Max Exploring the material editor and its functionalities Skillfully applying and adjusting materials for realistic renders Incorporating textures to add depth and detail to the models Module 4: Lighting and Cameras in 3ds Max Mastering the art of lighting creation and manipulation Utilizing the daylight system for enhanced realism Understanding cameras and perspectives for compelling visual storytelling Part 3: V-Ray (8 hours) Module 1: Introduction to V-Ray Getting acquainted with the V-Ray interface and workflow Exploring V-Ray materials and textures for high-quality renders Module 2: Lighting and Rendering in V-Ray Creating and refining lighting setups for stunning renders Utilizing global illumination to enhance the realism of scenes Implementing advanced rendering techniques for professional output Module 3: Materials and Textures in V-Ray Crafting and modifying V-Ray materials for realistic surfaces Applying V-Ray textures to add depth and realism to objects Utilizing V-Ray displacement maps for intricate details For 3ds Max free trial, visit: https://www.autodesk.co.uk/products/free-trial. To access the V-Ray free trial, visit: https://www.chaosgroup.com/. Start your journey to becoming a proficient designer and renderer in the world of 3D modeling and visualization. Download Revit Revit and 3dsMax V-Ray Visualization Basic to Advance Training Course: Proficient Software Skills: Acquire a strong command of Revit and 3dsMax, along with advanced techniques in V-Ray rendering. High-Quality Visualizations: Create realistic and visually stunning architectural visualizations using V-Ray. Architectural Modeling: Master the process of modeling architectural elements with precision and efficiency. Materials and Textures: Understand how to apply realistic materials and textures to enhance visualizations. Lighting Setup: Set up lighting environments to achieve optimal illumination and ambiance in renderings. Rendering Techniques: Explore advanced rendering techniques, including global illumination, caustics, and ambient occlusion. Real-World Projects: Complete industry-relevant projects to build a professional-grade portfolio. Problem-Solving Skills: Develop the ability to troubleshoot and resolve rendering challenges effectively. Efficient Workflows: Learn time-saving workflows and best practices for efficient visualization production. Portfolio Showcase: Showcase your newly acquired skills through a diverse range of visualizations.

3ds Max Basics Training
By London Design Training Courses
Why Choose 3ds Max Basics Training Course? Click for more info What am I going to get from this course? Create your own models in 3ds Max; Use built in poly modelling tools to create basic 3D objects. Learn everything you need about 3ds Max with this guide, from the basics of modelling and animation to more advanced steps. Duration: 10 hrs Method: 1-on-1, Personalized attention. Schedule: Tailor your own schedule by pre-booking a convenient hour of your choice, available from Mon to Sat between 9 am and 7 pm. 3ds Max Basic Training Course: Course Name: 3ds Max Basics Training Course. Core Skills for 3D Modeling, Rendering, Animations, and Games. Target Audience: Beginners and new users from diverse industries, including architects, interior designers, engineers, game developers, artists, and animators.Course Outline: 3D Modeling and Animation with 3ds MaxI. Introduction to 3ds Max- Course overview and objectives - Navigating the user interface - Basic settings and preferencesII. Creating 3D Objects- Building simple shapes with primitive objects - Craft complex designs using Editable Poly - Enhancing objects with modifiers - Applying materials and textures for realistic effectsIII. Lighting Techniques- Illuminating scenes with different light sources - Exploring various types of lighting - Adjusting light properties for desired effects - Casting shadows to enhance realismIV. Camera Control- Creating and configuring camera views - Fine-tuning camera settings for optimal shots - Animating cameras for dynamic scenesV. Animation Fundamentals- Mastering keyframe animation techniques - Utilizing the time slider and track view - Animating object transformations - Adding movement to materials and texturesVI. Rendering Process- Configuring render settings for high-quality output - Selecting appropriate output formats - Streamlining rendering with batch processing - Enhancing final renders with post-processing effectsVII. Project-Based Learning- Applying acquired skills to complete a final project - Exercising creativity and problem-solving abilities - Integrating modeling, animation, lighting, and rendering into the projectIn-Depth Course Outline:1. Modeling- Edit Poly Modeling: Extrude, Chamfer, Cut, and Slices - Symmetry Mirror Modeling - Designing a Table and Chair - Creating a Basic House Model - Working with Lines and Shapes - Importing Plans from AutoCAD/Vectorworks - Crafting Interior Spaces - Adding Doors, Windows, Railings, and Trees - Implementing Stairs2. Modifiers- Exploring Compound Objects - Utilizing Connect, Scatter, Pro Boolean, Loft, and Terrain Modifiers - Manipulating Bend, Taper, Twist, Stretch, Skew, FFD, Wave, Ripple, and Lattice - Employing the Lathe Modifier for Curved Objects3. 3ds Max Basic Lights- Mastering Omni, Spot, and Direct Lights for Illumination4. 3ds Max Camera- Understanding Free and Target Cameras for Optimal Shots5. Texturing and Rendering- Applying Diffuse and Bump Mapping Techniques - Integrating Environment and Background Images - Configuring Render Settings for High-Quality Images - Lighting and Rendering Scenes in 3ds MaxAre you ready to take your 3D modeling and animation skills to the next level? Download the 30-day free trial of 3ds Max from Autodesk and embark on a transformative learning journey today. Explore the possibilities and unleash your creative potential!

AutoCAD Electrical Training Course | Bespoke
By London Design Training Courses
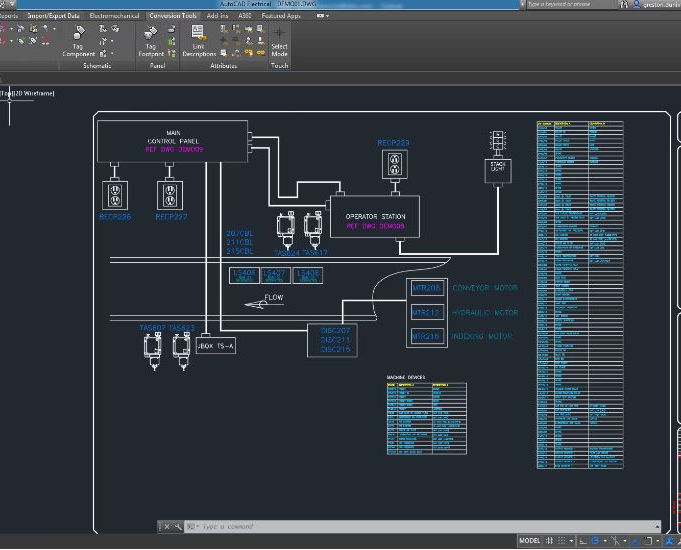
Why Choose AutoCAD Electrical Training Course | Bespoke? Course Link Master electrical drawings, schematics, and layouts. Utilize symbol libraries and automated circuit design. Access recorded lessons and lifetime email support. "Say goodbye to group classes and hello to 1-on-1 Courses. Dial 02077202581 or WhatsApp 07970325184 to reserve your dates. Duration: 16 hrs. Method: 1-on-1, Personalized attention. Schedule: Tailor your own hours of your choice, available from Mon to Sat between 9 am and 7 pm. AutoCAD Electrical Training Course: Specialized electrical CAD design skills with precision. Streamlined workflows for efficient design. Consistent adherence to industry standards. Increased productivity in electrical design. Enhanced collaboration with other professionals. Access to recorded lessons for review. Lifetime email support for ongoing assistance. Learn AutoCAD for electrical design. Enroll now and create accurate and professional electrical drawings with confidence. Choose in-person or live online sessions. AutoCAD Electrical Training Course: Specialized electrical CAD design skills with precision. Streamlined workflows for efficient design. Consistent adherence to industry standards. Increased productivity in electrical design. Enhanced collaboration with other professionals. Access to recorded lessons for review. Lifetime email support for ongoing assistance. Learn AutoCAD for electrical design. Enroll now and create accurate and professional electrical drawings with confidence. Choose in-person or live online sessions. AutoCAD Electrical Course Content: Introduction to AutoCAD Electrical Software: Overview and features of AutoCAD Electrical Understanding the software interface and tools Project file structure and management Layout and Navigation: Navigating the AutoCAD Electrical workspace Creating new project files and using attribute editors Understanding WDD, WDX, and WDF project files Exploring the Project Manager interface and attribute editors Electrical Diagram Drawing: Numbering and titling wires in diagrams Labelling components Utilizing diagram symbol libraries Creating and editing Electrical Control Circuits (ECC) Component dialog box and Circuit Scale dialog box Introduction to Programmable Logic Controllers (PLCs) and Integrated Systems: PLC Symbols and Concepts Inserting Programmable Logic Controllers (PLCs) into diagrams Adding PLC Units to diagrams Working with PLC Input and Output points and circuits Understanding PLC-based classification Using the Spreadsheet to PLC Input and Output Points utility Custom and Bespoke Symbols: Creating custom symbols for Switches, Wires, Contactors, Motors, Transformers, etc. Specifying symbol conventions and standards Offline and online usage of AutoCAD Electrical databases Drawing for Terminals and Plans: Implementing Terminal symbols in diagrams Handling terminal plans and locations Working with compound level terminals and locations Utilizing the Component command for single and multiple components Managing Jumpers and wiring Modifying Terminal Strips and Dual In-Line Packages (DIP) Understanding DIN Rail, Electrical Enclosure, Circuit Breakers, and Electrical Equipment Generating PDFs and Reports: Exporting drawings to PDF format Organizing report templates Automating the generation of reports Creating Electrical Audit Reports This AutoCAD Electrical course provides comprehensive knowledge of the software, focusing on electrical diagram drawing, symbol creation, PLC integration, terminal planning, and report generation. Participants will gain the skills needed to efficiently design electrical systems using AutoCAD Electrical software. Upon completing the AutoCAD Electrical course, participants will master the intricacies of the software. They will adeptly create accurate electrical diagrams, seamlessly integrate PLCs, design personalized symbols, strategize terminal layouts, and produce reports with precision and efficiency. Armed with these skills, graduates will possess the expertise to confidently design complex electrical systems. This proficiency opens avenues in various job roles such as Electrical Design Engineer, CAD Technician, Control Systems Designer, or even Project Manager in industries like manufacturing, automation, and engineering consultancy.
Game Design Training: 3ds Max and Unity 3D Personalized
By Real Animation Works
Game design training face to face training customised and bespoke.

Cannulation Training – CPD Approved
By Lead Academy
Do you want to boost your medical career by learning about the cannulation process? This comprehensive cannulation course is ideal for you! You can learn about the whole venepuncture and cannulation procedure in this Venepuncture and Cannulation Training Course, as well as the safest methods for handling, flushing, and removing a cannula. This course will provide you with the necessary training to flourish in your profession, whether you are a novice or an experienced individual wishing to enhance your career in the healthcare industry. Course Highlights Designed by healthcare professionals Accredited by the CPD Certification Recognised and Valuable Certification Self-Paced Online Theoretical Learning High-Quality Study Materials Interactive practical training Practical Day Class Schedule – 1 Day Face-to-Face Training Venue Location London: Bank Studio, 23 Park Royal Road, NW10 7JH Date: 21st February, 2025 Date: 30th March, 2025 Date: 28th April, 2025 Date: 27th May, 2025 Date: 21st June, 2025 Time: 10:00 am – 05:00 pm Venue Location Birmingham: 83-85 Hagley Road, Birmingham, B16 8QG Date: 25th January, 2025 Date: 24th February, 2025 Date: 23rd March, 2025 Date: 21st April, 2025 Date: 26th May, 2025 Date: 26th June, 2025 Time: 10:00 am – 05:00 pm This extensive IV Cannulation Course covers the following credentials: Selection of veins for cannulation Arm and hand physiology and anatomy Types of cannula Process of cannulation Safety measures Proper insertion of the cannula Classroom-Based Cannulation Course Practical learning We offer comprehensive theoretical study materials and practical sessions for our cannulation training. As part of the practical training, you will receive practical dry lab demonstrations and hands-on experience to justify your role. Who is this Venepuncture and Cannulation Course for? This Venepuncture and Cannulation course is primarily aimed at: Health Visitors Healthcare professionals Nurses, midwives, pharmacists and doctors Freshers looking to begin their career in the healthcare sector Anyone looking to enhance their cannulation skills Aims and Learning Outcomes of this Venepuncture and Cannulation Training Course Know how to select the appropriate veins for cannulation Understand the anatomy and physiology of hands and arms Recognise the various sizes of a cannula Identify the risks concerning cannulation Know how to insert the cannula properly Recognise the safety precautions that should be maintained Gain knowledge about the dressing procedure Know how to safely flush and remove a cannula Learn how to securely dispose of all the sharps Learning how to perform Phlebotomy Trainingand Catheterisation Training can help you to provide better care to your patients. By being able to insert a catheter quickly and effectively, you can administer necessary treatments more efficiently, which can improve patient outcomes and reduce discomfort. Entry Requirements There are no academic entry requirements for this cannulation course, and it is open to students of all educational backgrounds. You need to join the Phlebotomy Training before attending the Cannulation Training. Assessment Method In this Venepuncture and Cannulation training, learners will be assessed via observation. That means during the practical training, you will be observed by the supervisor/trainer. Upon successful demonstration of blood sampling and blood draw, you will be awarded a CPD-accredited certificate accepted by thousands of professional bodies and government regulators in the UK and worldwide. Whether you are a fresher looking to kickstart your career in healthcare or practising healthcare looking to enhance your cannulation skills, this course will help you achieve your professional aspirations by all means. Course Curriculum 1. Cannulation Training - Course Introduction 2. What are Venepuncture and Cannulation 3. Anatomy and Physiology of the Circulatory System 4. Legal Aspects of Venepuncture (Phlebotomy) and Cannulation 5. Practitioner Requirements 6. Professional Competence and Accountability 7. Documentation and Record Keeping 8. Vicarious Liability 9. Consent 10. Influencing Factors during Venepuncture 11. Infection Prevention and Management 12. Haemolysis 13. Selecting Correct Equipment 14. Procedure of Venepuncture and Cannulation 15. Order of Draw 16. Peripheral Cannula and Venepuncture 17. Procedure Prior to Cannulation 18. During Cannulation 19. Cannula Size and Cannulation Aftercare 20. Removal of Cannulation 21. Complications 22. Cannulation Training - Conclusion Recognised Accreditation This course is accredited by Continuing Professional Development (CPD). CPD UK is globally recognised by employers, professional organisations, and academic institutions, thus a certificate from CPD Certification Service creates value towards your professional goal and achievement. CPD certificates are accepted by thousands of professional bodies and government regulators here in the UK and around the world. Many organisations look for employees with CPD requirements, which means, that by doing this course, you would be a potential candidate in your respective field. Certificate of Achievement On successful completion of the cannulation course, you will be eligible to obtain a CPD-accredited certificate of achievement as proof of your new skill. The certificate of achievement is an official credential that confirms that you successfully finished a course with Lead Academy.

Rhino 3D Basic to Intermediate Training
By London Design Training Courses
Why Choose Rhino 3D Basic to Intermediate Training Course? Course Link Learn NURBS modeling, curves, and 3D printing prep in our Rhino 3D Course. Master materials, textures, and lighting for 2D & 3D modeling. A basic understanding of Rhino is valuable for creative professionals pursuing careers in product, furniture, architectural, or jewelry design. Duration: 10 hrs Method: 1-on-1, Personalized attention Schedule: Tailor your own hours of your choice, available from Mon to Sat between 9 am and 7 pm. Supported Learning Approach: Personalized Support: No matter the course duration, our team is dedicated to supporting you every step of the way. From homework assignments to video tutorials and free after-support, we ensure a supportive path to software expertise. One to One Course Advantage: The One-to-One Course Advantage offers personalized learning, flexible scheduling, focused feedback, and a private environment to boost confidence and achieve your specific objectives. Rhino 3D Basic to Intermediate Training Course Course Duration: 10 hours Course Description: 3D modeling journey with our Rhino 3D Basic to Intermediate Training Course. Ideal for beginners, master the powerful Rhino 3D software used by architects and designers. Explore the interface, create captivating 3D models, and enhance your designs with comprehensive tools and techniques. Course Outline: I. Introduction to Rhino 3D (1 hour) - Explore the Rhino 3D interface and discover essential tools for 3D modeling - Master seamless navigation and viewport controls - Grasp the significance of units and tolerance for precise creations - Customize your workspace for an efficient and personalized workflow II. Creating Basic 3D Objects (3 hours) - Unleash your creativity by crafting simple yet captivating 3D shapes - Gain expertise in editing objects and working with curves for refinement - Dive into the world of surfaces and solids, refining your skills - Effortlessly use transformations and copying techniques to enhance your designs III. Organizing and Enhancing Models (2 hours) - Streamline your projects with smart organization using groups and layers - Elevate the visual appeal of your models with vibrant colors, materials, and textures - Illuminate your creations with fundamental lighting techniques IV. Advanced Modeling Techniques (2 hours) - Master the art of tackling complex shapes with advanced modeling tools - Explore the nuances of creating and editing curves and surfaces - Enhance your proficiency in handling solids and understand Boolean operations and trimming techniques V. Introduction to Rendering (1 hour) - Gain an overview of rendering and its role in visualizing your designs - Understand Rhino's powerful render engine and its capabilities - Apply basic materials to elevate the quality of your renderings VI. Exporting and Importing (1 hour) - Acquire a comprehensive understanding of file formats for seamless sharing - Prepare your models for 3D printing using best practices - Integrate models from other software into Rhino 3D for a unified workflow VII. Conclusion and Next Steps (30 minutes) - Recapitulate the knowledge gained throughout the course - Access valuable tips and resources for continuous learning and growth - Engage in an interactive Q&A session to receive feedback and support Note: The above course outline is flexible, ensuring it meets the unique needs and skill levels of learners. Download - Rhino

Mastering 3ds Max and Photoshop Training Course
By ATL Autocad Training London
Mastering 3ds Max and Photoshop Training Course. earn 3D design, modeling, and rendering with 3ds Max, and seamlessly integrate Photoshop skills. Expert instructors guide you in enhancing images and creating stunning renderings. Our 3ds Max course is designed to help you learn basic and advanced architectural visualisation. Click here for more info: Website Duration: 20 hours Approach: 1-on-1, Customized and Flexible pacing. Session Flexibility: Design your own timetable at your convenient hour between 9 am and 7 pm, Mon to Sat. 20-Hour Comprehensive Training in 3ds Max and Photoshop. Course Breakdown: Module 1: Introduction to 3ds Max (6 hours) Familiarization with 3ds Max's interface and workspace Navigation and basic modeling tools usage Creation and manipulation of primitive objects Object modification with modifiers for specific effects Materials, textures, and basic lighting techniques Introduction to rendering 3D scenes Module 2: Intermediate 3ds Max Techniques (6 hours) Advanced modeling with splines and polygons Camera creation and animation for realistic perspectives Character rigging and animation using bones Particle systems for visual effects and dynamic simulations Designing landscapes and outdoor scenes Exploration of advanced lighting and rendering methods Module 3: Introduction to Photoshop for 3D Artists (4 hours) Understanding Photoshop interface and essential editing tools Seamless integration of 3D models and textures between 3ds Max and Photoshop Creation and editing of textures and materials for realistic surfaces Post-production and compositing techniques to enhance 3D renders Module 4: Advanced Photoshop Techniques for 3D Artists (4 hours) Custom brush and texture creation for artistic elements Non-destructive editing using layer masks and adjustment layers Advanced compositing for seamless 3D element integration Crafting photorealistic textures and materials for impressive visuals Module 5: Project-Based Learning (4 hours) Application of learned techniques to a real-world project 3D modeling, texturing in Photoshop, and final image rendering Instructor feedback for project refinement Presentation of completed projects, showcasing acquired skills. Attendees will learn to craft intricate 3D models using Autodesk 3ds Max, mastering primitive objects, splines, and polygons for complex designs. Advanced Rendering Techniques: Participants will acquire skills in texturing, material application, lighting strategies, and rendering tools, crafting visually striking and lifelike 3D environments. Animation Prowess: Students will delve into object and character animation, simulation of perspectives with cameras, and the dynamic use of particle systems for visual effects and simulations. Essential Photoshop Proficiency: Attendees will gain vital Photoshop skills for post-processing, compositing 3D renders, and creating realistic textures, enhancing the quality of their 3D projects. Hands-On Project Engagement: Through practical projects, participants will receive expert feedback, honing their skills and demonstrating their expertise in real-world applications. Creative Problem-Solving Abilities: Attendees will cultivate creative thinking and problem-solving skills, enabling them to manifest their unique artistic visions in their 3D projects. Skills Acquired: Participants in the Mastering 3ds Max and Photoshop Training Course will gain advanced proficiency in 3D modeling, texturing, lighting, and rendering using 3ds Max. Additionally, they will master digital image manipulation, graphic design, and photo editing techniques using Photoshop. Key skills include: Advanced 3D Modeling and Rendering in 3ds Max Expert Texturing and Lighting Techniques Digital Image Manipulation and Retouching in Photoshop Graphic Design and Visual Communication Skills Job Opportunities: Upon completion, individuals can pursue a range of exciting career opportunities, including: Senior 3D Artist Game Developer Architectural Visualization Specialist Graphic Designer Visual Effects Artist This course equips participants with the expertise needed for roles in animation studios, game development companies, architectural firms, advertising agencies, and more, providing a pathway to thriving careers in the creative industry. Advantages of joining this program: Thorough education: Excel in 3ds Max and Photoshop for high-quality visual effects and motion graphics at a professional level. Certified mentors and industry specialists: Receive instruction from seasoned professionals for expert direction. Interactive online sessions: Engage from any location; no need for travel. Lesson recordings: Access recorded sessions for revision and reinforcement. Long-term email assistance: Receive ongoing support even after the course completion. Complimentary career guidance: Gain valuable industry insights to boost your career prospects. Download Adobe Photoshop Download Autodesk 3dsmax

Vectorworks Garden Design Training
By London Design Training Courses
Why choose Vectorworks Garden Design Training Course? Vectorworks, a user-friendly industry-standard software, is perfect for interior design, architectural planning, 3D modeling, and landscaping projects. Its versatility makes it suitable for both home enthusiasts and professionals. Course Info Scheduling: 1-on-1 training, your schedule. Book any hour, Mon to Sat, 9 am - 7 pm. Call 02077202581 to reserve. Duration: 16 hours. Method: In-person face-to-face sessions and live online instruction. Vectorworks Garden Design Training Course: Master the art of garden design with Vectorworks software in our specialized training program. Led by certified tutors and industry experts, this course equips you with comprehensive skills and techniques tailored to garden design. Create stunning 2D layouts and 3D landscapes, visualize designs, and produce professional documentation for your projects. Benefits: In-Person and Live Online Options: Choose between in-person or live online sessions for flexible learning. Certified Tutors and Experts: Learn from experienced tutors passionate about garden design. Comprehensive Curriculum: Cover essential aspects of garden design using Vectorworks. Lesson Recordings: Access valuable session recordings for review and reinforcement. Lifetime Email Support: Receive ongoing assistance from industry experts for continuous growth. Course Duration: 16 hours Course Description: This advanced Vectorworks course is tailored for individuals who already possess basic knowledge of the software and wish to enhance their skills to become proficient users. Participants will learn more advanced 2D and 3D techniques, including advanced 3D modeling, rendering, visualization, and customizing Vectorworks to suit their specific needs and workflows. The course will cover topics such as creating custom tools, working with planting plans, and integrating with AutoCAD. Course Outline: Module 1: Vectorworks Interface and Basic Concepts - Understanding the Vectorworks interface and palettes - Opening, saving, and managing files - Creating and editing objects and shapes - Utilizing Undo/Redo and Snaps for precision - Applying graphic attributes and working with dimensions Module 2: Modeling and Drawing Techniques - Exploring advanced tools and commands in detail - Integrating with AutoCAD and data exchange - Creating, modifying, and editing text - Utilizing callout text tool for annotations - Organizing information using design layers and classes Module 3: Working with Buildings and Models - Utilizing design layers and sheet layers for architectural projects - Assigning objects to layers and classes - Working with viewports and sheet layers for presentation - Drawing buildings, including walls and roofs - Setting up and rendering perspective views Module 4: Creating Site and Landscape Plans - Importing land surveys or architects' files - Drawing site surveys and working with hard landscape elements - Adding and customizing plantings using the plant tool - Editing plant definitions and creating custom plant symbols - Generating plant schedules and reports Module 5: Vectorworks Architect Features - Setting up files and scaling the drawing - Customizing text styles and dimension standards - Working with scanned images and creating site models - Designing floors, doors, and windows using standard Vectorworks elements - Creating and managing title blocks, labels, notes, and keynotes Module 6: Working Drawings and Final Project - Developing the final project with 2D and 3D elements - Applying site modifiers and stairs to the design - Generating printing layouts for presentations - Creating working drawings with detailed plans and elevations Download Vectorworks Trial https://www.vectorworks.net/trial Proficiently use Vectorworks software for garden design, including creating accurate site plans and garden layouts. Apply 2D and 3D modeling techniques to visualize garden designs and present them professionally. Incorporate plants, hardscape elements, and other design elements into garden layouts effectively. Generate detailed construction drawings for seamless implementation of garden projects. Understand the key features and functionalities of Vectorworks specific to garden design. Demonstrate proficiency in utilizing Vectorworks tools for various garden design tasks. Interact collaboratively in face-to-face or online learning environments, engaging with instructors and peers. Utilize lesson recordings to review and reinforce course concepts for continuous learning. Seek personalized guidance and assistance through lifetime email support from certified tutors and industry experts. Transform creative garden design ideas into practical and stunning real-world projects using Vectorworks software.