- Professional Development
- Medicine & Nursing
- Arts & Crafts
- Health & Wellbeing
- Personal Development
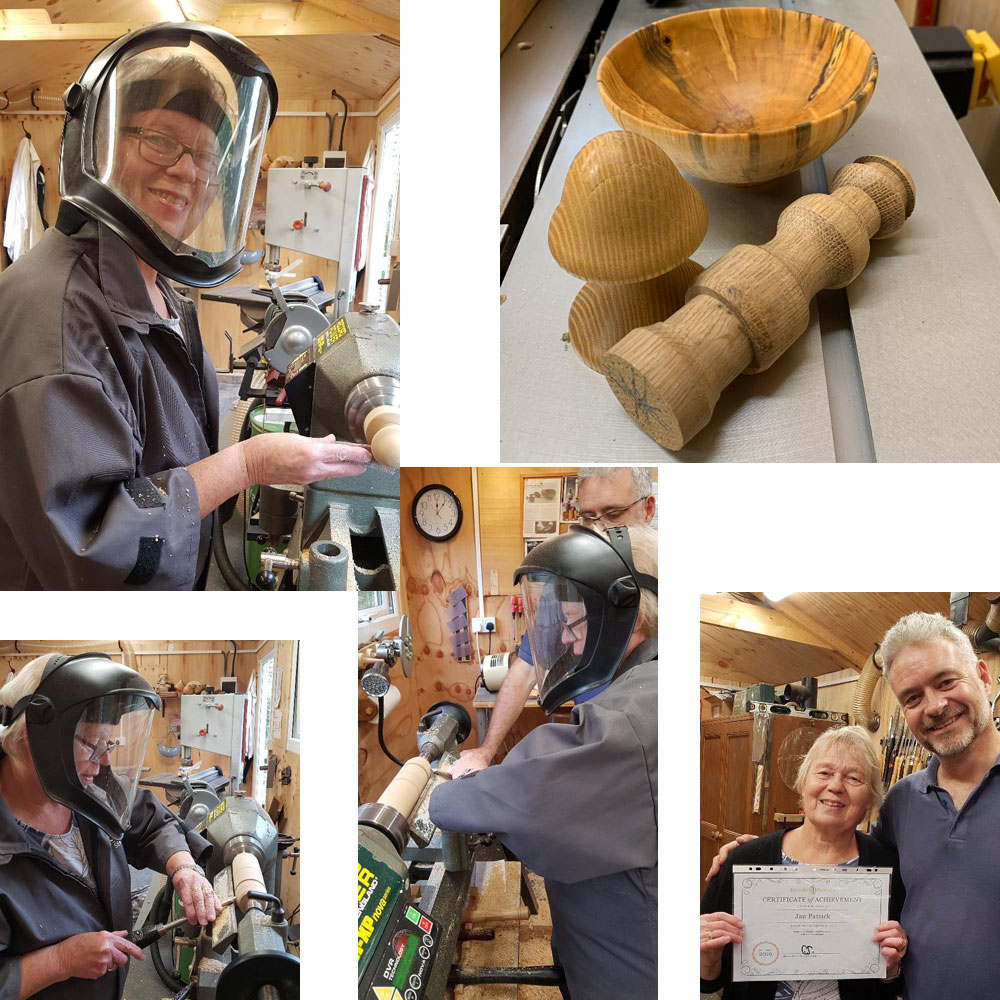
Angelic Reiki 1&2 Workshop
By Academy Of Angelic Healing
Learn Angelic Reiki with multi-award winning Master Teacher, Jayn Lee-Miller, who was one of the first to work professionally with angels and is now approaching her 18th year of teaching Angelic Reiki. Please email info@healingangels.co.uk for full details of this healing module which has been channelled through the Archangel Metatron especially for this time as the consciousness of humanity is collectively ascending to fifth dimension. The Angelic Kingdom of Light is assisting in helping us hold a place of unconditional love to help us remember the divine beings we truly are. In Angelic Reiki you are attuned by Angels to The Angelic Kingdom of Light and during healing exchanges you actually become the Angel you are channelling.

Vray for 3ds max Training
By London Design Training Courses
Why Learn Vray for 3ds max Training Course? Course Link 3ds Max - Rendering with V-Ray training offers an extensive master class in utilizing V-Ray, a widely used tool in architecture, interior design, film, and various industries. Topics covered include lighting techniques for interiors using both natural and artificial light sources. Duration: 10 hrs Method: 1-2-1, Personalized attention. Schedule: Tailor your own hours of your choice, available from Mon to Sat between 9 am and 7 pm. Module 1: Introduction to Vray for 3ds Max (2 hours) Learn the purpose and advantages of Vray for 3ds Max. Install and set up Vray for 3ds Max. Get familiar with the Vray interface and workflow. Understand Vray materials and their usage in 3ds Max. Module 2: Lighting with Vray (2 hours) Explore lighting techniques using Vray in 3ds Max. Work with different types of Vray lights and their settings. Create and control Vray sun and sky for outdoor scenes. Utilize Vray dome lighting for interior scenes. Learn about IES lights in Vray and their usage. Establish an efficient lighting workflow with Vray. Module 3: Vray Camera (2 hours) Understand Vray camera settings and their impact on renders. Control exposure and use Vray depth of field. Create camera animations with Vray for dynamic shots. Explore Vray frame buffer functionalities for post-processing. Module 4: Vray Materials (2 hours) Learn about properties and settings of Vray materials. Create realistic and visually appealing materials with Vray. Save and organize custom Vray material libraries. Use Vray material overrides for efficient material changes. Module 5: Vray Rendering and Post Production (2 hours) Get an overview of Vray rendering settings for high-quality output. Render still images and animations using Vray. Enhance Vray renders in Photoshop with post-production techniques. Utilize Vray frame buffer for fine-tuning renders. Composit Vray render elements in Photoshop for added control. Work with Vray denoiser for noise reduction in renders. You can access the free trial of Vray for 3ds Max here: (https://www.chaosgroup.com/vray/sketchup/free-trial), material libraries here: (https://www.vray-materials.de/), and textures here: (https://textures.com/).

Revit Basic to Fundamentals
By London Design Training Courses
Why Choose Revit Basic to Fundamentals Course Course Link In this course you will learn Revit skills for BIM modeling. In-person or live online. Autodesk Revit Architecture training for students to create full 3D architectural project models and set them up in working drawings. Duration: 10hours Method: 1-on-1 method with tailored content and flexible pace, backed by individual support. Schedule: Choose a convenient hour from Mon to Sat between 9 am and 7 pm to create your own schedule. Revit Essentials Training: Learn Revit fundamentals for architecture and structural design, supporting efficient building construction with BIM workflows. Delivery Options: In-class at our center Live online sessions I. Introduction to Revit Overview of Revit and its uses Revit interface and basic tools Navigation and viewport controls Creating and saving projects II. Setting up a Project Creating a new project Setting up project levels and grids Adding site and building information Setting up project units III. Creating Building Elements Creating and modifying walls Adding doors and windows Creating and modifying floors and ceilings Creating roofs and modifying roof shapes Creating stairs and railings IV. Views and Sheets Creating and managing views Creating and managing sheets Adding schedules and tags Creating construction documents V. Annotation and Detailing Adding text and dimensions Creating and modifying detail components Adding symbols and keynote legends Adding annotations to construction documents VI. Conclusion and Next Steps Review of course content Tips for further learning and resources Q&A and feedback Note: The above course outline is just a suggestion, and the course content and duration can be adjusted according to the needs and level of the learners. Detailed Course Outline. 1. Starting a Project Creating a new project and the importance of a template. Understanding project settings and scales Adding levels Adding grids Adding columns 2. Modeling Basics Adding walls Using snaps Wall properties and wall types Using the modified tools Adding doors and windows Using constraints See: Autodesk Seek and Revit City websites 3. Links, Imports, and Groups Working with DWG files Creating topography from a DWG link Understanding CAD inserts Using import tips Creating a group Working with Revit links Managing links 4. Sketch-Based Modeling Components Working with floors Working with roofs Adding openings Working with stairs Working with railings Working with ceilings 5. Complex Walls Creating a custom basic wall type Adding curtain walls Adding curtain grids and mullions 6. Visibility and Graphics Controls Using object styles Working with visibility/graphic overrides Using Hide/Isolate Understanding view range Using the Linework Using cutaway views 7. Rooms Adding rooms Controlling room numbering Understanding room bounding elements 8. Schedules and Tags Understanding tags Adding schedules Modifying schedules Creating a key schedule 9. Annotation and Details Adding text Adding dimensions Adding symbols Adding legend views Creating a detail callout Using detail components Adding filled and masking regions 10. The Basics of Families Understanding familiesUsing reference planes, parameters, and constraints Adding solid geometry Adding void geometry Completing the family 11. Sheets, Plotting, and Publishing Adding sheets Exporting to AutoCAD and JPG

COURSE INTRODUCTION The purpose of this one day course is to introduce / refresh participants’ knowledge and skills in the essential aspects of diabetes management in their practice setting. AIMS AND OBJECTIVES Identify their current knowledge of diabetes care and how confident they feel about offering advice to a patient with diabetes and or their family. Purpose and outcomes of the main treatment options for people with diabetes . Discuss the importance of addressing the person’s needs and how regular clinic visits impact on the management of diabetes All course materials and certificate of attendance Accreditation 6 CPD points awarded completion. Accredited by One Awards (*Certificate £30) and CPD Standards (*Certificate free) Copyright © Annie Barr. All Rights Reserved. Discuss how to build relationships and establish an environment that enables the person with diabetes to take an active role in their diabetes management COURSE CONTENTS OVERVIEW Aetiology and diagnosis of type 1 and type 2. Difference between type 1 and type 2 diabetes Implications for practice Management goals TYPE 1 Treatment and management options Carbohydrate awareness Challenges in self-management Hypoglycaemia and hyperglycaemia Screening and the annual review TYPE 2 First line treatment and step-wise options Food choices and relation to risk Activity and type 2 diabetes Cardiovascular disease and type 2 diabetes Screening and annual review SUPPORTING PEOPLE WITH DIABETES AND THEIR FAMILY Seeing the person not the disease Consultation skills Ongoing support needs Copyright © Annie Barr. All Rights Reserved. SPECIFIC SESSIONS CAN ALSO BE OFFERED IN: Food and lifestyle messages for diabetes Annual review and screening including foot care advice Blood glucose monitoring Consultation skills and relationship building Complications and treatment options WHO SHOULD ATTEND? Nurses HCAs

3ds Max Basics Training
By London Design Training Courses
Why Choose 3ds Max Basics Training Course? Click for more info What am I going to get from this course? Create your own models in 3ds Max; Use built in poly modelling tools to create basic 3D objects. Learn everything you need about 3ds Max with this guide, from the basics of modelling and animation to more advanced steps. Duration: 10 hrs Method: 1-on-1, Personalized attention. Schedule: Tailor your own schedule by pre-booking a convenient hour of your choice, available from Mon to Sat between 9 am and 7 pm. 3ds Max Basic Training Course: Course Name: 3ds Max Basics Training Course. Core Skills for 3D Modeling, Rendering, Animations, and Games. Target Audience: Beginners and new users from diverse industries, including architects, interior designers, engineers, game developers, artists, and animators.Course Outline: 3D Modeling and Animation with 3ds MaxI. Introduction to 3ds Max- Course overview and objectives - Navigating the user interface - Basic settings and preferencesII. Creating 3D Objects- Building simple shapes with primitive objects - Craft complex designs using Editable Poly - Enhancing objects with modifiers - Applying materials and textures for realistic effectsIII. Lighting Techniques- Illuminating scenes with different light sources - Exploring various types of lighting - Adjusting light properties for desired effects - Casting shadows to enhance realismIV. Camera Control- Creating and configuring camera views - Fine-tuning camera settings for optimal shots - Animating cameras for dynamic scenesV. Animation Fundamentals- Mastering keyframe animation techniques - Utilizing the time slider and track view - Animating object transformations - Adding movement to materials and texturesVI. Rendering Process- Configuring render settings for high-quality output - Selecting appropriate output formats - Streamlining rendering with batch processing - Enhancing final renders with post-processing effectsVII. Project-Based Learning- Applying acquired skills to complete a final project - Exercising creativity and problem-solving abilities - Integrating modeling, animation, lighting, and rendering into the projectIn-Depth Course Outline:1. Modeling- Edit Poly Modeling: Extrude, Chamfer, Cut, and Slices - Symmetry Mirror Modeling - Designing a Table and Chair - Creating a Basic House Model - Working with Lines and Shapes - Importing Plans from AutoCAD/Vectorworks - Crafting Interior Spaces - Adding Doors, Windows, Railings, and Trees - Implementing Stairs2. Modifiers- Exploring Compound Objects - Utilizing Connect, Scatter, Pro Boolean, Loft, and Terrain Modifiers - Manipulating Bend, Taper, Twist, Stretch, Skew, FFD, Wave, Ripple, and Lattice - Employing the Lathe Modifier for Curved Objects3. 3ds Max Basic Lights- Mastering Omni, Spot, and Direct Lights for Illumination4. 3ds Max Camera- Understanding Free and Target Cameras for Optimal Shots5. Texturing and Rendering- Applying Diffuse and Bump Mapping Techniques - Integrating Environment and Background Images - Configuring Render Settings for High-Quality Images - Lighting and Rendering Scenes in 3ds MaxAre you ready to take your 3D modeling and animation skills to the next level? Download the 30-day free trial of 3ds Max from Autodesk and embark on a transformative learning journey today. Explore the possibilities and unleash your creative potential!

This Temporary Works Supervisor (TWS) course is part of our Site Safety Plus suite of training courses and it is designed to provide participants with a thorough and detailed knowledge of what the role of a temporary works supervisor involves. Overview This course will give you some important in depth knowledge of the role of a Temporary Works Supervisor, as well as an understanding of temporary works and the risk management involved. COURSE DURATION: The course lasts for 1 day This training is designed to teach the following: – Understanding risk management when applied to temporary works. – The role of the temporary works supervisor in co-operation, co-ordination, communications and competency while managing temporary works. – The legal duties, roles and responsibilities of the temporary works supervisor. – The role of any other temporary work processes. – Any understanding of the relevant aspects of the temporary work supervisor if BS 5975:2008+A1:2011. ENTRY REQUIREMENTS: In order to enroll in this course you will need to have experience managing all forms of temporary works. Also, you should have a basic understanding of written and spoken English, as the course materials and instruction are all in English. If you have any questions or concerns, please feel free to contact us at any time. Certification/Qualification: Upon successful completion of this course you will receive the CITB Cskills Awards Site Safety Plus certificate.


Make friends with your overlocker
By cheekyhandmades
Learn to use your overlocker! Bring your overlocker to class and I will teach you all you need to know about threading it, changing it from 3/4 thread and back, changing the needles, adjusting stitch length and differential feed etc. I only have one overlocker here and in any case it is definititely something you want to do on your own, so you will need to bring your machine to this class.