- Professional Development
- Medicine & Nursing
- Arts & Crafts
- Health & Wellbeing
- Personal Development
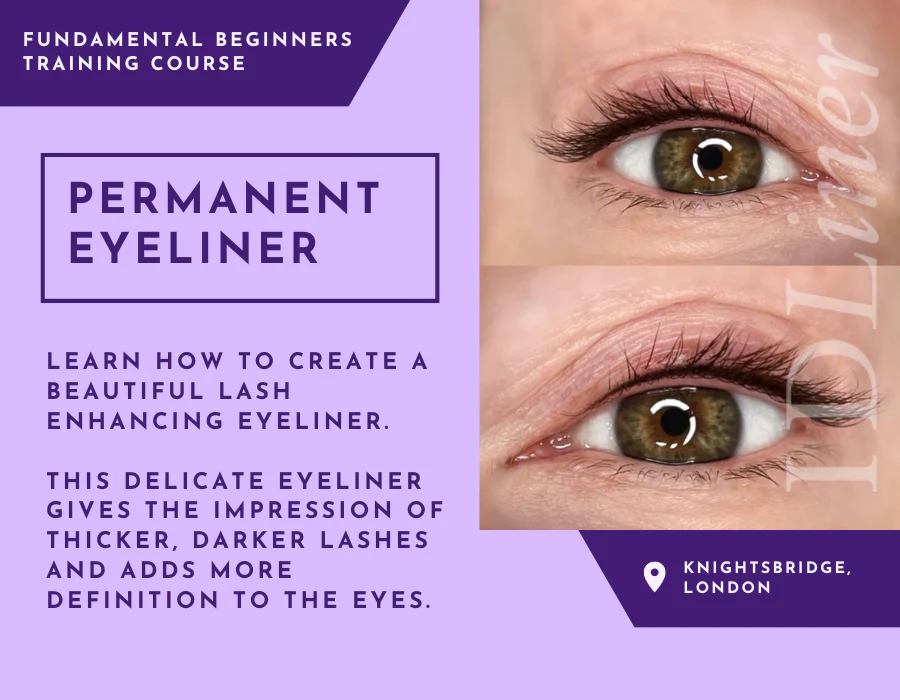
Permanent Eyeliner | Fundamental Beginners PMU Training -Small Group Learning
By ID Liner | Permanent Makeup Training & Supplies
The objective of the ID Liner Permanent Eyeliner fundamental course is to teach you how to achieve this look for your clients. It is the perfect solution for clients who struggle to draw on their own eyeliner or who just want an expertly enhanced look 24/7
Vray for Architects and Interior Designers 3ds max or Sketchup Training
By London Design Training Courses
Why Choose Vray for Architects and Interior Designers 3ds max or Sketchup Training Course? Click here for info Achieve stunningly realistic renders with our tailored course in V-Ray. Designed for experienced SketchUp and 3ds max users, this advanced training covers model preparation and rendering techniques, customized to your skill level and preferences. Duration: 10 hrs. Method: 1-on-1, Personalized attention. Schedule: Tailor your own hours of your choice, available from Mon to Sat between 9 am and 7 pm. SketchUp is renowned for its user-friendly interface and widespread usage in 3D modeling. Now, with V-Ray for SketchUp, users can take advantage of a powerful rendering tool for unparalleled visualization quality and realism. V-Ray seamlessly integrates into the SketchUp environment, allowing for efficient rendering within your existing workflows. Our course is ideal for those seeking to enhance their SketchUp proficiency by incorporating V-Ray's potent rendering capabilities for 3D models. We adapt the training to your current skill levels in both SketchUp and V-Ray and tailor the content to your modeling requirements and desired rendering quality. V-Ray Rendering Training Course. Course Duration: 10 hours Course Description: This 10-hour course enhances rendering skills with V-Ray, a leading 3D visualization engine. Participants master photorealistic renders, focusing on lighting, materials, and post-production. Covering key concepts, workflow, lighting techniques, material creation, rendering settings, and post-processing, the course ensures stunning visual results. Course Outline: Module 1: Introduction to V-Ray Rendering (1 hour) Overview of V-Ray and its role in 3D rendering Understanding the rendering workflow Setting up V-Ray for your 3D software platform Module 2: Essential Rendering Concepts (1 hour) Understanding global illumination and its impact on renders Exploring image sampling and antialiasing techniques Introduction to render elements for post-processing Module 3: Lighting Techniques (2 hours) Mastering various lighting types in V-Ray Creating natural lighting with HDRI maps Implementing artificial lighting with V-Ray lights Achieving realistic daylight with V-Ray sun and sky Module 4: Material Creation (2 hours) Creating realistic materials using V-Ray material editor Applying textures and procedural maps for added realism Understanding material reflections and refractions Advanced techniques for materials like glass, metal, and fabric Module 5: Rendering Settings and Optimization (1.5 hours) Exploring V-Ray rendering settings for different scenarios Understanding render output options and resolution settings Efficiently using V-Ray distributed rendering for faster results Module 6: Post-Processing with Photoshop (1.5 hours) Enhancing renders through post-processing techniques Compositing render elements for added control Adjusting colors, contrast, and lighting in Photoshop Adding effects and final touches to achieve photorealism Module 7: Advanced Rendering Techniques (1 hour) Working with V-Ray proxies and instancing for complex scenes Utilizing V-Ray displacement for intricate detailing Understanding depth of field and motion blur effects Module 8: Real-World Project (1 hour) Applying the skills learned to complete a real-world rendering project Guidance and feedback from the instructor

Adobe InDesign Advanced Training
By London Design Training Courses
Why Learn Adobe InDesign Advanced Training Course? Master Adobe InDesign for efficient page layouts with our advanced course. Learn document setup, text formatting, and special effects. Suitable for beginners and advanced users. London Design Training Course provides top InDesign course with Adobe Certified Instructors. Course Link Duration: 10 hrs Method: 1-on-1, Personalized attention Schedule: Tailor your own schedule by pre-booking hours of your choice, available from Mon to Sat between 9 am and 7 pm Flexible Learning Options: Choose between in-class training at our London center or participate online. Both options provide hands-on, practical learning with step-by-step demonstrations and ample opportunities for questions. Introduction to InDesign: Exploring InDesign Basics Customizing Preferences and Workspace Navigating Panels and Windows Setting Up Toolbar and Properties Panel Document Management: New Document, Pages, and Order Quick Navigation Techniques with Shortcuts Smart Layout: Organizing Layouts with Guides and Grids Understanding Bleed, Slug, and Margins Utilizing Smart Guides for Precision Typography: Mastering the Type Tool Adding Text to Pages and Using Placeholder Text Text Formatting with Character and Paragraph Controls Editing Text Frames and Justifying Text Multi-column Setup and Styling with Character/Paragraph Styles Working with Bullet Points and Numbering Working with Images: Creating Frames and Placing Images Content Fitting Options: Proportional Fit, Content-Aware Fit, Auto-Fit Manipulating Frame Properties: Fill, Stroke, Effects Utilizing Object Styles for Consistent Frames Advanced Techniques: Image Frame Grids, Merging Frames, Text Wrap Options Understanding Image Formats and Resolution Tabs and Alignment: Mastering Tab Palette and Alignment Options Adding Leaders for Enhanced Formatting Color Theory and Editing: Basics of Color Theory and Color Modes Creating Color Themes with the Color Theme Tool Swatches, Color Libraries, and Gradients Editing Gradient Fills and Colors Advanced Interactive Actions: Adding Animation Effects with Animation Panel Fine-tuning Animations with Timing Panel Creating Complex Object States and Action Buttons Adding and Testing Hyperlinks, Page Transitions Parent Page Basics: Understanding Parent Pages Page Numbering, Order, Headers, and Footers Inserting Text Variables for Dynamic Content Advanced Object Styles and Effects: Opacity Control and Blending Modes Black and White Conversion, Color Blending Modes Adding Dimension with Bevel and Emboss Effects Advanced Text Frame Options: Auto-sizing Text Frames and Balancing Column Height Inset Spacing and Fill Colors for Text Boxes Hot Corner Resizing Shortcuts and Anchor Objects Footnotes: Purpose and Usage of Footnotes Adding, Editing Footnotes with Footnote Options By the end of this Adobe InDesign training, participants will: Understand InDesign basics and its interface. Create effective page layouts with text formatting and image placement. Work with layers, apply special effects, and manage tables. Ensure error-free and print-ready documents through preflighting. Receive a practical training guide and an e-certificate upon completion.

Vectorworks Garden Design Training
By London Design Training Courses
Why choose Vectorworks Garden Design Training Course? Vectorworks, a user-friendly industry-standard software, is perfect for interior design, architectural planning, 3D modeling, and landscaping projects. Its versatility makes it suitable for both home enthusiasts and professionals. Course Info Scheduling: 1-on-1 training, your schedule. Book any hour, Mon to Sat, 9 am - 7 pm. Call 02077202581 to reserve. Duration: 16 hours. Method: In-person face-to-face sessions and live online instruction. Vectorworks Garden Design Training Course: Master the art of garden design with Vectorworks software in our specialized training program. Led by certified tutors and industry experts, this course equips you with comprehensive skills and techniques tailored to garden design. Create stunning 2D layouts and 3D landscapes, visualize designs, and produce professional documentation for your projects. Benefits: In-Person and Live Online Options: Choose between in-person or live online sessions for flexible learning. Certified Tutors and Experts: Learn from experienced tutors passionate about garden design. Comprehensive Curriculum: Cover essential aspects of garden design using Vectorworks. Lesson Recordings: Access valuable session recordings for review and reinforcement. Lifetime Email Support: Receive ongoing assistance from industry experts for continuous growth. Course Duration: 16 hours Course Description: This advanced Vectorworks course is tailored for individuals who already possess basic knowledge of the software and wish to enhance their skills to become proficient users. Participants will learn more advanced 2D and 3D techniques, including advanced 3D modeling, rendering, visualization, and customizing Vectorworks to suit their specific needs and workflows. The course will cover topics such as creating custom tools, working with planting plans, and integrating with AutoCAD. Course Outline: Module 1: Vectorworks Interface and Basic Concepts - Understanding the Vectorworks interface and palettes - Opening, saving, and managing files - Creating and editing objects and shapes - Utilizing Undo/Redo and Snaps for precision - Applying graphic attributes and working with dimensions Module 2: Modeling and Drawing Techniques - Exploring advanced tools and commands in detail - Integrating with AutoCAD and data exchange - Creating, modifying, and editing text - Utilizing callout text tool for annotations - Organizing information using design layers and classes Module 3: Working with Buildings and Models - Utilizing design layers and sheet layers for architectural projects - Assigning objects to layers and classes - Working with viewports and sheet layers for presentation - Drawing buildings, including walls and roofs - Setting up and rendering perspective views Module 4: Creating Site and Landscape Plans - Importing land surveys or architects' files - Drawing site surveys and working with hard landscape elements - Adding and customizing plantings using the plant tool - Editing plant definitions and creating custom plant symbols - Generating plant schedules and reports Module 5: Vectorworks Architect Features - Setting up files and scaling the drawing - Customizing text styles and dimension standards - Working with scanned images and creating site models - Designing floors, doors, and windows using standard Vectorworks elements - Creating and managing title blocks, labels, notes, and keynotes Module 6: Working Drawings and Final Project - Developing the final project with 2D and 3D elements - Applying site modifiers and stairs to the design - Generating printing layouts for presentations - Creating working drawings with detailed plans and elevations Download Vectorworks Trial https://www.vectorworks.net/trial Proficiently use Vectorworks software for garden design, including creating accurate site plans and garden layouts. Apply 2D and 3D modeling techniques to visualize garden designs and present them professionally. Incorporate plants, hardscape elements, and other design elements into garden layouts effectively. Generate detailed construction drawings for seamless implementation of garden projects. Understand the key features and functionalities of Vectorworks specific to garden design. Demonstrate proficiency in utilizing Vectorworks tools for various garden design tasks. Interact collaboratively in face-to-face or online learning environments, engaging with instructors and peers. Utilize lesson recordings to review and reinforce course concepts for continuous learning. Seek personalized guidance and assistance through lifetime email support from certified tutors and industry experts. Transform creative garden design ideas into practical and stunning real-world projects using Vectorworks software.
Dashboards will summarize and present the key indications of large data in an attractive visual display, hightlighting the most important trends so the most imporatnf aspects of data could could be seen in a snap second by glancing at attractive, colourful charts. PowerPivot helps analyze the data and brings new capabilities to business users to analyse, explore and gain new insight into business and marketing data. Power Pivot help analyze and understand the growing quantities of data that are created on a daily basis.

An Introduction to Emotional Intelligence
By Mpi Learning - Professional Learning And Development Provider
Not everyone is born with it, but unlike IQ, Emotional Intelligence can be acquired and improved with practice.

Sketchup One to One Basic to Intermediate Level
By Real Animation Works
Sketchup face to face training customised and bespoke.

Autodesk AutoCAD | 3ds Max Training
By London Design Training Courses
Why Learn Autodesk AutoCAD | 3ds Max Training Course? Course Link 3ds Max serves as a powerful tool in architectural modeling, product design, games and films. Engaging with 3ds Max tutorials proves invaluable, particularly for game designers, as it can significantly enhance their professional growth and career prospects. Duration: 16 hrs Method: 1-on-1, Personalized attention. Schedule: Tailor your own schedule by pre-booking a convenient hour of your choice, available from Mon to Sat between 9 am and 7 pm. AutoCAD and 3ds Max Training Course: Tailored Learning Experience: Benefit from personalized, one-on-one training tailored to your individual needs and learning pace. Flexibility in Learning: Choose between attending in-person sessions or participating in live online classes, granting you the flexibility to learn from anywhere at your convenience. Accessible Lesson Recordings: Access recorded lessons to revisit concepts, practice techniques, and reinforce your understanding whenever you need. Ongoing Email Support: Receive continuous assistance and expert guidance through lifetime email support, ensuring you never feel left behind in your learning journey. Learn from Certified Tutors and Industry Experts: Be educated by experienced professionals proficient in both Autodesk AutoCAD and 3ds Max, providing valuable insights into industry best practices. Complimentary Career Advice: Take advantage of our career advisory services to receive valuable guidance in navigating your professional path and making informed decisions. Download Autodesk Autocad and 3ds max AutoCAD and 3ds Max Training Course. Course Duration: 16 hours Course Overview: Join our training program to master AutoCAD and 3ds Max. Suitable for beginners and experienced 2D/3D modelers, this course equips you with essential skills to create stunning designs in both 2D and 3D. Course Outline: Part 1: Introduction to AutoCAD Familiarizing with the AutoCAD interface Understanding the drawing environment Mastering basic 2D geometry creation Exploring essential drawing tools and commands Introduction to blocks and symbols for efficient design Part 2: Advanced AutoCAD Techniques Delving into advanced drawing techniques Manipulating and editing 2D geometry like a pro Creating custom symbols and blocks for enhanced productivity Working with text and annotations for clear communication Utilizing layers and line types for organized design Part 3: Plans sections and Elevations Entering the realm of Plans sections and Elevations Crafting Plans and 2D construction detailing precision Modifying and manipulating 2D seamlessly Crafting custom materials and textures for realistic designs Part 4: Introduction to 3ds Max Embracing the 3ds Max interface and workspace setup Mastering navigation within 3ds Max Understanding the viewport for optimized design Exploring basic 3D modeling techniques in 3ds Max Part 5: Materials and Textures in 3ds Max Applying and modifying textures to elevate designs Unraveling the art of UVW mapping for precise texturing Utilizing the material editor for creative freedom Crafting custom materials to suit your design vision Harnessing the power of Vray materials for realistic renders Part 6: Lighting in 3ds Max Introducing various lighting techniques Understanding light properties for impactful designs Setting up lights strategically to enhance scenes Illuminating scenes using Vray lights Part 7: Cameras in 3ds Max Mastering camera systems in 3ds Max Exploring camera properties for cinematic effects Creating animation with cameras for dynamic scenes Utilizing Vray cameras to achieve stunning renders Part 8: Rendering in 3ds Max Unveiling the art of rendering Utilizing Vray Global Illumination for realistic lighting Leveraging Vray Physical Cameras for precise control Enhancing scenes with Vray HDRI Lighting Following a Vray Rendering Workflow for professional results Part 9: Advanced Modeling Techniques Crafting complex geometry with finesse Utilizing modifiers for intricate designs Exploring polygonal modeling for versatile creations Creating organic and inorganic models with expertise Unleashing the potential of advanced modeling techniques Part 10: Projects Applying all learned skills to create real-world scenes Designing a simple interior scene with attention to detail Crafting a captivating exterior scene for visual impact Creating a complex scene with multiple objects and materials Course Requirements: A computer with AutoCAD and 3ds Max installed Basic knowledge of computer operations An interest in 2D and 3D modeling and design
AutoCAD 2D Basics to Advanced Course
By ATL Autocad Training London
Who is this course for? AutoCAD 2D Basics to Advanced Course. Click here for more info: Website This course enables you to learn the skills in the CAD. Upon completion, you'll proficiently edit and create 2D drawings, utilizing advanced features like Paperspace and Block Attributes for increased efficiency. 1-on-1 sessions. Our booking are available Mon to Sat, 9 am to 7 pm Duration: 16 hours, which you can flexibly distribute across as many days you want. Approach: In-person or live online training. AutoCAD Basics to Advanced Level Training Course Outline. Fundamental Concepts: Introduction to AutoCAD interface, commands, and tools. Managing drawings and creating basic shapes. Basic modification techniques like erase, move, rotate, and scale. Intermediate Techniques: Working with layers and adjusting properties. Creating and modifying text and dimensions. Introduction to blocks and attributes. Advanced Topics: Advanced object modification techniques such as fillet, chamfer, trim, and extend. Utilizing grips for object manipulation. Creating and editing polylines and splines. Course Highlights: Engaging exercises and projects for skill reinforcement. Access to Q&A and troubleshooting support. Proficiency in AutoCAD 2D for basic to intermediate drawings. Topics Covered: Drawing techniques encompassing various shapes. Inquiry tools for measurement and selection. Modification commands for object manipulation. Layer management and attributes. Annotation and dimensioning. Hatching objects and working with reusable content. Layouts and viewports for better organization. Annotating drawings effectively. Polylines, splines, ellipses, and tables. Plotting drawings and creating templates. Multi-lines, revision clouds, and wipeout objects. Working with point objects and calculations. Creating and managing templates. Annotation scaling and text manipulation. Dimensioning and geometric annotations. Dynamic blocks and attributes. Layer management best practices. Introduction to sheet sets and their properties. Utilizing fields and attributes in sheet sets. Working with tables, table styles, and advanced tables. Exporting and importing tables. Creating tables linked to external data. Download AutoCAD Software https://www.autodesk.co.uk What Will I Gain from this Course? Throughout this course, you will develop expertise in the following areas: CAD layering techniques Text and dimension style manipulation Proficiency in creating and editing 2D drawings Mastery of attributed block creation and editing Efficient utilization of Paperspace Dynamic input and grips utilization This comprehensive training program not only provides you with an advanced comprehension of 2D drawing in AutoCAD but also offers a fundamental introduction to 3D drawing concepts. Upon completion of this course, you will possess the skills to: Swiftly generate schematics, parts, and assemblies Enhance efficiency by reusing content and customizing tool palettes Save time through the use of dynamic blocks, which can be edited in place Gain full control over your viewports and layouts Is This Course Right for Me? This advanced AutoCAD 2D training assumes that you are already a proficient AutoCAD user. We recommend prior attendance of our Introduction and/or Intermediate AutoCAD 2D training courses or practical experience in the topics covered in those courses. If you have any doubts about the suitability of this course for your skill level, please feel free to contact us, and we will be happy to assist you. In this course, you will gain proficiency in utilizing essential features of AutoCAD (Computer Aided Design) to enhance the efficiency of producing and editing 2D CAD drawings. You will acquire expertise in layering, text and dimension styles, the creation and modification of attributed blocks, and effective use of Paperspace. Additionally, you will master dynamic inputs, grips, and the art of renaming and purging. This flexible course grants you 16 hours to complete, typically spanning 4 to 5 days. It serves as a valuable continuation of skills acquired from the CAD: AutoCAD 2D Essentials course or as an opportunity to expand your existing AutoCAD knowledge. Upon course completion, you will possess the ability to efficiently create and modify 2D drawings, leveraging advanced features like Paperspace and Block Attributes. Your instruction will be provided by an Autodesk-certified instructor with industry experience." 1. All-encompassing course designed to accommodate both novices and advanced users. 2. Addresses essential functions and advanced methodologies in AutoCAD. 3. Enhances proficiency in creating precise and professional 2D drawings. Interactive instruction guided by seasoned educators. Benefit from on-demand access to lesson recordings for convenient revision. Receive ongoing support through lifetime email and phone assistance. Post-course Assistance: Enjoy continuous support via lifetime email and phone assistance. Should you encounter any challenges or queries after the course, we are readily available to address your concerns via email or phone calls."
MICRO & NANOFAT GRAFTING TRAINING COURSE
By Harley Elite Academy (HeLa)
EXPERT – MASTERCLASS 8 CPD POINTS 1 DAY INTENSIVE COURSE ONLINE or IN-CLINIC NOTE! After booking we will contact you for scheduling the exact course date! Courses dates are subject to change due to mentors availability. We will inform you via email if a date becomes available! DERMAGRAFT AND ENRICHED NANO-MICROFAT TRANSFER FOR FACE, NECK & HANDS – VOLUMIZATION & REJUVINATION WHAT IS MICROFAT AND NANOFAT GRAFTING FOR FACE AND NECK LIFT? Microfat and enriched nanofat graft transfer (also known as autologous fat transfer or lipoinjection), to the face and the neck is a minimally invasive, short-lasting procedure with rapid recovery, and can be done under local anaesthesia. Following completion of the procedure, the patient can return to the normal daily life activities. But firstly, we need to clearly explain what the terms microfat and nanofat grafts mean…. Microfat is defined a small-diameter fat particle and is used to improve the appearance of wrinkles, grooves and the lack of volume and sagginess of the skin of the face and neck, in response to the aging process. Similarly, nanofat, is referred to as the smallest diameter fat particle. The main advantage of the nanofat is that it contains cells that have the ability to differentiate in any type of body cell. Stem cells – as they are called- play a very important role in the process of rejuvenation, as they can differentiate into cells called fibroblasts which in turn produce collagen thus making the skin firmer and more youthful in appearance. The Course can be divided into two stages: 1. In the first stage, fat cells will be obtained from one or more parts of the body and are then purified and injected into the face and the neck. The doctor will identify an area in your body where the fat will be obtained from. This area is usually the flanks, but fat can also be obtained from other areas such as the abdomen, and the outer and inner thighs. You will be given enough local anaesthesia to numb the area where the fat will be harvested from. Then, a small-diameter cannula called microcannula connected to a special vacuum syringe will be gently introduced under the skin to obtain the fat. During this process, you should not feel any pain, the local anaesthetic will have made you numb. After the fat is harvested, it will contain a mixture of fat cells, blood, water, and local anaesthetic. Therefore, this fat will not be pure. This mixture of fat, blood, water and local anaesthetic will then become filtered into a special filtering and processing device whereby all the blood, water and local anaesthetic are being washed out, so that pure fat remains. This fat is then further processed by passing it through special filters whereby it becomes a smaller-sized fat particle known as microfat and nanofat graft. You need to be medically qualified as a doctor, dentist, nurse, pharmacist or paramedic with full governing body registration and have completed a Foundation Filler Course and to have administered a number of cases. Additional information ATTENDANCE ONLINE (theory), IN-CLINIC (Practice) COURSE LEVEL EXPERT | Masterclass Course
