- Professional Development
- Medicine & Nursing
- Arts & Crafts
- Health & Wellbeing
- Personal Development
271 Attention courses delivered Live Online
Nice Work x Foundry
By Right Aligned
In this series we invite globally respected studios to walk us through the processes and methods they employ when working with clients.

3ds Max Basics Training
By London Design Training Courses
Why Choose 3ds Max Basics Training Course? Click for more info What am I going to get from this course? Create your own models in 3ds Max; Use built in poly modelling tools to create basic 3D objects. Learn everything you need about 3ds Max with this guide, from the basics of modelling and animation to more advanced steps. Duration: 10 hrs Method: 1-on-1, Personalized attention. Schedule: Tailor your own schedule by pre-booking a convenient hour of your choice, available from Mon to Sat between 9 am and 7 pm. 3ds Max Basic Training Course: Course Name: 3ds Max Basics Training Course. Core Skills for 3D Modeling, Rendering, Animations, and Games. Target Audience: Beginners and new users from diverse industries, including architects, interior designers, engineers, game developers, artists, and animators.Course Outline: 3D Modeling and Animation with 3ds MaxI. Introduction to 3ds Max- Course overview and objectives - Navigating the user interface - Basic settings and preferencesII. Creating 3D Objects- Building simple shapes with primitive objects - Craft complex designs using Editable Poly - Enhancing objects with modifiers - Applying materials and textures for realistic effectsIII. Lighting Techniques- Illuminating scenes with different light sources - Exploring various types of lighting - Adjusting light properties for desired effects - Casting shadows to enhance realismIV. Camera Control- Creating and configuring camera views - Fine-tuning camera settings for optimal shots - Animating cameras for dynamic scenesV. Animation Fundamentals- Mastering keyframe animation techniques - Utilizing the time slider and track view - Animating object transformations - Adding movement to materials and texturesVI. Rendering Process- Configuring render settings for high-quality output - Selecting appropriate output formats - Streamlining rendering with batch processing - Enhancing final renders with post-processing effectsVII. Project-Based Learning- Applying acquired skills to complete a final project - Exercising creativity and problem-solving abilities - Integrating modeling, animation, lighting, and rendering into the projectIn-Depth Course Outline:1. Modeling- Edit Poly Modeling: Extrude, Chamfer, Cut, and Slices - Symmetry Mirror Modeling - Designing a Table and Chair - Creating a Basic House Model - Working with Lines and Shapes - Importing Plans from AutoCAD/Vectorworks - Crafting Interior Spaces - Adding Doors, Windows, Railings, and Trees - Implementing Stairs2. Modifiers- Exploring Compound Objects - Utilizing Connect, Scatter, Pro Boolean, Loft, and Terrain Modifiers - Manipulating Bend, Taper, Twist, Stretch, Skew, FFD, Wave, Ripple, and Lattice - Employing the Lathe Modifier for Curved Objects3. 3ds Max Basic Lights- Mastering Omni, Spot, and Direct Lights for Illumination4. 3ds Max Camera- Understanding Free and Target Cameras for Optimal Shots5. Texturing and Rendering- Applying Diffuse and Bump Mapping Techniques - Integrating Environment and Background Images - Configuring Render Settings for High-Quality Images - Lighting and Rendering Scenes in 3ds MaxAre you ready to take your 3D modeling and animation skills to the next level? Download the 30-day free trial of 3ds Max from Autodesk and embark on a transformative learning journey today. Explore the possibilities and unleash your creative potential!

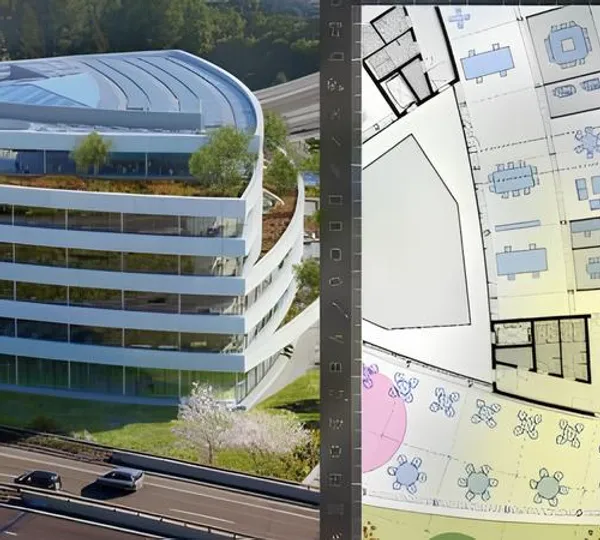
Landscape Architecture Training Course Beginner to Advanced
By ATL Autocad Training London
Who is this course for? This course is ideal for individuals interested in learning landscape architecture, emphasizing the planning, design, and management of various outdoor spaces, such as private gardens, public parks, and commercial landscapes. Click here for more info: Website 1-on-1 training, Monday to Saturday, 9 a.m. to 7 p.m., or call to book. Tailor your 40-hour course Option A: AutoCAD, Sketchup, Vray, and Photoshop. Option B: Rhino, Sketchup, Vray, and Photoshop. Both covering specializes in Planting Plans and Maps. Course Outline - Option A: AutoCAD, Sketchup, Vray, Photoshop (Total: 40 hours) AutoCAD (10 hours): Module 1: Introduction to AutoCAD (2 hours) - Overview of AutoCAD interface and tools - Creating, opening, and saving drawings - Basic drawing and editing commands Module 2: Drawing and Editing (3 hours) - Working with lines, circles, and arcs - Utilizing polylines and polygons - Modifying objects: Move, Copy, Rotate, and Scale Module 3: Precision Drawing (3 hours) - Using coordinate systems for precision - Dimensioning and text incorporation - Hatching and gradients for added detail Module 4: Advanced Tools (2 hours) - Leveraging blocks and attributes - Managing layers and object properties - Creating layouts and preparing for plotting Sketchup (16 hours): (Specializing in Planting Plans, Vegetation Plans, and Maps) Module 1: Introduction to Sketchup (2 hours) - Navigating the Sketchup interface - Grasping basic 2D and 3D modeling concepts - Creating and manipulating objects Module 2: Advanced Modeling (6 hours) - Model intricate garden elements with curves and surfaces - Expertly edit and transform geometry - Specialized focus on Planting Plans, Vegetation Plans, and Maps Module 3: Visualization with Vray (4 hours) - Understanding the Vray rendering engine - Applying materials and textures for realism - Setting up lighting and cameras for realistic rendering Module 4: Image Enhancement with Photoshop (10 hours): - Introduction to Photoshop for design purposes - Editing and enhancing Sketchup and Vray outputs - Creating visually striking presentations Additional Resources: Access free online portfolio design assistance, career growth guidance, and mock interviews to ensure your readiness for the competitive job market. Course Outline - Option B: AutoCAD, Rhino, Vray, Photoshop (Total: 40 hours) AutoCAD (12 hours): Module 1: Introduction to AutoCAD (2 hours) - Overview of AutoCAD interface and tools - Creating, opening, and saving drawings - Basic drawing and editing commands Module 2: Drawing and Editing (3 hours) - Working with lines, circles, and arcs - Utilizing polylines and polygons - Modifying objects: Move, Copy, Rotate, and Scale Module 3: Precision Drawing (3 hours) - Using coordinate systems for precision - Dimensioning and text incorporation - Hatching and gradients for added detail Module 4: Advanced Tools (4 hours) - Leveraging blocks and attributes - Managing layers and object properties - Creating layouts and preparing for plotting Rhino (14 hours): Module 1: Introduction to Rhino (2 hours) - Navigating the Rhino interface - Grasping basic 2D and 3D modeling concepts - Creating and manipulating objects Module 2: Advanced Modeling (6 hours) - Model intricate garden structures with curves and surfaces - Proficiently edit and transform geometry - Build complex 3D structures Module 3: Visualization with Vray (6 hours) - Setting up lights and cameras for garden renders - Exploring rendering settings and options - Post-production and compositing techniques Image Enhancement with Photoshop (8 hours): - Introduction to Photoshop for design purposes - Editing and enhancing Rhino and Vray outputs - Creating visually striking presentations Both Option A and Option B provide comprehensive training in essential design software, with the choice between specialization in Sketchup (Option A) or a broader skill set with Rhino (Option B). Additionally, both options offer access to valuable resources for career preparation. When Can I Book this Training Course? Personalized 1-on-1 training sessions available, allowing for a tailored learning experience. Pre-book your preferred time slot from Monday to Saturday between 9 a.m. and 7 p.m. Alternatively, call 02077202581 to book over the phone. Training Duration 40-hour training program, with the flexibility to split hours based on your ideal learning schedule. Training Method Choose between in-person Face to Face or Live Online 1-on-1 training. Expect personalized attention, flexible learning pace, and individualized support throughout your training. Live Online sessions available over Zoom for added convenience. Enroll in our 1-on-1 Course Today! Comprehensive Training Program Overview Option A: AutoCAD (10 hours) Sketchup (16 hours) (Specializing in Planting Plans, Vegetation Plans, and Maps) Vray (4 hours) Photoshop (10 hours) Option B: AutoCAD (12 hours) Rhino (14 hours) Vray (6 hours) Photoshop (8 hours) Benefits of Option A: Diverse Skillset: Gain expertise in AutoCAD, Sketchup, Vray, and Photoshop for various design fields. Specialization: Focus on Planting Plans, Vegetation Plans, and Maps within Sketchup. Realistic Renderings: Learn Vray for compelling 3D renderings. Image Editing: Enhance images effectively with Photoshop. Career Readiness: Access resources like portfolio design assistance and mock interviews for job market readiness. Benefits of Option B: Versatile Expertise: Master AutoCAD, Rhino, Vray, and Photoshop for various design disciplines. Advanced 3D Modeling: Excel in complex designs with Rhino and 3ds Max. Quality Renderings: Create impressive 3D renderings with Vray. Image Editing Mastery: Perfect design concepts with Photoshop. Additional Training Course Benefits: Compatible with both Mac and Windows operating systems. Price Assurance for exceptional value. Flexible scheduling from Monday to Sunday, 9 am to 8 pm. Lifetime Email and Phone Support. Assistance in configuring your computer for seamless software installation. Referral Benefits, including special discounts for friend referrals and savings on group training courses.
Neuro EMDR: Adapting EMDR to clients with cognitive difficulties
By Dr Jonathan Hutchins
Neuro EMDR Workshop will teach people how to use EMDR with people who have cognitive problems. 6 CPD Credits from the UK EMDR Association have been applied for.


Rhino 3D Basic to Intermediate Training
By London Design Training Courses
Why Choose Rhino 3D Basic to Intermediate Training Course? Course Link Learn NURBS modeling, curves, and 3D printing prep in our Rhino 3D Course. Master materials, textures, and lighting for 2D & 3D modeling. A basic understanding of Rhino is valuable for creative professionals pursuing careers in product, furniture, architectural, or jewelry design. Duration: 10 hrs Method: 1-on-1, Personalized attention Schedule: Tailor your own hours of your choice, available from Mon to Sat between 9 am and 7 pm. Supported Learning Approach: Personalized Support: No matter the course duration, our team is dedicated to supporting you every step of the way. From homework assignments to video tutorials and free after-support, we ensure a supportive path to software expertise. One to One Course Advantage: The One-to-One Course Advantage offers personalized learning, flexible scheduling, focused feedback, and a private environment to boost confidence and achieve your specific objectives. Rhino 3D Basic to Intermediate Training Course Course Duration: 10 hours Course Description: 3D modeling journey with our Rhino 3D Basic to Intermediate Training Course. Ideal for beginners, master the powerful Rhino 3D software used by architects and designers. Explore the interface, create captivating 3D models, and enhance your designs with comprehensive tools and techniques. Course Outline: I. Introduction to Rhino 3D (1 hour) - Explore the Rhino 3D interface and discover essential tools for 3D modeling - Master seamless navigation and viewport controls - Grasp the significance of units and tolerance for precise creations - Customize your workspace for an efficient and personalized workflow II. Creating Basic 3D Objects (3 hours) - Unleash your creativity by crafting simple yet captivating 3D shapes - Gain expertise in editing objects and working with curves for refinement - Dive into the world of surfaces and solids, refining your skills - Effortlessly use transformations and copying techniques to enhance your designs III. Organizing and Enhancing Models (2 hours) - Streamline your projects with smart organization using groups and layers - Elevate the visual appeal of your models with vibrant colors, materials, and textures - Illuminate your creations with fundamental lighting techniques IV. Advanced Modeling Techniques (2 hours) - Master the art of tackling complex shapes with advanced modeling tools - Explore the nuances of creating and editing curves and surfaces - Enhance your proficiency in handling solids and understand Boolean operations and trimming techniques V. Introduction to Rendering (1 hour) - Gain an overview of rendering and its role in visualizing your designs - Understand Rhino's powerful render engine and its capabilities - Apply basic materials to elevate the quality of your renderings VI. Exporting and Importing (1 hour) - Acquire a comprehensive understanding of file formats for seamless sharing - Prepare your models for 3D printing using best practices - Integrate models from other software into Rhino 3D for a unified workflow VII. Conclusion and Next Steps (30 minutes) - Recapitulate the knowledge gained throughout the course - Access valuable tips and resources for continuous learning and growth - Engage in an interactive Q&A session to receive feedback and support Note: The above course outline is flexible, ensuring it meets the unique needs and skill levels of learners. Download - Rhino

Adobe After Effects One Day Course (Live Online Only)
By London Design Training Courses
Click here for more info Duration: 5 hrs Method: 1-2-1, Personalized attention, Tailored content, Flexible pace, Individual support. Schedule: Personalized training experience with our flexible 1-2-1 sessions. Choose your convenient hour from Monday to Saturday between 9 am and 7 pm. After Effects CC Training: From Novices to Experts Immerse yourself in the world of motion graphics and VFX with our Adobe Certified After Effects Courses, suitable for total novices and experts alike. Learn to create captivating motion graphics, smooth animations, and stunning special effects in a professional environment. Choose from four learning options: London Classroom: Attend in-person sessions 1-2-1 in our dynamic studio. Live Online Classes: Join interactive classes from the comfort of your home or office. Bespoke Training: Tailor the course to your specific needs and preferences. Whichever path you select, all options cover the same lesson plan delivered by our Certified Professional Trainers. Rest assured, your learning experience is fully supported by our 100% Satisfaction Guarantee. Adobe After Effects Essentials (5-hour course) Session 1: Introduction to After Effects (1 hour) Overview of After Effects and its applications in motion graphics and visual effects. Understanding the workspace and interface. Importing and organizing assets for seamless workflow. Creating projects and compositions. Session 2: Animation Basics (1.5 hours) Working with layers: Adding, editing, and arranging layers in the timeline. Keyframe animation: Introduction to keyframes and creating simple animations. Motion paths: Manipulating motion paths for dynamic animations. Easing motion: Applying ease in and ease out to smoothen animations. Animation presets: Utilizing built-in presets for efficient animation. Session 3: Effects and Compositing (1.5 hours) Applying effects: Adding visual effects to layers and compositions. Compositing techniques: Understanding blending modes and layer styles. Masking and track mattes: Using masks to control the visibility of layers and apply effects. Motion tracking: Applying tracking data to objects in a scene. Session 4: Text and Shape Animation (1 hour) Text animation: Creating and animating text layers with different styles. Shape layers: Introduction to shape layers and their applications. Animating shapes: Using shape layers to create dynamic animations. Session 5: Final Project and Exporting (1 hour) Applying all the learned techniques to create a final motion graphics project. Refining the project and adding finishing touches. Understanding export settings and rendering the final output. By the end of this 5-hour Adobe After Effects Essentials course, participants will achieve the following learning outcomes: Introduction to After Effects: Understand the fundamentals of After Effects, its interface, and workspace. Animation Basics: Master keyframe animation and motion path manipulation for smooth and dynamic animations. Effects and Compositing: Apply visual effects, utilize blending modes, and work with masks and track mattes for creative compositing. Text and Shape Animation: Create and animate text layers with various styles and explore the versatility of shape layers in animations. Final Project and Exporting: Apply all learned techniques to create a final motion graphics project and export the finished output.

Vray for Maya Training
By London Design Training Courses
Why Learn Vray for Maya Training Course? Course info. Become a V-Ray for Maya expert with our training course. Led by certified tutors, you'll master lighting, shading, and rendering techniques to create stunning visual effects and animations. In-person or live online sessions, access recorded lessons, and receive lifetime email support. Duration: 10 hrs Method: 1-on-1, Personalized attention. Schedule: Tailor your own schedule by pre-booking hours of your choice, available from Mon to Sat between 9 am and 7 pm. Maya - Advanced Rendering with V-Ray Course Description: VRay Course for Maya to learn advanced rendering techniques and create stunning photo-realistic renderings. Gain access to all project and source files, allowing you to practice and perfect your skills. Key Details: Advanced Rendering Techniques: Learn advanced rendering methods using V-Ray in Maya. Photo-Realistic Renderings: Create stunning, lifelike renderings that closely resemble real-world images. VRay Course: Access a detailed step-by-step instruction to master VRay rendering in Maya. Project and Source Files: Get hands-on practice with all the necessary files provided. Skill Level: Designed for intermediate to advanced Maya users seeking to enhance their rendering capabilities. Instructor-led: Benefit from expert guidance and insights from experienced instructors. Flexible Learning: Study at your own pace and convenience. Realistic Visuals: Take your rendering skills to the next level and achieve professional-grade results. Course Modules: Module 1: Introduction to Vray for Maya (2 hours) Understand Vray's significance and benefits in Maya Install and set up Vray for Maya Familiarize with the Vray interface and workflow Learn about Vray materials and their usage in Maya Module 2: Lighting with Vray (2 hours) Explore various lighting techniques with Vray in Maya Work with different types of Vray lights and their settings Create outdoor scenes with Vray sun and sky Utilize Vray dome lighting for interior scenes Introduction to IES lights and their usage in Vray for Maya Module 3: Vray Camera (2 hours) Master Vray camera settings and their impact on the render Control exposure and use Vray depth of field Create camera animations with Vray for dynamic shots Utilize Vray frame buffer for post-processing Module 4: Vray Materials (2 hours) Understand Vray material properties and settings Create realistic materials using Vray Save and organize custom Vray material libraries Utilize Vray material overrides for efficient changes Module 5: Vray Rendering and Post Production (2 hours) Optimize Vray rendering settings for high-quality output Render still images and animations using Vray Enhance Vray renders in Photoshop with post-production techniques Utilize Vray frame buffer for fine-tuning the render Composit Vray render elements in Photoshop for added control Reduce noise in renders with Vray denoiser V-Ray for Maya Trial - Free Download Chaos Group https://www.chaos.com ⺠vray ⺠maya ⺠free-trial V-Ray for Maya. Add realism to your VFX and animation projects. Try free for 30 days. Download trial. Master Vray for Maya to create high-quality renders. Apply various lighting techniques for realistic and visually appealing scenes. Control Vray camera settings and create dynamic shots. Create and customize realistic Vray materials for 3D scenes. Optimize rendering settings for high-quality output. Enhance renders with post-production techniques in Photoshop. Establish an efficient workflow with Vray in Maya. Gain hands-on experience and access valuable resources for further practice.

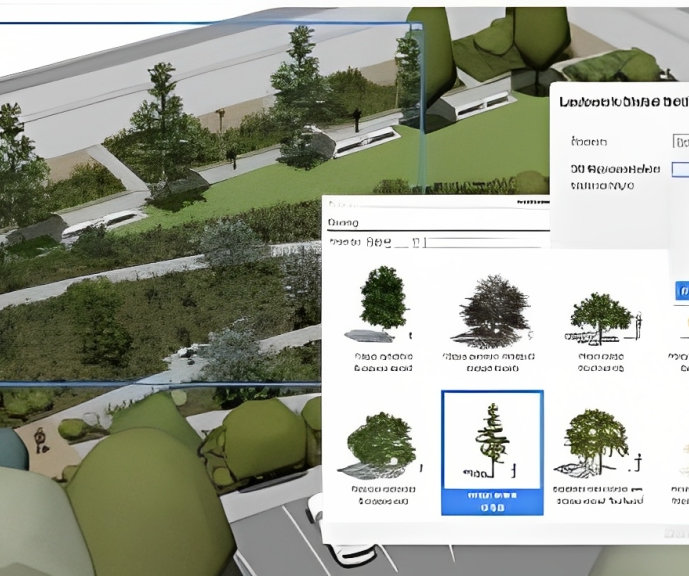
Vectorworks Landmark Training
By London Design Training Courses
Why choose Vectorworks Landmark Training Course? Course info Explore the Vectorworks Landmark Training Course! 1-on-1 Live Online sessions led by certified tutors and industry experts. Master Vectorworks Landmark for landscape and site design, creating captivating outdoor spaces. Enroll now to unleash your design skills. Duration: 16 hrs. Method: 1-on-1, Personalized attention. Schedule: Tailor your own schedule by pre-booking a convenient hour of your choice, available from Mon to Sat between 9 am and 7 pm. This course focuses on Vectorworks Landmark fundamentals, providing essential tools and techniques for landscape architecture, design, and related disciplines. Participants should have a basic understanding of Vectorworks software. The course covers 2D and 3D drawing, file organization, landscape plan/model creation, and more. Learning Objectives: Organize drawing files using industry standards and best practices for effective collaboration. Utilize imported files and field-collected data for base plans and site inventories. Integrate 2D and 3D elements for plan documentation and model analysis. Utilize worksheet features for material quantification and project efficiency. Course Prerequisites: Participants should be familiar with basic drafting concepts, computer operations, and keyboard shortcuts. This training demonstrates sustainable design principles and the use of CAD tools for erosion control, runoff calculations, plant tracking, and sun/shade analysis. Participants will learn to create a 3D site digital terrain model and assess proposed plantings' effects on solar heat gain and water usage. Vectorworks Landmark Basic to Intermediate Training Course Duration: 16 hours Join our comprehensive Vectorworks Landmark Basic to Intermediate Training, designed for landscape architects and designers. Master 2D and 3D landscape design with essential techniques, covering site analysis, plans, irrigation, and 3D visualization. Unleash your creativity with custom plant symbols and detailed planting plans using the plant database. Course Outline: I. Introduction to Vectorworks Landmark (1 hour) An overview of Vectorworks Landmark for landscape design Interface orientation and basic tool usage Navigation and viewport controls Landscape design project creation and management II. Site Analysis and Site Plans (3 hours) Collecting site information and producing site analysis drawings Crafting site plans and hardscape design Working with contours, elevations, and terrain models Incorporating site amenities like paths, fences, and walls III. Planting Plans (5 hours) Utilizing the plant database to select suitable plants for specific regions Creating personalized plant symbols Developing comprehensive planting plans and plant lists Understanding plant compatibility and growth patterns IV. Irrigation Design (2 hours) Designing and editing irrigation systems and zones Integrating irrigation components into the site plan Generating irrigation reports for efficient planning V. 3D Visualization (3 hours) Creating captivating 3D models of landscape designs Applying textures and materials to hardscape elements and plants Utilizing the Renderworks engine for high-quality rendering Enhancing designs with lighting and special effects VI. Customization (1 hour) Tailoring the interface for landscape design efficiency Creating custom object styles and resource libraries VII. Collaboration and Sharing (1 hour) Importing and exporting data from other software platforms Sharing landscape design drawings with colleagues and collaborators VIII. Conclusion and Next Steps (1 hour) Comprehensive review of course content Guidance on further learning resources Q&A session and feedback gathering Enroll in our Vectorworks Landmark Basic to Intermediate Training to enhance your landscape design expertise and unleash your creative prowess. Download Vectorworks Landmark https://www.vectorworks.net/en-GB/landmark By the end of the Vectorworks Landmark Training Course, participants will: Understand the key features and functionalities of Vectorworks Landmark for landscape design. Demonstrate proficiency in using essential tools for site analysis, site plans, and hardscape design. Create detailed planting plans, selecting appropriate plants, and understanding their compatibility and growth patterns. Design efficient and effective irrigation systems, including generating irrigation reports. Create 3D visualizations of landscape designs, applying textures, materials, lighting, and special effects. Customize the interface and create personalized object styles and resources. Collaborate and share landscape design drawings with other software users. Have the foundation to pursue further learning and exploration in landscape design using Vectorworks Landmark.
Adobe Illustrator and Photoshop Training
By London Design Training Courses
Why Choose Adobe Illustrator and Photoshop Training Course? Click here for more info Master vector graphics, digital illustrations, photo manipulations, and more. Certified tutors provide personalized guidance and feedback. Flexible scheduling available. Receive a Certificate of Completion. Learn Adobe Creative Cloud. Duration: 10 hrs. Method: 1-on-1, Personalized attention. Schedule: Tailor your own schedule by pre-booking a convenient hour of your choice, available from Mon to Sat between 9 am and 7 pm. This comprehensive and hands-on course introduces you to digital design through Adobe Photoshop and Illustrator. Learn how these three programs seamlessly collaborate to create stunning designs. Gain insights into bitmap and vector graphics and discover the most suitable image file formats for different scenarios. 10-hour course outline for Adobe Photoshop and Illustrator: Module 1: Introduction to Adobe Photoshop (1 hour) Overview of Photoshop interface and tools Understanding bitmap graphics and resolution Basic image editing techniques (cropping, resizing, color adjustments) Layers and their importance in design Module 2: Essential Photoshop Tools (1 hour) Working with selection tools (Marquee, Lasso, Magic Wand) Understanding brushes and brush settings Introduction to the Pen tool for precise selections Working with layers and layer styles Module 3: Advanced Image Editing (1 hour) Advanced color adjustments (Curves, Levels, Hue/Saturation) Photo retouching and manipulation techniques Creating composite images using blending modes Filters and special effects for creative designs Module 4: Introduction to Adobe Illustrator (1 hour) Overview of Illustrator interface and tools Working with vector graphics and paths Basic shapes and drawing tools Understanding anchor points and handles Module 5: Creating Vector Artwork (1 hour) Using the Pen tool for precise vector illustration Creating and editing shapes and objects Working with gradients and patterns Understanding the Appearance panel Module 6: Illustrator Typography (1 hour) Text tools and formatting options Creating text effects and artistic typography Combining text with shapes and images Working with text on a path Module 7: Combining Photoshop and Illustrator (1 hour) Importing Illustrator files into Photoshop and vice versa Working with smart objects and vector shapes in Photoshop Creating custom brushes and patterns in Illustrator for use in Photoshop Designing posters and flyers combining elements from both software Module 8: Integration with InDesign (1 hour) Exporting assets from Photoshop and Illustrator for InDesign Designing layouts in InDesign using assets from both programs Understanding print and digital design considerations Preparing files for printing and online use Module 9: Advanced Techniques and Tips (1 hour) Creating custom actions and automation in Photoshop Mastering advanced selection techniques Utilizing Illustrator's advanced tools (Pathfinder, Shape Builder, etc.) Exploring creative design styles and trends Module 10: Final Projects and Portfolio (1 hour) Students work on individual or group projects incorporating Photoshop and Illustrator skills Review and feedback on the projects Preparing a portfolio showcasing their work Download Adobe Illustrator - Free Trial https://www.adobe.com/uk/illustrator Throughout the course, you will explore various processes, including design and layout, workspaces, tools and palettes, importing files, and preparing files for both on-screen and print outputs. Course Objectives: By the course's conclusion, you will have a solid understanding of the fundamentals of each software package and their individual functionalities. You will learn how to efficiently work with all three applications in tandem and skillfully assemble print and digital-ready designs, leveraging elements crafted in Photoshop and Illustrator and integrated using InDesign.