The legendary Peter Keep from Jewellery Training Solutions is heading to Woking from Australia to teach his vast knowledge. Our focus within both courses on offer this weekend is to offer our students intricate technical knowledge which is quickly lost to new technology. Well skilled technical jewellers able to create multiple designs by hand are rare and in demand, Peter is dedicated to sharing his endless knowledge and tips, and while he can usually be found online, we are lucky enough to offer classes with Peter in person – a golden opportunity not to be missed. WHEN: FRIDAY 6th September 10-4 WHERE: Workshop 925 based at The Mayford Centre, just outside of Woking and very close to Guildford. Unit F9 The Mayford Centre, Mayford Green Woking, Surrey GU22 0PP TUTOR: Peter Keep –About WHAT DOES THE DAY INVOLVE? The legendary Peter Keep from Jewellery Training Solutions is heading to Woking from Australia to teach his vast knowledge. Our focus within both courses on offer this weekend is to offer our students intricate technical knowledge which is quickly lost to new technology. Well skilled technical jewellers able to create multiple designs by hand are rare and in demand, Peter is dedicated to sharing his endless knowledge and tips, and while he can usually be found online, we are lucky enough to offer classes with Peter in person – a golden opportunity not to be missed. In this class Peter will teach you how to make a catch with a hinged locking mechanism.This project is easier than it first looks, but you do need to have experience piercing out shapes and drilling. During the one-day workshop Peter will show you some other options and explain how they work. You will also be provided with information handouts and materials. These specialist skills can be applied across other aspects of jewellery making. You NEVER stop learning as far as the jewellery industry is concerned and it is Peter’s passion to maintain traditional skill. EXPERIENCE REQUIRED: Students should have some workshop experience and be confident using normal jewellery tools and equipment. If you are unsure, please email us at hello@workshop925.com to discuss any queries, we are always here to help. CLASS SIZE: 7 WHAT IS INCLUDED? All tools and consumables are supplied. WHAT TO BRING: For safety reasons, during each class, you are required to wear appropriate footwear, we request that no open toed shoes are worn within Workshop 925. Long hair should also be tied back when working with the equipment. You may also wish to bring a notebook. We have handouts for many demonstrations, but there are always many tips and tricks given verbally by the tutor, which some might like to keep note of. Please bring any lunch, snacks and drinks which you may want to your session. We have tea and coffee for you to help yourselves to. We supply all materials and tools. PAYMENT OPTIONS: You can pay via our website or in our workshop in person using our card machine. If you prefer to pay directly, you can email us on hello@workshop925.com and we can invoice you manually to arrange a bank transfer. For classes over £80, instalment options are also available. Please email us on hello@workshop925.com to arrange. Gift Voucher – if you have a voucher to redeem, please email us before booking on hello@workshop925.com Please check your dates carefully before booking a class as we are unable to offer refunds. See our Terms & Conditions for full details.
Unlocking Project Communication using NLP to deliver added value to your current projects. Apply the NLP Communication Model can get behind the 'miscommunications' encountered on a daily basis.
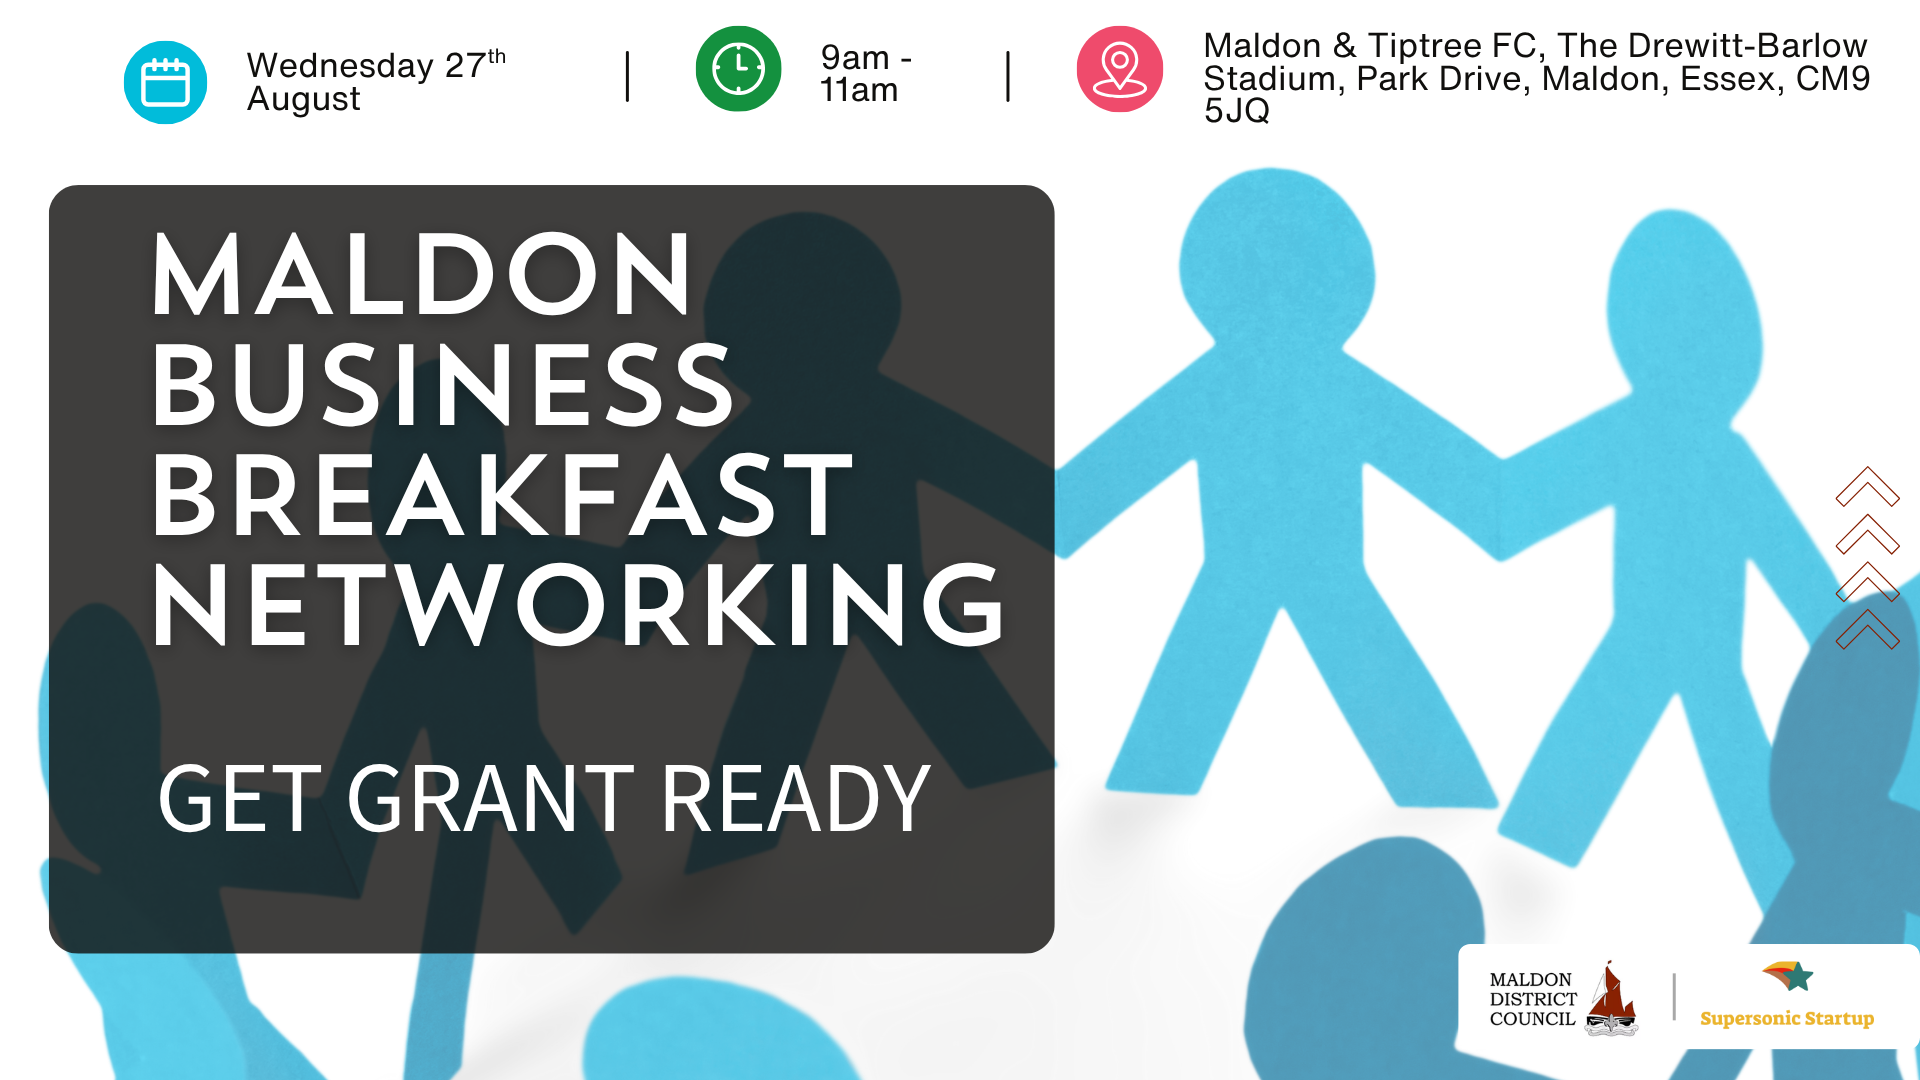
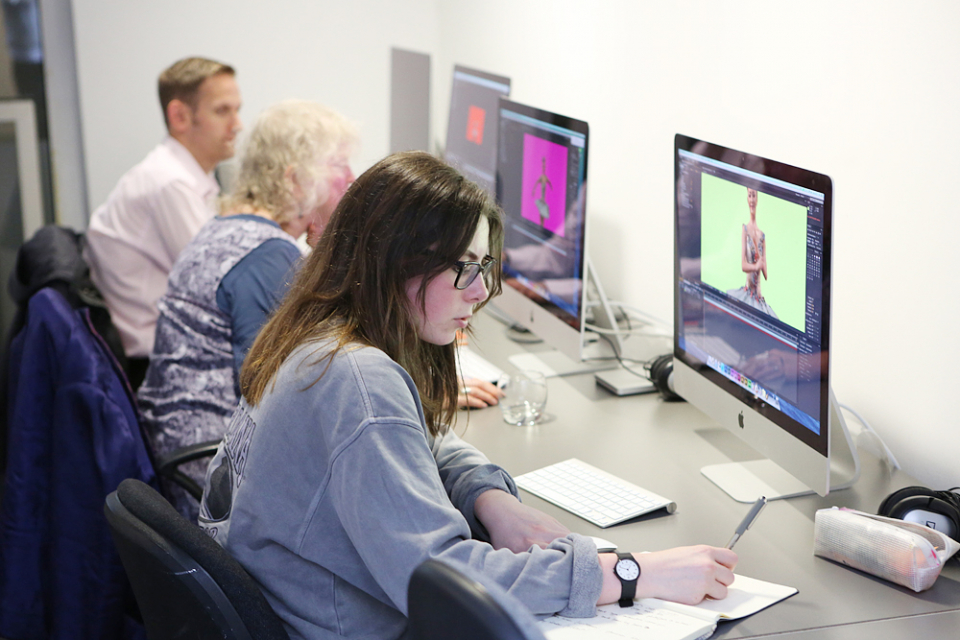
Adobe After Effects CC is the industry leader in video compositing software, offering an exciting and versatile array of applications for the creation of professional moving image work. On this course you will learn a range of visual effects and animation techniques, working between Photoshop and After Effects to create videos which explore text based motion graphics, character animation, green-screen compositing, 3D landscapes, motion tracking and lots more in-between. Alongside technical exercises the tutor will screen and discuss relevant artists, designers and filmmakers, providing both the technical skills and inspiration to create your own professional motion graphics work, filmic special effects or experimental artists video. Computer experience is required. Week 1 This week we will create a short video that combines text, still image and video layers. Through this exercise you will learn how to: Navigate the workspace on After Effects Set up a project and select a video format Introduce video to the timeline and split layers Change the position and scale of layers Introduce basic text Use selections in Photoshop to create a still image composition Import this composition into After Effects to create a composite video. Week 2 This week we will look at basic animation techniques. Through a series of exercises, you will learn how to: Use Photoshop to great multi-layered elements for animation Import these Photoshop elements into After Effects Work with key-frames and interpolation Add motion blur Duplicate and pre-compose animated elements Create a parallax effect to give the illusion of depth Apply blending modes Work with the puppet tool to create moving joints for an animated character Week 3 This week we will look at converting 2D photographs into a 3D virtual space to provide depth and movement. Through a series of exercises, you will learn how to: Convert a 2D image into a 3D space Set up a multi-layered diorama in Photoshop Import this into After Effects and position the layers within 3D space Create an animated camera move through 3D space Apply depth of field Week 4 This week we will look at working with green-screen compositing to place a live action figure within an animated backdrop. Through a series of exercises, you will learn how to: Work with the Keylight filter Adjust colour balance and tone Composite the figure against an animated background Introduce shadows and highlights Use the green-screen figure to create a silhouette Week 5 This week we will look at applying masks to footage to create cutouts, as well as exploring different applications for effects. Through a series of exercises, you will learn how to: Work with masks Use the Roto-mask tool Apply time re-mapping Work with ‘Particle Playground’ and similar effects Week 6 This week we will look at working with the paint panel to create animated drawings, as well as using motion tracking to attach a text element to a moving point within a video clip. Finally, we will cover how to output your final project, adding sound effects and applying a basic edit. Through a series of exercises, you will learn how to: Create text based motion graphics (kinetic typography) Apply motion tracking to live action footage Render your project Add sound to your video Courses are subject to minimum enrolment. Please register early, within five days of the start date, to reduce the likelihood of course cancellation. Please read our cancellation policy before booking. Students, anyone over the age of 65, and those in receipt of any form of benefits can claim the concessionary price, offering a 10% discount on the full course price. Valid proof of eligibility must be produced on the first day of the course. Please use the code CONCESSION when prompted at checkout.
Managing Stress in Challenging Times: In-House Training This course looks at the symptoms and causes of stress and how these affect us emotionally, behaviorally, and physically. You will learn some simple stress-busting techniques that will have a positive influence on your beliefs and behaviors around stress. You will also have the opportunity to develop a personal action plan which will serve as an ongoing reference point for dealing with pressure in its many forms - home, family, social, and work. What You Will Learn At the end of this program, you will be able to: Recognize the symptoms and causes of stress Manage and reduce the effects of stress in your life with simple stress-busting techniques Create a simple personalized plan to manage stress and promote a healthier, happier, and more productive lifestyle Getting Started Foundation Concepts What is stress? Why stress matters Flight or fight response and role of hormones Work-Life Balance How to create balance and set boundaries Learning how to say 'no' Stress-Reduction Techniques Visualization and relaxation techniques Behaviors and beliefs Putting things in perspective Circle of influence (vs. circle of control) Slowing down Be Responsible and Kind to Yourself Basic human needs Honest communication Your responsibility to yourself and others Calming thoughts
Course Title: 3ds Max Night Training Program. Join our 3ds Max Evening Course for after-work convenience and guidance in 3D modeling. Personalized attention, and build an impressive portfolio. 3ds Max Courses & Classes Online and in-person in London. Click here for more info: Website Training Duration: 10 hours Learning Approach: 1-on-1 sessions and Customized content. Course Schedule: Reserve a convenient hour from 9 am to 7 pm, Monday to Saturday, to suit your schedule. I. Introduction to 3ds Max Course Overview Familiarization with the User Interface Basic Navigation and Settings II. Creating 3D Objects Formation of Primitive Objects Crafting Complex Shapes using Editable Poly Application of Modifiers to Objects Implementing Materials and Textures III. Lighting Introducing Light Sources in a Scene Different Types of Lighting Adjustment of Light Properties Creating Shadows IV. Camera Establishing Cameras and Camera Views Fine-Tuning Camera Settings Camera Animation Techniques V. Animation Fundamentals Keyframe Animation Techniques Utilizing the Time Slider and Track View Animation of Object Transformations Animated Materials and Textures VI. Rendering Configuration of Render Settings Selection of Output Format Batch Rendering Procedures Post-Processing Effects VII. Project-Based Learning Application of Learned Techniques in a Final Project Creative Problem-Solving for Project Completion In-Depth Course Outline: Modeling Techniques Edit Poly Modeling Extrusion, Chamfer, Cut, and Slicing Techniques Symmetry Mirror Modeling Designing Furniture (Tables and Chairs) Basic House Model Design Creating Lines and Shapes Importing Plans from AutoCAD/Vectorworks Interior Space Design Doors, Windows, Railings, Trees, and Stairs Modifiers Compound Objects (Connect, Scatter, Pro Boolean, Loft, Terrain) Bend, Taper, Twist, Stretch, Skew, FFD, Wave, and Ripple Lattice and Lathe Techniques 3ds Max Basic Lighting Omni Light Spot Light Direct Light 3ds Max Camera Techniques Free Camera Target Camera Texturing and Rendering Diffuse and Bump Mapping Incorporating Environment and Background Images Rendering Images with Advanced Lighting in 3ds Max For a hands-on experience, access a free 30-day trial of 3ds Max, a robust 3D modeling and rendering software for design visualization, games, and animation, via Autodesk's official website. Download 3ds max. Autodesk Download a free 30 day trial of 3ds Max, 3D modelling and rendering software. Learning Outcomes after 3ds Max: Advanced 3D Skills: Master intricate 3D modeling, animation, and rendering techniques. Project Experience: Apply skills to real-world projects, building a professional portfolio. Problem-Solving: Develop critical thinking for complex design challenges. Potential Jobs: 3D Modeler: Create detailed 3D models for various industries. Character Animator: Animate lifelike characters for entertainment media. Architectural Visualizer: Produce realistic architectural renders. Interior Designer: Visualize and present interior designs. Game Environment Artist: Design immersive game environments. Product Visualization Specialist: Render detailed product visuals. Visual Effects Artist: Create stunning visual effects for film/TV. Freelance 3D Artist: Take on diverse projects as an independent professional. Details: Duration: 10 Hours of Comprehensive Training Focus: Advanced 3D Modeling, Animation, and Rendering Techniques Learning Format: Personalized One-on-One Sessions for Maximum Attention Availability: Flexible Scheduling, Monday to Saturday, 9 am to 7 pm Instructors: Certified Experts and Industry Professionals Materials: Certificate of Completion and Extensive Training Guides Interactive Learning: Live Feedback Sessions and Access to Recorded Classes Support: Lifetime Email and Phone Assistance for Continued Learning Special Benefits: Competitive Rates, Referral Discounts, and Assistance with Software Installation This intensive 3ds Max Masterclass provides advanced training in 3D design and animation, ensuring personalized attention, interactive learning, and lifelong support for your creative journey. Personalized Instruction: Skilled trainers provide tailored one-on-one coaching, meeting your unique learning requirements. Practical Learning: Participate in hands-on demonstrations, strengthening skills applicable in design, gaming, and film industries. Comprehensive Materials: Obtain a Certificate of Attendance and detailed guides for continuous reference. Interactive Engagement: Engage in live sessions with tutors, gaining valuable feedback and access to session recordings. Flexible Learning: Choose between online or in-person sessions, aligning with your schedule and preferences. Value and Support: Benefit from competitive rates, referral discounts, and lifelong assistance via email and phone. Seamless Start: Get help with software installation, ensuring a smooth and hassle-free learning experience.
Learn the Basic PhotoshopTraining Course Learn retouching, layers, color, correction, shapes, and symbols. Delve into graphic design, photo editing, and digital art. From beginner to pro, gaining expertise in UX strategies, ensuring your websites are impactful and user-friendly. Click here for more info: Website Duration: 10 hours Approach: 1-on1 sessions and Personalized guidance. Schedule: Customize your schedule by booking a convenient hour, available from Monday to Saturday between 9 am and 7 pm. Module 1: Interface and Preferences Familiarize yourself with the Photoshop Interface Customize Panels and Toolbars to match your workflow Explore Photoshop Preferences to optimize settings Discover various Photoshop CC Workspaces tailored for different tasks Begin with essential Keyboard Shortcuts Module 2: Image File Formats Understand diverse image file formats such as PSD, JPEG, PNG, and PDF Delve into File Compression and its influence on image quality Module 3: Creating a New Document Set dimensions and size for new documents Grasp media units for accurate design specifications Explore Color Profiles and their significance Save presets for swift document setups Module 4: Placing Images Differentiate Embedded vs. Linked images Introduction to Smart Objects for non-destructive editing Master the Selection tool for precise image placement Module 5: Image Size and Resolution Save images using various formats and compression settings Understand Image Size and Resolution for diverse output needs Module 6: Layers Introduction Organize your work with Layer management Master layer tasks such as reordering, renaming, grouping, locking, and hiding Module 7: Selection Tools Explore Selection Tools like Marquee, Magic Wand, Quick Selection, and Lasso Grasp Inverse Selection and Deselect for efficient editing Module 8: Layer Effects Apply captivating Layer Effects such as Drop Shadow, Stroke, and Outer Glow Save and replicate Effects Styles for quick application Combine multiple effects for creative designs Module 9: Introduction to Shapes Utilize the Shapes tool for fundamental design elements Create Custom Shapes for unique designs Understand Color principles and use the Properties Panel for adjustments Master the Direct Selection tool for precise shape editing Create a basic poster using provided examples Module 10: Type and Typography Work with Type and explore the Character and Paragraph Panel Utilize Styles Panel for consistent text formatting Save favorite fonts for easy access Apply Effects and Layer Styles on Type for impactful typography Learn about Leading, Tracking, and Kerning for optimal text spacing Module 11: Colors Understand RGB vs. CMYK color modes Select colors using the Eyedropper tool Save colors as Swatches for reuse Create gradients using the Gradient Tool Module 12: Creating a Clipping Mask Master the concept of Clipping Masks and their application Apply Clipping Masks to Type, Images, and Shapes Combine Layer Effects with Clipping Masks for creative designs Module 13: Introduction to Masking Understand Masking and its importance in image editing Utilize the Brush tool for mask creation Learn Masking shortcuts and use Gradient Mask for smooth transitions Module 14: Adjustment Layers Explore Color and Gradient Adjustment Layers for image enhancements Master Curves, Levels, and Hue/Saturation Adjustment Layers for precise color control Convert images to Black and White using Adjustment Layers Combine Adjustment Layer Masks for targeted edits Module 15: Image Touch Up Master various touch-up techniques, including Red Eye Removal, Spot Healing Brush, and Patch Tool Utilize Content Aware Removal for seamless object removal Restore old photos using Clone Stamp and Dodge/Burn tools Enhance portraits by removing blemishes and whitening teeth Module 16: Filters Introduction Understand Smart Objects and Filter usage for non-destructive editing Explore the Filters Gallery and experiment with Blur and Vantage filters Module 17: Blending Modes Introduction Master the concept of Blending Modes and their effects on layer overlays Understand different Blending Modes like Darken, Lighten, and Overlay Layer Mastery: Develop expertise in working with layers, mastering advanced techniques for seamless editing and design organization in Adobe Photoshop. Precision Editing: Skillfully employ a variety of selection tools, ensuring precise and meticulous editing, manipulation, and composition of images and elements. Creative Layer Effects: Apply captivating Layer Effects with finesse, enhancing your designs and visuals to achieve professional-grade aesthetics. Advanced Editing Techniques: Understand the functionalities of Adjustment Layers, Masking, and Clipping Masks, enabling you to perform advanced editing and compositing tasks with confidence and precision. Effective Photo Restoration: Acquire techniques to touch up and restore photographs effectively, ensuring professional-quality results in photo editing and retouching. Typography Expertise: Explore advanced typography techniques, enabling you to create visually appealing text designs that complement your overall compositions. Filter Applications: Gain an introductory understanding of Filters and their creative applications, enhancing your ability to add artistic effects and refine visuals. Practical Color Theory: Grasp the fundamental principles of Color Theory and apply them practically in your designs, ensuring harmonious and visually pleasing color schemes in your work. Course Highlights: Advanced Photoshop Skills: Learn intricate techniques for professional image editing, retouching, and manipulation. Creative Design Projects: Engage in hands-on projects to enhance your practical skills in real-world scenarios. Mastering Special Effects: Dive into advanced topics like layer effects, filters, and blending modes to create stunning visual effects. Typography and Design Principles: Explore typography styles, layout design, and color theory for compelling compositions. Professional Portfolio Development: Receive guidance on creating a professional portfolio showcasing your Photoshop expertise. Potential Job Roles: Graphic Designer: Craft visually appealing graphics for print and digital media. Digital Artist: Create digital artwork for various applications, from illustrations to advertisements. Photo Retoucher: Enhance and manipulate photos for professional use, including portrait retouching. UI/UX Designer: Design user interfaces and experiences for websites and applications. Web Designer: Develop visually engaging websites with expertise in Photoshop for web design. Marketing Content Creator: Produce marketing materials such as banners, brochures, and social media visuals. Freelance Designer: Work independently, offering design services to clients across different industries. Advertising Creative: Contribute to creative campaigns by designing impactful ad visuals. Print Production Specialist: Prepare print-ready materials, ensuring quality in printed products. Photography Post-Processing Specialist: Enhance and retouch photographs, optimizing them for professional use. Comprehensive Photoshop Proficiency: Develop a solid foundation in Photoshop, mastering essential tools and techniques vital for image editing and manipulation. Creative Editing Expertise: Learn advanced retouching, image enhancement, digital artwork creation, and graphic design using Photoshop's powerful features. Professional-Grade Results: Acquire skills for achieving professional-level outcomes in image editing, ensuring precise color correction, seamless retouching, and visually appealing compositions. Optimized Workflow: Discover time-saving tips, shortcuts, and efficient techniques to enhance your Photoshop workflow. Learn layer management, non-destructive editing, and automation for streamlined processes. Versatile Design Skills: Unlock creative possibilities by mastering text effects, digital collages, filters, and graphic design for diverse mediums. Access to Recorded Lessons: Revisit course material and reinforce learning through recorded lessons. Review specific techniques at your own pace, deepening your understanding of Photoshop. Lifetime Email Assistance: Benefit from continuous support with lifetime email assistance. Seek guidance, get answers to questions, and seek clarification even after completing the course.
Why Choose Rhino Introduction to Intermediate Training Course? Learn: 3D NURBS models. Master: Surfacing modeling. Interface: Rhino's navigation. Rendering Skills: Enhance presentations with Rhino renderings. Check our Website Flexible Scheduling: 1-on-1 training sessions according to your convenience. Choose any hour between 9 a.m. and 7 p.m., Mon to Sat. You can call us at 02077202581 to book over the phone. Duration: 10 hours. Methods: Personalized training either in-person, or live online. Introduction and Navigation Become acquainted with Rhino's interface, menus, and screen layout. Efficiently traverse through Rhino models, ensuring precision in 2D lines, polylines, and NURBS curves. Utilize modeling setup features, incorporating constraints like snap, ortho, and planar for accuracy. Leverage object snaps and Smart Track functionality to enhance precision. Solid and Surface Modeling Develop rapid 3D solids and surfaces, employing Rhino's organized layering system. Utilize coordinates and constraints for meticulous modeling, exploring 3D space and elevations. Create diverse shapes, such as rectangles, circles, arcs, ellipses, and polygon curves. Elevate models with Rhino render and render color, incorporating free-form curves, helix, and spiral curves. Efficiently handle model views with pan, zoom, and view management tools. Implement various editing commands for curve manipulation and transform curves into surfaces and solids. Utilize history tracking for advanced editing and execute general editing actions: move, copy, rotate, mirror, and scale. Create arrays with both polar and rectangular arrangements and employ boolean operations like union, difference, and intersection. Offset curves and surfaces effectively, ensuring meticulous detailing. Intermediate Edit and Surfacing Introduce key NURBS modeling concepts and terminologies. Edit curves and surfaces via control point manipulation and rebuild them for optimal refinement. Employ the nudge modeling aid for precise adjustments and generate deformable shapes. Create curves through projection techniques and split surfaces using curves and surfaces. Blend surfaces seamlessly, utilizing symmetry tools, lighting, and rendering effects. Convert intricate 3D objects into detailed 2D drawings, expertly crafting page layouts. Advanced Surfacing and Solid Modeling Construct model primitives and solid text, employing techniques such as pipe and extrusion. Modify solids efficiently using Boolean tools, expanding your surface modeling capabilities. Employ techniques like extrusion, lofting, and revolving for intricate surfaces. Create sweeps using 1 and 2 rail curves, mastering surface network techniques for complex shapes. Upon completion, you will: Master Rhino Tools: Navigate interfaces, utilize advanced tools for precise modeling, and employ features like object snaps and Smart Track. Expert Solid and Surface Modeling: Develop intricate 3D solids and surfaces, create diverse shapes, and use Rhino render effectively. Advanced Editing Skills: Apply intermediate and advanced editing techniques, including symmetry tools and realistic rendering. Precision Modeling: Utilize coordinates, constraints, and advanced aids for accurate detailing and problem-solving. Professional Project Execution: Create high-quality renderings, 2D drawings, and polished 3D models for real-world design scenarios. Upon completion, you'll be adept at 3D modeling, product design, and architecture, positioning you as a valuable asset in the design industry. Why Choose Our Rhino Courses? Rhino, also known as Rhinoceros, stands as a robust 3D computer graphics and computer-aided design software, utilized extensively in domains like architecture, industrial design, and multimedia. Our Rhino courses are meticulously crafted to empower you in mastering this software. Led by seasoned instructors, our courses provide a comprehensive understanding of Rhino, enabling you to create exceptional designs. Rhino 3D Training: Our Rhino 3D training caters to beginners and those seeking advanced techniques. Course Highlights: Precise 3D Modeling: Master free-form 3D NURBS models with precision. Advanced Functionality: Explore Rhino's features, including advanced surfacing commands. User Interface Mastery: Navigate Rhino's interface and hone skills in curves, surfaces, and solids. Expert Guidance: Acquire expertise in Rhino's modeling environment under expert guidance. Modeling Techniques: Learn free-form and precision modeling techniques. Modeling Aids: Utilize tools for accurate modeling and create basic Rhino renderings. Benefits of our Courses: Expert Guidance: Receive instruction from experienced architects and designers, providing practical, real-world insights for comprehensive learning. Comprehensive Resources: Access bespoke video tutorials for additional learning and reference, enhancing your understanding of the course materials. Digital Reference Material: Receive a digital reference book to support your revision efforts, providing a comprehensive resource for your studies. Ongoing Support: Enjoy free after-support through phone or email even after course completion, ensuring continuous assistance and guidance. Tailored Learning Experience: Customize your learning journey by adapting the syllabus and projects to align with your specific needs and interests, fostering a personalized educational experience. Certificate: Upon completion, earn a certificate from us, validating your achievement and recognizing your expertise in the field.
Why Learn Bespoke AutoCAD Mac Basic-Intermediate Course? Learn AutoCAD using your projects and learn how to use powerful tools and techniques for drawing, dimensioning, and printing 2D drawings with our Intermediate AutoCAD course. Check our Website How long is the training? 10 hours, Choose and split 10 hrs Mon to Sat 9 am to 7 pm. Book online or call 02077202581 or 07970325184. Method? 1-on-1, available in both in-person and Live Online. Course Topics Include: Building Fundamental Shapes Working with Lines, Arcs, and Polylines Utilizing Grip Tools Precision Object Alignment Data Management and Backups Exploring File Formats Ensuring Disaster Recovery Mastering Object Creation Handling Measurement Units Dynamic Input Techniques Inquiring Commands and Measurement Tools Effective Object Viewing Navigating Zoom and Pan Object Manipulation Strategies Object Selection Methods Swift Object Management Object Transformation Techniques Scaling and Altering Objects Trim, Extend, and Offset Functions Creating Geometric Variations Object Joining and Editing Corner Filleting and Chamfering Stretching Objects Organizing Your Drawings Layer Management Customizing Object Properties Applying Linetypes Layout Design and Setup Efficient Page Configurations Scaling Drawing Views Adding Annotations Multiline and Single-Line Text Creation Text Styling and Editing Dimensioning Concepts Customizing Dimension Styles Dimension Editing Implementing Multileaders Object Hatching Hatching Editing Reusable Content Management Blocks and Symbols Tool Palette Usage Working with Groups Model Space and Paper Space Understanding Layout Creation and Viewports Viewport Scaling Plotting and PDF Output Managing Multiple Sheet Drawings Utilizing Plotstyles Crafting Custom Drawing Templates Download AutoCAD Mac https://www.autodesk.co.uk After completing the AutoCAD for Mac course, learners can expect the following learning outcomes: Proficiency in AutoCAD: Participants will acquire the skills and knowledge needed to confidently use AutoCAD for Mac, including creating and editing drawings, managing objects, and applying precision techniques. Effective Design Skills: They will gain the ability to produce accurate 2D drawings, making them valuable assets in design-related professions. Jobs that individuals can pursue after completing this course include: Draftsperson: Working in architectural, engineering, or construction firms to create technical drawings and plans. CAD Technician: Assisting in the development of designs for various projects, such as product design or urban planning. Interior Designer: Using AutoCAD for space planning and layout design in the interior design industry. Architectural Designer: Collaborating on architectural projects, including creating floor plans and elevations. Mechanical Designer: Participating in the design and development of mechanical components and systems. Civil Engineering Technician: Supporting civil engineers in designing infrastructure projects, such as roads and bridges. Electrical or Electronics Designer: Assisting in the creation of electrical schematics and electronic circuit diagrams. Landscape Designer: Planning and visualizing outdoor spaces, gardens, and landscapes. Completing this AutoCAD course opens doors to various industries where precise and detailed 2D drawing skills are highly valued. The AutoCAD Mac Bespoke 1 on 1 Basics to Intermediate Level Training Course provides participants with a comprehensive skill set, enabling them to attain proficiency in using AutoCAD Mac. This course covers a wide range of functionalities and caters to individuals at all skill levels, whether they are beginners or experienced users. Participants will begin by learning fundamental features such as drawing, editing, annotations, and dimensioning. As they progress, they will delve into more advanced topics like object manipulation, customizing workspaces, and streamlining workflows. Key Benefits of the Course: Mastery of Mac-AutoCAD: Acquire expertise in both essential and advanced techniques for creating precise 2D drawings. Enhanced Productivity: Increase efficiency by implementing time-saving tips and optimizing your work processes. Versatile Design Abilities: Develop the skills to undertake diverse projects in fields such as architecture, engineering, and more. Industry-Relevant Competencies: Elevate your career prospects across various industries by gaining in-demand AutoCAD skills. Access to Recorded Lessons: Review and reinforce your learning at your convenience with access to recorded lesson sessions. Ongoing Email Support: Receive continuous assistance and guidance via email even after completing the course. Enroll today to benefit from interactive learning experiences guided by experienced instructors. Choose between flexible in-person or online sessions, gain access to lesson recordings, and enjoy a lifetime of email support. Tailored Guidance: Get personalized coaching and instruction tailored to your unique learning needs and objectives. Convenient Scheduling: Choose from flexible training slots available Monday to Saturday from 9 am to 7 pm, accommodating your busy schedule. Versatile Learning Options: Select between in-person training at our location, conveniently situated just 5 minutes away from Oval Tube Station, or participate in live online sessions from anywhere. Engaging Interactions: Participate in interactive sessions designed for questions, discussions, and problem-solving, creating an immersive learning experience. Effective Progression: Accelerate your learning with focused guidance, allowing you to advance at your own pace while mastering the material. Tailored Curriculum: Customize the course content to align with your prior knowledge and specific areas of interest, ensuring a relevant and engaging learning experience. Real-Time Guidance: Receive immediate feedback from the instructor, enhancing your comprehension and skill development. Comprehensive Support: Enjoy ongoing assistance and clarification opportunities through email or additional sessions beyond the course for an in-depth learning experience.
This one day course is an introduction to powerboating includes boating techniques for launching and recovering a boat from a road trailer, everyday boat handling and the use of safety equipment. By the end of the course you will be able to drive a powerboat under supervision. Power Courses Our powerboat training is currently delivered on an MCA coded 7.8m Ribcraft with a 200hp Suzuki four stroke outboard engine and an E-series Raymarine chart plotter. We maintain a 3:1 student to instructor ratio which allows our experienced RYA instructors to tailor courses to the various levels and needs on board and deliver at a manageable pace. All course costs include tea and coffee, waterproofs are available on request.