- Professional Development
- Medicine & Nursing
- Arts & Crafts
- Health & Wellbeing
- Personal Development
16540 Organ courses
Performance Management
By Nexus Human
Duration 1 Days 6 CPD hours Overview After completing this course, students will know how to: - Identify difficult personality types and the effect they can have in an organization - Manage difficult employees and monitor their behavior - Document ongoing changes in behavior and performance - Communicate clearly and effectively, both verbally and nonverbally - Improve your listening skills - Communicate with difficult supervisors and co-workers - Identify types of employee dismissals - Identify the focus of feedback and give and receive feedback effectively - Provide positive and constructive feedback - Monitor performance afterwards - Identify communication styles - Manage difficult feedback sessions and identify when to avoid giving feedback - Identify some common myths associated with workplace conflicts, common reasons that conflicts arise, and types of workplace conflict - Distinguish between conflict management and conflict resolution - Identify conflict resolution styles, resolve workplace conflicts, including team conflicts, and identify the communication skills required to In this course, students learn to identify and manage difficult employees, monitor their behavior, develop clear and effective communications techniques, give and receive feedback, identify workplace conflicts and present resolutions. 1 - Getting Started Workshop Objectives 2 - The Basics What is Performance Management? How Does Performance Management Work? Tools Case Study 3 - The Basics (II) Three Phase Process Assessments Performance Reviews Case Study 4 - Goal Setting SMART Goal Setting Specific Goals Measurable Goals Attainable Goals Realistic Goals Timely Goals Monitoring Results Case Study 5 - Establishing Performance Goals Strategic Planning Job Analysis Setting Goals Motivation Case Study 6 - 360 Degree Feedback What is 360 Degree Feedback? Vs. Traditional Performance Reviews The Components Case Study Module Six: Review Questions 7 - Competency Assessments Competency Assessment Defined Implementation Final Destination Case Study 8 - Kolb's Learning Cycle Experience Observation Conceptualization Experimentation Case Study 9 - Motivation Key Factors The Motivation Organization Identifying Personal Motivators Evaluating and Adapting Case Study 10 - The Performance Journal Record Goals and Accomplishments Linking with Your Employees or Managers Implementing a Performance Coach Keeping Track Case Study 11 - Creating a Performance Plan Goals Desired Results Prioritization Measure Evaluation Case Study 12 - Wrapping Up Words from the Wise Lessons Learned Additional course details: Nexus Humans Performance Management training program is a workshop that presents an invigorating mix of sessions, lessons, and masterclasses meticulously crafted to propel your learning expedition forward. This immersive bootcamp-style experience boasts interactive lectures, hands-on labs, and collaborative hackathons, all strategically designed to fortify fundamental concepts. Guided by seasoned coaches, each session offers priceless insights and practical skills crucial for honing your expertise. Whether you're stepping into the realm of professional skills or a seasoned professional, this comprehensive course ensures you're equipped with the knowledge and prowess necessary for success. While we feel this is the best course for the Performance Management course and one of our Top 10 we encourage you to read the course outline to make sure it is the right content for you. Additionally, private sessions, closed classes or dedicated events are available both live online and at our training centres in Dublin and London, as well as at your offices anywhere in the UK, Ireland or across EMEA.

EFQM Foundation Training - Online
By Centre for Competitiveness
The essential course for anyone who wants to find out about the EFQM Model and RADAR and how these tools can benefit their organisation. The New EFQM Model was launched at the EFQM Forum in October 2019 and, as EFQM's country partner for Ireland, CforC is providing Foundation Training on the new model. Whilst this training is effective as a stand-alone course, it is also the starting point for all EFQM qualification routes. Who is it for? This course is suitable for anyone who wants to understand the new EFQM Model and how it can be used to make their organisation more effective. It provides a good overview for consultants who want to add the Model/RADAR to their portfolio of products and services. It is also a pre-requisite for anyone considering one of the EFQM qualification routes as a way of progressing their management development and career. Pre-requisites for this course None Benefits By the end of the course, participants will be able to: explain how the EFQM Model could benefit their organisation and how it could be used to overcome current and future challenges explain how the Model is structured and how the different elements apply to their organisation apply RADAR, the diagnostic and assessment tool, to identify strengths and areas for improvement conduct a high-level health check of their organisation The training comprises 8 modules; Module 1 The Changing World Module 2 The Organisation’s Ecosystem Module 3 The Value of a Model Module 4 The EFQM Model Module 5 RADAR Module 6 Using the EFQM Model and RADAR Module 7 The EFQM’s Digital Platform Module 8 Next Steps Delivery The course is delivered through a virtual trainer led live class Cost £450 + VAT which includes the training course, the EFQM Model e-book and your EFQM Foundation Certificate. If you are not yet a member but are already thinking about joining CforC, you can find more information on how to become a member and the benefits by clicking here.

EFQM Foundation Training - Online - 2025
By Centre for Competitiveness
The essential course for anyone who wants to find out about the EFQM Model and RADAR and how these tools can benefit their organisation. Whilst this training is effective as a stand-alone course, it is also the starting point for all EFQM qualification routes. Who is it for? This course is suitable for anyone who wants to understand the new EFQM Model and how it can be used to make their organisation more effective. It provides a good overview for consultants who want to add the Model/RADAR to their portfolio of products and services. It is also a pre-requisite for anyone considering one of the EFQM qualification routes as a way of progressing their management development and career. Pre-requisites for this course None Benefits By the end of the course, participants will be able to: explain how the EFQM Model could benefit their organisation and how it could be used to overcome current and future challenges explain how the Model is structured and how the different elements apply to their organisation apply RADAR, the diagnostic and assessment tool, to identify strengths and areas for improvement conduct a high-level health check of their organisation Following the welcome and introduction, this course comprises of 9 modules: Module 1 Why we need a model to face & master complexity? Why the EFQM Model? Module 2 Introduction to the EFQM Model Module 3 The Model (part 1): Direction Module 4 The EFQM Model Module 5 The Model (part 3): Results Module 6 RADAR Module 7 Assessment Module 8 Data & Insights Module 8 Next steps Delivery The course is delivered through a virtual trainer led live class Cost £450 + VAT which includes the training course, the EFQM Model e-book and your EFQM Foundation Certificate. If you are not yet a member but are already thinking about joining CforC, you can find more information on how to become a member and the benefits by clicking here.
Come and enjoy a fun day of Easter baking with internationally renowned baker & author, Emmanuel Hadjiandreou. Emmanuel is passionate about teaching bread making. Originally from South Africa, where he trained, he has worked all around the world. In the UK for Gordon Ramsey, the Savoy, Flour Power City Bakery, Daylesford Organics and Judges Bakery in Hastings, where he now lives.

Photoshop Basics to Essentials Training
By London Design Training Courses
Why Choose Photoshop Basics to Essentials Training Course? Course Link Mastering Photoshop is crucial for securing positions in creative fields such as graphic design, digital design, and user interface (UI) design. Acquiring this skill serves as a foundation to excel in various design programs essential for creative professionals. Duration: 16 hrs. Method: 1-on-1, Personalized attention. Schedule: Tailor your own hours of your choice, available from Monday to Saturday between 9 am and 7 pm. Photoshop Course: Total 16 hrs Module 1: Keyboard and Toolbar Shortcuts Customize toolbars and keyboard shortcuts for efficient workflow Learn essential keyboard shortcuts for faster navigation Module 2: Advanced Layer Management Filter, search, and color code layers for better organization Group and merge layers to streamline your design process Explore Blending Modes for creative effects Module 3: Blending Modes Understand Blending Modes and their usage within layers and effects Apply Blending Modes to enhance your designs Module 4: Layer Comps Discover Layer Comps and their benefits in managing complex designs Create, edit, and update Layer Comps for different design versions Export Layer Comps to PSD, PDF, and JPEG formats Module 5: Drawing Vectors Work with Vector images using shapes and the Pen Tool Use the Direct Selection Tool for precise editing Apply colors and create Clipping Masks with vectors Module 6: Advanced Type Techniques Convert text into Shapes and utilize font style changes with the Pen Tool Use text as a Clipping Mask and create text Outlines Design 3D text for impactful typography Module 7: Advanced Adjustment Layers Master advanced adjustments like Curves, Levels, and Black and White Utilize Selective Color and Gradient Maps for creative color control Module 8: Advanced Selection Techniques Use Smart Radius and Select and Mask for precise selections Learn to select complex objects like hair using Color Range and the Pen Tool Save and manage selections using the Path Panel Module 9: Colorizing Black and White Images Module 10: Displacement Maps Module 11: Advanced Filters Create Trees, Frames, Clouds, and Fire with filters Use Polarized, Wave, and Extrusion for artistic effects like "Japanese Sun" Explore Vanishing Point Filter, Camera RAW, Blur for depth of field, and Filter Gallery Combine 3D text with Vanishing Point for stunning designs Use Liquify for image manipulation Module 12: Introduction to Actions Automate tasks using Photoshop's preset Actions Create your own Actions to save time and effort Module 13: Creating an Animated GIF Learn frame by frame animation Utilize the Timeline to create engaging animated GIFs Learning Outcomes: Master advanced selection techniques, including the Path and Pen Tool, for precise editing. Gain proficiency in advanced layer management and utilize Layer Comps for efficient design organization. Enhance your designs with a deeper understanding and application of Blending Modes. Create visually appealing 3D text and text outlines to add depth and impact to your artwork. Explore advanced Filters like Displacement Maps, Blurs, and Distortion for creative effects. Automate tasks with actions and batch processing, streamlining your workflow. Craft engaging animated GIFs to add dynamic elements to your designs. Skillfully set project requirements by identifying the purpose, target audience, copyright considerations, and project management tasks for successful project execution.

Vectorworks Landmark Training
By London Design Training Courses
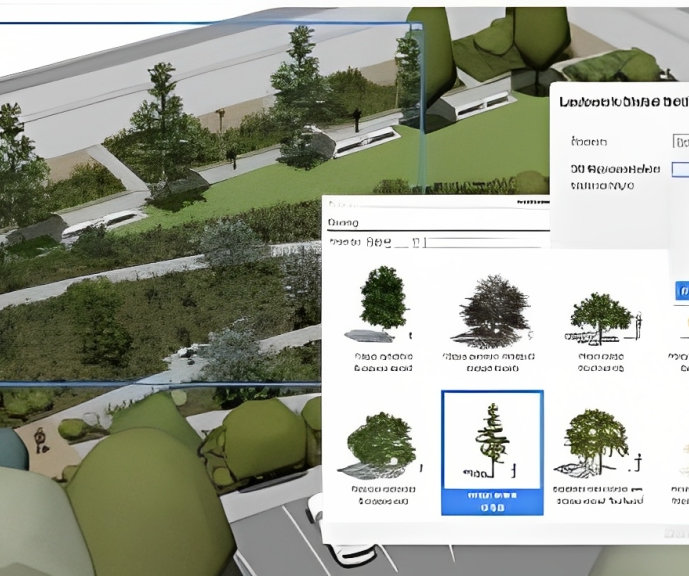
Why choose Vectorworks Landmark Training Course? Course info Explore the Vectorworks Landmark Training Course! 1-on-1 Live Online sessions led by certified tutors and industry experts. Master Vectorworks Landmark for landscape and site design, creating captivating outdoor spaces. Enroll now to unleash your design skills. Duration: 16 hrs. Method: 1-on-1, Personalized attention. Schedule: Tailor your own schedule by pre-booking a convenient hour of your choice, available from Mon to Sat between 9 am and 7 pm. This course focuses on Vectorworks Landmark fundamentals, providing essential tools and techniques for landscape architecture, design, and related disciplines. Participants should have a basic understanding of Vectorworks software. The course covers 2D and 3D drawing, file organization, landscape plan/model creation, and more. Learning Objectives: Organize drawing files using industry standards and best practices for effective collaboration. Utilize imported files and field-collected data for base plans and site inventories. Integrate 2D and 3D elements for plan documentation and model analysis. Utilize worksheet features for material quantification and project efficiency. Course Prerequisites: Participants should be familiar with basic drafting concepts, computer operations, and keyboard shortcuts. This training demonstrates sustainable design principles and the use of CAD tools for erosion control, runoff calculations, plant tracking, and sun/shade analysis. Participants will learn to create a 3D site digital terrain model and assess proposed plantings' effects on solar heat gain and water usage. Vectorworks Landmark Basic to Intermediate Training Course Duration: 16 hours Join our comprehensive Vectorworks Landmark Basic to Intermediate Training, designed for landscape architects and designers. Master 2D and 3D landscape design with essential techniques, covering site analysis, plans, irrigation, and 3D visualization. Unleash your creativity with custom plant symbols and detailed planting plans using the plant database. Course Outline: I. Introduction to Vectorworks Landmark (1 hour) An overview of Vectorworks Landmark for landscape design Interface orientation and basic tool usage Navigation and viewport controls Landscape design project creation and management II. Site Analysis and Site Plans (3 hours) Collecting site information and producing site analysis drawings Crafting site plans and hardscape design Working with contours, elevations, and terrain models Incorporating site amenities like paths, fences, and walls III. Planting Plans (5 hours) Utilizing the plant database to select suitable plants for specific regions Creating personalized plant symbols Developing comprehensive planting plans and plant lists Understanding plant compatibility and growth patterns IV. Irrigation Design (2 hours) Designing and editing irrigation systems and zones Integrating irrigation components into the site plan Generating irrigation reports for efficient planning V. 3D Visualization (3 hours) Creating captivating 3D models of landscape designs Applying textures and materials to hardscape elements and plants Utilizing the Renderworks engine for high-quality rendering Enhancing designs with lighting and special effects VI. Customization (1 hour) Tailoring the interface for landscape design efficiency Creating custom object styles and resource libraries VII. Collaboration and Sharing (1 hour) Importing and exporting data from other software platforms Sharing landscape design drawings with colleagues and collaborators VIII. Conclusion and Next Steps (1 hour) Comprehensive review of course content Guidance on further learning resources Q&A session and feedback gathering Enroll in our Vectorworks Landmark Basic to Intermediate Training to enhance your landscape design expertise and unleash your creative prowess. Download Vectorworks Landmark https://www.vectorworks.net/en-GB/landmark By the end of the Vectorworks Landmark Training Course, participants will: Understand the key features and functionalities of Vectorworks Landmark for landscape design. Demonstrate proficiency in using essential tools for site analysis, site plans, and hardscape design. Create detailed planting plans, selecting appropriate plants, and understanding their compatibility and growth patterns. Design efficient and effective irrigation systems, including generating irrigation reports. Create 3D visualizations of landscape designs, applying textures, materials, lighting, and special effects. Customize the interface and create personalized object styles and resources. Collaborate and share landscape design drawings with other software users. Have the foundation to pursue further learning and exploration in landscape design using Vectorworks Landmark.
AutoCAD Electrical Training Course | Bespoke
By London Design Training Courses
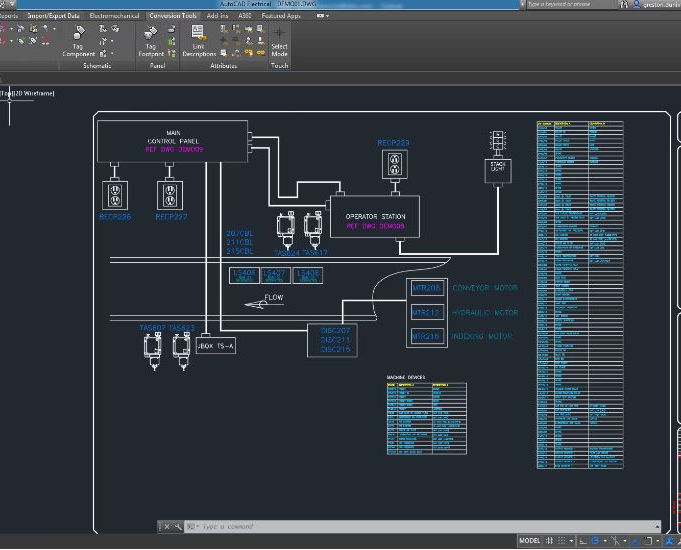
Why Choose AutoCAD Electrical Training Course | Bespoke? Course Link Master electrical drawings, schematics, and layouts. Utilize symbol libraries and automated circuit design. Access recorded lessons and lifetime email support. "Say goodbye to group classes and hello to 1-on-1 Courses. Dial 02077202581 or WhatsApp 07970325184 to reserve your dates. Duration: 16 hrs. Method: 1-on-1, Personalized attention. Schedule: Tailor your own hours of your choice, available from Mon to Sat between 9 am and 7 pm. AutoCAD Electrical Training Course: Specialized electrical CAD design skills with precision. Streamlined workflows for efficient design. Consistent adherence to industry standards. Increased productivity in electrical design. Enhanced collaboration with other professionals. Access to recorded lessons for review. Lifetime email support for ongoing assistance. Learn AutoCAD for electrical design. Enroll now and create accurate and professional electrical drawings with confidence. Choose in-person or live online sessions. AutoCAD Electrical Training Course: Specialized electrical CAD design skills with precision. Streamlined workflows for efficient design. Consistent adherence to industry standards. Increased productivity in electrical design. Enhanced collaboration with other professionals. Access to recorded lessons for review. Lifetime email support for ongoing assistance. Learn AutoCAD for electrical design. Enroll now and create accurate and professional electrical drawings with confidence. Choose in-person or live online sessions. AutoCAD Electrical Course Content: Introduction to AutoCAD Electrical Software: Overview and features of AutoCAD Electrical Understanding the software interface and tools Project file structure and management Layout and Navigation: Navigating the AutoCAD Electrical workspace Creating new project files and using attribute editors Understanding WDD, WDX, and WDF project files Exploring the Project Manager interface and attribute editors Electrical Diagram Drawing: Numbering and titling wires in diagrams Labelling components Utilizing diagram symbol libraries Creating and editing Electrical Control Circuits (ECC) Component dialog box and Circuit Scale dialog box Introduction to Programmable Logic Controllers (PLCs) and Integrated Systems: PLC Symbols and Concepts Inserting Programmable Logic Controllers (PLCs) into diagrams Adding PLC Units to diagrams Working with PLC Input and Output points and circuits Understanding PLC-based classification Using the Spreadsheet to PLC Input and Output Points utility Custom and Bespoke Symbols: Creating custom symbols for Switches, Wires, Contactors, Motors, Transformers, etc. Specifying symbol conventions and standards Offline and online usage of AutoCAD Electrical databases Drawing for Terminals and Plans: Implementing Terminal symbols in diagrams Handling terminal plans and locations Working with compound level terminals and locations Utilizing the Component command for single and multiple components Managing Jumpers and wiring Modifying Terminal Strips and Dual In-Line Packages (DIP) Understanding DIN Rail, Electrical Enclosure, Circuit Breakers, and Electrical Equipment Generating PDFs and Reports: Exporting drawings to PDF format Organizing report templates Automating the generation of reports Creating Electrical Audit Reports This AutoCAD Electrical course provides comprehensive knowledge of the software, focusing on electrical diagram drawing, symbol creation, PLC integration, terminal planning, and report generation. Participants will gain the skills needed to efficiently design electrical systems using AutoCAD Electrical software. Upon completing the AutoCAD Electrical course, participants will master the intricacies of the software. They will adeptly create accurate electrical diagrams, seamlessly integrate PLCs, design personalized symbols, strategize terminal layouts, and produce reports with precision and efficiency. Armed with these skills, graduates will possess the expertise to confidently design complex electrical systems. This proficiency opens avenues in various job roles such as Electrical Design Engineer, CAD Technician, Control Systems Designer, or even Project Manager in industries like manufacturing, automation, and engineering consultancy.
Vectorworks Evening Introduction Training Course
By Real Animation Works
Vectorworks Evening Course face to face One to one
Arnold for 3dsMax Basic to Advanced Training Course
By ATL Autocad Training London
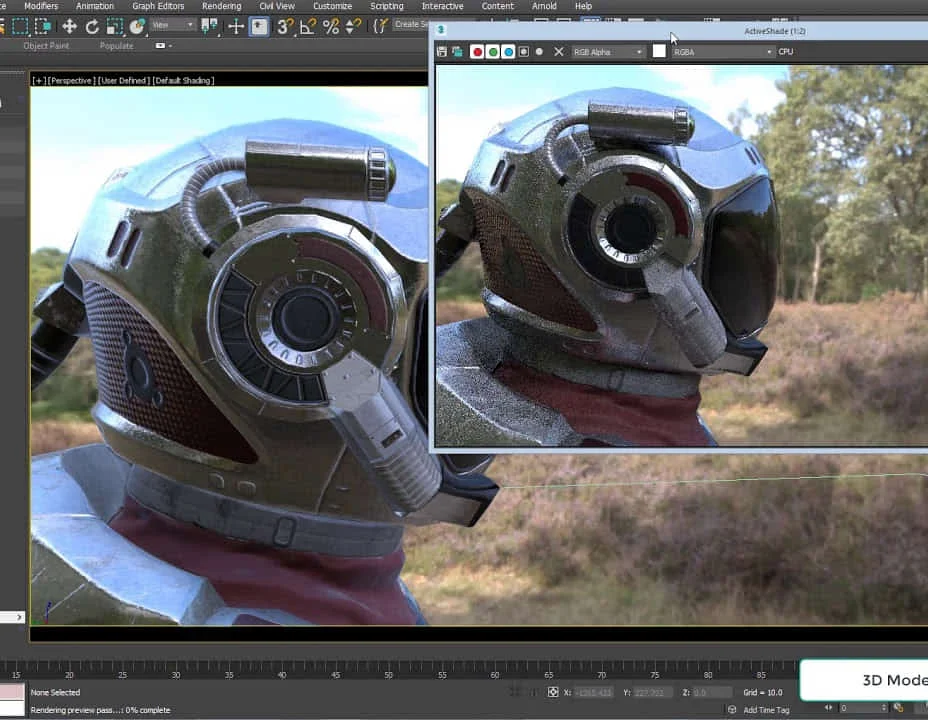
Learn 3ds Max + Arnold Photo Realistic Rendering Workflow. Enhance your skills with our Arnold renderer training for 3ds Max users. Learn to create lifelike 3D scenes and animations, mastering accurate light simulation. Explore essential Arnold features in lighting, materials, and rendering. Click here for more info: Website Training duration: 10 hrs. Method: 1-on-1 and Personalized attention. Schedule: Choose a convenient time from Monday to Saturday, 9 am to 7 pm, and book your slot. Course Duration: 10 hours Course Outline: Session 1: Introduction to Arnold Renderer (1 hour) Unveiling Arnold Renderer's features and capabilities Understanding the benefits of Arnold in 3ds Max Setting up Arnold renderer and exploring its interface Mastering the workflow for exceptional results Session 2: Basic Arnold Shading (1 hour) Navigating the Arnold shading network Creating essential materials with Arnold shaders Working with diverse shader types (standard, Lambert, etc.) Elevating visuals with maps and textures in Arnold's materials Session 3: Arnold Lighting Techniques (1.5 hours) Embracing the art of lighting with Arnold Lights Implementing various light types (area lights, spotlights, etc.) Creating ambiance with Arnold skydome and environment lighting Illuminating scenes using physical sky and image-based lighting Session 4: Arnold Cameras and Rendering Settings (1.5 hours) Mastering Arnold cameras and their settings Achieving depth of field and motion blur effects in Arnold Configuring optimal rendering settings for superior results Fine-tuning rendering with the Arnold Render Setup dialog Session 5: Advanced Arnold Shading (1.5 hours) Creating intricate materials with advanced Arnold shaders Realistic surfaces with Arnold's procedural textures Harnessing the power of advanced shading nodes (bump, displacement, etc.) Unleashing specialized effects with Arnold shaders (subsurface scattering, hair, etc.) Session 6: Arnold Rendering Optimization (1 hour) Streamlining rendering settings for enhanced efficiency Leveraging Arnold features like adaptive sampling and denoising Noise reduction techniques for smoother Arnold renders Troubleshooting common rendering issues and their solutions Session 7: Advanced Lighting Techniques (1 hour) Crafting lifelike lighting setups with Arnold's prowess Exploring advanced lighting properties (exposure, color temperature, etc.) Enhancing lighting with Arnold light filters and modifiers Implementing captivating effects like volumetric lighting and caustics Session 8: Arnold AOVs and Compositing (1 hour) Understanding Arnold AOVs (Arbitrary Output Variables) Configuring and rendering AOVs for post-production control Compositing AOVs for artistic adjustments in post-production Leveraging AOVs for fine-tuning the final image Session 9: Arnold for Animation and Motion Graphics (1 hour) Integrating Arnold seamlessly into animation and motion graphics projects Rendering animation sequences with finesse Managing motion blur and time-based effects with Arnold Unveiling Arnold's potential for particle rendering and dynamic effects Session 10: Arnold Tips, Tricks, and Best Practices (1 hour) Exploring advanced techniques and workflows for exceptional results Optimizing scene setup for enhanced rendering performance Troubleshooting tips for common issues and errors in Arnold Q&A session and final review to consolidate knowledge Upon completing this course, you will: Gain a solid understanding of Arnold, its rendering concepts, and its integration into 3D projects. Master the setup of Arnold renderer, optimizing performance, and ensuring compatibility with various platforms. Effectively create and manage materials for Arnold, enabling you to produce realistic and visually appealing scenes. Demonstrate proficiency in working with different shapes, lighting techniques, cameras, and shaders to enhance the visual quality of your 3D projects. Harness the power of textures to add depth and realism to your rendered scenes. Utilize Arnold scene sources efficiently, empowering you to streamline your workflow and achieve desired results in a faster and more organized manner. Overall, this course equips you with the necessary skills to confidently utilize Arnold in your projects and achieve exceptional rendering outcomes. Arnold is an advanced Monte Carlo ray tracing renderer designed for feature-length animation and visual effects. This comprehensive course equips you with the skills to produce photo-realistic 3D rendered scenes and animations. Learn accurate light simulation, artistic style techniques, and more. Our 3ds Max - Rendering with Arnold training is customizable, offering one-to-one sessions. Whether in-class or live online, our Autodesk Certified Instructors with vast rendering experience will guide you through hands-on exercises and provide a training guide for future reference. Upon completing the course, you'll receive an e-certificate and liftime email support from your Arnold trainer. Prior experience with 3ds Max is recommended, but no prior Arnold knowledge is required. Choose the Arnold version that suits your needs for this training course. Lifetime email support provided. Comprehensive handouts and useful documents included. Flexible financial support options available, including installment packages and funding through job center plus and DWP (Contact us for details). Money-back guarantee: Unsatisfied after your first session? We address your concerns and offer a refund if needed (Terms and conditions may apply). Assistance with computer optimization for improved software performance in Autocad, 3ds Max, and Photoshop on both MAC and PC platforms. Industry connections for portfolio promotion and job opportunities.
Vectorworks 2d | 3d and Spotlight training
By London Design Training Courses
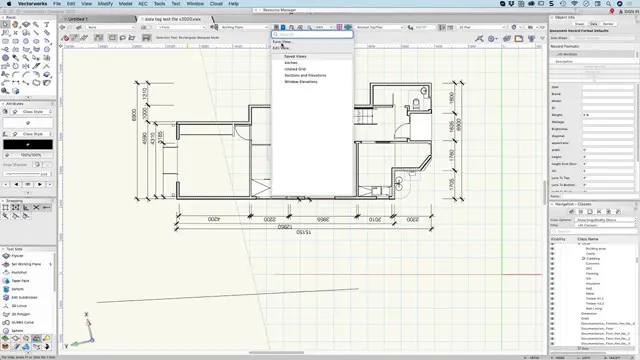
Why Learn Vectorworks 2d | 3d and Spotlight training Course? Course info Led by experts, this comprehensive program equips you with skills in 2D drafting, immersive 3D modeling, and dynamic lighting design. Master Vectorworks' powerful features, including the Spotlight module tailored for entertainment and events. Duration: 16 hrs Method: 1-on-1, Personalized attention. Schedule: Tailor your own hours, available from Mon to Sat between 9 am and 7 pm. Or Call 02077202581 or WhatsApp 07970325184. Course Details: Format: 1-on-1 Training Schedule: Flexible, Any Day, Anytime (Monday to Saturday), 9 AM to 7 PM Duration: Customizable to Individual Learning Pace Content: Comprehensive training in Vectorworks, focusing on 2D Drafting, Immersive 3D Modeling, and Dynamic Lighting Design. Specialization: Spotlight Module for Entertainment and Events Instructors: Expert-led sessions ensuring personalized attention and effective learning. Outcome: Mastery of Vectorworks' Powerful Features, Proficiency in 2D and 3D Design, and Expertise in Dynamic Lighting Design for Entertainment Purposes. Note: Schedule and course duration are flexible to accommodate individual preferences and learning needs. Course Details: Format: 1-on-1 Training Schedule: Flexible, Any Day, Anytime (Monday to Saturday), 9 AM to 7 PM Duration: Customizable to Individual Learning Pace Content: Comprehensive training in Vectorworks, focusing on 2D Drafting, Immersive 3D Modeling, and Dynamic Lighting Design. Specialization: Spotlight Module for Entertainment and Events Instructors: Expert-led sessions ensuring personalized attention and effective learning. Outcome: Mastery of Vectorworks' Powerful Features, Proficiency in 2D and 3D Design, and Expertise in Dynamic Lighting Design for Entertainment Purposes. Note: Schedule and course duration are flexible to accommodate individual preferences and learning needs. Vectorworks 2D | 3D and Spotlight Training Course Course Duration: 16 hours Course Description: I. Introduction to Vectorworks (1 hour) Overview of Vectorworks software and its applications Familiarization with the user interface and navigation Customizing preferences and settings for optimal workflow II. 2D Drawing Tools (2 hours) Using basic drawing tools for creating lines, rectangles, circles, and polygons Utilizing text and dimension tools for annotations Applying modify tools for editing and transforming objects Organizing elements with layers and classes III. 3D Modeling Tools (3 hours) Introduction to extrude, revolve, sweep, and loft tools for 3D modeling Creating 3D objects from 2D shapes for spatial representation Modifying and refining 3D models Exploring the 3D modeling environment IV. Advanced 3D Modeling Tools (2 hours) Utilizing solid modeling tools for complex geometry creation Performing Boolean operations to combine or subtract shapes Creating and utilizing symbols for efficient workflow V. Introduction to Spotlight (1 hour) Overview of the Spotlight workspace and its features Adding and configuring lighting devices for stage and event design Creating and modifying lighting positions for accurate placement VI. Spotlight Tools and Techniques (3 hours) Creating and editing lighting instruments for customized setups Using visualization tools for lighting simulations Creating and applying labels and legends for documentation Generating worksheets and reports for lighting analysis VII. Advanced Spotlight Techniques (2 hours) Utilizing video and projection tools for multimedia presentations Incorporating audio and sound systems for immersive experiences Understanding rigging and hoisting for stage setup Managing paperwork and documentation for effective planning VIII. Integration with Other Software (1 hour) Importing and exporting files to collaborate with other software Utilizing Vectorworks in CAD and BIM workflows for interoperability Exploring plugins and add-ons for expanded functionality IX. Project-based Exercises (1 hour) Applying learned techniques to real-world scenarios Creating a lighting plan for a concert or theater production Designing a 3D model of a building or interior space Free 30-day, BIM & CAD Software Trial Request | Vectorworks https://www.vectorworks.net/trial Vectorworks Trial Version Request. Please fill out the following form. We will provide you with an evaluation serial number to activate your trial copy. Learning Outcomes of Vectorworks 2D | 3D and Spotlight Training Course: Master Vectorworks with 2D and 3D design skills. Create precise 2D drawings and detailed 3D models. Learn specialized tools for lighting and event planning in Spotlight. Optimize workflows and improve project coordination. Produce realistic renderings and visualizations. Apply skills to real-world projects in architecture and events.