- Professional Development
- Medicine & Nursing
- Arts & Crafts
- Health & Wellbeing
- Personal Development
432 Media courses in Sale delivered Live Online

InDesign Basic to Essential Training Course
By Real Animation Works
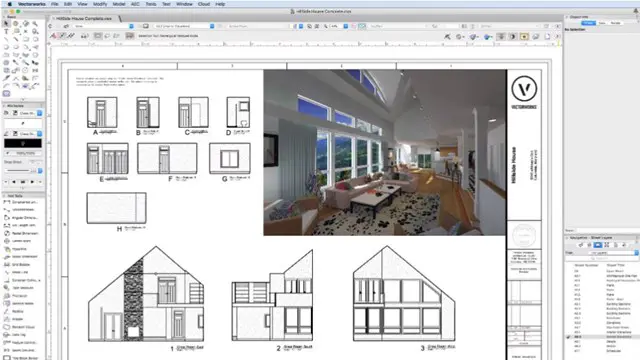
Vectorworks Evening Course face to face One to one
Cisco Administering Cisco Contact Center Enterprise (CCEA)
By Nexus Human
Duration 4 Days 24 CPD hours This course is intended for Account and project managers Contact Center Enterprise (CCE) administrators Deployment engineers Technical sales Overview After taking this course, you should be able to: Navigate CCE configuration and scripting tools Configure a dialed number, call type, and media routing domain Build a basic Cisco Intelligent Contact Management (ICM) script Configure agents and skill groups Configure basic Interactive Voice Response (IVR) functionality Implement attributes and precision queues Configure Ring-No-Answer (RONA) using CCE configuration tools Configure and populate an agent team and primary supervisor Improve agent efficiency through finesse enhancements Build and test a basic Voice XML (VXML) application Implement roles, departments, and business hours Run Cisco Unified Intelligence Center (CUIC) reports using the Reporting tool The Administering Cisco Contact Center Enterprise (CCEA) v1.0 course teaches you the contextual information around call flow between components in the Cisco© Unified Contact Center Enterprise (UCCE) solution including intelligent contact routing, call treatment, network-to-desktop Computer Telephony Integration (CTI), and multichannel contact management over an IP infrastructure. You receive hands-on practice using administrative tools to perform routine adds, moves, and changes in an inbound contact center environment. Cisco Unified Contact Center Review Contact Center Basics Components and Architecture Deploying Basic Call Settings Associate Basic Call Settings Explore Media Routing Domains Building a Basic Cisco Unified Contact Center Enterprise Script Introduce Script Editor Use Script Editor Nodes Configuring Basic Agent Functionality Introduce Agent Functionality Configure Agent Desk Settings Configuring Basic Call Treatment and Queuing Explore Media Server and Files Introduce Microapps Implementing Precision Routing Introduce Precision Routing Basics Examine the Migration Path Configuring RONA Support Introduce RONA Functionality Identify RONA Timeout Considerations Configuring Agent Teams and Supervisors Configuring Teams and Supervisors Explore Agent Roles Administering the Cisco Finesse Desktop Administering Cisco Finesse Desktop Introduce Cisco Finesse Administration Implementing Voice XML Applications Introduce VXML Build a Basic Call Studio Project Configuring Roles, Departments, and Business Hours Examine Post-Call Survey Functionality Configure Post-Call Survey Running Unified CC Enterprise Reports with Unified Intelligence Center (IC) Configure Unified CC Enterprise Administrators Configure Departments

LEVEL 4 ENDORSED CERTIFICATION DIPLOMA
By Export Unlocked Limited
Level 4 Endorsed Diploma - International Trade Qualification Complete all 15 modules and 3 assessments, from a choice of 7 to earn a Level 4 Diploma in International Trade.

Adobe illustrator 1-2-1 Training Course
By Real Animation Works
Illustrator face to face training customised and bespoke Online or Face to Face

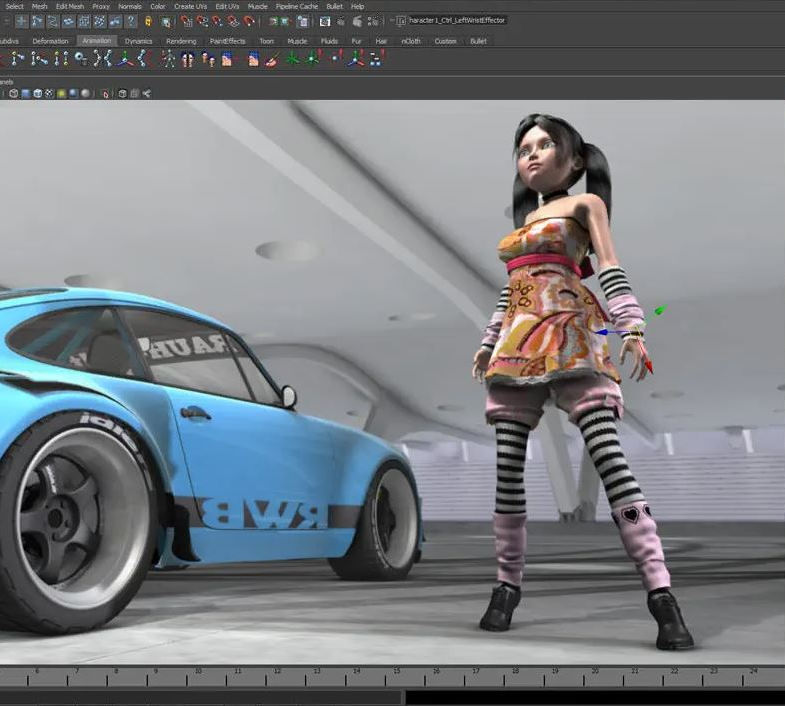
Autodesk Maya Basics to Advanced Level
By London Design Training Courses
Why Learn Autodesk Maya Basics to Advanced Level Course? Course info. Autodesk Maya is one of the best tools for 3D animation and visual effects. Learn Maya with our training courses covering sectors like Architecture, Games & Films, Animation, and Media. London Design Training Courses empower you to master Maya, transforming your 3d skills.  Duration: 40 hrs Method: 1-on-1. Schedule: Tailor your own schedule by pre-booking a convenient hour of your choice, available from Mon to Sat 9 am and 7 pm. Experience advanced-level Maya training covering essential aspects such as modeling, UV mapping, texturing, lighting, camera movement, and rigging. The course is tailored to your specific requirements and work preferences. You can discuss your learning goals with our trainer, and we will suggest a syllabus that meets your needs. Flexible Training Options: Choose in-class training at one of our UK center or attend live online sessions. Certified Tutors and Authoritative: London Design Training Course has all Autodesk Authorized Trainers. Hands-on Learning Approach: The training is practical and hands-on, combining theory and step-by-step demonstrations. You'll have ample time to practice techniques on your computer with Maya, and you can keep all the files you create. Compatible with Windows and Mac: Maya training is available for both Windows and Mac users, with options to suit any recent version of Maya. Maya Basic to Advanced Course Duration: 40 hours Course Description: In this course, you will learn the fundamental and advanced skills to create complex 3D models and animations using Autodesk Maya software. You will gain knowledge of the Maya interface, tools, and workflow. You will learn the essentials of modeling, texturing, rigging, animating, and rendering 3D models. You will also learn how to create advanced special effects and understand advanced modeling techniques. I. Introduction to Maya (3 hours) Overview of Maya and its Uses Maya interface and basic tools Navigation and viewport controls Creating and saving projects II. Basic Polygon Modeling (6 hours) Polygon modeling basics Creating basic shapes and objects Editing and modifying objects Creating complex objects with extrusions and bevels Creating organic shapes with NURBS III. Intermediate Modeling (6 hours) Advanced polygon modeling techniques Creating complex models with Booleans and deformers Creating and modifying curves and surfaces Creating organic shapes with sculpting tools Creating architectural models IV. Texturing and Materials (6 hours) Introduction to texturing Creating and applying materials Texture mapping and UV unwrapping Creating realistic materials with shaders Painting textures with the 3D paint tool V. Lighting and Rendering (6 hours) Basic lighting techniques Advanced lighting techniques Creating realistic lighting environments Setting up a camera and creating a composition Rendering still images and animations Output options and file formats VI. Animation (9 hours) Introduction to animation Keyframe animation and animation curves Creating and editing animation clips Rigging and animating a simple character Creating and editing motion paths and animation layers Creating complex character rigs Creating lip sync and facial animation Creating realistic animation with dynamics and simulations Cloth Animation Ncloth VII. Rigging (4 hours) Introduction to rigging Creating joints and skeletons Binding skin to joints and creating weight maps Creating simple rigging systems and rigging a character Creating complex rigging systems VIII. Special Effects (4 hours) Particle systems and dynamics Creating and manipulating fluids and fire effects Creating and editing special effects like explosions and smoke Creating advanced simulations with nCloth and nParticles Paint effects Mash Networks and Mash Animation IX. Advanced Rendering Techniques (2 hours) Render layers and passes Global illumination and ambient occlusion Mental Ray rendering and settings X. Conclusion and Next Steps (1 hour) Review of course content Tips for further learning and resources Q&A; and feedback Note: The above course outline is just a suggestion, and the course content and duration can be adjusted according to the needs and level of the learners. Proficiency in Advanced Maya Techniques: Participants will gain advanced skills in various aspects of Maya, including modeling, UV mapping, texturing, lighting, camera movement, and rigging. Tailored Training: The course is customized to meet the specific requirements of participants, focusing on their preferred techniques and work type. Hands-On and Practical Experience: The training is practical and hands-on, allowing participants to practice techniques on their own computers with Maya. Versatility in Operating Systems: Participants will be equipped to use Maya on both Windows and Mac systems. Accredited Certification: Upon successful completion, participants will receive an e-certificate, accredited by Autodesk Certified instructor, confirming their achievement in the Maya training course. Post-Course Support: After the training, participants are entitled to 30 days of email support from their Maya trainer, ensuring assistance with any post-course questions or issues. Up-to-Date and Relevant Learning: The training can be based on any recent version of Maya, providing participants with up-to-date knowledge and skills.
Existential Dialogue 2025: "Polarisation" with Prof. Kirk Schneider
By Therapy Harley Street
Polarization, or the “polarized mind,” is a fixation on one view, causing widespread destructiveness. It needs presence and love to address. We aim to explore the lived experiences on irregular perceptions of reality with an open mind. Each Saturday includes: a live dialogue between Prof. Ernesto Spinelli and an International Existential Therapist; a moment to share your thoughts and feelings with the teachers; and a final integration facilitated by Bárbara Godoy. This series of ten dialogues set out to explore the multifaceted dimentions and complexities associated with Existential Therapies. It attempts to engage with various interpretations of insanity through the lens of patients often painful, confounding, and deeply unsettling life experiences. Polarisation - between Prof. Ernesto Spinelli and Prof. Kirk Schneider “I view polarization or that which I call the “polarized mind” as the fixation on a single point of view to the utter exclusion of competing points of view, and I see it as a core dimension of human destructiveness both individually and collectively. Arguably, polarization or the polarized mind is responsible for more devaluation and abuse than any other general psychological dimension, and it crosses cultures, parties, disciplines and so-called diagnosed and undiagnosed populations. In fact it is the undiagnosed populations—polarized cultural, political, and religious leaders and their followers–who have arguably caused the most human destructiveness by far, over those whom we conventionally termed the diagnosed The polarized mind may be partly dispositional but appears to be largely fear-driven and requires abiding presence and love to address it. We are in a race against time to avail people to these “nutrients.” Prof. Kirk Schneider. Prof. Kirk J. Schneider, Ph.D. is a leading spokesperson for contemporary existential-humanistic and existential-integrative psychology. Dr Schneider was a 2022 Candidate for President of the American Psychological Association (APA), a co-founder and current president of the Existential-Humanistic Institute (an award-winning psychotherapy training center), and a two-term Member of the Council of Representatives of the APA. He is also past president (2015-2016) of the Society for Humanistic Psychology (Division 32) of the APA, recent past editor of the Journal of Humanistic Psychology (2005-2012), a founder and frequent presenter/facilitator of the bridge-building dialogue approach the Experiential Democracy Dialogue and a trained moderator for the conflict mediation group Braver Angels. Dr Schneider is also an adjunct faculty member at Saybrook University and Teachers College, Columbia University and an Honorary Member of the Society for Existential Analysis of the UK and the East European Association for Existential Therapy. He received the Rollo May Award for “outstanding and independent contributions” to the field of humanistic psychology from the Society for Humanistic Psychology, APA and is a Fellow of seven Divisions of the APA (5, 9, 32, 42, 12, 29, and 24). His work on existential-integrative psychotherapy has been featured in a special issue of the Journal of Psychotherapy Integration (March 2016), as well as The Wiley World Handbook of Existential Therapy and the APA’s forthcoming Handbook of Psychotherapy. Dr Schneider has published over 200 articles, interviews and chapters and has authored or edited 14 books including The Paradoxical Self, Horror and the Holy, Rediscovery of Awe, Awakening to Awe, The Spirituality of Awe, The Polarized Mind, The Handbook of Humanistic Psychology, Existential-Humanistic therapy, Existential-Integrative Psychotherapy, The Wiley World Handbook of Existential Therapy, The Depolarizing of America: A Guidebook for Social Healing and his latest volume (February, 2023) Life-Enhancing Anxiety: Key to a Sane World. Dr. Schneider’s work has been featured in Scientific American, the New York Times, USA Today, The Guardian, Vanity Fair, Forbes Health, Psychology Today, BBC World News and many other health and psychology outlets. Prof. Ernesto Spinelli was Chair of the Society for Existential Analysis between 1993 and 1999 and is a Life Member of the Society. His writings, lectures and seminars focus on the application of existential phenomenology to the arenas of therapy, supervision, psychology, and executive coaching. He is a Fellow of the British Psychological Society (BPS) as well as an APECS accredited executive coach and coaching supervisor. In 2000, he was the Recipient of BPS Division of Counselling Psychology Award for Outstanding Contribution to the Profession. And in 2019, Ernesto received the BPS Award for Distinguished Contribution to Practice. His most recent book, Practising Existential Therapy: The Relational World 2nd edition (Sage, 2015) has been widely praised as a major contribution to the advancement of existential theory and practice. Living up to the existential dictum that life is absurd, Ernesto is also the author of an on-going series of Private Eye novels. Date and Time: Saturday 12 April from 2 pm to 3 pm – (UK time) Individual Dialogue Fee: £70 Venue: Online Zoom FULL PROGRAMME 2025: 25 January “Knots” with Prof. Ernesto Spinelli and Bárbara Godoy 22 February “Healing” with Dr. Michael Guy Thompson and Prof. Ernesto Spinelli 22 March “Difference” with Prof. Tod DuBose and Prof. Ernesto Spinelli 12 April “Polarisation” with Prof. Kirk Schneider and Prof. Ernesto Spinelli 3 May “Character” with Prof. Robert Romanyshyn and Prof. Ernesto Spinelli 21 June “Opening” with Dr. Yaqui Martinez and Prof. Ernesto Spinelli 19 July “Meaning” with Dr. Jan Resnick and Prof. Ernesto Spinelli 25 October “Invention” with Dr. Betty Cannon and Prof. Ernesto Spinelli 15 November “Hallucination” with Prof. Simon du Plock and Prof. Ernesto Spinelli 13 December “Hysteria” with Bárbara Godoy and Prof. Ernesto Spinelli Read the full programme here > Course Organised by:

Photoshop Training Course Basics to Advanced
By ATL Autocad Training London
Photoshop Training Course Basics to Advanced designed for individuals of every skill level, ranging from beginners to advanced image editing professionals. Immerse yourself in the realm of potent image manipulation tools at our school in London. Personalized Photoshop courses either at our facility or directly at your location. Click here for more info: Website Duration: 20 hours. Method: Personalized 1-on-1. Schedule: Customize your learning with pre-booked sessions available Monday to Saturday, from 9 am to 7 pm. Course Title: Mastering Photoshop: From Basics to Advanced Proficiency Course Duration: 20 hours Module 1: Introduction to Photoshop (2 hours) Understanding the Photoshop interface Navigating tools and panels Basic keyboard shortcuts for efficient workflow Introduction to different file formats and their uses Module 2: Essential Tools and Techniques (3 hours) Selection tools and techniques for precise editing Working with layers: management and blending modes Understanding brushes, gradients, and patterns Introduction to basic filters and their applications Module 3: Image Editing and Retouching (4 hours) Color correction and adjustment layers Advanced retouching techniques: Healing Brush, Clone Stamp, and Content-Aware tools Removing backgrounds and unwanted elements Restoring old or damaged photographs Module 4: Advanced Photo Manipulation (3 hours) Compositing multiple images seamlessly Advanced blending modes and layer effects Creative use of masks and clipping paths Special effects: lighting, shadows, and reflections Module 5: Text and Typography (2 hours) Working with text layers and formatting options Creating custom typography and text effects Utilizing layer styles for creative text designs Text manipulation along paths and shapes Module 6: Web and UI Design (3 hours) Designing web banners, buttons, and interfaces Slicing and optimizing images for the web Creating interactive prototypes and mockups Exporting assets for web and app development Module 7: Print Design and Prepress (2 hours) Understanding color modes: CMYK vs. RGB Setting up documents for print: bleed, margins, and resolution Designing print materials: brochures, business cards, and posters Preparing files for professional printing Module 8: Project-Based Learning (1 hour) Applying learned techniques to real-world projects Instructor-led project: creating a digital artwork or advertisement Feedback and critique session for skill refinement Final presentation of completed projects Upon completion, you will: Master Photoshop Skills: Gain proficiency in fundamental and advanced Photoshop techniques, enabling professional-level image editing and creative design. Enhance Creativity: Develop creative problem-solving abilities, enabling innovative and visually appealing design solutions. Job Opportunities: Graphic Designer: Craft compelling visual content for ads, websites, and marketing materials. Photo Retoucher: Edit and enhance photographs to meet professional standards. Digital Artist: Create digital artwork and illustrations for various purposes. Web/UI/UX Designer: Design user-friendly interfaces and engaging online experiences. Marketing Content Creator: Generate eye-catching promotional visuals and social media content. Video Editor: Enhance video footage and create engaging video content for online platforms. Professional Adobe Photoshop Training in London - On-Site & Live Virtual Classes Being the industry-leading image editing software, Photoshop empowers users to manipulate images, enhance colors, and create visually striking designs. Its extensive toolkit allows for intricate adjustments, retouching, and even editing videos, graphic design, and 3D imagery. Enroll in our Photoshop course to establish a strong foundation in creative visuals, focusing on essential skills like image adjustment, composition, and common troubleshooting. For a more in-depth understanding, our Advanced course delves into advanced techniques such as color fills, text and layer styling, and creating web-ready artwork. Explore our masterclass options for advanced training and deeper insights. Both beginner courses are available in physical classrooms and online, providing flexible learning opportunities. Holistic Design Education: Comprehensive training across diverse design fields. Industry-Experienced Instructors: Learn from seasoned professionals in the field. Flexible Learning: Accommodating schedules for busy professionals and students. Practical Projects: Hands-on projects for real-world design experience. Career-Focused Skills: Acquire industry-relevant skills for professional growth. Cutting-Edge Facilities: Access state-of-the-art technology and facilities. Personalized Training: Tailored programs to suit individual learning needs. Networking Opportunities: Connect with design professionals for valuable connections. Innovation Exploration: Explore creative trends and emerging technologies. Ongoing Support: Continuous assistance and post-course guidance.

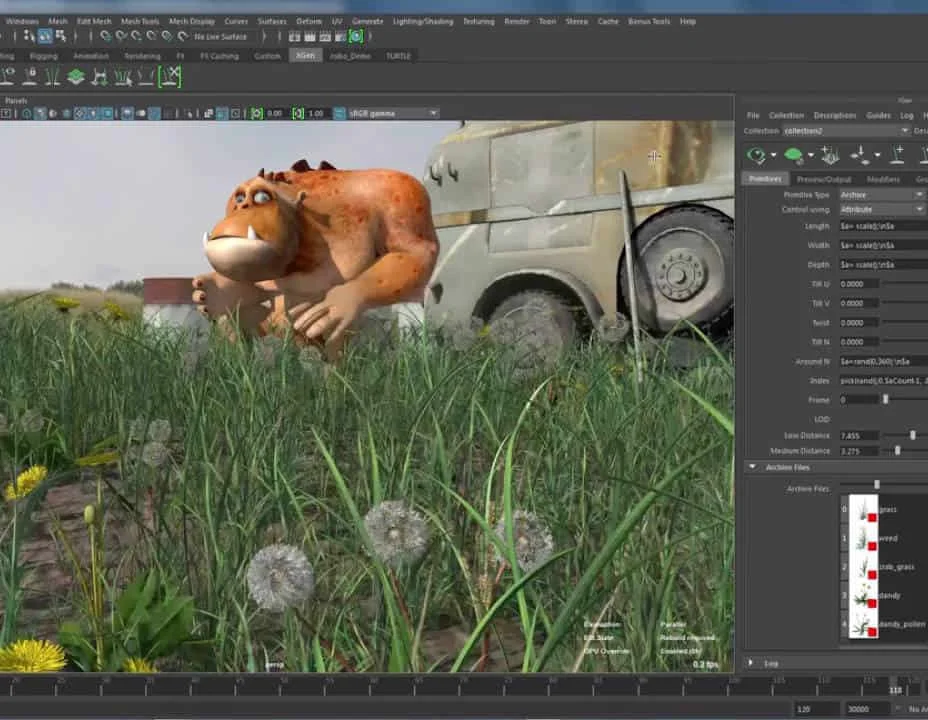
Complete Maya Beginner to Advanced Training
By ATL Autocad Training London
Why Choose Complete Maya Beginner to Advanced Training? Maya's extensive toolkit includes modeling, animation, simulation, and more, amplifying your versatility and influence in the 3D production pipeline. Click here for more info: Website Beginners or those with basic 3D knowledge. No specific digital media background is required. Duration: 40 hours Training Approach: 1-on-1 Sessions. Schedule: Customize your schedule by pre-booking a convenient hour of your choice, available Monday to Saturday between 9 am and 7 pm Course Structure: I. Introduction to Maya (3 hours) Maya Overview and Applications Interface Navigation and Basic Tools Project Creation and Management II. Basic Polygon Modeling (6 hours) Fundamentals of Polygon Modeling Creating and Editing Basic Shapes Advanced Techniques: Extrusions, Bevels, and NURBS for Organic Shapes III. Intermediate Modeling (6 hours) Advanced Polygon Modeling: Booleans, Deformers, and Surfaces Architectural Model Creation Sculpting Tools for Organic Shapes IV. Texturing and Materials (6 hours) Introduction to Texturing and Material Application Texture Mapping, UV Unwrapping, and Shaders Painting Textures with 3D Paint Tool V. Lighting and Rendering (6 hours) Basic and Advanced Lighting Techniques Realistic Lighting Environments Camera Setup, Composition, and Rendering VI. Animation (9 hours) Keyframe Animation and Animation Curves Character Rigging and Animation Complex Character Rigs, Lip Sync, Facial Animation, Dynamics, and Simulations VII. Rigging (4 hours) Skeleton Creation and Joint Binding Weight Maps and Simple to Complex Rigging Systems VIII. Special Effects (4 hours) Particle Systems, Fluid Dynamics, Fire, and Explosions Advanced Simulations with nCloth and nParticles Paint Effects and Mash Networks IX. Advanced Rendering Techniques (2 hours) Render Layers, Passes, and Global Illumination Mental Ray Rendering and Settings X. Conclusion and Next Steps (1 hour) Course Review, Tips for Further Learning Q&A Session and Feedback Please note that the course outline is flexible and can be tailored based on the learners' needs and proficiency levels. Autodesk Maya Basics to Advanced Level Course: Modeling: Surfaces, Control Vertex, Polygons, Extrusion Techniques, Subdiv Modeling, and More Deformations: Twist, Lattice, Flare, Bend Tools Shapes: Lines, Pen Tools, Surface Manipulation Techniques Animations: Keyframe Setup, Path Animations, Skeletons, IK Handles, Skinning Dynamics and Special Effects: Particle Systems, Fluid Dynamics, Lighting Effects, and Advanced Simulations Texturing and Rendering: Diffuse and Bump Mapping, Reflections, Shaders, Lights, and Camera Techniques Fluid Effects and Ncloth: 2D and 3D Containers, Collision Effects, Wind Simulations, and Gravity Control Rendering: Image and Animation Rendering, Playblast, Resolution Controls, and Output Formats. Advanced Modeling: Master intricate 3D models, including polygon, NURBS, and architectural modeling. Expert Texturing: Create realistic textures, apply shaders, and utilize the 3D paint tool. Complex Animation: Rig characters, perform lip sync, facial animation, and dynamic simulations. Special Effects Mastery: Understand particle systems, fluid dynamics, fire effects, and advanced simulations. Rendering Expertise: Grasp advanced rendering techniques, including layers, passes, and global illumination. Comprehensive Rigging: Develop joints, skeletons, and advanced rigging systems for characters and objects. Fluid Dynamics Proficiency: Manipulate 2D/3D fluid containers, create collision effects, and work with wind/gravity simulations. Advanced Lighting and Camera: Perfect lighting, shadows, and special effects. Master camera setups for diverse visual compositions. Recommended Books: "Introducing Autodesk Maya 2023" by Dariush Derakhshani and Randi L. Derakhshani "Mastering Autodesk Maya 2023" by Todd Palamar "Maya Character Creation: Modeling and Animation Controls" by Chris Maraffi "Maya Secrets of the Pros" by John Kundert-Gibbs and Dariush Derakhshani "The Art of 3D Computer Animation and Effects" by Isaac Victor Kerlow Advanced Maya Training Tailored to You: Elevate your Maya skills with specialized training covering essential areas like modeling, UV mapping, texturing, lighting, camera movement, and rigging. Your learning experience is personalized to match your unique requirements and preferences. Discuss your goals with our trainer, and we'll create a syllabus tailored just for you. Flexible Training Choices: Select between in-person sessions at our UK center or attend live online classes, offering convenience and accessibility. Certified Instructors: Benefit from expert guidance provided by Autodesk Authorized Trainers from London Design Training Course. Hands-On Learning: Our practical approach combines theory with step-by-step demonstrations, allowing ample time for hands-on practice on your computer with Maya. You'll retain all the files you create. Compatibility Across Platforms: Maya training caters to both Windows and Mac users, ensuring compatibility with various versions of Maya. Comprehensive Training Package: Participants receive an e-certificate upon successful completion, validating their Maya training. Lifetime Support: Enjoy a lifetime of email support post-training, ensuring assistance with any queries or challenges that arise. Tailored to Your Version: Training can be adapted to your preferred Maya version, ensuring you learn using the most relevant and up-to-date software features. Download Maya https://www.autodesk.co.uk Highly skilled mentors with practical experience. Cutting-edge facilities ensuring an immersive learning environment. Comprehensive courses spanning diverse design disciplines. Practical projects to enhance your portfolio. Networking avenues within the dynamic design community. Skills attuned to current industry trends. Opportunities for professional growth. Choose from flexible in-person or online classes. Internationally recognized training credentials. Engage in London's thriving art and design scene.
PL-100T00 Microsoft Power Platform App Maker
By Nexus Human
Duration 4 Days 24 CPD hours This course is intended for The App Maker builds solutions to simplify, automate, and transform tasks and processes for themselves and their team where they have deep expertise in the solution business domain. They have basic data modeling, user experience design, requirements analysis, and process analysis skills. The App Maker creates and enforces business processes, structures digital collection of information, improves efficiency of repeatable tasks, and automates business processes. The App Maker uses the Maker tools of Power Platform to solve business problems. They may use advanced features of Microsoft apps and third-party productivity tools. The App Maker is aware of the capabilities and limitations of available tools and understands how to apply them. The App Maker is self-directed, and solution focused. They may not have formal IT training but are comfortable using technology to solve business problems with a personal growth mindset. They understand the operational need and have a vision of the desired outcome. They approach problems with phased and iterative strategies. This course will teach you how to build apps with low-code techniques to simplify, automate, and transform business tasks and processes using Microsoft Power Platform. This course contains a 1-day Applied Workshop. This workshop will allow you to practice your App Maker skills by creating an end-to-end solution to solve a problem for a fictitious company. The solution will include a Microsoft Dataverse database, Power Apps canvas app, and Power Automate flows. 1 - Get started with Microsoft Power Platform for app makers Identify components Create apps Get started with Microsoft Dataverse Work with Copilot in Microsoft Power Platform 2 - Create tables in Dataverse Table characteristics Table relationships Dataverse logic and security Dataverse auditing Dual-write vs. virtual tables 3 - Create and manage columns within a table in Dataverse Define columns in Microsoft Dataverse Column types in Microsoft Dataverse Add a column to a table Primary name column Restrictions that apply to columns in a table Create an auto numbering column Create an alternate key 4 - Load/export data and create data views in Dataverse View data in a table Create or edit views of data in a table Dataverse data import options Load data into a table Dataverse data export options Export Add, update, or delete data in a table by using Excel Import data using Power Query 5 - Export data from Dataverse and use Microsoft Excel to edit records Export data to Excel Edit and update data in Excel 6 - Get started with Microsoft Dataverse for Teams Dataverse for Teams vs Dataverse Provision your first Dataverse environment Create your first table to store data 7 - Build your first app with Power Apps and Dataverse for Teams Create your first app with the hero template Customize your app with Power Apps Studio Publish your app Install template apps 8 - Build your first workflow with Power Automate and Dataverse for Teams Types of workflows that Power Automate can build in Dataverse Schedule a flow 9 - Create reports with Power BI and Dataverse for Teams Connect to and transform Dataverse for Teams data from Power BI Create a Power BI report Publish the report Share the data 10 - Get started building with Power BI Use Power BI Building blocks of Power BI Tour and use the Power BI service 11 - Explore what Power BI can do for you What can I do with the Power BI service as a consumer? View content in the Power BI service Collaborate and share in Power BI Find and view dashboards and reports 12 - Create and manage workspaces in Power BI Distribute a report or dashboard Monitor usage and performance Recommend a development life cycle strategy Troubleshoot data by viewing its lineage Configure data protection 13 - Manage semantic models in Power BI Use a Power BI gateway to connect to on-premises data sources Configure a semantic model scheduled refresh Configure incremental refresh settings Manage and promote semantic models Troubleshoot service connectivity Boost performance with query caching (Premium) 14 - Create dashboards in Power BI Configure data alerts Explore data by asking questions Review Quick insights Add a dashboard theme Pin a live report page to a dashboard Configure a real-time dashboard Set mobile view 15 - Implement row-level security Configure row-level security with the static method Configure row-level security with the dynamic method 16 - Create dashboards in Power BI Configure data alerts Explore data by asking questions Review Quick insights Add a dashboard theme Pin a live report page to a dashboard Configure a real-time dashboard Set mobile view 17 - Secure, publish, and share data in Power BI Share and use reports in Power BI Row-level security Publish a report to a Power BI workspace Share reports and user experience Protect data in Power BI Data refresh and alerts 18 - Embed Power BI content Embed Power BI reports Embed other Power BI content types Optimize the embedding experience 19 - How to build your first model-driven app with Dataverse Model-driven apps, powered by Microsoft Dataverse Explore sample apps 20 - Get started with model-driven apps in Power Apps Introducing model-driven apps Components of model-driven apps Design model-driven apps Incorporate business process flows 21 - Configure forms, charts, and dashboards in model-driven apps Forms overview Form elements Configure multiple forms Use specialized form components Configure views overview Configure grids Create and edit views Configure charts overview Dashboards overview Use interactive streams and tiles 22 - Manage Dynamics 365 model-driven app settings and security Configure role-based security Manage teams and business units Explore settings and customizations 23 - Use specialized components in a model-driven form Create business process flows Embed a canvas app in a model-driven form Add a timeline in a model-driven form Create a report in a model-driven form 24 - Get started with Power Apps canvas apps Start Power Apps Power Apps data sources Use Power Apps with Power Automate and Power BI Designing a Power Apps app 25 - Customize a canvas app in Power Apps Improve your app by making basic customizations Explore controls and screens in canvas apps 26 - How to build the User Interface in a canvas app in Power Apps Use themes to quickly change the appearance of your app Brand a control Icons Images Personalization Build for phones or tablets 27 - Navigation in a canvas app in Power Apps Understanding navigation The Navigate and Back functions More ways to use the Navigate function 28 - Manage apps in Power Apps Power Apps review 29 - Build a mobile-optimized app from Power Apps Learn about mobile-optimized apps Identify components to make a canvas app mobile-optimized Create a mobile-optimized app that uses responsive designs Identify performance considerations for a mobile-optimized canvas app 30 - Use and understand Controls in a canvas app in Power Apps Core properties of controls Entering and displaying data with text controls Additional controls for enhancing your app's usability Media Modern controls Work with component libraries 31 - Create formulas to change properties in a Power Apps canvas app Formulas overview Use a formula to modify the format of controls Use formulas to perform calculations Use a control to modify the property of other controls Conditional formatting Functions for validating data 32 - Use imperative development techniques for canvas apps in Power Apps Imperative versus declarative development The three types of variables in Power Apps Global variables Contextual variables Collections Additional variable concepts 33 - Manage apps in Power Apps Power Apps review 34 - Create formulas to change properties in a Power Apps canvas app Formulas overview Use a formula to modify the format of controls Use formulas to perform calculations Use a control to modify the property of other controls Conditional formatting Functions for validating data 35 - Create formulas to change behaviors in a Power Apps canvas app Formulas and functionality Understanding true and false Understanding control behaviors and actions Performing multiple actions in a formula Control the display mode through a formula Use controls and functions to create a dynamic formula 36 - Author a basic formula that uses tables and records in a Power Apps canvas app Records and tables Using the Table function Store a table Filter your table Use the lookup function to return a record Additional table functions 37 - Build a canvas app for a real estate solution with Copilot in Power Apps 38 - Get started with Power Automate Introducing Power Automate Create your first flow Troubleshoot flows 39 - Build approval flows with Power Automate Provide solutions to real-world scenarios. 40 - Build flows to manage user information 41 - Power Automate's deep integration across multiple data sources 42 - Use the Admin center to manage environments and data policies in Power Automate Administer flows Export and import flows Learn how to distribute button flows 43 - Use AI Builder in Power Automate AI Builder in Power Automate saves time Advanced usage of AI Builder in Power Automate 44 - Optimize your business process with process advisor Get familiar with process advisor Create your first recording Edit recordings and group actions Analyze recordings and interpret results Automation recommendations 45 - Optimize your business process with process advisor Get familiar with process advisor Create your first recording Edit recordings and group actions Analyze recordings and interpret results Automation recommendations 46 - Build flows for a real estate solution using Copilot in Power Automate When to use Copilot in Power Automate 47 - Use Dataverse triggers and actions in Power Automate Dataverse triggers Query data Create, update, delete, and relate actions 48 - Create tables in Dataverse Table characteristics Table relationships Dataverse logic and security Dataverse auditing Dual-write vs. virtual tables 49 - Create and manage columns within a table in Dataverse Define columns in Microsoft Dataverse Column types in Microsoft Dataverse Add a column to a table Primary name column Restrictions that apply to columns in a table Create an auto numbering column Create an alternate key 50 - Get started with Power Apps canvas apps Start Power Apps Power Apps data sources Use Power Apps with Power Automate and Power BI Designing a Power Apps app 51 - How to build the User Interface in a canvas app in Power Apps Use themes to quickly change the appearance of your app Brand a control Icons Images Personalization Build for phones or tablets 52 - Get started with Power Automate Introducing Power Automate Create your first flow Troubleshoot flows 53 - Challenge Project - Build a booking requests app with Power Apps and Power Automate Prepare