- Professional Development
- Medicine & Nursing
- Arts & Crafts
- Health & Wellbeing
- Personal Development
August Reiki Level I Training with Penelope Silver Reiki Master /Teacher in Alderley, Cheshire.
(56)By Penelope Silver Spiritual Coaching and Mentoring
Reiki level 1, is the beginners level. Even at this level, you have access to Reiki energy and the ability to use Reiki energy to heal yourself and others. Level 1 is open to anyone. The focus during Level 1 is on opening the energy channels on a physical level, allowing the practitioner to connect to the universal life force energy; you will receive full ongoing support to ensure you feel fully confident and consistent in your practice. I believe this means more practitioners will continue to use reiki daily, rather than be attuned and then never use it again.

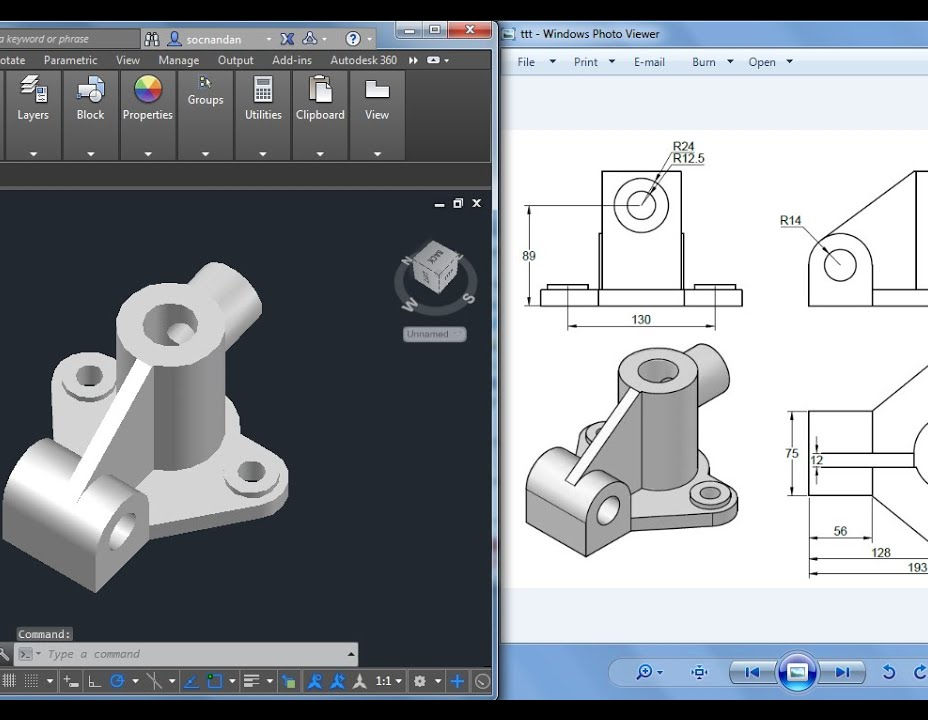
3D AutoCAD Basics to Advanced Training Course
By ATL Autocad Training London
Why Choose 3D AutoCAD Basics to Advanced Training Course? Students learn how to create and modify both solid and surface models. This AutoCAD Training course also teaches students how to present their designs in 3D products and designs. Check our Website Duration: 16 hours Approach: 1-on-1, Book your own day and time. We are open Monday to Saturday 9 am to 7 pm. How to Book this course? Call us on 02077202581 and we will book the dates and times you like. Flexible Schedule: 1-on-1 Face to Face or Live Online. AutoCAD 3D Training: Comprehensive Course Overview Exploration of 3D Modeling and Imaging Generating 3D Drawings Navigating the 3D Modeling Workspace Crafting 3D Shapes using Solid Tools Extruding Polylines into 3D Forms Isolating Coordinates with Point Filters Navigating and Orienting Your Model Achieving Visual Effects Converting 3D Views into 2D AutoCAD Drawings Advanced 3D Techniques Setting Up AutoCAD for 3D Mastering the User Coordinate System Leveraging UCS Options Utilizing Viewports for 3D Drawing Employing Array Tools Crafting Complex 3D Surfaces Constructing Spiral Forms Developing Surface Models Manipulating Objects in 3D Space Rendering and Visualization of 3D Drawings Introduction to Rendering Rapid Rendering Techniques Simulating Sunlight and Shadows Application and Adjustment of Materials Creating Effects with Lights and Materials Texture Mapping and Adjustments Exploration of Rendering Options Enhancing Views with Cameras Printing Rendered Drawings Simulating Natural Lighting Editing and Visualizing 3D Solids Overview of Solid Modeling Creation of Basic and Complex Solids Editing Solid Forms Improving the 2D Drawing Process Visualization and Analysis of Solids Exploration of 3D Mesh and Surface Modeling Introduction to 3D Meshes and Surfaces Creation and Editing of 3D Meshes Crafting Mesh Surfaces Conversion of Meshes to Solids Understanding and Editing 3D Surfaces Customization of Interface and Tools Customization of Workspaces Personalization of the User Interface Creation of Macros in Tools and Menus Working with Expanded Text Boxes Saving and Managing Customizations Exploration of the Diesel Macro Language Designing Custom Linetypes and Hatch Patterns Management and Sharing of Your Drawings Sharing Drawings Online ePublishing Your Work Managing Drawings with DesignCenter and Tool Palettes Exploring the Drawing Library with Content Explorer Establishment of Office Standards Conversion of Layer Settings https://www.autodesk.co.uk Download a free 30-day trial of AutoCAD Learning outcomes after completing the AutoCAD 3D course. Professional Presentation: Create dynamic walkthroughs and presentations that effectively communicate your 3D models and designs. Certification: Obtain a certification as proof of your proficiency in AutoCAD 3D modeling, validating your skills in the industry. Mastery of 3D Modeling: Possess comprehensive skills, from fundamental concepts to advanced techniques in 3D modeling. Enhanced Career Prospects: Improve your career opportunities and prospects in various design-related fields such as architecture, engineering, and product design. Realistic Rendering: Be able to create highly realistic visualizations that enhance the quality of your designs. Practical Hands-On Experience: Gain practical experience and confidence in 3D modeling through extensive hands-on practice. Personalized Learning: Benefit from one-on-one attention and tailored training to meet your specific learning needs and pace. Lifetime Email Support: Continue to receive assistance and guidance through lifetime email support, ensuring you are supported even after completing the course. 3D AutoCAD Training Courses Gain confidence and proficiency in AutoCAD. Discover the fundamentals of 3D modeling and object creation in this introductory AutoCAD 3D course. Booking Your Training Course: Experience personalized training with our adaptable 1-on-1 sessions. You have the freedom to customize your schedule by reserving a convenient hour at your discretion. Our booking slots are available from Monday to Saturday, spanning from 9 a.m. to 7 p.m. You can also reach us at 02077202581 to make a booking over the phone. Course Duration: 10 hours "You have the flexibility to divide these 10 hours across multiple days to suit your ideal schedule." Training Method: 1-on-1 (In-person face-to-face or Live Online) Expect personalized attention, tailor-made content, a flexible learning pace, and dedicated individual support throughout your training journey. This hands-on course provides ample opportunities to experiment with newly acquired techniques and seek answers to your questions. Key Features: An introductory course tailored to AutoCAD 3D's essential features. Abundant one-on-one guidance and dedicated question time. Friendly expert trainers, small class sizes, and a comfortable learning environment. Comprehensive course materials and additional resources. Ongoing support and assistance with post-course challenges. What Will You Learn? This course will equip you with the foundational knowledge and workflows necessary to create 3D models within AutoCAD 3D. You will delve into the creation and modification of both solid and surface models. Upon completion, you will be able to: Effortlessly fashion intricate shapes by combining simple elements. Precisely extract geometries and dimensions from your creations. Easily customize the view and presentation style of your objects. Is This Course Right for You? No prior experience with AutoCAD 3D is required. This course caters to individuals proficient in working with 2D objects who aspire to construct 3D models of their designs. Gain proficiency in the fundamental tools and functionalities to create precise and professional 2D and 3D drawings, advancing to more complex techniques. Enhanced Efficiency: Discover time-saving strategies, tips, and workflows that will boost your productivity and streamline your design process within AutoCAD 3D. Versatility in Design: Develop the skills needed to undertake a wide range of projects, from architectural plans and engineering drawings to mechanical components and electrical schematics. Industry-Recognized Expertise: Cultivate in-demand skills relevant to architecture, engineering, construction, and manufacturing, paving the way for career advancement and professional development. Accessible Lesson Recordings: Access recorded lessons at your convenience to review and reinforce course material whenever necessary. Continuous Email Support: Benefit from ongoing assistance with lifetime email support, ensuring you have access to guidance, answers, and clarifications even beyond the completion of the course.
Responding to the climate and environmental crisis through history and geography
(1)By Historical Association
Artificial Intelligence is becoming more and more prevalent in society and many occupational sectors. But what about teaching? Is AI a threat to history and geography teaching, assessment and quality assurance? Or is it the saviour for teacher workload and a creative force that can bring our subjects to life for our pupils? Is it both of these things, or neither? In this special partnership event from the Historical Association and Royal Geographical Society (with IBG), we explore the implications of AI for history and geography in schools and how we can best harness the power of AI for us as teachers and for our pupils. This event will be suitable for primary and secondary teachers of history and geography.

Enscape Rendering Training Course
By ATL Autocad Training London
Who is this course for? Enscape Rendering Training Course. The Enscape Rendering Training Course is tailored for architects, interior designers, and design students aiming to learn realistic visualizations using Enscape. Whether you prefer 1-on-1 in-person or online courses, this training is best for you. Click here for more info: Website Training duration: 5 hrs Method: 1-on-1 and Tailored content Schedule: Customize your training. Choose any hour from Mon to Sat, 9 am to 7 pm Call 02077202581 or WhatsApp at 07970325184 to book. Course Outline: Enscape Rendering Software Training (5 hours) Course 1: Enscape for Revit Hour 1: 1. Introduction to Enscape: Overview of Enscape rendering software, its features, and benefits. 2. Installing and Setting up Enscape: Step-by-step guidance on installing and configuring Enscape for Revit. 3. Enscape Interface: Familiarizing with the Enscape user interface and navigation controls within Revit. Hour 2: 4. Enscape Materials: Exploring material creation, application, and customization within Enscape for Revit. 5. Lighting in Enscape: Understanding different lighting options, adjusting light settings, and creating realistic lighting effects. Hour 3: 6. Enscape Camera Settings: Manipulating camera angles, perspectives, and settings for optimal visualization. 7. Enscape Rendering Settings: Exploring various rendering settings and techniques to enhance the quality of the final output. Hour 4: 8. Enscape Rendering Workflow: Demonstrating a step-by-step workflow for generating renderings and walkthroughs using Enscape in Revit. 9. Advanced Features: Introduction to advanced features such as creating panoramas, virtual reality (VR) walkthroughs, and creating animations in Enscape. Hour 5: 10. Tips and Tricks: Sharing tips and techniques for maximizing efficiency and achieving high-quality results in Enscape for Revit. 11. Q&A and Troubleshooting: Addressing participant questions, providing troubleshooting guidance, and discussing common challenges and solutions. OR Course Outline: Enscape Rendering Software Training (5 hours) Course 1: Enscape for Sketchup Hour 1: 1. Introduction to Enscape: Overview of Enscape rendering software, its features, and benefits for SketchUp users. 2. Installing and Setting up Enscape: Step-by-step guidance on installing and configuring Enscape for SketchUp. 3. Enscape Interface: Familiarizing with the Enscape user interface and navigation controls within SketchUp. Hour 2: 4. Enscape Materials: Exploring material creation, application, and customization within Enscape for SketchUp. 5. Lighting in Enscape: Understanding different lighting options, adjusting light settings, and creating realistic lighting effects. Hour 3: 6. Enscape Camera Settings: Manipulating camera angles, perspectives, and settings for optimal visualization in SketchUp. 7. Enscape Rendering Settings: Exploring various rendering settings and techniques to enhance the quality of the final output. Hour 4: 8. Enscape Rendering Workflow: Demonstrating a step-by-step workflow for generating renderings and walkthroughs using Enscape in SketchUp. 9. Advanced Features: Introduction to advanced features such as creating panoramas, virtual reality (VR) walkthroughs, and creating animations in Enscape. Hour 5: 10. Tips and Tricks: Sharing tips and techniques for maximizing efficiency and achieving high-quality results in Enscape for SketchUp. 11. Q&A and Troubleshooting: Addressing participant questions, providing troubleshooting guidance, and discussing common challenges and solutions. Learning Outcome: After completing the Enscape (VR) Training and Interactive Workshop, participants will master real-time walkthroughs, set up VR applications, efficiently migrate models, navigate designs dynamically, update objects in real-time, control visual styles, adjust day-time settings, export and share designs, utilize the asset library, and gain a comprehensive overview of Enscape. These skills will enable them to confidently visualize and display 3D designs without cloud uploads or external software, enhancing communication and collaboration in architectural projects. What does the Enscape Training & Interactive Workshop offer? The Enscape Training & Interactive Workshop is designed to help you get up and running with Virtual Reality (VR) in a cost-effective manner. It covers hardware and software setup, navigation techniques, real-time updates, material settings, and more. The workshop also allows participants to experience VR firsthand. What are the benefits of attending the Enscape (VR) Training and Interactive Workshop? By attending this workshop, you will gain the ability to perform real-time walkthroughs of your designs in 3D. You can view your projects in VR without the need for cloud uploads or exporting to other 3D software. The workshop offers extensive asset libraries, collaboration, and annotation sharing, enhancing your design visualization capabilities. What are the prerequisites for attending the Enscape (VR) Training and Interactive Workshop? No prior knowledge of Enscape is required. However, assistance from IT management may be necessary for hardware and software installation. Logistics, such as room suitability and technical requirements, will be discussed before the workshop. What will I learn in the Enscape (VR) Training and Interactive Workshop? The workshop covers hardware setup, software installation, and configuration. You will learn how to migrate models from Revit and SketchUp into VR, navigate through designs, update objects and materials in real-time, and utilize various visual styles and settings. The course also includes interactive workshops with support from our expert tutors. Enscape rendering courses offer valuable benefits: Real-time Visualization: Instantly visualize designs for quick iterations and informed decisions. Seamless Integration: Streamline rendering by integrating with popular design software. High-Quality Visuals: Create photorealistic presentations and walkthroughs. Efficient Design Communication: Enhance collaboration and communication during presentations. Enhanced Design Iteration: Explore options and make informed decisions in real-time. Time and Cost Savings: Reduce rendering time and deliver projects more efficiently. Portfolio Enhancement: Elevate your portfolio with visually striking renderings, opening new opportunities.

Halo Arts Presents Hillhead Summer Arts Academy Interested in drama, dance, art and performance? Join Halo Arts & Hillhead Youth Theatre for our fab new Summer holiday arts project for young people aged 6-12 Learn new skills, develop confidence and make new friends! Where: Hillhead Library, Byres Road When? Monday 7th- Friday 11th July 11am-3pm For more info or to sign up - https://halo-arts.cademy.co.uk www.wearehaloarts.com

Power BI - introduction to intermediate (2 days) (In-House)
By The In House Training Company
This course starts with the basics then moves seamlessly to an intermediate level. It includes a comprehensive yet balanced look at the four main components that make up Power BI Desktop: Report view, Data view, Model view, and the Power Query Editor. It also demonstrates how to use the online Power BI service. It looks at authoring tools that enables you to connect to and transform data from a variety of sources, allowing you to produce dynamic reports using a library of visualisations. Once you have those reports, the course looks at the seamless process of sharing those with your colleagues by publishing to the online Power BI service. The aim of this course is to provide a strong understanding of the Power BI analysis process, by working with real-world examples that will equip you with the necessary skills to start applying your knowledge straight away. 1 Getting started The Power BI process Launching Power BI Desktop The four views of Power BI Dashboard visuals 2 Connecting to files Connect to data sources Connect to an Excel file Connect to a CSV file Connect to a database Import vs. DirectQuery Connect to a web source Create a data table 3 Transforming data The process of cleaning data Column data types Remove rows with filters Add a custom column Append data to a table Fix error issues Basic maths operations 4 Build a data model Table relationships Manage table relationships 5 Merge queries Table join kinds Merging tables 6 Create report visualisations Creating map visuals Formatting maps Creating chart visuals Formatting chart Tables, matrixes, and cards Control formatting with themes Filter reports with slicers Reports for mobile devices Custom online visuals Export report data to Excel 7 The power query editor Fill data up and down Split columns by delimiter Add conditional columns Merging columns 8 The M formula Creating M functions Create an IF function Create a query group 9 Pivot and unpivot tables Pivot tables in the query editor Pivot and append tables Pivot but don't summarise Unpivot tables Append mismatched headers 10 Data modelling revisited Data model relationships Mark a calendar as a date table 11 Introduction to calculated columns New columns vs. measures Creating a new column calculation The SWITCH function 12 Introduction to DAX measures Common measure categories The SUM measure Adding measures to visuals COUNTROWS and DISINCTCOUNT functions DAX rules 13 The CALCULATE measure The syntax of CALCULATE Things of note about CALCULATE 14 The SUMX measure The SUMX measure X iterator functions Anatomy of SUMX 15 Introduction to time intelligence Importance of a calendar table A special lookup table The TOTALYTD measure Change year end in TOTALYTD 16 Hierarchy, groups and formatting Create a hierarchy to drill data Compare data in groups Add conditional formatting 17 Share reports on the web Publish to the BI online service Get quick insights Upload reports from BI service Exporting report data What is Q&A? Sharing your reports 18 Apply your learning Post training recap lesson

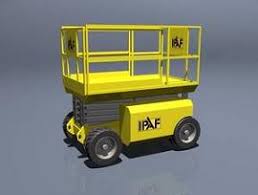
IPAF Operator Training 3a/3b
By Kingfisher Access
The IPAF operator course instructs a candidate to prepare and safely operate various types of MEWPs, also referred to as cherry pickers, aerial lifts or scissor lifts. Categories include Static Vertical (1a), Static Boom (1b), Mobile Vertical (3a), Mobile Boom (3b), Specialist Machines (SPECIAL), Push Around Vehicle (PAV), Insulated Aerial Device (IAD).Categories include Static Vertical (1a), Static Boom (1b), Mobile Vertical (3a), Mobile Boom (3b),

IPAF Operator Training 3a
By Kingfisher Access
The IPAF operator course instructs a candidate to prepare and safely operate various types of MEWPs, also referred to as cherry pickers, aerial lifts or scissor lifts. Categories include Static Vertical (1a), Static Boom (1b), Mobile Vertical (3a), Mobile Boom (3b), Specialist Machines (SPECIAL), Push Around Vehicle (PAV), Insulated Aerial Device (IAD).Categories include Static Vertical (1a), Static Boom (1b), Mobile Vertical (3a), Mobile Boom (3b),