- Professional Development
- Medicine & Nursing
- Arts & Crafts
- Health & Wellbeing
- Personal Development
193 Courses in Cardiff delivered Live Online
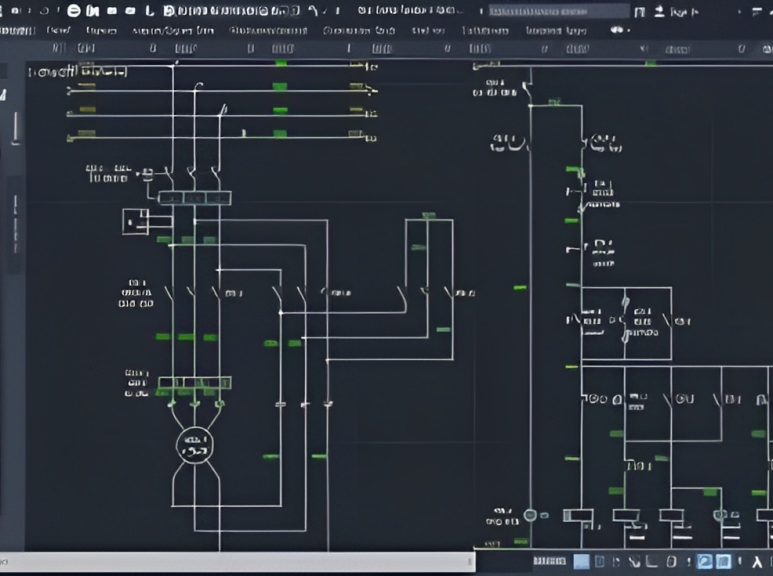
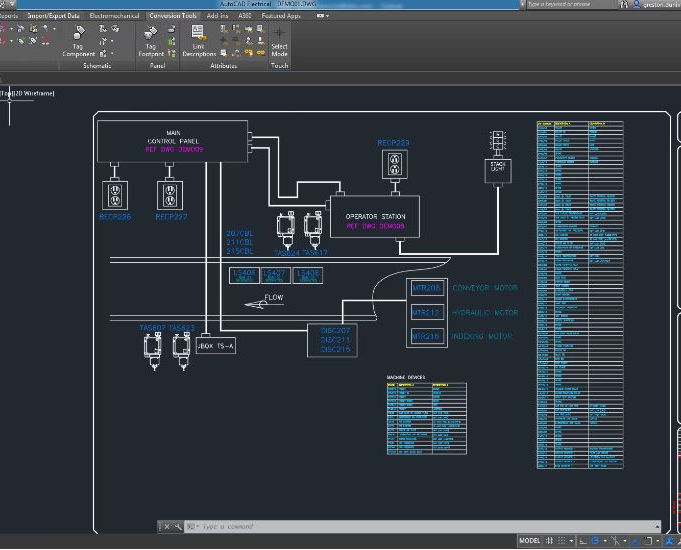
AutoCAD Training Course for Electrical
By ATL Autocad Training London
Exclusive to AutoCAD subscribers, the AutoCAD Electrical toolset simplifies electrical system creation. Click here for more info: Website Our course provides a strong foundation in 2D electrical design, covering essential tools. Flexible one-on-one sessions from 9 a.m. to 7 p.m., Monday to Saturday. Call 02077202581 or book online. The 16-hour course offers flexibility, divide hours across days. Benefit from individualized attention and tailored content. Enroll for in-person or Zoom sessions to excel in AutoCAD Electrical. AutoCAD Electrical Course Content: Introduction to AutoCAD Electrical Software: Overview and features of AutoCAD Electrical Understanding the software interface and tools Project file structure and management Layout and Navigation: Navigating the AutoCAD Electrical workspace Creating new project files and using attribute editors Understanding WDD, WDX, and WDF project files Exploring the Project Manager interface and attribute editors Electrical Diagram Drawing: Numbering and titling wires in diagrams Labelling components Utilizing diagram symbol libraries Creating and editing Electrical Control Circuits (ECC) Component dialog box and Circuit Scale dialog box Introduction to Programmable Logic Controllers (PLCs) and Integrated Systems: PLC Symbols and Concepts Inserting Programmable Logic Controllers (PLCs) into diagrams Adding PLC Units to diagrams Working with PLC Input and Output points and circuits Understanding PLC-based classification Using the Spreadsheet to PLC Input and Output Points utility Custom and Bespoke Symbols: Creating custom symbols for Switches, Wires, Contactors, Motors, Transformers, etc. Specifying symbol conventions and standards Offline and online usage of AutoCAD Electrical databases Drawing for Terminals and Plans: Implementing Terminal symbols in diagrams Handling terminal plans and locations Working with compound level terminals and locations Utilizing the Component command for single and multiple components Managing Jumpers and wiring Modifying Terminal Strips and Dual In-Line Packages (DIP) Understanding DIN Rail, Electrical Enclosure, Circuit Breakers, and Electrical Equipment Generating PDFs and Reports: Exporting drawings to PDF format Organizing report templates Automating the generation of reports Creating Electrical Audit Reports This AutoCAD Electrical course provides comprehensive knowledge of the software, focusing on electrical diagram drawing, symbol creation, PLC integration, terminal planning, and report generation. Participants will gain the skills needed to efficiently design electrical systems using AutoCAD Electrical software. Upon completion, participants will proficiently use AutoCAD Electrical to create precise electrical diagrams, integrate PLCs, design custom symbols, plan terminals, and generate reports efficiently. They will possess the skills needed to confidently design electrical systems and enhance their expertise in electrical design and drawing. AutoCAD Electrical Training Course: Master precision in specialized electrical design skills. Optimize your design process with streamlined workflows. Ensure compliance with industry standards consistently. Boost productivity in electrical design tasks. Facilitate seamless collaboration with fellow professionals. Benefit from recorded lessons for convenient review. Enjoy continuous support with lifetime email assistance. Unleash the complete power of AutoCAD for your electrical design needs. Enroll today and craft precise, professional electrical drawings confidently. Select between in-person and live online sessions to suit your preference. Flexible Evening Sessions: Learn AutoCAD at your own pace with evening sessions designed for busy individuals. Boost your career opportunities in computer-aided design. Comprehensive Skill Development: Gain a strong foundation in AutoCAD's core features and advance to 3D modeling and rendering techniques, enhancing your design capabilities. Industry-Standard Knowledge: Become proficient in AutoCAD, a widely used CAD software in architecture, engineering, and construction fields, making you highly sought after by employers. Practical Application: Apply AutoCAD skills to real-world design scenarios, creating detailed plans for professional projects in architecture, engineering, and mechanical fields. Recorded Lessons for Review: Access lesson recordings to reinforce learning and review specific topics or techniques whenever needed. Lifetime Email Support: Enjoy ongoing support with lifetime email assistance, even after completing the course, for guidance and clarification.
O3201 Fundamentals of IBM Watson Explorer Deep Analytics Edition oneWEX (V12.0.x)
By Nexus Human
Duration 2 Days 12 CPD hours This course is intended for This course is for analysts, developers, and administrators of IBM Watson Explorer Deep Analytics Edition oneWEX. Overview Identify oneWEX platformsIdentify the process and data flows of oneWEX projectsExplore the oneWEX user interfaceExplain ingestion and conversionUtilize Content MinerDefine enrichmentIdentify advanced features of oneWEX This course is designed to teach students core concepts of IBM Watson Explorer Deep Analytics Edition oneWEX. Students will learn to identify the oneWEX platforms as well as the process flow and data flow of oneWEX projects. Students will explore oneWEX tools, such as Content Miner and the Admin Console, while gaining hands-on experience in data acquisition and enrichment. Finally, students will be exposed to more advanced topics, such as Application Builder, Content Analytics Studio, and API usage. Overview of oneWEX Introduction to oneWEX Explore oneWEX architecture Identify installation options Navigation in oneWEX Explore the Admin Console Explore navigation using Content Miner The Collection detail view The REST API Data flow Explore the data flow of oneWEX Search and Analytics collection templates Identify data acquisition Data ingestion Work with datasets Work with crawlers Use an importer Explore conversion Data ingestion log files Analysis using oneWEX Content Miner Explore analysis using Content Miner The Guided Analysis Experience The Guided Analysis view Explore Annotators Enrichment using Annotators Annotator types Enrichment using Labeler Identify enrichment Identify document classification Classify using training data Classification versus clustering The document classification process Enrichment using Ranker Identify enrichment using Ranker The ranking process Migrate annotators from Content Analytics Studio Migrate Content Analytics Studio annotators Identify the UIMA pipeline configuration for oneWEX Update annotators Using Application Builder with oneWEX Application Builder and user roles Explore Application Builder Set up a oneWEX data source Functionality for oneWEX data sources Additional course details: Nexus Humans O3201 Fundamentals of IBM Watson Explorer Deep Analytics Edition oneWEX (V12.0.x) training program is a workshop that presents an invigorating mix of sessions, lessons, and masterclasses meticulously crafted to propel your learning expedition forward. This immersive bootcamp-style experience boasts interactive lectures, hands-on labs, and collaborative hackathons, all strategically designed to fortify fundamental concepts. Guided by seasoned coaches, each session offers priceless insights and practical skills crucial for honing your expertise. Whether you're stepping into the realm of professional skills or a seasoned professional, this comprehensive course ensures you're equipped with the knowledge and prowess necessary for success. While we feel this is the best course for the O3201 Fundamentals of IBM Watson Explorer Deep Analytics Edition oneWEX (V12.0.x) course and one of our Top 10 we encourage you to read the course outline to make sure it is the right content for you. Additionally, private sessions, closed classes or dedicated events are available both live online and at our training centres in Dublin and London, as well as at your offices anywhere in the UK, Ireland or across EMEA.

AutoCAD Electrical Training Course | Bespoke
By London Design Training Courses
Why Choose AutoCAD Electrical Training Course | Bespoke? Course Link Master electrical drawings, schematics, and layouts. Utilize symbol libraries and automated circuit design. Access recorded lessons and lifetime email support. "Say goodbye to group classes and hello to 1-on-1 Courses. Dial 02077202581 or WhatsApp 07970325184 to reserve your dates. Duration: 16 hrs. Method: 1-on-1, Personalized attention. Schedule: Tailor your own hours of your choice, available from Mon to Sat between 9 am and 7 pm. AutoCAD Electrical Training Course: Specialized electrical CAD design skills with precision. Streamlined workflows for efficient design. Consistent adherence to industry standards. Increased productivity in electrical design. Enhanced collaboration with other professionals. Access to recorded lessons for review. Lifetime email support for ongoing assistance. Learn AutoCAD for electrical design. Enroll now and create accurate and professional electrical drawings with confidence. Choose in-person or live online sessions. AutoCAD Electrical Training Course: Specialized electrical CAD design skills with precision. Streamlined workflows for efficient design. Consistent adherence to industry standards. Increased productivity in electrical design. Enhanced collaboration with other professionals. Access to recorded lessons for review. Lifetime email support for ongoing assistance. Learn AutoCAD for electrical design. Enroll now and create accurate and professional electrical drawings with confidence. Choose in-person or live online sessions. AutoCAD Electrical Course Content: Introduction to AutoCAD Electrical Software: Overview and features of AutoCAD Electrical Understanding the software interface and tools Project file structure and management Layout and Navigation: Navigating the AutoCAD Electrical workspace Creating new project files and using attribute editors Understanding WDD, WDX, and WDF project files Exploring the Project Manager interface and attribute editors Electrical Diagram Drawing: Numbering and titling wires in diagrams Labelling components Utilizing diagram symbol libraries Creating and editing Electrical Control Circuits (ECC) Component dialog box and Circuit Scale dialog box Introduction to Programmable Logic Controllers (PLCs) and Integrated Systems: PLC Symbols and Concepts Inserting Programmable Logic Controllers (PLCs) into diagrams Adding PLC Units to diagrams Working with PLC Input and Output points and circuits Understanding PLC-based classification Using the Spreadsheet to PLC Input and Output Points utility Custom and Bespoke Symbols: Creating custom symbols for Switches, Wires, Contactors, Motors, Transformers, etc. Specifying symbol conventions and standards Offline and online usage of AutoCAD Electrical databases Drawing for Terminals and Plans: Implementing Terminal symbols in diagrams Handling terminal plans and locations Working with compound level terminals and locations Utilizing the Component command for single and multiple components Managing Jumpers and wiring Modifying Terminal Strips and Dual In-Line Packages (DIP) Understanding DIN Rail, Electrical Enclosure, Circuit Breakers, and Electrical Equipment Generating PDFs and Reports: Exporting drawings to PDF format Organizing report templates Automating the generation of reports Creating Electrical Audit Reports This AutoCAD Electrical course provides comprehensive knowledge of the software, focusing on electrical diagram drawing, symbol creation, PLC integration, terminal planning, and report generation. Participants will gain the skills needed to efficiently design electrical systems using AutoCAD Electrical software. Upon completing the AutoCAD Electrical course, participants will master the intricacies of the software. They will adeptly create accurate electrical diagrams, seamlessly integrate PLCs, design personalized symbols, strategize terminal layouts, and produce reports with precision and efficiency. Armed with these skills, graduates will possess the expertise to confidently design complex electrical systems. This proficiency opens avenues in various job roles such as Electrical Design Engineer, CAD Technician, Control Systems Designer, or even Project Manager in industries like manufacturing, automation, and engineering consultancy.
Mastering 3ds Max and Photoshop Training Course
By ATL Autocad Training London
Mastering 3ds Max and Photoshop Training Course. earn 3D design, modeling, and rendering with 3ds Max, and seamlessly integrate Photoshop skills. Expert instructors guide you in enhancing images and creating stunning renderings. Our 3ds Max course is designed to help you learn basic and advanced architectural visualisation. Click here for more info: Website Duration: 20 hours Approach: 1-on-1, Customized and Flexible pacing. Session Flexibility: Design your own timetable at your convenient hour between 9 am and 7 pm, Mon to Sat. 20-Hour Comprehensive Training in 3ds Max and Photoshop. Course Breakdown: Module 1: Introduction to 3ds Max (6 hours) Familiarization with 3ds Max's interface and workspace Navigation and basic modeling tools usage Creation and manipulation of primitive objects Object modification with modifiers for specific effects Materials, textures, and basic lighting techniques Introduction to rendering 3D scenes Module 2: Intermediate 3ds Max Techniques (6 hours) Advanced modeling with splines and polygons Camera creation and animation for realistic perspectives Character rigging and animation using bones Particle systems for visual effects and dynamic simulations Designing landscapes and outdoor scenes Exploration of advanced lighting and rendering methods Module 3: Introduction to Photoshop for 3D Artists (4 hours) Understanding Photoshop interface and essential editing tools Seamless integration of 3D models and textures between 3ds Max and Photoshop Creation and editing of textures and materials for realistic surfaces Post-production and compositing techniques to enhance 3D renders Module 4: Advanced Photoshop Techniques for 3D Artists (4 hours) Custom brush and texture creation for artistic elements Non-destructive editing using layer masks and adjustment layers Advanced compositing for seamless 3D element integration Crafting photorealistic textures and materials for impressive visuals Module 5: Project-Based Learning (4 hours) Application of learned techniques to a real-world project 3D modeling, texturing in Photoshop, and final image rendering Instructor feedback for project refinement Presentation of completed projects, showcasing acquired skills. Attendees will learn to craft intricate 3D models using Autodesk 3ds Max, mastering primitive objects, splines, and polygons for complex designs. Advanced Rendering Techniques: Participants will acquire skills in texturing, material application, lighting strategies, and rendering tools, crafting visually striking and lifelike 3D environments. Animation Prowess: Students will delve into object and character animation, simulation of perspectives with cameras, and the dynamic use of particle systems for visual effects and simulations. Essential Photoshop Proficiency: Attendees will gain vital Photoshop skills for post-processing, compositing 3D renders, and creating realistic textures, enhancing the quality of their 3D projects. Hands-On Project Engagement: Through practical projects, participants will receive expert feedback, honing their skills and demonstrating their expertise in real-world applications. Creative Problem-Solving Abilities: Attendees will cultivate creative thinking and problem-solving skills, enabling them to manifest their unique artistic visions in their 3D projects. Skills Acquired: Participants in the Mastering 3ds Max and Photoshop Training Course will gain advanced proficiency in 3D modeling, texturing, lighting, and rendering using 3ds Max. Additionally, they will master digital image manipulation, graphic design, and photo editing techniques using Photoshop. Key skills include: Advanced 3D Modeling and Rendering in 3ds Max Expert Texturing and Lighting Techniques Digital Image Manipulation and Retouching in Photoshop Graphic Design and Visual Communication Skills Job Opportunities: Upon completion, individuals can pursue a range of exciting career opportunities, including: Senior 3D Artist Game Developer Architectural Visualization Specialist Graphic Designer Visual Effects Artist This course equips participants with the expertise needed for roles in animation studios, game development companies, architectural firms, advertising agencies, and more, providing a pathway to thriving careers in the creative industry. Advantages of joining this program: Thorough education: Excel in 3ds Max and Photoshop for high-quality visual effects and motion graphics at a professional level. Certified mentors and industry specialists: Receive instruction from seasoned professionals for expert direction. Interactive online sessions: Engage from any location; no need for travel. Lesson recordings: Access recorded sessions for revision and reinforcement. Long-term email assistance: Receive ongoing support even after the course completion. Complimentary career guidance: Gain valuable industry insights to boost your career prospects. Download Adobe Photoshop Download Autodesk 3dsmax

Rhino 3D Basic to Intermediate Training
By London Design Training Courses
Why Choose Rhino 3D Basic to Intermediate Training Course? Course Link Learn NURBS modeling, curves, and 3D printing prep in our Rhino 3D Course. Master materials, textures, and lighting for 2D & 3D modeling. A basic understanding of Rhino is valuable for creative professionals pursuing careers in product, furniture, architectural, or jewelry design. Duration: 10 hrs Method: 1-on-1, Personalized attention Schedule: Tailor your own hours of your choice, available from Mon to Sat between 9 am and 7 pm. Supported Learning Approach: Personalized Support: No matter the course duration, our team is dedicated to supporting you every step of the way. From homework assignments to video tutorials and free after-support, we ensure a supportive path to software expertise. One to One Course Advantage: The One-to-One Course Advantage offers personalized learning, flexible scheduling, focused feedback, and a private environment to boost confidence and achieve your specific objectives. Rhino 3D Basic to Intermediate Training Course Course Duration: 10 hours Course Description: 3D modeling journey with our Rhino 3D Basic to Intermediate Training Course. Ideal for beginners, master the powerful Rhino 3D software used by architects and designers. Explore the interface, create captivating 3D models, and enhance your designs with comprehensive tools and techniques. Course Outline: I. Introduction to Rhino 3D (1 hour) - Explore the Rhino 3D interface and discover essential tools for 3D modeling - Master seamless navigation and viewport controls - Grasp the significance of units and tolerance for precise creations - Customize your workspace for an efficient and personalized workflow II. Creating Basic 3D Objects (3 hours) - Unleash your creativity by crafting simple yet captivating 3D shapes - Gain expertise in editing objects and working with curves for refinement - Dive into the world of surfaces and solids, refining your skills - Effortlessly use transformations and copying techniques to enhance your designs III. Organizing and Enhancing Models (2 hours) - Streamline your projects with smart organization using groups and layers - Elevate the visual appeal of your models with vibrant colors, materials, and textures - Illuminate your creations with fundamental lighting techniques IV. Advanced Modeling Techniques (2 hours) - Master the art of tackling complex shapes with advanced modeling tools - Explore the nuances of creating and editing curves and surfaces - Enhance your proficiency in handling solids and understand Boolean operations and trimming techniques V. Introduction to Rendering (1 hour) - Gain an overview of rendering and its role in visualizing your designs - Understand Rhino's powerful render engine and its capabilities - Apply basic materials to elevate the quality of your renderings VI. Exporting and Importing (1 hour) - Acquire a comprehensive understanding of file formats for seamless sharing - Prepare your models for 3D printing using best practices - Integrate models from other software into Rhino 3D for a unified workflow VII. Conclusion and Next Steps (30 minutes) - Recapitulate the knowledge gained throughout the course - Access valuable tips and resources for continuous learning and growth - Engage in an interactive Q&A session to receive feedback and support Note: The above course outline is flexible, ensuring it meets the unique needs and skill levels of learners. Download - Rhino

SketchUp Course for Interior Designers and Architects with Layout and Vray
By London Design Training Courses
Why choose SketchUp Course for Interior Designers and Architects with Layout and Vray? Introducing SketchUp Training Course tailored for Interior Designers and Architects. This comprehensive course is designed for interior designers and architects who want to master SketchUp for 3D modeling, Layout for creating construction documents, and V-Ray for rendering. Course info Duration: 10 hrs Method: 1-2-1, Personalized attention Schedule: Tailor your own hours, available from Mon to Sat between 9 am and 7 pm Explore the world of 3D drawing with Sketchup in this beginner-friendly course. With its user-friendly interface, Sketchup offers a gentle learning curve, allowing you to quickly grasp 3D geometries. As you become acquainted with the basic drawing tools, you'll uncover a plethora of advanced techniques to create intricate and complex 3D objects. Who Should Take This Course? This course is ideal for individuals seeking to utilize a 3D drawing tool to solve three-dimensional problems or engage in more advanced design endeavors. Our experienced tutors communicate in accessible English, avoiding complex jargon and ensuring clarity throughout the course. We offer a wealth of learning resources for you to access beyond live lessons. Stay up-to-date, practice, and review key concepts essential to your growth. Course Title: SketchUp Training for Interior Designers and Architects with Layout and V-Ray Course Course Duration: 10 hours Course Description: This comprehensive course is designed for interior designers and architects who want to master SketchUp for 3D modeling, Layout for creating construction documents, and V-Ray for advanced rendering. Participants will learn how to create stunning 3D models for their projects, produce detailed construction documents, and apply professional-grade rendering techniques to bring their designs to life. Course Outline: Module 1: Introduction to SketchUp (1 hour) - Overview of SketchUp for interior design and architecture - Interface and basic tools - Navigation and viewport controls - Creating and saving interior design and architecture projects Module 2: Creating Floor Plans (1 hour) - Importing floor plans and site plans - Drawing walls, windows, and doors - Creating and editing floor levels - Understanding Layers and Scenes Module 3: Adding Furniture and Fixtures (2 hours) - Importing furniture and fixtures from the 3D Warehouse - Creating custom furniture and fixtures - Placing and arranging furniture and fixtures in the space - Creating and editing custom materials Module 4: Advanced Modeling Techniques (2 hours) - Creating more complex 3D models using advanced tools - Using groups and components for model organization - Adding custom details and finishes Module 5: Layout for Construction Documents (2 hours) - Creating construction documents in Layout - Importing SketchUp models into Layout - Creating floor plans, elevations, and sections - Adding annotations and dimensions to construction documents Module 6: Introduction to V-Ray (1 hour) - Overview of V-Ray for SketchUp - Basic V-Ray interface and tools - Understanding V-Ray materials and textures Module 7: Advanced Rendering Techniques (1 hour) - Applying advanced rendering techniques to SketchUp models - Creating artificial lighting and using natural lighting - Adding entourage and landscaping to designs Module 8: Importing and Exporting (30 minutes) - Importing and exporting files from other software - Understanding file formats and compatibility - Exporting models for 3D printing Module 9: Conclusion and Next Steps (30 minutes) - Review of course content - Tips for further learning and resources - Q&A and feedback

Rhino 3D Evening Training
By London Design Training Courses
Who Should Attend Rhino 3D Evening Training Course? Click here for info. This Evening Course is for individuals seeking to learn 2D and 3D modeling skills in a supportive and creative learning environment. Whether you are new to Rhino or want to expand your existing knowledge, this course is for product, furniture, architectural, and jewelry design industries. Duration: 10 hrs Method: 1-on-1, Personalized attention Schedule: Tailor your own schedule hours of your choice, available from Mon to Sat between 9 am and 7 pm Course Inclusions: Free Lifetime email support: Enjoy the flexibility of a free lifetime email support. Expert Instruction: Learn from experienced architects, designers, and software professionals, ensuring top-notch teaching. Hands-On Learning: Engage in practical, hands-on lessons with personalized project work to apply your skills effectively. Digital Reference: Access valuable video tutorials and a digital reference book for convenient revision and continuous development. London Design Training Course Certificate of Completion: Receive a certificate upon course completion, enhancing your CV and LinkedIn profile. Free Career Guidance: Benefit from career guidance, including tips on job applications and setting up a creative business, to stand out in the competitive design industry. Rhino 3D Basic to Intermediate Training Course Course Duration: 10 hours Introduction to Rhino and Interface: Familiarizing with Rhino's command system and toolbar usage. Navigating the geometry menus, command line, and status bar efficiently. Understanding the Properties window and its functionalities. Managing file operations, including opening and saving files. Grasping the three entity types: curves, surfaces, and solids. Exploring various geometric elements, such as Bezier curves, B-splines, NURBS objects, isocurve surfaces, and mesh surfaces. Setting measurement units for accurate modeling. Navigation: Introducing the viewport and its features. Using construction planes to aid in modeling. Utilizing shading modes for better visualization. Learning essential viewport controls: pan, zoom, rotate, and reset. Workflow Basics: Creating basic objects like curves, surfaces, and solids. Performing fundamental transformations to manipulate objects. Organizing projects efficiently using layers. Drawing: 2D Geometry: Understanding the creation of lines, polylines, rectangles, polygons, arcs, circles, and ellipses. Drawing freeform curves for more creative designs. Modeling: 3D Surfaces: Comparing various 3D surface types. Utilizing extrusion to add features to models. Creating surfaces with loft, revolve, rail revolve, sweep rail, and network surface commands. Constructing complex surfaces with the Network Surface tool. Modeling: 3D Solids: Introducing solid modeling techniques. Creating solids with primitives and curves. Applying Boolean operators to create unique shapes. Editing solids using the solid edit tool. Transforming solids and incorporating modeling aids like Grid Snap, Ortho, and Planar. Editing and Transforming Objects: Using Fillet and Chamfer to edit corners. Employing curve Booleans for trimming and splitting. Mastering the Drag and Nudge tools for object movement and rotation. Copying, pasting, and grouping objects effectively. Scaling and duplicating objects with the Mirror command. Analysis and Degrees: Understanding degrees of curves and surfaces. Creating screen captures for quick proofs. Generating 2D views and rendering projects. Preparation for 3D Printing and Manufacturing: Preparing models for prototyping by ensuring closed gaps. Using the shell technique to create wall thickness suitable for 3D printing.

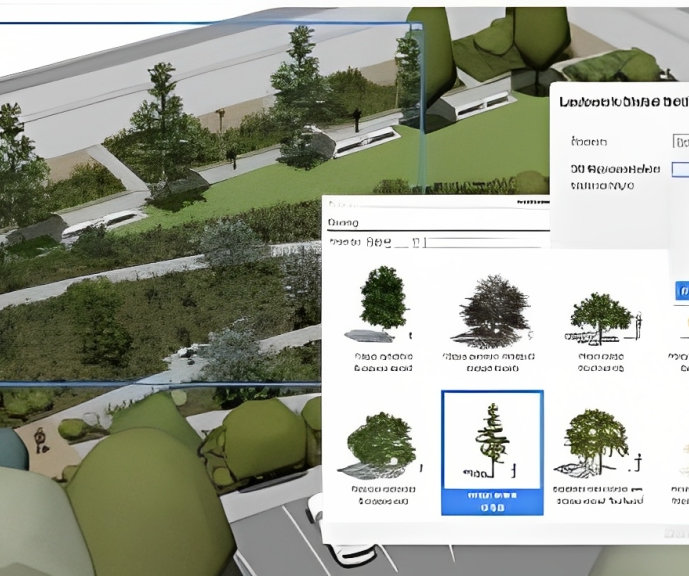
Vectorworks Landmark Training
By London Design Training Courses
Why choose Vectorworks Landmark Training Course? Course info Explore the Vectorworks Landmark Training Course! 1-on-1 Live Online sessions led by certified tutors and industry experts. Master Vectorworks Landmark for landscape and site design, creating captivating outdoor spaces. Enroll now to unleash your design skills. Duration: 16 hrs. Method: 1-on-1, Personalized attention. Schedule: Tailor your own schedule by pre-booking a convenient hour of your choice, available from Mon to Sat between 9 am and 7 pm. This course focuses on Vectorworks Landmark fundamentals, providing essential tools and techniques for landscape architecture, design, and related disciplines. Participants should have a basic understanding of Vectorworks software. The course covers 2D and 3D drawing, file organization, landscape plan/model creation, and more. Learning Objectives: Organize drawing files using industry standards and best practices for effective collaboration. Utilize imported files and field-collected data for base plans and site inventories. Integrate 2D and 3D elements for plan documentation and model analysis. Utilize worksheet features for material quantification and project efficiency. Course Prerequisites: Participants should be familiar with basic drafting concepts, computer operations, and keyboard shortcuts. This training demonstrates sustainable design principles and the use of CAD tools for erosion control, runoff calculations, plant tracking, and sun/shade analysis. Participants will learn to create a 3D site digital terrain model and assess proposed plantings' effects on solar heat gain and water usage. Vectorworks Landmark Basic to Intermediate Training Course Duration: 16 hours Join our comprehensive Vectorworks Landmark Basic to Intermediate Training, designed for landscape architects and designers. Master 2D and 3D landscape design with essential techniques, covering site analysis, plans, irrigation, and 3D visualization. Unleash your creativity with custom plant symbols and detailed planting plans using the plant database. Course Outline: I. Introduction to Vectorworks Landmark (1 hour) An overview of Vectorworks Landmark for landscape design Interface orientation and basic tool usage Navigation and viewport controls Landscape design project creation and management II. Site Analysis and Site Plans (3 hours) Collecting site information and producing site analysis drawings Crafting site plans and hardscape design Working with contours, elevations, and terrain models Incorporating site amenities like paths, fences, and walls III. Planting Plans (5 hours) Utilizing the plant database to select suitable plants for specific regions Creating personalized plant symbols Developing comprehensive planting plans and plant lists Understanding plant compatibility and growth patterns IV. Irrigation Design (2 hours) Designing and editing irrigation systems and zones Integrating irrigation components into the site plan Generating irrigation reports for efficient planning V. 3D Visualization (3 hours) Creating captivating 3D models of landscape designs Applying textures and materials to hardscape elements and plants Utilizing the Renderworks engine for high-quality rendering Enhancing designs with lighting and special effects VI. Customization (1 hour) Tailoring the interface for landscape design efficiency Creating custom object styles and resource libraries VII. Collaboration and Sharing (1 hour) Importing and exporting data from other software platforms Sharing landscape design drawings with colleagues and collaborators VIII. Conclusion and Next Steps (1 hour) Comprehensive review of course content Guidance on further learning resources Q&A session and feedback gathering Enroll in our Vectorworks Landmark Basic to Intermediate Training to enhance your landscape design expertise and unleash your creative prowess. Download Vectorworks Landmark https://www.vectorworks.net/en-GB/landmark By the end of the Vectorworks Landmark Training Course, participants will: Understand the key features and functionalities of Vectorworks Landmark for landscape design. Demonstrate proficiency in using essential tools for site analysis, site plans, and hardscape design. Create detailed planting plans, selecting appropriate plants, and understanding their compatibility and growth patterns. Design efficient and effective irrigation systems, including generating irrigation reports. Create 3D visualizations of landscape designs, applying textures, materials, lighting, and special effects. Customize the interface and create personalized object styles and resources. Collaborate and share landscape design drawings with other software users. Have the foundation to pursue further learning and exploration in landscape design using Vectorworks Landmark.
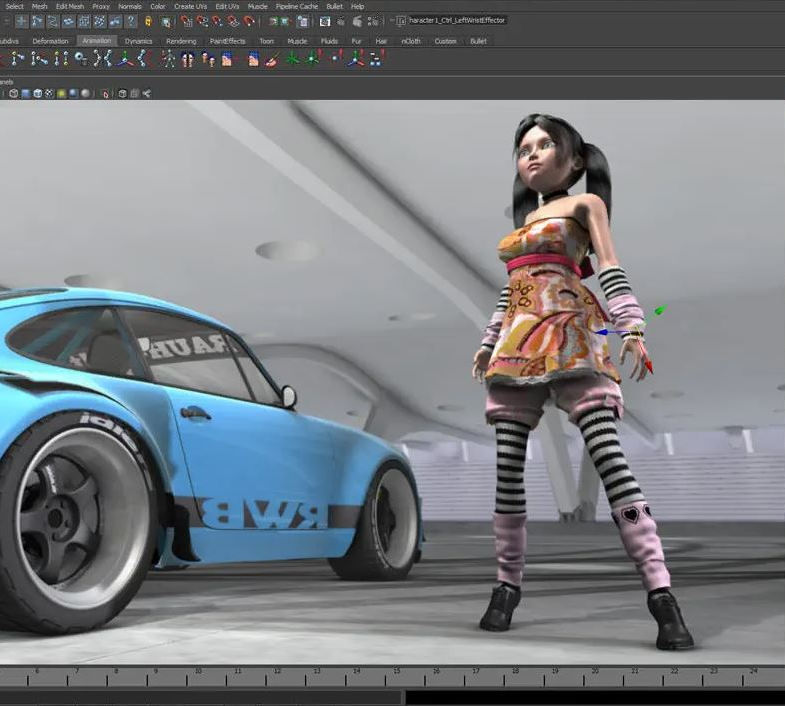
Autodesk Maya Basics to Advanced Level
By London Design Training Courses
Why Learn Autodesk Maya Basics to Advanced Level Course? Course info. Autodesk Maya is one of the best tools for 3D animation and visual effects. Learn Maya with our training courses covering sectors like Architecture, Games & Films, Animation, and Media. London Design Training Courses empower you to master Maya, transforming your 3d skills.  Duration: 40 hrs Method: 1-on-1. Schedule: Tailor your own schedule by pre-booking a convenient hour of your choice, available from Mon to Sat 9 am and 7 pm. Experience advanced-level Maya training covering essential aspects such as modeling, UV mapping, texturing, lighting, camera movement, and rigging. The course is tailored to your specific requirements and work preferences. You can discuss your learning goals with our trainer, and we will suggest a syllabus that meets your needs. Flexible Training Options: Choose in-class training at one of our UK center or attend live online sessions. Certified Tutors and Authoritative: London Design Training Course has all Autodesk Authorized Trainers. Hands-on Learning Approach: The training is practical and hands-on, combining theory and step-by-step demonstrations. You'll have ample time to practice techniques on your computer with Maya, and you can keep all the files you create. Compatible with Windows and Mac: Maya training is available for both Windows and Mac users, with options to suit any recent version of Maya. Maya Basic to Advanced Course Duration: 40 hours Course Description: In this course, you will learn the fundamental and advanced skills to create complex 3D models and animations using Autodesk Maya software. You will gain knowledge of the Maya interface, tools, and workflow. You will learn the essentials of modeling, texturing, rigging, animating, and rendering 3D models. You will also learn how to create advanced special effects and understand advanced modeling techniques. I. Introduction to Maya (3 hours) Overview of Maya and its Uses Maya interface and basic tools Navigation and viewport controls Creating and saving projects II. Basic Polygon Modeling (6 hours) Polygon modeling basics Creating basic shapes and objects Editing and modifying objects Creating complex objects with extrusions and bevels Creating organic shapes with NURBS III. Intermediate Modeling (6 hours) Advanced polygon modeling techniques Creating complex models with Booleans and deformers Creating and modifying curves and surfaces Creating organic shapes with sculpting tools Creating architectural models IV. Texturing and Materials (6 hours) Introduction to texturing Creating and applying materials Texture mapping and UV unwrapping Creating realistic materials with shaders Painting textures with the 3D paint tool V. Lighting and Rendering (6 hours) Basic lighting techniques Advanced lighting techniques Creating realistic lighting environments Setting up a camera and creating a composition Rendering still images and animations Output options and file formats VI. Animation (9 hours) Introduction to animation Keyframe animation and animation curves Creating and editing animation clips Rigging and animating a simple character Creating and editing motion paths and animation layers Creating complex character rigs Creating lip sync and facial animation Creating realistic animation with dynamics and simulations Cloth Animation Ncloth VII. Rigging (4 hours) Introduction to rigging Creating joints and skeletons Binding skin to joints and creating weight maps Creating simple rigging systems and rigging a character Creating complex rigging systems VIII. Special Effects (4 hours) Particle systems and dynamics Creating and manipulating fluids and fire effects Creating and editing special effects like explosions and smoke Creating advanced simulations with nCloth and nParticles Paint effects Mash Networks and Mash Animation IX. Advanced Rendering Techniques (2 hours) Render layers and passes Global illumination and ambient occlusion Mental Ray rendering and settings X. Conclusion and Next Steps (1 hour) Review of course content Tips for further learning and resources Q&A; and feedback Note: The above course outline is just a suggestion, and the course content and duration can be adjusted according to the needs and level of the learners. Proficiency in Advanced Maya Techniques: Participants will gain advanced skills in various aspects of Maya, including modeling, UV mapping, texturing, lighting, camera movement, and rigging. Tailored Training: The course is customized to meet the specific requirements of participants, focusing on their preferred techniques and work type. Hands-On and Practical Experience: The training is practical and hands-on, allowing participants to practice techniques on their own computers with Maya. Versatility in Operating Systems: Participants will be equipped to use Maya on both Windows and Mac systems. Accredited Certification: Upon successful completion, participants will receive an e-certificate, accredited by Autodesk Certified instructor, confirming their achievement in the Maya training course. Post-Course Support: After the training, participants are entitled to 30 days of email support from their Maya trainer, ensuring assistance with any post-course questions or issues. Up-to-Date and Relevant Learning: The training can be based on any recent version of Maya, providing participants with up-to-date knowledge and skills.
Accessible Documents
By Nexus Human
Duration 0.75 Days 4.5 CPD hours This course is intended for Making Microsoft Word documents accessible. Overview Please refer to Overview. During this course students will interact with a variety of Word documents and review components that would render the document inaccessible. Students will enable the Accessibility Checker and the Speak feature and progress through the processes and procedures to meet the AODA mandate. Students will ultimately create an accessible set of styles and use those styles within the document. Adding the Accessibility Checker and the Speak feature Discussions will follow as to the limitations of the checker When the checker won?t run Document Metadata Students will review where and why to add metadata to a Word Document Setting the application language and setting the document language Setting the document title Adding the Author and subject metadata fields Creating Accessible Paragraphs and Columns Students will see the perils of incorrect use of hard returns and text boxes within a document Exercises will have students work with paragraph formatting and column formatting for accessibility Creating Accessible Tables Students will interact with tables that are poorly designed and restricted them to still maintain content but that are now accessible Discussions will surround, changes to how tables are handled when sending to PDF Accessible Imagery Students will discuss the need to images with a document The Alternate text feature will be used and the rationale for adding specific types of descriptions Students will see and understand the rationale for ?in-line- imagery Styles for Navigation Students will use and modify the built-in styles feature of Microsoft Word and create a table of contents Students will see with the use of the navigation pane, how styles impact accessibility Students will also understand the importance of proper styles nesting Headers, Footers and Footnotes Students will discuss and then implement accessible headers and footers Students will discuss footnotes and alternative methods to provide footnotes Verifying Reading Order Students will ?listen? to their documents using the Speak feature Students will enable the selection pane as an accessibility tools and discuss its limitations Creating an Accessible Style Template Students will create several accessible styles including headings and paragraphs Students will save the style within a template Additional course details: Nexus Humans Accessible Documents training program is a workshop that presents an invigorating mix of sessions, lessons, and masterclasses meticulously crafted to propel your learning expedition forward. This immersive bootcamp-style experience boasts interactive lectures, hands-on labs, and collaborative hackathons, all strategically designed to fortify fundamental concepts. Guided by seasoned coaches, each session offers priceless insights and practical skills crucial for honing your expertise. Whether you're stepping into the realm of professional skills or a seasoned professional, this comprehensive course ensures you're equipped with the knowledge and prowess necessary for success. While we feel this is the best course for the Accessible Documents course and one of our Top 10 we encourage you to read the course outline to make sure it is the right content for you. Additionally, private sessions, closed classes or dedicated events are available both live online and at our training centres in Dublin and London, as well as at your offices anywhere in the UK, Ireland or across EMEA.