- Professional Development
- Medicine & Nursing
- Arts & Crafts
- Health & Wellbeing
- Personal Development
862 Courses
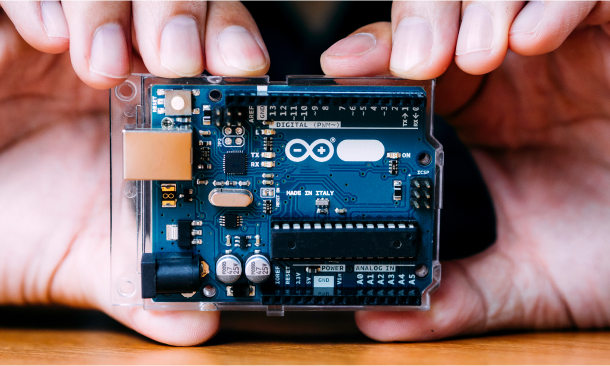
Step into innovation and technology with our groundbreaking course, 'Arduino Interfacing with Sensors in Your Smartphone.' Embark on a journey where creativity meets functionality as you harness the power of Arduino to connect sensors to your smartphone seamlessly. From the thrill of setting up your hardware and software to crafting custom Android apps without coding, this course promises to unlock endless possibilities in mobile technology. Discover the essential components needed to kickstart your Arduino adventure, from hardware requirements to navigating the intricacies of MIT App Inventor. Dive deep into the realms of mobile app development as you explore the Designer and Blocks Editor, laying the foundation for your foray into creating intuitive mobile apps. With our guidance, even those with zero coding experience can craft innovative applications that effortlessly bridge the gap between Arduino and smartphones. Unlock the potential of sensors as you delve into the world of proximity, accelerometer, gyroscope, and magnetometer sensors. Learn how to read analogue sensor data with Arduino and translate it into interactive mobile experiences. Whether you're a budding technologist, a hobbyist seeking to expand your skills, or an entrepreneur with a vision for innovative mobile solutions, this course equips you with the tools and knowledge to turn your ideas into reality. Learning Outcomes: Understand the hardware and software requirements for interfacing Arduino with smartphones. Master MIT App Inventor to design and develop custom Android apps for Arduino projects. Explore various sensors, including proximity, accelerometer, gyroscope, and magnetometer. Learn to create mobile apps without coding, integrating Arduino seamlessly. Gain proficiency in reading analogue sensor data and controlling Arduino remotely via smartphones. Highlights of the Arduino Interfacing with Sensors in Your Smartphone : Unlimited access to the course for a lifetime. Opportunity to earn a certificate accredited by the CPD Quality Standards and CIQ after completing this course. Structured lesson planning in line with industry standards. Immerse yourself in innovative and captivating course materials and activities. Assessments designed to evaluate advanced cognitive abilities and skill proficiency. Flexibility to complete the Course at your own pace, on your own schedule. Receive full tutor support throughout the week, from Monday to Friday, to enhance your learning experience. Unlock career resources for CV improvement, interview readiness, and job success. Who is this Arduino Interfacing with Sensors in Your Smartphone Course for? Tech enthusiasts eager to explore Arduino and smartphone integration. Hobbyists looking to expand their knowledge in mobile app development. Entrepreneurs seeking to develop innovative mobile solutions. Students interested in learning about sensor interfacing and mobile technology. Engineers and developers aiming to enhance their skills in IoT and mobile connectivity. How is the course assessed? To successfully complete the course you must pass an automated, multiple-choice assessment. The assessment is delivered through our online learning platform. You will receive the results of your assessment immediately upon completion. Will I receive a certificate of completion? Upon successful completion, you will qualify for the UK and internationally-recognised certification and you can choose to make your achievement formal by obtaining your PDF Certificate at a cost of £9 and Hardcopy Certificate for £15. Requirements The Arduino Interfacing with Sensors in Your Smartphone is open to all, with no formal entry requirements. All you need is a passion for learning, a good understanding of the English language, numeracy and IT, and to be over the age of 16. Career Path Mobile App Developer: £25,000 - £70,000 per annum IoT Engineer: £30,000 - £65,000 per annum Software Engineer: £25,000 - £70,000 per annum Electronics Engineer: £25,000 - £55,000 per annum Embedded Systems Developer: £30,000 - £70,000 per annum Technology Consultant: £35,000 - £80,000 per annum Course Curriculum Introduction and Getting Started Introduction 00:03:00 Hardware and Software Requirements Hardware and Software Requirements 00:02:00 Download and Install MIT App Inventor 00:10:00 Download and Install Arduino Pro IDE 00:09:00 Setting Up App Inventor What is App Inventor 00:02:00 Designer and Blocks Editor MIT App Inventor User Interface Explained 00:04:00 First Mobile App to Control Arduino Make your first Mobile App - Blink LED 00:15:00 Code your Arduino - Blink LED 00:05:00 Proximity Sensor Proximity Sensor Mobile App 00:14:00 Light Sensor Mobile App and Arduino Code 00:13:00 Practical Testing 00:03:00 Accelerometer Sensor Accelerometer Sensor Mobile App 00:14:00 Coding Accelerometer Sensor 00:05:00 Gyroscope Sensor Gyroscope Sensor Mobile App and Arduino Code 00:06:00 Magnetometer Sensor Magnetometer Sensor Mobile App and Arduino Code 00:05:00 Make Android App With Zero Experience MIT App Inventor Introduction uuuu 00:03:00 What can you do and system requirements 00:03:00 What is app inventor in More Details 00:02:00 Java Vs App Inventor 00:03:00 Why using App Inventor 00:01:00 App Architecture 00:05:00 Let's Start Making Apps 00:05:00 First App Add Items and Start Programming with Blocks 00:10:00 First App Testing and Running the App using Emulator 00:13:00 Resources you need to visit to Create Better Apps 00:02:00 How to Create a website for your app for free and take credit for it 00:05:00 Android Apps for Arduino with MIT App Inventor without Coding Introduction 00:03:00 App Inventor Overview 00:04:00 An App Challenge 00:01:00 System Requirements 00:01:00 AppInventor Vs Java and C 00:03:00 Why App Inventor Works 00:02:00 App Architecture 00:05:00 Download and Install App Inventor on Your Device 00:09:00 AppInventor UserInterface With Example 00:14:00 Arduino Coding for Led On Off Practical Example 00:09:00 Making an Android App for Led On Off Practical Example 00:12:00 Testing On Off App with Arduino 00:07:00 Make a Login Protected Led Control App 00:14:00 Slider Application to Control Led Brightness 00:15:00 Slider Practical 00:09:00 Practical Connect Bluetooth Module 00:05:00 RGB Led Controller Android Application 00:14:00 RGB LED Arduino Coding 00:12:00 Sensor Readings Arduino Coding 00:09:00 Sensor Readings Android Application 00:17:00 LCD Text Arduino Coding 00:09:00 LCD Text Android Application 00:06:00 Remote Controlled Robot Android Application 00:09:00 Remote Controlled Robot Arduino Coding 00:15:00 Make Money with MIT App Inventor Apps 00:05:00 Reading Analog Sensor with Arduino Introduction 00:02:00 How to read analogue sensors using Arduino 00:02:00 Software Requirements 00:04:00 Wiring Analog Sensors to Arduino 00:09:00 Writing code to collect reading from analogue sensors 00:07:00 Practical Analogue Sensor Testing 00:03:00 Analyse and convert Sensor Reading 00:03:00 Manipulating Sensors Reading 00:06:00 ADC in Arduino Explained 00:14:00
Python Machine Learning Bootcamp
By Packt
Welcome to the Bootcamp course. You will obtain a firm understanding of machine learning with this course. By doing so, you will be able to develop machine learning solutions for various challenges you might encounter and be prepared to start using machine learning at work or in technical interviews.

Embark on a transformative journey into the realm of AutoCAD Plugin Development using VB.NET and Windows Forms with our meticulously crafted course. From the intricacies of Windows Form and Controls to the hands-on development of diverse projects like DrawRectangle, Automate Update Layer, and Multiple Object Extractor, this course promises to be a dynamic exploration of VB.NET's potential in the AutoCAD ecosystem. Delve into the heart of coding as you master the creation of utility classes, design intuitive user interfaces, and seamlessly integrate controls such as ComboBox, TextBox, RadioButton, and Checkbox. Elevate your programming prowess through real-world applications, ensuring you not only understand the theoretical foundations but also acquire the practical skills needed to thrive in the world of AutoCAD Plugin Development. Unlock the mysteries of AutoCAD Plugin Development as you navigate through engaging modules, honing your skills with each meticulously crafted project. By the end, you'll emerge not just as a student but as a proficient developer ready to create powerful plugins that enhance AutoCAD functionalities. Learning Outcomes Gain a comprehensive understanding of Windows Form and Controls, mastering their implementation in AutoCAD Plugin Development. Develop practical expertise in coding essential controls like ComboBox, TextBox, RadioButton, and Checkbox for seamless integration into your projects. Acquire the skills to design and execute diverse projects, from DrawRectangle to Multiple Object Extractor, elevating your proficiency in VB.NET. Learn the art of creating utility classes, a fundamental aspect of building robust and scalable AutoCAD plugins. Explore automation in AutoCAD through projects like Automate Update Layer and Multiple Plot DWG to PDF, enhancing your capabilities in streamlining tasks. Why choose this AutoCAD Plugin Development Using VB.NET and Windows Forms course? Unlimited access to the course for a lifetime. Opportunity to earn a certificate accredited by the CPD Quality Standards after completing this course. Structured lesson planning in line with industry standards. Immerse yourself in innovative and captivating course materials and activities. Assessments are designed to evaluate advanced cognitive abilities and skill proficiency. Flexibility to complete the AutoCAD Plugin Development Using VB.NET and Windows Forms Course at your own pace, on your own schedule. Receive full tutor support throughout the week, from Monday to Friday, to enhance your learning experience. Who is this AutoCAD Plugin Development Using VB.NET and Windows Forms course for? Aspiring developers eager to specialize in AutoCAD Plugin Development. Professionals seeking to expand their skill set in VB.NET and Windows Forms for application in the AutoCAD environment. Students pursuing a career in computer programming with a keen interest in CAD software development. Architects and engineers looking to customize and enhance AutoCAD functionalities for their specific needs. Individuals interested in exploring the intersection of coding and design within the AutoCAD ecosystem. Career path CAD Plugin Developer: £35,000 - £45,000 Automation Engineer in CAD: £40,000 - £50,000 VB.NET Developer: £30,000 - £40,000 Software Integration Specialist: £45,000 - £55,000 AutoCAD Customization Consultant: £50,000 - £60,000 Prerequisites This AutoCAD Plugin Development Using VB.NET and Windows Forms does not require you to have any prior qualifications or experience. You can just enrol and start learning.This AutoCAD Plugin Development Using VB.NET and Windows Forms was made by professionals and it is compatible with all PC's, Mac's, tablets and smartphones. You will be able to access the course from anywhere at any time as long as you have a good enough internet connection. Certification After studying the course materials, there will be a written assignment test which you can take at the end of the course. After successfully passing the test you will be able to claim the pdf certificate for £4.99 Original Hard Copy certificates need to be ordered at an additional cost of £8. Course Curriculum Course Outline Module 01: Landing Page 00:02:00 Module 02: Course Outline 00:03:00 Introduction Module 01: Introduction 00:05:00 Module 02: Who is this course for? 00:04:00 Module 03: Tools Needed for this Course 00:01:00 What Will You Learn From This Course? Module 01: What will you learn from this Course - Overview 00:06:00 Windows Form And Controls Module 01: Windows Form and Controls - Overview 00:04:00 Module 02: ControlsDemo Project - Overview 00:03:00 Module 03: ControlsDemo Project - Creating the Project 00:04:00 Module 04: Controls Demo Project - Designing the Form 00:19:00 Module 05: ControlsDemo Project - Creating the Utility Class 00:10:00 Module 06: ControlsDemo Project - Coding the Combobox Control 00:15:00 Module 07: ControlsDemo Project - Coding the Textbox Control 00:10:00 Module 08: ControlsDemo Project - Coding the Radiobutton Control 00:08:00 Module 09: ControlsDemo Project - Coding the Checkbox Control 00:17:00 Developing Projects Module 01: Draw Rectangle Project - Overview 00:03:00 Module 02: Creating the DrawRectangle Project 00:04:00 Module 03: DrawRectangle Project - Creating the Utility Class 00:20:00 Module 04: DrawRectangle Project - Designing the Form 00:15:00 Module 05: DrawRectangle Project - Coding the User Interface Part 1 00:24:00 Module 06: DrawRectangle Project - Coding the User Interface Part 2 00:18:00 Module 07: DrawRectangle Project - Running the Program 00:06:00 Module 08: Automate Update Layer Project - Overview 00:02:00 Module 09: Creating the AutomateUpdateLayer Project 00:03:00 Module 10: Automate Update Layer Project - Creating the Utility Class 00:17:00 Module 11: AutomateUpdateLayer Project - Designing the User Interface 00:07:00 Module 12: AutomateUpdateLayer Project - Coding the Form 00:18:00 Module 13: AutomateUpdateLayer Project - Running the Program 00:07:00 Module 14: Automatic Block Extractor Project - Overview 00:03:00 Module 15: AutomaticBlockExtractor Project - Creating the Project 00:03:00 Module 16: AutomaticBlockExtractor Project - Creating the User Interface 00:09:00 Module 17: AutomaticBlockExtractor Project - Coding the Form 00:27:00 Module 18: AutomaticBlockExtractor Project - Creating the Utility Class 00:27:00 Module 19: AutomaticBlockExtractor Project - Running the Program 00:10:00 Module 20: AutomateUpdateTextStyles Project - Overview 00:03:00 Module 21: AutomateUpdateTextStyle Project - Creating the Project 00:02:00 Module 22: AutomateUpdateTextStyle Project - Creating the User Interface 00:09:00 Module 23: AutomateUpdateTextStyle Project - Coding the Form 00:20:00 Module 24: AutomateUpdateTextStyle Project - Coding the Utility Class 00:16:00 Module 25: AutomateUpdateTextStyle Project - Running the Program 00:08:00 Module 26: Multiple Plot DWG to PDF Project - Overview 00:03:00 Module 27: MultiplePlotDWGtoPDF Project - Creating the Project 00:04:00 Module 28: MultiplePlotDWGtoPDF Project - Creating the User Interface 00:09:00 Module 29: MultiplePlotDWGtoPDF Project - Coding the Form 00:20:00 Module 30: MultiplePlotDWGtoPDF Project - Creating the Utility Class 00:30:00 Module 31: MultiplePlotDWGtoPDF Project - Running the Program 00:13:00 Module 32: Multiple Object Extractor Project - Overview 00:03:00 Module 33: MultipleObjectExtractor Project - Creating the Project 00:02:00 Module 34: MultipleObjectExtractor Project - Creating the User Interface 00:15:00 Module 35: MultipleObjectExtractor Project - Coding the Form Load Event 00:05:00 Module 36: MultipleObjectExtractor Project - Coding the Browse Buttons 00:10:00 Module 37: MultipleObjectExtractor Project - Coding the Extract Button 00:20:00 Module 38: MultipleObjectExtractor Project - Coding the ProcessDrawing Method 00:09:00 Module 39: MultipleObjectExtractor Project - Coding the ProcessObjectExtraction Method 00:11:00 Module 40: MultipleObjectExtractor Project - Coding the ExtractLine Method 00:09:00 Module 41: MultipleObjectExtractor Project - Coding the ExtractCircle Method 00:03:00 Module 42: MultipleObjectExtractor Project - Coding the ExtractPolyline Method 00:09:00 Module 43: MultipleObjectExtractor Project - Coding the ExtractMText Method 00:05:00 Module 44: MultipleObjectExtractor Project - Coding the ExtractBlock Method 00:05:00 Module 45: MultipleObjectExtractor Project - Running the Program 00:15:00

Unlock a transformative approach to sustainable weight management with my Hypnotherapy for Weight Management Masterclass. Designed for Hypnotherapy professionals and wellness enthusiasts, this masterclass provides actionable insights into breaking the cycle of dieting and embracing natural, lasting change.

Ultimate Tableau Desktop Course - Beginner to Advanced Bundle
By Packt
Let's build sophisticated visualizations and dashboards using Sankey diagrams and geospatial, sunburst, and circular charts and animate your visualizations. We will also cover advanced Tableau topics, such as Tableau parameters and use cases and Level of Detail (LOD) expressions, spatial functions, advanced filters, and table calculations.
Enrolment for the Women's Voice Medicine Journey & 3 x 1-1 Coaching Sessions
(39)By Sing for Your Soul
Welcome to the Women's Voice Medicine Journey. This is a female-designed, step-by-step programe, to teach you how you can truly activate and integrate some of the most essential Embodied Voicework tools to Free Your Voice and unleash your Creative Feminine Power.

Mastering User Experience (UX) Design for Experienced Web Developers (TT4213)
By Nexus Human
Duration 3 Days 18 CPD hours This course is intended for The intended audience for this course is experienced web developers who are new to User Experience (UX) and Responsive Design principles. These professionals typically have a solid understanding of front-end development technologies such as HTML, CSS, and JavaScript but seek to expand their skillset to create more user-centric, adaptable, and accessible web experiences. Roles that would benefit from this course include: Front-end Web Developers Full-stack Developers Web Designers Team Leads and Project Managers Freelance Web Developers Overview Working in a hands-on learning environment led by our expert UX coach, you'll learn to: Understand and apply UX principles and user-centered design processes: Participants will learn to identify the needs and preferences of users, create user personas, and apply UX best practices to develop intuitive, user-friendly web experiences. Design and implement responsive web layouts: Participants will gain the skills to create fluid grid layouts, use flexible images, and apply media queries to design web pages that adapt seamlessly across various devices and screen sizes. Optimize web performance for responsive designs: Participants will learn techniques to improve website performance, including image optimization, responsive images, and minification and concatenation of assets, ensuring a fast and smooth user experience across devices. Implement accessible web designs: Participants will understand the importance of accessibility in web design and learn to apply WCAG principles and accessible design patterns to create websites that are usable by a wide range of users, including those with disabilities. Collaborate effectively with designers, developers, and stakeholders: Participants will gain insights into design collaboration and handoff processes, enhancing their ability to communicate design decisions, provide and receive feedback, and work efficiently with team members and clients. In today's fast-paced digital world, user-centric and adaptable websites are no longer a luxury ? they're a necessity. By embracing UX and responsive design, you'll unlock the potential to elevate your websites, boosting user satisfaction and engagement. This, in turn, leads to higher conversion rates and a stronger online presence for your clients or organization, as well as better collaboration within your team, bridging the gap between designers, developers, and stakeholders.UX Design & Responsive Design for Experienced Web Developers is a three day, engaging hands-on workshop designed to equip you with the latest skills and best practices in User Experience (UX) and Responsive Web Design required to create seamless, user-friendly websites that adapt effortlessly across devices. This course will immerse you in the latest skills, best practices, and hands-on activities, empowering you to create exceptional, accessible websites that excel across devices and captivate users. Throughout the program you?ll explore the fundamentals of UX and responsive design, including user-centered design processes, mobile-first and desktop-first approaches, and design techniques for various devices and screen sizes. You'll gain practical experience creating responsive layouts, optimizing performance, and implementing accessible web designs, all while leveraging popular frameworks and design tools. You'll also gain valuable insights into performance optimization, accessibility, and collaboration strategies, ensuring you have the complete toolkit to excel in your field.By the end of this workshop, you?ll have gained a solid understanding of UX and responsive design principles, as well as hands-on experience in applying these concepts to real-world projects. You?ll be able to create more user-friendly, responsive, and accessible websites, and collaborate more effectively with your design and development teams. Introduction to UX and Responsive Design: Understanding User Experience What is UX? Importance of UX in web development UX principles and best practices User-centered design process Responsive Web Design Basics What is Responsive Web Design? Importance of Responsive Design in modern web development Fluid grid layout, flexible images, and media queries Hands-on Activity: Creating a Responsive Layout Designing a simple responsive layout using HTML, CSS, and media queries Breakdown and explanation of the code Testing responsiveness across different devices Mobile-first vs. Desktop-first Approaches Pros and cons of each approach Deciding which approach to use Designing for Different Devices and Screen Sizes Common breakpoints and device considerations Accessibility and usability across devices Typography, color, and other design elements in responsive design Hands-on Activity: Designing for Different Devices Modifying the previously created responsive layout to optimize for various devices Discussion and feedback on designs Advanced UX and Responsive Design Techniques: UX Research and Testing Importance of UX research Usability testing and user feedback A/B testing and heatmaps Navigation and Information Architecture Designing effective and user-friendly navigation Organizing content and information Common navigation patterns in responsive design Hands-on Activity: Designing Navigation for Responsive Websites Adding navigation elements to the previously created responsive layout Testing navigation on different devices and screen sizes Discussion and feedback on navigation designs Responsive Web Design Frameworks and Tools Overview of popular frameworks (Bootstrap, Foundation, etc.) Pros and cons of using frameworks Introduction to design tools (Sketch, Figma, Adobe XD) Hands-on Activity: Exploring Frameworks and Tools Experimenting with a chosen framework or design tool Redesigning the responsive layout using the selected framework/tool Sharing experiences and discussing the benefits and drawbacks UX and Responsive Design Best Practices: Design Patterns and UI Components Common design patterns in responsive web design Designing reusable UI components Consistency and usability in UI components Performance Optimization Importance of performance in responsive design Image optimization and responsive images Minification and concatenation of assets Hands-on Activity: Optimizing Performance (1.5 hours) Applying performance optimization techniques to the responsive layout Testing the improvements in performance Sharing results and discussing best practices Accessibility in UX and Responsive Design Importance of accessibility in web design Accessibility principles (WCAG) Accessible design patterns and techniques Hands-on Activity: Evaluating and Improving Accessibility Assessing the accessibility of the responsive layout Implementing accessibility improvements Testing and discussing the results Design Collaboration and Handoff Collaborating with designers, developers, and stakeholders Effective communication and documentation Design handoff tools and techniques Hands-on Activity: Simulating Design Handoff Participants will work in pairs to simulate a design handoff Reviewing, discussing, and providing feedback on each other's responsive layouts Sharing experiences and lessons learned

Course Overview: The demand for User Experience (UX) and User Interface (UI) designers is skyrocketing. Our Advanced Diploma in User Experience UI/UX Design is a comprehensive program that equips you with the knowledge and skills to craft seamless and user-centric designs that leave a lasting impact.Through a series of thoughtfully designed modules, learners will not only gain an understanding of UX/UI but also the dynamics of the Web Industry, Graphic Design implications, and the intricate details of UX Design, followed by an extensive dive into UI Design and Optimization techniques. Ultimately, the course incorporates a holistic understanding of the Careers in UX/UI, empowering students to venture confidently into this promising field.Enrol in this Advanced Diploma in User Experience UI/UX Design course today and start your journey to a successful career in UX or UI design! Key Features of the Course: CPD Certification 24/7 Learning Assistance Interesting Learning Materials Who is This Course For? This Advanced Diploma in User Experience UI/UX Design course is ideal for aspiring UX/UI designers, web developers, graphic designers, product managers, and professionals looking to enhance their design skills. Whether you are a beginner or have some experience in design, this course will help you develop a solid foundation and master the intricacies of UX/UI design. What You Will Learn: In the first part of the Advanced Diploma in User Experience UI/UX Design course, you will dive into the fundamentals, including the difference between UX and UI, the roles and responsibilities of designers in a team, and an overview of the web development process. You will also explore the psychology of colour, working with fonts and icons, and the essential tools and techniques used in graphic design. Moving forward, you will uncover the core principles of UX design, learn how to analyse user profiles, identify pain points, and create user personas. You will gain insights into customer journeys, sales funnels, and the principles of influence. Through hands-on projects, you will develop skills in creating storyboards, mood boards, and information architecture. In the latter part of the course, you will focus on wireframing, prototyping, and testing, ensuring your designs are user-friendly and intuitive. You will learn about usability reports, the "Above the Fold" rule, and optimisation using analytics and heat maps. The course also provides valuable guidance on launching a UX/UI design career, including freelancing, personal branding, and building a professional website. Why Enrol in This Course: Join thousands of satisfied learners who highly rated this Advanced Diploma in User Experience UI/UX Design course for its comprehensive curriculum and effective approach. Benefit from up-to-date industry insights and the latest design trends, ensuring you stay ahead of the curve. UX/UI design is one of the fastest-growing fields, offering abundant job opportunities and career growth potential. Develop your design thinking and problem-solving skills, unleashing your creative potential to craft extraordinary user experiences. Requirements: Enrolling in this Advanced Diploma in User Experience UI/UX Design course requires a basic understanding of design concepts and access to a computer with an internet connection. No prior coding or design experience is required. Career Path: Upon completing this Advanced Diploma in User Experience UI/UX Design course, you will be well-prepared for a range of exciting career opportunities, including: UX/UI Designer (£35,000 - £55,000 per annum) Web Developer (£30,000 - £45,000 per annum) Graphic Designer (£25,000 - £40,000 per annum) Product Manager (£40,000 - £70,000 per annum) UX Researcher (£35,000 - £50,000 per annum) Interaction Designer (£35,000 - £60,000 per annum) User Experience Architect (£45,000 - £75,000 per annum) Certification: Upon completing the Advanced Diploma in User Experience UI/UX Design course, you will receive a CPD certificate, widely recognised as a mark of excellence in the professional development of individuals. Enrol today and join the ranks of successful designers who have harnessed the power of user-centric design to create remarkable digital experiences. Course Curriculum 9 sections • 112 lectures • 12:52:00 total length •Learn UX/UI Course Overview: 00:05:00 •Section Overview: 00:04:00 •UX vs UI: 00:04:00 •UX/UI Designer Marketplace: 00:05:00 •Overview of UX Roles: 00:06:00 •Web Industry Section Overview: 00:03:00 •The Phases of Web Development: 00:13:00 •Designer Responsibilities (working in a team): 00:09:00 •Roles & Descriptions (working in a team): 00:05:00 •Agile Approach To Project Management: 00:12:00 •Scrum - Flexible Framework: 00:06:00 •Project Management Apps: 00:13:00 •XD Lesson - Introduction: 00:13:00 •Graphic Design Section Overview: 00:02:00 •The Psychology of Color: 00:13:00 •Color Wheel & Color Schemes: 00:06:00 •Working with Fonts: 00:10:00 •Working With Icons: 00:04:00 •XD Lesson - Tools, Object Manipulation and Components: 00:13:00 •XD Lesson - Font Styles and Artboard Settings: 00:07:00 •Graphic Design Software Tools: 00:03:00 •Adobe XD lesson 4 - Icons & Vector Graphics: 00:14:00 •UX Design Section Overview: 00:04:00 •What is User Experience Design? (UX): 00:09:00 •UX Design Process: 00:03:00 •The UX Analysis Process: 00:08:00 •Working with User Profiles: 00:03:00 •Understanding User Pain Points: 00:03:00 •XD Lesson 5 Class Project: Сompetitive Analysis: 00:10:00 •Developing a Persona Part 1: 00:05:00 •Developing a Persona Part 2: 00:05:00 •Customer Journey: 00:04:00 •Customer Journey vs Sales Funnel: 00:04:00 •3 Phases of a Sales Funnel: 00:07:00 •4 Stages of a Sales Funnel: 00:06:00 •Macro/Micro Conversions: 00:05:00 •Stages of Market Sophistication: 00:06:00 •Lead Generation Funnel: 00:06:00 •Digital Product Sales Funnel: 00:05:00 •7 Principles of Influence: 00:12:00 •Age Based Influence Triggers: 00:06:00 •Gender Influence Triggers: 00:06:00 •Interest Based Marketing: 00:04:00 •Understanding User Flow: 00:08:00 •XD Lesson 6 Class Project: Userflow - Your first UX deliverable: 00:07:00 •Working with Story Boards: 00:05:00 •XD Lesson 7 Class Project: Crafting a Story board: 00:09:00 •Working with Moodboards: 00:04:00 •XD Lesson 8 Class Project: Creating Moodboard: 00:11:00 •Sitemap & Information Architecture: 00:07:00 •XD Lesson - Class Project: App Architecture: 00:09:00 •Low and Hi Fidelity Wireframes: 00:03:00 •XD Lesson - Class Project: Login Screen Wireframe Using Material Design: 00:08:00 •Working with Prototypes: 00:04:00 •XD Lesson - Class Project: Home Screen Wireframe and Linking: 00:07:00 •XD Lesson - Class Project: Adding Interaction to Wireframes: 00:10:00 •Testing and Evaluating: 00:11:00 •UX Deliverables: 00:03:00 •UX Design Conclusion: 00:01:00 •UI Design Section Overview: 00:03:00 •UI Design Overview: 00:03:00 •Types of Interfaces: 00:10:00 •Landing Pages Overview: 00:10:00 •XD Lesson - Using Grids in XD: 00:08:00 •XD Lesson - Single Card design: 00:13:00 •UI Controls: 00:07:00 •UI Components: 00:12:00 •Navigational Components: 00:12:00 •Header Design Overview: 00:07:00 •XD Lesson - Mobile & Desktop: Header Design: 00:10:00 •XD Lesson - Mobile & Desktop: Dropdown Design: 00:06:00 •Common Layouts Overview: 00:08:00 •XD Lesson - Common Layouts: 00:07:00 •Mobile & Desktop Footer Design Overview: 00:07:00 •XD Lesson - Mobile & Desktop: Footer Design: 00:06:00 •Mobile & Desktop Button Design Overview: 00:05:00 •XD Lesson - Mobile & Desktop: Button Design: 00:10:00 •XD Lesson - Mobile & Desktop: Input Design: 00:07:00 •Mobile & Desktop Filter Search Bar Design Overview: 00:06:00 •Adobe XD Lesson - Mobile & Desktop: Filter Design: 00:07:00 •Adobe XD Lesson - Mobile & Desktop: Search Design: 00:03:00 •UI Kit Overview: 00:05:00 •Adobe XD Lesson - Desktop and Mobile: UI Kit: 00:06:00 •Microinteractions Overview: 00:05:00 •Adobe XD lesson - Microinteractions: 00:07:00 •Optimization Section Overview: 00:02:00 •Feedback Review & Getting Referrals: 00:04:00 •'Above the Fold' Rule: 00:04:00 •Adobe XD lesson - Designing a Powerful Above the Fold: 00:08:00 •Using Analytics For Optimization: 00:05:00 •Heat Maps & Element Placements: 00:04:00 •Crafting A Usability Report Overview: 00:08:00 •Adobe XD lesson - Crafting Reports in XD: 00:20:00 •Careers in UX/UI Section Overview: 00:06:00 •Your Daily Productivity Hub: 00:14:00 •How To Start Freelancing: 00:08:00 •Client Consulting: 00:04:00 •Building a Brand: 00:10:00 •Personal Branding: 00:06:00 •The Importance of Having a Website: 00:08:00 •Creating a Logo: 00:05:00 •Step by Step Website Setup: 00:17:00 •UI Templates: 00:06:00 •Logo Templates: 00:04:00 •Creating a Business Email: 00:06:00 •Networking Do's and Don'ts: 00:04:00 •Top Freelance Websites: 00:10:00 •UX/UI Project Scope Questions: 00:10:00 •Laser Focus & Productivity Tools: 00:06:00 •The Places to Find UX Jobs: 00:05:00 •Resources - Advanced Diploma in User Experience UI/UX Design: 00:00:00 •Assignment - Advanced Diploma in User Experience UI/UX Design: 00:00:00


AWS Certified Developer Associate - A Practical Guide
By Packt
The complete manual to help you master real-world AWS concepts and pass the AWS Developer Associate - Exam