- Professional Development
- Medicine & Nursing
- Arts & Crafts
- Health & Wellbeing
- Personal Development
6155 Courses
CSCS Green Labourers Card Health & Safety
By MJ Electrical Training
Discover a streamlined pathway to obtaining your CSCS Health and Safety qualification with our online course and City & Guilds exam. Designed for construction workers, our program offers test-your-knowledge exercises, 200+ practice questions, and comprehensive mock exams, ensuring effective preparation for success.

HLTA - Level 4 Certificate for Higher Level Teaching Assistants (RQF)
(212)By The Learning College Group
The Learning College Group offers this HLTA Level 4 Higher Level Teaching Assistant qualification that is fully Regulated and accepted in all schools across the UK. This HLTA qualification enables you to work with children between the ages of 5-18 years. Our TQUK Level 4 HLTA Teaching Assistant (RQF) Qualification is a fully recognised qualification regulated by Ofqual, of which is accepted within schools throughout the UK in the teaching sector.
Level 3 Assessor Training Qualification - CAVA or A1 Assessor Training
(47)By Academy for Health and Fitness
Ofqual Regulated Qualification|100% Online Course| FREE Assessment, Certificate & 1 Year Web Subscription|Expert Support
Diabetes Awareness - CPD Certified
By Wise Campus
Diabetes Awareness Online Training Are you interested in learning more about this field or starting a career in diabetes awareness? The latest advancements for guaranteeing success in your profession in diabetes awareness are fully covered by the Diabetes Awareness Training Curriculum. Six simple-to-understand lessons make up this diabetes awareness training course. You will first learn about the many types of diabetes through this Diabetes Awareness Training course. Furthermore, those complications will be thoroughly covered in this diabetes awareness training course. The Diabetes Awareness Training course will teach you about all of the diabetic therapies. Ultimately, this diabetes awareness training will teach you how to efficiently manage your daily life even when you have diabetes. So without further delay, enrol in this Diabetes Awareness Training course on diabetes awareness today to give yourself a competitive edge over your peers. Learning Outcomes of This Diabetes Awareness Training After completing this Diabetes Awareness Training course, you will be able to - Through the Diabetes Awareness Training, you will learn a little bit about the disease and its complications. Diabetes Awareness Training will also assist you in understanding chronic complications. You will learn about the use of medication and insulin for treating diabetes through diabetes awareness training. Diabetes awareness training will teach you how to treat diabetes with diet and exercise. Through the Diabetes Aware Main Course: Diabetes Awareness Free Courses are including with this Wellbeing: Wellbeing Training Course Along with The Diabetes: Diabetes Awareness Course, We Offer a free Massage Therapy course Along with The Diabetes: Diabetes Awareness Course, We Offer a free Adults Support Worker Course Special Offers of this Diabetes Awareness Course This Diabetes Awareness Course includes a FREE PDF Certificate. Lifetime access to this Diabetes Awareness Course Instant access to this Diabetes Awareness Course Get FREE Tutor Support to this Diabetes Awareness Course Diabetes Awareness: Diabetes Awareness Online Training You will learn about the different types of diabetes, potential complications, and diabetes management techniques to reduce the likelihood of these issues in this diabetes awareness course. After completing this course, you will have a solid understanding of diabetes and be able to support and assist others with confidence. Who is this course for? Diabetes Awareness: Diabetes Awareness Training Anyone interested in participating in this Diabetes Awareness: Diabetes Awareness Training is welcome to do so. Requirements Diabetes Awareness: Diabetes Awareness Training To enrol in this Diabetes Awareness Course, students must fulfil the following requirements. To join in our Diabetes Awareness: Diabetes Course, you must have a strong command of the English language. To successfully complete our Diabetes Awareness: Diabetes Training Course, you must be vivacious and self driven. To complete our Diabetes Awareness: Diabetes Training Course, you must have a basic understanding of computers. A minimum age limit of 15 is required to enrol in this Diabetes Awareness: Diabetes Training Course. Career path Diabetes Awareness: Diabetes Awareness Training Your chances of landing a job in this sector will enhance if you finish this Diabetes Awareness: Diabetes Awareness Training.
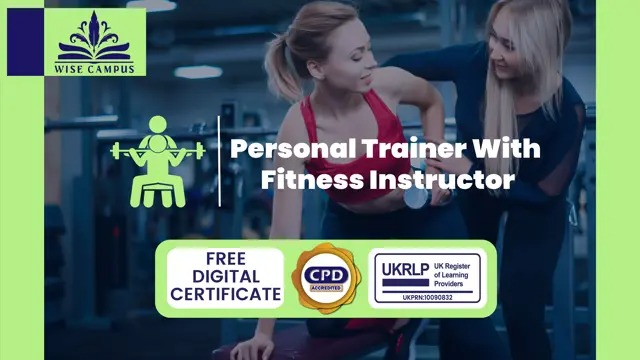
Complete Personal Trainer Training - CPD Accredited
By Wise Campus
Personal Trainer : Personal Trainer Online Training Are you ready to advance your fitness career by becoming a certified personal trainer? It would be the perfect place for you to start your journey with us. Our Personal Trainer : Personal Trainer course is approved and recognised in the fitness industry, ensuring that you obtain a high-quality education. They boost your learning experience by bringing a wealth of expertise and practical knowledge to the Personal Trainer : Personal Trainer course. Throughout our Personal Trainer : Personal Trainer course, you will gain a deep understanding of anatomy, physiology, exercise science, and nutrition. With this Personal Trainer : Personal Trainer course you will learn how to guide clients towards achieving their fitness goals and promoting a healthy lifestyle by doing our Personal Trainer : Personal Trainer course. The Personal Trainer : Personal Trainer course provides effective feedback and assistance, ensuring you obtain the direction you need to flourish in your studies and future job as a Personal trainer. Main Course: Personal trainer Free Courses are including with this Personal trainer: Personal trainer Course Along with The Personal trainer: Personal trainer Course, We Offer a free Gym InstructorCourse Along with The Personal trainer: Personal trainer Course, We Offer a free Diploma in Sports Nutrition Course Special Offers of this Personal trainer: Personal trainer Training Course This Personal trainer: Personal trainer Course includes a FREE PDF Certificate. Lifetime access to this Personal trainer: Personal trainer Course Instant access to this Personal trainer: Personal trainer Course Get FREE Tutor Support to this Personal trainer: Personal trainer Course Personal Trainer : Personal Trainer Online Training Our Comprehensive Personal Trainer : Personal Trainer Certification Course also provides you with the knowledge and skills required to become an excellent personal trainer. The Personal Trainer : Personal Trainer course also offers a transformative learning experience that encourages you to make a positive impact on the lives of your future clients. Don’t delay! Enrol in our Personal Trainer : Personal Trainer course now! Who is this course for? Personal Trainer : Personal Trainer Online Training The Personal Trainer : Personal Trainer course is perfect for those who are really interested in fitness and wish to share their enthusiasm with others. This Personal Trainer : Personal Trainer course is suitable for anyone who wants to make a career in this field. Requirements Personal Trainer : Personal Trainer Online Training To enrol in this Personal Trainer : Personal Trainer Course, students must fulfil the following requirements. To join in our Personal Trainer : Personal Trainer course, you must have a strong command of the English language. To successfully complete our Personal Trainer : Personal Trainer course, you must be vivacious and self driven. To complete our Personal Trainer : Personal Trainer course, you must have a basic understanding of computers. A minimum age limit of 15 is required to enrol in this Personal Trainer : Personal Trainer course. Career path Personal Trainer : Personal Trainer Completing the Comprehensive Personal Trainer: Personal Trainer Certification Course will offer you a plethora of interesting and gratifying employment prospects in the fitness sector.
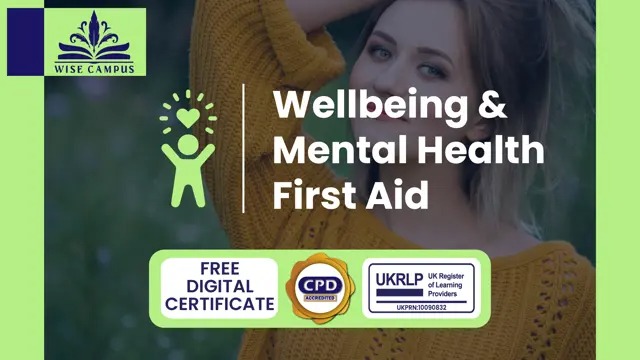
Wellbeing & Mental Health First Aid
By Wise Campus
Wellbeing: Wellbeing Training Course Healthy state of mind is a key step of spiritual well being! - Keep up your journey energetic with our Health and Wellbeing: Wellbeing Training Course. Invest in your overall well-being with our empowering Wellbeing: Wellbeing course. Dive deep into the Wellbeing program, mastering essential Wellbeing techniques, and gaining invaluable Wellbeing knowledge. Enroll today to enhance your holistic well-being, achieving a more balanced and fulfilling life. Don't miss this opportunity to excel in Wellbeing. Join us now and take the first step toward a happier, healthier you. Enrol in the Wellbeing: Wellbeing Training Course right away if you want to succeed in the field of health and wellbeing in the future. Main Course: Diploma in Health and Wellbeing Free Courses are including with this Wellbeing: Wellbeing Training Course Along with The Wellbeing: Wellbeing Course, We Offer a free Massage Therapy course Along with The Wellbeing: Wellbeing Course, We Offer a free Level 5 Mental Health First Aid Certification Course Along with The Wellbeing: Wellbeing Course, We Offer a free Level 2 Health & Care Course Along with The Wellbeing: Wellbeing Course, We Offer a free Drug and Alcohol Awareness Training Course Along with The Wellbeing: Wellbeing Course, We Offer a free Level 2 Award in Improving Personal Exercise, Health and Nutrition Course Special Offers of this Wellbeing: Wellbeing Training Course This Wellbeing: Wellbeing Training Course includes a FREE PDF Certificate. Lifetime access to this Wellbeing: Wellbeing Training Course Instant access to this Wellbeing: Wellbeing Training Course Get FREE Tutor Support to this Wellbeing: Wellbeing Training Course Wellbeing: Wellbeing Training Course This Wellbeing Training: Wellbeing Training Course will teach you about a variety of health and social issues, including addiction, mood disorders, and nutrition. Whether you want to be a Social Worker, a Counsellor, or a Mental Health Worker, the Wellbeing Training: Wellbeing Training Course will prepare you to help others. Who is this course for? Wellbeing: Wellbeing Training Course The learners can take this Wellbeing: Wellbeing Training Course without any prior knowledge. The Health and Wellbeing Course has no age limitations. Requirements Wellbeing: Wellbeing Training Course To enrol in this Wellbeing: Wellbeing Training Course, students must fulfil the following requirements. To join in our Wellbeing: Wellbeing Training Course, you must have a strong command of the English language. To successfully complete our Wellbeing: Wellbeing Training Course, you must be vivacious and self driven. To complete our Wellbeing: Wellbeing Training Course, you must have a basic understanding of computers. A minimum age limit of 15 is required to enrol in this Wellbeing: Wellbeing Training Course. Career path Wellbeing: Wellbeing Training Course After completing the Wellbeing: Wellbeing Training Course, you will be in a position to better yourself and enhance your Wellbeing abilities for your profession in the relevant Health and Wellbeing: Wellbeing area with the utmost confidence. Assistant for Health and Wellbeing Health and wellbeing assistant
AUTOCAD Training for Both MAC and PC Users
By Real Animation Works
Face to Face Training Customised and Bespoke.
Photoshop Evening Training
By London Design Training Courses
Why Choose Photoshop Evening Training Course? Click here for more info Become proficient in Photoshop, the premier photo editing software, with our London Software Training course. Gain essential skills in photo editing, enabling independent navigation of the interface for successful edits and graphic creation. Duration: 10 hours Approach: 1-on-1 guidance, Customized instruction. Schedule: Tailor your own hours, available from Mon to Sat between 9 am and 7 pm.Or Call 02077202581 or WhatsApp 07970325184. Participate in our Photoshop Evening Training Course, hosted at the UK's largest training school. Whether you're a beginner or an expert, our course is tailored to suit your level, offered both live online and in person. Adobe Photoshop Course Highlights: Embark on your design journey with our Adobe Photoshop course, conducted at the UK's leading Adobe Training Centre. Acquire proficiency in Adobe's premier digital imaging software, crucial for digital content creation. Our courses prioritize hands-on exercises, ensuring practical learning experiences. Whether you're new to Photoshop or an experienced user seeking efficiency, our diverse courses cater to your needs. Join us to master Photoshop and unleash your creative potential. Course Details: Duration: 10 hours Approach: Personalized 1-on-1 guidance, customized instruction. Schedule: Flexible hours available from Mon to Sat between 9 am and 7 pm. For inquiries, call 02077202581 or WhatsApp 07970325184. Evening Adobe Photoshop - 10-Hour Training Course Module 1: Introduction to Photoshop (1 hour) Overview of Photoshop interface and tools Understanding file formats and resolution Navigating the workspace and customizing preferences Essential keyboard shortcuts for efficient workflow Module 2: Working with Layers (1 hour) Mastering the concept of layers and their importance Organizing and managing layers effectively Applying layer styles for creative effects Utilizing blend modes for stunning compositions Module 3: Selection Techniques (1 hour) Understanding different selection tools and their uses Precise selections using the Marquee, Lasso, and Magic Wand tools Advanced selections with Quick Selection and Refine Edge Creating masks for non-destructive editing Module 4: Image Editing and Retouching (1 hour) Essential photo retouching techniques for portraits and landscapes Correcting exposure, color, and tone with Adjustment Layers Using the Healing Brush and Clone Stamp for seamless repairs Removing distractions and blemishes with Content-Aware tools Module 5: Typography and Text Effects (1 hour) Working with text layers and formatting options Creating eye-catching text effects using Layer Styles Manipulating text along paths and shapes Designing typographic compositions Module 6: Advanced Image Manipulation (1 hour) Combining images with layer masks and blending modes Creating composite images and surreal artwork Applying transformations and distortions for creative effects Working with Smart Objects for non-destructive editing Module 7: Filters and Special Effects (1 hour) Exploring various filters for artistic and practical purposes Applying blur, sharpening, and distortion filters Creating artistic effects with the Filter Gallery Using smart filters for flexible editing Module 8: Drawing and Vector Graphics (1 hour) Working with shape layers and vector tools Creating custom shapes and icons Utilizing the Pen tool for precise illustrations Designing logos and scalable graphics Module 9: Advanced Color Correction (1 hour) Mastering color adjustments with Curves and Levels Using Adjustment Layers for selective color control Understanding color spaces and profiles Creating duotones and split-tones Module 10: Designing for Web and Print (1 hour) Preparing images for web and social media platforms Understanding resolution and color modes for print Exporting files in various formats for different purposes Final project: Designing a digital artwork or print-ready composition Learning Outcome refers to what students are expected to know, understand, or be able to do at the end of a learning experience, such as a course, training program, or educational module. Learning outcomes are usually specific, measurable, and achievable objectives that demonstrate the effectiveness of the learning process. For example, learning outcomes for a Photoshop course could include: Participants will be proficient in using essential Photoshop tools and features. Participants will demonstrate the ability to apply advanced image editing and retouching techniques. Participants will be able to create visually appealing designs using layers, typography, and special effects. Participants will understand and utilize different file formats and color modes for various output requirements. Participants will produce a final project showcasing their skills and creativity in Adobe Photoshop.

77-728 Complete Techniques for the MOS Excel Expert Exam
By Packt
Become a Microsoft Certified Excel Expert - includes lectures, test exercises, and video solutions