- Professional Development
- Medicine & Nursing
- Arts & Crafts
- Health & Wellbeing
- Personal Development
415 PM courses in Cardiff delivered Live Online
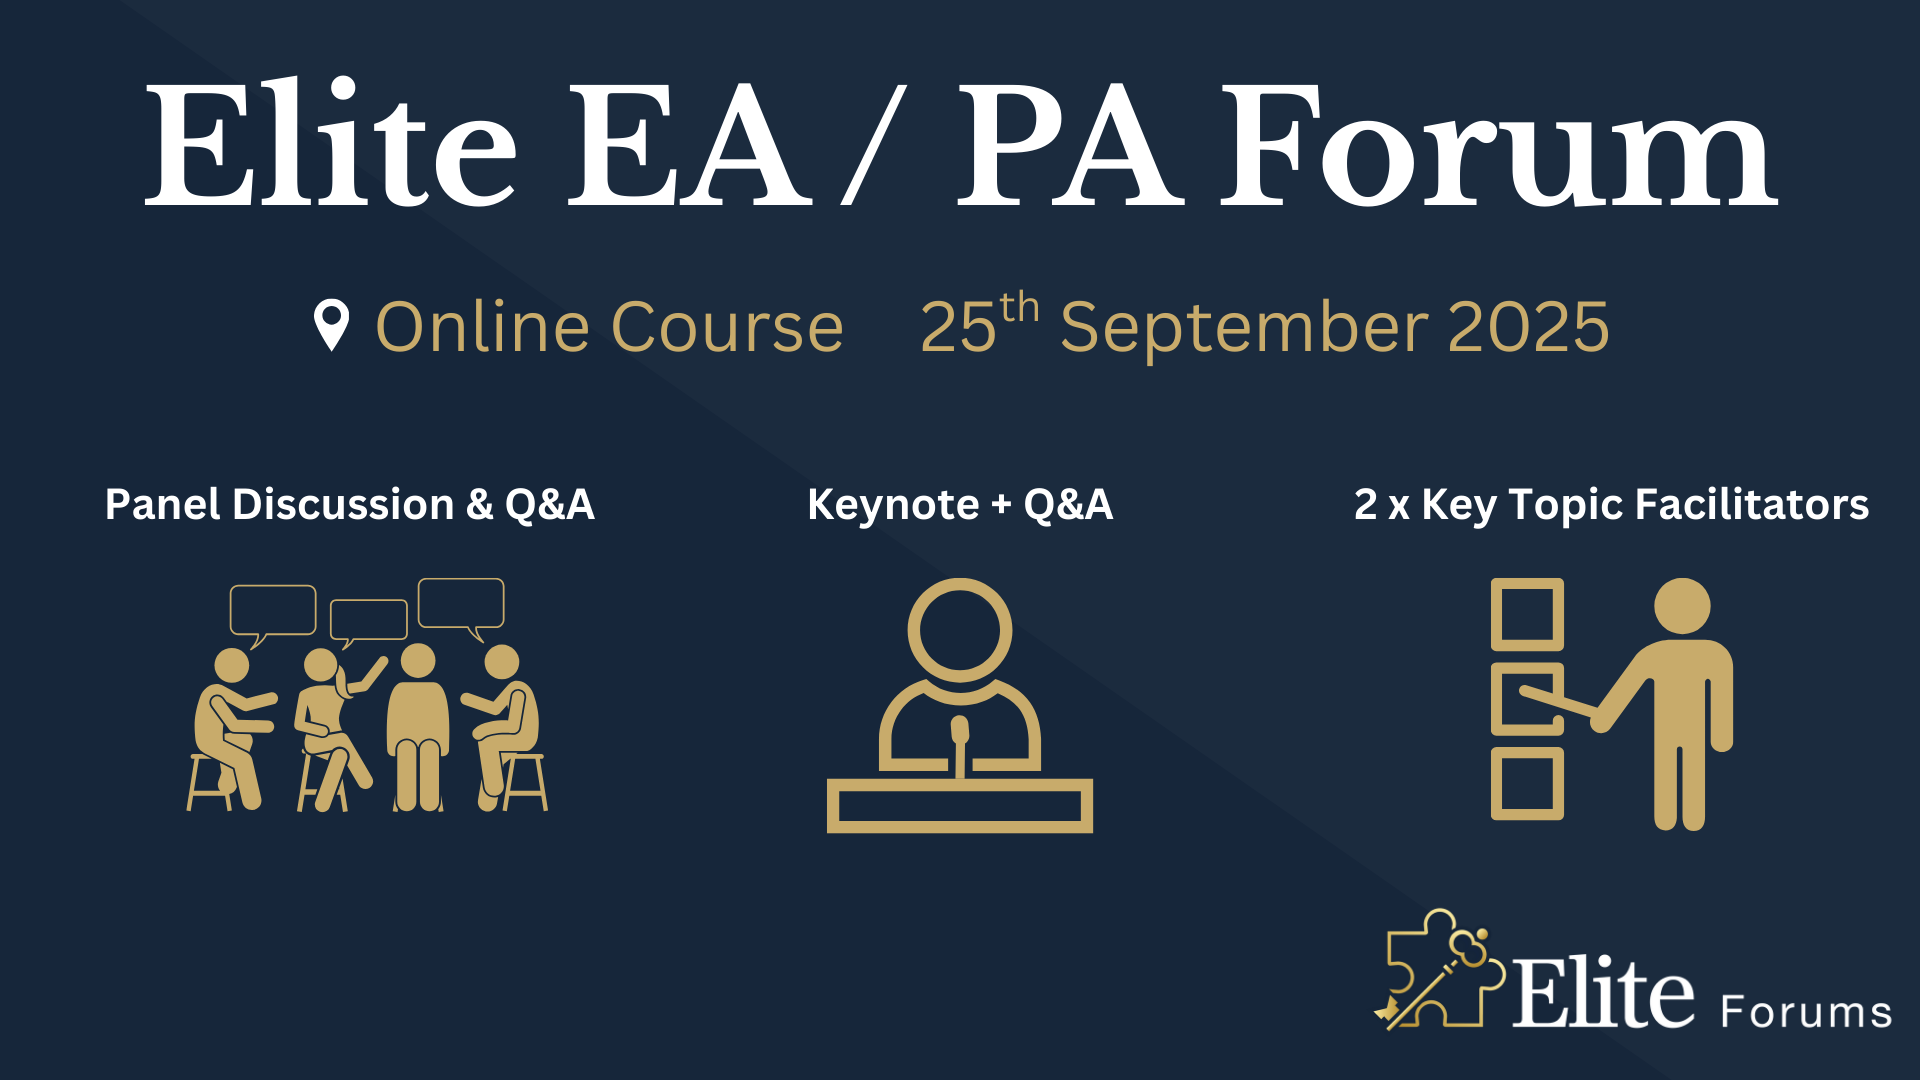
Elite EA PA Forum 🇳🇿
By Elite Forums Events
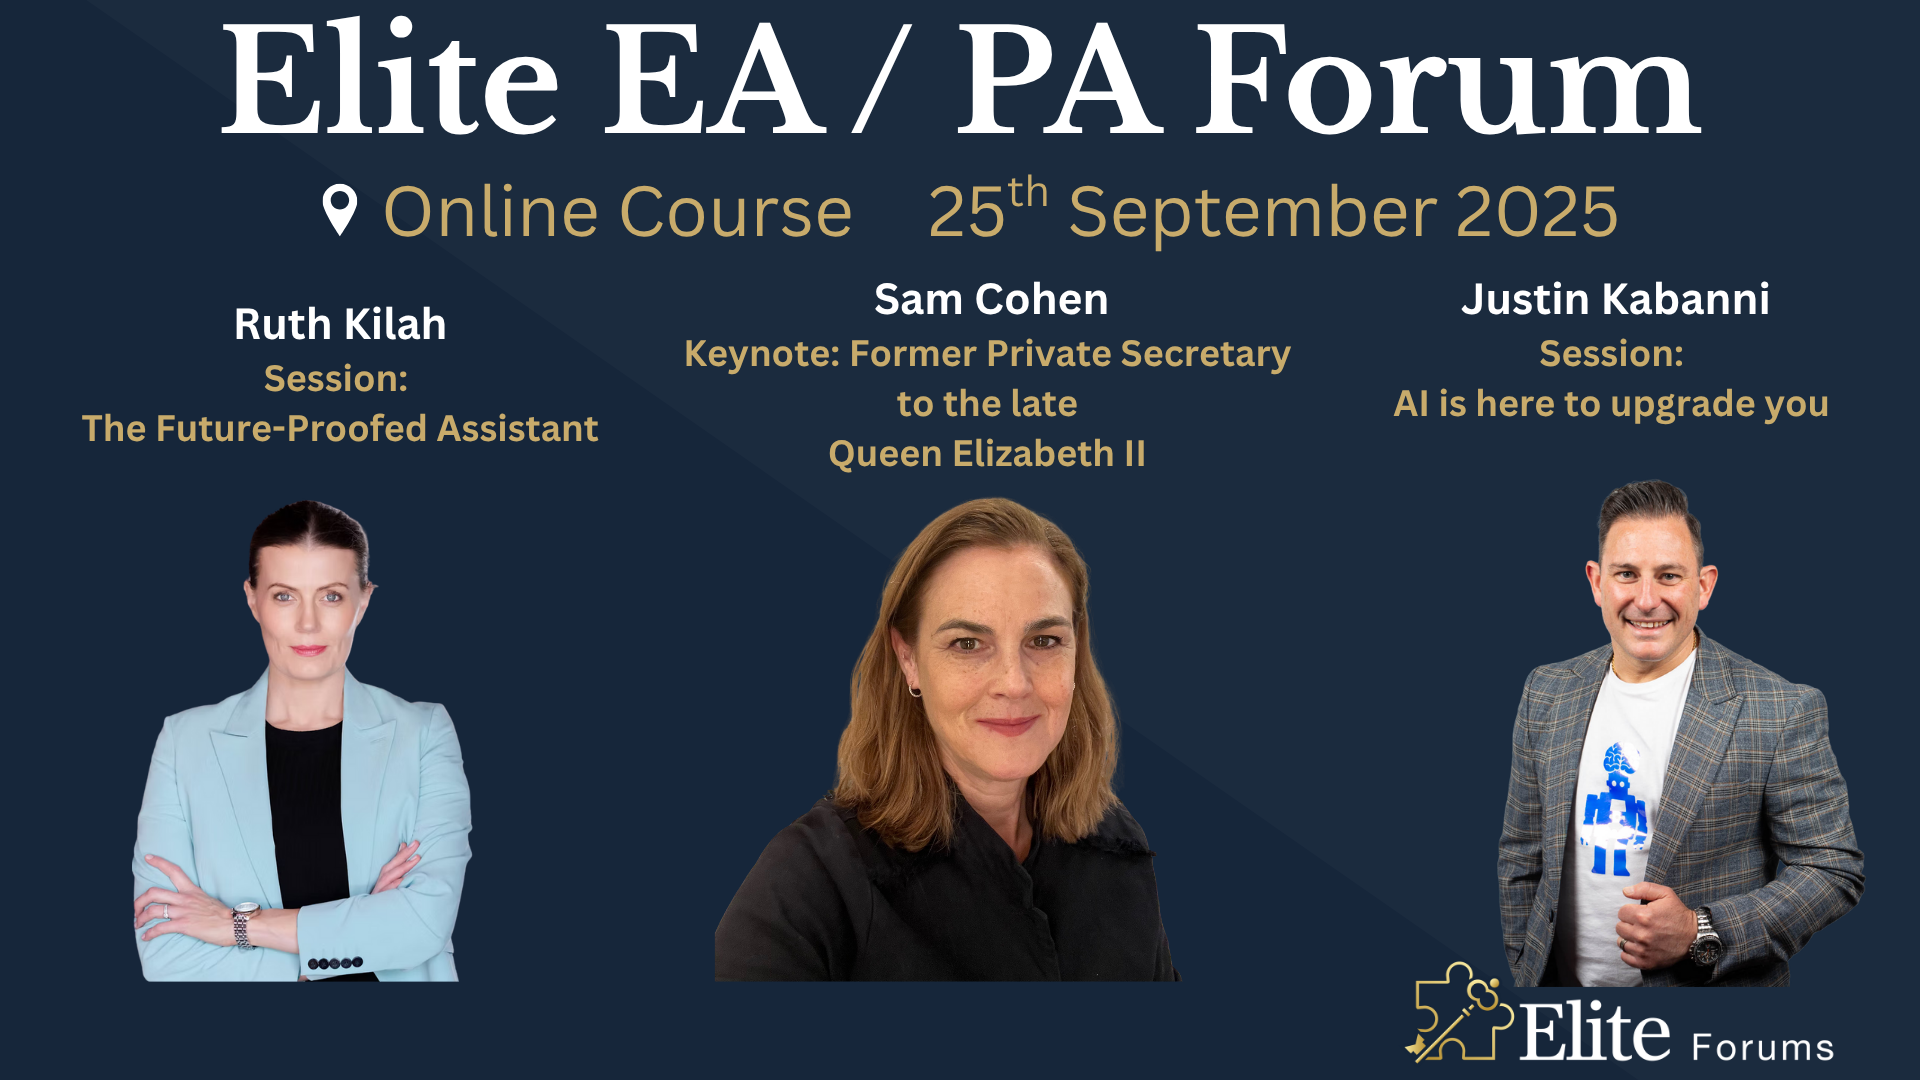
Elite EA/PA Forum We are delighted to announce that the Elite EA/PA Forum for Australia & New Zealand will be on the 25th of September 2025. Our workshop aims to: Enhance your influence and impact by mastering assertive communication, negotiation, and self-advocacy skills. Stay composed and solution-focused in high-pressure situations with practical tools for crisis management and clear decision-making. Embrace evolving technology by understanding how AI and automation can streamline your role and boost efficiency. Future-proof your career by building strategic value, resilience, and adaptability in an ever-changing professional landscape. Keynote Address with Q&A from the audience: What to expect from Sam's Keynote: With over 30 years supporting leaders at the highest levels, Sam Cohen brings a wealth of insight, experience, and stories (the kind she can share) to the stage. From 18 years serving within The Royal Household - including as Deputy Private Secretary and Press Secretary to Her late Majesty Queen Elizabeth II - to working with The Duke and Duchess of Sussex, running the Prime Minister’s Office at Downing Street, and serving as Chief of Staff to the global CEO of Rio Tinto, Sam’s career is a masterclass in discretion, diplomacy, and delivering at the top. In this exclusive keynote, Beyond the Role, Sam will explore how Executive Assistants don’t just support leaders - they shape leadership, drive strategy, and build legacy from behind the scenes. Join us for this rare opportunity to hear from someone who’s been at the epicentre of power - and bring your questions! The keynote will include a live Q&A, where you can ask Sam about her remarkable career, leadership insights, and how to truly excel in high-performance environments. (Don’t ask her what the Queen kept in her handbag - she’s not telling.) Sam Cohen Career Bio: Sam Cohen has spent the last 30 years working to support leaders in the public and private sectors. Sam spent 18 years serving The Royal Household, as Deputy Private Secretary to Her late Majesty Queen Elizabeth II and Press Secretary to The Queen. Sam also served as Private Secretary to The Duke and Duchess of Sussex. Following this time, Sam worked as Director of the Prime Minister’s Office at Downing Street under Boris Johnson and, most recently, was Chief of Staff to the global CEO at Rio Tinto. Source: ABC News - YouTube Channel. Facilitator - AM: The Future-Proofed Assistant: Speak Up, Stand Out & Shape Your Career Path How to reimagine your Assistant role in 2025 and beyond - How the EA role is evolving (and what Executives now expect) & why Assistants who think like strategists will be indispensable Assertiveness as an Assistant – The key to retaining your role & the difference between being ‘helpful’ and being ‘heard’ Self-Advocacy as a Career Growth Strategy – The importance of advocating for your career development, workload boundaries and recognition Own Your Professional Future - Map your career development. Whether you're an EA for life or looking to a role beyond in the future, this is for you. Ruth Kilah Career Bio: Ruth is an international executive career coach and founder of Hoxton Hyde – Executive Career Coaching & Mentoring, delivering 1:1 and group programs for experienced Executive Assistants. She specialises in helping EAs step into higher-level roles, increase their income, and expand their professional impact. With 14 years’ experience supporting C-suite executives in Australia and the UK, Ruth brings deep industry insight and a strategic approach to career development. She empowers Assistants to gain clarity on their next move, adopt a strategic mindset, communicate their value effectively, and lead their own growth conversations with confidence. A former EA turned Stakeholder Relations and Project Manager, Ruth launched Hoxton Hyde in 2018 after spotting a clear gap in the market for tailored coaching for career-driven EAs. She is a recognised member of the World Administrators Alliance and a respected thought leader in the EA space, regularly sharing insights via LinkedIn and Instagram. Ruth is also a certified fitness and wellness coach, passionate about helping Assistants achieve long-term career fulfilment through intentional development and well-being. Panel: Crisis Mode: What to do when everything goes wrong Master a step-by-step approach to prioritising and problem-solving under pressure. Strengthen emotional resilience and calm decision-making during unexpected disruptions. Learn how to communicate clearly and lead from behind in high-stress situations. Emma-Kate Bos Bio Emma-Kate works alongside the CEO at Squadron Energy, one of Australia’s leading renewable energy companies. With over 28 years of experience in Executive Assistant and Operational roles supporting business leaders in professional services, politics, membership industries, sporting and not-for-profit organisations, Emma-Kate has a deep understanding of business support roles and has managed large teams of assistants and receptionists. She is passionate about developing and mentoring team members Emma-Kate holds an Associate Degree in Law, Mini MBA and Certificate in Public Relations. Sepi Nowlands Sepi has also worked as an EO for Deloitte and spent 18 years previously as an Executive Assistant at the ATO, Law Council of Australia, Grains Research and Development Corporation and Air Services Australia. Holly Clareburt Hollie Clareburt is an experienced Executive Assistant, currently supporting the Managing Director of Microsoft New Zealand and the Chief Partner Officer. Known for her professionalism and discretion, she excels in providing high-level support in fast-paced, executive environments. Prior to Microsoft, Hollie was Executive Assistant to the Chief of Corporate & Enterprise Systems at BECA, and previously supported the CEO at SKY News New Zealand. Her career reflects a strong track record of reliability, organisation, and executive partnership. Liv Wilson With over 20 years of experience across banking, government, creative industries, and global tech, Liv has supported senior leaders at companies including LinkedIn and Slack. She brings a strategic lens to the business support function, with deep expertise in operations, leadership enablement, and organisational effectiveness. As a passionate advocate for elevating the role of Executive Assistants, Liv has led women’s networks, championed DEI and social impact initiatives, and continues to push for recognition of business support as a critical driver of business success. She is currently working on her side hustle business - collaborating with executives, entrepreneurs, and small business owners to amplify their impact by removing operational barriers, optimising systems, and unlocking their capacity to lead and grow. Facilitator - PM: Justin Kabbani AI Is Not Here to Replace You. It's Here to Upgrade You. We'll explore Justin's proven 3P framework: Priming – How to set up AI like a strategic advisor by feeding it context, tone and mindset Prompting – How to craft clear, structured instructions to get consistently great results Producing – How to turn AI outputs into high-leverage work that makes you stand out Your session outcomes: Real examples from admin professionals already using AI to elevate their work Prompts you can copy, adapt, and test live Interactive exercises to build confidence fast A practical challenge to implement right after the session If you’ve been overwhelmed by AI, or underwhelmed by its impact, this session will change that. You'll leave with tools you can use today, and a mindset you’ll carry forward for the rest of your career. Justin Kabbani Career Bio: Justin Kabbani is one of Australia’s most in-demand AI trainers and keynote speakers, known for making AI feel simple, powerful, and immediately useful. He’s worked with brands like Uber, Treasury Wine Estates, and Udemy, helping their teams embed AI into daily workflows, strategic planning, and executive communication. Over the past two years, Justin has trained more than 2,000 professionals across Australia and beyond, consistently earning feedback like “mind-blowing,” and “game-changing”. His signature Prime, Prompt, Produce framework has transformed how business leaders, executive assistants, marketers, and teams think, work, and communicate with AI, without needing to be “tech people.” Justin believes AI isn’t here to replace people. It’s here to take the robotic work off our plate, so we can focus on what humans do best. LinkedIn: https://www.linkedin.com/in/justinkabbani/ Website: https://justinkabbani.com/ Speed Connections Networking Session Join us for Speed Connections, a lively 30-minute networking session designed to foster meaningful connections in a fun, fast-paced environment. Every 10 minutes, attendees will be placed into new breakout rooms with small groups, giving everyone the chance to meet a diverse range of peers. Each breakout session will feature engaging prompts to spark conversations and make networking enjoyable and memorable! Who will attend this event? Executive Assistant (EA) Personal Assistant (PA) Virtual Assistant (VA) Legal Secretary Legal Executive Assistant Administrative Assistant Office Manager Health Care Office Manager Chief of Staff Additional roles may be relevant depending on role responsibilities, along with development opportunities. This workshop is open to females, male including trans women/males and non-binary professionals. Group Rate Discounts: To discuss our group rates in more detail, please email support@elite-forums.com and provide the following: Group Number (How many would like to attend) Event Date (If numerous dates, please advise if we are splitting attendees across multiple dates) Attendee Contact details (Or request our Group Rate Document. Complete and return - we'll sort the rest.) Group discounts are on request - see below group rate discount brackets: 🧩 You just need one piece to come together - to unlock your Elite Potential. 🔑
3D AutoCAD Basics to Advanced Training Course
By ATL Autocad Training London
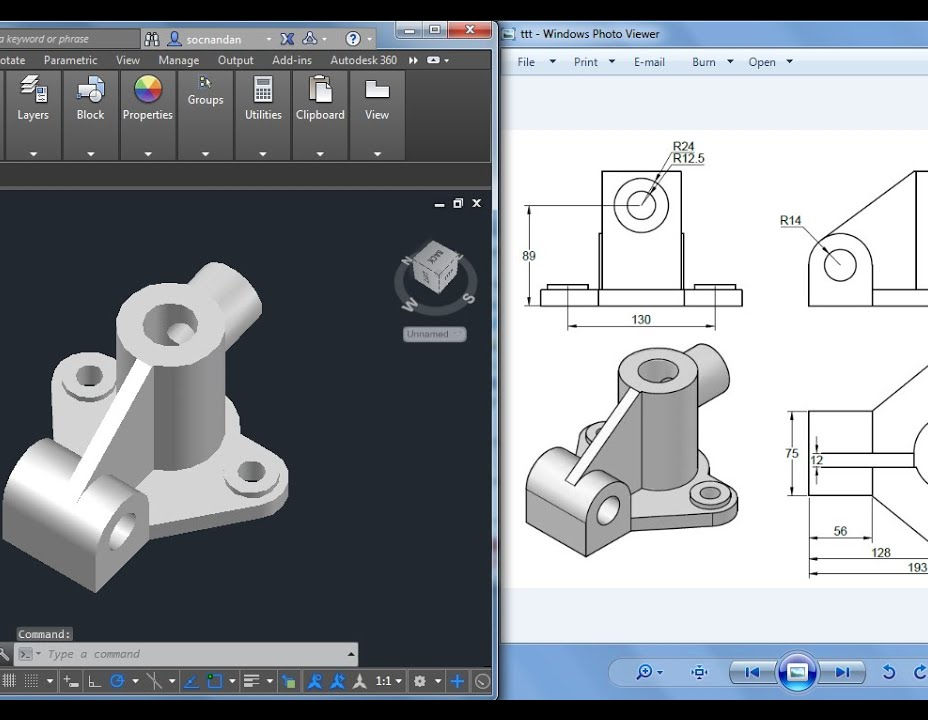
Why Choose 3D AutoCAD Basics to Advanced Training Course? Students learn how to create and modify both solid and surface models. This AutoCAD Training course also teaches students how to present their designs in 3D products and designs. Check our Website Duration: 16 hours Approach: 1-on-1, Book your own day and time. We are open Monday to Saturday 9 am to 7 pm. How to Book this course? Call us on 02077202581 and we will book the dates and times you like. Flexible Schedule: 1-on-1 Face to Face or Live Online. AutoCAD 3D Training: Comprehensive Course Overview Exploration of 3D Modeling and Imaging Generating 3D Drawings Navigating the 3D Modeling Workspace Crafting 3D Shapes using Solid Tools Extruding Polylines into 3D Forms Isolating Coordinates with Point Filters Navigating and Orienting Your Model Achieving Visual Effects Converting 3D Views into 2D AutoCAD Drawings Advanced 3D Techniques Setting Up AutoCAD for 3D Mastering the User Coordinate System Leveraging UCS Options Utilizing Viewports for 3D Drawing Employing Array Tools Crafting Complex 3D Surfaces Constructing Spiral Forms Developing Surface Models Manipulating Objects in 3D Space Rendering and Visualization of 3D Drawings Introduction to Rendering Rapid Rendering Techniques Simulating Sunlight and Shadows Application and Adjustment of Materials Creating Effects with Lights and Materials Texture Mapping and Adjustments Exploration of Rendering Options Enhancing Views with Cameras Printing Rendered Drawings Simulating Natural Lighting Editing and Visualizing 3D Solids Overview of Solid Modeling Creation of Basic and Complex Solids Editing Solid Forms Improving the 2D Drawing Process Visualization and Analysis of Solids Exploration of 3D Mesh and Surface Modeling Introduction to 3D Meshes and Surfaces Creation and Editing of 3D Meshes Crafting Mesh Surfaces Conversion of Meshes to Solids Understanding and Editing 3D Surfaces Customization of Interface and Tools Customization of Workspaces Personalization of the User Interface Creation of Macros in Tools and Menus Working with Expanded Text Boxes Saving and Managing Customizations Exploration of the Diesel Macro Language Designing Custom Linetypes and Hatch Patterns Management and Sharing of Your Drawings Sharing Drawings Online ePublishing Your Work Managing Drawings with DesignCenter and Tool Palettes Exploring the Drawing Library with Content Explorer Establishment of Office Standards Conversion of Layer Settings https://www.autodesk.co.uk Download a free 30-day trial of AutoCAD Learning outcomes after completing the AutoCAD 3D course. Professional Presentation: Create dynamic walkthroughs and presentations that effectively communicate your 3D models and designs. Certification: Obtain a certification as proof of your proficiency in AutoCAD 3D modeling, validating your skills in the industry. Mastery of 3D Modeling: Possess comprehensive skills, from fundamental concepts to advanced techniques in 3D modeling. Enhanced Career Prospects: Improve your career opportunities and prospects in various design-related fields such as architecture, engineering, and product design. Realistic Rendering: Be able to create highly realistic visualizations that enhance the quality of your designs. Practical Hands-On Experience: Gain practical experience and confidence in 3D modeling through extensive hands-on practice. Personalized Learning: Benefit from one-on-one attention and tailored training to meet your specific learning needs and pace. Lifetime Email Support: Continue to receive assistance and guidance through lifetime email support, ensuring you are supported even after completing the course. 3D AutoCAD Training Courses Gain confidence and proficiency in AutoCAD. Discover the fundamentals of 3D modeling and object creation in this introductory AutoCAD 3D course. Booking Your Training Course: Experience personalized training with our adaptable 1-on-1 sessions. You have the freedom to customize your schedule by reserving a convenient hour at your discretion. Our booking slots are available from Monday to Saturday, spanning from 9 a.m. to 7 p.m. You can also reach us at 02077202581 to make a booking over the phone. Course Duration: 10 hours "You have the flexibility to divide these 10 hours across multiple days to suit your ideal schedule." Training Method: 1-on-1 (In-person face-to-face or Live Online) Expect personalized attention, tailor-made content, a flexible learning pace, and dedicated individual support throughout your training journey. This hands-on course provides ample opportunities to experiment with newly acquired techniques and seek answers to your questions. Key Features: An introductory course tailored to AutoCAD 3D's essential features. Abundant one-on-one guidance and dedicated question time. Friendly expert trainers, small class sizes, and a comfortable learning environment. Comprehensive course materials and additional resources. Ongoing support and assistance with post-course challenges. What Will You Learn? This course will equip you with the foundational knowledge and workflows necessary to create 3D models within AutoCAD 3D. You will delve into the creation and modification of both solid and surface models. Upon completion, you will be able to: Effortlessly fashion intricate shapes by combining simple elements. Precisely extract geometries and dimensions from your creations. Easily customize the view and presentation style of your objects. Is This Course Right for You? No prior experience with AutoCAD 3D is required. This course caters to individuals proficient in working with 2D objects who aspire to construct 3D models of their designs. Gain proficiency in the fundamental tools and functionalities to create precise and professional 2D and 3D drawings, advancing to more complex techniques. Enhanced Efficiency: Discover time-saving strategies, tips, and workflows that will boost your productivity and streamline your design process within AutoCAD 3D. Versatility in Design: Develop the skills needed to undertake a wide range of projects, from architectural plans and engineering drawings to mechanical components and electrical schematics. Industry-Recognized Expertise: Cultivate in-demand skills relevant to architecture, engineering, construction, and manufacturing, paving the way for career advancement and professional development. Accessible Lesson Recordings: Access recorded lessons at your convenience to review and reinforce course material whenever necessary. Continuous Email Support: Benefit from ongoing assistance with lifetime email support, ensuring you have access to guidance, answers, and clarifications even beyond the completion of the course.
SketchUp - Rendering with V-Ray Course
By ATL Autocad Training London
Who is this course for? SketchUp - Rendering with V-Ray Course This course is tailored for architects, designers, 3D artists, and anyone interested in enhancing their rendering skills using SketchUp and V-Ray. Whether you're a beginner or an experienced user, this course provides in-depth training to create stunning visualizations and realistic renders in SketchUp using V-Ray. Check our Website Course Duration: 6 hours Training Method: 1-on-1, (Face to Face) or Live Online session. Personalized to your needs. Course Content Overview: SketchUp and V-Ray: Exploring Intermediate Modeling Techniques Mastering V-Ray Materials: Textures, Sources, and Editing Managing and Optimizing Textures for Graphics and Bitmaps Illuminate Your Designs: Delving into Lighting: Types, Placement, and Scene Enhancement Understanding V-Ray Camera: Exposure, White Point, and Efficient Setup Achieve Stunning Renderings: Rendering Scenes: Digital Output, File Formats, and Best Practices Optimizing Quality Settings for Efficient Scene Creation Transitioning from 2D to 3D: Modeling Essentials for Visualization Utilizing Follow-Me and Push-Pull Techniques Enhancing Designs with Components: Choosing Between Groups and Components Mastering V-Ray Frame Buffer: Automatic 2D Graphic Saving File Types, Properties, and Effective Usage Perfecting V-Ray Materials: Materials Editor: Layering, Previews, and Shiny Surfaces Incorporating Bumps and Bitmaps for Realism Exploring Advanced Techniques: Unveiling Ambient Occlusion Effects Advanced Modeling, including Magic Box and Polygon Techniques Optimizing Texturing: Projected UVW Mapping Fine-Tuning Mapping Size and Position Locking Mapping for Consistency Alpha Channels: Preparing Graphics with Alpha Channels Integrating Rendered Output with Photoshop Hands-On Learning: Practical Exercises: From Concept to Stunning Renderings Vray for SketchUp Trial. https://www.chaosgroup.com/vray/sketchup/free-trial. Texture resources https://www.vray-materials.de/ and https://textures.com After completing the SketchUp and Vray course, participants will: Gain expertise in creating realistic 3D architectural and interior design scenes using Vray for SketchUp. Master lighting, camera settings, and composition for visually striking renders. Excel in applying Vray materials and textures for enhanced design quality. Produce high-quality renderings and refine them with post-production techniques. Receive a certification of attendance and 30 days of post-course email support. Job opportunities include roles in architectural visualization, interior design, real estate marketing, product design, and more. Skills Acquired: Advanced SketchUp Proficiency: Master advanced techniques for modeling and designing in SketchUp. V-Ray Rendering Skills: Learn how to use V-Ray to create realistic, high-quality renders in SketchUp. Texture Mapping and Material Application: Understand the art of texturing and applying materials for lifelike renders. Lighting Techniques: Explore various lighting setups to enhance the realism of your renders. Post-Processing: Gain skills in enhancing renders further through post-processing techniques. Job Opportunities: Architectural Visualizer: Create detailed and realistic architectural visualizations for projects. Interior Designer: Develop compelling interior visualizations for residential or commercial spaces. 3D Artist: Work in the gaming or animation industry, creating 3D models and environments. Visualization Specialist: Provide visualization services for real estate, marketing, or design agencies. Freelance Renderer: Offer your rendering services on a freelance basis to various clients. Why Choose Our Training? Personalized Coaching: Benefit from one-on-one training sessions conducted either Face to Face (SW96DE) or Live online, ensuring a tailored experience with practicing architects and designers. Flexible Hours: Our training is available Monday to Saturday from 9 am to 7 pm, accommodating your schedule for a seamless learning experience. Tailored Tutorials: Take advantage of custom video tutorials designed specifically for you, providing additional resources to enhance your learning journey. Comprehensive Reference: Receive a digital reference book to support thorough revision, ensuring a comprehensive understanding of each concept covered. Ongoing Support: Enjoy free and continuous support via phone or email even after the course concludes, ensuring your success beyond the classroom. Adaptable Syllabus: We customize the syllabus and projects to meet your specific needs, ensuring a focused learning experience on what matters most to you. Official Certification: Receive a certificate upon completing your course, recognizing your achievement in mastering the content. Why Us? Individualized Learning Support: Our courses, ranging from 10 hours to 120 hours Diploma training Courses, provide consistent support. With personalized assignments and post-course assistance, we guide you towards mastering software with dedicated help. Personal Attention, No Crowds: Say goodbye to crowded classrooms. Experience the intimacy of one-on-one learning, ensuring you receive the focused attention necessary for a confident and comfortable learning environment. Financial Flexibility: We understand the financial aspects of education. We offer various payment plans tailored to your needs, making your learning journey accessible and affordable. Expert Instructors, Real-world Knowledge: Our instructors are industry experts chosen for their extensive knowledge and teaching passion. Dedicated to imparting invaluable skills, they provide real-world insights to anyone eager to learn.

Vectorworks Basics to Essentials Training
By London Design Training Courses
Why Learn Vectorworks Basics to Essentials Training Course? Our Vectorworks training is meticulously crafted to educate and inspire designers of all levels. Whether you're a beginner or an experienced designer, our courses will equip you with new skills, refine your workflows, and teach Plans, sections and elevations. Course Link Duration: 10 hrs. Method: 1-on-1, Personalized attention. Schedule: Tailor your own schedule by pre-booking hours of your choice, available from Mon to Sat between 9 am and 7 pm. Vectorworks Basics to Essentials Training Course Discover and Enhance Your Design Skills Our Vectorworks training is meticulously crafted to educate and inspire designers of all levels. Whether you're a beginner or an experienced designer, our courses will equip you with new skills, refine your workflows, and unlock the full potential of your Vectorworks software. Online Training Options Customized Online Sessions: Tailored training sessions for your specific needs and expertise level. Virtual Classroom: Join interactive virtual classes from the comfort of your office. Getting Started Guides: Comprehensive guides to help you navigate the fundamentals of Vectorworks. In-Person Training Opportunities Customized On-Site Sessions: Hands-on training delivered directly to your office or regional event. One to One: Engage in interactive learning at our training locations. Get Vectorworks https://www.vectorworks.net ⺠downloads ⺠ServicePack Vectorworks, Inc. 2D 3D CAD BIM software for Mac or Windows allows designers to transform the world. Project sharing makes it easy. Download or try today. Module 1: Grasping CAD and Vectorworks Understanding the Role of CAD in Design Getting Acquainted with Vectorworks Software Module 2: Configuring Your Workspace Customizing Your Workspace Essential Options and Preferences Module 3: Mastering Foundational Drawing Skills Techniques for Drawing Object Selection Methods Module 4: Advanced Object Manipulation Merging Shapes Reflecting Objects Rotating Objects Grouping Elements Module 5: Precision Drawing and Scaling Techniques Working with Scale Setting Preferences for Accuracy Creating and Saving Templates Module 6: Achieving Accurate Object Placement Ensuring Drawing Precision Precise Object Movement Module 7: Advanced Editing Methods Utilizing Fillet Tool Applying Offset Function Module 8: Understanding Object Attributes and Groups Basic Attribute Management Editing Object Groups Module 9: Object Duplication Techniques Linear Duplicates Rectangular Duplicates Circular Duplicates Module 10: Crafting Room Plans Designing Walls Incorporating Windows and Doors Module 11: Development of Room Plans Methods for Room Plan Drawing Module 12: Exploring Additional Attributes Hatch Patterns Gradients Image Fills Module 13: Creating Elevation Drawings Elevation Drawing Techniques Effective Approaches Module 14: Importing Images for Graphic Use Graphic Illustration Integrating Images Module 15: Symbols and Resource Handling Symbol Creation Introduction to Resource Browser Module 16: Organizing Drawings Using Design Layers Optimizing Design Layer Utilization Module 17: Labeling Drawings and Title Blocks Drawing Labels Title Block Text Placement Module 18: Plotting and Printing Methods User Interface Navigation and Terminology Printing Approaches Module 19: Generating Drawing Sheets A1, A2, and A3 Sheet Formats Module 20: Utilizing Viewports Effectively Managing Multiple Views Module 21: Professional Model Presentation Techniques Paper Space Presentation Conversion to PDF Formats Module 22: File and Project Management Module 23: Object Display and Terminology Module 24: Objects and Data Management Module 25: Precise Object Placement Object Snapping Quick Selection Module 26: Dividing and Measuring Objects Module 27: Dimensioning and Annotations Module 28: Working with Text Elements Module 29: Customizing Tool Palettes Module 30: Organizing Tool Palettes Module 31: Efficient Tool Palette Usage Module 32: Standard Views and Drawing Techniques Module 33: Drawing Curved Shapes Arcs, Donuts, and Ellipses Drawing Module 34: Real-World Units and Measurements Module 35: Object Manipulation Adjusting Object Angles Module 36: File Handling and Management Saving, Exiting, and Opening Projects Module 37: Creating Mirrored Images Module 38: Introduction to 3D Modeling Creating Extrusions Basic 3D Concepts Understanding For a free 30-day trial of Vectorworks, request an evaluation serial number at the provided link. https://www.vectorworks.net/trial Learning Outcomes of the Vectorworks Basics to Essentials Training Course: Proficiency in Vectorworks software, mastering its basic and essential features. Enhanced design skills and efficient workflows for architectural, landscape, and entertainment projects. Customized training based on individual needs and expertise levels. Flexibility with online and on-site options for convenient learning. Access to Vectorworks University with a wealth of resources for continuous learning. Interactive virtual classrooms and immersive hands-on training for practical experience.
Enscape Rendering Training Course
By ATL Autocad Training London
Who is this course for? Enscape Rendering Training Course. The Enscape Rendering Training Course is tailored for architects, interior designers, and design students aiming to learn realistic visualizations using Enscape. Whether you prefer 1-on-1 in-person or online courses, this training is best for you. Click here for more info: Website Training duration: 5 hrs Method: 1-on-1 and Tailored content Schedule: Customize your training. Choose any hour from Mon to Sat, 9 am to 7 pm Call 02077202581 or WhatsApp at 07970325184 to book. Course Outline: Enscape Rendering Software Training (5 hours) Course 1: Enscape for Revit Hour 1: 1. Introduction to Enscape: Overview of Enscape rendering software, its features, and benefits. 2. Installing and Setting up Enscape: Step-by-step guidance on installing and configuring Enscape for Revit. 3. Enscape Interface: Familiarizing with the Enscape user interface and navigation controls within Revit. Hour 2: 4. Enscape Materials: Exploring material creation, application, and customization within Enscape for Revit. 5. Lighting in Enscape: Understanding different lighting options, adjusting light settings, and creating realistic lighting effects. Hour 3: 6. Enscape Camera Settings: Manipulating camera angles, perspectives, and settings for optimal visualization. 7. Enscape Rendering Settings: Exploring various rendering settings and techniques to enhance the quality of the final output. Hour 4: 8. Enscape Rendering Workflow: Demonstrating a step-by-step workflow for generating renderings and walkthroughs using Enscape in Revit. 9. Advanced Features: Introduction to advanced features such as creating panoramas, virtual reality (VR) walkthroughs, and creating animations in Enscape. Hour 5: 10. Tips and Tricks: Sharing tips and techniques for maximizing efficiency and achieving high-quality results in Enscape for Revit. 11. Q&A and Troubleshooting: Addressing participant questions, providing troubleshooting guidance, and discussing common challenges and solutions. OR Course Outline: Enscape Rendering Software Training (5 hours) Course 1: Enscape for Sketchup Hour 1: 1. Introduction to Enscape: Overview of Enscape rendering software, its features, and benefits for SketchUp users. 2. Installing and Setting up Enscape: Step-by-step guidance on installing and configuring Enscape for SketchUp. 3. Enscape Interface: Familiarizing with the Enscape user interface and navigation controls within SketchUp. Hour 2: 4. Enscape Materials: Exploring material creation, application, and customization within Enscape for SketchUp. 5. Lighting in Enscape: Understanding different lighting options, adjusting light settings, and creating realistic lighting effects. Hour 3: 6. Enscape Camera Settings: Manipulating camera angles, perspectives, and settings for optimal visualization in SketchUp. 7. Enscape Rendering Settings: Exploring various rendering settings and techniques to enhance the quality of the final output. Hour 4: 8. Enscape Rendering Workflow: Demonstrating a step-by-step workflow for generating renderings and walkthroughs using Enscape in SketchUp. 9. Advanced Features: Introduction to advanced features such as creating panoramas, virtual reality (VR) walkthroughs, and creating animations in Enscape. Hour 5: 10. Tips and Tricks: Sharing tips and techniques for maximizing efficiency and achieving high-quality results in Enscape for SketchUp. 11. Q&A and Troubleshooting: Addressing participant questions, providing troubleshooting guidance, and discussing common challenges and solutions. Learning Outcome: After completing the Enscape (VR) Training and Interactive Workshop, participants will master real-time walkthroughs, set up VR applications, efficiently migrate models, navigate designs dynamically, update objects in real-time, control visual styles, adjust day-time settings, export and share designs, utilize the asset library, and gain a comprehensive overview of Enscape. These skills will enable them to confidently visualize and display 3D designs without cloud uploads or external software, enhancing communication and collaboration in architectural projects. What does the Enscape Training & Interactive Workshop offer? The Enscape Training & Interactive Workshop is designed to help you get up and running with Virtual Reality (VR) in a cost-effective manner. It covers hardware and software setup, navigation techniques, real-time updates, material settings, and more. The workshop also allows participants to experience VR firsthand. What are the benefits of attending the Enscape (VR) Training and Interactive Workshop? By attending this workshop, you will gain the ability to perform real-time walkthroughs of your designs in 3D. You can view your projects in VR without the need for cloud uploads or exporting to other 3D software. The workshop offers extensive asset libraries, collaboration, and annotation sharing, enhancing your design visualization capabilities. What are the prerequisites for attending the Enscape (VR) Training and Interactive Workshop? No prior knowledge of Enscape is required. However, assistance from IT management may be necessary for hardware and software installation. Logistics, such as room suitability and technical requirements, will be discussed before the workshop. What will I learn in the Enscape (VR) Training and Interactive Workshop? The workshop covers hardware setup, software installation, and configuration. You will learn how to migrate models from Revit and SketchUp into VR, navigate through designs, update objects and materials in real-time, and utilize various visual styles and settings. The course also includes interactive workshops with support from our expert tutors. Enscape rendering courses offer valuable benefits: Real-time Visualization: Instantly visualize designs for quick iterations and informed decisions. Seamless Integration: Streamline rendering by integrating with popular design software. High-Quality Visuals: Create photorealistic presentations and walkthroughs. Efficient Design Communication: Enhance collaboration and communication during presentations. Enhanced Design Iteration: Explore options and make informed decisions in real-time. Time and Cost Savings: Reduce rendering time and deliver projects more efficiently. Portfolio Enhancement: Elevate your portfolio with visually striking renderings, opening new opportunities.

BA09 - Managing Requirements for SharePoint Projects
By Nexus Human
Duration 2 Days 12 CPD hours This course is intended for Executives, Project Managers, Business Analysts, Business and IT stakeholders engaged in improving the delivery of products and services that meet user needs through the use of Microsoft SharePoint; Anyone who wants to improve their Business Analysis skills; Project stakeholders concerned with SharePoint requirements. Overview Plan, manage and close requirements for a project in reduced time using good business analysis practices Minimize project uncertainty and risk by applying good techniques Ensure your project delivers required functionality and adds value to the business Create an environment of self-management for your team that will be able to continuously align the delivered product or services with desired business needs, easily adapting to changing requirements throughout the process. Requirements can change frequently during a SharePoint project, and therefore projects need a streamlined, flexible approach to requirements change management. SharePoint professionals want to develop systems and services which are both high-quality and high-value, and the easiest way to achieve this is to implement the highest priority requirements first. This enables the projects to maximize value for their stakeholders. Introduction ? Roles involved in a SharePoint project The opportunities and challenges of a SharePoint project The business analysis process BA role vs. project manager role BA / PM competencies Case Study Exercise Understanding SharePoint Requirements Business, User, Functional, Quality-of-service and implementation requirements Requirements vs. specifications Requirements vs. business rules Risk management and risk response strategies Analyzing requirements Characteristics of effective requirements Case Study Exercise SharePoint Requirements Modeling Identify high level scope Identify initial requirements stack Identify an architectural vision Plan your iteration Iteration modeling Model storming Test driven development Case Study Exercise The Change Management Process Managing the Solution Scope and Requirements Capturing the Requirements Traceability Maintaining the Requirements for re-use Managing Requirements Conflicts Preparing the Requirements Package Building the Requirements communications plan Case Study Exercise Assessing & Validating Requirements Validating and verifying SharePoint Requirements Creating a master test plan Create test scenarios and test cases Case Study Exercise Additional Information Useful books and links on managing requirements and projects for SharePoint initiatives

Elite EA PA Admin Forum 🇦🇺
By Elite Forums AU
Elite EA/PA Forum We are delighted to announce the Elite EA/PA Forum for ANZ will be on the 25th of September 2025. Our workshop aims to: Enhance your influence and impact by mastering assertive communication, negotiation, and self-advocacy skills. Stay composed and solution-focused in high-pressure situations with practical tools for crisis management and clear decision-making. Embrace evolving technology by understanding how AI and automation can streamline your role and boost efficiency. Future-proof your career by building strategic value, resilience, and adaptability in an ever-changing professional landscape. Keynote Address with Q&A from the audience: What to expect from Sam's Keynote: With over 30 years supporting leaders at the highest levels, Sam Cohen brings a wealth of insight, experience, and stories (the kind she can share) to the stage. From 18 years serving within The Royal Household - including as Deputy Private Secretary and Press Secretary to Her late Majesty Queen Elizabeth II - to working with The Duke and Duchess of Sussex, running the Prime Minister’s Office at Downing Street, and serving as Chief of Staff to the global CEO of Rio Tinto, Sam’s career is a masterclass in discretion, diplomacy, and delivering at the top. In this exclusive keynote, Beyond the Role, Sam will explore how Executive Assistants don’t just support leaders - they shape leadership, drive strategy, and build legacy from behind the scenes. Join us for this rare opportunity to hear from someone who’s been at the epicentre of power - and bring your questions! The keynote will include a live Q&A, where you can ask Sam about her remarkable career, leadership insights, and how to truly excel in high-performance environments. (Don’t ask her what the Queen kept in her handbag - she’s not telling.) Sam Cohen Career Bio: Sam Cohen has spent the last 30 years working to support leaders in the public and private sectors. Sam spent 18 years serving The Royal Household, as Deputy Private Secretary to Her late Majesty Queen Elizabeth II and Press Secretary to The Queen. Sam also served as Private Secretary to The Duke and Duchess of Sussex. Following this time, Sam worked as Director of the Prime Minister’s Office at Downing Street under Boris Johnson and, most recently, was Chief of Staff to the global CEO at Rio Tinto. Source: ABC News - YouTube Channel. Facilitator - AM: The Future-Proofed Assistant: Speak Up, Stand Out & Shape Your Career Path How to reimagine your Assistant role in 2025 and beyond - How the EA role is evolving (and what Executives now expect) & why Assistants who think like strategists will be indispensable Assertiveness as an Assistant – The key to retaining your role & the difference between being ‘helpful’ and being ‘heard’ Self-Advocacy as a Career Growth Strategy – The importance of advocating for your career development, workload boundaries and recognition Own Your Professional Future - Map your career development. Whether you're an EA for life or looking to a role beyond in the future, this is for you. Ruth Kilah Career Bio: Ruth is an international executive career coach and founder of Hoxton Hyde – Executive Career Coaching & Mentoring, delivering 1:1 and group programs for experienced Executive Assistants. She specialises in helping EAs step into higher-level roles, increase their income, and expand their professional impact. With 14 years’ experience supporting C-suite executives in Australia and the UK, Ruth brings deep industry insight and a strategic approach to career development. She empowers Assistants to gain clarity on their next move, adopt a strategic mindset, communicate their value effectively, and lead their own growth conversations with confidence. A former EA turned Stakeholder Relations and Project Manager, Ruth launched Hoxton Hyde in 2018 after spotting a clear gap in the market for tailored coaching for career-driven EAs. She is a respected thought leader in the EA space, regularly sharing insights via LinkedIn and Instagram. Panel: Crisis Mode: What to do when everything goes wrong Master a step-by-step approach to prioritising and problem-solving under pressure. Strengthen emotional resilience and calm decision-making during unexpected disruptions. Learn how to communicate clearly and lead from behind in high-stress situations. Emma-Kate Bos Bio Emma-Kate works alongside the CEO at Squadron Energy, one of Australia’s leading renewable energy companies. With over 28 years of experience in Executive Assistant and Operational roles supporting business leaders in professional services, politics, membership industries, sporting and not-for-profit organisations, Emma-Kate has a deep understanding of business support roles and has managed large teams of assistants and receptionists. She is passionate about developing and mentoring team members Emma-Kate holds an Associate Degree in Law, Mini MBA and Certificate in Public Relations. Sepi Nowlands Sepi has also worked as an EO for Deloitte and spent 18 years previously as an Executive Assistant at the ATO, Law Council of Australia, Grains Research and Development Corporation and Air Services Australia. She is now EA and EO to the CPO. Holly Clareburt Hollie Clareburt is an experienced Executive Assistant, currently supporting the Managing Director of Microsoft New Zealand and the Chief Partner Officer. Known for her professionalism and discretion, she excels in providing high-level support in fast-paced, executive environments. Prior to Microsoft, Hollie was Executive Assistant to the Chief of Corporate & Enterprise Systems at BECA, and previously supported the CEO at SKY News New Zealand. Her career reflects a strong track record of reliability, organisation, and executive partnership. Liv Wilson With over 20 years of experience across banking, government, creative industries, and global tech, Liv has supported senior leaders at companies including LinkedIn and Slack. She brings a strategic lens to the business support function, with deep expertise in operations, leadership enablement, and organisational effectiveness. As a passionate advocate for elevating the role of Executive Assistants, Liv has led women’s networks, championed DEI and social impact initiatives, and continues to push for recognition of business support as a critical driver of business success. She is currently working on her side hustle business - collaborating with executives, entrepreneurs, and small business owners to amplify their impact by removing operational barriers, optimising systems, and unlocking their capacity to lead and grow. Facilitator - PM: Justin Kabbani AI Is Not Here to Replace You. It's Here to Upgrade You. We'll explore Justin's proven 3P framework: Priming – How to set up AI like a strategic advisor by feeding it context, tone and mindset Prompting – How to craft clear, structured instructions to get consistently great results Producing – How to turn AI outputs into high-leverage work that makes you stand out Your session outcomes: Real examples from admin professionals already using AI to elevate their work Prompts you can copy, adapt, and test live Interactive exercises to build confidence fast A practical challenge to implement right after the session If you’ve been overwhelmed by AI, or underwhelmed by its impact, this session will change that. You'll leave with tools you can use today, and a mindset you’ll carry forward for the rest of your career. Justin Kabbani Career Bio: Justin Kabbani is one of Australia’s most in-demand AI trainers and keynote speakers, known for making AI feel simple, powerful, and immediately useful. He’s worked with brands like Uber, Treasury Wine Estates, and Udemy, helping their teams embed AI into daily workflows, strategic planning, and executive communication. Over the past two years, Justin has trained more than 2,000 professionals across Australia and beyond, consistently earning feedback like “mind-blowing,” and “game-changing”. His signature Prime, Prompt, Produce framework has transformed how business leaders, executive assistants, marketers, and teams think, work, and communicate with AI, without needing to be “tech people.” Justin believes AI isn’t here to replace people. It’s here to take the robotic work off our plate, so we can focus on what humans do best. LinkedIn: https://www.linkedin.com/in/justinkabbani/ Website: https://justinkabbani.com/ Speed Connections Networking Session Join us for Speed Connections, a lively 30-minute networking session designed to foster meaningful connections in a fun, fast-paced environment. Every 10 minutes, attendees will be placed into new breakout rooms with small groups, giving everyone the chance to meet a diverse range of peers. Each breakout session will feature engaging prompts to spark conversations and make networking enjoyable and memorable! Who will attend this event? Executive Assistant (EA) Personal Assistant (PA) Virtual Assistant (VA) Legal Secretary Legal Executive Assistant Administrative Assistant Office Manager Health Care Office Manager Chief of Staff Additional roles may be relevant depending on role responsibilities along with development opportunities. We understand the challenge. Professional development for assistants is often undervalued, and securing budget or approval for external training can be difficult. That’s why we’ve created a ready-to-use business case template to help you justify attendance at this event and highlight the value it brings to both you and your organisation. If you need support or costings confirmed for single or group attendance, please reach out to our support team at: support@elite-forums.com You can download and edit the template below: This workshop is open to females, male including trans women/males and non-binary professionals. Group Rate Discounts: To discuss our group rates in more detail, please email support@elite-forums.com and provide the following: Group Number (How many would like to attend) Event Date (If numerous dates, please advise if we are splitting attendees across multiple dates) Attendee Contact details (Or request our Group Rate Document. Complete and return - we'll sort the rest.) Group discounts are on request - see below group rate discount brackets: 🧩 You just need one piece to come together - to unlock your Elite Potential. 🔑 Please note: All facilatators, panelists, and speakers are all PAID with applicable contracts in place. We value our speakers and want the best to ensure our attendees get the best development. Media outlets/organisations will not be permitted to attend this event.
SketchUp Basic Level Training Course
By ATL Autocad Training London
Who is this course for? SketchUp Basic Level Training Course. Click here for more info: Website Ideal for newcomers to 3D modeling, it suits students, hobbyists, and professionals. Gain a strong foundation in SketchUp, perfect for careers in architecture and interior design. Our flexible 1-on-1 sessions let you tailor your learning schedule. Schedule sessions Monday to Saturday, 9 am to 7 pm. The 5-hour course adapts to your timeline, ensuring a personalized, supportive, and adaptable learning experience. Course Title: SketchUp Basic Course. Course Duration: 5 hours Understanding the Basics of SketchUp Introduction to SketchUp Navigating the SketchUp Environment Exploring Zoom, Pan, and Rotate Functions Familiarizing Yourself with the XYZ Axis Mastering SketchUp Tools Efficient Toolbar Selections Utilizing Templates for Projects Drawing with Precision Using the Pencil Tool Working with Fundamental Geometric Shapes Taking Accurate Measurements Advanced SketchUp Techniques Creating Circles and Arcs Harnessing Sticky Geometry Solutions Unveiling the Power of Tags (Formerly Layers) Streamlining Workflow with Keyboard Shortcuts Accurate Object Measurement within SketchUp Information Management and Database Usage Moving and Copying Objects Simple Array Techniques Mastering Rotational Manipulations Effortless Rotational Copying Fractional and Relative Scaling Component and Group Creation Constructing Components for Reusability Creating Efficient Groups Comparing the Advantages of Components and Groups Saving and Reusing Components Importing Components from Digital Repositories Advanced Modeling and Geometry Leveraging Push-Pull Operations Creating Complex Shapes with the Follow Me Tool Exploring Geometry Intersections Duplicating and Offsetting Faces, Edges, and Polygons Incorporating 2D Polygons into Your Drawings Skillful Use of the Paint Bucket Tool Materials and Textures Proficiency with the Materials Editor Applying High-Quality Textures Sourcing and Positioning Textures Graphics and Bitmap Considerations Crafting Scenes and Styles Generating and Customizing Scenes Managing Scenes and Styles Introduction to Animation and Presentation Animation Concepts Adding Dimensions to Your SketchUp Models Annotating Designs for Clarity Preparing Models for Printing Exporting Images and PDFs in 2D Formats This comprehensive SketchUp Fundamentals course will equip you with essential skills to create, modify, and present 3D models effectively. After completing our 5-hour SketchUp training, you'll achieve the following learning outcomes: Basic SketchUp Proficiency: Gain essential skills to navigate the SketchUp interface and utilize its core features effectively. Geometry Creation: Learn to create 2D and 3D geometric shapes, lines, and curves with precision. Rendering Concepts: Understand the fundamentals of rendering and how to apply basic rendering techniques to enhance your designs. Model Organization: Discover techniques for organizing and structuring your SketchUp models efficiently. Visualization Skills: Develop the ability to visualize and plan architectural and interior design concepts in 3D. Efficient Workflows: Acquire time-saving tips and tricks for streamlining your design workflow. Personal Projects: Apply your newfound skills to your personal design projects or professional endeavors. By the end of this short training, you'll have a solid foundation in SketchUp, allowing you to create and present basic 3D models and designs effectively. After SketchUp Training, You'll Acquire: Advanced 3D Modeling: Master the art of creating intricate 3D models, architectural designs, and detailed structures using SketchUp. Texture Mapping and Material Application: Learn to apply realistic textures and materials, enhancing the visual appeal of your 3D creations. Rendering Techniques: Explore rendering plugins like V-Ray or Twilight Render to create lifelike visualizations of your designs. Collaboration and Presentation: Develop skills to effectively collaborate with teams and present your ideas in professional and compelling ways. Project Visualization: Enhance your ability to transform conceptual ideas into visually stunning and detailed 3D representations. Job Opportunities: Architectural Designer: Create detailed architectural models for residential and commercial projects. Interior Designer: Design interior spaces, visualizing furniture placements, colors, and decor elements. Landscape Architect: Develop 3D landscape designs, showcasing outdoor spaces and environmental elements. 3D Modeler: Work in various industries, creating 3D models for animations, games, or simulations. Visualization Specialist: Provide visualization services to real estate agencies, design firms, or marketing companies, transforming ideas into compelling visuals. Why Choose Us? Tailored One-on-One Training: Exclusive coaching from skilled architects and designers, in-person or live online, Monday to Saturday. Customized Tutorials: Enhance your skills with tailored video tutorials to take home. Comprehensive Learning: Receive digital resources for thorough understanding and revision. Free Ongoing Support: Enjoy continuous assistance via phone or email, ensuring your success beyond the course. Flexible Syllabus: Adapted to your needs for focused learning. Official Certificate: Validate your expertise with our prestigious certification.
On-Demand SketchUp Training Course: Enhance Your 3D Design Skills
By Real Animation Works
Personalized SketchUp Training: Pay-As-You-Go One-to-One Sessions