- Professional Development
- Medicine & Nursing
- Arts & Crafts
- Health & Wellbeing
- Personal Development
Artful Brain - 6 Week Course
By Artful Mindscape
Immerse yourself in the science and art of attention to power up your knowledge, make shifts towards increased mindfulness, mental resilience, improved focus and sense of wellbeing.


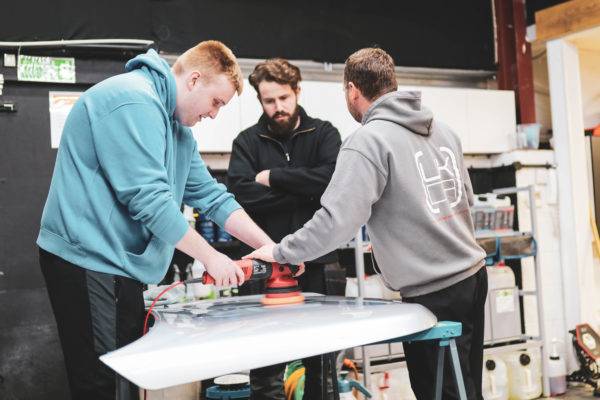
The perfect day for enthusiast detailers to learn. A course for car care enthusiasts who have a passion for keeping their cherished vehicles in peak cosmetic condition, and who want to further their knowledge of detailing. Organised as a small group day - this is ideal for those who want to learn more about detailing and caring for their own vehicles in a relaxed and subject-focused one-day session. Availability If no dates are showing as available in the calendar, you can sign up for updates to find out when new dates are released and new course developments. Enthusiast Detailing 101, Small Group day. The perfect course for car care enthusiasts who have a passion for keeping their cherished vehicles in peak cosmetic condition, and who want to further their knowledge of detailing. The course will guide the attendee through best practice processes of safe pressure & hand washing, decontamination, inspection, paint protection, mild paint correction, and discuss/apply the various protection options on offer. Course Details: • Assessment of vehicle exterior & interior inspection. • Cleaning, decontamination & preparatory work of the vehicle body: Washing processes, Pre-wash & snow foam, multi bucket methods, acids and alkalis, fallout removers and in-depth cleaning practices. • Cleaning, decontamination & preparatory work of alloy wheels. • Paintwork inspection using lighting techniques, depth gauges, and visual cues. Identifying areas of concern and how to address them. • Practical overview of machine polisher ranges and their usage including dual and forced action machines from Flex, Rupes, and budget brands. • Practical overview of various polishing compounds and pad combinations. • Paintwork and alloy wheel sealant protection options and application technique. • Glass cleansing and protection practical overview. • Detailing tips and tricks to give you the best results. You will have hands-on experience starting from the very beginning and working your way through all steps of a full enhancement detail, it will then be up to you to build on the knowledge you have gained by practicing on your own vehicle, with ongoing support. The course is run from our fully equipped studio in the heart of Gloucestershire, with easy access to the M4/M5, and under an hour and a half to the M25. Course Length 1 Day (0930-1600) Group Size Up to 5 people Location UK Detailing Academy, 2 Purlieus Barn, Ewen, Cirencester, GL7 6BY Experience / Qualification Open to all Refreshments or Lunch Refreshments included
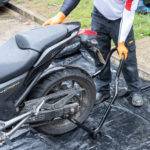
Add a specialism and tap a new detailing market. Motorbike detailing is an untapped market for many detailers, but with the right skills can be an excellent source of revenue, especially at the start and end of the summer when many bikes are removed from or put away for storage. Designed specifically for established professional detailers, this group session 1-day course will give you the best practice knowledge and skills required to perform in-depth detailing and related work on motorcycles in a safe and effective manner. This helps you take the guesswork out of a new sector and introduces you to the techniques to safely work on and handle motorbikes, correctly assess and decontaminate them, and perform a full motorbike detail. You will need a basic level of competency as an existing valeter or detailer, as there is a certain assumption of existing technique to build on. You are not required to hold a motorbike licence however as no riding will be taking place and all training vehicles will be provided for you. Availability If no dates are showing as available in the calendar, you can sign up for updates to find out when new dates are released and new course developments. Professional Motorcycle Detailing Group Day Designed specifically for established Professional Detailers, this group course will give you the best practice knowledge and skills required to perform in-depth detailing and related work on motorcycles. As this relies on prior basic knowledge, you will need a basic level of competence in a professional car care environment. You are not required to hold a Motorbike Licence as no riding will be taking place and all training vehicles will be provided for you. Course Details: Health & Safety How to market as a Motorcycle Detailer Safe handling of motorcycles - side/centre stands, paddock stands, jacking Assessment of motorbike condition Cleaning, decontamination & preparatory work of the tank, fairings, screen and exposed surfaces: Washing processes, Pre-wash & snow foam, acids and alkalis, fallout removers and in-depth cleaning practices Cleaning, decontamination & preparatory work of wheels Suspension, running gear, swing arm and fork degreasing and cleaning Safe fairing panel removal Engine cleaning Chain and sprockets inspection, cleaning and re-lubrication Paintwork inspection and defect identification Introduction to small-area machine polishing equipment Perspex polishing Paint, plastic, wheel, metal, chrome, anodised, powder coat and anti-corrosion protection options Helmet and visor care Course Length 1 Day (0930-1600) Location UK Detailing Academy, 2 Purlieus Barn, Ewen, Cirencester, GL7 6BY Experience / Qualification Level 1 Experience Refreshments or Lunch Refreshments included Group Size Up to 10 people
CNC your own plant pot
By Geo Ply
Guided design and manufacture of a plant pot from birch plywood, using Fusion 360 and a CNC machine.

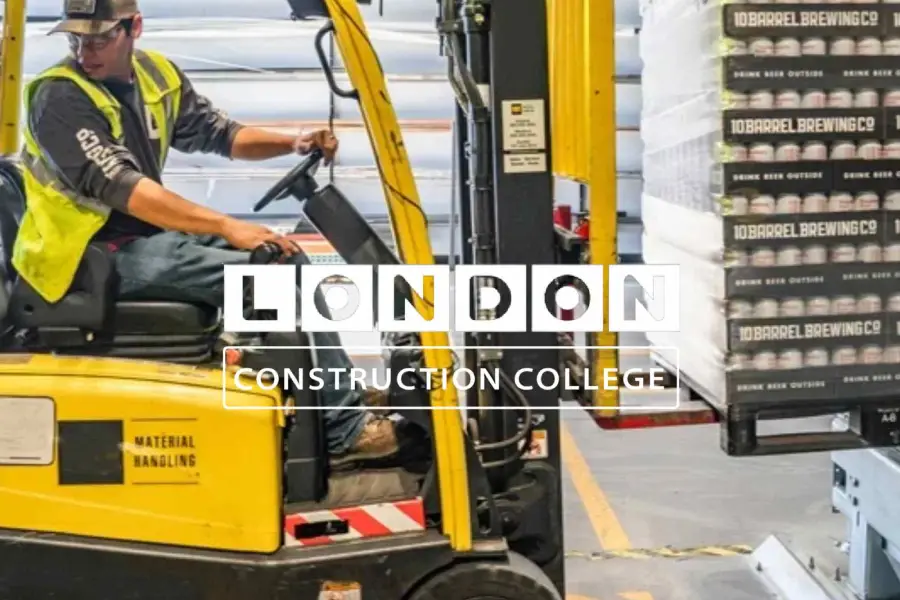
Forklift Training Course
By London Construction College
Take The Forklift Training Course This Will Take You 7 Days To Complete. Enroll Now On To The Course! What is the Forklift Training Course? A forklift course is a specialized training program designed to teach individuals how to safely and effectively operate forklifts, also known as lift trucks or powered industrial trucks. Forklifts are commonly used in various industries, especially in construction, warehouses, manufacturing, and logistics, to lift and move heavy materials and goods. Course Overview: 7 Days Course | Course Fee: £220 Payment Structure: £70 deposit and £150 payment in the office Forklift Training Course Road Map Forklift operators are essential in the world of construction. They are responsible for the safe and efficient movement of heavy materials and equipment on job sites. Here are some compelling reasons to consider our Forklift Course: 01 Skill Development Operating a forklift is a specialized skill. Our course equips you with the expertise needed to safely and effectively operate these heavy machines. 02 Safety First Safety is a top priority in construction. Our course emphasizes safety practices, ensuring you’re well-prepared to handle materials and equipment without compromising the well-being of yourself and others. 03 Career Opportunities Certified forklift operators are in high demand in the construction industry. Completing this course opens doors to job opportunities and career advancement. Why Choose A Forklift Training Course? Our Forklift Course covers a comprehensive range of topics to ensure you’re well-prepared for the responsibilities of a forklift operator: Forklift Operation Learn the fundamentals of forklift operation, including controls, steering, and maneuvering. Safety Protocols Understand safety protocols and procedures for forklift operators, including load handling and maintenance. Load Management Gain expertise in safely handling and transporting various loads and materials, such as pallets, crates, and construction equipment. Site Navigation Learn how to navigate construction sites efficiently, ensuring the timely delivery of materials to the required locations. Launching Your Career With Forklift Training Course Embark on a transformative journey towards a dynamic career in material handling with our Forklift Training Course. Designed for both beginners and experienced operators, this comprehensive program focuses on safety, precision, and efficiency in forklift operations. FAQ Forklift Training Course What is the primary focus of the Forklift Training Course at London Construction College? The Forklift Training Course at London Construction College focuses on providing comprehensive training for individuals aiming to operate forklifts in the construction industry. The course emphasizes safety, regulatory compliance, and practical skills necessary for efficient forklift operations. Who is eligible to enroll in the Forklift Training Course at London Construction College? The course is open to individuals seeking to operate forklifts in the construction sector. It is suitable for both beginners and experienced operators looking to enhance their skills and comply with industry standards. What specific topics are covered in the course curriculum? The course covers a range of topics, including forklift types and applications in construction, safety protocols, maintenance procedures, operational techniques, and specialized equipment operation relevant to the construction environment. Is the Forklift Training Course compliant with UK construction industry regulations? Yes, the Forklift Training Course at London Construction College is designed in strict adherence to UK construction industry regulations. It covers relevant legal requirements, ensuring participants are well-versed in compliance measures. Can the course be tailored to meet the specific needs of construction industry professionals? Absolutely. The course is designed to be flexible, with modules that can be customized to address the unique requirements of construction industry professionals. Whether participants work in large-scale construction sites or smaller projects, the training can be adapted accordingly. Is certification provided upon completion of the Forklift Training Course? Yes, participants who successfully complete the course receive a Forklift Operator Certification from London Construction College. This certification is recognized within the construction industry and enhances employability.

Counter Balance Training Course
By London Construction College
Take The Counter Balance Training Course. This Will Take You 7 Days To Complete. Enroll Now On To The Course! What Is The Counter Balance Training Course? Operating a fork hoist, also known as a forklift, is a skill that opens doors to various industries and job opportunities. Fork hoists are crucial for efficiently moving and handling heavy loads, making their operators indispensable in construction, logistics, warehousing, and manufacturing. Course Overview: 7 Days Course | Course Fee: £220 Payment Structure: £70 deposit and £150 payment in the office Why Choose A Counter Balance Training Course? Operating a counterbalance forklift isn’t just about moving materials; it’s about ensuring the safety of personnel and property. Here are compelling reasons to consider our Counterbalance Forklift Training Course Specialized Proficiency Counterbalance forklift operation demands specialized knowledge and practical skills. Our course equips you with the expertise needed to confidently operate this equipment. Career Advancement The demand for certified counterbalance forklift operators remains high in diverse industries. Completing this course can lead to job opportunities and career progression. Safety-Centric Safety is the cornerstone of counterbalance forklift operation. Our training places a strong emphasis on safety protocols, ensuring you can navigate any workplace securely. Maintenance Knowledge Acquire in-depth knowledge of counterbalance forklift maintenance, troubleshooting, and preventive care to guarantee the equipment’s optimal performance and safety. Launching Your Career With Our Counter Balance Training Elevate your career with our Counterbalance Training, a dynamic program designed to equip you with essential skills in forklift operations. Our course emphasizes safety, versatility, and hands-on experience, providing a comprehensive foundation for success. Taught by industry-experienced instructors, you’ll gain the expertise needed for diverse work environments. Course Highlights Our Counterbalance Forklift Training Course encompasses a comprehensive curriculum, ensuring you are fully prepared for the responsibilities of a certified operator: Forklift Operation Master the intricacies of counterbalance forklift operation, including controls, steering, load handling techniques, and efficient maneuvering. Safety Protocols Learn and apply safety protocols and procedures specific to counterbalance forklift operation, encompassing load management, pre-operation checks, and emergency response. Load Handling Develop expertise in the safe handling and transportation of a variety of loads, from pallets and crates to heavy machinery and materials Hazard Recognition Learn how to identify potential workplace hazards, assess risks, and apply strategies to mitigate these risks effectively. FAQ Counter Balance Training Course Who is eligible to enroll in the Counterbalance Training program at London Construction College? The Counterbalance Training program at London Construction College is open to individuals with an interest in forklift operations, whether beginners or experienced operators looking to enhance their skills. There are no specific prerequisites for enrollment. What is the duration of the Counterbalance Training program? The duration of the Counterbalance Training program varies based on the specific course. Typically, our programs range from a few days to a couple of weeks, ensuring comprehensive coverage of theoretical concepts and practical hands-on experience. Can the Counterbalance Training be tailored to meet the specific needs of construction industry professionals? Absolutely. The Counterbalance Training program is designed to be flexible, with modules that can be customized to address the unique requirements of construction industry professionals. Whether participants work on construction sites or in related environments, the training can be adapted accordingly. Is job placement assistance provided upon completion of the Counterbalance Training program? Yes, London Construction College offers job placement assistance to graduates of the Counterbalance Training program. We provide guidance on job opportunities post-completion and connect participants with potential employers within the construction sector.
FLT TRAINING COURSE
By London Construction College
Take The FLT TRAINING COURSE This Will Take You 7 Days To Complete. Enroll Now On To The Course! What is the FLT Training Course? An FLT (Forklift Truck) training course is a specialized educational program designed to provide individuals with the knowledge and practical skills necessary to operate forklift trucks safely and effectively. Forklift trucks, often referred to as lift trucks, are essential industrial vehicles used in various industries to lift, move, and transport heavy materials, goods, and equipment within workplaces such as construction sites, warehouses, manufacturing facilities, and logistics centers. Course Overview: 7 Days Course | Course Fee: £220 Payment Structure: £70 deposit and £150 payment in the office FLT Training Course Road Map Forklift operators are essential in the world of construction. They are responsible for the safe and efficient movement of heavy materials and equipment on job sites. Here are some compelling reasons to consider our Forklift Course: 01 Introduction To Forklift Operations Overview of Forklift Types and Functions Importance of Forklift Safety Understanding Forklift Controls and Components 02 Safety Procedures And Regulations OSHA Regulations and Compliance Personal Protective Equipment (PPE) Requirements Hazard Identification and Risk Assessment 03 Practical Training And Evaluation Hands-on Forklift Operation under Supervision Skill Assessment and Evaluation Feedback and Improvement Strategies Why Choose An FLT Training Course? Operating a forklift is not only a skill but a responsibility. A qualified forklift operator ensures the safety of materials, equipment, and personnel. Here are some compelling reasons to consider our FLT Training Course: Specialized Expertise Operating an FLT requires specialized knowledge and skills. Our course offers in-depth training, ensuring you can safely and effectively handle forklift operations. Safety First Safety is paramount in any industry. Our course places a strong emphasis on safety protocols and best practices, allowing you to perform your role with the utmost safety consciousness. Career Advancement The demand for certified FLT operators is high across various industries. Completing this course can open doors to career advancement and job opportunities. Site Navigation Learn how to navigate construction sites efficiently, ensuring the timely delivery of materials to the required locations. Launching Your Career With Our FLT Training Course Embark on a transformative journey towards a rewarding career in material handling with our FLT (Forklift Truck) Training Course. Tailored for individuals at every skill level, our comprehensive program ensures you master the art of safe and efficient FLT operations. Led by seasoned instructors, you’ll receive hands-on training, theoretical knowledge, and industry insights. Attain your FLT Operator Certification, unlocking opportunities in logistics, warehouses, and construction. Course Highlights FLT Operation Gain an in-depth understanding of forklift controls, operation, maneuvering, and load handling techniques. Safety Protocols Learn about safety protocols and procedures specific to forklift operation, including load management, pre-operation checks, and emergency response. Legal Requirements Understand the legal and regulatory aspects of forklift operation to ensure compliance with relevant laws and regulations. Load Management Learn how to efficiently handle and transport various types of loads, from pallets and crates to machinery and materials. FAQ FLT Training Course What is the purpose of the FLT Training Course? The FLT Training Course is designed to provide individuals with the knowledge and skills required for safe and efficient forklift operation. It covers various aspects, from basic techniques to advanced skills, ensuring participants are well-prepared for real-world scenarios. Who should take this course? This course is ideal for individuals who operate or plan to operate forklifts in various industries, including warehouses, manufacturing, logistics, and construction. It caters to both beginners and experienced operators looking to enhance their skills. Is this course compliant with industry regulations? Yes, the FLT Training Course adheres to industry standards and includes comprehensive coverage of Occupational Safety and Health Administration (OSHA) regulations. Participants will gain a deep understanding of legal requirements and compliance measures. How is practical training conducted? Practical training is conducted in dedicated facilities equipped with various forklift models. Participants engage in hands-on sessions covering stability, maneuvering, load handling, and simulated scenarios. Individualized coaching ensures practical skills development. Is certification provided upon completion? Yes, participants who successfully complete the course receive a Forklift Operator Certification. This certification is widely recognized and demonstrates competence in forklift operations. Can the course be customized for specific industry needs? Absolutely. The course is designed to be adaptable, with modules that can be customized to address specific industry requirements. Whether participants work in warehouses, construction sites, or manufacturing plants, the training can be tailored accordingly.

Dressmaking course - Sew with stretch fabrics!
By cheekyhandmades
Runs on Sundays 25th Februrary and 2nd March 10:30-3:30 Make the fab Tilly and the Buttons Coco or Billy dress in this one day class. These dresses are made from knitted fabric and therefor a great pattern to make in a short time - No zips or buttonholes! It should just fit straight out of the envelope. This is a good class to learn about using stretch fabrics on a domestic sewing machine. For a more in-depth class covering fitting please join the 3 day dressmaking course instead. The pattern for this garment is included in the class fee, as are the machines, haberdashery, endless tea and coffee. All you'll need to bring is the fabric for your dress, I will discuss the exact amount and what kind is suitable once the class is booked. This is a small class so you will get lots of time with me. I will have a maximum of 4 students in the class but usually we just have 2 or 3. Event Terms & Conditions Classes need to be paid for at the time of booking. They will only run once the minimum number of students is met. My studio sadly isn’t accessible to those with mobility issues. I have cats but no soft furnishings or carpets in the studio so most people with allergies are fine with antihistamines.

Dressmaking for Mind and Body - Friday Morning Dressmaking Course with Helen
(49)By Stitching Kitchen
Get 4 weeks of quality sewing me time with Helen at the Stitching Kitchen sewing studio - Friday mornings!