- Professional Development
- Medicine & Nursing
- Arts & Crafts
- Health & Wellbeing
- Personal Development
916 Courses in London
Microsoft Project Advanced - In-company (now with trainer led live online classes)
By Microsoft Office Training
Course Objectives At the end of this course you will be able to: Manage project costs Consolidate and reuse project plan information Exchange project plan data with other applications Update a project plan Customise Project to meet specific requirements ' 1 year email support service Take a look at the consistent excellent feedback from our corporate clients visiting our site ms-officetraining co uk Customer Feedback Really useful and engaging course. Learnt a lot that will be very beneficial in my job. Trainer was great. Kelly Moreley - TACT Very happy with the course. Worked as a good refresher from what I knew already and enhanced my knowledge further Jenny Price - Acer ' With more than 20 years experience, we deliver courses on all levels of the Desktop version of Microsoft Office and Office 365; ranging from Beginner, Intermediate, Advanced to the VBA level. Our trainers are Microsoft certified professionals with a proven track record with several years experience in delivering public, one to one, tailored and bespoke courses. Our competitive rates start from £550.00 per day of training Tailored training courses: You can choose to run the course exactly as they are outlined by us or we can customise it so that it meets your specific needs. A tailored or bespoke course will follow the standard outline but may be adapted to your specific organisational needs. Exchanging Project Plan Data with Other Applications Import a list of tasks from Outlook Import a Task List from an Excel File Create a Custom Import Map Export Project Plan Cost Data into Excel Save Project Plan Information as a Web Page Updating a Project Plan Enter Task Progress Information View Task Progress Split a Task Reschedule a Task Creating Custom Fields Text fields Lookup fields Calculated fields with the use of formulas and functions Inserting Graphical Indicators Customizing how you look at data Filter Tasks in a Project Plan Create a Custom Table Create a Custom View Copy custom Views and Tables between projects Earned value analysis Understanding Earned Value Fields View Multiple Baselines in a Single Project Tracking progress between interim plans Creating Custom Reports Create a Custom Report Modify a Custom Report's Header and Footer Add a Picture to a Report Modify a Custom Report's Margins Print a Custom Report Re-using Project Plan Information Create a Project Plan Template Create a Custom Combination View Make Custom Views Available to Other Project Plans Share Resources between Projects, Create a Master Project Plan with sub projects Who is this course for? Who is this course for? This course is designed for those that who already have the skills to create and modify project plans and would like to acquire a more in depth and thorough knowledge of more advanced functionalities in project planning and tracking. Requirements Requirements Preferably, delegates would have attended the MS Project Introduction course. Career path Career path Microsoft Office know-how can instantly increase your job prospects as well as your salary. 80 percent of job openings require spreadsheet and word-processing software skills

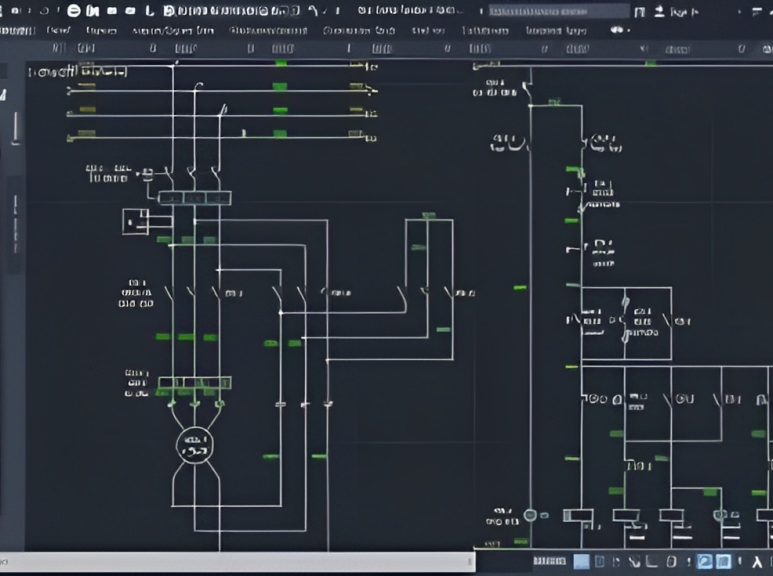
AutoCAD Training Course for Electrical
By ATL Autocad Training London
Exclusive to AutoCAD subscribers, the AutoCAD Electrical toolset simplifies electrical system creation. Click here for more info: Website Our course provides a strong foundation in 2D electrical design, covering essential tools. Flexible one-on-one sessions from 9 a.m. to 7 p.m., Monday to Saturday. Call 02077202581 or book online. The 16-hour course offers flexibility, divide hours across days. Benefit from individualized attention and tailored content. Enroll for in-person or Zoom sessions to excel in AutoCAD Electrical. AutoCAD Electrical Course Content: Introduction to AutoCAD Electrical Software: Overview and features of AutoCAD Electrical Understanding the software interface and tools Project file structure and management Layout and Navigation: Navigating the AutoCAD Electrical workspace Creating new project files and using attribute editors Understanding WDD, WDX, and WDF project files Exploring the Project Manager interface and attribute editors Electrical Diagram Drawing: Numbering and titling wires in diagrams Labelling components Utilizing diagram symbol libraries Creating and editing Electrical Control Circuits (ECC) Component dialog box and Circuit Scale dialog box Introduction to Programmable Logic Controllers (PLCs) and Integrated Systems: PLC Symbols and Concepts Inserting Programmable Logic Controllers (PLCs) into diagrams Adding PLC Units to diagrams Working with PLC Input and Output points and circuits Understanding PLC-based classification Using the Spreadsheet to PLC Input and Output Points utility Custom and Bespoke Symbols: Creating custom symbols for Switches, Wires, Contactors, Motors, Transformers, etc. Specifying symbol conventions and standards Offline and online usage of AutoCAD Electrical databases Drawing for Terminals and Plans: Implementing Terminal symbols in diagrams Handling terminal plans and locations Working with compound level terminals and locations Utilizing the Component command for single and multiple components Managing Jumpers and wiring Modifying Terminal Strips and Dual In-Line Packages (DIP) Understanding DIN Rail, Electrical Enclosure, Circuit Breakers, and Electrical Equipment Generating PDFs and Reports: Exporting drawings to PDF format Organizing report templates Automating the generation of reports Creating Electrical Audit Reports This AutoCAD Electrical course provides comprehensive knowledge of the software, focusing on electrical diagram drawing, symbol creation, PLC integration, terminal planning, and report generation. Participants will gain the skills needed to efficiently design electrical systems using AutoCAD Electrical software. Upon completion, participants will proficiently use AutoCAD Electrical to create precise electrical diagrams, integrate PLCs, design custom symbols, plan terminals, and generate reports efficiently. They will possess the skills needed to confidently design electrical systems and enhance their expertise in electrical design and drawing. AutoCAD Electrical Training Course: Master precision in specialized electrical design skills. Optimize your design process with streamlined workflows. Ensure compliance with industry standards consistently. Boost productivity in electrical design tasks. Facilitate seamless collaboration with fellow professionals. Benefit from recorded lessons for convenient review. Enjoy continuous support with lifetime email assistance. Unleash the complete power of AutoCAD for your electrical design needs. Enroll today and craft precise, professional electrical drawings confidently. Select between in-person and live online sessions to suit your preference. Flexible Evening Sessions: Learn AutoCAD at your own pace with evening sessions designed for busy individuals. Boost your career opportunities in computer-aided design. Comprehensive Skill Development: Gain a strong foundation in AutoCAD's core features and advance to 3D modeling and rendering techniques, enhancing your design capabilities. Industry-Standard Knowledge: Become proficient in AutoCAD, a widely used CAD software in architecture, engineering, and construction fields, making you highly sought after by employers. Practical Application: Apply AutoCAD skills to real-world design scenarios, creating detailed plans for professional projects in architecture, engineering, and mechanical fields. Recorded Lessons for Review: Access lesson recordings to reinforce learning and review specific topics or techniques whenever needed. Lifetime Email Support: Enjoy ongoing support with lifetime email assistance, even after completing the course, for guidance and clarification.
Marine Insurance and Claims
By International Maritime Training
Marine insurance provides coverage for risks related to maritime activities, including damage to ships, loss of cargo, and liability for third-party damage. Key components include hull insurance (for ship damage), cargo insurance (for goods in transit), and liability insurance. Claims in marine insurance involve policyholders or beneficiaries seeking compensation for covered losses. The process includes notifying the insurer, submitting documentation, claim assessment, adjustment, and eventual settlement. Efficient claims processing is crucial for maintaining the reliability and effectiveness of marine insurance in mitigating financial risks associated with maritime operations. Studying and specializing in maritime insurance can offer several advantages, both in terms of knowledge and job opportunities within the maritime industry. Here are some key points highlighting the importance and potential job prospects in this field: Specialized Knowledge : Gain expertise in managing risks specific to the maritime industry. Global Trade Impact : Contribute to international trade by ensuring the financial protection of maritime assets. Diverse Career Paths : Explore roles in underwriting, claims, risk analysis, and insurance brokerage with a maritime focus. Legal Compliance : Understand international maritime laws and regulations for effective insurance solutions. Global Opportunities : Pursue international career paths within insurance, shipping firms, or regulatory bodies. Economic Resilience : Benefit from the industry's stability and resilience to economic fluctuations. Industry Collaboration : Collaborate with stakeholders such as shipping companies and port authorities, enhancing networking opportunities. In summary, studying maritime insurance opens doors to a specialized skill set, diverse career paths, and global opportunities within a resilient and collaborative industry. Course contents: Core Units: Introduction to shipping Commercial shipping Specialization Unit: Marine insurance & claims

Sketchup Artificial Intelligence Training Course
By ATL Autocad Training London
Who is this course for? Sketchup Artificial Intelligence Training Course. Mastering SketchUp Artificial Intelligence (AI) is essential for designers, offering automation, efficiency, and innovative solutions. It saves time, enhances visualizations, fosters collaboration, and future-proofs skills, ensuring a competitive edge in the design industry. Click here for more info: Website How to Book? 1-on-1 training. Customize your schedule from Mon to Sat from 9 am to 7 pm Call to book Duration: 16 hours. Method: In-person or Live Online Sketchup and (Artificial Intelligence) Stable Diffusion Rendering Course (16 hours) Module 1: Sketchup Fundamentals (2 hours) Sketchup software overview and interface navigation Introduction to basic drawing tools and fundamental geometry creation techniques Module 2: Texturing and Material Mastery (2 hours) Application of textures and customization of materials Exploration of texture mapping and comprehensive material libraries Module 3: Illumination and Shadows (2 hours) Comprehending lighting principles and strategic light placement Crafting realistic shadows and reflections Module 4: Advanced Modeling Techniques (3 hours) Creating intricate shapes and harnessing advanced modeling tools Efficiently managing groups, components, and modifiers Module 5: Stable Diffusion Rendering (2 hours) Initiating stable diffusion rendering Optimizing rendering settings for superior outcomes Module 6: Scene Composition and Camera Configuration (2 hours) Exploring composition principles and camera perspectives Scene management and creation of captivating walkthrough animations Module 7: Rendering Optimization Strategies (2 hours) Techniques for optimizing models to expedite rendering Application of render passes and post-processing methods Module 8: Real-World Projects and Portfolio Building (1 hour) Application of acquired skills in completing authentic projects Professional portfolio presentation techniques Optional: Stable Diffusion and Python Installation (Additional 10 hours) Module 1: Introduction to Stable Diffusion and Python Comprehensive understanding of Stable Diffusion and Python's significance Module 2: System Prerequisites Hardware and software requirements for successful installation Module 3: Python Installation Guide Step-by-step installation process for various operating systems Module 4: Configuring Python Environment Configuration of environment variables and package managers Module 5: Stable Diffusion Installation Downloading and installing the Stable Diffusion package Module 6: Setting Up the Development Environment Configuration of integrated development environments (IDEs) for Python and Stable Diffusion Module 7: Troubleshooting and Common Issues Identification and resolution of common installation errors Module 8: Best Practices and Recommendations Effective management of Python and Stable Diffusion installations Module 9: Practical Applications and Projects Hands-on exercises exemplifying the practical usage of Stable Diffusion and Python Module 10: Advanced Topics (Optional) Exploration of advanced features and techniques Stable Diffusion https://stablediffusionweb.com https://stable-diffusion-ui.github.io https://stability.ai/stable-diffusion Upon successful completion of the Sketchup and Stable Diffusion Rendering Course with a focus on AI image rendering, participants will achieve the following: 1. Mastery of AI Image Rendering: Attain expertise in employing AI-powered rendering techniques to produce realistic and top-quality visualizations. 2. Proficiency in Sketchup for 3D Modeling: Navigate the software adeptly, utilize drawing tools with proficiency, and craft intricate 3D models. 3. Enhanced Rendering Optimization: Implement AI-based rendering to enhance model visuals, resulting in faster rendering times and superior image quality. 4. Application of AI-driven Lighting and Shadows: Employ AI algorithms for precise lighting placement, shadows, and reflections, elevating the realism of renderings. 5. Development of a Professional Portfolio: Present AI-rendered projects within a polished professional portfolio, highlighting advanced image rendering capabilities. 1. Mastering Sketchup: Attain proficiency in Sketchup, a renowned and user-friendly 3D modeling software, equipping you with the skills needed to adeptly create and manipulate 3D models. 2. Advanced Rendering Expertise: Explore stable diffusion rendering, an avant-garde technique that simplifies the creation of realistic and high-quality renderings. Broaden your rendering capabilities, producing visually stunning representations of your designs. 3. Practical Industry Applications: Cultivate practical skills relevant to diverse industries, encompassing architecture, interior design, product development, and visualization. Elevate your professional portfolio with captivating renderings that showcase your design prowess. 4. Interactive Learning: Participate in hands-on exercises and projects that promote active learning and the practical application of concepts. Benefit from personalized feedback and expert guidance, ensuring your continuous progress throughout the course. 5. Career Advancement: Elevate your career prospects by adding valuable skills to your toolkit. Proficiency in crafting detailed 3D models and impressive renderings through stable diffusion techniques opens doors to diverse job opportunities within the design and visualization sector. 6. Flexibility and Convenience: Access course materials online and learn at your own pace. Enjoy the flexibility of tailoring the coursework to your schedule, allowing you to harmonize your learning journey with other commitments. Course Advantages: Tailored Learning: Enjoy personalized 1-on-1 sessions, accommodating your schedule from Monday to Saturday, 9 am to 7 pm. Mastery of Sketchup: Develop proficiency in the widely-used and user-friendly 3D modeling software, enabling efficient creation and manipulation of 3D models. Advanced Rendering Proficiency: Acquire expertise in stable diffusion rendering for producing realistic, high-quality renderings that enhance the visual appeal of your designs. Practical Applicability: Develop practical skills applicable across diverse domains, including architecture, interior design, product development, and visualization, enriching your professional portfolio. Interactive Practical Experience: Engage in hands-on exercises with personalized guidance from seasoned instructors, ensuring consistent progress in your skillset. Career Progression: Boost your career opportunities by gaining valuable skills in 3D modeling and generating impressive renderings through stable diffusion techniques. Comprehensive Support: Benefit from free portfolio reviews, mock interviews, and career advice, providing additional resources to enhance your professional journey.

Sketchup Basic to Advance Training
By London Design Training Courses
Why Learn Sketchup Basic to Advance Training Course? Course info SketchUp mastery with our hands-on course go from basics to advanced 3D modeling, advanced rendering, and expert lighting techniques. Immerse yourself in transformative learning tailored for SketchUp excellence. Duration: 16 hrs. Method: 1-on-1 Online Over Zoom is also available. Schedule: Tailor your own schedule by pre-booking a convenient hour of your choice, available from Mon to Sat between 9 am and 7 pm. Course Benefits: Comprehensive Skills Development: Master SketchUp from basics to advanced, gaining a comprehensive skill set. Efficient 3D Modeling: Learn to navigate and create intricate designs effortlessly with AI-driven 3D modeling techniques. Stunning Visual Realism: Explore advanced rendering methods to bring your designs to life with stunning visual realism. Professional Lighting Mastery: Harness the power of lighting to add depth and dimension, achieving a polished and professional finish. Flexible Learning: Tailor your own schedule with the convenience of pre-booking hours between 9 am and 7 pm, Monday to Saturday. Personalized 1-on-1 Training: Receive personalized attention and guidance with our 1-on-1 training approach. Course Title: "Sketchup Basic to Advance Training Course" Module 1: SketchUp Fundamentals (4 hours) Explore the SketchUp Interface Learn Basic Drawing Tools and Techniques Create and Edit Components Utilize Groups and Layers for Organization Introduction to Scenes and Animation Module 2: Advanced SketchUp Techniques (4 hours) Precision Modeling with Measurements Dynamic Components and Interactivity Advanced 3D Modeling Techniques Importing and Managing 3D Assets Enhance Functionality with SketchUp Extensions Module 3: V-Ray Rendering Basics (4 hours) Navigate the V-Ray Interface Set up V-Ray Materials Master Basic Lighting Techniques Understand Camera Settings and Composition Optimize Rendering Settings and Output Module 4: Advanced V-Ray Rendering (4 hours) Global Illumination and Image-based Lighting Realistic Material Creation Post-Processing using V-Ray Frame Buffer Efficient Scene Management with V-Ray Proxy Rendering Animation Sequences Course Project (2 hours) Integrate SketchUp and V-Ray for a Final Project Receive Guidance on Creating Photorealistic Renderings Participate in a Review and Feedback Session Upon completing the SketchUp Basic to Advance Training Course, participants will: Master SketchUp Basics: Navigate the interface, use drawing tools, and manage components effectively. Advance 3D Modeling: Apply precision modeling, dynamic components, and advanced techniques. Explore Extensions: Enhance functionality with SketchUp extensions. V-Ray Rendering Introduction: Learn V-Ray basics, including materials, lighting, and rendering settings. Advanced V-Ray Techniques: Implement global illumination, realistic materials, post-processing, and animation. Course Project Proficiency: Integrate SketchUp and V-Ray for a final project with photorealistic renderings.

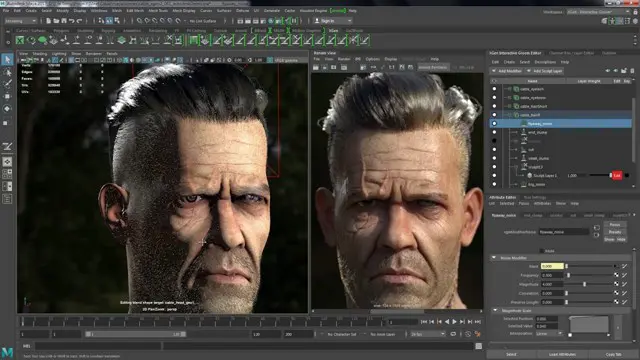
3ds max and Arnold Rendering one to one.
By Real Animation Works
Realistic rendering course with 3ds max and Arnold.

Microsoft Word Intermediate - In-company (now with live online classes)
By Microsoft Office Training
Course Objectives At the end of this course you will be able to: Customise tables and charts Customise formatting with styles and themes Modify pictures in a document Create customised graphic elements Insert content using Quick Parts Control text flow Use templates to automate document creation Perform mail merges Use macros to automate common tasks '1 year email support service Take a look at the consistent excellent feedback from our corporate clients visiting our site ms-officetraining co uk Customer Feedback Excelent enviroment for training. Tahnk you. Jenny Price - ACER ' With more than 20 years experience, we deliver courses on all levels of the Desktop version of Microsoft Office and Office 365; ranging from Beginner, Intermediate, Advanced to the VBA level. Our trainers are Microsoft certified professionals with a proven track record with several years experience in delivering public, one to one, tailored and bespoke courses. Our competitive rates start from £550.00 per day of training Tailored training courses: You can choose to run the course exactly as they are outlined by us or we can customise it so that it meets your specific needs. A tailored or bespoke course will follow the standard outline but may be adapted to your specific organisational needs. Working with Tables and Charts Sort Table Data Control Cell Layout Perform Calculations in a Table Create a Chart Customising Formats Using Styles and Themes Create and Modify Text Styles Create Custom List or Table Styles Apply Document Themes Using Images in a Document Resize an Image Adjust Image Appearance Integrate Pictures and Text Insert and Format Screenshots Use the Snipping tool Creating Custom Graphic Elements Create Text Boxes and Pull Quotes Draw Shapes Add WordArt and Other Text Effects Create Complex Illustrations with SmartArt Inserting Content Using Quick Parts Insert Building Blocks Create and Modify Building Blocks Insert Fields Using Quick Parts Controlling Text Flow Control Paragraph Flow Insert Section Breaks Insert Columns Link Text Boxes to Control Text Flow Using Templates Create a Document Using a Template Create a Template Using Mail Merge The Mail Merge Features Merge Envelopes and Labels Create a Data Source Using Word Using Macros Automate Tasks Using Macros Create a Macro Who is this course for? Who is this course for? This course is designed for users who to create or modify complex business documents as well as customised Word efficiency tools Requirements Requirements Preferably, delegates should have attended the Word Introduction course. Career path Career path Microsoft Office know-how can instantly increase your job prospects as well as your salary. 80 percent of job openings require spreadsheet and word-processing software skills Certificates Certificates Certificate of completion Digital certificate - Included
Autodesk Maya 10 hrs One to One training
By Real Animation Works
Autodesk face to face training customised and bespoke. Certified Tutors.
Lean Six Sigma Yellow Belt Certification Program
By IIL Europe Ltd
Lean Six Sigma Yellow Belt Certification Program This course is designed to instill an in-depth understanding of Lean Six Sigma and a clear sense of what is required to define high-impact improvement projects, establish Lean Six Sigma measurements, and complete Lean Six Sigma projects using the systematic and proven Define, Measure, Analyze, Improve, and Control (DMAIC) methodology. This course is designed to instill an in-depth understanding of Lean Six Sigma and a clear sense of what is required to define high-impact improvement projects, establish Lean Six Sigma measurements, and complete Lean Six Sigma projects using the systematic and proven Define, Measure, Analyze, Improve, and Control (DMAIC) methodology. Participants will learn basic tools and techniques of Lean Six Sigma and those who pass a thirty-question exam (70% or above) will become a Certified Lean Six Sigma Yellow Belt. This course is delivered through four 3-hour online sessions. What you Will Learn You'll learn how to: Establish the structure that supports and sustains Lean Six Sigma Quality Identify and calculate key Lean Six Sigma Measurements (Sigma, DPMO, and Yield) Select successful, high-impact projects that match strategic objectives Document, measure, and improve key processes using the DMAIC (Define, Measure, Analyze, Improve, and Control) Methodology Utilize data-based thinking to make key business decisions Introduction to the Fundamentals and Vision of Lean Six Sigma Lean Six Sigma's focus on the customer, on quality, and on results The costs of poor quality Critical factors to consider when deploying Lean Six Sigma Lean Six Sigma as a process improvement methodology Lean Six Sigma metrics Why do it - ROI and payback for Lean Six Sigma Business Process Management Critical Lean Six Sigma roles and responsibilities Main aspects of managing the organizational change Project selection Metrics of Lean Six Sigma and the DMAIC Model How to strategically align business metrics and projects within an organization How to identify and measure quality characteristics which are critical to customers What does the customer (internal or external) really want from our products and services? Establishing appropriate teams and setting those teams up to be successful What defines a good measurement system? How are we doing (learning the secret to measuring the right things, right)? How to improve output measures by understanding and measuring the process Where are there defects (how to properly select and scope high-impact projects)? Where is the process broken (the Lean Six Sigma version of root cause analysis)? How to determine the process efficiency, or value add, of a process The appropriate use of quality tools Understanding the concept of variation and how to reduce knee-jerk reactions How to achieve breakthrough results for any key measure How can we ensure the identified improvements will be sustainable (the basics of process control)?
