- Professional Development
- Medicine & Nursing
- Arts & Crafts
- Health & Wellbeing
- Personal Development
915 Courses in London
Vectorworks Night Training Courses
By ATL Autocad Training London
Why Choose Vectorworks Night Training Courses? Flexibility: Learn around your work schedule. Personalized Attention: Small classes for focused guidance. Practical Learning: Hands-on training for immediate application. Convenience: Balance work and learning seamlessly. Check our Website Training Duration: 10 hours. Approach: Personalized 1-on-1 Training and customized training. Timings: Schedule a convenient hour, Mon to Sat, between 9 am and 7 pm. Course Outline: Mastering Vectorworks Basics I. Introduction to CAD and Vectorworks Software Understanding the role of Computer-Aided Design (CAD) in modern workflows. Comprehensive introduction to Vectorworks software. II. Workspace Setup and Fundamental Options Configuring the workspace for efficient navigation and operation. Exploring basic options to enhance user experience. III. Basic Skills in Drawing and Object Selection Mastering fundamental drawing techniques. Expertise in selecting and manipulating objects. IV. Advanced Editing Techniques Combining shapes, mirroring, rotating, and grouping objects effectively. Working with precise scaling, preferences, and templates. V. Detailed Object Manipulation and Attributes Drawing and moving objects accurately within the design space. Utilizing advanced editing tools like fillet and offset. Introduction to basic attributes and group editing. VI. Advanced Drawing Techniques and Graphics Creating room plans with walls, windows, and doors. Implementing graphic elements such as hatching, gradients, and image fills. Drawing elevations using various methods and techniques. VII. Resource Management and Design Layers Importing images for graphic illustration. Creating symbols and navigating the Resource Browser. Organizing the drawing effectively using design layers. VIII. Labels, Annotations, and User Interface Mastery Labeling drawings and incorporating simple title block text. Navigating the user interface, understanding key terminologies. Plotting, printing, creating sheets (A1, A2, A3), and working with viewports. IX. Advanced Object Manipulation and Customization Converting drawings into PDF files. Efficiently working with files, objects, and data. Utilizing object snaps, quick selection, division, and measurement. X. Dimensioning, Text, and Tool Palettes Implementing dimensioning and annotations effectively. Working with text, custom tool palettes, and organizing these palettes. Creating standard views and additional drawing objects (Arc, Donut, Ellipse). XI. 3D Modeling Introduction and Real-World Units Introduction to 3D modeling, focusing on creating extrudes. Working with real-world units for accurate representation. XII. Advanced Object Manipulation and Exporting Manipulating objects, changing object angles, creating mirror images. Dealing with architectural elements like walls, doors, windows, and floors. By the end of the Vectorworks Evening Training Course, participants will: Demonstrate proficiency in using the Vectorworks interface, tools, and navigation. Create and edit 2D drawings, including walls, doors, windows, floors, ceilings, stairs, and railings. Effectively manage layers, classes, and views for organized and controlled object placement. Create and edit dimensions and annotations for accurate measurements and documentation. Develop skills in creating, modifying, and utilizing symbols for increased efficiency. Generate and edit 3D geometry, apply textures, and create sections and elevations from 3D models. Create polished presentation drawings using viewports, annotations, and text for clarity. Summarize course content and confidently apply learned skills in Vectorworks projects. Utilize available resources for further learning and professional development. Who Should Attend? Perfect for those aiming to master Advanced 2D Plans, Sections, Elevations and Construction detailing, lighting, and rendering in Vectorworks. Schedule Flexibility: Book personalized 1-on-1 sessions, Monday to Saturday, 9 a.m. to 7 p.m. Split 10 hours to fit your schedule. Method: Choose in-person or Live Online 1-on-1 sessions with tailored content and individual support, including Zoom options. Why Vectorworks? A pioneering CAD software, Vectorworks seamlessly integrates 2D and 3D capabilities, making it ideal for architects and designers. Free Educational Access: Students and professors can access a complimentary Vectorworks Designer license via the Academic Portal. Explore Vectorworks: Transform your designs with Vectorworks, the leading 2D, 3D, CAD, BIM software. Download or try now: https://www.vectorworks.net Tailored Training Solutions: We offer customized and project-focused training programs, designed to meet your specific needs and goals. Individualized Coaching: Receive personalized one-on-one guidance tailored exclusively for you. Adaptable Timings: Choose training slots that align with your schedule, ensuring flexibility in your learning journey. Ongoing Assistance: Access continuous post-course support to enhance your understanding and resolve queries. Comprehensive Learning Resources: Receive detailed materials providing in-depth insights for effective learning and reference. Recognition of Participation: Earn a Certificate of Attendance upon completion of your personalized training. Affordable Learning: Benefit from cost-effective rates, making quality education accessible to all. Software Setup Guidance: Get expert assistance in setting up your software on your devices for seamless learning experiences. Rewards for Referrals: Recommend our courses to others and enjoy special rewards for each successful referral. Group Learning Benefits: Enjoy exclusive discounts when you opt for group training, making it an ideal choice for teams. Convenient Hours of Operation: Access our training services at your convenience, with operating hours extending to accommodate your busy schedule. Tailored Learning Paths: Experience courses curated specifically for your needs, ensuring targeted and effective learning outcomes.

AAT Level 2 Certificate in Bookkeeping
By London School of Science and Technology
Gain the skills and essential knowledge needed for completing the manual bookkeeping activities that underpin all accountancy and finance roles. Course Overview Students studying this qualification will develop practical accountancy skills in the double-entry bookkeeping system and in using associated documents and processes. They will cover transactions for accuracy, make entries in appropriate books and ledgers and calculate sales invoices and credit notes. Gain the skills and essential knowledge needed for completing the manual bookkeeping activities that underpin all accountancy and finance roles. The jobs it can lead to: • Trainee bookkeeper • Finance assistant • Accounts administrator • Clerical assistant Entry Requirements: Students can start with any qualification depending on existing skills and experience. For the best chance of success, we recommend that students begin their studies with a good standard of English and maths. Course Content: Introduction to Bookkeeping: This unit provides students with an understanding of manual and digital bookkeeping systems, including the associated documents and processes. Students will learn the basic principles that underpin the double-entry bookkeeping systems. Learning outcomes: • Understand how to set up bookkeeping systems. • Process customer transactions. • Process supplier transactions. • Process receipts and payments. • Process transactions into the ledger accounts. Principles of Bookkeeping Controls: This unit builds on the knowledge and skills acquired from studying Introduction to Bookkeeping and explores control accounts, journals and reconciliations. Students will develop the ability to prepare the value added tax (VAT) control accounts as well as the receivables and payables ledger accounts. They will use the journal to record a variety of transactions, including the correction errors. Students will be able to redraft the initial trial balance, following adjustments. Learning outcomes: • Use control accounts. • Reconcile a bank statement with the cash book. • Use the journal. • Produce trial balances. DURATION 3 Months WHATS INCLUDED Course Material Case Study Experienced Lecturer Refreshments Certificate

Vray for 3ds max One to One training Course
By Real Animation Works
Vray for 3ds max face to face training customised and bespoke.

Petroleum Geology for Non-Geologists
By EnergyEdge - Training for a Sustainable Energy Future
About this Training Course To the non-geologist, working with Petroleum Geologists can be confusing. Petroleum geology has specific terminology and many concepts and data sources unfamiliar to the uninitiated. This course has been designed to introduce these terms and provide an insight into how oil and gas are formed, how they are found and how they are extracted. Using a holistic combination of lectures, experiments, case study and practical exercises, the course involves an introduction to fundamental geological concepts, to exploration techniques, prospecting, drilling, well logs and recovery methods. The course will also demystify the terminology surrounding petroleum geology, demonstrate the use of geological information to show the value and weakness of different datasets, and lead to better communication and decision-making between the geologists and non-geologists. It will feature world-class virtual reality field trips that incorporate activities and features unavailable in the physical field, and provide for a more integrated and flexible learning resource (also see the trainer's article on page 4 which was first published in GEO ExPro Magazine, the upstream oil and gas industry's favourite magazine). Course Highlights: Course facilitator has delivered petroleum geology training to many companies over the years Facilitator is also a professionally trained teacher and former university lecturer who is experienced in communicating with people at all levels of technical knowledge Practical exercises, experiments, examination of real rocks, a virtual reality field trip and case study are used to clarify and reinforce important concepts Training Objectives By attending this training, you will be able to acquire the following: Understand the geological methods and principles used in hydrocarbon exploration, development and production. Understand the key elements of a petroleum system, from hydrocarbon source to reservoir and seal Appreciate basin analysis, regional geology and play based exploration techniques Be aware of the different sorts of hydrocarbon trap from structural to stratigraphic Understand the technical terminology, tools and methods used in exploration geology Learn about unconventional Understand and evaluate the sources and reliability of various types of geological information Understand acquisition, processing and interpretation of seismic data Learn the technical processes and terminology involved in exploration Understand how a prospect is defined and risked Understand how seismic, existing well information and outcrop geology can be used for exploration Gain an understanding of the methods used for petroleum geology to allow a discovery to be appraised and then developed Target Audience The course is suitable to all personnel, but those that benefit most include: This course will benefit Petroleum Engineers (reservoir, drilling, production) who work with geological data, Geophysicists with little or no geological background, Project managers whose teams include petroleum geologists, Finance, Procurement, Marketing and Communications staff, and government Data Managers who handle petroleum geological data and need to understand the sources of different types of data. Trainer Your expert course leader is the Geosciences Technical Director for PetroEdge. She was previously, the manager of Robertson Petroleum Training Centre and a Senior Project Scientist at Robertson CGG. She has over 20 years of experience in teaching geology and leading field trips. Prior to her 8 years at Robertson, she was in academia as a lecturer for 6 years and a Research Fellow for 3 years. She has conducted fieldwork and led field trips in the US and many areas in the UK. In addition, she has led university regional geology day schools and has comprehensive experience in course and study programme writing. She has extensive experience in delivering courses and in Clastic and Carbonate Reservoir Geology, Deepwater Turbidites, Sandstone Reservoirs, Wireline Log Interpretation, Integrated Sequence Stratigraphy, Basin Analysis and Exploration & Appraisal workshops globally. In delivering the Exploration Team Management Workshop, she has project managed and taught key principles and modules on project planning, data collection/collation, geophysical assessment, stratigraphy and facies mapping, source rock facies and hydrocarbon generation, play fairway mapping, risking and prospect evaluation. Her knowledge and enthusiasm for instructing is reflected in consistently being rated as excellent by trainees, and clients specifically requesting her participation in courses. POST TRAINING COACHING SUPPORT (OPTIONAL) To further optimise your learning experience from our courses, we also offer individualized 'One to One' coaching support for 2 hours post training. We can help improve your competence in your chosen area of interest, based on your learning needs and available hours. This is a great opportunity to improve your capability and confidence in a particular area of expertise. It will be delivered over a secure video conference call by one of our senior trainers. They will work with you to create a tailor-made coaching program that will help you achieve your goals faster. Request for further information post training support and fees applicable Accreditions And Affliations

Autodesk AutoCAD | 3ds Max Training
By London Design Training Courses
Why Learn Autodesk AutoCAD | 3ds Max Training Course? Course Link 3ds Max serves as a powerful tool in architectural modeling, product design, games and films. Engaging with 3ds Max tutorials proves invaluable, particularly for game designers, as it can significantly enhance their professional growth and career prospects. Duration: 16 hrs Method: 1-on-1, Personalized attention. Schedule: Tailor your own schedule by pre-booking a convenient hour of your choice, available from Mon to Sat between 9 am and 7 pm. AutoCAD and 3ds Max Training Course: Tailored Learning Experience: Benefit from personalized, one-on-one training tailored to your individual needs and learning pace. Flexibility in Learning: Choose between attending in-person sessions or participating in live online classes, granting you the flexibility to learn from anywhere at your convenience. Accessible Lesson Recordings: Access recorded lessons to revisit concepts, practice techniques, and reinforce your understanding whenever you need. Ongoing Email Support: Receive continuous assistance and expert guidance through lifetime email support, ensuring you never feel left behind in your learning journey. Learn from Certified Tutors and Industry Experts: Be educated by experienced professionals proficient in both Autodesk AutoCAD and 3ds Max, providing valuable insights into industry best practices. Complimentary Career Advice: Take advantage of our career advisory services to receive valuable guidance in navigating your professional path and making informed decisions. Download Autodesk Autocad and 3ds max AutoCAD and 3ds Max Training Course. Course Duration: 16 hours Course Overview: Join our training program to master AutoCAD and 3ds Max. Suitable for beginners and experienced 2D/3D modelers, this course equips you with essential skills to create stunning designs in both 2D and 3D. Course Outline: Part 1: Introduction to AutoCAD Familiarizing with the AutoCAD interface Understanding the drawing environment Mastering basic 2D geometry creation Exploring essential drawing tools and commands Introduction to blocks and symbols for efficient design Part 2: Advanced AutoCAD Techniques Delving into advanced drawing techniques Manipulating and editing 2D geometry like a pro Creating custom symbols and blocks for enhanced productivity Working with text and annotations for clear communication Utilizing layers and line types for organized design Part 3: Plans sections and Elevations Entering the realm of Plans sections and Elevations Crafting Plans and 2D construction detailing precision Modifying and manipulating 2D seamlessly Crafting custom materials and textures for realistic designs Part 4: Introduction to 3ds Max Embracing the 3ds Max interface and workspace setup Mastering navigation within 3ds Max Understanding the viewport for optimized design Exploring basic 3D modeling techniques in 3ds Max Part 5: Materials and Textures in 3ds Max Applying and modifying textures to elevate designs Unraveling the art of UVW mapping for precise texturing Utilizing the material editor for creative freedom Crafting custom materials to suit your design vision Harnessing the power of Vray materials for realistic renders Part 6: Lighting in 3ds Max Introducing various lighting techniques Understanding light properties for impactful designs Setting up lights strategically to enhance scenes Illuminating scenes using Vray lights Part 7: Cameras in 3ds Max Mastering camera systems in 3ds Max Exploring camera properties for cinematic effects Creating animation with cameras for dynamic scenes Utilizing Vray cameras to achieve stunning renders Part 8: Rendering in 3ds Max Unveiling the art of rendering Utilizing Vray Global Illumination for realistic lighting Leveraging Vray Physical Cameras for precise control Enhancing scenes with Vray HDRI Lighting Following a Vray Rendering Workflow for professional results Part 9: Advanced Modeling Techniques Crafting complex geometry with finesse Utilizing modifiers for intricate designs Exploring polygonal modeling for versatile creations Creating organic and inorganic models with expertise Unleashing the potential of advanced modeling techniques Part 10: Projects Applying all learned skills to create real-world scenes Designing a simple interior scene with attention to detail Crafting a captivating exterior scene for visual impact Creating a complex scene with multiple objects and materials Course Requirements: A computer with AutoCAD and 3ds Max installed Basic knowledge of computer operations An interest in 2D and 3D modeling and design
Photoshop Basics to Fundamentals Training
By London Design Training Courses
Why Choose Photoshop Basics to Fundamentals Training Course? Our Photoshop Basics to Fundamentals Training Course offers a strong skills in Adobe Photoshop, equipping with essential skills. Learn to use layers, selection tools, layer effects, layers, masking, photos, typography, filters, and color theory. Learn features for confident Photoshop usage. Course Link Duration: 10 hrs Method: 1-on-1, Personalized attention Schedule: Tailor your own hours of your choice, available from Mon to Sat between 9 am and 7 pm Course Highlights: Master Advanced Photoshop Skills: Develop expertise in professional image editing, retouching, and manipulation techniques. Hands-on Creative Projects: Engage in practical exercises to enhance real-world design skills. Explore Special Effects: Dive into advanced topics like layer effects, filters, and blending modes for stunning visual creations. Typography and Design Mastery: Learn typography styles, layout design, and color theory for compelling compositions. Build a Professional Portfolio: Receive guidance on crafting a portfolio showcasing your Photoshop expertise. Job Opportunities: Graphic Designer: Create captivating visuals for print and digital media. Digital Artist: Craft digital artwork for various applications, from illustrations to ads. UI/UX Designer: Design user interfaces and experiences for websites and apps. Web Designer: Develop visually engaging websites with expertise in Photoshop. Marketing Content Creator: Produce marketing materials, including banners and social media visuals. Freelance Designer: Offer design services independently to diverse clients. Advertising Creative: Design impactful ad visuals for creative campaigns. Print Production Specialist: Prepare print-ready materials, ensuring high-quality results. Photography Post-Processing Specialist: Enhance and retouch photographs for professional use. Module 1: Interface and Preferences Familiarize with the Photoshop Interface Customize Panels and Toolbars to suit your workflow Explore Photoshop Preferences for optimal settings Discover different Photoshop CC Workspaces for various tasks Get started with essential Keyboard Shortcuts Module 2: Image File Formats Understand various image file formats, including PSD, JPEG, PNG, and PDF Explore File Compression and its impact on image quality Module 3: Creating a New Document Set dimensions and size for new documents Understand media units for precise design specifications Explore Color Profiles and their importance Save presets for quick document setups Module 4: Placing Images Learn about Embedded vs. Linked images Introduction to Smart Objects for non-destructive editing Master the Selection tool for precise image placement Module 5: Image Size and Resolution Save images in different formats and compression settings Learn about Image Size and Resolution for various output requirements Module 6: Layers Introduction Organize your work using Layer management Master layer tasks such as reordering, renaming, grouping, locking, and hiding Module 7: Selection Tools Explore various Selection Tools like Marquee, Magic Wand, Quick Selection, and Lasso Understand Inverse Selection and Deselect for efficient editing Module 8: Layer Effects Apply captivating Layer Effects like Drop Shadow, Stroke, and Outer Glow Save and clone Effects Styles for quick application Combine multiple effects for creative designs Module 9: Introduction to Shapes Utilize the Shapes tool for basic design elements Create Custom Shapes for unique designs Understand Color principles and use the Properties Panel for adjustments Master the Direct Selection tool for precise shape editing Create a basic poster using provided examples Module 10: Type and Typography Work with Type and explore the Character and Paragraph Panel Utilize Styles Panel for consistent text formatting Save favorite fonts for easy access Apply Effects and Layer Styles on Type for impactful typography Learn about Leading, Tracking, and Kerning for optimal text spacing Module 11: Colors Understand RGB vs. CMYK color modes Select colors using the Eyedropper tool Save colors as Swatches for reuse Create gradients using the Gradient Tool Module 12: Creating a Clipping Mask Master the concept of Clipping Masks and its usage Apply Clipping Masks to Type, Images, and Shapes Combine Layer Effects with Clipping Masks for creative designs Module 13: Introduction to Masking Understand Masking and its importance in image editing Utilize the Brush tool for creating masks Learn Masking shortcuts and use Gradient Mask for smooth transitions Module 14: Adjustment Layers Explore Color and Gradient Adjustment Layers for image enhancements Master Curves, Levels, and Hue/Saturation Adjustment Layers for precise color control Convert images to Black and White using Adjustment Layers Combine Adjustment Layer Masks for targeted edits Module 15: Image Touch Up Master various touch-up techniques, including Red Eye Removal, Spot Healing Brush, and Patch Tool Utilize Content Aware Removal for seamless object removal Restore an old photo using Clone Stamp and Dodge/Burn tools Improve portraits by removing blemishes and whitening teeth Module 16: Filters Introduction Understand Smart Objects and Filter usage for non-destructive editing Explore the Filters Gallery and experiment with Blur and Vantage filters Module 17: Blending Modes Introduction Master the concept of Blending Modes and their impact on layer overlays Understand different types of Blending Modes, including Darken, Lighten, and Overlay Master the art of working with layers in Adobe Photoshop. Skillfully utilize various selection tools for precise editing and manipulation. Apply captivating Layer Effects to enhance your designs and visuals. Understand the functionality of Adjustment Layers, Masking, and Clipping Masks for advanced editing and compositing. Acquire the techniques to touch up and restore photographs effectively. Explore typography techniques to create visually appealing text designs. Gain an introductory understanding of Filters and their creative applications. Grasp the principles of Color Theory and its practical application in design.

This two-day CPD approved programme provides delegates with the skills, competencies and strategies to undertake an effective mediation intervention as part of their existing role. The course is delivered by some of the top mediation trainers in the UK and it is powered by TCM’s award-winning FAIR Mediation Model™.

Vectorworks 2d | 3d and Spotlight training
By London Design Training Courses
Why Learn Vectorworks 2d | 3d and Spotlight training Course? Course info Led by experts, this comprehensive program equips you with skills in 2D drafting, immersive 3D modeling, and dynamic lighting design. Master Vectorworks' powerful features, including the Spotlight module tailored for entertainment and events. Duration: 16 hrs Method: 1-on-1, Personalized attention. Schedule: Tailor your own hours, available from Mon to Sat between 9 am and 7 pm. Or Call 02077202581 or WhatsApp 07970325184. Course Details: Format: 1-on-1 Training Schedule: Flexible, Any Day, Anytime (Monday to Saturday), 9 AM to 7 PM Duration: Customizable to Individual Learning Pace Content: Comprehensive training in Vectorworks, focusing on 2D Drafting, Immersive 3D Modeling, and Dynamic Lighting Design. Specialization: Spotlight Module for Entertainment and Events Instructors: Expert-led sessions ensuring personalized attention and effective learning. Outcome: Mastery of Vectorworks' Powerful Features, Proficiency in 2D and 3D Design, and Expertise in Dynamic Lighting Design for Entertainment Purposes. Note: Schedule and course duration are flexible to accommodate individual preferences and learning needs. Course Details: Format: 1-on-1 Training Schedule: Flexible, Any Day, Anytime (Monday to Saturday), 9 AM to 7 PM Duration: Customizable to Individual Learning Pace Content: Comprehensive training in Vectorworks, focusing on 2D Drafting, Immersive 3D Modeling, and Dynamic Lighting Design. Specialization: Spotlight Module for Entertainment and Events Instructors: Expert-led sessions ensuring personalized attention and effective learning. Outcome: Mastery of Vectorworks' Powerful Features, Proficiency in 2D and 3D Design, and Expertise in Dynamic Lighting Design for Entertainment Purposes. Note: Schedule and course duration are flexible to accommodate individual preferences and learning needs. Vectorworks 2D | 3D and Spotlight Training Course Course Duration: 16 hours Course Description: I. Introduction to Vectorworks (1 hour) Overview of Vectorworks software and its applications Familiarization with the user interface and navigation Customizing preferences and settings for optimal workflow II. 2D Drawing Tools (2 hours) Using basic drawing tools for creating lines, rectangles, circles, and polygons Utilizing text and dimension tools for annotations Applying modify tools for editing and transforming objects Organizing elements with layers and classes III. 3D Modeling Tools (3 hours) Introduction to extrude, revolve, sweep, and loft tools for 3D modeling Creating 3D objects from 2D shapes for spatial representation Modifying and refining 3D models Exploring the 3D modeling environment IV. Advanced 3D Modeling Tools (2 hours) Utilizing solid modeling tools for complex geometry creation Performing Boolean operations to combine or subtract shapes Creating and utilizing symbols for efficient workflow V. Introduction to Spotlight (1 hour) Overview of the Spotlight workspace and its features Adding and configuring lighting devices for stage and event design Creating and modifying lighting positions for accurate placement VI. Spotlight Tools and Techniques (3 hours) Creating and editing lighting instruments for customized setups Using visualization tools for lighting simulations Creating and applying labels and legends for documentation Generating worksheets and reports for lighting analysis VII. Advanced Spotlight Techniques (2 hours) Utilizing video and projection tools for multimedia presentations Incorporating audio and sound systems for immersive experiences Understanding rigging and hoisting for stage setup Managing paperwork and documentation for effective planning VIII. Integration with Other Software (1 hour) Importing and exporting files to collaborate with other software Utilizing Vectorworks in CAD and BIM workflows for interoperability Exploring plugins and add-ons for expanded functionality IX. Project-based Exercises (1 hour) Applying learned techniques to real-world scenarios Creating a lighting plan for a concert or theater production Designing a 3D model of a building or interior space Free 30-day, BIM & CAD Software Trial Request | Vectorworks https://www.vectorworks.net/trial Vectorworks Trial Version Request. Please fill out the following form. We will provide you with an evaluation serial number to activate your trial copy. Learning Outcomes of Vectorworks 2D | 3D and Spotlight Training Course: Master Vectorworks with 2D and 3D design skills. Create precise 2D drawings and detailed 3D models. Learn specialized tools for lighting and event planning in Spotlight. Optimize workflows and improve project coordination. Produce realistic renderings and visualizations. Apply skills to real-world projects in architecture and events.

Basic Photoshop Training Course
By ATL Autocad Training London
Learn the Basic PhotoshopTraining Course Learn retouching, layers, color, correction, shapes, and symbols. Delve into graphic design, photo editing, and digital art. From beginner to pro, gaining expertise in UX strategies, ensuring your websites are impactful and user-friendly. Click here for more info: Website Duration: 10 hours Approach: 1-on1 sessions and Personalized guidance. Schedule: Customize your schedule by booking a convenient hour, available from Monday to Saturday between 9 am and 7 pm. Module 1: Interface and Preferences Familiarize yourself with the Photoshop Interface Customize Panels and Toolbars to match your workflow Explore Photoshop Preferences to optimize settings Discover various Photoshop CC Workspaces tailored for different tasks Begin with essential Keyboard Shortcuts Module 2: Image File Formats Understand diverse image file formats such as PSD, JPEG, PNG, and PDF Delve into File Compression and its influence on image quality Module 3: Creating a New Document Set dimensions and size for new documents Grasp media units for accurate design specifications Explore Color Profiles and their significance Save presets for swift document setups Module 4: Placing Images Differentiate Embedded vs. Linked images Introduction to Smart Objects for non-destructive editing Master the Selection tool for precise image placement Module 5: Image Size and Resolution Save images using various formats and compression settings Understand Image Size and Resolution for diverse output needs Module 6: Layers Introduction Organize your work with Layer management Master layer tasks such as reordering, renaming, grouping, locking, and hiding Module 7: Selection Tools Explore Selection Tools like Marquee, Magic Wand, Quick Selection, and Lasso Grasp Inverse Selection and Deselect for efficient editing Module 8: Layer Effects Apply captivating Layer Effects such as Drop Shadow, Stroke, and Outer Glow Save and replicate Effects Styles for quick application Combine multiple effects for creative designs Module 9: Introduction to Shapes Utilize the Shapes tool for fundamental design elements Create Custom Shapes for unique designs Understand Color principles and use the Properties Panel for adjustments Master the Direct Selection tool for precise shape editing Create a basic poster using provided examples Module 10: Type and Typography Work with Type and explore the Character and Paragraph Panel Utilize Styles Panel for consistent text formatting Save favorite fonts for easy access Apply Effects and Layer Styles on Type for impactful typography Learn about Leading, Tracking, and Kerning for optimal text spacing Module 11: Colors Understand RGB vs. CMYK color modes Select colors using the Eyedropper tool Save colors as Swatches for reuse Create gradients using the Gradient Tool Module 12: Creating a Clipping Mask Master the concept of Clipping Masks and their application Apply Clipping Masks to Type, Images, and Shapes Combine Layer Effects with Clipping Masks for creative designs Module 13: Introduction to Masking Understand Masking and its importance in image editing Utilize the Brush tool for mask creation Learn Masking shortcuts and use Gradient Mask for smooth transitions Module 14: Adjustment Layers Explore Color and Gradient Adjustment Layers for image enhancements Master Curves, Levels, and Hue/Saturation Adjustment Layers for precise color control Convert images to Black and White using Adjustment Layers Combine Adjustment Layer Masks for targeted edits Module 15: Image Touch Up Master various touch-up techniques, including Red Eye Removal, Spot Healing Brush, and Patch Tool Utilize Content Aware Removal for seamless object removal Restore old photos using Clone Stamp and Dodge/Burn tools Enhance portraits by removing blemishes and whitening teeth Module 16: Filters Introduction Understand Smart Objects and Filter usage for non-destructive editing Explore the Filters Gallery and experiment with Blur and Vantage filters Module 17: Blending Modes Introduction Master the concept of Blending Modes and their effects on layer overlays Understand different Blending Modes like Darken, Lighten, and Overlay Layer Mastery: Develop expertise in working with layers, mastering advanced techniques for seamless editing and design organization in Adobe Photoshop. Precision Editing: Skillfully employ a variety of selection tools, ensuring precise and meticulous editing, manipulation, and composition of images and elements. Creative Layer Effects: Apply captivating Layer Effects with finesse, enhancing your designs and visuals to achieve professional-grade aesthetics. Advanced Editing Techniques: Understand the functionalities of Adjustment Layers, Masking, and Clipping Masks, enabling you to perform advanced editing and compositing tasks with confidence and precision. Effective Photo Restoration: Acquire techniques to touch up and restore photographs effectively, ensuring professional-quality results in photo editing and retouching. Typography Expertise: Explore advanced typography techniques, enabling you to create visually appealing text designs that complement your overall compositions. Filter Applications: Gain an introductory understanding of Filters and their creative applications, enhancing your ability to add artistic effects and refine visuals. Practical Color Theory: Grasp the fundamental principles of Color Theory and apply them practically in your designs, ensuring harmonious and visually pleasing color schemes in your work. Course Highlights: Advanced Photoshop Skills: Learn intricate techniques for professional image editing, retouching, and manipulation. Creative Design Projects: Engage in hands-on projects to enhance your practical skills in real-world scenarios. Mastering Special Effects: Dive into advanced topics like layer effects, filters, and blending modes to create stunning visual effects. Typography and Design Principles: Explore typography styles, layout design, and color theory for compelling compositions. Professional Portfolio Development: Receive guidance on creating a professional portfolio showcasing your Photoshop expertise. Potential Job Roles: Graphic Designer: Craft visually appealing graphics for print and digital media. Digital Artist: Create digital artwork for various applications, from illustrations to advertisements. Photo Retoucher: Enhance and manipulate photos for professional use, including portrait retouching. UI/UX Designer: Design user interfaces and experiences for websites and applications. Web Designer: Develop visually engaging websites with expertise in Photoshop for web design. Marketing Content Creator: Produce marketing materials such as banners, brochures, and social media visuals. Freelance Designer: Work independently, offering design services to clients across different industries. Advertising Creative: Contribute to creative campaigns by designing impactful ad visuals. Print Production Specialist: Prepare print-ready materials, ensuring quality in printed products. Photography Post-Processing Specialist: Enhance and retouch photographs, optimizing them for professional use. Comprehensive Photoshop Proficiency: Develop a solid foundation in Photoshop, mastering essential tools and techniques vital for image editing and manipulation. Creative Editing Expertise: Learn advanced retouching, image enhancement, digital artwork creation, and graphic design using Photoshop's powerful features. Professional-Grade Results: Acquire skills for achieving professional-level outcomes in image editing, ensuring precise color correction, seamless retouching, and visually appealing compositions. Optimized Workflow: Discover time-saving tips, shortcuts, and efficient techniques to enhance your Photoshop workflow. Learn layer management, non-destructive editing, and automation for streamlined processes. Versatile Design Skills: Unlock creative possibilities by mastering text effects, digital collages, filters, and graphic design for diverse mediums. Access to Recorded Lessons: Revisit course material and reinforce learning through recorded lessons. Review specific techniques at your own pace, deepening your understanding of Photoshop. Lifetime Email Assistance: Benefit from continuous support with lifetime email assistance. Seek guidance, get answers to questions, and seek clarification even after completing the course.
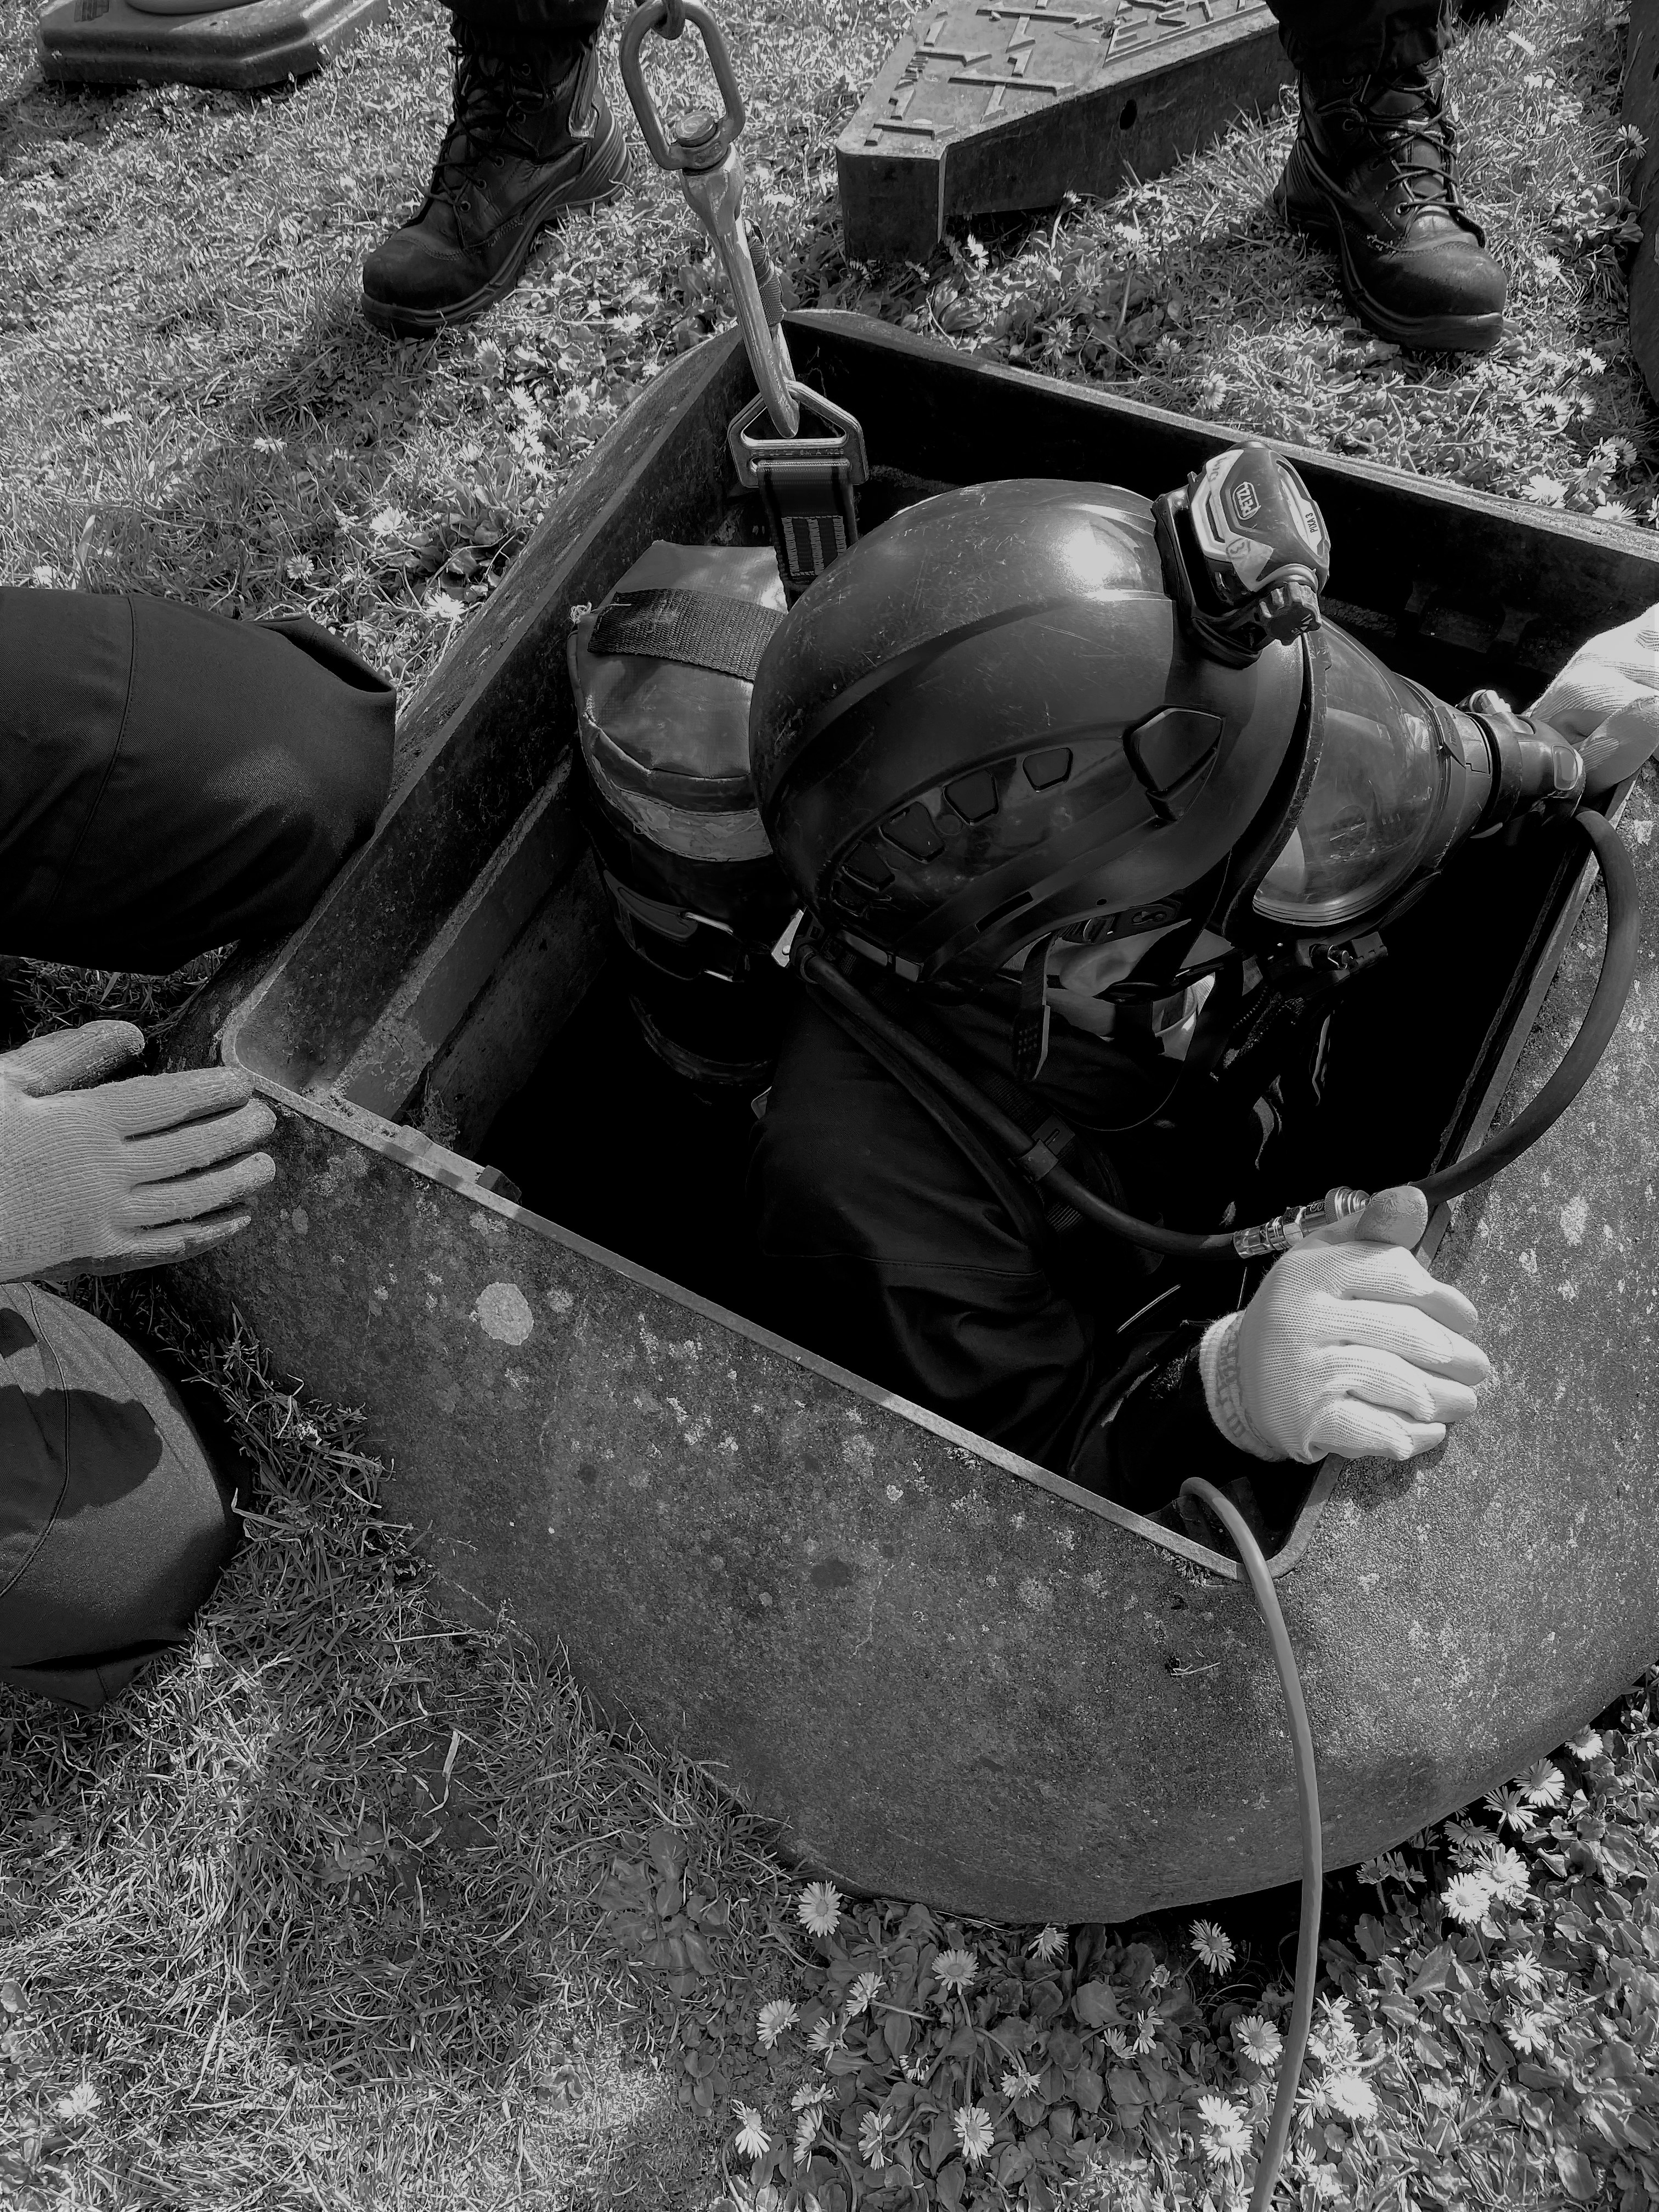
CS3 - Introduction to Working as a Member of a Confined Space Rescue Team
By Vp ESS Training
This course is designed to provide delegates that intend to work as part of a confined space rescue team with an introduction to planning and executing casualty rescue procedures and the equipment which may be required. This is intended for delegates who already hold a high risk (full Breathing apparatus) qualification such as our CS2. Note: A pre-requisite qualification is required to complete this course. The ESS CS2 course (https://www.vp-ess.com/training/confined-spaces/cs2-(high-risk)-confined-space-entry-full-breathing-apparatus,-self-rescue-and-ba-control/) must have been completed within 6 months as a pre-requisite for this CS3 course. Book via our website @ https://www.vp-ess.com/training/confined-spaces/cs3-introduction-to-working-as-a-member-of-a-confined-space-rescue-team/ or via email at: esstrainingsales@vpplc.com or phone on: 0800 000 346