- Professional Development
- Medicine & Nursing
- Arts & Crafts
- Health & Wellbeing
- Personal Development
518 Flexibility courses
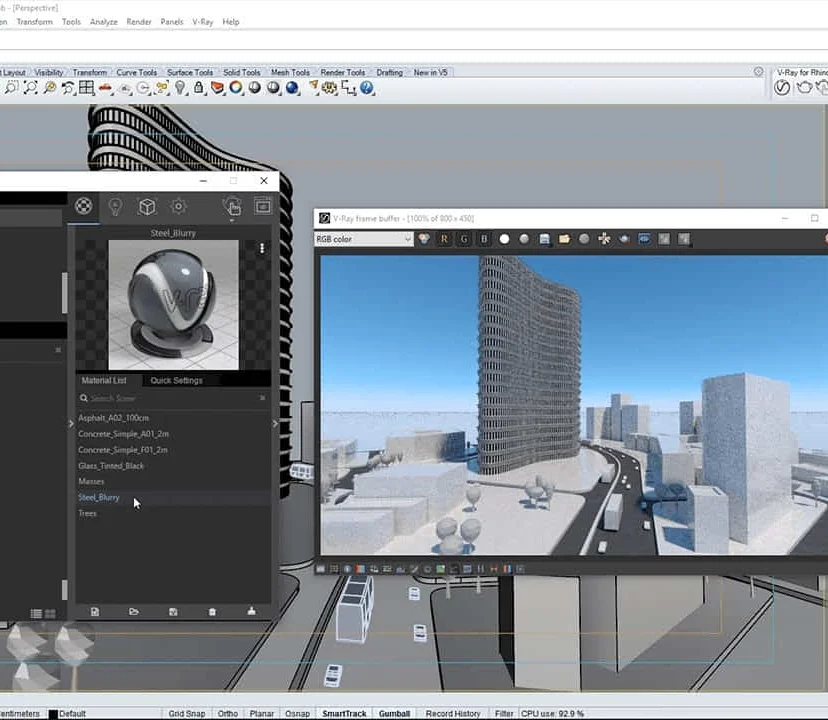
Vray for Sketchup Training
By London Design Training Courses
Why choose Vray for Sketchup Training Course? Course info Our in-person or live online sessions led by certified tutors. Learn advanced rendering techniques, practical hands-on experience, recorded lessons, lifetime email support, and an industry-recognized certification. Enroll now to elevate your Sketchup renderings. Duration: 6 hrs Method: 1-on-1, Personalized attention Schedule: Tailor your own schedule by pre-booking a convenient hour of your choice, available from Monday to Saturday between 9 am and 7 pm Experience V-Ray training, where you'll master the art of creating stunningly realistic 3D architectural and interior design scenes from your SketchUp models. V-Ray for SketchUp is a user-friendly rendering solution, offering faster rendering, enhanced lighting tools, and the ability to visualize intricate scenes effortlessly. Our SketchUp - Rendering with V-Ray course empowers you to seamlessly integrate SketchUp with V-Ray, allowing you to craft scenes with captivating features, including: Various lighting techniques (daylight, sunlight, and skylight). Reflective surfaces for added depth. Dynamic moving cameras for captivating visualizations. This hands-on course is highly practical, ensuring you gain real-world skills and expertise. You have the flexibility to arrange this course on-request, either as one-to-one training or as a 'closed course' for your group. The training can be tailored to accommodate your existing knowledge and specific project requirements. Choose from in-class sessions available at six centers or participate in live online classes. V-Ray works seamlessly on both Windows and Mac platforms, and our centers provide computers for delegates to use, ensuring a familiar environment for all. Upon successful completion, you'll receive an e-certificate to validate your V-Ray training. Following the training, you'll enjoy lifetime email support from your trainer to address any post-course queries or concerns. Prerequisites for this course include familiarity with the fundamentals of SketchUp, such as attending our Introduction to SketchUp course or possessing equivalent knowledge. Our training can accommodate any recent version of SketchUp Pro and V-Ray, ensuring compatibility with your preferred Windows or Mac platform. Experience the transformative power of V-Ray and elevate your SketchUp projects to new heights. Experience V-Ray training, where you'll master the art of creating stunningly realistic 3D architectural and interior design scenes from your SketchUp models. V-Ray for SketchUp is a user-friendly rendering solution, offering faster rendering, enhanced lighting tools, and the ability to visualize intricate scenes effortlessly. Module 1: Introduction to Vray for SketchUp Gain insights into Vray's benefits for SketchUp Install and set up Vray for SketchUp Familiarize with the Vray interface and workflow Explore Vray materials and their properties Module 2: Lighting and Environment Master effective lighting techniques in Vray Understand different Vray light types and settings Create realistic outdoor lighting with Vray sun and sky Utilize Vray dome lighting for interior scenes Introduce IES lights and their usage in Vray Module 3: Camera and Composition Learn Vray camera settings and their impact on the final image Control exposure and adjust camera settings in Vray Create depth of field effects with Vray camera Animate the Vray camera for dynamic shots Explore the Vray frame buffer and its functionalities Module 4: Vray Materials and Textures Gain an in-depth understanding of Vray materials and their properties Create realistic materials using Vray's material editor Save and organize custom Vray material libraries Apply Vray material overrides for quick changes Module 5: Rendering and Post-Production Explore Vray rendering settings and optimization techniques Render high-quality images and animations with Vray Enhance Vray renders using post-production techniques in Photoshop Fine-tune the final output with the Vray frame buffer Compose Vray render elements in Photoshop for added control For those interested in trying Vray for SketchUp, a free trial can be accessed through the following link: https://www.chaosgroup.com/vray/sketchup/free-trial. Additionally, provided material and texture resources (https://www.vray-materials.de/ and https://textures.com/) can enhance the quality of renders by providing access to a variety of materials and textures for use in Vray.

Unity 3D One-Day Course (One-to-One)
By Real Animation Works
Photoshop basic to fundamentals Training Course bespoke and customized
Holistic Massage Practitioner Course
By lindsay wild
You will gain an accredited certificate for Holistic Massage Practitioner with BH Holistics an approved executive training provider with International Practitioners of Holistic Medicine.
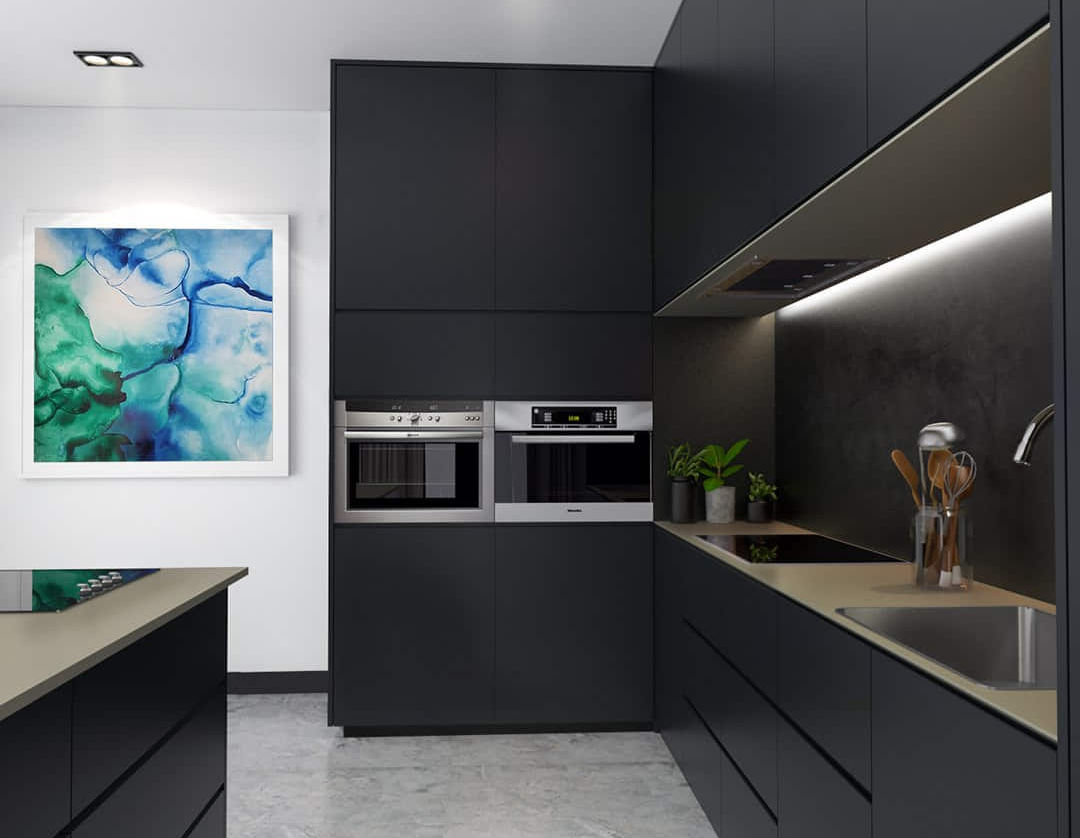
SketchUp Pro Training Course For Kitchen Designers
By ATL Autocad Training London
Who is this course for? SketchUp Pro Training Course For Kitchen Designers. This course is designed for kitchen designers aiming to elevate their skills in SketchUp Pro. Learn creating stunning kitchen worktops, cabinets, and designs tailored to perfection. Perfect your skills and bring 3d kitchen to life. Click here for more info: Website Duration: 6 hours. Method: 1-on-1, available in-person or Live Online sessions. Monday to Saturday between 9 am and 7 pm Alternatively, contact us at 02077202581 to book over the phone. Course Outline: SketchUp Pro Training Course For Kitchen Designers (6 hours) Module 1: Exploring 3D Warehouse for Appliance Selection Navigating 3D Warehouse for Appliance Models Selecting and Importing Appliances for Your Kitchen Design Module 2: Cabinetry Layout Introduction to Cabinetry Layout Planning and Arranging Cabinets for Functional Kitchens Module 3: Innovative Approaches to Cabinet Design Creative Strategies for Unique Cabinet Designs Incorporating Special Features and Functions Module 4: Creating Countertops and Sink Arrangements Designing Functional Countertops Integrating Sinks and Faucets Effectively Module 5: Enhancing Kitchen Spaces with Backsplashes Utilizing Backsplashes for Aesthetic and Practical Purposes Designing Custom Backsplash Solutions Module 6: Designing Efficient Range Hoods Range Hood Design Principles Ensuring Proper Ventilation and Aesthetics Module 7: Crafting Upper Cabinet Solutions Maximizing Storage and Style with Upper Cabinets Incorporating Upper Cabinet Design Variations Module 8: Perfecting Crown Moulding Applications Enhancing Cabinet and Wall Transitions Achieving a Polished Look with Crown Moulding Module 9: Optimizing Kitchen Islands Designing Functional and Stylish Kitchen Islands Utilizing Islands for Storage and Dining Module 10: Elevating the Ambiance with Wall Design Details Enhancing Walls with Creative Design Elements Adding Character and Texture to Kitchen Spaces Module 11: Ensuring Precise Dimensions Mastering Dimensioning Techniques Achieving Accuracy in Your Kitchen Design Module 12: Mastering Shadows and Style Customization Controlling Shadows for Realistic Renderings Customizing Styles to Enhance Visualization Upon completing the SketchUp Pro Training Course for Kitchen Designers, you will: Master SketchUp for comprehensive kitchen design. Efficiently select appliances from 3D Warehouse. Plan innovative cabinet layouts. Design functional countertops and sinks. Enhance kitchens with stylish backsplashes. Create efficient range hoods. Maximize storage with upper cabinets. Perfect crown moulding applications. Optimize kitchen islands. Elevate ambiance with wall design details. Ensure precision in dimensions. Customize realistic renderings. Job Opportunities: Kitchen designers can pursue roles such as Kitchen Designer, Interior Designer, Cabinet Designer, CAD Specialist, 3D Modeler, Home Renovation Consultant, and more. Freelance opportunities are also available. Skills Acquired: Advanced Kitchen Modeling: Master the art of creating detailed kitchen worktops, cabinets, and layouts using SketchUp Pro. Texture Mapping and Material Application: Learn to apply realistic textures and materials to enhance kitchen designs. Lighting and Rendering Techniques: Explore lighting setups and rendering tools for lifelike visualizations. Collaborative Design: Enhance skills in collaborative design, enabling seamless communication with clients and colleagues. Job Opportunities: Kitchen Designer: Design custom kitchen spaces, work closely with clients, and bring their visions to life. Interior Designer: Specialize in kitchen interior design, working with a focus on functionality and aesthetics. Furniture Designer: Create bespoke kitchen furniture pieces and optimize space for practical use. Freelance Kitchen Design Consultant: Offer specialized kitchen design services on a freelance basis, catering to various clients and projects. Personalized Learning! Why Choose Us? Tailored One-on-One Training: Exclusive coaching from skilled architects and designers, in-person or live online, Monday to Saturday. Customized Tutorials: Enhance your skills with tailored video tutorials to take home. Comprehensive Learning: Receive digital resources for thorough understanding and revision. Free Ongoing Support: Enjoy continuous assistance via phone or email, ensuring your success beyond the course. Flexible Syllabus: Adapted to your needs for focused learning. Official Certificate: Validate your expertise with our prestigious certification. Why Us? Supported Individual Learning: Personalized guidance, homework assignments, and post-course assistance for mastery. Personal Attention: Experience one-on-one learning for focused and confident progress. Financial Flexibility: Explore payment options tailored to your budget. Expert Instructors: Learn from industry experts dedicated to your success.
Complete Rhino 3D and V-Ray Training Program: Basic to Intermediate
By ATL Autocad Training London
Why Choose Complete Rhino 3D and V-Ray Training Program: Basic to Intermediate? Learn Rhino 3D and V-Ray for Rhino Basic to Intermediate Training Course. Suitable for beginners and experienced users alike, this program equips you with vital modeling and rendering skills. Opt for in-person or live online sessions. Click here for more info: Website Duration: 16 hours. Approach: 1-on-1 Sessions, Customized Content and Flexible Learning. Scheduling Flexibility: Tailor your sessions from Mon to Sat between 9 am and 7 pm. Course Title: Complete Rhino 3D and V-Ray Training Program: Basic to Intermediate - 16 Hours Session 1-2: Introduction to Rhino 3D Basics (2 hours) Understanding Rhino Interface: Navigating toolbars, command line, and properties panel. Basic Geometric Shapes: Creating lines, circles, and polygons with precision. Editing Tools: Mastering move, rotate, scale, and mirror commands. Session 3-4: Advanced Rhino 3D Modeling Techniques (2 hours) Curves and Surfaces: Delving into NURBS curves, creating complex surfaces, and blending techniques. Modeling Aids: Utilizing grids, snaps, and construction planes for accuracy. Organizing with Layers: Managing complex projects efficiently. Session 5-6: Introduction to V-Ray for Rhino (2 hours) V-Ray Interface: Understanding V-Ray toolbar and settings. Basic Lighting: Exploring different light types and their effects on scenes. Materials: Creating realistic materials, understanding diffuse, reflection, and transparency. Session 7-8: Intermediate V-Ray Concepts (2 hours) Advanced Lighting: Mastering HDRI lighting, creating natural outdoor lighting scenarios. Texture Mapping: Understanding UV mapping, applying textures seamlessly. Rendering Optimization: Reducing noise, optimizing settings for quicker, high-quality renders. Session 9-10: Rhino-V-Ray Integration (2 hours) Model Preparation: Optimizing Rhino models for V-Ray rendering. Advanced Material Manipulation: Creating complex materials, incorporating textures. Interactive Rendering: Real-time adjustments for immediate feedback. Session 11-12: Advanced Modeling Techniques in Rhino (2 hours) Advanced Surface Modeling: Creating organic shapes, advanced surfacing techniques. Precision Modeling: Advanced curve editing, filleting, and trimming. Working with 3D Text: Creating custom 3D text for design projects. Session 13-14: Scene Composition and Presentation (2 hours) Camera Settings: Understanding focal length, depth of field, and perspective. Scene Composition: Design principles, rule of thirds, focal points, and balance. Post-Processing: Enhancing renders in Photoshop, adding atmosphere and context. Session 15-16: Final Project and Portfolio Review (2 hours) Final Project Work: Participants apply learned skills to create a complex 3D scene. Instructor-led Critique: Feedback session for final projects. Portfolio Guidance: Tips for selecting the best works for a professional portfolio. By the end of this 16-hour course, participants will have a deep understanding of both Rhino 3D and V-Ray, allowing them to create intricate 3D models and produce high-quality, realistic renders for various applications. Upon completing the Rhino 3D and V-Ray Basic to Intermediate Training Course, participants can expect to achieve the following learning outcomes: Proficiency in Rhino 3D and V-Ray: Develop a comprehensive understanding of Rhino 3D and V-Ray interfaces, tools, and functionalities, enabling participants to navigate and utilize the software effectively. 3D Modeling Skills: Master the art of creating captivating 3D objects and shapes using Rhino 3D, including editing, transforming, and refining designs for diverse applications. Material Application: Acquire the ability to apply and customize materials and textures to enhance the visual appeal and realism of 3D models, elevating the quality of designs. Lighting Techniques: Gain expertise in utilizing V-Ray lighting tools, such as V-Ray lights and HDRI maps, to achieve striking lighting effects in rendered scenes. Rendering Excellence: Learn to optimize V-Ray render settings, control global illumination, and apply dynamic effects like depth of field and motion blur for high-quality and impressive renders. Advanced Modeling: Develop skills in advanced modeling techniques, including handling curves, surfaces, and solids, enabling participants to tackle complex design challenges. Lighting Mastery: Acquire the knowledge and expertise to create and adjust artificial lights, utilize the Sun and Sky system, and craft custom HDR images for realistic lighting setups. Seamless File Management: Understand various file formats for exporting and importing 3D models, facilitating efficient collaboration and preparation for 3D printing. Creative Problem-Solving: Enhance creative thinking and problem-solving abilities through hands-on practice and exploration of diverse design scenarios. Professional Presentation: Learn post-production techniques in Photoshop to enhance renders and create visually appealing design presentations for effective communication. Continuous Learning: Access valuable resources and tips to encourage continuous learning and professional growth in Rhino 3D and V-Ray. Skills You'll Gain: Master Rhino 3D basics: Curves, surfaces, modeling aids, and precision techniques. Explore intermediate V-Ray concepts: Advanced lighting, material manipulation, and texture mapping. Understand Rhino-V-Ray integration for seamless 3D modeling and rendering workflows. Optimize render settings for high-quality output and reduced rendering times. Career Opportunities: Upon completing this program, you'll be prepared for various roles in the design and visualization industry, such as: 3D Modeler: Create detailed 3D models for diverse industries, including architecture and product design. Architectural Visualizer: Produce realistic architectural visualizations for presentations and marketing materials. Product Designer: Develop visually appealing product prototypes and visualizations for marketing and manufacturing. Visualization Specialist: Work in design studios, advertising agencies, or game development companies, creating immersive visual content. Freelance Designer: Offer your skills on platforms like Upwork or Fiverr, providing 3D modeling and rendering services to clients worldwide. Solidify Rhino 3D Expertise: Master foundational modeling skills, including intricate geometries and surface manipulation, establishing a robust foundation for your 3D design journey. Unlock V-Ray for Rhino: Explore the potential of V-Ray for Rhino, learning to create mesmerizing visualizations and achieve lifelike rendering results that bring vitality to your designs. Enhance Visual Appeal: Grasp advanced lighting techniques, material application, and texture methods to elevate the visual allure of your 3D creations, making them more immersive and authentic. Explore Advanced Concepts: Delve into optimizing rendering settings, post-production tactics, and efficient workflows, advancing your design proficiency to higher levels. Hands-On Experience: Engage in practical exercises and real-world projects, applying your skills in practical contexts to enrich your portfolio and showcase your capabilities effectively. Certification of Achievement: Receive a valuable Certificate of Completion, confirming your expertise in Rhino 3D and V-Ray for Rhino, enhancing your professional credibility as a skilled designer. Flexible Learning Paths: In-Person or Live Online: Opt for in-person sessions, fostering collaborative learning, or choose live online classes for convenience and accessibility, tailoring your learning experience to your preferences. Personalized Guidance: Regardless of your chosen format, benefit from tailored instruction and guidance, ensuring optimal learning outcomes and continuous support throughout the course.
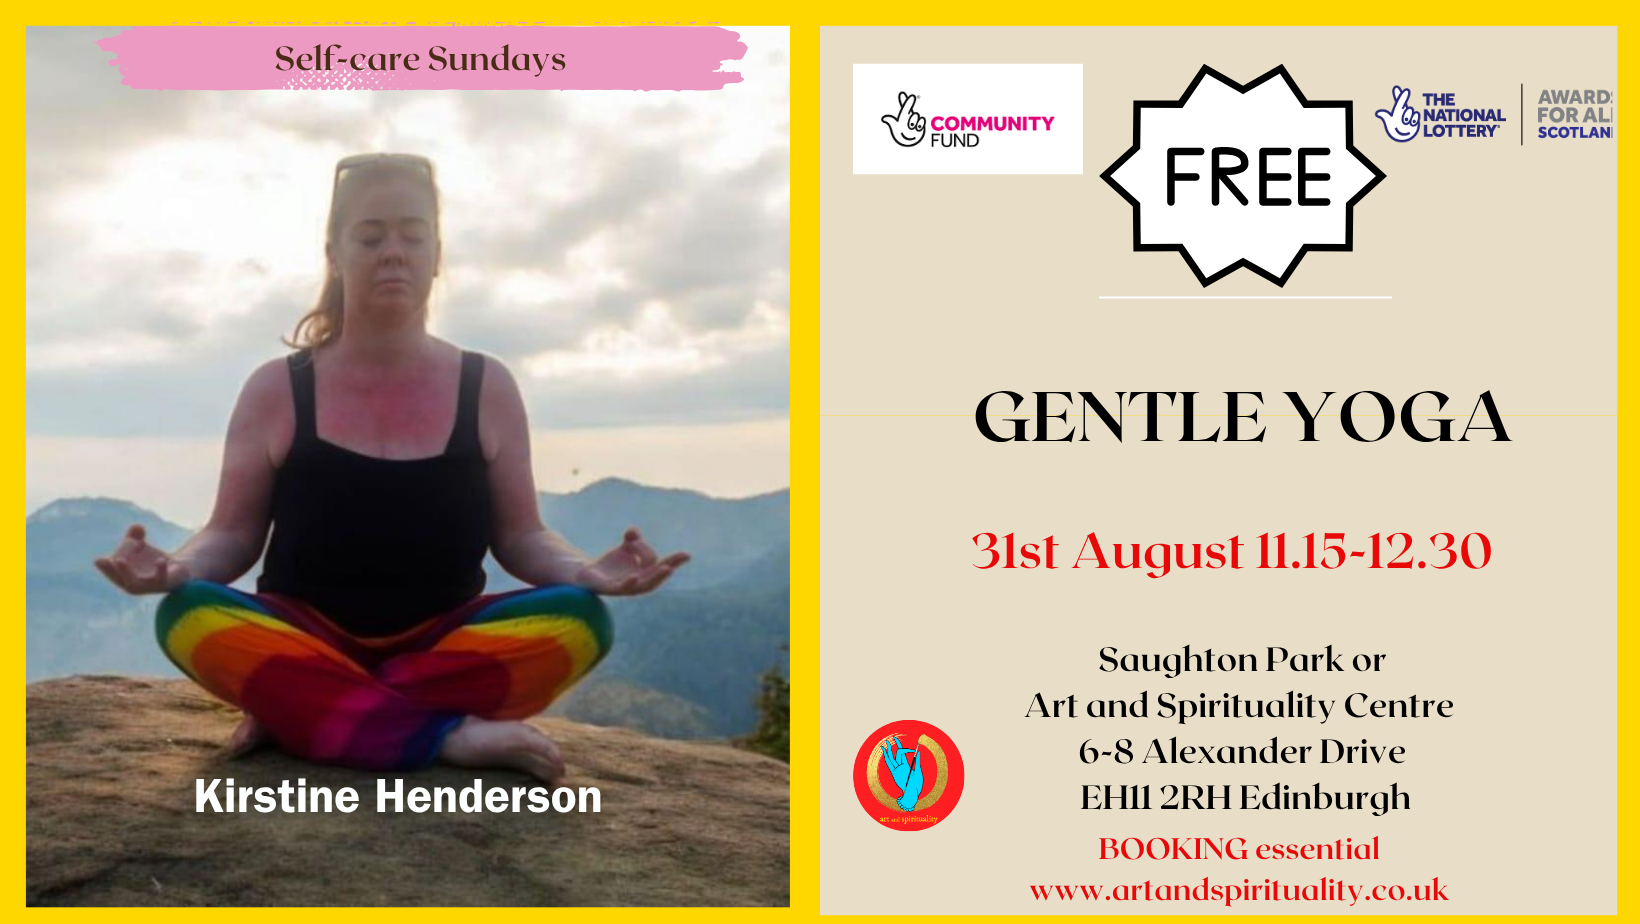
Designed to promote deep relaxation and mindfulness through a thoughtfully slower-paced practice, this nurturing class offers a sanctuary from the demands of daily life. Led by experienced instructor Kirstine Henderson, each session focuses on gentle stretching and accessible exercises that honor your body's natural rhythm and capabilities, making it welcoming for practitioners of all ages, fitness levels, and experience. Throughout the class, you'll be guided through a carefully curated sequence of calming poses that work harmoniously to enhance flexibility, improve balance, and cultivate overall well-being. The emphasis is on moving with intention rather than intensity, allowing you to truly listen to your body and respond to its needs. Each posture is offered with modifications and variations, ensuring that everyone can participate comfortably and safely. Whether you are completely new to yoga and taking your first steps onto the mat, or you're a seasoned practitioner seeking a soothing way to unwind and reconnect with yourself, this class provides a supportive and non-judgmental environment. You'll discover how gentle movement can be profoundly transformative, helping you release physical tension while quieting mental chatter. Meeting in the studio 11.15 to leave to the park if the weather allowed. Mats provided This class sponsored by Awards for All, Community Fund We prioritize the area of Gorgie-Dalry-Saughton where our studio is based. By attending this class you release the teacher, Giada Gaslini and Art and Spirituality Cic, from any liability arising out of any personal injuries, emotional or physical release, death, expectations of results, theft in the venue or damages that may happen to people and objects while attending.
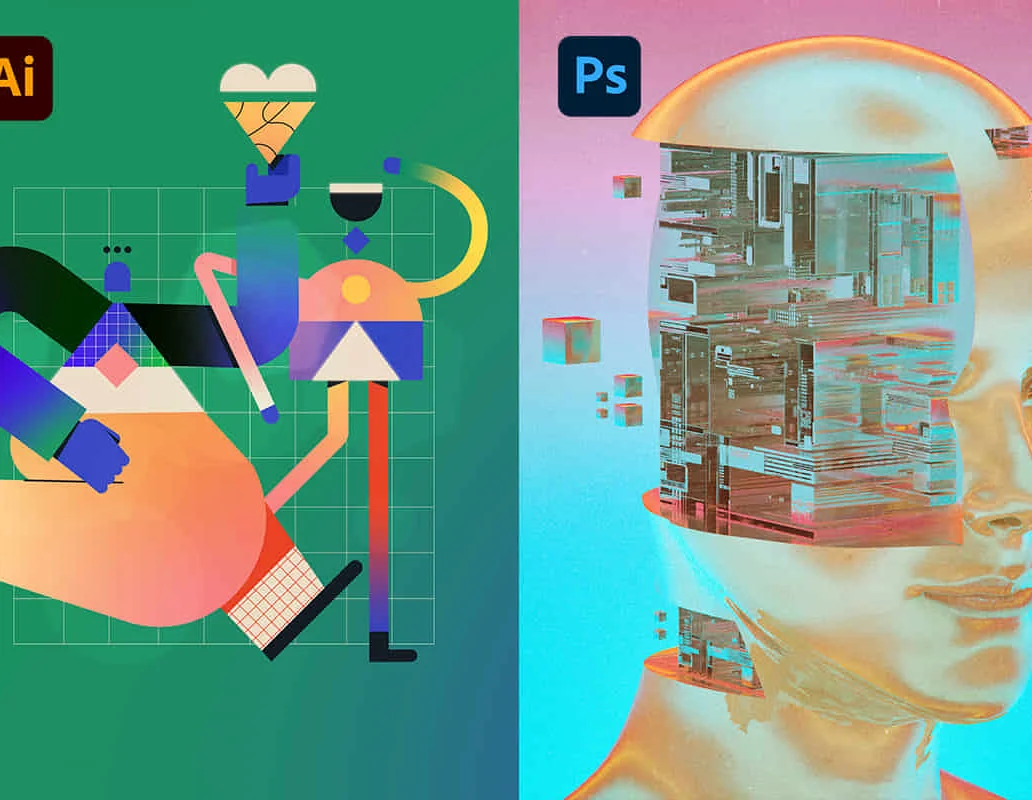
Adobe Illustrator and Photoshop Masterclass Training
By ATL Autocad Training London
Adobe Illustrator and Photoshop Masterclass Training, your gateway to Photoshop and Illustrator. Learn with the best software for publishing and marketing materials. This comprehensive training covers Photoshop, Illustrator, and InDesign, offering step-by-step tutorials tailored for creative professionals. Click here for more info: Website Duration: 10 hours Approach: Individualized, Tailored Content, Flexible Pace, Personal Support Scheduling Flexibility: 1-on-1 sessions from Mon to Sat, 9 am to 7 pm, based on your availability. Course Title: Adobe Photoshop and Illustrator Mastery Workshop Duration: 10 Hours (Divided into 10 Modules) Module 1: Introduction to Adobe Photoshop (1 hour) Familiarization with Photoshop interface and tools Understanding bitmap graphics and resolution Basic image editing techniques (cropping, resizing, color adjustments) Significance of layers in design Module 2: Essential Photoshop Tools (1 hour) Mastery of selection tools (Marquee, Lasso, Magic Wand) Understanding brushes and their settings Introduction to the Pen tool for precise selections Working adeptly with layers and layer styles Module 3: Advanced Image Editing (1 hour) Proficiency in advanced color adjustments (Curves, Levels, Hue/Saturation) Techniques for photo retouching and manipulation Creating composite images using blending modes Application of filters and special effects for creative designs Module 4: Introduction to Adobe Illustrator (1 hour) Exploration of Illustrator interface and tools Working with vector graphics and paths Basic shapes and drawing tools Understanding anchor points and handles Module 5: Creating Vector Artwork (1 hour) Expert use of the Pen tool for precise vector illustration Creating and editing shapes and objects Mastery in handling gradients and patterns Understanding the Appearance panel Module 6: Illustrator Typography (1 hour) Text tools and advanced formatting options Crafting text effects and artistic typography Integration of text with shapes and images Working adeptly with text on a path Module 7: Combining Photoshop and Illustrator (1 hour) Importing Illustrator files into Photoshop and vice versa Efficient use of smart objects and vector shapes in Photoshop Creation of custom brushes and patterns in Illustrator for seamless use in Photoshop Designing posters and flyers by combining elements from both software Module 8: Integration with InDesign (1 hour) Exporting assets from Photoshop and Illustrator for InDesign Crafting layouts in InDesign using assets from both programs Understanding print and digital design nuances Preparing files for printing and online use Module 9: Advanced Techniques and Tips (1 hour) Creating custom actions and automation in Photoshop Mastery in advanced selection techniques Utilizing Illustrator's advanced tools (Pathfinder, Shape Builder, etc.) Exploration of creative design styles and trends Module 10: Final Projects and Portfolio (1 hour) Individual or group projects incorporating Photoshop and Illustrator skills Detailed review and feedback on the projects Preparation of a portfolio showcasing the work Upon completion of the Adobe Photoshop and Illustrator Mastery Workshop, participants will: Master Advanced Design Techniques: Acquire expert skills in both Adobe Photoshop and Illustrator, delving into advanced tools, filters, and effects for intricate design work. Seamlessly Integrate Software: Learn to seamlessly integrate Photoshop and Illustrator, enabling the creation of dynamic and visually appealing designs by leveraging the unique strengths of both programs. Develop Creative Problem-Solving: Cultivate creative problem-solving abilities by exploring diverse design styles and industry-relevant trends, empowering the creation of innovative and captivating visuals. Construct Professional Portfolios: Gain the expertise to construct professional portfolios, showcasing a diverse range of projects incorporating advanced Photoshop and Illustrator techniques. Collaborate on Real-World Projects: Collaborate effectively on real-world design projects, combining Photoshop and Illustrator skills to produce high-quality marketing materials, promotional content, and digital artwork. Career Opportunities: Upon mastering Photoshop and Illustrator, participants can pursue a range of creative careers, including: Graphic Designer: Craft visually appealing designs for print and digital media, ranging from marketing materials to social media graphics. Digital Illustrator: Create intricate digital illustrations and artworks for various applications, including book covers, digital publications, and games. Web Designer: Develop engaging and user-friendly website layouts and elements, optimizing user experience through appealing visuals. Advertising Artist: Design compelling advertisements for print and online platforms, captivating audiences and promoting brands effectively. Freelance Designer: Work as a freelance designer, taking on diverse projects from clients and agencies, showcasing versatility in both Photoshop and Illustrator skills. By mastering these Adobe tools, participants open doors to a multitude of creative opportunities in the ever-expanding digital design industry. Skills Acquired: Participants in the Adobe Illustrator and Photoshop Masterclass Training will develop advanced skills in vector graphics, digital illustration, and photo manipulation using Adobe Illustrator and Photoshop. Key skills include: Precision Vector Graphic Design in Illustrator Creative Digital Illustration Techniques Advanced Photo Editing and Manipulation in Photoshop Job Opportunities: Upon completion, individuals can pursue roles such as: Graphic Designer Digital Illustrator Advertising Creative Branding Specialist Elevate Your Design Skills: Master Adobe Illustrator and Photoshop, crafting stunning graphics, logos, and digital illustrations. Understand design principles, tools, and workflows. Receive a recognized Certificate of Completion and access recorded lessons for future reference. Expert Guidance, Your Schedule: Learn from certified experts, tailored to your timetable-flexible online or in-person sessions, Monday to Sunday, 9 am to 8 pm. Enjoy lifetime email support for seamless learning. Unleash Your Creativity Today: Enroll now to ignite your creative potential in Adobe Illustrator and Photoshop. Elevate your designs effortlessly.
Reflexology Practitioner Course
By lindsay wild
You will gain an accredited certificate for reflexology massage practitioner with BH Holistics an approved executive training provider with International Practitioners of Holistic Medicine.
One to One Stone Cutting Workshop: Cabochons and Rough Form Stones (Farnham Workshop) Weekends or Weekdays – Flexible Booking (4 hour session)
(21)By Workshop 925
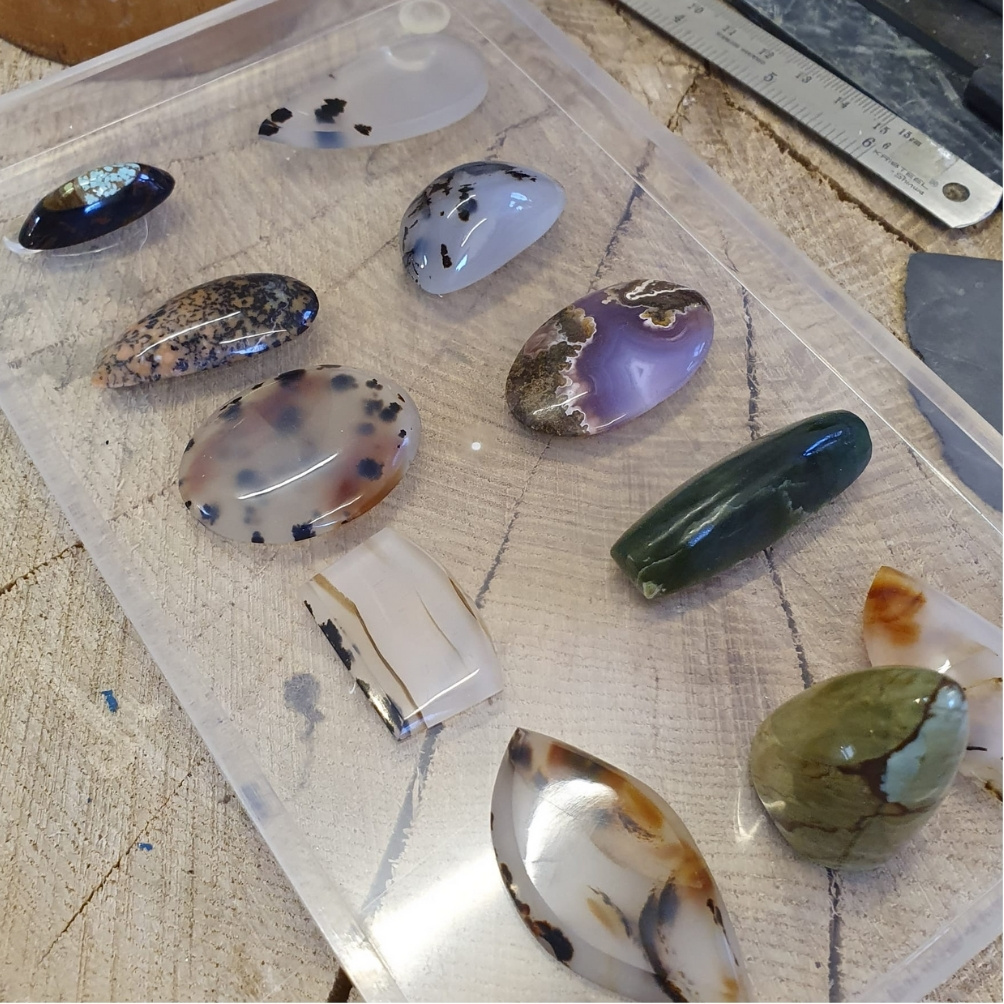
In this unique course with tutor Sarah Reece you will learn how to cut two shapes of stones: The first will be a free form shape with a flat edges as shown in the images. The second the focus will be how to create a traditional cabochon. This stone will be have a flat base with a rounded top. This will be cut from rough stone which you can each select from Sarahs beautiful collection. You can decide the shape and size and which part of the stone you wish to use. The class size is limited to just 1 student. So you do not breathe in harmful rock dust during the process, you will be cutting the stone while it is in water. With this in mind, please wear older clothes, and waterproof shoes – wellies are advised as it is not a clean or dry activity. Water sprays from the rotating wheels as you are working. We will provide you with a waterproof apron. This course is an excellent introduction to stone cutting. It allows you to step into the world of Lapidary where you can cut and create any shaped stone you desire, you won’t be beholden to the shop bought stone. This means your projects and settings can become completely unique as per your designs. You will be working with a Cab King 6″ and the Diamond Pacific Pixie Cabbing Machine. We have factored in a 30 minute break for lunch during our Saturday sessions. Full info below… When: Sarah is available at weekends and during the week. If you decide to book a stone cutting course, there is flexibility for your booking. We will contact you to find a suitable session. Length: The session will last 4 hours Where: THIS WORKSHOP COURSE IS BASED IN FARNHAM NOT OUR WOKING WORKSHOP Weydon Farm House Weydon Farm Lane GU9 8QJ There is parking on site. Tutor: Sarah Reece What does the session involve? In this unique course with tutor Sarah Reece you will learn how to cut two shapes of stones: The first will be a free form shape with flat edges (as shown in the images). The second the focus will be how to create a traditional cabochon. This stone will have a flat base with a rounded top. This will be cut from rough stone which you can select from Sarah’s beautiful collection. You can decide the shape and size and which part of the stone you wish to use. You will be cutting the stone while it is in water so you do not inhale harmful dusts. With this in mind, please wear older clothes, and waterproof shoes – wellies are advised as it is not a clean or dry activity. Water sprays from the rotating wheels as you are working. We will provide you with a waterproof apron. This course is an excellent introduction to stone cutting. It allows you to step into the world of Lapidary where you can cut and create any shaped stone you desire, you won’t be beholden to the shop bought stone. This means your projects and settings can become completely unique as per your designs. You will be working with a Cab King 6″ and the Diamond Pacific Pixie Cabbing Machine. The class size is limited to just 1 student. This Instagram post gives you a preview of what to expect from your session Experience required: None, all abilities are welcomed. We support you throughout the session and provide demonstrations to show you the techniques and steps needed to create your project. With one to one sessions, you will gain a large amount of support in this intensive introduction to stone cutting Class size: 1 What is included? All tools and consumables are supplied The stones you will carve are NOT INCLUDED in the price of the course – This is something you can choose on the day so you can select something you would like to work with. Sarah has priced up different varies in generous sizes ranging from £3-£20. If you would rather not buy stone to work with, no problem, Sarah has plenty of beautiful flint that you can use instead. What to bring: For safety reasons, during each class, you are required to wear appropriate footwear, we request that no open toed shoes are worn within the workshop. Wellies or older waterproof shoes advised. Long hair should also be tied back when working with the equipment. You may also wish to bring a notebook. There are always many tips and tricks given verbally by the tutor, which some might like to keep note of. Also pack your own snacks and drinks for the session if required.