- Professional Development
- Medicine & Nursing
- Arts & Crafts
- Health & Wellbeing
- Personal Development
Business Process Modeling: Virtual In-House Training
By IIL Europe Ltd
Business Process Modeling: Virtual In-House Training This course is part of IIL's Business Analysis Certificate Program (BACP), a program designed to help prepare individuals pass the IIBA® Certification exam to become a Certified Business Analysis Professional (CBAP®). Learn more at www.iil.com/bacp A process model is a description of a process in terms of its steps or actions, the data flowing between them and participants in the process, machines, systems, and organizations involved. Modeling is a critical business analysis skill. It applies graphical and text communication techniques to describe the actions, objects, and relationships acted upon in the process and the steps that act upon them. This course teaches the technique of process modeling and ties together the core methods of process, behavior, and data modeling to enable business analysts to fully describe business processes in levels of detail from multiple perspectives. What you will Learn Upon completion, participants will be able to: Identify business processes and their components Work with UML diagrams Use process modeling in business diagramming Diagram and model business processes Foundation Concepts The role of the business analyst The IIBA® BABOK® Knowledge Areas Business Process Modeling (BPM) and the business analyst A practical approach to business process modeling The Context for Modeling Business Processes Overview of context for business process modeling Analyzing stakeholder information Modeling best practices Critical inputs for BPM: Business Rules Critical inputs for BPM: Context Diagrams Data Models Overview of data modeling Entity relationship diagrams Object-oriented approach Class diagrams Other data models Process Models - Part I (Non-UML) Overview of process modeling Data flow diagrams Workflow diagrams Flowcharts Process Models - Part II (UML) Overview of UML Process Models UML Activity Diagrams UML Sequence Diagrams Usage Models - Part I (Non-UML) Overview of usage modeling Prototyping options Static prototyping and storyboards Dynamic prototyping User Interface Design and user stories Usage Models - Part II (UML Use Cases) Overview of Use Cases Use Case diagrams Use Case descriptions Use Cases and the product life cycle Integrating the Models Overview of integrating the models General analysis best practices Specific analysis techniques summary Best practices for transition to design Summary and Next Steps What did we learn and how can we implement this in our work environments?

Natural Language Processing with Real-World Projects
By Packt
Want to become an expert NLP engineer and a data scientist? Then this is the right course for you. In this course, we will be covering complex theory, algorithms, and coding libraries in a very simple way that can be easily grasped by any beginner as well.

Change Management Practitioner
By Career Smarter
Change Management Practitioner, a comprehensive program building on foundational knowledge. Dive into advanced concepts, models, and tools for effective organisational change. Develop the skills to lead, implement, and sustain successful change. About this course £297.00 19 lessons Accredited training Certificate of completion included Course curriculum IntroductionIntroduction Session 1Lesson - Change & the IndividualTest Your Knowledge Quiz Module 2Lesson - Change & the OrganisationTest Your Knowledge Quiz Module 3Lesson - Stakeholder Engagement & CommunicationTest Your Knowledge Quiz Module 4Lesson - Change PracticeTest Your Knowledge Quiz Supporting Documents APMG Candidate Guidance - Examinable Text by Chapter APMG Change Management Development Paper APMG Change Management Leaflet APMG Change Management Practitioner - Sample Exam PaperFile APMG Change Management Practitioner Candidate Guidance APMG Change Management Summary APMG Change Management Syllabus Study Timetable Accredited AgilePM training is provided by ITonlinelearning, APMG-International Accredited Training Organisation.

77-727 Microsoft Excel Certification - MOS Excel Core Exam
By Packt
MOS Core Excel - 77-727 : Complete Techniques for Exam Success
Bespoke AutoCAD Mac Basic-Intermediate Course
By ATL Autocad Training London
Why Learn Bespoke AutoCAD Mac Basic-Intermediate Course? Learn AutoCAD using your projects and learn how to use powerful tools and techniques for drawing, dimensioning, and printing 2D drawings with our Intermediate AutoCAD course. Check our Website How long is the training? 10 hours, Choose and split 10 hrs Mon to Sat 9 am to 7 pm. Book online or call 02077202581 or 07970325184. Method? 1-on-1, available in both in-person and Live Online. Course Topics Include: Building Fundamental Shapes Working with Lines, Arcs, and Polylines Utilizing Grip Tools Precision Object Alignment Data Management and Backups Exploring File Formats Ensuring Disaster Recovery Mastering Object Creation Handling Measurement Units Dynamic Input Techniques Inquiring Commands and Measurement Tools Effective Object Viewing Navigating Zoom and Pan Object Manipulation Strategies Object Selection Methods Swift Object Management Object Transformation Techniques Scaling and Altering Objects Trim, Extend, and Offset Functions Creating Geometric Variations Object Joining and Editing Corner Filleting and Chamfering Stretching Objects Organizing Your Drawings Layer Management Customizing Object Properties Applying Linetypes Layout Design and Setup Efficient Page Configurations Scaling Drawing Views Adding Annotations Multiline and Single-Line Text Creation Text Styling and Editing Dimensioning Concepts Customizing Dimension Styles Dimension Editing Implementing Multileaders Object Hatching Hatching Editing Reusable Content Management Blocks and Symbols Tool Palette Usage Working with Groups Model Space and Paper Space Understanding Layout Creation and Viewports Viewport Scaling Plotting and PDF Output Managing Multiple Sheet Drawings Utilizing Plotstyles Crafting Custom Drawing Templates Download AutoCAD Mac https://www.autodesk.co.uk After completing the AutoCAD for Mac course, learners can expect the following learning outcomes: Proficiency in AutoCAD: Participants will acquire the skills and knowledge needed to confidently use AutoCAD for Mac, including creating and editing drawings, managing objects, and applying precision techniques. Effective Design Skills: They will gain the ability to produce accurate 2D drawings, making them valuable assets in design-related professions. Jobs that individuals can pursue after completing this course include: Draftsperson: Working in architectural, engineering, or construction firms to create technical drawings and plans. CAD Technician: Assisting in the development of designs for various projects, such as product design or urban planning. Interior Designer: Using AutoCAD for space planning and layout design in the interior design industry. Architectural Designer: Collaborating on architectural projects, including creating floor plans and elevations. Mechanical Designer: Participating in the design and development of mechanical components and systems. Civil Engineering Technician: Supporting civil engineers in designing infrastructure projects, such as roads and bridges. Electrical or Electronics Designer: Assisting in the creation of electrical schematics and electronic circuit diagrams. Landscape Designer: Planning and visualizing outdoor spaces, gardens, and landscapes. Completing this AutoCAD course opens doors to various industries where precise and detailed 2D drawing skills are highly valued. The AutoCAD Mac Bespoke 1 on 1 Basics to Intermediate Level Training Course provides participants with a comprehensive skill set, enabling them to attain proficiency in using AutoCAD Mac. This course covers a wide range of functionalities and caters to individuals at all skill levels, whether they are beginners or experienced users. Participants will begin by learning fundamental features such as drawing, editing, annotations, and dimensioning. As they progress, they will delve into more advanced topics like object manipulation, customizing workspaces, and streamlining workflows. Key Benefits of the Course: Mastery of Mac-AutoCAD: Acquire expertise in both essential and advanced techniques for creating precise 2D drawings. Enhanced Productivity: Increase efficiency by implementing time-saving tips and optimizing your work processes. Versatile Design Abilities: Develop the skills to undertake diverse projects in fields such as architecture, engineering, and more. Industry-Relevant Competencies: Elevate your career prospects across various industries by gaining in-demand AutoCAD skills. Access to Recorded Lessons: Review and reinforce your learning at your convenience with access to recorded lesson sessions. Ongoing Email Support: Receive continuous assistance and guidance via email even after completing the course. Enroll today to benefit from interactive learning experiences guided by experienced instructors. Choose between flexible in-person or online sessions, gain access to lesson recordings, and enjoy a lifetime of email support. Tailored Guidance: Get personalized coaching and instruction tailored to your unique learning needs and objectives. Convenient Scheduling: Choose from flexible training slots available Monday to Saturday from 9 am to 7 pm, accommodating your busy schedule. Versatile Learning Options: Select between in-person training at our location, conveniently situated just 5 minutes away from Oval Tube Station, or participate in live online sessions from anywhere. Engaging Interactions: Participate in interactive sessions designed for questions, discussions, and problem-solving, creating an immersive learning experience. Effective Progression: Accelerate your learning with focused guidance, allowing you to advance at your own pace while mastering the material. Tailored Curriculum: Customize the course content to align with your prior knowledge and specific areas of interest, ensuring a relevant and engaging learning experience. Real-Time Guidance: Receive immediate feedback from the instructor, enhancing your comprehension and skill development. Comprehensive Support: Enjoy ongoing assistance and clarification opportunities through email or additional sessions beyond the course for an in-depth learning experience.

MHFA England Mental Health First Aid 2-day course With Mindmaps Wellbeing, your instructor will be a Registered Mental Health Nurse.
By Mindmaps Wellbeing
Mental Health First Aid (MHFA) England Training with Mindmaps Wellbeing Enhance workplace wellbeing and mental health awareness with MHFA England-certified training by Mindmaps Wellbeing. Our expert-led courses, delivered by Registered Mental Health Nurses and Healthcare Educators, equip you with the skills to recognize, support, and respond to mental health challenges. Whether online or in-person, our training ensures flexible learning options without compromising quality. Join us to gain certification as a Mental Health First Aider and access exclusive benefits like ongoing peer support, expert forums, and resources for self-care. Book now with Mindmaps Wellbeing and take the first step toward a healthier, more supportive environment for all.
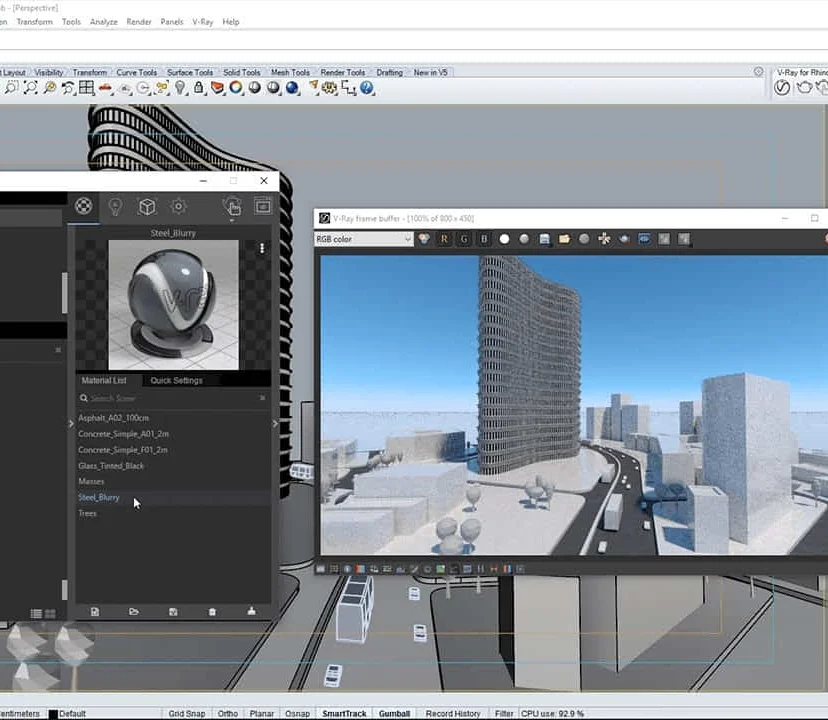
Complete Rhino 3D and V-Ray Training Program: Basic to Intermediate
By ATL Autocad Training London
Why Choose Complete Rhino 3D and V-Ray Training Program: Basic to Intermediate? Learn Rhino 3D and V-Ray for Rhino Basic to Intermediate Training Course. Suitable for beginners and experienced users alike, this program equips you with vital modeling and rendering skills. Opt for in-person or live online sessions. Click here for more info: Website Duration: 16 hours. Approach: 1-on-1 Sessions, Customized Content and Flexible Learning. Scheduling Flexibility: Tailor your sessions from Mon to Sat between 9 am and 7 pm. Course Title: Complete Rhino 3D and V-Ray Training Program: Basic to Intermediate - 16 Hours Session 1-2: Introduction to Rhino 3D Basics (2 hours) Understanding Rhino Interface: Navigating toolbars, command line, and properties panel. Basic Geometric Shapes: Creating lines, circles, and polygons with precision. Editing Tools: Mastering move, rotate, scale, and mirror commands. Session 3-4: Advanced Rhino 3D Modeling Techniques (2 hours) Curves and Surfaces: Delving into NURBS curves, creating complex surfaces, and blending techniques. Modeling Aids: Utilizing grids, snaps, and construction planes for accuracy. Organizing with Layers: Managing complex projects efficiently. Session 5-6: Introduction to V-Ray for Rhino (2 hours) V-Ray Interface: Understanding V-Ray toolbar and settings. Basic Lighting: Exploring different light types and their effects on scenes. Materials: Creating realistic materials, understanding diffuse, reflection, and transparency. Session 7-8: Intermediate V-Ray Concepts (2 hours) Advanced Lighting: Mastering HDRI lighting, creating natural outdoor lighting scenarios. Texture Mapping: Understanding UV mapping, applying textures seamlessly. Rendering Optimization: Reducing noise, optimizing settings for quicker, high-quality renders. Session 9-10: Rhino-V-Ray Integration (2 hours) Model Preparation: Optimizing Rhino models for V-Ray rendering. Advanced Material Manipulation: Creating complex materials, incorporating textures. Interactive Rendering: Real-time adjustments for immediate feedback. Session 11-12: Advanced Modeling Techniques in Rhino (2 hours) Advanced Surface Modeling: Creating organic shapes, advanced surfacing techniques. Precision Modeling: Advanced curve editing, filleting, and trimming. Working with 3D Text: Creating custom 3D text for design projects. Session 13-14: Scene Composition and Presentation (2 hours) Camera Settings: Understanding focal length, depth of field, and perspective. Scene Composition: Design principles, rule of thirds, focal points, and balance. Post-Processing: Enhancing renders in Photoshop, adding atmosphere and context. Session 15-16: Final Project and Portfolio Review (2 hours) Final Project Work: Participants apply learned skills to create a complex 3D scene. Instructor-led Critique: Feedback session for final projects. Portfolio Guidance: Tips for selecting the best works for a professional portfolio. By the end of this 16-hour course, participants will have a deep understanding of both Rhino 3D and V-Ray, allowing them to create intricate 3D models and produce high-quality, realistic renders for various applications. Upon completing the Rhino 3D and V-Ray Basic to Intermediate Training Course, participants can expect to achieve the following learning outcomes: Proficiency in Rhino 3D and V-Ray: Develop a comprehensive understanding of Rhino 3D and V-Ray interfaces, tools, and functionalities, enabling participants to navigate and utilize the software effectively. 3D Modeling Skills: Master the art of creating captivating 3D objects and shapes using Rhino 3D, including editing, transforming, and refining designs for diverse applications. Material Application: Acquire the ability to apply and customize materials and textures to enhance the visual appeal and realism of 3D models, elevating the quality of designs. Lighting Techniques: Gain expertise in utilizing V-Ray lighting tools, such as V-Ray lights and HDRI maps, to achieve striking lighting effects in rendered scenes. Rendering Excellence: Learn to optimize V-Ray render settings, control global illumination, and apply dynamic effects like depth of field and motion blur for high-quality and impressive renders. Advanced Modeling: Develop skills in advanced modeling techniques, including handling curves, surfaces, and solids, enabling participants to tackle complex design challenges. Lighting Mastery: Acquire the knowledge and expertise to create and adjust artificial lights, utilize the Sun and Sky system, and craft custom HDR images for realistic lighting setups. Seamless File Management: Understand various file formats for exporting and importing 3D models, facilitating efficient collaboration and preparation for 3D printing. Creative Problem-Solving: Enhance creative thinking and problem-solving abilities through hands-on practice and exploration of diverse design scenarios. Professional Presentation: Learn post-production techniques in Photoshop to enhance renders and create visually appealing design presentations for effective communication. Continuous Learning: Access valuable resources and tips to encourage continuous learning and professional growth in Rhino 3D and V-Ray. Skills You'll Gain: Master Rhino 3D basics: Curves, surfaces, modeling aids, and precision techniques. Explore intermediate V-Ray concepts: Advanced lighting, material manipulation, and texture mapping. Understand Rhino-V-Ray integration for seamless 3D modeling and rendering workflows. Optimize render settings for high-quality output and reduced rendering times. Career Opportunities: Upon completing this program, you'll be prepared for various roles in the design and visualization industry, such as: 3D Modeler: Create detailed 3D models for diverse industries, including architecture and product design. Architectural Visualizer: Produce realistic architectural visualizations for presentations and marketing materials. Product Designer: Develop visually appealing product prototypes and visualizations for marketing and manufacturing. Visualization Specialist: Work in design studios, advertising agencies, or game development companies, creating immersive visual content. Freelance Designer: Offer your skills on platforms like Upwork or Fiverr, providing 3D modeling and rendering services to clients worldwide. Solidify Rhino 3D Expertise: Master foundational modeling skills, including intricate geometries and surface manipulation, establishing a robust foundation for your 3D design journey. Unlock V-Ray for Rhino: Explore the potential of V-Ray for Rhino, learning to create mesmerizing visualizations and achieve lifelike rendering results that bring vitality to your designs. Enhance Visual Appeal: Grasp advanced lighting techniques, material application, and texture methods to elevate the visual allure of your 3D creations, making them more immersive and authentic. Explore Advanced Concepts: Delve into optimizing rendering settings, post-production tactics, and efficient workflows, advancing your design proficiency to higher levels. Hands-On Experience: Engage in practical exercises and real-world projects, applying your skills in practical contexts to enrich your portfolio and showcase your capabilities effectively. Certification of Achievement: Receive a valuable Certificate of Completion, confirming your expertise in Rhino 3D and V-Ray for Rhino, enhancing your professional credibility as a skilled designer. Flexible Learning Paths: In-Person or Live Online: Opt for in-person sessions, fostering collaborative learning, or choose live online classes for convenience and accessibility, tailoring your learning experience to your preferences. Personalized Guidance: Regardless of your chosen format, benefit from tailored instruction and guidance, ensuring optimal learning outcomes and continuous support throughout the course.
Revit and 3dsMax V-Ray Visualization Basic to Advance Training
By London Design Training Courses
Why Learn Revit and 3dsMax V-Ray Visualization Basic to Advance Training Course? Course info Master architectural visualization and photorealistic renderings. In-person or live online options available. Learn Revit and 3dsMax, V-Ray rendering, and advanced techniques. Hands-on projects for real-world experience. Duration: 40 hrs Method: 1-on-1 - Individual support. Schedule: Tailor your own schedule by pre-booking a convenient hour of your choice, available from Mon to Sat between 9 am and 7 pm. Comprehensive Training: Master Revit, 3dsMax, and advanced visualization techniques for exceptional results. V-Ray Rendering: Explore realistic rendering with V-Ray, including advanced techniques and materials. Real-World Projects: Work on industry-relevant projects for a professional portfolio. Flexible Learning: Choose in-person or live online sessions for an engaging experience. Lesson Recordings: Access recorded classes to reinforce your understanding. Lifetime Email Support: Get guidance and assistance from experienced instructors beyond the course duration. Autodesk Certified Instructors. Comprehensive Training: Master Revit, 3dsMax, and advanced visualization techniques for exceptional results. V-Ray Rendering: Explore realistic rendering with V-Ray, including advanced techniques and materials. Real-World Projects: Work on industry-relevant projects for a professional portfolio. Flexible Learning: Choose in-person or live online sessions for an engaging experience. Lesson Recordings: Access recorded classes to reinforce your understanding. Lifetime Email Support: Get guidance and assistance from experienced instructors beyond the course duration. Autodesk Certified Instructors. Part 1: Revit (16 hours) Module 1: Introduction to Revit Familiarizing with the Revit interface and workspace Embracing the Building Information Modeling (BIM) workflow Creating a fundamental building model as a starting point Module 2: Basic Modeling in Revit Working with essential elements such as walls, doors, and windows Constructing floors and roofs to complete the building structure Crafting functional and visually appealing stairs and railings Module 3: Advanced Modeling in Revit Delving into the creation and manipulation of families Utilizing parameters and constraints to enhance modeling efficiency Exploring intricate geometries for complex designs Module 4: Annotation and Documentation in Revit Enhancing project documentation by adding text and dimensions Generating informative schedules for better project management Mastering the printing and exporting processes for professional output Part 2: 3ds Max (16 hours) Module 1: Introduction to 3ds Max Navigating the 3ds Max interface and workspace Understanding the 3D modeling workflow for design visualization Initiating the creation of basic 3D models Module 2: Basic Modeling in 3ds Max Working with primitive shapes to build foundational models Creating and refining splines to form versatile shapes Advancing to complex 3D model development for intricate designs Module 3: Materials and Textures in 3ds Max Exploring the material editor and its functionalities Skillfully applying and adjusting materials for realistic renders Incorporating textures to add depth and detail to the models Module 4: Lighting and Cameras in 3ds Max Mastering the art of lighting creation and manipulation Utilizing the daylight system for enhanced realism Understanding cameras and perspectives for compelling visual storytelling Part 3: V-Ray (8 hours) Module 1: Introduction to V-Ray Getting acquainted with the V-Ray interface and workflow Exploring V-Ray materials and textures for high-quality renders Module 2: Lighting and Rendering in V-Ray Creating and refining lighting setups for stunning renders Utilizing global illumination to enhance the realism of scenes Implementing advanced rendering techniques for professional output Module 3: Materials and Textures in V-Ray Crafting and modifying V-Ray materials for realistic surfaces Applying V-Ray textures to add depth and realism to objects Utilizing V-Ray displacement maps for intricate details For 3ds Max free trial, visit: https://www.autodesk.co.uk/products/free-trial. To access the V-Ray free trial, visit: https://www.chaosgroup.com/. Start your journey to becoming a proficient designer and renderer in the world of 3D modeling and visualization. Download Revit Revit and 3dsMax V-Ray Visualization Basic to Advance Training Course: Proficient Software Skills: Acquire a strong command of Revit and 3dsMax, along with advanced techniques in V-Ray rendering. High-Quality Visualizations: Create realistic and visually stunning architectural visualizations using V-Ray. Architectural Modeling: Master the process of modeling architectural elements with precision and efficiency. Materials and Textures: Understand how to apply realistic materials and textures to enhance visualizations. Lighting Setup: Set up lighting environments to achieve optimal illumination and ambiance in renderings. Rendering Techniques: Explore advanced rendering techniques, including global illumination, caustics, and ambient occlusion. Real-World Projects: Complete industry-relevant projects to build a professional-grade portfolio. Problem-Solving Skills: Develop the ability to troubleshoot and resolve rendering challenges effectively. Efficient Workflows: Learn time-saving workflows and best practices for efficient visualization production. Portfolio Showcase: Showcase your newly acquired skills through a diverse range of visualizations.

Arduino Text to Speech Training
By Study Plex
Recognised Accreditation This course is accredited by continuing professional development (CPD). CPD UK is globally recognised by employers, professional organisations, and academic institutions, thus a certificate from CPD Certification Service creates value towards your professional goal and achievement. The Quality Licence Scheme is a brand of the Skills and Education Group, a leading national awarding organisation for providing high-quality vocational qualifications across a wide range of industries. What is CPD? Employers, professional organisations, and academic institutions all recognise CPD, therefore a credential from CPD Certification Service adds value to your professional goals and achievements. Benefits of CPD Improve your employment prospects Boost your job satisfaction Promotes career advancement Enhances your CV Provides you with a competitive edge in the job market Demonstrate your dedication Showcases your professional capabilities What is IPHM? The IPHM is an Accreditation Board that provides Training Providers with international and global accreditation. The Practitioners of Holistic Medicine (IPHM) accreditation is a guarantee of quality and skill. Benefits of IPHM It will help you establish a positive reputation in your chosen field You can join a network and community of successful therapists that are dedicated to providing excellent care to their client You can flaunt this accreditation in your CV It is a worldwide recognised accreditation What is Quality Licence Scheme? This course is endorsed by the Quality Licence Scheme for its high-quality, non-regulated provision and training programmes. The Quality Licence Scheme is a brand of the Skills and Education Group, a leading national awarding organisation for providing high-quality vocational qualifications across a wide range of industries. Benefits of Quality License Scheme Certificate is valuable Provides a competitive edge in your career It will make your CV stand out Course Curriculum Introduction to the Course Introduction 00:05:00 Who We Are 00:05:00 Hardware and Software Requirements Hardware and Software Requirements 00:03:00 Software Requirements 00:02:00 Download and Install Coding Software 00:09:00 Circuit Amplifier Circuit 00:05:00 Circuit Design and Wiring 00:09:00 Code Programming Arduino 00:09:00 Writing Your Own Code 00:09:00 The Code 00:01:00 Talkie Library Get Library 00:02:00 Download and Install Software Section Download and Install Circuit Design and Wiring Software 00:06:00 Obtain Your Certificate Order Your Certificate of Achievement 00:00:00 Get Your Insurance Now Get Your Insurance Now 00:00:00 Feedback Feedback 00:00:00

Microsoft Power BI Desktop In-company (now with live online classes)
By Microsoft Office Training
This course will allow you to explore the potential of self-service business intelligence using Power BI Desktop to analyse and connect to different sources of data, creating Relationships between those different datasets, Query the data using Shaping and data Modelling, to create Visualizations, and publish Reports to different platforms . Course Objectives At the end of this course you will be able to: Connect to data from different sources. Use the Query Editor Perform Power BI desktop data Shaping and Transformation. Create Power BI desktop Modelling. Create Power BI desktop Visualizations and Reports. ' 1 year email support service Take a closer look at the consistent excellent feedback from our growing corporate clients visiting our site ms-officetraining co uk With more than 20 years experience, we deliver courses on all levels of the Desktop version of Microsoft Office and Office 365; ranging from Beginner, Intermediate, Advanced to the VBA level and Business Intelligence. Our trainers are Microsoft certified professionals with a proven track record with several years experience in delivering public, one to one, tailored and bespoke courses. Our competitive rates start from £550.00 per day of training Tailored training courses: You can choose to run the course exactly as they are outlined by us or we can customise it so that it meets your specific needs. A tailored or bespoke course will follow the standard outline but may be adapted to your specific organisational needs. Please visit our site (ms-officetraining co uk) to get a feel of the excellent feedback our courses have had and look at other courses you might be interested in. Introduction to Power BI Power BI Jargon explained A quick look at Power BI Desktop A quick look at the Power BI service Helpful resources Power BI and Excel Introduction to using Excel data in Power BI Upload Excel data to Power BI Import Power View and Power Pivot to Power BI Getting started with Power BI Desktop Overview of Power BI Desktop Accessing Help and Helpful resources Connect to data sources in Power BI Desktop Shaping and Transforming Data with Query Editor Introduction to the Query Editor Data Sources Power BI Desktop can Connect to Introduction to Steps and M code Combining Data Using Merge and Append Queries Data Type Properties Working with Delimiters Clean and transform your data with the Query Editor Text Specific Transformation Tools Number Specific Transformation Tools Date Specific Transformation Tools Split and Merge columns Creating an Index Column Adding Conditional Columns Columns From Examples Grouping and Aggregating data Pivoting and Unpivoting Using filters Modeling the data Introduction to modeling your data How to manage your data relationships Create calculated columns Optimizing data models Create calculated measures Show Values As and Quick Measures Create calculated tables Explore your time-based data Introduction to DAX DAX calculation types DAX functions Visualizations Introduction to visuals in Power BI Create and customize simple visualizations Modify colors in charts and visuals Shapes, text boxes, and images Page layout and formatting Group interactions among visualizations Visual hierarchies and drill-down Using custom visualizations Create a KPI Visualization Geo-Data and Maps Reports, Publishing and Sharing Introduction to the Power BI service Quick insights in Power BI Create and configure a dashboard Ask questions of your data with natural language Create custom Q&A suggestions Share dashboards with your organization Introduction to content packs, security, and groups Publish Power BI Desktop reports Print and export dashboards and reports Create groups in Power BI Use content packs Update content packs Publish to web Who is this course for? Who is this course for? This course facilitates you with knowledge on the potential for Power BI Desktop to analyse and connect to different sources of data, creating Relationships between those different datasets, Query the data using Shaping and data Modelling, and to create Visualizations, and publish Reports to different platforms. Requirements Requirements Before attending this course, delegates should have: - A general knowledge of database concepts (fields, records and relationships) - Familiarity with Excel. Career path Career path Business Intelligence Data Analysis ETL & Data Warehousing
