- Professional Development
- Medicine & Nursing
- Arts & Crafts
- Health & Wellbeing
- Personal Development
124 Courses in Glasgow delivered Live Online
Public Suicide First Aid through Understanding Suicide Intervention (SFAUSI)
(2)By Changing Minds Training
Course Overview Teaching the theory and practise of suicide intervention skills that can be applied in any professional or personal setting, captured in a one-day event accredited by City and Guilds of London. We use only the most experienced suicide prevention trainers to deliver this unique learning experience: for anyone who seeks greater understanding and confidence to intervene with people at risk of suicide. The Suicide First Aid through Understanding Suicide Intervention (SFAUSI) course gives learners the knowledge and tools to understand that suicide is one of the most preventable deaths and some basic skills can help someone with thoughts of suicide stay safe from their thoughts and stay alive. Course Content SFAUSI is comprised of 4 parts, each 90 minutes duration. The programme teaches and practices the skills and knowledge needed to identify someone who may be thinking about suicide and competently intervene to help create suicide- safety as a first aid approach. Part 1 Introduction to: the day; programme; ourselves and suicide prevention Stigma, Survivors of bereavement by suicide and the Hidden Toll Suicide thoughts and suicide behaviour Intention of behaviour Versus Outcome of behaviour Possible Causes of Suicidal thoughts Part 2 Suicide – the Ripple Effect Population-based approach to suicide prevention Partnership working Working with attitudes and values “I’m so glad you told me” - Audio visual Part 3 Meeting the needs of a person who is thinking about suicide Suicide-Safety Guide Step 1 – Recognising suicide and asking about suicide Step 2 – Understanding options Part 4 Step 3 – Safeguarding suicide Suicide-safety and self-care The risk assessment approach Suicide and suicide gestures Future learning Format Taught over 6 hours using tutor facilitated Socratic learning, tutor-led practice session, mini lectures, group work and audio-visual presentations. This is a highly interactive and emotionally engaging learning experience. Pre-training requirement No previous experience or training is necessary. Participants will be asked to self-reflect and empathise with a person having thoughts of suicide. There is no expectation on participants to share personal experiences. Who should attend? Multi-sector managers and practitioners including health, housing, social care, education, criminal justice, call centre operators, private, voluntary and public sector workers and community groups or members. Accreditation Participants can choose to register for the City and Guilds accredited unit of learning for an additional fee of £85 per person. This involves completion of a written assignment.
Microsoft PowerPoint for the Business User
By Nexus Human
Duration 1 Days 6 CPD hours This course is intended for This course is intended for people who use PowerPoint for their business communication needs. Overview To ensure your success in this course, you should have end-user skills with any current version of Windows, including being able to open and close applications, navigate basic file structures, and manage files and folders. This course is intended for those who wish to take advantage of the application for high quality business presentations and reports. Presentations Create Attractive Presentations from Existing PowerPoint Templates Creating Presentations Quickly using Outline to build a Structure Incorporating and reusing slides from other presentations into your own Templates and Customization Using Slide Layouts Using the Slide Master Creating Custom Slide Layout Working with Charts and Tables Create and Modify Tables Create Charts and Graphs Copying Charts into PowerPoint Link Vs Embed Add Visual Elements to a Presentation Create and Modify Shapes Add Images Create SmartArt to Make Easily Modifiable graphics Use SmartArt to Give Dull Text a More Visual Appeal Working with Media and Animation Add Audio to A Presentation Add Video to A Presentation Add and Customize Animations Add and Customize Transitions Preparing to Present Add Notes to A Presentation Presenter View And Slide Show Controls Create A Custom Slide Show Saving and Sharing the Presentation Printing Options and Handouts Additional course details: Nexus Humans Microsoft PowerPoint for the Business User training program is a workshop that presents an invigorating mix of sessions, lessons, and masterclasses meticulously crafted to propel your learning expedition forward. This immersive bootcamp-style experience boasts interactive lectures, hands-on labs, and collaborative hackathons, all strategically designed to fortify fundamental concepts. Guided by seasoned coaches, each session offers priceless insights and practical skills crucial for honing your expertise. Whether you're stepping into the realm of professional skills or a seasoned professional, this comprehensive course ensures you're equipped with the knowledge and prowess necessary for success. While we feel this is the best course for the Microsoft PowerPoint for the Business User course and one of our Top 10 we encourage you to read the course outline to make sure it is the right content for you. Additionally, private sessions, closed classes or dedicated events are available both live online and at our training centres in Dublin and London, as well as at your offices anywhere in the UK, Ireland or across EMEA.

Adobe Premiere Pro
By Nexus Human
Duration 3 Days 18 CPD hours There are good reasons Adobe Premiere Pro is such a popular post-production video editing software application. It excels for a wide variety of uses; tapeless and DSLR footage; cross-platforms, open workflows for easy collaboration, powerful metadata features for greater editing and production efficiency, plus real-time 3D editing and Virtual Reality. This four-day course is ideal for beginners, as well as Final Cut Pro and Avid editors - or for anyone who is involved in a content creation environment. Adobe Premiere Interface Performing Nonlinear Editing in Premiere Pro Looking at the Standard Digital Video Workflow Enhancing the Workflow with Premiere Pro Expanding the Workflow Incorporating other Components into the Editing Workflow Adobe Creative Cloud Video Workflow Touring the Premiere Pro Workspace Looking at the Workspace Layout Customizing the Workspace Introducing Preferences Keyboard Shortcuts Moving, Backing up, and Syncing User Settings Setting up a Project Setting up a Sequence Setting up the Timeline Importing Media Importing Assets Working with ingest Options and Proxy Media Working with the Media Browser Importing Images Using Adobe Stock Customizing the Media Cache Recording a Voice-over Organizing Media Project Panel Working with Bins Monitoring Footage Modifying Clips Mastering the Essentials of Video Editing Using the Source Monitor Navigating the Timeline Essential Editing Commands Working with Clips and Markers Using Program Monitor Controls Setting the Playback Resolution Playing back VR Video Using Markers Using Sync Lock and Track Lock Finding Gaps in the Timeline Selecting Clips Moving Clips Extracting and Deleting Segments Adding Transitions Understanding Transitions Edit points and Handles Adding Video Transitions Using A/B mode to Fine-tune a Transition Adding Audio Transitions Performing Advanced Editing Techniques Performing Three or Four-point Editing Changing Playback Speed Replacing Clips and Footage Nesting Sequences Performing Regular Trimming Performing Advanced Trimming Trimming in the Program Monitor Putting Clips in Motion Adjusting the Motion Effect Changing Clip Position, Size, and Rotation Working with Keyframe Interpolation Using other Motion-related Effects Multi-camera Editing Following the Multi-camera Process Creating a Multi-camera Sequence Switching Multiple Cameras Finalizing Multi-camera Editing Editing and Mixing Audio Setting up the Interface to Work with Audio Examining Audio Characteristics Creating a Voice-over Scratch Track Adjusting Audio Volume Normalizing Audio Creating a Split Edit Adjusting Audio Levels for a Clip Sweetening Sound Sweetening Sound with Audio Effects Adjusting EQ Cleaning up Noisy Audio Fading Audio with Essential Sounds Adding Video Effects Working with Effects Master Clip Effects Masking and Tracking Visual Effects Keyframing Effects Effect Presets Frequently Used Effects Improving Clips with Color Correction and Grading Following a Color-oriented Workflow An overview of Color-oriented Effects Fixing Exposure Problems Fixing Color Balance Using Special Color Effects Creating a Look Exploring Compositing Techniques Understanding an Alpha Channel Making Compositing Part of Your Projects Working with the Opacity Effect Working with Alpha-channel Transparencies Color Keying a Green Screen Shot Using Mattes Creating Titles An Overview of Shapes & Type Loading in Graphics Using the Essentials Graphic Panel Browsing Templates Saving Templates Mastering Video Typography Essentials Creating Titles Stylizing Text Making Text Roll and Crawl Introducing Captions Managing Your Projects Using the File menu Using the Project Manager Performing the Final Project Management Steps Importing Projects or Sequences Managing Collaboration Using the Libraries Panel Managing Your Hard Drives Exporting Frames, Clips, and Sequences Overview of Export Options Exporting Single Frames Exporting a Master Copy Working with Adobe Media Encoder Uploading to Social Media Exchanging with Other Editing Applications Additional course details: Nexus Humans Adobe Premiere Pro training program is a workshop that presents an invigorating mix of sessions, lessons, and masterclasses meticulously crafted to propel your learning expedition forward. This immersive bootcamp-style experience boasts interactive lectures, hands-on labs, and collaborative hackathons, all strategically designed to fortify fundamental concepts. Guided by seasoned coaches, each session offers priceless insights and practical skills crucial for honing your expertise. Whether you're stepping into the realm of professional skills or a seasoned professional, this comprehensive course ensures you're equipped with the knowledge and prowess necessary for success. While we feel this is the best course for the Adobe Premiere Pro course and one of our Top 10 we encourage you to read the course outline to make sure it is the right content for you. Additionally, private sessions, closed classes or dedicated events are available both live online and at our training centres in Dublin and London, as well as at your offices anywhere in the UK, Ireland or across EMEA.
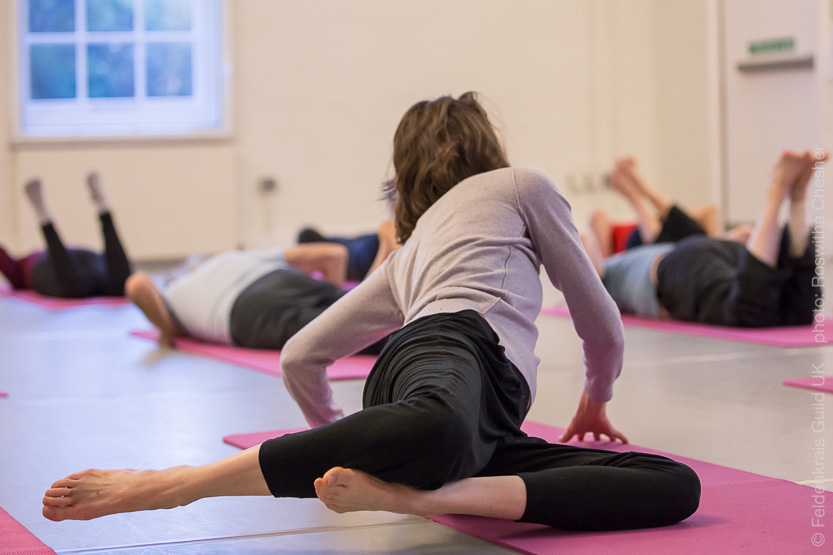
A kinder sense of yourself - mindful movement classes
By Jonathan Young
Learn to respect and enjoy your own sensations, deepen your breathing and discover how engaging your whole self opens up new freedoms of moving, feeling and thinking for your life. Gentle Awareness through Movement (Feldenkrais) classes, usually done lying on a mat.
Articulate Storyline 360
By Nexus Human
Duration 2 Days 12 CPD hours Whether you are already an instructional designer or just looking to get into the world of developing eLearning courses, this two-day course covers the full feature set of Articulate Storyline 360 and uses real world exercises to create projects from scratch. The course will include how to add interactivity to your slides via buttons, triggers, text entry areas, and hotspots. You'll also learn how to create quizzes, and how to publish your eLearning projects for the widest possible audience. The class will also explore Articulate Storyline's advance techniques and methods on Themes & Templates, Custom Navigation, Gamification, Advanced Quizzing, Accessibility and Reporting, and more. Exploring Articulate Storyline Explore a Finished Storyline Project Explore Slides and Panels Zoom and Magnify Explore Panels Preview the Entire Project Creating Projects Create a New Project Apply a Theme Apply a Content Master Slide Insert New Slides Create a New Content Master Slide Apply a Different Master Slide Layout to a Slide Import Content From PowerPoint Adding Content Create and Format a Text Box Work with a List Add an Image to a Slide Add a Shape to a Slide Customize a Shape Insert a Character Insert a Caption Interactivity Add Buttons to Slides Change Button States Create Layers Insert a Text Entry Field Triggers and Hotspots Delete Default Triggers Add a Trigger to a Button Hide Player Buttons Add Triggers to Layers Add a Hide Layer Trigger Add a Slide Trigger Add a Conditional Trigger Edit a Trigger Add a Hotspot and Lightbox Trigger Variables Manage a Variable Reference a Variable Create a Variable Manipulate a Variable with a Trigger Create a True/False Variable Create a Trigger to Change a True/False Variable Add a Condition to an Existing Trigger Play Audio with a Conditional Trigger Add a Condition to a Button Audio, Animation and Video Add Voiceover Audio to a Slide Change Slide Audio Edit Slide Audio Add Silence Record Voiceover Audio Control Object Timing Animate an Object Control Animation Options Insert Video Delay Object Start Times Trim Video Animate a Video Add a Slide Transition Quizzes Insert a Multiple Choice Slide Insert a Matching Drag-and-Drop Slide Insert a Freeform Drag and Drop Quiz Slide Insert a Quiz Result Slide
Vectorworks Spotlight Training Courses
By ATL Autocad Training London
Why Learn Vectorworks Spotlight Training Courses? VectorWorks Spotlight Course offers strong 2D drawing tools and lighting skills. while. Spotlight goes beyond fundamentals, offering solution for designing, modeling, and sharing entertainment projects. It's the industry standard for lighting, scenery, sets, corporate events, theater, and exhibits. Click here for more info: Website When can I book this course? 1-on-1 training. Duration: 16 hrs, Flexible scheduling (Mon to Sat, 9 am - 7 pm). Choose your own day and time. Training Course: Vectorworks Spotlight Duration: 16 hours Course Overview: I. Introduction to Vectorworks (1 hour) Overview of Vectorworks software and its diverse applications Familiarization with the user interface and navigation Customizing preferences and settings to optimize workflow II. 2D Drawing Tools (2 hours) Utilizing basic drawing tools for creating lines, rectangles, circles, and polygons Implementing text and dimension tools for annotations Applying modify tools for object editing and transformation Organizing elements using layers and classes III. 3D Modeling Tools (3 hours) Introduction to extrude, revolve, sweep, and loft tools for 3D modeling Creating 3D objects from 2D shapes for spatial representation Modifying and refining 3D models Exploration of the 3D modeling environment IV. Advanced 3D Modeling Tools (2 hours) Utilization of solid modeling tools for complex geometry creation Performing Boolean operations to combine or subtract shapes Creation and use of symbols for efficient workflow V. Introduction to Spotlight (1 hour) Overview of the Spotlight workspace and its features Adding and configuring lighting devices for stage and event design Creation and modification of lighting positions for precise placement VI. Spotlight Tools and Techniques (3 hours) Creation and editing of lighting instruments for customized setups Use of visualization tools for lighting simulations Creation and application of labels and legends for documentation Generation of worksheets and reports for lighting analysis VII. Advanced Spotlight Techniques (2 hours) Utilization of video and projection tools for multimedia presentations Incorporation of audio and sound systems for immersive experiences Understanding rigging and hoisting for stage setup Management of paperwork and documentation for effective planning VIII. Integration with Other Software (1 hour) Importing and exporting files for collaborative work with other software Utilizing Vectorworks in CAD and BIM workflows for seamless interoperability Exploration of plugins and add-ons for expanded functionality IX. Project-based Exercises (1 hour) Application of learned techniques to real-world scenarios Creation of a lighting plan for a concert or theater production Designing a 3D model of a building or interior space Free 30-day BIM & CAD Software Trial Request: Vectorworks After completing Vectorworks 2D | 3D and Spotlight Training Course? Vectorworks Proficiency: Master Vectorworks software, including interface and tools. 2D Drafting: Create precise technical drawings using fundamental 2D tools. 3D Modeling: Develop skills in 3D modeling, modification, and spatial representation. Spotlight Expertise: Learn stage and event design tools, focusing on lighting setups. Advanced Techniques: Explore complex 3D modeling and Spotlight features. Interdisciplinary Integration: Integrate Vectorworks with other software in CAD and BIM workflows. Project Application: Apply skills to real-world scenarios, creating plans and models. Job Opportunities: CAD Technician: Draft detailed plans for architecture and engineering firms. Stage Designer: Plan lighting, sound, and multimedia setups for events. Event Planner: Design event layouts with lighting and audio-visual setups. Architectural Drafter: Create accurate architectural plans and models. Interior Designer: Visualize interior spaces in 2D and 3D for clients. Lighting Designer: Specialize in various lighting applications, from buildings to stages. BIM Specialist: Work with architectural firms on Building Information Modeling projects. Freelance Designer: Offer services in 2D/3D modeling, event planning, or architectural visualization. What is Vectorworks Spotlight? Vectorworks Spotlight is a specialized package tailored for entertainment design professionals, offering both 2D and 3D capabilities. It is the industry-standard CAD software for entertainment design, ideal for lighting, scenery, sets, events, theater, and exhibits. Training Details: Duration: 16 hrs (flexible scheduling) Method: Personalized 1-on-1 training (In-person or Live Online over Zoom) Tailored content, adaptable pace, individual support Differences from Vectorworks Fundamentals: Vectorworks Fundamentals serves general modeling and drawing needs, while Spotlight provides comprehensive solutions for design, modeling, documentation, and collaborative project sharing, catering specifically to industry experts. Applications of Spotlight: Spotlights have diverse uses, including emergency situations and when a powerful light source surpassing a flashlight is required. Interior Designers and Vectorworks: Yes, interior designers use Vectorworks software, particularly Vectorworks Architect, for efficient workflow and effective realization of creative visions. Course Structure: Individualized Instruction (1-2-1) Customized Content Adaptable Learning Pace Flexible Scheduling: Monday to Saturday, 9 am to 7 pm Get Vectorworks: For more information and to download Vectorworks, visit Vectorworks Website. Individualized Training: Get personalized attention and tailored guidance during your training sessions. Flexible Timings: Select your preferred schedule and training days to fit your convenience. Post-Training Assistance: Access complimentary online support even after course completion. Comprehensive Resources: Receive detailed PDF notes and handouts for effective learning. Certification of Completion: Receive a recognition certificate upon successfully finishing the course. Affordable Pricing: Take advantage of budget-friendly training rates. Software Setup Support: Receive assistance in configuring the software on your device. Referral Benefits: Recommend a friend and enjoy discounts on upcoming courses. Group Training Offers: Benefit from special discounts for group training programs. Convenient Hours: Attend sessions from Monday to Sunday, with extended operating hours. Tailored Learning: Experience customized training designed to meet your specific requirements.

AI-102T00 Designing and Implementing an Azure AI Solution
By Nexus Human
Duration 4 Days 24 CPD hours This course is intended for Software engineers concerned with building, managing and deploying AI solutions that leverage Azure AI Services, Azure AI Search, and Azure OpenAI. They are familiar with C# or Python and have knowledge on using REST-based APIs to build computer vision, language analysis, knowledge mining, intelligent search, and generative AI solutions on Azure. AI-102 Designing and Implementing an Azure AI Solution is intended for software developers wanting to build AI infused applications that leverage?Azure AI Services,?Azure AI Search, and?Azure OpenAI. The course will use C# or Python as the programming language. Prerequisites Before attending this course, students must have: Knowledge of Microsoft Azure and ability to navigate the Azure portal Knowledge of either C# or Python Familiarity with JSON and REST programming semantics Recommended course prerequisites AI-900T00: Microsoft Azure AI Fundamentals course 1 - Prepare to develop AI solutions on Azure Define artificial intelligence Understand AI-related terms Understand considerations for AI Engineers Understand considerations for responsible AI Understand capabilities of Azure Machine Learning Understand capabilities of Azure AI Services Understand capabilities of the Azure Bot Service Understand capabilities of Azure Cognitive Search 2 - Create and consume Azure AI services Provision an Azure AI services resource Identify endpoints and keys Use a REST API Use an SDK 3 - Secure Azure AI services Consider authentication Implement network security 4 - Monitor Azure AI services Monitor cost Create alerts View metrics Manage diagnostic logging 5 - Deploy Azure AI services in containers Understand containers Use Azure AI services containers 6 - Analyze images Provision an Azure AI Vision resource Analyze an image Generate a smart-cropped thumbnail 7 - Classify images Provision Azure resources for Azure AI Custom Vision Understand image classification Train an image classifier 8 - Detect, analyze, and recognize faces Identify options for face detection analysis and identification Understand considerations for face analysis Detect faces with the Azure AI Vision service Understand capabilities of the face service Compare and match detected faces Implement facial recognition 9 - Read Text in images and documents with the Azure AI Vision Service Explore Azure AI Vision options for reading text Use the Read API 10 - Analyze video Understand Azure Video Indexer capabilities Extract custom insights Use Video Analyzer widgets and APIs 11 - Analyze text with Azure AI Language Provision an Azure AI Language resource Detect language Extract key phrases Analyze sentiment Extract entities Extract linked entities 12 - Build a question answering solution Understand question answering Compare question answering to Azure AI Language understanding Create a knowledge base Implement multi-turn conversation Test and publish a knowledge base Use a knowledge base Improve question answering performance 13 - Build a conversational language understanding model Understand prebuilt capabilities of the Azure AI Language service Understand resources for building a conversational language understanding model Define intents, utterances, and entities Use patterns to differentiate similar utterances Use pre-built entity components Train, test, publish, and review a conversational language understanding model 14 - Create a custom text classification solution Understand types of classification projects Understand how to build text classification projects 15 - Create a custom named entity extraction solution Understand custom named entity recognition Label your data Train and evaluate your model 16 - Translate text with Azure AI Translator service Provision an Azure AI Translator resource Specify translation options Define custom translations 17 - Create speech-enabled apps with Azure AI services Provision an Azure resource for speech Use the Azure AI Speech to Text API Use the text to speech API Configure audio format and voices Use Speech Synthesis Markup Language 18 - Translate speech with the Azure AI Speech service Provision an Azure resource for speech translation Translate speech to text Synthesize translations 19 - Create an Azure AI Search solution Manage capacity Understand search components Understand the indexing process Search an index Apply filtering and sorting Enhance the index 20 - Create a custom skill for Azure AI Search Create a custom skill Add a custom skill to a skillset 21 - Create a knowledge store with Azure AI Search Define projections Define a knowledge store 22 - Plan an Azure AI Document Intelligence solution Understand AI Document Intelligence Plan Azure AI Document Intelligence resources Choose a model type 23 - Use prebuilt Azure AI Document Intelligence models Understand prebuilt models Use the General Document, Read, and Layout models Use financial, ID, and tax models 24 - Extract data from forms with Azure Document Intelligence What is Azure Document Intelligence? Get started with Azure Document Intelligence Train custom models Use Azure Document Intelligence models Use the Azure Document Intelligence Studio 25 - Get started with Azure OpenAI Service Access Azure OpenAI Service Use Azure OpenAI Studio Explore types of generative AI models Deploy generative AI models Use prompts to get completions from models Test models in Azure OpenAI Studio's playgrounds 26 - Build natural language solutions with Azure OpenAI Service Integrate Azure OpenAI into your app Use Azure OpenAI REST API Use Azure OpenAI SDK 27 - Apply prompt engineering with Azure OpenAI Service Understand prompt engineering Write more effective prompts Provide context to improve accuracy 28 - Generate code with Azure OpenAI Service Construct code from natural language Complete code and assist the development process Fix bugs and improve your code 29 - Generate images with Azure OpenAI Service What is DALL-E? Explore DALL-E in Azure OpenAI Studio Use the Azure OpenAI REST API to consume DALL-E models 30 - Use your own data with Azure OpenAI Service Understand how to use your own data Add your own data source Chat with your model using your own data 31 - Fundamentals of Responsible Generative AI Plan a responsible generative AI solution Identify potential harms Measure potential harms Mitigate potential harms Operate a responsible generative AI solution
Adobe Captivate 2019 - The Essentials
By Nexus Human
Duration 2 Days 12 CPD hours Overview #NAME? A course that teaches the core Adobe Captivate skills needed to create eLearning courses. 1 - EXPLORING CAPTIVATE Explore a Finished Captivate Project Zoom and Magnify Navigate a Project Explore and Reset the Workspace Preview the Entire Project 2 - NEW PROJECTS & SOFT SKILLS ELEARNING Create a Blank Project Add Images to Placeholders Import Images Use a Smart Shape as a Button Disable Click Sounds 3 - SCREEN RECORDINGS Rehearse a Script Review Recording Settings Review Recording Modes Record Using Multiple Modes Record a Custom Simulation Record a Demonstration that Pans Manually Record the Screen 4 - VIDEO DEMOS Record a Video Demo Add a Video Zoom Add a Video Pan Smooth a Mouse Path and Show Visual Clicks Split a Video Trim a Video Insert a Video Project into a Standard Project Publish a Video Demo 5 - CAPTIONS, STYLES, TIMING, AND ROUND TRIPPING Insert and Edit Text Captions Edit the Default Caption Style Change a Callout Type Used by a Text Caption Control Slide Timing Control Slide Object Timing Check Spelling Align Slide Objects Export Captions to Word Import Captions from Word into Captivate 6 - POINTERS, PATHS, PATHS, BOXES, AND BUTTONS Control Mouse Effects Edit a Mouse Path Clone an Object Style Insert a Highlight Box Insert an Image Button Control Appear After Timing 7 - IMAGES AND VIDEOS Insert, Resize, and Restore an Image Import Images into the Library Resize, Transform, and Align Images Manage Unused Library Assets Create an Image Slideshow Insert a Video Set Video Properties 8 - AUDIO Work with Rollover Captions Import Audio onto a Slide Object Import Background Audio Add a Slide Note Calibrate a Microphone Record Slide Audio Import Audio onto a Slide Edit an Audio File Insert Silence Convert Text-to-Speech 9 - STATES, ANIMATIONS, AND OBJECT EFFECTS Change State Views for a Button Add an Animation to a slide Insert a Text Animation Apply an Effect to a Slide Object Apply a Free Fall Effect to an Object 10 - SOFTWARE SIMULATIONS Hide the Mouse Replace Phrases Insert a Click Box Insert a Text Entry Box 11 - WORKING WITH POWERPOINT Create a Project from a Presentation Edit the Source Presentation Synchronize with Source Rescale a Project 12 - QUIZZING Edit Quizzing Object Styles Set the Quiz Preferences Question Slides Insert Question Slides Edit a Question Slide Compare Submit All to Submit Buttons Insert a Knowledge Check Review a GIFT File Import a GIFT File into a Project Create Question Pools Move Questions to Pools Insert Random Question Slides 13 - PUBLISHING Apply a Skin Edit, Save, and Delete a Skin Name Slides Check Publish Settings and Add a Loading Screen Publish as SWF and PDF Run the HTML5 Tracker Publish as HTML5
Microsoft Powerpoint Advanced (live online classes)
By Microsoft Office Training
Course Objectives At the end of this course you will be able to: Modify the PowerPoint environment Using Master View in order to customise a design template Add and customize SmartArt graphics Add animations and change its effect options Add action buttons to control the flow of the presentation Use various options to customise slide shows Use different PowerPoint file types to distribute presentations ' 1 year email support service Take a closer look at the consistent excellent feedback from our growing corporate clients visiting our site ms-officetraining co uk Customer Feedback Very clearly explained Good pace. Lucy Tailor - ACER ' With more than 20 years experience, we deliver courses on all levels of the Desktop version of Microsoft Office and Office 365; ranging from Beginner, Intermediate, Advanced to the VBA level. Our trainers are Microsoft certified professionals with a proven track record with several years experience in delivering public, one to one, tailored and bespoke courses. Tailored in company training courses: You can choose to run the course exactly as they are outlined by us or we can customise it so that it meets your specific needs. A tailored or bespoke course will follow the standard outline but may be adapted to your specific organisational needs. Customising the PowerPoint Environment Customise the User Interface Set PowerPoint Options Customising Design Templates Modify Slide Masters and Slide Layouts Add Headers and Footers Modify the Notes Master and the Handout Master Adding SmartArt to a Presentation Create SmartArt Modify SmartArt Working with Media Add Audio to a Presentation Add Video to a Presentation Working with Animations Entrance, Emphasis and Exit Animations Animate Charts by Category and Series Customise Animations and Transitions Collaborating on a Presentation Review a Presentation Store and Share Presentations on the Web Customising a Slide Show Annotate a Presentation Set Up a Slide Show Create a Custom Slide Show Add Hyperlinks Add Action Buttons Record a Presentation Securing and Distributing a Presentation Secure a Presentation Create a Video or a CD Distribute the Presentation in different File Formats Who is this course for? Who is this course for? This course is designed for delegates who want to gain the skills necessary to work with design templates, various types of diagrams, special effects, custom slide shows, collaboration functionality, and advanced presentation delivery. Requirements Requirements Preferably, delegates should have attended the Powerpoint Introduction course. Career path Career path Microsoft Office know-how can instantly increase your job prospects as well as your salary. 80 percent of job openings require spreadsheet and word-processing software skills

Apple - Mac Final Cut Pro X - Level 101
By Nexus Human
Duration 3 Days 18 CPD hours This course is intended for This class is designed for anyone looking to edit professional-quality video with Final Cut Pro X and who prefers hands-on and interactive instruction to best explore its functionality. Overview Start with basic video editing techniques and work all the way through Final Cut Pro's powerful advanced features. Students work with dramatic real-world media to learn the practical techniques used daily in editing projects. Final Cut Pro X is a revolutionary video editing application that makes it possible for beginners and professionals to achieve stunning results. This course teaches students to perform editing functions and becoming familiar with the user interface. Exploring the Final Cut Pro X Interface Following a Workflow Opening Final Cut Pro X Exploring the Interface Using Menus and Shortcuts Viewing and Sorting Events Skimming Clips and Changing Views Viewing and Creating Projects Working in the Project Library Viewing Projects in the Timeline Hiding and Quitting Final Cut Pro Importing Importing Media into an Event Importing Folders as Keyword Collections Analyzing and Correcting Imported Clips Importing from a Camera Importing from the Finder Importing from Other Applications Organizing Clips in an Event Using Metadata to Customize an Event Adding Keywords to Clips Assigning Multiple Keywords to Clips Applying Keywords to a Clip Range Rating, Sorting and Searching Clips Creating Smart Collections Building a Rough Cut Creating a New Project Screening and Marking Clips Appending Clips in the Timeline Viewing and Arranging Clips in the Magnetic Timeline Inserting Clips into the Primary Storyline Changing Edited Clips Connecting Clips to the Primary Storyline Closing your Project Finetuning a Rough CutAdding to the Primary Storyline Duplicating a Project Removing Clip Selections and Adding Gaps Understanding Trimming, Applying the Trim Tool Trimming with Precision Applying Transitions Preparing for Transitions Applying a Video Transition Using the Transitions Browser Modifying Transitions Changing Transition Parameters in the Inspector Adding Transitions to Other Storylines and Compound Clips Exploring Audio Transitions Working with Sound Monitoring and Adjusting Audio in the Timeline Adding Music and Sound Effects, Adjusting Levels in the Audio Inspector Creating Audio Fades Recording a Narration Track Correcting Problem Audio Working with Titles, Generators and Themes Using the Titles Browser Adding a Lower Third Modifying Titles Adding Bumpers and Credits Working with Video Generators Using Themes Retiming and Transforming Clips Understanding Motion Properties Retiming Clips Creating Holds and Variable Speed Segments Applying Preset Speed Effects Transforming an Image Cropping an Image Adding a Ken Burns Effect Creating Keyboard Shortcuts Applying Effects and Enhancing Color Applying Video Effects Modifying Effect Parameters Auditioning and Animating Effects Applying Audio Effects Enhancing Color in Final Cut Pro Exporting and Sharing Your Project Preparing a Project for Exporting and Sharing Detecting Audio Peaks Adjusting Video Levels for Broadcast Exporting Movie File Publishing a Project to Apple Devices Publishing a Project to Video Sharing Sites Exporting an Image from your Project Exporting for Blue-Ray Disc, DVD, or Disk Image Certification Exam Students can take an end user exam to earn Apple Certified Pro, Final Cut Pro X Level One status Additional course details: Nexus Humans Apple - Mac Final Cut Pro X - Level 101 training program is a workshop that presents an invigorating mix of sessions, lessons, and masterclasses meticulously crafted to propel your learning expedition forward. This immersive bootcamp-style experience boasts interactive lectures, hands-on labs, and collaborative hackathons, all strategically designed to fortify fundamental concepts. Guided by seasoned coaches, each session offers priceless insights and practical skills crucial for honing your expertise. Whether you're stepping into the realm of professional skills or a seasoned professional, this comprehensive course ensures you're equipped with the knowledge and prowess necessary for success. While we feel this is the best course for the Apple - Mac Final Cut Pro X - Level 101 course and one of our Top 10 we encourage you to read the course outline to make sure it is the right content for you. Additionally, private sessions, closed classes or dedicated events are available both live online and at our training centres in Dublin and London, as well as at your offices anywhere in the UK, Ireland or across EMEA.