- Professional Development
- Medicine & Nursing
- Arts & Crafts
- Health & Wellbeing
- Personal Development
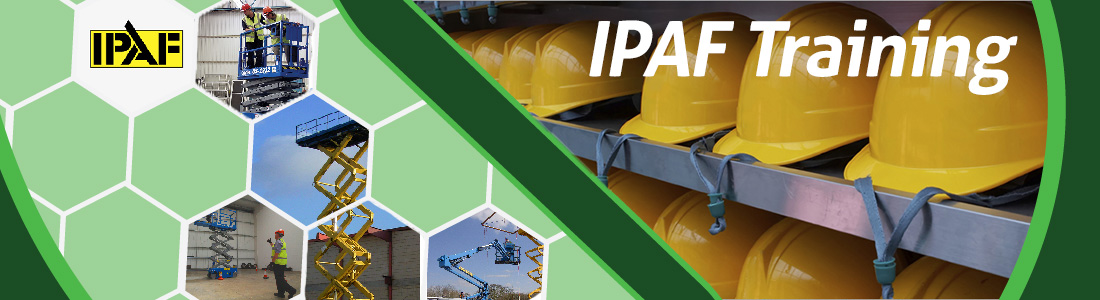
IPAF training is the most widely recognised standard for Mobile Elevated Work Platform operators. These are commonly known as MEWP’s or Scissor Lifts and Cherry Pickers. MHA Training is a fully approved and registered IPAF member and we can deliver a wide range of courses. This can be done at our training centre in Warrington or On-Site at customer premises Nationwide. The International Powered Access Federation (IPAF) promotes the safe and effective use of powered access worldwide. Set up in 1983, IPAF is a non-profit organisation that represents the interests of member training companies. Over the years, IPAF has played a key role in promoting many of the design safety and testing procedures that are now established in the powered access industry. Companies such as MHA Training in Warrington are responsible for training for over 90,000 operators each year. Those who successfully complete their training at our centre in Warrington, or out On-Site nationwide are awarded the PAL Smart card. The (Powered Access Licence) is the most widely held and recognised qualification for mobile platform operators. The PAL Smart card is valid for five years and shows the machine categories that an operator has been trained on. It also features the holders photo and signature, and can be verified on their website. IPAF itself does not provide any training, it is provided by approved quality training centres like MHA Training. Approved training centres are regularly audited by IPAF, which ensures the highest standards are consistently met. Class sizes are kept small and courses generally last 1-2 days and are a mixture of theory and practical. To ensure success candidates must then undergo a 30 question multiple choice paper and a practical test. Course material is available in many languages and training centre’s receive regular updates. MHA Training was established in 2008 based at our training centre in Warrington, Cheshire. We provide an array of services On-Site also for clients around the North West in areas such as Manchester, Liverpool, Widnes, St. Helens, Runcorn, Wigan, Preston and Leeds. Over the years we have expanded and have instructors available Nationwide. IPAF E-Learning. IPAF’s new E-learning module is part of its full training programme for mobile elevating work platforms (MEWPs). The E-learning module delivers flexibility and interactive tools, with the same emphasis on practical training. Together with supervised written and practical testing of operator skills. E-learning can lead to a PAL Card (Powered Access Licence) which proves that the operator has successfully completed the training and is able to operate MEWP’s safely. Benefits: Flexible. Trainees complete the theory part anytime, anywhere, on any device, at their own pace. Interactive. Engages trainees with games, quizzes, videos and simulations. Operator E-learning does not replace practical training. Trainees who complete the online session must still pass a supervised theory test with an IPAF centre like MHA training. Also must successfully complete a minimum half-day of practical training and testing before being issued a PAL Card as proof of successfully completed operator training. Training Courses Available: Operators. Demonstrators. Static Boom (1b). Mobile Vertical (3a). Mobile Boom (3b). Push Around Vertical (PAV). Other courses: Harness Use and Inspection (H).

Paediatric First Aid (12 Hour) Description: This two-day paediatric first aid course focuses on emergency scenarios that face those looking after young children and infants, including day nurseries, private nursery schools, pre-schools, before and after school clubs for children in the early years age group, childminders, parents and carers of children at home. Designed around the needs of all child carers, our paediatric first aid courses place emphasis on dealing with sick or injured children and babies. Our 12 hour course syllabus exceeds the Ofsted Early Years and Childcare Register requirements. Our professional trainers utilise both practical and theory sessions. Learners receive a Paediatric First Aid guide book, a training dressing and a CPR barrier protection device.Cardio Pulmonary Resuscitation and care of the unconscious requires physical effort. Learners should be capable of working with casualties at floor level. Learners are assessed continually by the trainer. The HSE strongly recommend that all First Aiders undertake annual refresher training of at least 3 hours per year. Syllabus Planning for and dealing with emergencies Resuscitation (CPR) Care of the unconscious casualty Choking Bleeding and shock Fractures Head, Neck and Spine injuries Minor injuries Epilepsy and Febrile Convulsions Asthma Poisons Diabetes Foreign objects in the eyes, ears & nose Sickle cell Meningitis Electric Shock Burns and Scalds Anaphylaxis Bites and stings Reporting of accidents & recording information First Aid Kits Cost: £131.00 + VAT

Course Details Any persons carrying out non-licensed works with asbestos containing materials, as laid down in CAR 2012, Reg 3(2). This would normally include, but is not limited to, trade operatives such as demolition workers, construction workers, general maintenance staff, electricians, plumbers, gas fitters, painters and decorators, joiners, shop fitters, plasterers, roofers, heating and ventilation engineers, telecommunication engineers, computer installers, fire and burglar alarm installers, architects, building surveyors and other such professionals or any other persons likely to disturb and carry out work on asbestos containing materials as defined in CAR 2012.

Adobe Photoshop Workshop
By Greta Powell Training
This Photoshop Course is workshop tailored to your content. If you need to gain Photoshop skills for a new position, learn Photoshop to progress further in your career then this workshop is ideal.


SUMMER TERM: Wednesday Afternoon Silver Jewellery Class 24th July – 28th August (6 weeks) 12.30-2.30pm with Krista Thomson
(21)By Workshop 925
Time: Wednesday Afternoon 12.30-2.30pm Dates: 24th July – 28th August (6 weeks) Length: 2 hours each week, each term runs for 6 weeks Tutor: Krista Thomson Where: Workshop 925 Unit F9 The Mayford Centre, Mayford Green Woking, Surrey GU22 0PP What does the term time course involve? Our term time classes allow students of all abilities the opportunity to design and create their own jewellery while learning new skills along the way. During the first session your tutor will settle you all in and get to grips with what each student is aiming to complete or learn during the term. Your tutor will discuss your different aims and goals, whether that’s really focusing upon learning and practicing a certain skill, or if it is to finish a specific project. Any new starters will be given a tour of the workshop and you will be introduced to some basic techniques during the first session, so you feel comfortable within the workshop. You can then discuss your ideas for the term and your tutor will help you with how and where to order materials from for your project, we have a substantial list of good suppliers and discount codes to get you started. Soon enough you will have a good understanding of the essential jewellery making skills which you can then go on to develop further, there are many areas of jewellery making to explore. Throughout your time with us, your tutor and peers will help you develop the skills and knowledge required to bring your designs to life. Each student will be working on their own projects, everybody has different directions and design ideas and techniques they want to work on. However during our terms we run demonstrations which are relevant to student projects to help them complete aspects of their project- other students are welcome to watch these too, we also run demonstrations requested by students, this might be a repeat of something a student would like a refresher on, or maybe a technique they would like to learn for their next project and we will also provide demonstrations to strive to introduce you to new skills. We also like to keep you up to date with industry news, show you designer inspiration to help you learn methods to process new ideas and gain an understanding of design processes behind jewellery making. We are very much here to support your development. The more terms you complete with us, the more time you have to develop a wide range of skills and a good understanding of the industry as a whole. Jewellery making skills take time to practice and learn. Here is a Pinterest board to inspire new starters. Summer Terms: Summer terms differ from our regular terms. Regular term time students are not given first refusal of spaces to allow a break in the year, and our schedule changes as summer holidays and children being off school affect tutor availability. Summer term allows others the opportunity to secure a place. Should a space be available on the regular term time classes they will be offered to those on our waiting list, please email us at hello@workshop925.com if you would like to be on our waiting list for September – The regular term timers enrolled in July will have first refusal of their space for September any spaces will then be offered to those waiting list. Experience required: This class is suitable for those with any level of experience. Some students on our termly courses, have been with us for many years, others are beginners. We run a very welcoming and supportive environment, so whatever level your skills are at, you will always feel encouraged and supported by all to develop your ability further. Class size: We have 9 jeweller’s wooden workbenches in our workshop, however our term time classes always run with 6/7 students. 2 CATCH UPS are permitted over summer terms, meaning if you miss any classes due to holidays, you can catch these up on other sessions – it is not guaranteed we will have sessions available, however most sessions run with a space to accommodate a student on a catch up. Please make us aware of absences in advance. What is included? All tools and consumables are supplied Light refreshments are provided The cost of this course does not include materials. What to bring: For safety reasons, during each class, you are required to wear appropriate footwear, we request that no open toed shoes are worn within Workshop 925. Long hair should also be tied back when working with the equipment. You may also wish to bring a notebook. We have handouts for many demonstrations, but there are always many tips and tricks given verbally by the tutor, which some might like to keep note of. Please bring any, snacks and drinks to each session if you require refreshments.

Enscape Rendering Training
By London Design Training Courses
Why Choose Enscape Rendering Training Course? Course info Best real-time visualization plugin, integrates with design tools like Revit, SketchUp, Rhino, ArchiCAD, and Vectorworks. Experience swift and real-time visualization within your preferred applications, eliminating extra costs and adjustments. Elevate your design projects effortlessly with Enscape. Duration: 5 hrs Method: 1-on-1, Personalized attention Schedule: Tailor your own hours of your choice, available from Mon to Sat between 9 am and 7 pm What does the Enscape Training & Interactive Workshop offer? The Enscape Training & Interactive Workshop is designed to help you get up and running with Virtual Reality (VR) in a cost-effective manner. It covers hardware and software setup, navigation techniques, real-time updates, material settings, and more. The workshop also allows participants to experience VR firsthand. What will I learn in the Enscape (VR) Training and Interactive Workshop? The workshop covers hardware setup, software installation, and configuration. You will learn how to migrate models from Revit and SketchUp into VR, navigate through designs, update objects and materials in real-time, and utilize various visual styles and settings. The course also includes interactive workshops with support from our expert tutors. Course Outline: Enscape Rendering Software Training (5 hours) Course 1: Enscape for Revit Hour 1: 1. Introduction to Enscape: Overview of Enscape rendering software, its features, and benefits. 2. Installing and Setting up Enscape: Step-by-step guidance on installing and configuring Enscape for Revit. 3. Enscape Interface: Familiarizing with the Enscape user interface and navigation controls within Revit. Hour 2: 4. Enscape Materials: Exploring material creation, application, and customization within Enscape for Revit. 5. Lighting in Enscape: Understanding different lighting options, adjusting light settings, and creating realistic lighting effects. Hour 3: 6. Enscape Camera Settings: Manipulating camera angles, perspectives, and settings for optimal visualization. 7. Enscape Rendering Settings: Exploring various rendering settings and techniques to enhance the quality of the final output. Hour 4: 8. Enscape Rendering Workflow: Demonstrating a step-by-step workflow for generating renderings and walkthroughs using Enscape in Revit. 9. Advanced Features: Introduction to advanced features such as creating panoramas, virtual reality (VR) walkthroughs, and creating animations in Enscape. Hour 5: 10. Tips and Tricks: Sharing tips and techniques for maximizing efficiency and achieving high-quality results in Enscape for Revit. 11. Q&A and Troubleshooting: Addressing participant questions, providing troubleshooting guidance, and discussing common challenges and solutions. OR Course Outline: Enscape Rendering Software Training (5 hours) Course 1: Enscape for Sketchup Hour 1: 1. Introduction to Enscape: Overview of Enscape rendering software, its features, and benefits for SketchUp users. 2. Installing and Setting up Enscape: Step-by-step guidance on installing and configuring Enscape for SketchUp. 3. Enscape Interface: Familiarizing with the Enscape user interface and navigation controls within SketchUp. Hour 2: 4. Enscape Materials: Exploring material creation, application, and customization within Enscape for SketchUp. 5. Lighting in Enscape: Understanding different lighting options, adjusting light settings, and creating realistic lighting effects. Hour 3: 6. Enscape Camera Settings: Manipulating camera angles, perspectives, and settings for optimal visualization in SketchUp. 7. Enscape Rendering Settings: Exploring various rendering settings and techniques to enhance the quality of the final output. Hour 4: 8. Enscape Rendering Workflow: Demonstrating a step-by-step workflow for generating renderings and walkthroughs using Enscape in SketchUp. 9. Advanced Features: Introduction to advanced features such as creating panoramas, virtual reality (VR) walkthroughs, and creating animations in Enscape. Hour 5: 10. Tips and Tricks: Sharing tips and techniques for maximizing efficiency and achieving high-quality results in Enscape for SketchUp. 11. Q&A and Troubleshooting: Addressing participant questions, providing troubleshooting guidance, and discussing common challenges and solutions.