- Professional Development
- Medicine & Nursing
- Arts & Crafts
- Health & Wellbeing
- Personal Development
SketchUp Training Course for Interior Designers and Architects
By London Design Training Courses
Why choose SketchUp Training Course for Interior Designers and Architects? Course info During this training course, you will begin with an introduction to SketchUp, exploring its interface, fundamental concepts, including design tools, component, color and texture, and importing from 3D Warehouse related to interior design. Duration: 6 hrs. Method: 1-on-1, Personalized attention. Schedule: Tailor your own schedule by pre-booking a convenient hour of your choice, available from Mon to Sat between 9 am and 7 pm. Advantages of SketchUp: Intuitive and Fast: Compared to other 3D modeling software, SketchUp is simple, fast, and easy to use. Quick Learning Curve: Within a few hours, users can create simple models and get started with SketchUp. Efficient Modeling: SketchUp allows for the creation of models with fewer faces, optimizing performance. Versatility: Its non-parametric modeling principle makes SketchUp suitable for various applications. Rich Component Library: Access a vast collection of free components in the 3D Warehouse. Extensive Plugins: Benefit from numerous free plugins. Interior Designers' SketchUp Training Course Course Duration: 6 hours I. Introduction to SketchUp (1 hour) Overview of SketchUp for interior design Familiarization with the interface and essential tools Navigating the 3D environment efficiently Project creation and management II. Creating Floor Plans (1 hour) Importing and drawing floor plans accurately Wall, window, and door precision Effective floor level management Organizing designs with Layers and Scenes III. Furniture and Fixtures (2 hours) Accessing 3D Warehouse for furniture and fixtures Crafting custom elements for unique designs Strategic arrangement within the space Materials and textures customization IV. Advanced Modeling (1 hour) Utilizing advanced tools for intricate 3D models Organizing models with groups and components Adding details and finishes for high-quality design V. 3D Visualization (1 hour) Creating immersive 3D models Applying textures to walls, floors, ceilings Mastering rendering for realistic presentations VI. Importing and Exporting (30 minutes) Seamless collaboration with other software File formats and compatibility understanding Preparing models for 3D printing VII. Conclusion and Next Steps (30 minutes) Comprehensive review and key takeaways Further learning resources and improvement avenues Interactive Q&A and feedback collection SketchUp - SketchUp trial https://www.sketchup.com Unlock Your Design's Full Potential With SketchUp's Powerful 3D Software. VR Model Viewing. Free Trial Available. Secure Payment Options. Types: SketchUp Go, SketchUp Pro.
Rhino 3D Evening Training
By London Design Training Courses
Who Should Attend Rhino 3D Evening Training Course? Click here for info. This Evening Course is for individuals seeking to learn 2D and 3D modeling skills in a supportive and creative learning environment. Whether you are new to Rhino or want to expand your existing knowledge, this course is for product, furniture, architectural, and jewelry design industries. Duration: 10 hrs Method: 1-on-1, Personalized attention Schedule: Tailor your own schedule hours of your choice, available from Mon to Sat between 9 am and 7 pm Course Inclusions: Free Lifetime email support: Enjoy the flexibility of a free lifetime email support. Expert Instruction: Learn from experienced architects, designers, and software professionals, ensuring top-notch teaching. Hands-On Learning: Engage in practical, hands-on lessons with personalized project work to apply your skills effectively. Digital Reference: Access valuable video tutorials and a digital reference book for convenient revision and continuous development. London Design Training Course Certificate of Completion: Receive a certificate upon course completion, enhancing your CV and LinkedIn profile. Free Career Guidance: Benefit from career guidance, including tips on job applications and setting up a creative business, to stand out in the competitive design industry. Rhino 3D Basic to Intermediate Training Course Course Duration: 10 hours Introduction to Rhino and Interface: Familiarizing with Rhino's command system and toolbar usage. Navigating the geometry menus, command line, and status bar efficiently. Understanding the Properties window and its functionalities. Managing file operations, including opening and saving files. Grasping the three entity types: curves, surfaces, and solids. Exploring various geometric elements, such as Bezier curves, B-splines, NURBS objects, isocurve surfaces, and mesh surfaces. Setting measurement units for accurate modeling. Navigation: Introducing the viewport and its features. Using construction planes to aid in modeling. Utilizing shading modes for better visualization. Learning essential viewport controls: pan, zoom, rotate, and reset. Workflow Basics: Creating basic objects like curves, surfaces, and solids. Performing fundamental transformations to manipulate objects. Organizing projects efficiently using layers. Drawing: 2D Geometry: Understanding the creation of lines, polylines, rectangles, polygons, arcs, circles, and ellipses. Drawing freeform curves for more creative designs. Modeling: 3D Surfaces: Comparing various 3D surface types. Utilizing extrusion to add features to models. Creating surfaces with loft, revolve, rail revolve, sweep rail, and network surface commands. Constructing complex surfaces with the Network Surface tool. Modeling: 3D Solids: Introducing solid modeling techniques. Creating solids with primitives and curves. Applying Boolean operators to create unique shapes. Editing solids using the solid edit tool. Transforming solids and incorporating modeling aids like Grid Snap, Ortho, and Planar. Editing and Transforming Objects: Using Fillet and Chamfer to edit corners. Employing curve Booleans for trimming and splitting. Mastering the Drag and Nudge tools for object movement and rotation. Copying, pasting, and grouping objects effectively. Scaling and duplicating objects with the Mirror command. Analysis and Degrees: Understanding degrees of curves and surfaces. Creating screen captures for quick proofs. Generating 2D views and rendering projects. Preparation for 3D Printing and Manufacturing: Preparing models for prototyping by ensuring closed gaps. Using the shell technique to create wall thickness suitable for 3D printing.
SketchUp Course for Interior Designers and Architects with Layout and Vray
By London Design Training Courses
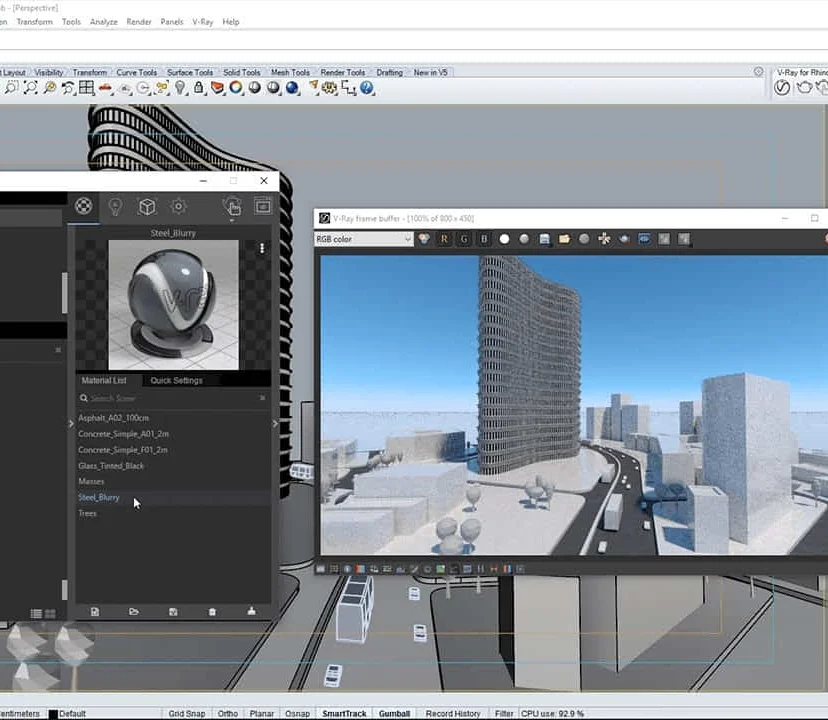
Why choose SketchUp Course for Interior Designers and Architects with Layout and Vray? Introducing SketchUp Training Course tailored for Interior Designers and Architects. This comprehensive course is designed for interior designers and architects who want to master SketchUp for 3D modeling, Layout for creating construction documents, and V-Ray for rendering. Course info Duration: 10 hrs Method: 1-2-1, Personalized attention Schedule: Tailor your own hours, available from Mon to Sat between 9 am and 7 pm Explore the world of 3D drawing with Sketchup in this beginner-friendly course. With its user-friendly interface, Sketchup offers a gentle learning curve, allowing you to quickly grasp 3D geometries. As you become acquainted with the basic drawing tools, you'll uncover a plethora of advanced techniques to create intricate and complex 3D objects. Who Should Take This Course? This course is ideal for individuals seeking to utilize a 3D drawing tool to solve three-dimensional problems or engage in more advanced design endeavors. Our experienced tutors communicate in accessible English, avoiding complex jargon and ensuring clarity throughout the course. We offer a wealth of learning resources for you to access beyond live lessons. Stay up-to-date, practice, and review key concepts essential to your growth. Course Title: SketchUp Training for Interior Designers and Architects with Layout and V-Ray Course Course Duration: 10 hours Course Description: This comprehensive course is designed for interior designers and architects who want to master SketchUp for 3D modeling, Layout for creating construction documents, and V-Ray for advanced rendering. Participants will learn how to create stunning 3D models for their projects, produce detailed construction documents, and apply professional-grade rendering techniques to bring their designs to life. Course Outline: Module 1: Introduction to SketchUp (1 hour) - Overview of SketchUp for interior design and architecture - Interface and basic tools - Navigation and viewport controls - Creating and saving interior design and architecture projects Module 2: Creating Floor Plans (1 hour) - Importing floor plans and site plans - Drawing walls, windows, and doors - Creating and editing floor levels - Understanding Layers and Scenes Module 3: Adding Furniture and Fixtures (2 hours) - Importing furniture and fixtures from the 3D Warehouse - Creating custom furniture and fixtures - Placing and arranging furniture and fixtures in the space - Creating and editing custom materials Module 4: Advanced Modeling Techniques (2 hours) - Creating more complex 3D models using advanced tools - Using groups and components for model organization - Adding custom details and finishes Module 5: Layout for Construction Documents (2 hours) - Creating construction documents in Layout - Importing SketchUp models into Layout - Creating floor plans, elevations, and sections - Adding annotations and dimensions to construction documents Module 6: Introduction to V-Ray (1 hour) - Overview of V-Ray for SketchUp - Basic V-Ray interface and tools - Understanding V-Ray materials and textures Module 7: Advanced Rendering Techniques (1 hour) - Applying advanced rendering techniques to SketchUp models - Creating artificial lighting and using natural lighting - Adding entourage and landscaping to designs Module 8: Importing and Exporting (30 minutes) - Importing and exporting files from other software - Understanding file formats and compatibility - Exporting models for 3D printing Module 9: Conclusion and Next Steps (30 minutes) - Review of course content - Tips for further learning and resources - Q&A and feedback

Rhino Introduction to Intermediate Training Course
By ATL Autocad Training London
Why Choose Rhino Introduction to Intermediate Training Course? Learn: 3D NURBS models. Master: Surfacing modeling. Interface: Rhino's navigation. Rendering Skills: Enhance presentations with Rhino renderings. Check our Website Flexible Scheduling: 1-on-1 training sessions according to your convenience. Choose any hour between 9 a.m. and 7 p.m., Mon to Sat. You can call us at 02077202581 to book over the phone. Duration: 10 hours. Methods: Personalized training either in-person, or live online. Introduction and Navigation Become acquainted with Rhino's interface, menus, and screen layout. Efficiently traverse through Rhino models, ensuring precision in 2D lines, polylines, and NURBS curves. Utilize modeling setup features, incorporating constraints like snap, ortho, and planar for accuracy. Leverage object snaps and Smart Track functionality to enhance precision. Solid and Surface Modeling Develop rapid 3D solids and surfaces, employing Rhino's organized layering system. Utilize coordinates and constraints for meticulous modeling, exploring 3D space and elevations. Create diverse shapes, such as rectangles, circles, arcs, ellipses, and polygon curves. Elevate models with Rhino render and render color, incorporating free-form curves, helix, and spiral curves. Efficiently handle model views with pan, zoom, and view management tools. Implement various editing commands for curve manipulation and transform curves into surfaces and solids. Utilize history tracking for advanced editing and execute general editing actions: move, copy, rotate, mirror, and scale. Create arrays with both polar and rectangular arrangements and employ boolean operations like union, difference, and intersection. Offset curves and surfaces effectively, ensuring meticulous detailing. Intermediate Edit and Surfacing Introduce key NURBS modeling concepts and terminologies. Edit curves and surfaces via control point manipulation and rebuild them for optimal refinement. Employ the nudge modeling aid for precise adjustments and generate deformable shapes. Create curves through projection techniques and split surfaces using curves and surfaces. Blend surfaces seamlessly, utilizing symmetry tools, lighting, and rendering effects. Convert intricate 3D objects into detailed 2D drawings, expertly crafting page layouts. Advanced Surfacing and Solid Modeling Construct model primitives and solid text, employing techniques such as pipe and extrusion. Modify solids efficiently using Boolean tools, expanding your surface modeling capabilities. Employ techniques like extrusion, lofting, and revolving for intricate surfaces. Create sweeps using 1 and 2 rail curves, mastering surface network techniques for complex shapes. Upon completion, you will: Master Rhino Tools: Navigate interfaces, utilize advanced tools for precise modeling, and employ features like object snaps and Smart Track. Expert Solid and Surface Modeling: Develop intricate 3D solids and surfaces, create diverse shapes, and use Rhino render effectively. Advanced Editing Skills: Apply intermediate and advanced editing techniques, including symmetry tools and realistic rendering. Precision Modeling: Utilize coordinates, constraints, and advanced aids for accurate detailing and problem-solving. Professional Project Execution: Create high-quality renderings, 2D drawings, and polished 3D models for real-world design scenarios. Upon completion, you'll be adept at 3D modeling, product design, and architecture, positioning you as a valuable asset in the design industry. Why Choose Our Rhino Courses? Rhino, also known as Rhinoceros, stands as a robust 3D computer graphics and computer-aided design software, utilized extensively in domains like architecture, industrial design, and multimedia. Our Rhino courses are meticulously crafted to empower you in mastering this software. Led by seasoned instructors, our courses provide a comprehensive understanding of Rhino, enabling you to create exceptional designs. Rhino 3D Training: Our Rhino 3D training caters to beginners and those seeking advanced techniques. Course Highlights: Precise 3D Modeling: Master free-form 3D NURBS models with precision. Advanced Functionality: Explore Rhino's features, including advanced surfacing commands. User Interface Mastery: Navigate Rhino's interface and hone skills in curves, surfaces, and solids. Expert Guidance: Acquire expertise in Rhino's modeling environment under expert guidance. Modeling Techniques: Learn free-form and precision modeling techniques. Modeling Aids: Utilize tools for accurate modeling and create basic Rhino renderings. Benefits of our Courses: Expert Guidance: Receive instruction from experienced architects and designers, providing practical, real-world insights for comprehensive learning. Comprehensive Resources: Access bespoke video tutorials for additional learning and reference, enhancing your understanding of the course materials. Digital Reference Material: Receive a digital reference book to support your revision efforts, providing a comprehensive resource for your studies. Ongoing Support: Enjoy free after-support through phone or email even after course completion, ensuring continuous assistance and guidance. Tailored Learning Experience: Customize your learning journey by adapting the syllabus and projects to align with your specific needs and interests, fostering a personalized educational experience. Certificate: Upon completion, earn a certificate from us, validating your achievement and recognizing your expertise in the field.
Rhino 3d and V-ray for Rhino Basic to Intermediate Training
By London Design Training Courses
Why Learn Rhino 3d and V-ray for Rhino Basic to Intermediate Training Course? Course Link Learn Rhino 3D and V-Ray for Rhino Basic to Intermediate Training Course. Designed for beginners and experienced users, this course empowers you with essential modeling and rendering techniques. Choose between in-person or live online sessions. Duration: 16 hrs. Method: 1-on-1, Personalized attention. Schedule: Tailor your own schedule by pre-booking hours of your choice, available from Mon to Sat between 9 am and 7 pm. London Design Training Course Certified tutors for Rhino 3D and Vray Training - Online, On-Site, or In-Class one to one. Choose from a diverse range of Rhino courses conducted by expert trainers with extensive production experience. Rhino 3D and V-Ray Comprehensive Training Course Duration: 16 hours Course Overview: Learn Rhino 3D and V-Ray with our Basic to Intermediate Training Course. Perfect for beginners, this course equips you with the skills to navigate Rhino's interface, create captivating 3D models, apply textures, and utilize V-Ray for stunning renders. Course Outline: I. Introduction to Rhino 3D and V-Ray (1 hour) Get familiar with Rhino 3D and V-Ray interfaces and essential tools Master viewport navigation with expert controls Understand units and tolerance for precise designs Customize your workspace for seamless workflow II. Creating Basic 3D Objects (3 hours) Craft captivating 3D shapes and objects Edit objects and work with curves for refined designs Explore surfaces and solids for advanced modeling Utilize transformations and copying techniques for enhancements III. Materials and Textures (2 hours) Unleash the power of materials and textures on your designs Apply stunning materials to bring your creations to life Enhance your designs with custom materials for an aesthetic boost IV. Basic Lighting Techniques in V-Ray (2 hours) Discover the magic of lighting with V-Ray for impactful renders Utilize V-Ray lights and HDRI maps for striking lighting effects Adjust lighting settings for impeccable results V. Enhancing Renders with V-Ray Settings (3 hours) Optimize V-Ray render settings for the best output Adjust global illumination and reflection settings for desired looks Elevate renders with dynamic effects like depth of field and motion blur VI. Advanced Modeling Techniques (2 hours) Master advanced modeling tools for intricate shapes Refine curve and surface creation and editing skills Handle solids with Boolean operations and trimming techniques VII. Advanced Lighting Techniques in V-Ray (2 hours) Create and adjust artificial lights for perfect illumination Utilize V-Ray's Sun and Sky system for realism Craft custom HDR images for enhanced lighting VIII. Exporting and Importing (1 hour) Learn file formats for seamless sharing and collaboration Prepare models for 3D printing with best practices Integrate models from other software for a unified workflow IX. Conclusion and Next Steps (30 minutes) Recap course knowledge and highlights Access valuable tips and resources for continuous learning Engage in interactive Q&A for feedback and support Resources: Explore V-Ray with a free trial at: https://www.chaosgroup.com/vray/sketchup/free-trial Access material library at: https://www.vray-materials.de/ Discover textures at: https://textures.com/ Downloads: Download Rhino 7 for Windows for a full 90-day evaluation at: https://www.rhino3d.com Experience Rhino 7 for Mac Evaluation with a user-friendly interface and seamless performance for 90 days. Upon completing the Rhino 3D and V-Ray Basic to Intermediate Training Course, participants can expect to achieve the following learning outcomes: Proficiency in Rhino 3D and V-Ray: Develop a comprehensive understanding of Rhino 3D and V-Ray interfaces, tools, and functionalities, enabling participants to navigate and utilize the software effectively. 3D Modeling Skills: Master the art of creating captivating 3D objects and shapes using Rhino 3D, including editing, transforming, and refining designs for diverse applications. Material Application: Acquire the ability to apply and customize materials and textures to enhance the visual appeal and realism of 3D models, elevating the quality of designs. Lighting Techniques: Gain expertise in utilizing V-Ray lighting tools, such as V-Ray lights and HDRI maps, to achieve striking lighting effects in rendered scenes. Rendering Excellence: Learn to optimize V-Ray render settings, control global illumination, and apply dynamic effects like depth of field and motion blur for high-quality and impressive renders. Advanced Modeling: Develop skills in advanced modeling techniques, including handling curves, surfaces, and solids, enabling participants to tackle complex design challenges. Lighting Mastery: Acquire the knowledge and expertise to create and adjust artificial lights, utilize the Sun and Sky system, and craft custom HDR images for realistic lighting setups. Seamless File Management: Understand various file formats for exporting and importing 3D models, facilitating efficient collaboration and preparation for 3D printing. Creative Problem-Solving: Enhance creative thinking and problem-solving abilities through hands-on practice and exploration of diverse design scenarios. Professional Presentation: Learn post-production techniques in Photoshop to enhance renders and create visually appealing design presentations for effective communication. Continuous Learning: Access valuable resources and tips to encourage continuous learning and professional growth in Rhino 3D and V-Ray.
Maya Essentials Basic to Fundamental Training Program
By ATL Autocad Training London
Autodesk Maya Basic to Fundamentals Training. Ideal for beginners, learn to navigate Maya's interface, create models, apply textures, animate objects, and delve into advanced topics. Engage in interactive in-person or online sessions. Access recorded lessons for review and receive lifelong email support. Learn 3D modeling and animation - enroll today! Click here for more info: Website Duration: 10 hours of immersive learning. Method: Personalized 1-to-1 sessions and Choose your own day and time Monday to Saturday 9 am to 7 pm. Course Overview: I. Introduction to Maya (1 hour) Maya overview and applications Basic interface and navigation tools Project creation and management II. 3D Modeling Techniques (2 hours) Polygon modeling fundamentals Creating, editing, and refining objects Advanced techniques like extrusions and bevels III. Texturing and Materials (1 hour) Introduction to texturing concepts Material creation and application Texture mapping, UV unwrapping, and image importing IV. Lighting and Rendering (1.5 hours) Basic lighting techniques and composition setup Rendering images and animations effectively Output options and file formats V. Animation Skills (2.5 hours) Keyframe animation and animation curves Character rigging and animation Special effects: particles, fluids, explosions, and smoke VI. Intermediate Modeling Techniques (1 hour) NURBS modeling basics and advanced curves/surfaces manipulation Creating organic shapes with NURBS and sculpting tools VII. Conclusion and Next Steps (0.5 hours) Course review and recap Further learning resources and tips Q&A and feedback session Autodesk Maya Basic to Fundamentals Training Course Key Learning Areas: Advanced modeling techniques: Surfaces, Polygons, Subdiv Modeling, etc. Deformation methods: Twist, Lattice, Flare, Bend Shape manipulation: Lines, Pen tools, Revolve, Loft, Planer, Text in Maya Animation: Keyframes, Path animations, Timeline Texturing and Rendering: Diffuse, Reflections, Transparency, Shaders, Resolution settings Lighting and Camera: Basic & advanced lights, Shadows, Camera effects, Path animation Note: The course content and duration are adaptable to cater to learners' needs and proficiency levels. Maya Interface Proficiency: Participants will develop a comprehensive understanding of Maya's interface, tools, and workflow, allowing them to navigate seamlessly and manage projects efficiently. 3D Modeling Skills: Students will be equipped with polygon modeling techniques to create both basic and complex 3D models with precision. They will master the art of shaping and refining objects, elevating their creativity in 3D design. Texturing and Materials Mastery: Learners will gain expertise in texturing, applying materials, and incorporating images to enhance the visual appeal of their 3D models. They will create captivating surfaces with colors, textures, and reflectivity. Lighting and Rendering Expertise: Participants will learn essential lighting techniques to illuminate their scenes effectively. They will set up cameras and produce high-quality still images and dynamic animations with Maya's powerful rendering capabilities. Animation Techniques: Students will explore the world of animation, utilizing keyframe techniques and animation curves to bring their creations to life. They will delve into character rigging, animating characters with sophistication and realism. Special Effects and Dynamics: Learners will unleash their creativity with mesmerizing particle systems, fluid simulations, and dynamic effects. They will craft captivating visuals, such as explosions and smoke, adding depth and excitement to their projects. Intermediate Modeling Techniques: Participants will refine their skills with NURBS modeling, mastering curve and surface manipulation. They will create intricate organic shapes, pushing the boundaries of their artistic expression. Creative Problem-Solving: Throughout the course, students will tackle real-world projects, facing challenges that foster creative problem-solving skills. They will gain confidence in overcoming obstacles in 3D modeling and animation. Maya Essentials Basic to Fundamental Training Program: Course Focus: Autodesk Maya Essentials, covering fundamental concepts and techniques. Duration: Flexible scheduling, tailored to individual learning pace. Method: Personalized 1-1 training, interactive sessions, hands-on projects. Curriculum Highlights: Introduction to Maya (1 hour): Interface overview, navigation, project management. 3D Modeling Techniques (2 hours): Polygon basics, object creation, advanced editing. Texturing and Materials (1 hour): Texture mapping, material application, UV unwrapping. Lighting and Rendering (1.5 hours): Lighting fundamentals, composition setup, effective rendering. Animation Skills (2.5 hours): Keyframe animation, character rigging, special effects. Intermediate Modeling (1 hour): NURBS modeling, organic shapes, sculpting tools. Conclusion and Next Steps (0.5 hours): Course review, learning resources, Q&A session. These resources will complement your training, providing additional support and insights as you explore the world of Autodesk Maya. Explore the World of 3D Animation: Master the intricacies of 3D computer graphics and animation using Autodesk Maya. Delve into modeling, texturing, animation, and rendering to bring your creative visions to life. Practical Learning Experience: Dive into hands-on projects refining your skills. Craft 3D models, apply textures, animate characters, and produce polished renders. Recognized Industry Expertise: Gain proficiency in Autodesk Maya, a leading software in entertainment, gaming, and animation. Enhance your employability with highly sought-after skills, opening doors to diverse career paths. Endless Applications: Uncover Maya's versatility in entertainment, architectural visualization, product design, and more. Tailor your expertise to align with your passions and career aspirations. Reinforcement through Recordings: Access comprehensive lesson recordings for thorough review. Revisit specific topics, reinforcing your grasp of Autodesk Maya at your own pace. Continuous Guidance: Receive lifetime email support for ongoing mentorship. Seek answers, clarifications, and expert advice, ensuring your continuous growth even after completing the course.

Comprehensive 3ds Max Course Fundamentals to Intermediate Online or In-Person Training
By Real Animation Works
Face to face training customised and bespoke. Online or Face to Face

Complete Rhino 3D and V-Ray Training Program: Basic to Intermediate
By ATL Autocad Training London
Why Choose Complete Rhino 3D and V-Ray Training Program: Basic to Intermediate? Learn Rhino 3D and V-Ray for Rhino Basic to Intermediate Training Course. Suitable for beginners and experienced users alike, this program equips you with vital modeling and rendering skills. Opt for in-person or live online sessions. Click here for more info: Website Duration: 16 hours. Approach: 1-on-1 Sessions, Customized Content and Flexible Learning. Scheduling Flexibility: Tailor your sessions from Mon to Sat between 9 am and 7 pm. Course Title: Complete Rhino 3D and V-Ray Training Program: Basic to Intermediate - 16 Hours Session 1-2: Introduction to Rhino 3D Basics (2 hours) Understanding Rhino Interface: Navigating toolbars, command line, and properties panel. Basic Geometric Shapes: Creating lines, circles, and polygons with precision. Editing Tools: Mastering move, rotate, scale, and mirror commands. Session 3-4: Advanced Rhino 3D Modeling Techniques (2 hours) Curves and Surfaces: Delving into NURBS curves, creating complex surfaces, and blending techniques. Modeling Aids: Utilizing grids, snaps, and construction planes for accuracy. Organizing with Layers: Managing complex projects efficiently. Session 5-6: Introduction to V-Ray for Rhino (2 hours) V-Ray Interface: Understanding V-Ray toolbar and settings. Basic Lighting: Exploring different light types and their effects on scenes. Materials: Creating realistic materials, understanding diffuse, reflection, and transparency. Session 7-8: Intermediate V-Ray Concepts (2 hours) Advanced Lighting: Mastering HDRI lighting, creating natural outdoor lighting scenarios. Texture Mapping: Understanding UV mapping, applying textures seamlessly. Rendering Optimization: Reducing noise, optimizing settings for quicker, high-quality renders. Session 9-10: Rhino-V-Ray Integration (2 hours) Model Preparation: Optimizing Rhino models for V-Ray rendering. Advanced Material Manipulation: Creating complex materials, incorporating textures. Interactive Rendering: Real-time adjustments for immediate feedback. Session 11-12: Advanced Modeling Techniques in Rhino (2 hours) Advanced Surface Modeling: Creating organic shapes, advanced surfacing techniques. Precision Modeling: Advanced curve editing, filleting, and trimming. Working with 3D Text: Creating custom 3D text for design projects. Session 13-14: Scene Composition and Presentation (2 hours) Camera Settings: Understanding focal length, depth of field, and perspective. Scene Composition: Design principles, rule of thirds, focal points, and balance. Post-Processing: Enhancing renders in Photoshop, adding atmosphere and context. Session 15-16: Final Project and Portfolio Review (2 hours) Final Project Work: Participants apply learned skills to create a complex 3D scene. Instructor-led Critique: Feedback session for final projects. Portfolio Guidance: Tips for selecting the best works for a professional portfolio. By the end of this 16-hour course, participants will have a deep understanding of both Rhino 3D and V-Ray, allowing them to create intricate 3D models and produce high-quality, realistic renders for various applications. Upon completing the Rhino 3D and V-Ray Basic to Intermediate Training Course, participants can expect to achieve the following learning outcomes: Proficiency in Rhino 3D and V-Ray: Develop a comprehensive understanding of Rhino 3D and V-Ray interfaces, tools, and functionalities, enabling participants to navigate and utilize the software effectively. 3D Modeling Skills: Master the art of creating captivating 3D objects and shapes using Rhino 3D, including editing, transforming, and refining designs for diverse applications. Material Application: Acquire the ability to apply and customize materials and textures to enhance the visual appeal and realism of 3D models, elevating the quality of designs. Lighting Techniques: Gain expertise in utilizing V-Ray lighting tools, such as V-Ray lights and HDRI maps, to achieve striking lighting effects in rendered scenes. Rendering Excellence: Learn to optimize V-Ray render settings, control global illumination, and apply dynamic effects like depth of field and motion blur for high-quality and impressive renders. Advanced Modeling: Develop skills in advanced modeling techniques, including handling curves, surfaces, and solids, enabling participants to tackle complex design challenges. Lighting Mastery: Acquire the knowledge and expertise to create and adjust artificial lights, utilize the Sun and Sky system, and craft custom HDR images for realistic lighting setups. Seamless File Management: Understand various file formats for exporting and importing 3D models, facilitating efficient collaboration and preparation for 3D printing. Creative Problem-Solving: Enhance creative thinking and problem-solving abilities through hands-on practice and exploration of diverse design scenarios. Professional Presentation: Learn post-production techniques in Photoshop to enhance renders and create visually appealing design presentations for effective communication. Continuous Learning: Access valuable resources and tips to encourage continuous learning and professional growth in Rhino 3D and V-Ray. Skills You'll Gain: Master Rhino 3D basics: Curves, surfaces, modeling aids, and precision techniques. Explore intermediate V-Ray concepts: Advanced lighting, material manipulation, and texture mapping. Understand Rhino-V-Ray integration for seamless 3D modeling and rendering workflows. Optimize render settings for high-quality output and reduced rendering times. Career Opportunities: Upon completing this program, you'll be prepared for various roles in the design and visualization industry, such as: 3D Modeler: Create detailed 3D models for diverse industries, including architecture and product design. Architectural Visualizer: Produce realistic architectural visualizations for presentations and marketing materials. Product Designer: Develop visually appealing product prototypes and visualizations for marketing and manufacturing. Visualization Specialist: Work in design studios, advertising agencies, or game development companies, creating immersive visual content. Freelance Designer: Offer your skills on platforms like Upwork or Fiverr, providing 3D modeling and rendering services to clients worldwide. Solidify Rhino 3D Expertise: Master foundational modeling skills, including intricate geometries and surface manipulation, establishing a robust foundation for your 3D design journey. Unlock V-Ray for Rhino: Explore the potential of V-Ray for Rhino, learning to create mesmerizing visualizations and achieve lifelike rendering results that bring vitality to your designs. Enhance Visual Appeal: Grasp advanced lighting techniques, material application, and texture methods to elevate the visual allure of your 3D creations, making them more immersive and authentic. Explore Advanced Concepts: Delve into optimizing rendering settings, post-production tactics, and efficient workflows, advancing your design proficiency to higher levels. Hands-On Experience: Engage in practical exercises and real-world projects, applying your skills in practical contexts to enrich your portfolio and showcase your capabilities effectively. Certification of Achievement: Receive a valuable Certificate of Completion, confirming your expertise in Rhino 3D and V-Ray for Rhino, enhancing your professional credibility as a skilled designer. Flexible Learning Paths: In-Person or Live Online: Opt for in-person sessions, fostering collaborative learning, or choose live online classes for convenience and accessibility, tailoring your learning experience to your preferences. Personalized Guidance: Regardless of your chosen format, benefit from tailored instruction and guidance, ensuring optimal learning outcomes and continuous support throughout the course.
Rhino 2D | 3D Training Course for Jewellery Design
By London Design Training Courses
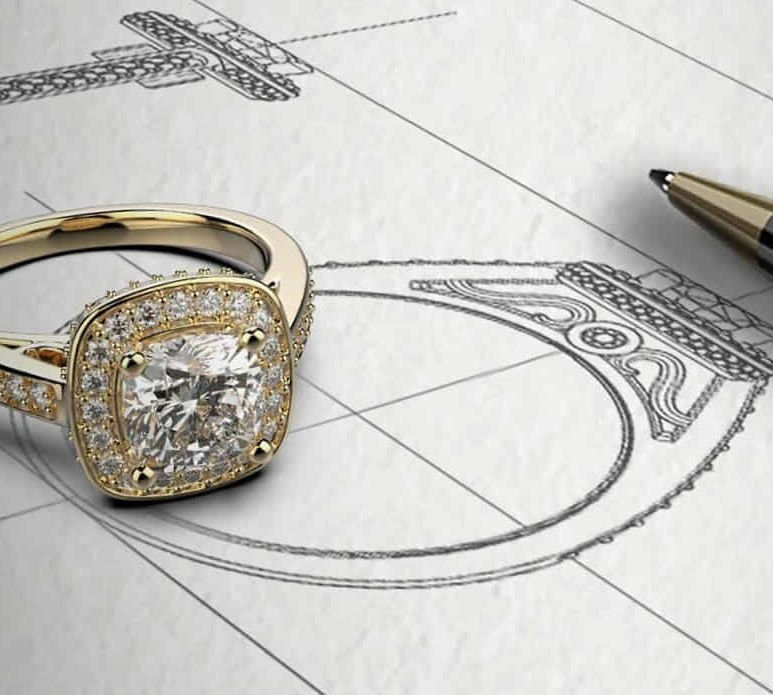
Why Opt for the Rhino 3D Training Course in Jewelry Design? Click here for more info Within a span of 10 hours, you'll master the interface and gain insights into how Rhino leverages points, lines, surfaces, and solids to fashion printable 3D objects. Moreover, you'll explore the art of crafting repetitive and intricate geometric shapes, perfect for creating minimalist and elegant jewelry. Flexible Scheduling: 1-on-1 training sessions tailored to your schedule. Pick any hour between 9 am and 7 pm from Mon to Sat. Course Duration: 10 hours. Training Methods: Choose between in-person sessions or live online training. Why Choose Our Rhino 3D Training Course for Jewelry Design? Rhino, also known as Rhinoceros, stands as a robust 3D computer graphics and computer-aided design software extensively utilized in various industries, including architecture, industrial design, and multimedia. LDTC offers meticulously crafted Rhino courses to empower you in mastering this software. Led by experienced instructors, our courses ensure a comprehensive understanding of Rhino, equipping you to create exceptional designs, specifically tailored for jewelry creation. Rhino 3D Training for Jewelry Design: Our Rhino 3D training caters to both beginners and those aspiring to acquire advanced techniques, emphasizing its application in jewelry design. Course Highlights: Precise 3D Modeling: Master the art of crafting free-form 3D NURBS models with utmost precision. Advanced Functionality: Explore Rhino's advanced surfacing commands and features tailored for jewelry design. User Interface Mastery: Navigate Rhino's interface seamlessly and refine your skills in curves, surfaces, and solids. Expert Guidance: Acquire expertise in Rhino's modeling environment under the guidance of seasoned professionals. Modeling Why Choose Our Rhino 3D Training Course for Jewelry Design? Rhino, also known as Rhinoceros, stands as a robust 3D computer graphics and computer-aided design software extensively utilized in various industries, including architecture, industrial design, and multimedia. LDTC offers meticulously crafted Rhino courses to empower you in mastering this software. Led by experienced instructors, our courses ensure a comprehensive understanding of Rhino, equipping you to create exceptional designs, specifically tailored for jewelry creation. Rhino for Jewelry Design - 16-Hour Course Module 1: Introduction and Navigation Get acquainted with Rhino's interface, menus, and screen layout. Navigate Rhino models with precision in 2D lines, polylines, and NURBS curves. Use modeling setup features like snap, ortho, and planar constraints for accuracy. Leverage object snaps and Smart Track functionality for enhanced precision. Module 2: Solid and Surface Modeling Fundamentals Rapidly develop 3D solids and surfaces using Rhino's organized layering system. Utilize coordinates and constraints for meticulous modeling in 3D space. Create diverse shapes, including rectangles, circles, arcs, ellipses, and polygon curves. Enhance models with Rhino render, render color, and free-form curves. Efficiently handle model views with pan, zoom, and view management tools. Implement various editing commands for curve manipulation and transforming curves into surfaces and solids. Utilize history tracking for advanced editing and execute general editing actions. Module 3: Intermediate Edit and Surfacing Techniques Introduce essential NURBS modeling concepts and terminologies. Edit curves and surfaces through control point manipulation and rebuilding for optimal refinement. Use the nudge modeling aid for precise adjustments and generate deformable shapes. Create curves through projection techniques and split surfaces using curves and surfaces. Blend surfaces seamlessly, utilizing symmetry tools, lighting, and rendering effects. Convert intricate 3D objects into detailed 2D drawings and craft page layouts. Module 4: Advanced Surfacing and Solid Modeling Techniques Construct model primitives and solid text using techniques such as pipe and extrusion. Efficiently modify solids using Boolean tools, expanding surface modeling capabilities. Utilize techniques like extrusion, lofting, and revolving for intricate surfaces. Create sweeps using 1 and 2 rail curves and master surface network techniques for complex shapes. Downlaod Rhino. Upon completion of the Rhino 3D Training Course for Jewelry Design, participants can expect the following learning outcomes: Mastering Rhino Interface: Gain a comprehensive understanding of Rhino's interface, menus, and screen layout. Precision in Modeling: Navigate Rhino models with precision using 2D lines, polylines, and NURBS curves. Modeling Setup Proficiency: Utilize modeling setup features such as snap, ortho, and planar constraints for accurate designs. Enhanced Navigation Techniques: Leverage object snaps and Smart Track functionality for enhanced precision during navigation. Solid and Surface Modeling Skills: Rapidly develop 3D solids and surfaces with Rhino's organized layering system. Coordination and Constraint Application: Utilize coordinates and constraints for meticulous modeling in 3D space. Diverse Shape Creation: Create diverse shapes, including rectangles, circles, arcs, ellipses, and polygon curves. Rendering and Enhancement Techniques: Enhance models with Rhino render, render color, and free-form curves. Efficient Model View Handling: Efficiently handle model views with pan, zoom, and view management tools. Intermediate Edit and Surfacing Techniques: Edit curves and surfaces through control point manipulation and rebuilding for optimal refinement. NURBS Modeling Mastery: Introduce essential NURBS modeling concepts and terminologies. Advanced Editing and Modeling Skills: Use the nudge modeling aid for precise adjustments and generate deformable shapes. Complex Shape Creation: Create sweeps using 1 and 2 rail curves and master surface network techniques for intricate shapes. Solid Modeling Proficiency: Construct model primitives and solid text using techniques such as pipe and extrusion. Application of Boolean Tools: Efficiently modify solids using Boolean tools, expanding surface modeling capabilities. Advanced Surfacing Techniques: Utilize techniques like extrusion, lofting, and revolving for intricate surfaces. Conversion and Crafting of 2D Drawings: Convert intricate 3D objects into detailed 2D drawings and craft page layouts. Hands-On Project Experience: Engage in practical exercises and hands-on projects tailored for jewelry design applications. Upon mastering these skills, participants will be well-equipped to create sophisticated jewelry designs using Rhino 3D modeling software.
The 'people side' of projects (In-House)
By The In House Training Company
Running a successful project requires skills in planning, budgeting, tracking deliverables and stakeholder management. An area that can be neglected by project managers is the 'people side' - not the project team themselves but the end-users, those who will be affected by the project. Too often there is a single line at the end of the project plan that says 'Comms and Training'. If people are going to have to work differently and learn some new processes, then there is work to be done by the project team to help them through the emotional side of the change. This session explores why it's important to bring people along when a change is being made. It will provide project teams with the skills and knowledge either to manage the people change plan themselves or to secure the right resources for their project. Understand the importance of the 'people side' of change 8 'Golden Rules' of change management - overview How to create a simple but effective change plan Adoption Benefits of good change management 1 Introduction Objectives and agenda People and projects - why is it important? The Change Curve - the emotional side of change 2 8 'Golden Rules' of change management - including... Role of the sponsor Communication Resistance to change 3 Change plan Elements of a change plan Change impact assessment Alignment with the project plan 4 Adoption Who owns the change? The vital role of the manager Feedback and action loops 5 Benefits Estimating the costs / benefits 6 Next steps Summary of key learning points Reflection on next steps 7 Close
