- Professional Development
- Medicine & Nursing
- Arts & Crafts
- Health & Wellbeing
- Personal Development
812 Construction courses
Vectorworks Garden Design Training
By London Design Training Courses
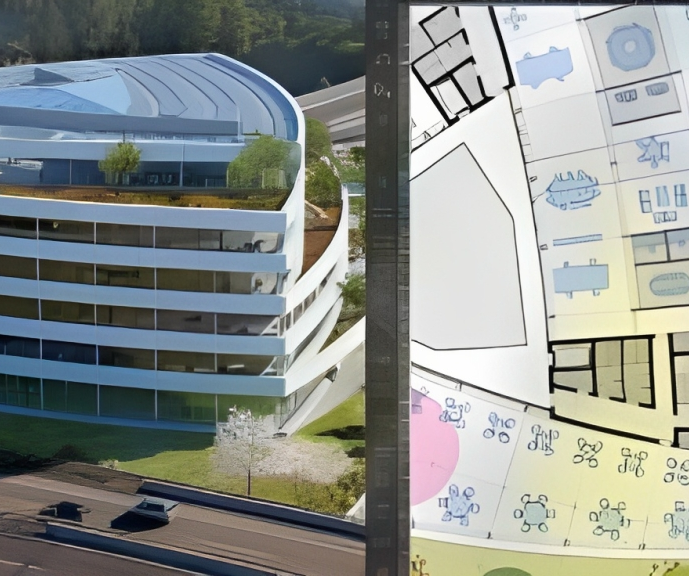
Why choose Vectorworks Garden Design Training Course? Vectorworks, a user-friendly industry-standard software, is perfect for interior design, architectural planning, 3D modeling, and landscaping projects. Its versatility makes it suitable for both home enthusiasts and professionals. Course Info Scheduling: 1-on-1 training, your schedule. Book any hour, Mon to Sat, 9 am - 7 pm. Call 02077202581 to reserve. Duration: 16 hours. Method: In-person face-to-face sessions and live online instruction. Vectorworks Garden Design Training Course: Master the art of garden design with Vectorworks software in our specialized training program. Led by certified tutors and industry experts, this course equips you with comprehensive skills and techniques tailored to garden design. Create stunning 2D layouts and 3D landscapes, visualize designs, and produce professional documentation for your projects. Benefits: In-Person and Live Online Options: Choose between in-person or live online sessions for flexible learning. Certified Tutors and Experts: Learn from experienced tutors passionate about garden design. Comprehensive Curriculum: Cover essential aspects of garden design using Vectorworks. Lesson Recordings: Access valuable session recordings for review and reinforcement. Lifetime Email Support: Receive ongoing assistance from industry experts for continuous growth. Course Duration: 16 hours Course Description: This advanced Vectorworks course is tailored for individuals who already possess basic knowledge of the software and wish to enhance their skills to become proficient users. Participants will learn more advanced 2D and 3D techniques, including advanced 3D modeling, rendering, visualization, and customizing Vectorworks to suit their specific needs and workflows. The course will cover topics such as creating custom tools, working with planting plans, and integrating with AutoCAD. Course Outline: Module 1: Vectorworks Interface and Basic Concepts - Understanding the Vectorworks interface and palettes - Opening, saving, and managing files - Creating and editing objects and shapes - Utilizing Undo/Redo and Snaps for precision - Applying graphic attributes and working with dimensions Module 2: Modeling and Drawing Techniques - Exploring advanced tools and commands in detail - Integrating with AutoCAD and data exchange - Creating, modifying, and editing text - Utilizing callout text tool for annotations - Organizing information using design layers and classes Module 3: Working with Buildings and Models - Utilizing design layers and sheet layers for architectural projects - Assigning objects to layers and classes - Working with viewports and sheet layers for presentation - Drawing buildings, including walls and roofs - Setting up and rendering perspective views Module 4: Creating Site and Landscape Plans - Importing land surveys or architects' files - Drawing site surveys and working with hard landscape elements - Adding and customizing plantings using the plant tool - Editing plant definitions and creating custom plant symbols - Generating plant schedules and reports Module 5: Vectorworks Architect Features - Setting up files and scaling the drawing - Customizing text styles and dimension standards - Working with scanned images and creating site models - Designing floors, doors, and windows using standard Vectorworks elements - Creating and managing title blocks, labels, notes, and keynotes Module 6: Working Drawings and Final Project - Developing the final project with 2D and 3D elements - Applying site modifiers and stairs to the design - Generating printing layouts for presentations - Creating working drawings with detailed plans and elevations Download Vectorworks Trial https://www.vectorworks.net/trial Proficiently use Vectorworks software for garden design, including creating accurate site plans and garden layouts. Apply 2D and 3D modeling techniques to visualize garden designs and present them professionally. Incorporate plants, hardscape elements, and other design elements into garden layouts effectively. Generate detailed construction drawings for seamless implementation of garden projects. Understand the key features and functionalities of Vectorworks specific to garden design. Demonstrate proficiency in utilizing Vectorworks tools for various garden design tasks. Interact collaboratively in face-to-face or online learning environments, engaging with instructors and peers. Utilize lesson recordings to review and reinforce course concepts for continuous learning. Seek personalized guidance and assistance through lifetime email support from certified tutors and industry experts. Transform creative garden design ideas into practical and stunning real-world projects using Vectorworks software.
Introduction to Exploration and Production for New Engineers and Non-Technical Professionals in Oil & Gas (2 Days)
By EnergyEdge - Training for a Sustainable Energy Future
Enhance your knowledge of exploration and production in oil & gas with EnergyEdge's course. Ideal for new engineers and non-technical professionals.

Economic and Financial Analysis of Renewable Energy, Storage and Hydrogen
By EnergyEdge - Training for a Sustainable Energy Future
Enhance your knowledge of economic and financial analysis in renewable energy storage and hydrogen with EnergyEdge's course. Enroll now!

Autodesk AutoCAD | 3ds Max Training
By London Design Training Courses
Why Learn Autodesk AutoCAD | 3ds Max Training Course? Course Link 3ds Max serves as a powerful tool in architectural modeling, product design, games and films. Engaging with 3ds Max tutorials proves invaluable, particularly for game designers, as it can significantly enhance their professional growth and career prospects. Duration: 16 hrs Method: 1-on-1, Personalized attention. Schedule: Tailor your own schedule by pre-booking a convenient hour of your choice, available from Mon to Sat between 9 am and 7 pm. AutoCAD and 3ds Max Training Course: Tailored Learning Experience: Benefit from personalized, one-on-one training tailored to your individual needs and learning pace. Flexibility in Learning: Choose between attending in-person sessions or participating in live online classes, granting you the flexibility to learn from anywhere at your convenience. Accessible Lesson Recordings: Access recorded lessons to revisit concepts, practice techniques, and reinforce your understanding whenever you need. Ongoing Email Support: Receive continuous assistance and expert guidance through lifetime email support, ensuring you never feel left behind in your learning journey. Learn from Certified Tutors and Industry Experts: Be educated by experienced professionals proficient in both Autodesk AutoCAD and 3ds Max, providing valuable insights into industry best practices. Complimentary Career Advice: Take advantage of our career advisory services to receive valuable guidance in navigating your professional path and making informed decisions. Download Autodesk Autocad and 3ds max AutoCAD and 3ds Max Training Course. Course Duration: 16 hours Course Overview: Join our training program to master AutoCAD and 3ds Max. Suitable for beginners and experienced 2D/3D modelers, this course equips you with essential skills to create stunning designs in both 2D and 3D. Course Outline: Part 1: Introduction to AutoCAD Familiarizing with the AutoCAD interface Understanding the drawing environment Mastering basic 2D geometry creation Exploring essential drawing tools and commands Introduction to blocks and symbols for efficient design Part 2: Advanced AutoCAD Techniques Delving into advanced drawing techniques Manipulating and editing 2D geometry like a pro Creating custom symbols and blocks for enhanced productivity Working with text and annotations for clear communication Utilizing layers and line types for organized design Part 3: Plans sections and Elevations Entering the realm of Plans sections and Elevations Crafting Plans and 2D construction detailing precision Modifying and manipulating 2D seamlessly Crafting custom materials and textures for realistic designs Part 4: Introduction to 3ds Max Embracing the 3ds Max interface and workspace setup Mastering navigation within 3ds Max Understanding the viewport for optimized design Exploring basic 3D modeling techniques in 3ds Max Part 5: Materials and Textures in 3ds Max Applying and modifying textures to elevate designs Unraveling the art of UVW mapping for precise texturing Utilizing the material editor for creative freedom Crafting custom materials to suit your design vision Harnessing the power of Vray materials for realistic renders Part 6: Lighting in 3ds Max Introducing various lighting techniques Understanding light properties for impactful designs Setting up lights strategically to enhance scenes Illuminating scenes using Vray lights Part 7: Cameras in 3ds Max Mastering camera systems in 3ds Max Exploring camera properties for cinematic effects Creating animation with cameras for dynamic scenes Utilizing Vray cameras to achieve stunning renders Part 8: Rendering in 3ds Max Unveiling the art of rendering Utilizing Vray Global Illumination for realistic lighting Leveraging Vray Physical Cameras for precise control Enhancing scenes with Vray HDRI Lighting Following a Vray Rendering Workflow for professional results Part 9: Advanced Modeling Techniques Crafting complex geometry with finesse Utilizing modifiers for intricate designs Exploring polygonal modeling for versatile creations Creating organic and inorganic models with expertise Unleashing the potential of advanced modeling techniques Part 10: Projects Applying all learned skills to create real-world scenes Designing a simple interior scene with attention to detail Crafting a captivating exterior scene for visual impact Creating a complex scene with multiple objects and materials Course Requirements: A computer with AutoCAD and 3ds Max installed Basic knowledge of computer operations An interest in 2D and 3D modeling and design

Rhino 3D Evening Training
By London Design Training Courses
Who Should Attend Rhino 3D Evening Training Course? Click here for info. This Evening Course is for individuals seeking to learn 2D and 3D modeling skills in a supportive and creative learning environment. Whether you are new to Rhino or want to expand your existing knowledge, this course is for product, furniture, architectural, and jewelry design industries. Duration: 10 hrs Method: 1-on-1, Personalized attention Schedule: Tailor your own schedule hours of your choice, available from Mon to Sat between 9 am and 7 pm Course Inclusions: Free Lifetime email support: Enjoy the flexibility of a free lifetime email support. Expert Instruction: Learn from experienced architects, designers, and software professionals, ensuring top-notch teaching. Hands-On Learning: Engage in practical, hands-on lessons with personalized project work to apply your skills effectively. Digital Reference: Access valuable video tutorials and a digital reference book for convenient revision and continuous development. London Design Training Course Certificate of Completion: Receive a certificate upon course completion, enhancing your CV and LinkedIn profile. Free Career Guidance: Benefit from career guidance, including tips on job applications and setting up a creative business, to stand out in the competitive design industry. Rhino 3D Basic to Intermediate Training Course Course Duration: 10 hours Introduction to Rhino and Interface: Familiarizing with Rhino's command system and toolbar usage. Navigating the geometry menus, command line, and status bar efficiently. Understanding the Properties window and its functionalities. Managing file operations, including opening and saving files. Grasping the three entity types: curves, surfaces, and solids. Exploring various geometric elements, such as Bezier curves, B-splines, NURBS objects, isocurve surfaces, and mesh surfaces. Setting measurement units for accurate modeling. Navigation: Introducing the viewport and its features. Using construction planes to aid in modeling. Utilizing shading modes for better visualization. Learning essential viewport controls: pan, zoom, rotate, and reset. Workflow Basics: Creating basic objects like curves, surfaces, and solids. Performing fundamental transformations to manipulate objects. Organizing projects efficiently using layers. Drawing: 2D Geometry: Understanding the creation of lines, polylines, rectangles, polygons, arcs, circles, and ellipses. Drawing freeform curves for more creative designs. Modeling: 3D Surfaces: Comparing various 3D surface types. Utilizing extrusion to add features to models. Creating surfaces with loft, revolve, rail revolve, sweep rail, and network surface commands. Constructing complex surfaces with the Network Surface tool. Modeling: 3D Solids: Introducing solid modeling techniques. Creating solids with primitives and curves. Applying Boolean operators to create unique shapes. Editing solids using the solid edit tool. Transforming solids and incorporating modeling aids like Grid Snap, Ortho, and Planar. Editing and Transforming Objects: Using Fillet and Chamfer to edit corners. Employing curve Booleans for trimming and splitting. Mastering the Drag and Nudge tools for object movement and rotation. Copying, pasting, and grouping objects effectively. Scaling and duplicating objects with the Mirror command. Analysis and Degrees: Understanding degrees of curves and surfaces. Creating screen captures for quick proofs. Generating 2D views and rendering projects. Preparation for 3D Printing and Manufacturing: Preparing models for prototyping by ensuring closed gaps. Using the shell technique to create wall thickness suitable for 3D printing.

Vectorworks Intermediate Training Course
By ATL Autocad Training London
Who is this course for? Vectorworks Intermediate Training Course. This intermediate course empowers designers with Vectorworks skills, enhancing productivity and enabling the creation of intricate, high-quality designs. Design career with this essential training. Vectorworks courses cater to individuals of all skill levels. Click here for more info: Website Scheduling: 1-on-1 training, your schedule. Book any hour, Mon to Sat, 9 am - 7 pm. Call 02077202581 to reserve. Duration: 16 hours. Method: In-person sessions and live online. Comprehensive Course Outline Please note that the following is a general outline, and the specific topics covered during your training will be tailored to your student level, available time, and course preferences. Essential Foundations Navigating the Interface and User-Friendly Navigation Document Settings Adjustment and Template File Creation Effective File Navigation: Zooming, Panning, and Page Fitting Object Selection Techniques and Deletion Creating Basic Drawings with Precision Utilizing Object Snaps for Accurate Drawing Understanding the Object Info Palette Exploring Fundamental 2D Tools and Tool Modes Crafting Complex Lines and Shapes Project Organization Efficiently Organizing Your Drawings Using Classes Customizing Colors, Line Types, and Line Thickness Views Management: Saving and Editing Views Annotating and Printing Your Designs Adding Text and Annotations Incorporating Dimensions for Clarity Preparing and Printing Your Drawings Advanced Presentation Techniques Leveraging the Power of Sheets and Viewports Creating Standard and Cropped Viewports Annotating and Editing Viewports Exploring Viewport Display Overrides and Sheet Layer Printing Streamlining Workflows Between Viewports and Design Layers Efficiently Saving and Editing Views for Navigation Enhancement Importing DWG and File Formats Importing and Effectively Working with DWG Files Integrating Sketches and Photos into Your Drawings Enhancing Efficiency Creating and Editing Symbols Resource Browser: Management and Organization of Symbols Maximizing Productivity with Worksheets, Schedules, and Reports Custom Attribute Creation and Management (Hatches, Gradients, and Image Fills) Designing Custom Title Blocks Free 30-day Trial Vectorworks https://www.vectorworks.net/trial After completing this course, you will: Master Vectorworks: Gain proficiency in Vectorworks software, including its interface and essential design tools. Precise Drawing: Create accurate drawings with dimensions and object snaps. Project Management: Efficiently organize and manage design projects using classes and views. Clear Presentation: Annotate and dimension your drawings for professional presentations and printing. Advanced Presentation: Learn advanced presentation techniques, including sheets and viewports. File Integration: Work with DWG files, sketches, and photos to enhance your designs. Efficiency Boost: Discover time-saving workflows, symbol creation, and customization. Top Job Opportunities for Designers: Architectural Drafter Interior Designer Landscape Designer CAD Technician Graphic Designer Construction Estimator Product Designer Set Designer Event Planner Urban Planner These roles span various industries and offer career growth for Vectorworks-trained designers in fields like architecture, engineering, entertainment, and more. Tailored Vectorworks Training Our Vectorworks courses are customized to your needs, offering 1-2-1 sessions that adapt content to your expertise, experience, and project requirements. Whether in class, onsite, or via live online sessions, these bespoke courses ensure optimal learning outcomes. Course Overview Begin your journey into Vectorworks, unlocking the potential for digital 2D and 3D visualization in interior design, architecture, 3D modeling, and landscaping. Vectorworks, a user-friendly industry-standard software, is suitable for both PC and Mac users. Course Highlights Master proper drawing setup and utilize 2D drawing tools for professional plans and elevations. Navigate and leverage the built-in symbol library effectively. Transform 2D plans into fully rendered 3D perspectives with textures and lighting. Create a comprehensive project presentation print. (Note: This course does not cover complex curved shapes.) Tailored Training | Vectorworks Personalized One-on-One Guidance Flexible Learning Schedule Ongoing Post-Course Support Access to Extensive Learning Materials Recognition with a Certificate of Attendance Affordable Training Rates Assistance with Software Configuration Rewards for Referrals Special Group Training Discounts Convenient Hours to Suit Your Schedule Customized Courses for Your Animation Needs

Introduction to Exploration and Production for New Engineers and Non-Technical Professionals in Oil & Gas (2 Days)
By EnergyEdge - Training for a Sustainable Energy Future
Enhance your knowledge of exploration and production in oil & gas with EnergyEdge's course. Ideal for new engineers and non-technical professionals.

Introduction to Floating Production, Storage and Offloading Vessels (FPSO) – Design & Technology
By EnergyEdge - Training for a Sustainable Energy Future
Join Energy Edge's FPSO design and technology course to gain essential knowledge on floating production systems. Elevate your skills in the energy sector.