- Professional Development
- Medicine & Nursing
- Arts & Crafts
- Health & Wellbeing
- Personal Development
118 Collaboration courses in Warlingham
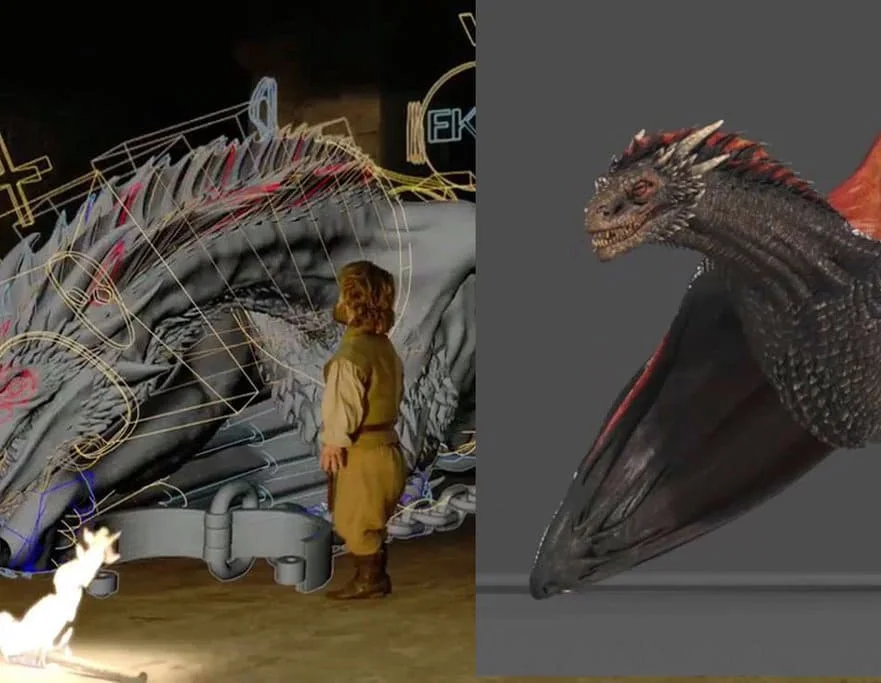
Diploma in Visual Effects for Film and Television Animation
By ATL Autocad Training London
Who is this course for? The Diploma in Visual Effects for Film and Television Animation is tailored for individuals aspiring to work in the Visual Effects, TV, Film, and 3D animation industry. Gain essential skills necessary for a successful career in these fields. Click here for more info: Website Duration: 120 hours of 1-on-1 Training. When can I book: 9 am - 4 pm (Choose your preferred day and time once a week). Monday to Saturday: 9 am - 7 pm (Flexible timing with advance booking). Course Overview for a 120-Hour Diploma Program in Game Design and Development Term 1: Introduction to Game Design and 3D Modeling (40 hours) Module 1: Introduction to Game Design (1 hour) Understanding the game development industry and current trends Exploring game mechanics and fundamental design principles Introduction to the game engines and tools utilized in the program Module 2: 3D Modeling with 3ds Max (25 hours) Familiarization with 3ds Max and its user interface Mastering basic modeling techniques like box modeling and extrusion Advanced modeling skills including subdivision and topology Texturing and shading techniques tailored for game development Module 3: Character Design and Animation (10 hours) Introduction to character design and its developmental process Creating and rigging characters specifically for games Keyframe animation techniques for character movement Term 2: Game Development and Unity 3D (40 hours) Module 4: Unity 3D Basics (20 hours) Navigating Unity 3D and understanding its interface Grasping fundamental game development concepts within Unity Creating game objects, writing scripts, and designing scenes Introduction to scripting using C# Module 5: Advanced Game Development with Unity 3D (10 hours) Constructing game mechanics including UI, scoring, and game states Working with physics and collision systems in Unity Crafting intricate game environments and level designs Module 6: Game Assets with Photoshop (10 hours) Exploring Photoshop tools and features for game asset creation Crafting game elements such as textures, sprites, and icons Optimizing assets for seamless integration into game development Term 3: Advanced Game Design and Portfolio Development (40 hours) Module 7: Advanced Game Design (20 hours) Delving into advanced game design concepts like balancing and difficulty curves Understanding player psychology and methods for engaging audiences Implementing game analytics and user testing for refinement Module 8: Portfolio Development (24 hours) Building a comprehensive portfolio showcasing acquired skills Effective presentation techniques for showcasing work Establishing a professional online presence and networking strategies Final Project: Creating and presenting a collection of best works in collaboration with tutors and fellow students Please note: Any missed sessions or absence without a 48-hour notice will result in session loss and a full class fee charge due to the personalized one-to-one nature of the sessions. Students can request pauses or extended breaks by providing written notice via email. What can you do after this course: Software Proficiency: Master industry-standard design tools for architectural and interior projects. Design Expertise: Develop a deep understanding of design principles and spatial concepts. Visualization Skills: Acquire advanced 2D/3D rendering and virtual reality skills for realistic design representation. Communication and Collaboration: Enhance communication skills and learn to collaborate effectively in design teams. Problem-Solving: Develop creative problem-solving abilities for real-world design challenges. Jobs and Career Opportunities: Architectural Visualizer Interior Designer CAD Technician Virtual Reality Developer 3D Modeler Project Coordinator Freelance Designer Visualization Consultant Students can pursue these roles, applying their expertise in architectural and interior design across various professional opportunities. Course Expectations: Maintain a dedicated notebook to compile your study notes. Schedule makeup sessions for any missed coursework, subject to available time slots. Keep meticulous notes and maintain a design folder to track your progress and nurture creative ideas. Allocate specific time for independent practice and project work. Attain certification from the esteemed professional design team. Post-Course Proficiencies: Upon successful course completion, you will achieve the following: Develop confidence in your software proficiency and a solid grasp of underlying principles. Demonstrate the ability to produce top-tier visuals for architectural and interior design projects. Feel well-prepared to pursue positions, armed with the assurance of your software expertise. Continued Support: We are pleased to offer lifetime, complimentary email and phone support to promptly assist you with any inquiries or challenges that may arise. Software Accessibility: Access to the required software is available through either downloading it from the developer's website or acquiring it at favorable student rates. It is important to note that student software should be exclusively utilized for non-commercial projects. Payment Options: To accommodate your preferences, we provide a range of payment options, including internet bank transfers, credit cards, debit cards, and PayPal. Moreover, we offer installment plans tailored to the needs of our students. Course Type: Certification. Course Level: Basic to Advanced. Time: 09:00 or 4 pm (You can choose your own day and time once a week) (Monday to Friday, 09 am to 7 pm, you can choose anytime by advance booking. Weekends can only be 3 to 4 hrs due to heavy demand on those days). Tutor: Industry Experts. Total Hours: 120 Price for Companies: £3500.00 (With VAT = £4200) For Companies. Price for Students: £3000.00 (With VAT = £3600) For Students.
Estimating for Business Analysts: In-House Training
By IIL Europe Ltd
Estimating for Business Analysts: In-House Training A business analyst does not have authority to estimate the project and will not be held responsible for the project staying within the proposed budget; however, the business analyst does participate in various planning exercises with the project team. Many times the business analyst is on his or her own, required to provide estimates of how long it will take to perform their tasks. This course acquaints you with the basics of estimating from the point of view of the business analyst, emphasizing time estimates for the work. It also covers some of the product cost estimates that a business analyst may have to provide when the business is performing a cost/benefit analysis for the project. What you will Learn You'll learn how to: Translate business needs and requirements into estimates Estimate durations using a variety of techniques Negotiate differences in estimates Getting Started Introductions Course structure Course goals and objectives Foundation Concepts The importance of estimating to a business analyst The good and bad of estimating The project context The meaning of good estimating Focuses of estimating Characteristics of a good estimate Estimating the Time Requirements Applicable BABOK® Knowledge Areas Business Analysis Planning and Monitoring Elicitation and Collaboration Estimating the elicitation Information Gathering Plan Relative times for elicitation activities Planning and estimating the business analysis approach and activities Planning the business analysis activities Impact of process Estimating the Product Estimating the value of the product Business analyst's role Defining and determining value Function and use case points Agile estimating Planning Poker Other agile estimating techniques Negotiating estimates Negotiation techniques Negotiation approaches Summary What did we learn, and how can we implement this in our work environment?

Estimating for Business Analysts
By IIL Europe Ltd
Estimating for Business Analysts A business analyst does not have authority to estimate the project and will not be held responsible for the project staying within the proposed budget; however, the business analyst does participate in various planning exercises with the project team. Many times the business analyst is on his or her own, required to provide estimates of how long it will take to perform their tasks. This course acquaints you with the basics of estimating from the point of view of the business analyst, emphasizing time estimates for the work. It also covers some of the product cost estimates that a business analyst may have to provide when the business is performing a cost/benefit analysis for the project. What you will Learn You'll learn how to: Translate business needs and requirements into estimates Estimate durations using a variety of techniques Negotiate differences in estimates Getting Started Introductions Course structure Course goals and objectives Foundation Concepts The importance of estimating to a business analyst The good and bad of estimating The project context The meaning of good estimating Focuses of estimating Characteristics of a good estimate Estimating the Time Requirements Applicable BABOK® Knowledge Areas Business Analysis Planning and Monitoring Elicitation and Collaboration Estimating the elicitation Information Gathering Plan Relative times for elicitation activities Planning and estimating the business analysis approach and activities Planning the business analysis activities Impact of process Estimating the Product Estimating the value of the product Business analyst's role Defining and determining value Function and use case points Agile estimating Planning Poker Other agile estimating techniques Negotiating estimates Negotiation techniques Negotiation approaches Summary What did we learn, and how can we implement this in our work environment?
Recognising and Responding to Acutely Unwell Individuals
By Guardian Angels Training
Gain the knowledge and skills to identify acute illness in patients with our "Recognising and Responding to Acutely Unwell Individuals" course. Improve patient outcomes and prevent deterioration in various healthcare settings. Enroll now.

Vectorworks Basic to Intermediate Course
By Real Animation Works
Revit face to face training customised and bespoke.
Vectorworks Basics to Intermediate Training
By London Design Training Courses
Why learn Vectorworks Basics to Intermediate Training Course? Course Link Vectorworks skills with our course! Led by certified expert tutors, this course takes you from basics to intermediate level, enabling you to create plans and sections. The course will cover 2D and 3D modeling, rendering, and visualization. Duration: 16 hrs. Method: 1-on-1, Personalized attention. Schedule: Tailor your own schedule by pre-booking a convenient hour of your choice, available from Mon to Sat between 9 am and 7 pm. At London Design Training Course, we offer a range of Vectorworks training options to meet your specific needs and those of your business. Explore the links below for detailed information about the various training types and their content. On-Site Training: London Design Training Course comes to your location, eliminating the need for you to travel. This approach allows us to fully understand your business culture and requirements. Training can be conducted in your studio or conference room, with scheduling flexibility tailored to your preferences. In-House Training: Our studio in London SW96DE, hosts In-House Vectorworks training for both individuals and groups. During the sessions, we provide the necessary software and hardware to ensure a seamless learning experience. Vectorworks Basic to Intermediate Course Course Duration: 16 hours The Vectorworks Basic to Intermediate Course is tailored for individuals with basic Vectorworks knowledge, aiming to master advanced 2D and 3D techniques, including modeling and rendering. Participants will customize Vectorworks to their needs, create custom tools, and automate tasks with scripting. I. Review of Basic Concepts (1 hour) - Vectorworks interface and navigation - Creating and editing 2D and 3D geometry - Working with layers and classes - Utilizing views and viewports II. Advanced 2D Drawing Techniques (2 hours) - Creating complex geometry using advanced drawing tools - Editing and modifying intricate geometry - Customizing line types and hatches - Utilizing advanced annotation tools III. Advanced 3D Modeling (3 hours) - Creating 3D forms and custom 3D objects - Exploring advanced 3D tools such as Solid Modeling - Converting 2D plans into 3D models IV. Visualization and Rendering (3 hours) - Setting up cameras and lights for visualization purposes - Utilizing the Renderworks engine for rendering - Enhancing visuals with the visualization palette - Creating and editing textures and materials V. Customizing Vectorworks (3 hours) - Personalizing the interface to suit specific preferences - Creating custom tools and automating tasks using the scripting language - Developing custom object styles and resources - Creating custom plug-ins and scripts VI. Collaboration and Sharing (2 hours) - Importing and exporting data from other software - Collaborating with others on the same project - Utilizing cloud-based collaboration tools VII. Conclusion and Next Steps (1 hour) - Review of course content and key skills learned - Tips for further learning and available resources - Q&A and feedback session Free 30-day, BIM & CAD Software Trial Request | Vectorworks https://www.vectorworks.net/trial Vectorworks Trial Version Request. Please fill out the following form. We will provide you with an evaluation serial number to activate your trial copy. Learning Outcomes of the Vectorworks Basics to Intermediate Training Course: Proficiency in Vectorworks interface, tools, and navigation. Master 2D drafting and 3D modeling skills. Efficiently manage workflows using layers, classes, and views. Spotlighting techniques for lighting design and stage productions. Advanced object manipulation with solid modeling and Boolean operations. Utilize the symbol library for enhanced productivity. Create professional presentation drawings using viewports and annotations. Integrate with other software and CAD/BIM workflows. Apply skills to real-world projects for practical application. Upon completing the course, participants will have essential skills to effectively use Vectorworks, advancing their proficiency to an intermediate level.

Enscape Rendering Training Course
By ATL Autocad Training London
Who is this course for? Enscape Rendering Training Course. The Enscape Rendering Training Course is tailored for architects, interior designers, and design students aiming to learn realistic visualizations using Enscape. Whether you prefer 1-on-1 in-person or online courses, this training is best for you. Click here for more info: Website Training duration: 5 hrs Method: 1-on-1 and Tailored content Schedule: Customize your training. Choose any hour from Mon to Sat, 9 am to 7 pm Call 02077202581 or WhatsApp at 07970325184 to book. Course Outline: Enscape Rendering Software Training (5 hours) Course 1: Enscape for Revit Hour 1: 1. Introduction to Enscape: Overview of Enscape rendering software, its features, and benefits. 2. Installing and Setting up Enscape: Step-by-step guidance on installing and configuring Enscape for Revit. 3. Enscape Interface: Familiarizing with the Enscape user interface and navigation controls within Revit. Hour 2: 4. Enscape Materials: Exploring material creation, application, and customization within Enscape for Revit. 5. Lighting in Enscape: Understanding different lighting options, adjusting light settings, and creating realistic lighting effects. Hour 3: 6. Enscape Camera Settings: Manipulating camera angles, perspectives, and settings for optimal visualization. 7. Enscape Rendering Settings: Exploring various rendering settings and techniques to enhance the quality of the final output. Hour 4: 8. Enscape Rendering Workflow: Demonstrating a step-by-step workflow for generating renderings and walkthroughs using Enscape in Revit. 9. Advanced Features: Introduction to advanced features such as creating panoramas, virtual reality (VR) walkthroughs, and creating animations in Enscape. Hour 5: 10. Tips and Tricks: Sharing tips and techniques for maximizing efficiency and achieving high-quality results in Enscape for Revit. 11. Q&A and Troubleshooting: Addressing participant questions, providing troubleshooting guidance, and discussing common challenges and solutions. OR Course Outline: Enscape Rendering Software Training (5 hours) Course 1: Enscape for Sketchup Hour 1: 1. Introduction to Enscape: Overview of Enscape rendering software, its features, and benefits for SketchUp users. 2. Installing and Setting up Enscape: Step-by-step guidance on installing and configuring Enscape for SketchUp. 3. Enscape Interface: Familiarizing with the Enscape user interface and navigation controls within SketchUp. Hour 2: 4. Enscape Materials: Exploring material creation, application, and customization within Enscape for SketchUp. 5. Lighting in Enscape: Understanding different lighting options, adjusting light settings, and creating realistic lighting effects. Hour 3: 6. Enscape Camera Settings: Manipulating camera angles, perspectives, and settings for optimal visualization in SketchUp. 7. Enscape Rendering Settings: Exploring various rendering settings and techniques to enhance the quality of the final output. Hour 4: 8. Enscape Rendering Workflow: Demonstrating a step-by-step workflow for generating renderings and walkthroughs using Enscape in SketchUp. 9. Advanced Features: Introduction to advanced features such as creating panoramas, virtual reality (VR) walkthroughs, and creating animations in Enscape. Hour 5: 10. Tips and Tricks: Sharing tips and techniques for maximizing efficiency and achieving high-quality results in Enscape for SketchUp. 11. Q&A and Troubleshooting: Addressing participant questions, providing troubleshooting guidance, and discussing common challenges and solutions. Learning Outcome: After completing the Enscape (VR) Training and Interactive Workshop, participants will master real-time walkthroughs, set up VR applications, efficiently migrate models, navigate designs dynamically, update objects in real-time, control visual styles, adjust day-time settings, export and share designs, utilize the asset library, and gain a comprehensive overview of Enscape. These skills will enable them to confidently visualize and display 3D designs without cloud uploads or external software, enhancing communication and collaboration in architectural projects. What does the Enscape Training & Interactive Workshop offer? The Enscape Training & Interactive Workshop is designed to help you get up and running with Virtual Reality (VR) in a cost-effective manner. It covers hardware and software setup, navigation techniques, real-time updates, material settings, and more. The workshop also allows participants to experience VR firsthand. What are the benefits of attending the Enscape (VR) Training and Interactive Workshop? By attending this workshop, you will gain the ability to perform real-time walkthroughs of your designs in 3D. You can view your projects in VR without the need for cloud uploads or exporting to other 3D software. The workshop offers extensive asset libraries, collaboration, and annotation sharing, enhancing your design visualization capabilities. What are the prerequisites for attending the Enscape (VR) Training and Interactive Workshop? No prior knowledge of Enscape is required. However, assistance from IT management may be necessary for hardware and software installation. Logistics, such as room suitability and technical requirements, will be discussed before the workshop. What will I learn in the Enscape (VR) Training and Interactive Workshop? The workshop covers hardware setup, software installation, and configuration. You will learn how to migrate models from Revit and SketchUp into VR, navigate through designs, update objects and materials in real-time, and utilize various visual styles and settings. The course also includes interactive workshops with support from our expert tutors. Enscape rendering courses offer valuable benefits: Real-time Visualization: Instantly visualize designs for quick iterations and informed decisions. Seamless Integration: Streamline rendering by integrating with popular design software. High-Quality Visuals: Create photorealistic presentations and walkthroughs. Efficient Design Communication: Enhance collaboration and communication during presentations. Enhanced Design Iteration: Explore options and make informed decisions in real-time. Time and Cost Savings: Reduce rendering time and deliver projects more efficiently. Portfolio Enhancement: Elevate your portfolio with visually striking renderings, opening new opportunities.

Emergency Response for Care Homes
By Guardian Angels Training
The "Emergency Response for Care Homes" course is designed to provide care home staff with essential knowledge and skills to effectively respond to a wide range of emergency situations. This course aims to reinforce and update the participants' understanding of emergency protocols, procedures, and best practices, ensuring a safe and coordinated response in times of crisis.

AgilePM Foundation
By IIL Europe Ltd
AgilePM® Foundation This course offers preparation for the Foundation-level examination to gain the APMG-International™ / Agile Project Management® Foundation Certification. Agile Project Management (AgilePM®) is the result of collaboration between APMG-International and The DSDM Consortium. DSDM (Dynamic Systems Development Method) is the longest-established Agile method, launched in 1995, and is the only Agile method to focus on the management of Agile projects. The method has evolved over the years and the DSDM Agile Project Framework is the latest version of which AgilePM is a subset. DSDM has always operated predominantly in the corporate environment and has consistently demonstrated its ability to successfully work with and complement existing corporate processes. APMG-International is a global Examination Institute accredited by The APM Group Ltd. It is one of the Examination Institutes accredited by AXELOS. APMG-International has regional offices located in Australia, China, Denmark, Germany, the Netherlands, Malaysia, the United States, and the United Kingdom. Their portfolio of qualifications includes the Best Practice qualifications of ITIL®, PRINCE2®, MSP®, M_o_R®, and P3O®. AgilePM is one of their specialist management qualifications, which also include Change Management and Service Catalogue. This course covers all the Foundation elements of the AgilePM Handbook v2 with: Clear explanations of the method and practical examples provided by your course tutor Sample exam paper for the Foundation-level exam to enrich your knowledge and understanding A case study to allow you to practice the application of the method to an agile project The Traditional Classroom option includes the Foundation exam to provide you with the right opportunity to verify your new skill set by way of a professional qualification The Virtual Classroom option includes a Foundation exam voucher to allow you to choose the date and time of your online exam to verify your new skill set by way of a professional qualification What You Will Learn You will learn how to: Identify and apply the concepts, tools, and techniques described in Section 1 (Agile Project Foundations) of the APMG-International's Agile Project Management Handbook v2 to agile projects Tailor and customize AgilePM to suit the needs of different projects Use AgilePM in conjunction with other project management methods such as PRINCE2® Prepare yourself for the Foundation exam in AgilePM Getting Started Introductions Course structure Course goals and objectives Choosing DSDM as your Agile Approach The Agile Manifesto Why choose DSDM as your Agile Approach? Philosophy and Fundamentals The DSDM Philosophy Understanding Project Variables Principles Introduction to the Principles The Principles Preparing for Success Instrumental Success Factors (ISFs) Embracing and Engaging The DSDM Process The Overview The DSDM Phases Roles and Responsibilities The DSDM Team Model The Roles DSDM Products Introduction The Products Planning and Control Planning Concepts Testing Concepts DSDM Practice - MoSCoW Prioritisation Introduction MoSCoW Rules DSDM Practice - Timeboxing Introduction Timebox Options Other DSDM Practices Facilitated Workshops Iterative development Summary and Next Steps Exam guidance Course closeout
Microsoft Project Blue Belt 2013
By IIL Europe Ltd
Microsoft Project Blue Belt® 2013 This course introduces Project Server 2013 features that expedite scheduling projects and simplify managing tasks within an enterprise environment. Learn different aspects of Project Server and their benefits to varying roles in the enterprise, and gain hands-on experience and insights on best practices from SMEs around the world. This course introduces Project Server 2013 features that expedite scheduling projects and simplify managing tasks within an enterprise environment. Learn different aspects of Project Server and their benefits to varying roles in the enterprise, and gain hands-on experience and insights on best practices from SMEs around the world. What you Will Learn You'll learn how to: Identify the project's life cycle Understand the Enterprise Project Management (EPM) environment Apply the basic project management principles to selecting, initiating, planning, executing, monitoring and controlling, and closing your Project 2013 schedules Take advantage of new features Explain Project Server 2013 views and project sites Meet deadlines and budget restrictions Keep the workloads of your resources within their available limits Efficiently update your schedule Take advantage of the standard reports, custom views, and visual reports for your projects Take a brief look at the Business Intelligence potential Efficiently and effectively manage your project(s) and programs Work comfortably within Project Server 2013 or Project Online Getting Started with Microsoft® Project Server 2013 Describing the EPM context Discovering Project Server 2013 and Project Online Differentiating the users of Project Server 2013 Working with Project Professional 2013 and Project Server 2013 Recognizing the Life Cycle within EPM Projects and Portfolio Management Portfolio management and governance Originating new initiatives within EPTs and workflows Prioritizing initiatives, analyzing scenarios, optimizing, and selecting the portfolio Initiating Projects Initiating processes with Project Professional, SharePoint lists, Enterprise Projects, and Resource Plans Importing projects and managing project owner and permissions Planning Projects - Scope and Schedule Management Planning context and framework Scheduling in PWA Using the Deliverables feature Planning Projects - Staffing Management Plan Building a project team Managing resource availability Reviewing the assignment cycle Resolving resource overallocation Planning Projects - Cost Components, Baseline, and Consolidated Schedules Developing components of the Cost Management Planning processes Working with the baseline in projects and programs or master schedules Improving the Collaboration in the Project Sites Creating the Project Sites Developing components of the Risk Management Plan and Issues Tracking Linking planning documents Additional apps and customization Executing Projects Understanding executing processes Managing resources using Build Team and other features Working with timesheets Reporting administrative time Configuring personal settings Monitoring and Controlling Projects - Tracking Task and Project Progress Understanding the Monitoring and Controlling processes Task progress and updates in PWA including considerations for different tracking methods Task progress and updates in Project Professional 2013 Monitor and Control Projects - Measuring Performance and Reporting Progress Understanding status reports Reviewing performance metrics and progress reports Taking advantage of preloaded reports at the Business Intelligence Center Considerations for defining custom reports Closing Projects Reviewing the closing processes and closing tasks to updates Supporting the closing process