- Professional Development
- Medicine & Nursing
- Arts & Crafts
- Health & Wellbeing
- Personal Development
This is the course for sailors who would like to pass on their sailing skills and experience on the water. The title RYA Cruising Instructor will allow the successful candidate to teach up to Day Skipper level. The course is for experienced Yachtmaster Offshore candidates, with commercial endorsement, who on successful completion of the exam be able to instruct practical courses. The course is taken over 5 days with a moderator joining at the end of the week. It is a combination of assessing the candidate's knowledge, providing a structured framework to instruct, coach, observe and deliver constructive feedback, and ensure the structure and standards required of RYA courses are understood. Prior to the course the candidate is required to have their RYA/MCA Yachtmaster Offshore Certificate of Competence commercially endorsed. Your Professional Practices and Responsibilities certificate (PPR this can be done online) Your original, completed ML5 or ENG1 (for cat 1 or 0 waters) medical fitness form A copy of your RYA Basic Sea Survival certificate or STCW Personal Survival Techniques A copy of your RYA Marine Radio SRC Certificate or other acceptable GMDSS Marine Radio Operator's Certificate. The course is for the experienced skipper with theoretical and practical knowledge well in excess of the RYA Yachtmaster Offshore Certificate of Competence. Candidates are required to pass an online Pre-Course Knowledge Check prior to attending the Cruising Instructor course. Access to the online check will be issued with the course Joining Instructions, which will be sent out 6 weeks before the course starts. As with all our courses, onboard food, fuel and marina fees are included in the cost. The course starts on a Monday morning (0900 hrs) and departs from Largs Yacht Haven, Scotland. Candidates are invited to arrive on Sunday evening and familiarize themselves with the yacht.

Hydrogen Storage, Transportation and Distribution – Successfully Navigate the Hydrogen Value Chain
By EnergyEdge - Training for a Sustainable Energy Future
Gain expertise in hydrogen storage, transportation, and distribution with Energyedge's course. Successfully navigate the hydrogen value chain. Enroll now!

AutoCAD Night Training Course
By ATL Autocad Training London
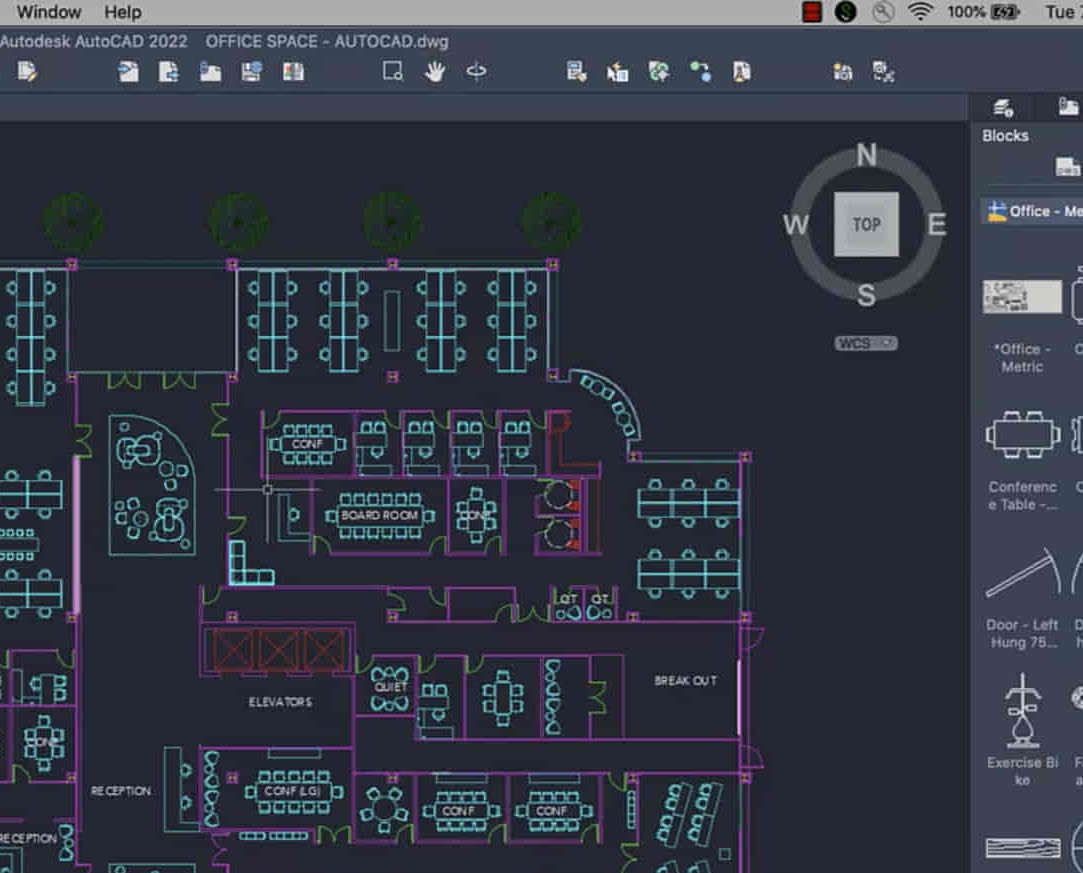
Why AutoCAD Night Training Course? This Autodesk AutoCAD 2D Evening Course, 10 hours, is perfect for beginners aiming to create 2D plans, elevations, sections. It covers all tools in AutoCAD 2D, making it valuable for both newcomers and those aspiring to enhance their skills. Click here for more info: Website When: Personalized 1-on-1 sessions. Available from Mon to Sat 9 am to 7 pm. Book over the phone, call 02077202581 Duration: 10 hours (Split 10 hrs over as many as days you want) Method: In-person or live online training Course Content: Foundational Shape Construction Manipulating Lines, Arcs, and Polylines Optimizing Object Alignment with Grip Tools Data Management and Backup Protocols File Format Exploration and Understanding Disaster Recovery Strategies Advanced Object Creation Techniques Precision Measurement Unit Handling Dynamic Input Methods Utilizing Inquiry Commands and Measurement Tools Effective Object Visualization and Navigation Zoom, Pan, and Object Manipulation Swift Object Management Strategies Object Transformation and Alteration Techniques Functions for Trimming, Extending, and Offsetting Objects Creating Various Geometric Shapes Object Editing, Joining, and Filleting Stretching and Organizing Objects Layer Management and Customization Configuring Object Properties and Linetypes Designing Layouts and Efficient Page Configurations Scaling Drawing Views and Adding Annotations Text Creation, Styling, and Editing Dimensioning Principles and Customization Implementing Multileaders for Annotations Object Hatching and Editing Techniques Managing Reusable Content: Blocks and Symbols Utilizing Tool Palettes and Working with Groups Understanding Model Space and Paper Space Creating Layouts and Viewports Scaling Viewports and Plotting/PDF Output Managing Multiple Sheet Drawings Optimizing Plotstyles for Printing Creating Custom Drawing Templates To download AutoCAD, visit Autodesk's official website. Advantages: AutoCAD stands as the industry-leading computer-aided design (CAD) software, widely adopted for creating architectural, engineering, and construction drawings. Acquire essential skills applicable across a diverse spectrum of industries. Assessment: Evaluation will occur informally during classes, which comprehensively cover specific topics, complemented by practical drawing exercises to reinforce skills and knowledge. Additionally, we offer longer, independent drawing tasks that encompass multiple acquired skills, evaluated against professional benchmarks. Requirements: Prospective participants should possess basic computer literacy and engagement in professions where CAD is utilized. English Proficiency: Applicants are expected to demonstrate proficiency in both written and spoken English. Why Opt for This Course? Our AutoCAD course is your gateway to mastering the essential skills for creating top-notch technical drawings. Designed with beginners in mind, this course is perfect for individuals who have little to no prior experience with AutoCAD. If your work or studies involve CAD drawings, gaining a solid grasp of the program is crucial for confidence and proficiency. Upon enrollment, students gain access to a free 30 days trial. While classes are conducted using AutoCAD on PC, it's worth noting that the course is compatible with AutoCAD on Mac, albeit with slight interface variations. Who Should Attend? This course caters to those eager to acquire the skills necessary for creating and interpreting drawings produced in AutoCAD. Our diverse system hails from various industries, including engineering, architecture, landscape architecture, construction, electronics, and product design. Why Opt for CAD Training? Practical Learning Experience: Immerse yourself in hands-on training. Personalized One-to-One AutoCAD Classes: Benefit from individualized attention. Expert and Knowledgeable Instructors: Learn from skilled and experienced teachers. Online Training Recordings: Access recorded AutoCAD training sessions online. Best Price Guarantee: Enjoy competitive pricing with a satisfaction guarantee. Pre and Post-Training Support: Receive lifetime free support before and after completing your training. Flexible Schedule: Choose your class timings and dates-weekdays, weekends, or evenings. Tailored Course Content: Customize the AutoCAD course to align with your specific needs. Access Anywhere: Access AutoCAD training and support from any location.
Sushi Masterclass. Cover all the fundamental techniques to become a Sushi Pro
(177)By London Cookery School
Sushi Masterclass taught by London Cookery School. Cover all the fundamentals to become a Sushi Pro. Make a full tray of beautiful Sushi and eat like royalty.

AutoCAD-Mac Introduction to Advanced Training Course
By ATL Autocad Training London
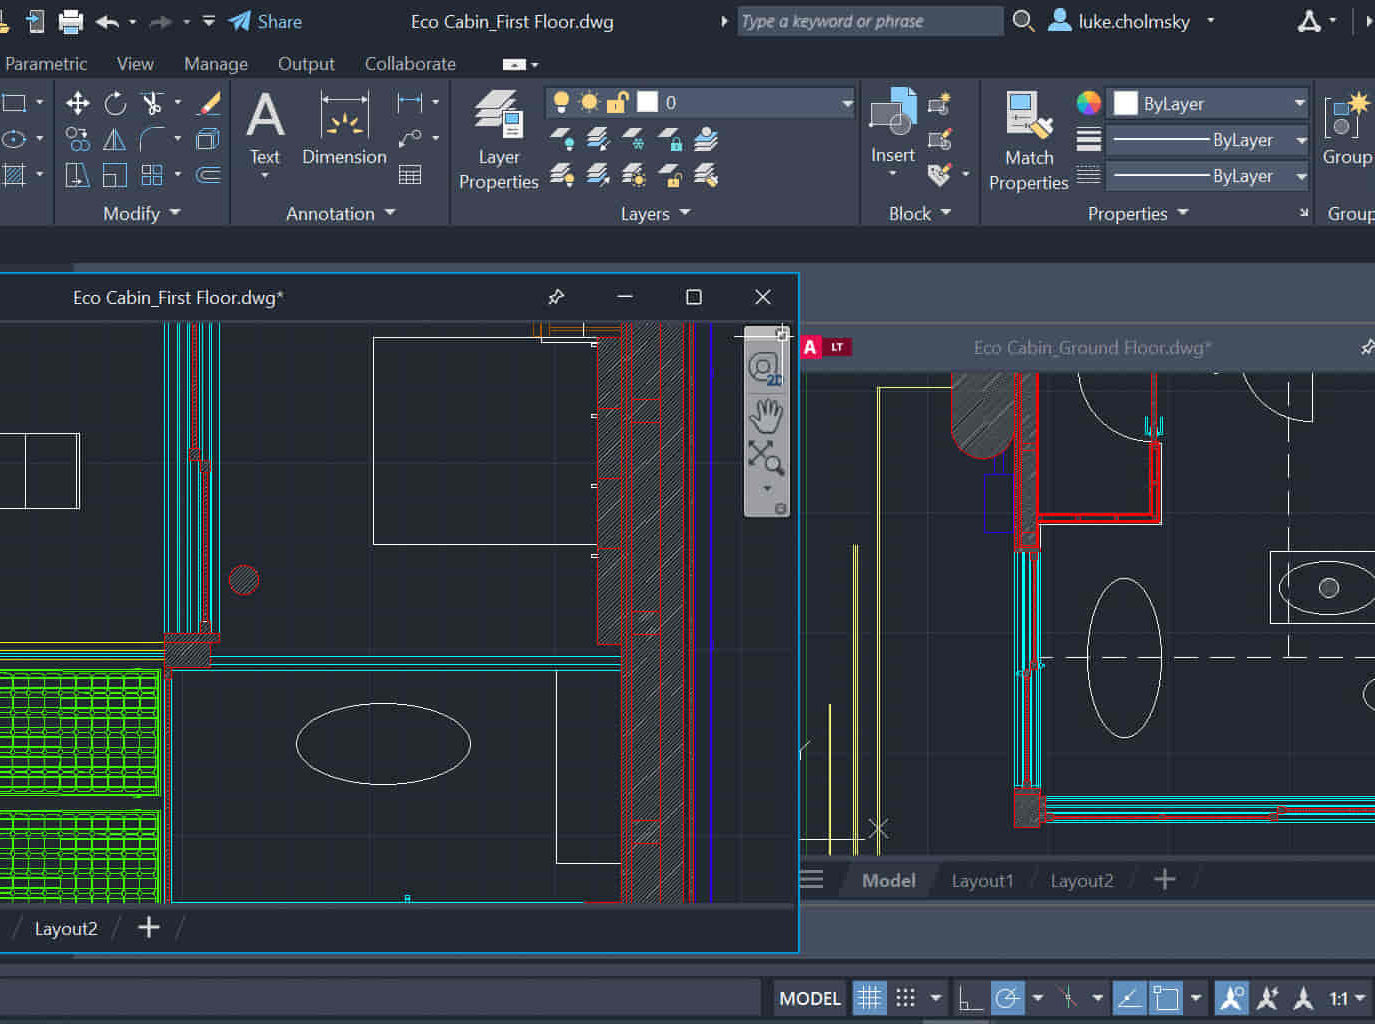
AutoCAD-Mac Introduction to Advanced Training Course This project-based course is tailored for AutoCAD Mac users, architecture and interior design students and professionals. Click here for more info: Website When Can I Book This Training Course? Personalized experience with 1-on-1 sessions designed to fit your unique needs. Available from Monday to Saturday, 9 am to 7 am Or Call to Book 02077202581. Duration of Training: 16 hours. Training Method: 1-on-1, providing the option for in-person sessions or live online training. Course Content Section 1: Introduction Course Overview Section 2: Basic Concepts Status Bar and The Units Drawing Commands Control Points - Vertex or Verteces Modifying Commands Snap Settings Drawing An Outline Section 3: Dimensions and Customization Adding Dimensions and Dimension Style Manager Importing Dimension Styles Customizing Shortcuts Section 4: Advanced Techniques Adding Walls Thickness with Offset Command Adding interior layout Cleaning Layout lines with Trim Section 5: Text and Styling Text Editing and Importing Text Styles Main File Formats in AutoCAD Section 6: Design Elements Creating Openings in the Floor Plan Adding Openings - Part 2 Adding Openings - Part 3 Drawing Doors & Windows Using Line Types & Linetype Scale Group and Ungroup Commands Using Blocks Using Blocks Library & Dynamic Blocks Section 7: Layers and Furnishing Layers - Part 2 Layers - Part 3 Furnishing Bedrooms & Bathrooms - Part 1 Adding Furniture, Fixtures, and Equipments | part 2 Adding Furniture, Fixtures, and Equipments | part 3 Drawing the Kitchen Drawing the Living Room Drawing Dining Room & Adding Casework Adding Steps and Railings Using Stretch Command Finishing Steps and patio areas Hatch command Hatch Customization Adding Plants & Finishing Floor Plan Section 8: Layout and Printing Paper Space & Page Setup Manager Working with Viewport & Using Print Command Scale & Using Multiple Viewports Locking Viewport Scale Drawing A Titleblock - Part 1 Drawing A Titleblock - Part 2 Copying the Titleblock Using Titleblock with Attributes Section 9: Roof Plan and Organization Drawing The Roof Plan Placing Roof Plan on Sheet Organizing Project Drawings & Using Layer Freeze AutoCAD Crashing And What To Do Section 10: Elevations Exterior elevations - Drawing the Outline Exterior elevations - Drawing the Openings Elevations - Detailing - Part 1 Elevations - Detailing - Part 2 Elevations - Repeating the workflow Elevations - Finishing 3rd Elevation Elevations - Drawing the final elevation Section 11: Sections Sections: Drawing Cut Lines & the Outline Sections: Placing 1st Section on Sheet Sections: Drawing Section #2 - Different Technique Sections: Adding Final Detail Section 12: Interior Elevations Interior Elevations: Drawing the Outline Interior Elevations: Placing on Sheet Interior Elevations: Using Block Clip Interior Elevations: Final Drawing Section 13: Conclusion Putting the Final Set Together Proficient AutoCAD Skills: Master essential tools for efficient drawing creation and manipulation. Accurate 2D Designs: Create precise and high-quality layouts with attention to detail. Effective Object Handling: Excel in selecting, moving, copying, and scaling objects. File Management: Organize drawings efficiently and understand different file formats. Precise Measurements: Utilize inquiry commands for accurate design analysis. Annotations and Hatching: Apply text, dimensions, and hatching to enhance drawings. Object Organization: Manage layers and object properties for organized designs. Reusable Content: Efficiently use blocks, tool palettes, and groups for productivity. Layout Optimization: Create layouts with viewports for optimal design presentation. Professional Output: Generate professional plots and PDF output for polished results. Enhanced Productivity: Explore AutoCAD toolsets and web/mobile apps for streamlined workflow. Course Overview: Learn versatile AutoCAD for Mac drawing techniques, applicable across all industries, enabling you to excel in the application. Our trainers incorporate exercises from various disciplines. Who Should Attend: Ideal for newcomers to AutoCAD for Mac, self-taught users seeking correct techniques, and those transitioning from other CAD tools. Requirements: A solid Mac OS understanding is essential, while prior CAD knowledge is not required. Pre-course preparation guidance is provided for new AutoCAD users. Highlights: Perfect for AutoCAD for Mac beginners. Gain skills for precise 2D layouts and designs. Versatile drawing techniques for all industries. Choose between in-class or live online training. Autodesk Certified Tutors: AutoCAD 1-2-1 courses. Hands-on learning with expert trainers. Lifetime post-course email support. Tailored on-request training available. Certificate: Digital certificate included. Tailored Mac Training: Excel in AutoCAD with specialized Mac training, leveraging its distinct features and interface for heightened efficiency. Comprehensive Skill Enhancement: Advance from fundamental to intermediate AutoCAD Mac proficiency, creating precise and professional 2D drawings. Industry-Relevant Expertise: Attain in-demand skills valued by employers in architecture, engineering, and design sectors. Hands-On Project Exposure: Immerse yourself in practical exercises mirroring real-world design scenarios, fostering practical competence. Lesson Recordings for Review: Access recorded lessons for reinforcement and deeper AutoCAD Mac comprehension. Ongoing Email Support: Benefit from lifetime email support, ensuring assistance beyond course completion."
Mooring and Anchoring Technology in Floating Photovoltaic (FPV) Systems – Site Evaluation, Innovative Structure, and Sustainable Practices
By EnergyEdge - Training for a Sustainable Energy Future
Explore mooring and anchoring technology for Floating Photovoltaic (FPV) systems with Energy Edge's comprehensive training course. Learn about site evaluation, innovative structures, and sustainable practices.


Introduction to Table Loom Weaving - Two Day Workshop
By Elka
Two day 'Introduction to Table Loom Weaving' workshop in the beautiful setting of Fisherton Mill in Salisbury, Wiltshire. Learn how to plan your weaving project, dress your loom (prepare your loom for weaving), read and understand weaving patterns and weave your own set of samples from a wide range of sustainable yarns and fibres in this relaxed & informative beginners weaving workshop. All materials and equipment are provided and you will leave with a clear handout of notes along with your first pieces of weaving!

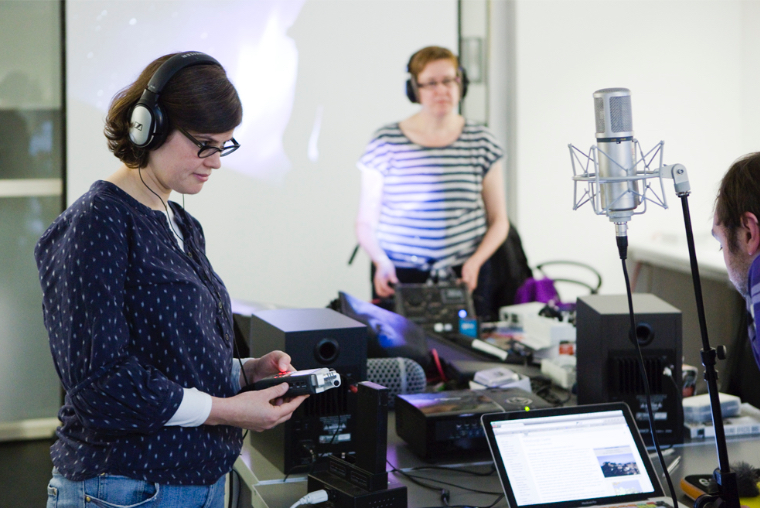
Employing a mix of practical exercises and critical reflection, this introductory day course provides an overview of fundamental techniques for recording and editing voice, ambiences and sound effects for podcasts, video/film and art installations or just for fun. The course uses industry standard software and introduces a range of popular, high quality microphones and portable recording devices. The course has enough flexibility to be steered by the individual interests of the participants, but you will generally cover; the properties of sound, microphone selection and placement, gain structure, effective planning, noise limiting and reduction, sound editing, dynamics, sound processing and spatial effects. If desired, we can look at a variety of techniques for improving sound quality and recording audio from video conferencing, as we all find ourselves working and interacting in this manner every day. Computer experience is required. Morning Microphone Selection – why and when to use Applications, characteristics, limitations Microphone type – Dynamic, Condenser, Lavalier, Shotgun, Boundary, Stereo, Binaural Polar Patterns – Omni, Cardoid, Attenuated and others Practical microphone placement and technique Critical distance, proximity effect, shielding, simple acoustic treatments, filtering Lavalier microphone – positioning, preventing distortion & rustles Booming – positioning, preventing microphone bumps Stereo Mics – phase issues Afternoon Editing techniques (fades, looping) Building a mix Basic sound processing, noise reduction and dynamics (channel strips, EQ and compression) Insert effects (modulation, filtering, distortion) Send effects (delay, reverb) Automation (of volume, panning etc) Bussing (sending signals to multiple fx) Mastering effects (limiting) Exporting and file types Courses are subject to minimum enrolment. Please register early, within five days of the start date, to reduce the likelihood of course cancellation. Please read our cancellation policy before booking. Students, anyone over the age of 65, and those in receipt of any form of benefits can claim the concessionary price, offering a 10% discount on the full course price. Valid proof of eligibility must be produced on the first day of the course. Please use the code CONCESSION when prompted at checkout.