- Professional Development
- Medicine & Nursing
- Arts & Crafts
- Health & Wellbeing
- Personal Development
45102 Courses
Teamwork and Team Building
By Nexus Human
Duration 1 Days 6 CPD hours Overview Students will come away with knowledge and skills to become a top-notch team performer. This workshop will encourage you to explore the different aspects of a team, as well as ways that they can become a top-notch team performer. 1 - GETTING STARTED Icebreaker Housekeeping Items The Parking Lot Workshop Objectives 2 - DEFINING SUCCESS What is a Team? An Overview of Tuckman and Jensen's Four-Phase Model 3 - TYPES OF TEAMS The Traditional Team Self-Directed Teams E-Teams 4 - THE FIRST STAGE OF TEAM DEVELOPMENT-FORMING Hallmarks of This Stage What To Do As A Leader What To Do As A Follower 5 - THE SECOND STAGE OF TEAM DEVELOPMENT-STORMING The Hallmarks of This Stage What To Do As A Leader What To Do As A Follower 6 - THE THIRD STAGE OF TEAM DEVELOPMENT-NORMING The Hallmarks of This Stage What To Do As A Leader What To Do As A Follower 7 - THE FOURTH STAGE OF TEAM DEVELOPMENT-PERFORMING Hallmarks of This Stage What To Do As A Leader What To Do As A Follower 8 - TEAM BUILDING ACTIVITIES The Benefits and Disadvantages Team-Building Activities That Won't Make People Cringe Choosing a Location for Team-Building 9 - MAKING THE MOST OF TEAM MEETINGS Setting the Time and Place Trying the 50-Minute Meeting Using Celebrations of All Sizes 10 - SOLVING PROBLEMS AS A TEAM The Six Thinking Hats Encouraging Brainstorming Building Consensus 11 - ENCOURAGING TEAMWORK Some Things to Do Some Things to Avoid Some Things to Consider 12 - WRAPPING UP Words from the Wise Review of Parking Lot Lessons Learned Completion of Action Plans Additional course details: Nexus Humans Teamwork and Team Building training program is a workshop that presents an invigorating mix of sessions, lessons, and masterclasses meticulously crafted to propel your learning expedition forward. This immersive bootcamp-style experience boasts interactive lectures, hands-on labs, and collaborative hackathons, all strategically designed to fortify fundamental concepts. Guided by seasoned coaches, each session offers priceless insights and practical skills crucial for honing your expertise. Whether you're stepping into the realm of professional skills or a seasoned professional, this comprehensive course ensures you're equipped with the knowledge and prowess necessary for success. While we feel this is the best course for the Teamwork and Team Building course and one of our Top 10 we encourage you to read the course outline to make sure it is the right content for you. Additionally, private sessions, closed classes or dedicated events are available both live online and at our training centres in Dublin and London, as well as at your offices anywhere in the UK, Ireland or across EMEA.

Waiter Training and Food Safety - Double Endorsed Certificate
By Imperial Academy
2 QLS Endorsed Course | CPD Certified | Free PDF + Hardcopy Certificates | 80 CPD Points | Lifetime Access
3ds Max and Photoshop Training
By London Design Training Courses
Why Choose 3ds Max and Photoshop Training Course? Click here for more info 3D modeling and rendering potential with our specialized 3ds Max and Photoshop Training Course! Learn from modeling to rendering in 3ds Max and enhance visuals with Photoshop. Personalized, live online sessions with an experienced instructor. Enroll now and bring your 3D visualizations to life. Duration: 20 hrs Method: 1-on-1, Personalized attention. Schedule: Tailor your own hours of your choice, available from Mon to Sat between 9 am and 7 pm. The 3ds Max and Photoshop Training Course offers comprehensive learning for beginners, focusing on core skills to create 3D models, rendered images, animations, and games using 3ds Max and Photoshop. Led by Autodesk Certified Instructors with expertise in 3D design, CGI, and visualizations, the course provides hands-on and practical training. 20-hour 3ds Max and Photoshop Training Course Course Description: 20-hour 3ds Max and Photoshop Training Course to master 3D modeling, rendering, and post-production. Learn to create 3D models, apply textures, animate objects, and utilize lighting techniques in 3ds Max. Gain expertise in Photoshop for post-processing and creating photorealistic textures. Ideal for 3D artists of all levels. Course Outline: Part 1: Introduction to 3ds Max (6 hours) - Understanding the user interface and workspace of 3ds Max - Navigating the viewport and utilizing basic tools for modeling - Creating and manipulating primitive objects for design purposes - Modifying objects with modifiers to achieve specific effects - Working with materials and textures to add realistic detail to 3D models - Basic lighting and rendering techniques to present the 3D scenes Part 2: Intermediate 3ds Max Techniques (6 hours) - Modeling using splines and polygons for more complex shapes - Creating and animating cameras to simulate real-world perspectives - Rigging and animating characters with bones for animation projects - Utilizing particle systems for visual effects and dynamic simulations - Designing realistic environments using landscape tools for outdoor scenes - Exploring advanced lighting and rendering techniques for enhanced visuals Part 3: Introduction to Photoshop for 3D Artists (4 hours) - Understanding the Photoshop workspace and essential tools for editing - Importing and exporting 3D models and textures between 3ds Max and Photoshop - Creating and editing textures and materials in Photoshop for realistic surfaces - Utilizing Photoshop for post-production and compositing to enhance 3D renders Part 4: Advanced Photoshop Techniques for 3D Artists (4 hours) - Creating custom brushes and textures for unique artistic elements - Using layer masks and adjustment layers for non-destructive editing - Exploring advanced compositing techniques for seamless integration of 3D elements - Creating photorealistic textures and materials for stunning 3D visuals Part 5: Project-Based Learning (4 hours) - Applying 3ds Max and Photoshop techniques to a real-world project - Creating a 3D model, texturing it in Photoshop, and rendering the final image - Receiving instructor feedback for critiquing and refining the project - Final presentation of the completed project showcasing skills learned.

Work Breakdown Structures: In-House Training
By IIL Europe Ltd
Work Breakdown Structures: In-House Training It's amazing how often project managers begin the project planning process by making an outlined list of every task they believe will be required to complete a project and then proclaim they have created the work breakdown structure (WBS) for the project. The result is a list of hundreds, or even thousands of tasks, many of them having durations of a few days or a few hours. Essentially, what they have done is create a 'to do' list, which they then use as a 'checklist' to measure progress. This approach leads to, and even encourages, micromanagement of the resources working on the project without consideration of more critical aspects of project management such as: requirements management, risk management, procurement management, estimating, scheduling, executing, and controlling. Further, it makes it impossible to see the big picture, at levels of detail, in keeping with the needs of sponsors, clients, project and functional managers, team leaders, and project performers. Join us for this exciting program and learn how to use the WBS to make better-informed business decisions. What You Will Learn You will learn how to: Describe the need for a project WBS Describe the WBS role in the project Gain practical experience in the development, decomposition, and use of the WBS Determine the appropriate level of detail in the WBS. Explain how the WBS integrates with project requirements, risk, procurement, estimating, scheduling, and overall project execution. Provide the basic tools to enhance efficient re-use of key information in your future projects Foundation Concepts Key definitions History of the WBS Importance of the WBS Overall structure Terminology Other breakdown structures WBS tools WBS & Scope Project scope management processes Specification of the project objectives WBS design based on project deliverable WBS decomposition process and 'The 100% rule' Work Packages and Control Accounts WBS & Risk Risk management planning and WBS Risk identification to enhance the WBS Risk analysis and the WBS Risk responses and updating the WBS Implementing risk response and Monitoring risks and the WBS WBS & Estimating Use of WBS in the estimating process Components and work packages Sizing and algorithmic estimates WBS & Scheduling Component Scheduling - High-Level Milestones WBS activity decomposition WBS elements dependencies Work Package Level Schedules Responsibility assignment matrix WBS & Execution and Control Earned Value Management and tracking of work performance Progress reports, forecasts, and corrective and preventive actions used to manage work performance Necessary information to close out a project

CWDP training course description The CWDP course consists of instructor-led training applicable to the design of wireless LANs using the latest technologies including 802.11n and 802.11ac. The course goes in-depth into the design process and provides attendees with the knowledge needed to plan, deploy and test modern 802.11-based networks. It also prepares students for the CWDP examination. Students who complete the course will acquire the necessary skills for preparing, planning performing and documenting site surveys and wireless LAN design procedures. What will you learn Design enterprise WiFi networks. Select appropriate antennas and Access points. Perform site surveys. Describe the security requirements required for enterprise networks. Test, validate and troubleshoot installations. CWDP training course details Who will benefit: Anyone looking for the skills to analyze, troubleshoot, and optimize any enterprise level Wi-Fi network, no matter which brand of equipment your organization deploys. Anyone looking to become a CWNP. Prerequisites: CWNA Duration 5 days CWDP training course contents WLAN design overview Importance of good design, Impact of bad design, Design process, Design skills, Design toolkit. Requirements analysis Pre-planning, Customer interaction, Requirements gathering, Discovering existing systems, Documenting the environment, Defining constraints, Creating documentation. Designing for clients and applications Client Device types, Application types, Application-specific design, High density design issues. Designing for industry Standard corporate networks, Industry-specific designs, Government, Healthcare, Hospitality, Retail, Public hotspots, Transportation, Mobile offices, Outdoor and mesh, Remote networks and branch offices, Last-miles / ISP and bridging. Vendor selection processes Defining vendor issues, Operational planes, Design models, Understanding architectures. Radio Frequency (RF) planning RF spectrum, RF behaviors, Modulation and coding schemes, RF accessories, Throughput factors. WLAN hardware selection Antennas, 802.11n and antennas, Choosing Aps, Powering Aps. Site surveys Site survey tools, Site survey preparation, Predictive site surveys, Manual site surveys, Site survey principles and processes. Designing for Quality of Service (QoS) QoS overview, QoS application points, Roaming support. Designing for security Bad security, Authentication solutions, Encryption solutions, Security best practices, Intrusion prevention. Installation testing, validation and troubleshooting Network health status, Troubleshooting and validation process, Troubleshooting and validation tools, Common problems. Hands-on lab exercises Hands-on labs depend on the audience and can include use of: Spectrum analyzers, Protocol analyzers, Site Survey software, Diagramming software, Various wireless access points, Various wireless adapters and antennas.

Welding Training
By The Teachers Training
Welding Training is yet another 'Teacher's Choice' course from Teachers Training for a complete understanding of the fundamental topics. You are also entitled to exclusive tutor support and a professional CPD-accredited certificate in addition to the special discounted price for a limited time. Just like all our courses, this Welding Training and its curriculum have also been designed by expert teachers so that teachers of tomorrow can learn from the best and equip themselves with all the necessary skills. Consisting of several modules, the course teaches you everything you need to succeed in this profession. The course can be studied part-time. You can become accredited within 9 hours studying at your own pace. Your qualification will be recognised and can be checked for validity on our dedicated website. Why Choose Teachers Training Some of our website features are: This is a dedicated website for teaching 24/7 tutor support Interactive Content Affordable price Courses accredited by the UK's top awarding bodies 100% online Flexible deadline Entry Requirements No formal entry requirements. You need to have: Passion for learning A good understanding of the English language Be motivated and hard-working Over the age of 16. Certification CPD Certification from The Teachers Training Successfully completing the MCQ exam of this course qualifies you for a CPD-accredited certificate from The Teachers Training. You will be eligible for both PDF copy and hard copy of the certificate to showcase your achievement however you wish. You can get your digital certificate (PDF) for £4.99 only Hard copy certificates are also available, and you can get one for only £10.99 You can get both PDF and Hard copy certificates for just £12.99! The certificate will add significant weight to your CV and will give you a competitive advantage when applying for jobs. Welding Basics Module 1: Introduction to Welding 00:25:00 Module 2: Getting Familiar with Metals 00:30:00 Module 3: Exploring Welding Methods 00:30:00 Module 4: Knowing the Welding Metals 00:40:00 Module 5: Preparing Steel for Welding 00:20:00 Module 6: Working with Stainless Steel 00:20:00 Module 7: Working with Aluminium and Other Metals 00:30:00 Welding Tutorials Module 8: MIG Welding Tutorial 00:40:00 Module 9: TIG Welding Tutorial 00:45:00 Module 10: Arc Welding Tutorial 00:55:00 Welding Hazards and Safety Module 11: Illness Caused by Welding Fume and Gases 00:20:00 Module 12: Welding Fume - Reducing the Risk 00:40:00 Module 13: Hearing Loss and Vibration White Finger 00:40:00 Module 14: Other Safety Issues 00:40:00 Module 15: Protection during Welding 00:50:00 Module 16: Safety in Gas Welding 00:40:00

Complete C# programming training course description This training course teaches developers the programming skills that are required for developers to create Windows applications using the C# language. Students review the basics of C# program structure, language syntax, and implementation details, and then consolidate their knowledge throughout the week as they build an application that incorporates several features of the .NET Framework. What will you learn Use the syntax and features of C#. Create and call methods, catch and handle exceptions, and describe the monitoring requirements of large-scale applications. Implement a typical desktop application. Create class, define and implement interfaces, and create and generic collections. Read and write data to/from files. Build a GUI using XAML. Complete C# programming training course details Who will benefit: Programmers wishing to learn C#. Prerequisites: Developers attending this course should already have gained some limited experience using C# to complete basic programming tasks. Duration 5 days Complete C# programming training course contents Review of C# Syntax Overview of Writing Applications using C#, Datatypes, Operators, and Expressions. C# Programming Language Constructs. Hands on Developing the Class Enrolment Application. Methods, exceptions and monitoring apps Creating and Invoking Methods. Creating Overloaded Methods and Using Optional and Output Parameters. Handling Exceptions. Monitoring Applications. Hands on Extending the Class Enrolment Application Functionality. Developing a graphical application Implementing Structs and Enums. Organizing Data into Collections. Handling Events. Hands on Writing the Grades Prototype Application. Classes and Type-safe collections Creating Classes. Defining and Implementing Interfaces. Implementing Type-safe Collections. Hands on Adding Data Validation and Type-safety to the Grades Application. Class hierarchy using Inheritance Class hierarchies. Extending .NET framework classes. Creating generic types. Hands on Refactoring common functionality into the User Class. Reading and writing local data Reading and Writing Files. Serializing and Deserializing Data. Performing I/O Using Streams. Hands on Generating the Grades Report. Accessing a Database Creating and using entity data models. Querying and updating data by using LINQ. Hands on Retrieving and modifying grade data. Accessing remote data Accessing data across the web and in the cloud. Hands on Modifying grade data in the Cloud. Designing the UI for a graphical applicatione Using XAML to design a User Interface. Binding controls to data. Styling a UI. Hands on Customizing Student Photographs and Styling the Application. Improving performance and responsiveness Implementing Multitasking by using tasks and Lambda Expressions. Performing operations asynchronously. Synchronizing concurrent data access. Hands on Improving the responsiveness and performance of the application. Integrating with unmanaged code Creating and using dynamic objects. Managing the Lifetime of objects and controlling unmanaged resources. Hands on Upgrading the grades report. Creating reusable types and assemblies Examining Object Metadata. Creating and Using Custom Attributes. Generating Managed Code. Versioning, Signing and Deploying Assemblies. Hands on Specifying the Data to Include in the Grades Report. Encrypting and Decrypting Data Implementing Symmetric Encryption. Implementing Asymmetric Encryption. Hands on Encrypting and Decrypting Grades Reports.
Get Going with QuickBooks
By Nexus Human
Duration 2 Days 12 CPD hours This course is intended for First-time QuickBooks users will learn the basic features of the software. Experienced QuickBooks users will quickly learn the new features and functionality of QuickBooks 2015, 2016 or 2018. Overview Upon completion of this course, students will be able to identify the types of information often tracked in business, understand common business terms, enter information into forms and lists, work with the Chart of Accounts, work with inventory and service items, and work with invoices, payments, bills, and bank accounts. This course is an introduction to QuickBooks. Getting Started Starting QuickBooks Setting QuickBooks Preferences Identifying Components of the QuickBooks Operating Environment Using QuickBooks Help Identifying Common Business Terms Exiting QuickBooks Setting Up a Company Creating a QuickBooks Company Using the Chart of Accounts Working with Lists Creating Company Lists Working with the Customers & Jobs List Working with the Employees List Working with the Vendors List Working with the Item List Working with Other Lists Managing Lists Setting Up Inventory Entering Inventory Ordering Inventory Receiving Inventory Paying for Inventory Manually Adjusting Inventory Selling Your Product Creating Product Invoices Applying Credit to Invoices Emailing Invoices Setting Price Levels Creating Sales Receipts Invoicing for Services Setting Up a Service Item Changing the Invoice Format Creating a Service Invoice Editing an Invoice Voiding an Invoice Deleting an Invoice Entering Statement Charges Creating Billing Statements Processing Payments Displaying the Open Invoices Report Using the Income Tracker Receiving Payments for Invoices Making Deposits Handling Bounced Checks Working with Bank Accounts Writing a QuickBooks Check Voiding a QuickBooks Check Using Bank Account Registers Entering a Handwritten Check Transferring Funds Between Accounts Reconciling Checking Accounts Entering and Paying Bills Handling Expenses Using QuickBooks for Accounts Payable Entering Bills Paying Bills Entering Vendor Credit Using the EasyStep Interview Using the EasyStep Interview Additional course details: Nexus Humans Get Going with QuickBooks training program is a workshop that presents an invigorating mix of sessions, lessons, and masterclasses meticulously crafted to propel your learning expedition forward. This immersive bootcamp-style experience boasts interactive lectures, hands-on labs, and collaborative hackathons, all strategically designed to fortify fundamental concepts. Guided by seasoned coaches, each session offers priceless insights and practical skills crucial for honing your expertise. Whether you're stepping into the realm of professional skills or a seasoned professional, this comprehensive course ensures you're equipped with the knowledge and prowess necessary for success. While we feel this is the best course for the Get Going with QuickBooks course and one of our Top 10 we encourage you to read the course outline to make sure it is the right content for you. Additionally, private sessions, closed classes or dedicated events are available both live online and at our training centres in Dublin and London, as well as at your offices anywhere in the UK, Ireland or across EMEA.
PRINCE2 Foundation: Virtual In-House Training
By IIL Europe Ltd
PRINCE2® Foundation: Virtual In-House Training Projects fail for a variety of reasons including poor planning, lack of defined quality criteria, poor understanding of the business drivers, inadequate control, and lack of senior management involvement in other words, lack of a structured best practice approach to project delivery. PRINCE2® (6th Edition is the current version) is a structured, process-based approach to project management providing a methodology which can be easily tailored and scaled to suit all types of projects. It is the de facto standard for project management in the UK Government and is used extensively in more than 150 countries worldwide with in excess of 20,000 organizations already benefiting from its powerful approach. It can be used easily in combination with PMI®'s PMBOK® Guideto provide a robust project management methodology, or to augment an existing PMBOK®-based methodology with additional rigor around areas such as Quality, Organization, and Benefits Realization. The goals of this course are to provide participants with a thorough grounding in PRINCE2® and its benefits and to prepare them to sit the Foundation exam. What you will Learn You'll learn how to: Identify the benefits and principles underlying a structured approach to project management Define the PRINCE2® method in depth, including the principles, themes, and processes Prepare and practice for the Foundation exam Getting Started Introductions Course structure Course goals and objectives Overview of the PRINCE2® Foundation exam PRINCE2® Introduction Introducing PRINCE2® The structure of PRINCE2® What PRINCE2® does not provide What makes a project a 'PRINCE2® project'? Project Management with PRINCE2® Defining a project Managing a project Controlling the variables The Project Manager's work PRINCE2 Principles PRINCE2® Principles The Seven Principles Tailoring and Adopting PRINCE2® Defining tailoring Defining embedding What can be tailored? Who is responsible for tailoring? Introduction to the PRINCE2® Themes What is a PRINCE2® Theme? What are the PRINCE2® Themes? Tailoring the themes Format of the theme chapters Business Case Need for a business case Elements of a business case How a business case is developed Managing Benefits Organization Need for a special type of organization PRINCE2® organization structure Roles in a PRINCE2® project Combining roles Quality Relevance of quality to project work Quality, quality control, and quality assurance Quality management approach and the quality register Who is responsible for quality? Plans Need for plans and their hierarchy Approach to planning Content of a PRINCE2® plan Product-based planning Risk The need to manage risks What is a risk? Risk and continued business justification A risk management option Change Change is inevitable Different types of change Baselines and configuration management Issue and change control in PRINCE2® Progress Controlling a PRINCE2® project The application of tolerance Types of control Raising exceptions Introduction to Processes Processes and the project lifecycle The PRINCE2® journey Structure of the process chapters Tailoring the processes Starting up a Project Appointing people to the PRINCE2® roles Establishing some baselines Should we go further with this work? Planning for initiation Directing a Project Should we start / continue the project? Responding to internal / external influences Should we close this project? Initiating a Project Establishing the project's approaches Creating the project plan Refining the business case Assembling the PID Controlling a Stage Authorizing and reviewing work Monitoring and reporting Handling non-planned situations Triggering the next process Managing Product Delivery Accepting work from the Project Manager Getting the work done by the team Routine and non-routine reporting Handing back the completed work Managing a Stage Boundary Taking stock of what we have done Updating the PID Consider the options for continuing / stopping Producing exception plans Closing a Project PRINCE2® at the end of a project Transition of product to operational use How well did we do? Tying up all the loose ends
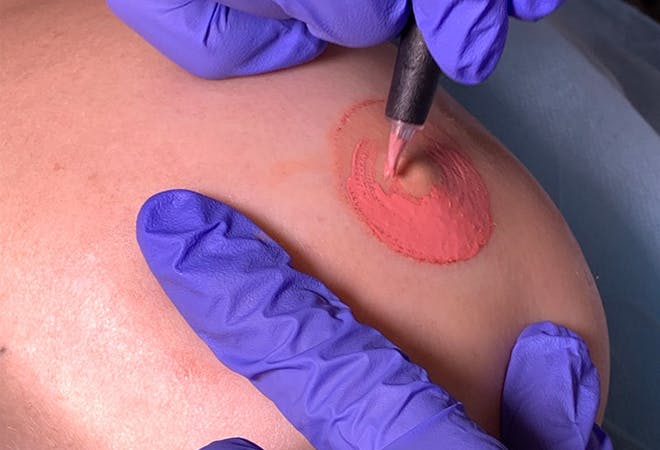
Areola Micropigmentation Training Course
By Cosmetic College
You will also learn how to visually improve scarring and areola asymmetries resulting from breast reduction and uplift surgical procedures. The specialist knowledge and techniques are gained through theory and step-by-step practice, which progresses from drawing on paper, to breast mound exercises and finally working on models. Course Prerequisites This course is suitable for those with no prior experience and is designed to provide the student with the ability to seek employment or start their own business upon qualification. Course Pre Study Before beginning practical training, students are required to complete: 30 hours of easy to access e-learning A series of online assessments Course Structure This is a 1 day course with intensive theory and practical sessions. All courses are kept intimate with a maximum of 4 students per course. Areas of study: The fundamental theory of cosmetic tattooing Anatomy and Physiology Health and Safety Colour Theory Client Assessment and Suitability Legal requirements, obtaining consent with consultation techniques and documentation Clinical setup procedures Pre-treatment drawing techniques Practical technique sessions on practice materials and model clients. Professional live demonstrations Industry leading pre and post treatment care for your clients Practical areas included in depth within the course are: Correct areola design planning Blending techniques Sanitation and sterilisation Correct station set up Skin colour matching analysis Needle specification