- Professional Development
- Medicine & Nursing
- Arts & Crafts
- Health & Wellbeing
- Personal Development
11263 Courses

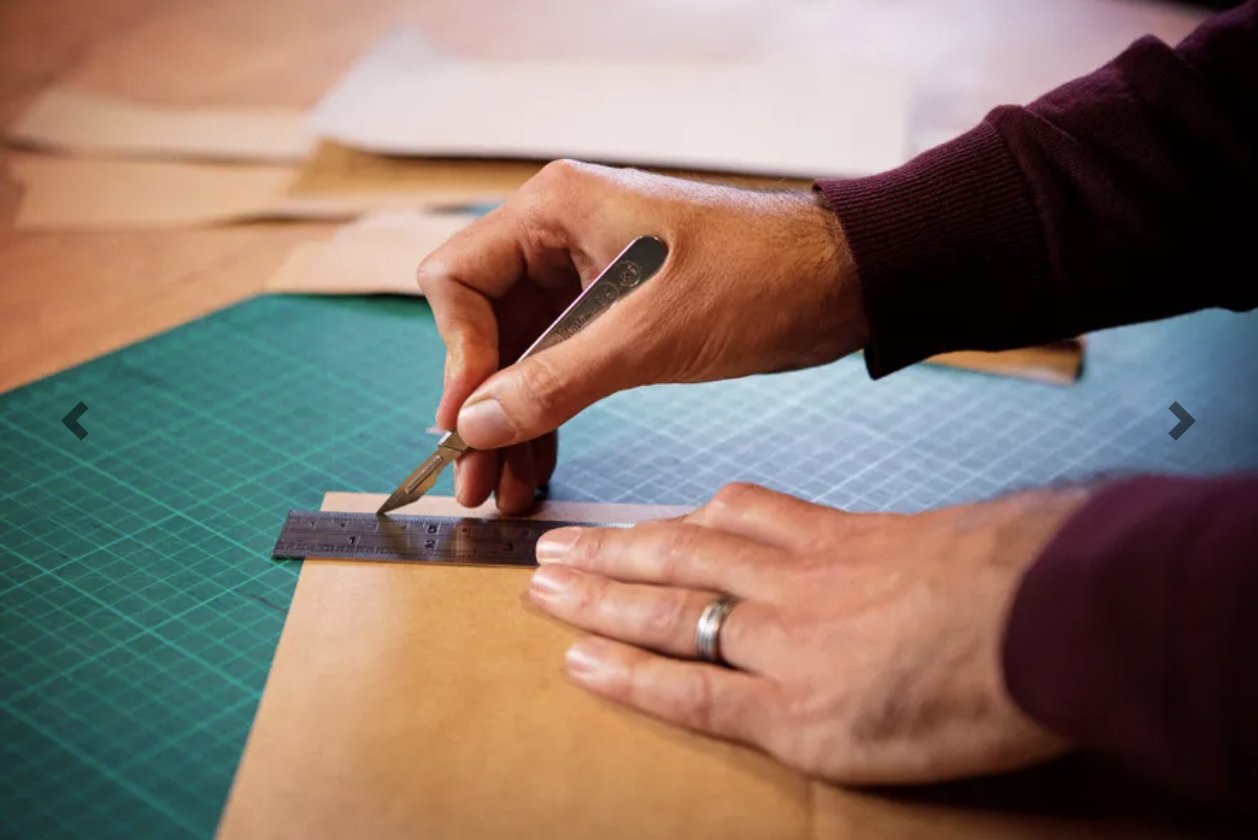
1-2-1 Tuition ‘Learn something new and master your craft’Pattern cutting, making, design and business consultancy for Bags and Accessories Join us in the Hands of Tym Workshop, Oxfordshire (UK) for a day of learning and making. Learn directly from Leathersmith and London College of Fashion Lecturer, Georgie Tym. Who is 1-2-1 tuition for?1-2-1 tuition is ideal for those who want a tailor made session. An excellent choice if you’re looking to make a bag, pattern cutting, discuss your ideas or bag designs, or to engage in consultancy for your business. What to expect No matter your leather crafting dreams or goals, 1-2-1 tuition has you covered. Time: Sessions run from 10am - 4pm. There will be a light lunch served at midday and tea/ coffee breaks throughout. Location: Sessions can be run online or from the Workshop of Hands Of Tym in Banbury, Oxfordshire, OX16 9DH. Parking: Parking is available on the drive with easy access via the M40. Transport: Banbury train station is a 30 min walk. Trains run from both London Marylebone and Birmingham to Banbury in 50 minutes. We’re also well connected to Reading, Oxford, and Leamington Spa. What's included in the price? Materials are an ADDITIONAL cost. This includes all the leather, hardware and other materials required. There will be a selection of leather and hardware colours for you to choose from on the day or you may bring your own to use. Cancellation policy Easy - Cancellation and a full refund can be obtained up to 2 weeks before the course starts About Georgie at Hands of Tym During training at Cordwainers, London College of Fashion in 2010 I learnt how to design, make and manufacture bags professionally. Following a varied career in Accessories design and development across many roles and international brands I set up Hands of Tym in 2016. The courses I offer are suitable for all, from experienced to total novice. Come along to learn something new, and design and make your own leather bag in a day.
V-Ray Course For Architects
By ATL Autocad Training London
Why learn V-Ray for architects and designers? Realistic Visuals: V-Ray produces lifelike renderings for precise design visualization. Enhanced Presentations: Stunning visuals secure approvals and investments effectively. Time and Cost Efficiency: Streamlines design iterations, cutting down prototyping expenses. Click here for more info: Website Scheduling Your Training: You can also call 02077202581 to book. Training Duration: 10 hours Method: In-person face-to-face sessions or live online. Course Title: V-Ray Essentials for Architects and Designers Course Duration: 10 Hours Course Overview: Unlock the power of V-Ray, the industry-standard rendering software, and elevate your architectural and design projects to new heights. In this comprehensive 10-hour course, you'll dive deep into V-Ray and gain the skills needed to create stunning visualizations. Whether you're an architect or designer, this course will equip you with the knowledge and techniques to bring your ideas to life. Module 1: Introduction to V-Ray (1 hour) Understanding the V-Ray interface Navigating the V-Ray toolbar Setting up your first V-Ray project Module 2: Lighting Mastery (2 hours) Utilizing various light sources Achieving realistic daylight simulations Creating artificial lighting setups Mastering V-Ray's advanced lighting tools Module 3: Material Magic (2 hours) Exploring V-Ray materials Creating realistic textures and finishes Understanding material properties Working with material libraries Module 4: Perfecting Render Settings (1 hour) Configuring render settings for optimal results Setting up render elements for post-processing Achieving photorealistic renderings Module 5: Advanced Rendering Techniques (2 hours) Fine-tuning render settings for specific scenarios Creating stunning visual effects Optimizing render times Rendering animations and walkthroughs Module 6: Realistic Environments (1 hour) Incorporating background images and environments Adding context to your architectural scenes Achieving seamless integration of 3D models and backgrounds Module 7: Portfolio-Ready Projects (1 hour) Applying V-Ray skills to complete a professional project Assembling a portfolio showcasing your work Course Benefits: Master V-Ray for architectural and design projects. Create photorealistic renderings with confidence. Customize lighting, materials, and textures for your designs. Optimize render settings for efficiency and quality. Enhance your portfolio with impressive visualizations. Receive lifetime email support for continued guidance. Explore career opportunities as a rendering specialist. Who Should Attend: Architects Interior Designers 3D Artists Visualization Specialists CGI Artists Architectural Renderers Game Environment Artists Virtual Reality (VR) Developers Anyone passionate about architectural rendering and design Method of Instruction: 1-on-1 personalized training In-person or live online sessions Hands-on exercises and practical projects Upon completing the "V-Ray Essentials for Architects and Designers" course, participants will: V-Ray Proficiency: Master V-Ray rendering for photorealistic visualizations. Advanced Lighting Skills: Create dynamic and realistic lighting scenarios. Material Expertise: Customize textures and materials for enhanced visuals. Optimized Renders: Configure settings for efficient workflows. Advanced Techniques: Learn rendering tricks for stunning effects. Realistic Environments: Integrate 3D models seamlessly into real-world settings. Portfolio Development: Build a competitive portfolio showcasing advanced rendering skills. Benefits for Interior Designers and Architects: Enhanced Visualization: Improve design communication with realistic visualizations. Competitive Edge: Stand out with high-quality renderings. Efficient Decision-Making: Experiment and refine designs before execution. Streamlined Workflows: Produce quality renders efficiently. Career Opportunities: Explore roles in architectural visualization, 3D art, and CGI. In short, this course equips interior designers and architects with V-Ray skills to create impressive visualizations, improve communication, gain a competitive edge, streamline workflows, and expand career options. Master Vray Rendering: Achieve proficiency in Vray rendering for architectural and interior design projects. Industry Excellence: Learn industry-standard practices and workflows to produce high-quality results. Flexible Learning: Choose between in-person or live online training to suit your schedule. Resourceful Learning: Access recorded lessons for convenient review and reinforcement. Ongoing Support: Benefit from lifetime email support, ensuring you receive guidance beyond the course. Career Guidance: Receive free career advice to make informed decisions about your professional growth. Upon completion, our Vray for Architects and Interior Designers Training Course opens doors to various career opportunities in the architecture and design industry. Graduates with advanced rendering skills can explore roles such as: Architectural Visualizer Interior Designer 3D Artist Rendering Specialist Visualization Specialist CGI Artist Architectural Renderer Game Environment Artist Virtual Reality (VR) Developer Freelance Rendering Professional Vray Mastery: Gain expertise in Vray rendering for architectural and interior design projects. Industry-Approved Methods: Learn tried-and-true workflows for exceptional results. Flexible Learning: Opt for in-person or live online training at your convenience. Easy Review: Access recorded lessons to reinforce your knowledge conveniently. Lifelong Support: Receive ongoing guidance even after course completion. Career Consultation: Make informed decisions about your professional growth. Career Opportunities: Unlock doors to diverse roles in architecture and design, including Architectural Visualizer, Interior Designer, 3D Artist, Rendering Specialist, and more.
Vray for Maya Essentials Course
By ATL Autocad Training London
Why Choose Vray for Maya Essentials Course? Learn V-Ray's power for stunning 3D visualizations. In design and architecture, it's essential for effective idea communication, offering an intuitive interface and efficient rendering, ensuring faster images and animations. Click here for more info: Website Duration: 10 hours Training Approach: 1-To-1 Sessions. Schedule: Customize your schedule by pre-booking a convenient hour of your choice, available Mon to Sat between 9 am and 7 pm. Module 1: Introduction to Vray for Maya (2 hours) Understand the significance of Vray and its integration with Maya. Installation and setup of Vray for Maya. Familiarize with the Vray interface, workflow, and materials overview. Module 2: Lighting with Vray (2 hours) Explore various lighting techniques in Vray. Understand different Vray lights and their settings. Master the creation and control of Vray sun, sky, dome lighting, and IES lights. Learn efficient lighting workflows with Vray. Module 3: Vray Camera (2 hours) Grasp Vray camera settings and exposure control. Work with Vray depth of field and create camera animations. Understand Vray frame buffer functionalities. Module 4: Vray Materials (2 hours) Explore Vray materials, realistic material creation, and custom material libraries. Utilize Vray material overrides for enhanced customization. Module 5: Vray Rendering and Post Production (2 hours) Dive into Vray rendering settings and techniques for both images and animations. Enhance post-production skills using Photoshop and Vray frame buffer. Learn the art of compositing Vray render elements and utilizing Vray denoiser. Additional Topics Covered: Global Illumination in VRay: Exploring techniques such as Irradiance Map, Light Cache, Quasi-Monte Carlo/Brute Force, and Environmental Lighting. Image Sampling: Understanding Fixed, Adaptive QMC, and Adaptive Subdivisions for optimal rendering quality. VRay Lights: Mastering Plane Light, Dome Light, Sphere Light, VRay Sun, VRay Shadow, Image-Based Lighting HDRI, and Object-Based Lighting. VRay Camera: Manipulating Focal Length, Film Speed, and Shutter Speed for precise camera control. VRay Materials: Customizing Diffuse Color, Reflection, Refraction, and Blurry Reflections for lifelike material creation. Rendering Test Scenes: Practical application by rendering interior and exterior scenes for a hands-on learning experience. V-Ray-Maya Trial https://www.chaos.com Master Vray for Maya to create high-quality renders. Apply various lighting techniques for realistic and visually appealing scenes. Control Vray camera settings and create dynamic shots. Create and customize realistic Vray materials for 3D scenes. Optimize rendering settings for high-quality output. Enhance renders with post-production techniques in Photoshop. Establish an efficient workflow with Vray in Maya. Gain hands-on experience and access valuable resources for further practice. Vray Proficiency: Master Vray tools, interface, and workflows in Maya for advanced 3D visualization. Advanced Lighting Skills: Expertise in diverse lighting techniques, including Vray sun, sky, and IES lights. Camera Control: Proficient manipulation of Vray camera settings, exposure, and animations. Material Customization: Create and customize realistic materials, utilizing custom libraries and overrides. Rendering Excellence: Skills in rendering images and animations, post-production, and compositing techniques. Global Illumination Mastery: Understand advanced global illumination methods for realistic scene lighting. Potential Jobs: 3D Lighting Artist: Specialize in illuminating scenes for films, games, or animations. 3D Visualization Specialist: Create realistic architectural or product visualizations. 3D Rendering Specialist: Focus on rendering high-quality images and animations. 3D Animator: Animate scenes within the context of realistic lighting. 3D Modeler: Develop detailed 3D models, ensuring realistic rendering. Visualization Consultant: Provide expert advice on visualization techniques. Freelance Vray Artist: Work independently on diverse projects, rendering scenes with exceptional realism. Expert Guidance: Receive guidance from certified tutors and industry professionals, benefitting from their deep expertise and practical insights. They will share valuable tips and techniques to enhance your rendering skills. Flexible Learning: Choose between in-person or live online sessions, tailored to your preference and location. Schedule training at your convenience, available Monday to Sunday, 9 am to 8 pm. Lifetime Assistance: Access lifetime email support, ensuring continuous guidance even after course completion. Our dedicated team is committed to addressing your queries and helping you overcome challenges. Unlock Your Potential: Enroll in our V-Ray for Maya Training Course to harness the power of this industry-leading rendering engine. Elevate your visual effects and animation skills, unleashing your creativity with stunning and lifelike renders.

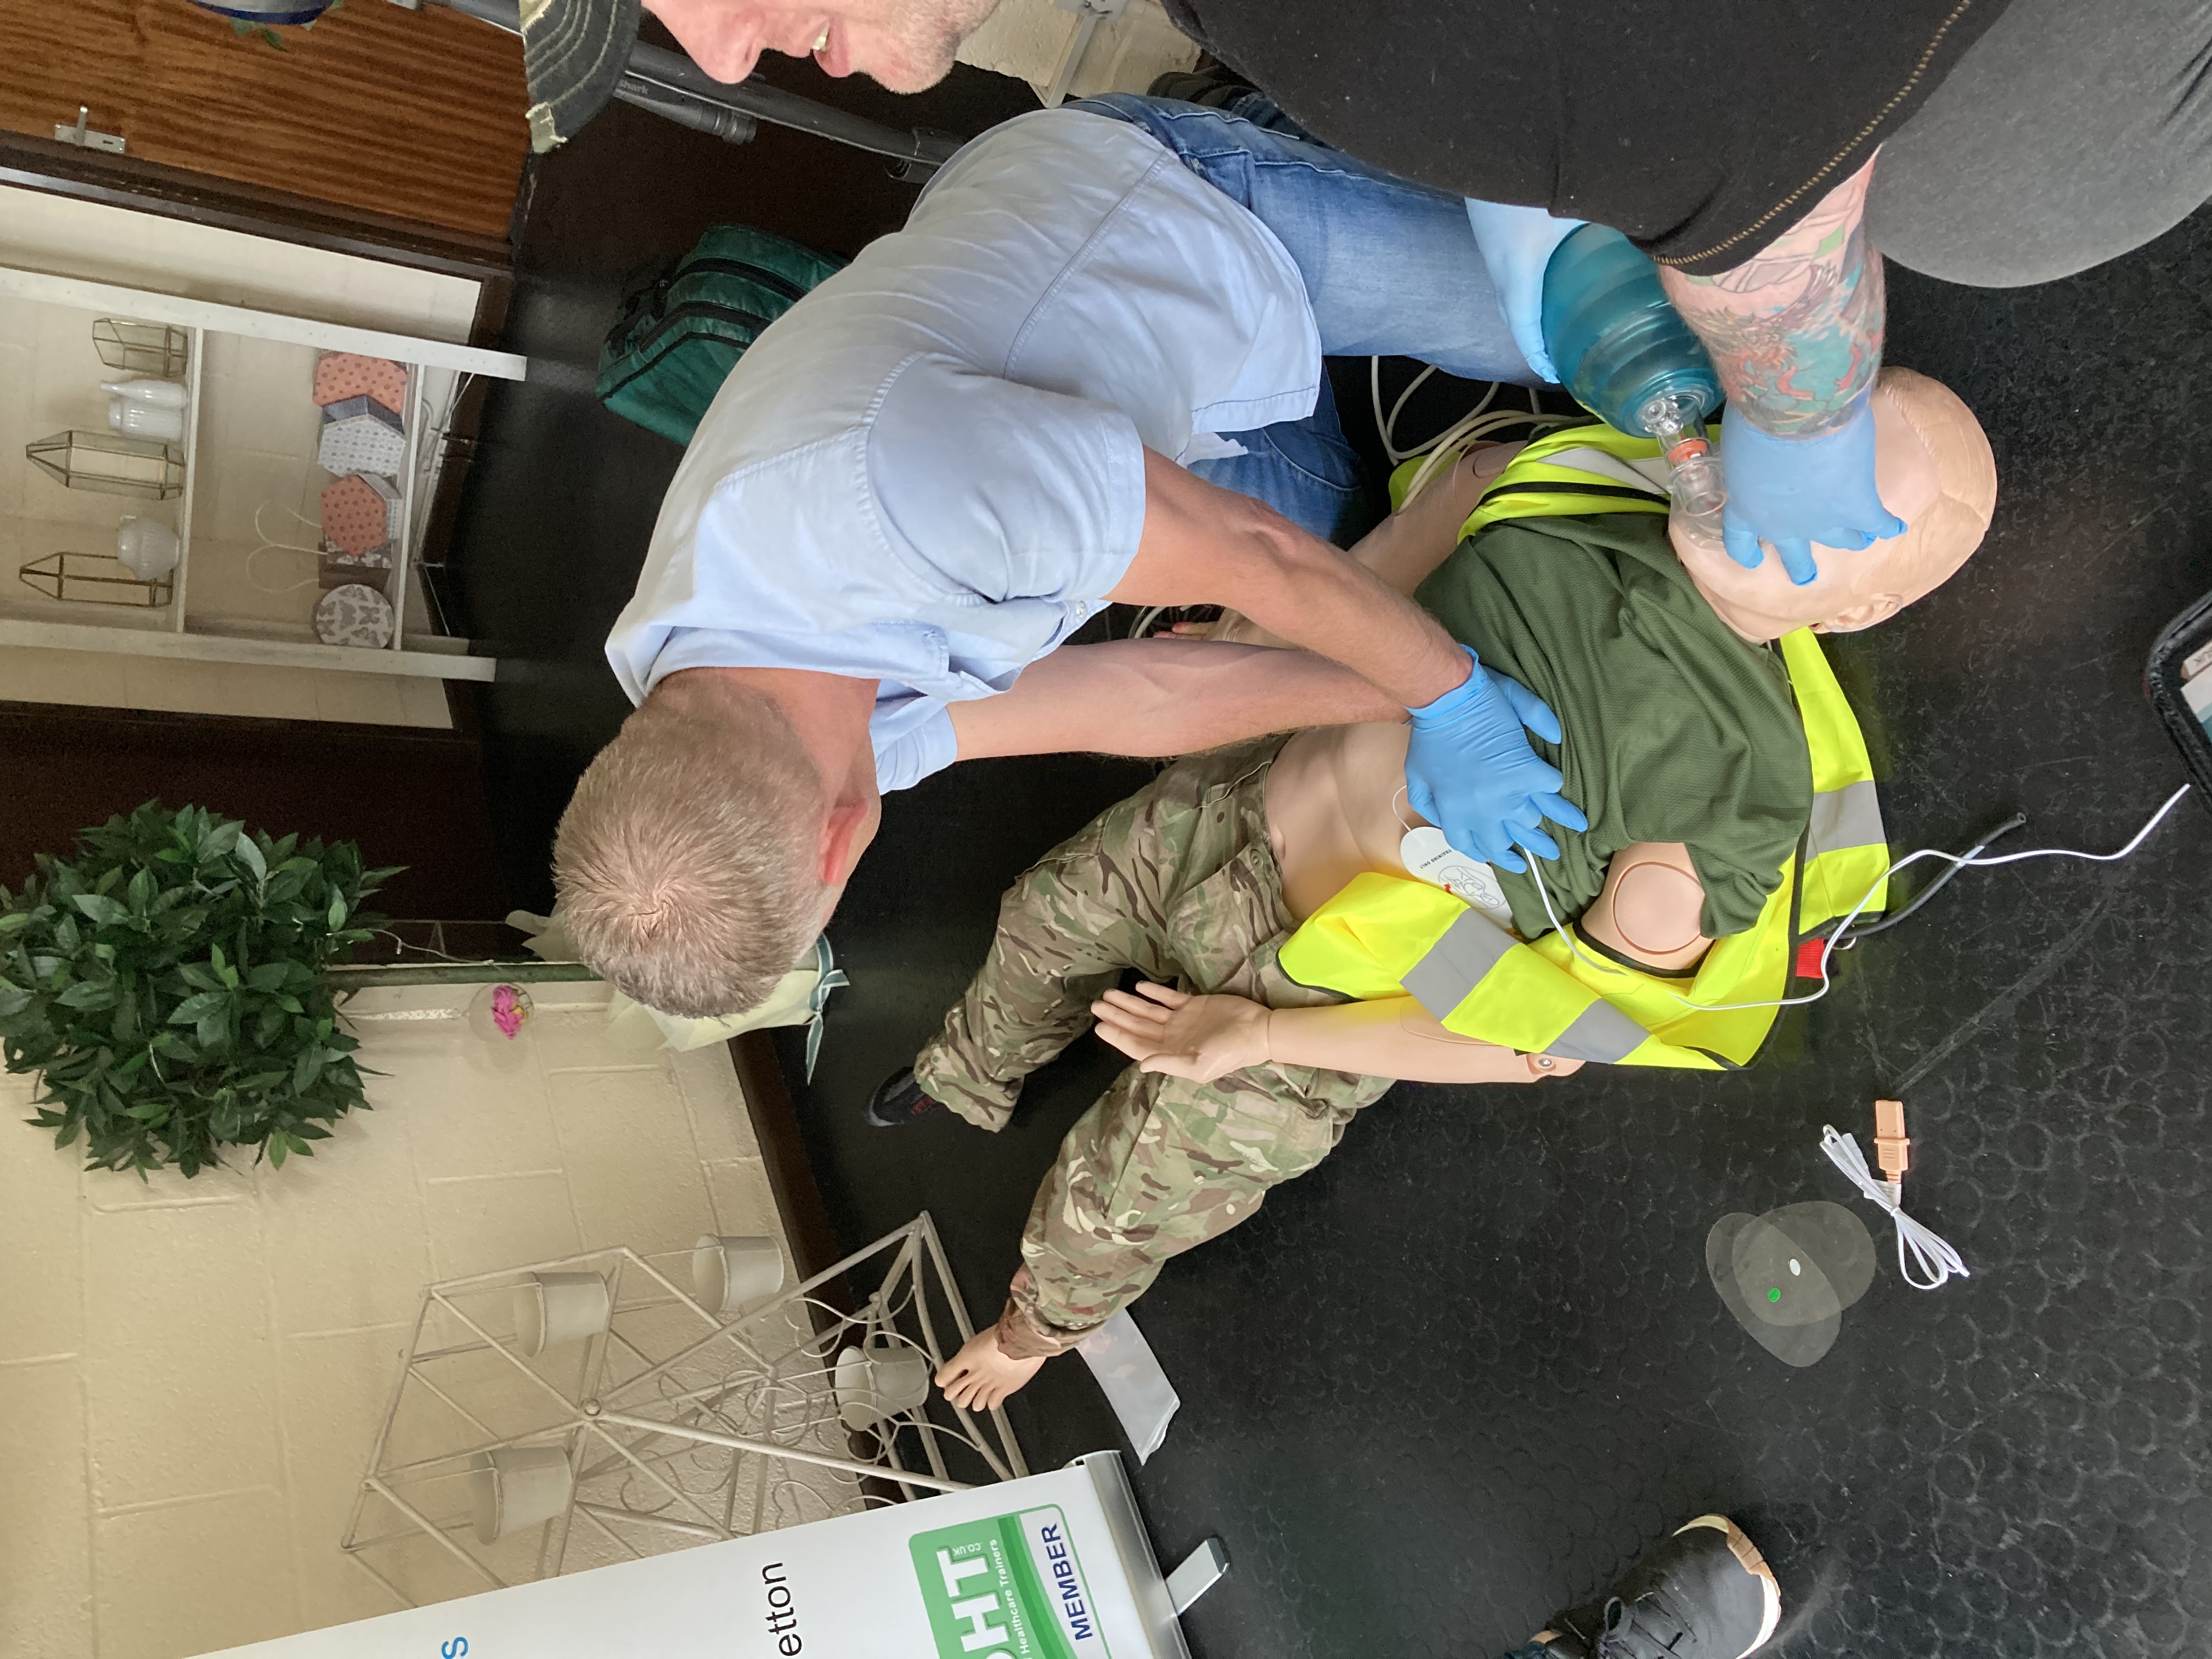
Qualsafe Level 3 Award in First Response Emergency Care (RQF)
By Brian Norkett
Qualsafe Level 3 Award in First Response Emergency Care (RQF)! Ideal for those looking to work in the event industry, security or the emergency services.
Essentials Of Sepsis Recognition & Escalation For Care & Support Staff
By NR Medical Training
To better equip care organisations and their amazing, hardworking staff in this fight, we offer the Essentials of Sepsis Recognition & Escalation For Care & Support Staff course. This face to face training course delivered by experienced healthcare professionals arms care and support staff with the necessary knowledge, skills and confidence to identify individuals at risk of sepsis, recognise its early signs, and escalate care effectively when they suspect sepsis. With our CQC compliant course, you'll be better prepared to help those at risk. Learners will receive an NR Medical Training/UK Sepsis Trust certificate which is valid for 1 year and a summary of elements covered throughout the course.