- Professional Development
- Medicine & Nursing
- Arts & Crafts
- Health & Wellbeing
- Personal Development
2960 PLA courses delivered Live Online
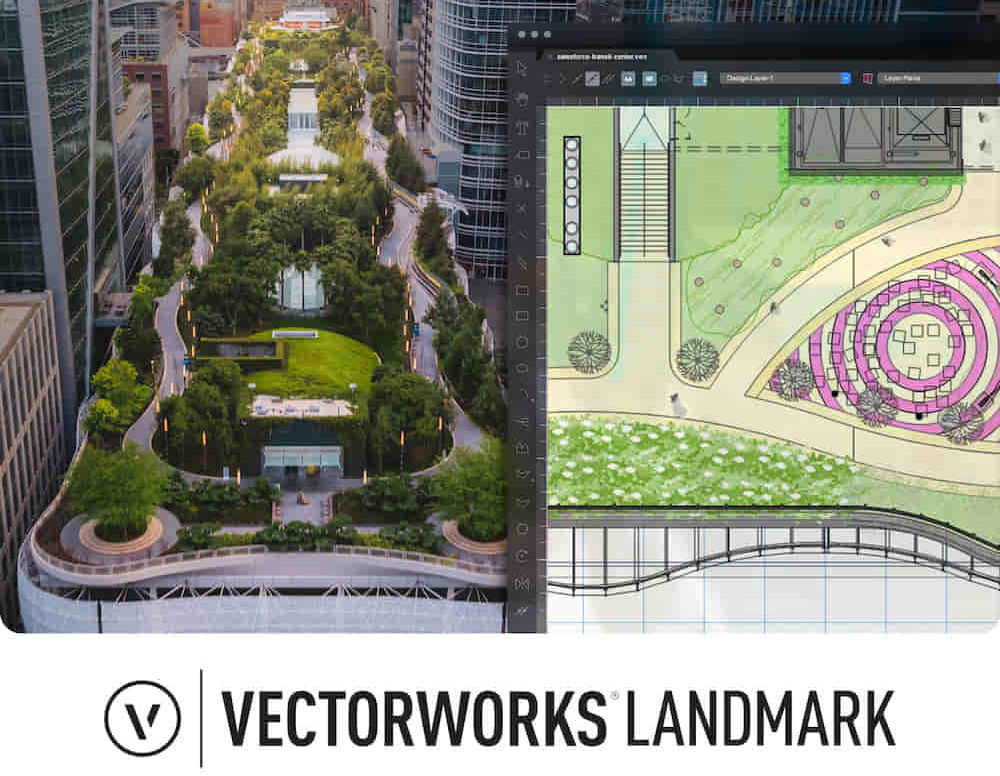
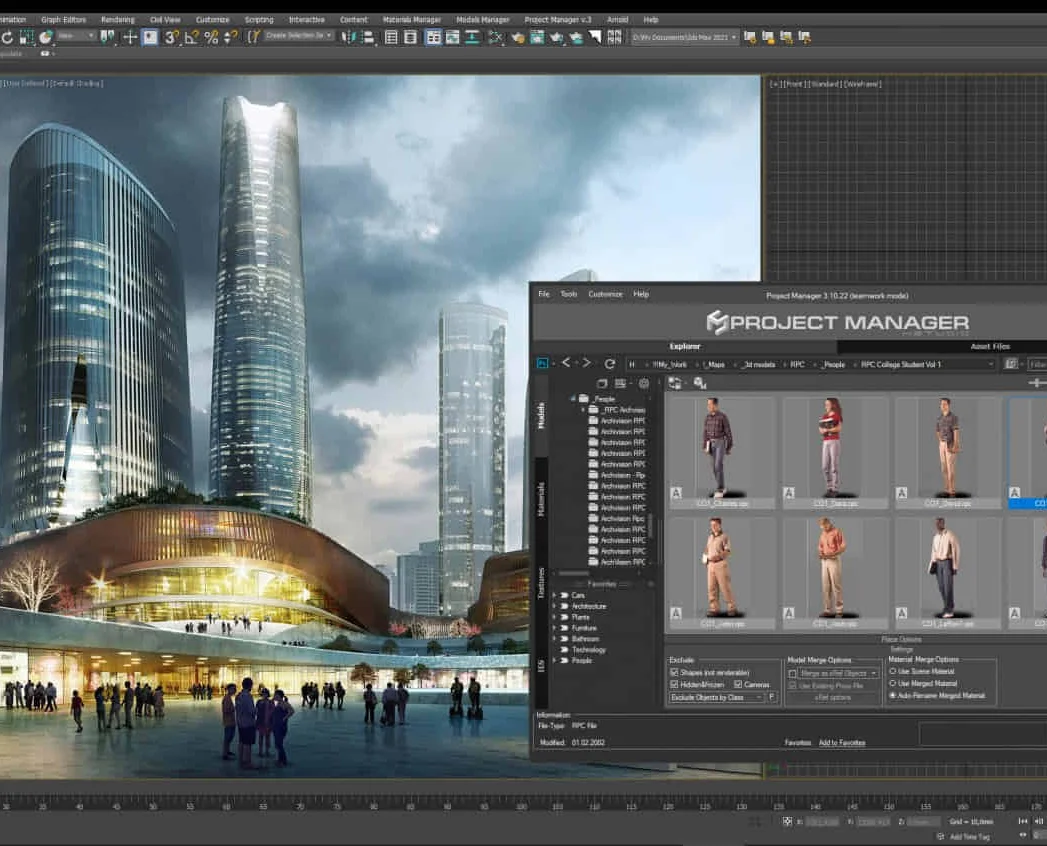
Landmark Training Course With Vectorworks
By ATL Autocad Training London
Who is this course for? Landmark Training Course With Vectorworks. Dive into terrain modeling, planting, irrigation, and site analysis guided by certified tutors. Master these tools for precise landscape designs and effective documentation. Check our Website Enrollment : 1-on-1 Landmark Training. Tailor your schedule. Mon to Sat between 9 am and 7 pm Call 02077202581 to book your slot. Duration: 16 hours. "Split these hours over multiple days as needed for your ideal schedule." Approach: In-person or live online. Landmark Training Course with Vectorworks: Basic to Intermediate Level Course Duration: 16 Hours Embark on a transformative journey with our Landmark Training Course tailored for landscape architects and designers. Over 16 intensive hours, dive deep into Vectorworks Landmark, mastering fundamental and intermediate techniques crucial for comprehensive 2D and 3D landscape design. Craft intricate site analyses, plans, irrigation systems, and elevate your designs with mesmerizing 3D visualizations. Explore custom plant symbols, detailed planting plans, and learn the art of efficient collaboration and customization. Course Highlights: I. Introduction to Vectorworks Landmark (1 hour) Explore Vectorworks Landmark for landscape design Master interface, tool usage, and project management II. Site Analysis and Site Plans (3 hours) Craft detailed site analyses and hardscape designs Work with contours, elevations, and terrain models III. Planting Plans (5 hours) Utilize the plant database for region-specific plant selection Create personalized plant symbols and comprehensive planting plans IV. Irrigation Design (2 hours) Design and edit efficient irrigation systems and zones Integrate irrigation components into site plans V. 3D Visualization (3 hours) Create captivating 3D models with realistic textures and materials Enhance designs with advanced lighting and special effects VI. Customization (1 hour) Tailor the interface for efficient landscape design Create custom object styles and resource libraries VII. Collaboration and Sharing (1 hour) Seamlessly import/export data from other platforms Share designs effectively with colleagues and collaborators VIII. Conclusion and Next Steps (1 hour) Review course content comprehensively Receive guidance on further learning resources Engage in a Q&A session and provide valuable feedback Enhance your landscape design expertise and unleash your creativity. Enroll now in our Vectorworks Landmark Basic to Intermediate Training and transform your designs. Download Vectorworks Landmark By the end of the Vectorworks Landmark Training Course, participants will: Understand the key features and functionalities of Vectorworks Landmark for landscape design. Demonstrate proficiency in using essential tools for site analysis, site plans, and hardscape design. Create detailed planting plans, selecting appropriate plants, and understanding their compatibility and growth patterns. Design efficient and effective irrigation systems, including generating irrigation reports. Create 3D visualizations of landscape designs, applying textures, materials, lighting, and special effects. Customize the interface and create personalized object styles and resources. Collaborate and share landscape design drawings with other software users. Have the foundation to pursue further learning and exploration in landscape design using Vectorworks Landmark. Mastering Foundations Begin your project by organizing your files and importing survey data. Learn to sketch existing buildings using Building Shell tools and model neighboring structures with Massing Model. Explore different methods for laying out survey points and marking existing features with precision. Objectives: Review File Organization Techniques Import Survey Data (DWG Import) Create Building Structures with Building Shell Tools Utilize Triangulation and Arc Tool for Precision Master Various Tape Measurement Techniques Elevating Your Design Enhance your survey with detailed ground, existing trees, and fences. Conduct shadow analysis to optimize planting locations. Dive into the Vectorworks Plant tool, your key design companion. Objectives: Develop Detailed Ground Surfaces Incorporate Existing Trees and Fences Design with Railing Fence Tool Conduct Shadow Analysis using Heliodon Tool Utilize Plant Tool Modes for Plant Placement Access Existing Plant Libraries and Customize Plants in 2D/3D Crafting Landscapes Create vibrant plant mixes using Landscape Area tool and apply them across your site models. Design intricate hardscapes, aligning them effortlessly even in complex paving scenarios. Learn to use components for detailed reporting, cut and fill calculations, and precise detailing. Explore custom object creation and site furniture placement. Objectives: Design Landscape Areas and Define Custom Plant Mixes Create Hardscapes and Define Custom Paving Constructions Generate Reports and Tags for Landscape Areas and Hardscapes Access and Manage Objects in Resource Manager Craft Custom Objects and Site Furniture Polished Presentation Present your designs professionally using Sheet layers and viewports. Create Section viewports to cut through your model and Detail viewports to focus on specific areas. Enhance visual appeal with mood boards and annotations, ensuring a refined, detailed presentation. Objectives: Craft Sheet Layers for Presentation Create Plan, Elevation, and Perspective Viewports Generate Section and Detail Viewports Annotate Viewports for Clear Communication Incorporate Images and Plant Reports for Comprehensive Presentations Master Vectorworks Landmark: Gain expertise in essential and advanced 2D/3D landscape design tools for precision and efficiency. Boost Efficiency: Learn time-saving techniques and workflows tailored to Vectorworks Landmark, enhancing productivity. Versatile Landscape Skills: Develop proficiency in site analysis, planting plans, hardscapes, and irrigation systems for diverse projects. Industry-Ready Expertise: Acquire sought-after skills in landscape architecture, paving the way for career growth. Flexible Learning: Access recorded lessons for convenient review and receive lifetime email support for ongoing guidance.
Garden Design Courses with Vectorworks Training Program
By ATL Autocad Training London
Why Choose Garden Design Courses with Vectorworks Training Program? Designed to enhance your skills in crafting stunning garden designs. Led by certified tutors. From 2D layouts to 3D landscapes and detailed plans and visualizations. Check our Website Details: 1-on-1 training. Customize your schedule, available Mon to Sat 9 am and 7 am Call 02077202581 to book your session over the phone. Duration: 16 hours. "You can divide this over multiple days to suit your schedule." Approach: 1-on-1 in-person or live online. Course Duration: 16 hours Course Description: This advanced Vectorworks course is tailored for individuals who already possess basic knowledge of the software and wish to enhance their skills to become proficient users. Participants will learn more advanced 2D and 3D techniques, including advanced 3D modeling, rendering, visualization, and customizing Vectorworks to suit their specific needs and workflows. The course will cover topics such as creating custom tools, working with planting plans, and integrating with AutoCAD. Course Outline: Module 1: Vectorworks Interface and Basic Concepts - Understanding the Vectorworks interface and palettes - Opening, saving, and managing files - Creating and editing objects and shapes - Utilizing Undo/Redo and Snaps for precision - Applying graphic attributes and working with dimensions Module 2: Modeling and Drawing Techniques - Exploring advanced tools and commands in detail - Integrating with AutoCAD and data exchange - Creating, modifying, and editing text - Utilizing callout text tool for annotations - Organizing information using design layers and classes Module 3: Working with Buildings and Models - Utilizing design layers and sheet layers for architectural projects - Assigning objects to layers and classes - Working with viewports and sheet layers for presentation - Drawing buildings, including walls and roofs - Setting up and rendering perspective views Module 4: Creating Site and Landscape Plans - Importing land surveys or architects' files - Drawing site surveys and working with hard landscape elements - Adding and customizing plantings using the plant tool - Editing plant definitions and creating custom plant symbols - Generating plant schedules and reports Module 5: Vectorworks Architect Features - Setting up files and scaling the drawing - Customizing text styles and dimension standards - Working with scanned images and creating site models - Designing floors, doors, and windows using standard Vectorworks elements - Creating and managing title blocks, labels, notes, and keynotes Module 6: Working Drawings and Final Project - Developing the final project with 2D and 3D elements - Applying site modifiers and stairs to the design - Generating printing layouts for presentations - Creating working drawings with detailed plans and elevations Download Vectorworks Trial https://www.vectorworks.net/trial Learning Outcomes: Master Vectorworks Tools: Proficiency in Vectorworks software, specializing in garden design features. Comprehensive Garden Design Skills: Expertise in 2D/3D modeling, plant selection, hardscapes, and irrigation systems. Professional Documentation: Create precise construction documents and visually compelling presentations. Collaboration and Project Management: Understand collaborative workflows, project management, and client communication. Job Opportunities: Landscape Designer/Architect: Design aesthetically pleasing and functional gardens for residential and commercial spaces. Garden Consultant/Horticulturist: Provide expert advice on plant selection, garden health, and sustainable practices. Entrepreneur/Educator: Start your own garden design business or teach garden design principles and techniques. Elevate your career with the Vectorworks Garden Design Course! Vectorworks Garden Design Mastery Course Course Enrollment Details: Unlock a personalized learning journey with our flexible 1-on-1 training sessions. Customize your schedule by reserving a time slot at your convenience, available Monday to Saturday between 9 a.m. and 7 p.m. Call 02077202581 to book your session over the phone. Training Duration: 16 hours. "You can divide these 16 hours over multiple days to suit your schedule." Training Approach: Experience tailored 1-on-1 sessions, either in-person or live online, providing individualized attention, customized content, flexible pacing, and comprehensive support. Live online 1-on-1 sessions via Zoom are also available. Course Overview: The Vectorworks Garden Design Mastery Course is meticulously crafted to empower participants with the expertise needed to craft exquisite garden designs using Vectorworks software. Guided by certified tutors and industry professionals, this program delivers a profound understanding of Vectorworks tools specifically tailored for garden design, enabling you to transform your landscaping ideas into breathtaking realities. Throughout the course, delve into the specialized features and functionalities of Vectorworks tailored for garden design. From 2D layouts to intricate 3D landscapes, master the art of utilizing Vectorworks to create detailed plans, visualize designs, and produce impeccable documentation for your garden projects. Tailored Training Excellence: Personalized One-to-One Guidance: Experience individualized coaching with undivided attention and customized instruction. Flexible Scheduling: Choose your preferred training slots, tailored to your schedule, even on weekends and late evenings. Post-Course Support and Comprehensive Materials: Access free online support post-training and receive detailed PDF notes and handouts for effective learning. Recognition of Achievement: Earn a Certificate of Attendance upon course completion, validating your expertise. Affordable Learning Solutions: Enjoy budget-friendly training rates without compromising on the quality of education. Tech Assistance and Referral Benefits: Receive software setup support and unlock referral discounts by recommending friends. Group Learning Perks and Tailored Courses: Avail special discounts for group sessions and experience customized training designed just for you. Elevate your skills affordably with our flexible schedules and personalized support.

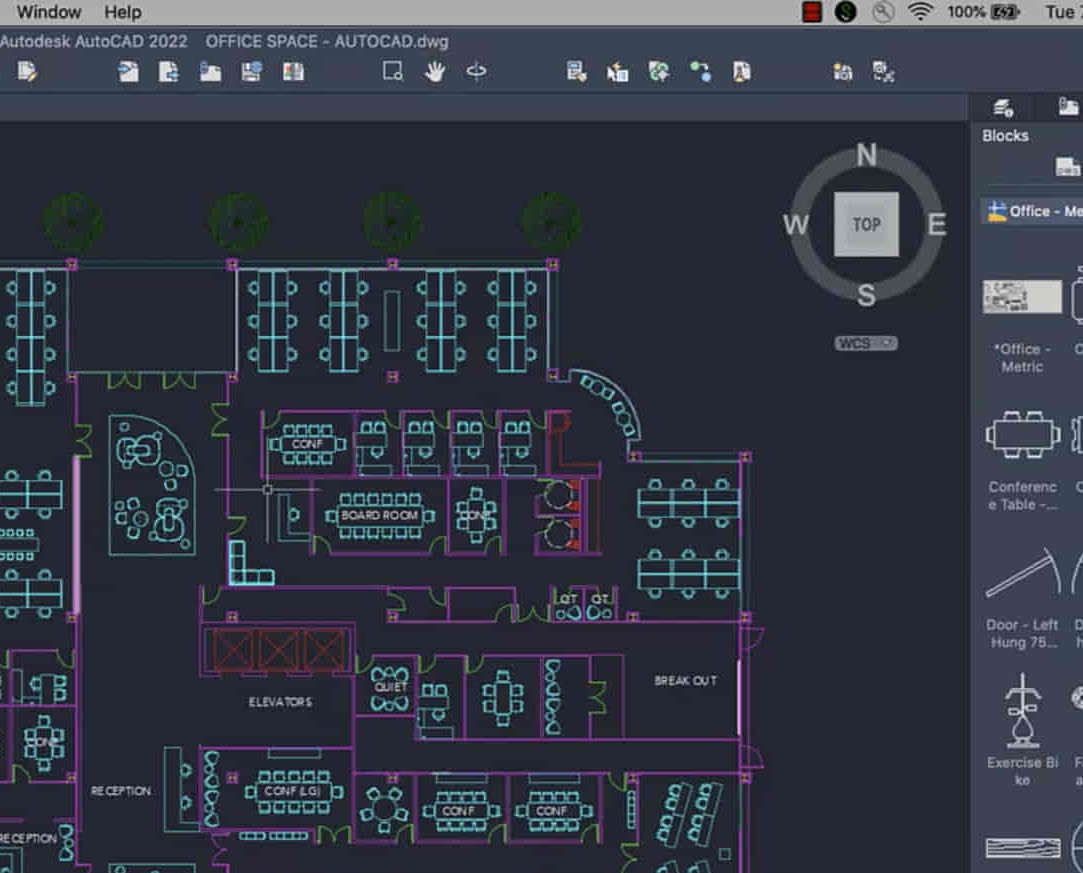
AutoCAD-Mac Introduction to Advanced Training Course
By ATL Autocad Training London
AutoCAD-Mac Introduction to Advanced Training Course This project-based course is tailored for AutoCAD Mac users, architecture and interior design students and professionals. Click here for more info: Website When Can I Book This Training Course? Personalized experience with 1-on-1 sessions designed to fit your unique needs. Available from Monday to Saturday, 9 am to 7 am Or Call to Book 02077202581. Duration of Training: 16 hours. Training Method: 1-on-1, providing the option for in-person sessions or live online training. Course Content Section 1: Introduction Course Overview Section 2: Basic Concepts Status Bar and The Units Drawing Commands Control Points - Vertex or Verteces Modifying Commands Snap Settings Drawing An Outline Section 3: Dimensions and Customization Adding Dimensions and Dimension Style Manager Importing Dimension Styles Customizing Shortcuts Section 4: Advanced Techniques Adding Walls Thickness with Offset Command Adding interior layout Cleaning Layout lines with Trim Section 5: Text and Styling Text Editing and Importing Text Styles Main File Formats in AutoCAD Section 6: Design Elements Creating Openings in the Floor Plan Adding Openings - Part 2 Adding Openings - Part 3 Drawing Doors & Windows Using Line Types & Linetype Scale Group and Ungroup Commands Using Blocks Using Blocks Library & Dynamic Blocks Section 7: Layers and Furnishing Layers - Part 2 Layers - Part 3 Furnishing Bedrooms & Bathrooms - Part 1 Adding Furniture, Fixtures, and Equipments | part 2 Adding Furniture, Fixtures, and Equipments | part 3 Drawing the Kitchen Drawing the Living Room Drawing Dining Room & Adding Casework Adding Steps and Railings Using Stretch Command Finishing Steps and patio areas Hatch command Hatch Customization Adding Plants & Finishing Floor Plan Section 8: Layout and Printing Paper Space & Page Setup Manager Working with Viewport & Using Print Command Scale & Using Multiple Viewports Locking Viewport Scale Drawing A Titleblock - Part 1 Drawing A Titleblock - Part 2 Copying the Titleblock Using Titleblock with Attributes Section 9: Roof Plan and Organization Drawing The Roof Plan Placing Roof Plan on Sheet Organizing Project Drawings & Using Layer Freeze AutoCAD Crashing And What To Do Section 10: Elevations Exterior elevations - Drawing the Outline Exterior elevations - Drawing the Openings Elevations - Detailing - Part 1 Elevations - Detailing - Part 2 Elevations - Repeating the workflow Elevations - Finishing 3rd Elevation Elevations - Drawing the final elevation Section 11: Sections Sections: Drawing Cut Lines & the Outline Sections: Placing 1st Section on Sheet Sections: Drawing Section #2 - Different Technique Sections: Adding Final Detail Section 12: Interior Elevations Interior Elevations: Drawing the Outline Interior Elevations: Placing on Sheet Interior Elevations: Using Block Clip Interior Elevations: Final Drawing Section 13: Conclusion Putting the Final Set Together Proficient AutoCAD Skills: Master essential tools for efficient drawing creation and manipulation. Accurate 2D Designs: Create precise and high-quality layouts with attention to detail. Effective Object Handling: Excel in selecting, moving, copying, and scaling objects. File Management: Organize drawings efficiently and understand different file formats. Precise Measurements: Utilize inquiry commands for accurate design analysis. Annotations and Hatching: Apply text, dimensions, and hatching to enhance drawings. Object Organization: Manage layers and object properties for organized designs. Reusable Content: Efficiently use blocks, tool palettes, and groups for productivity. Layout Optimization: Create layouts with viewports for optimal design presentation. Professional Output: Generate professional plots and PDF output for polished results. Enhanced Productivity: Explore AutoCAD toolsets and web/mobile apps for streamlined workflow. Course Overview: Learn versatile AutoCAD for Mac drawing techniques, applicable across all industries, enabling you to excel in the application. Our trainers incorporate exercises from various disciplines. Who Should Attend: Ideal for newcomers to AutoCAD for Mac, self-taught users seeking correct techniques, and those transitioning from other CAD tools. Requirements: A solid Mac OS understanding is essential, while prior CAD knowledge is not required. Pre-course preparation guidance is provided for new AutoCAD users. Highlights: Perfect for AutoCAD for Mac beginners. Gain skills for precise 2D layouts and designs. Versatile drawing techniques for all industries. Choose between in-class or live online training. Autodesk Certified Tutors: AutoCAD 1-2-1 courses. Hands-on learning with expert trainers. Lifetime post-course email support. Tailored on-request training available. Certificate: Digital certificate included. Tailored Mac Training: Excel in AutoCAD with specialized Mac training, leveraging its distinct features and interface for heightened efficiency. Comprehensive Skill Enhancement: Advance from fundamental to intermediate AutoCAD Mac proficiency, creating precise and professional 2D drawings. Industry-Relevant Expertise: Attain in-demand skills valued by employers in architecture, engineering, and design sectors. Hands-On Project Exposure: Immerse yourself in practical exercises mirroring real-world design scenarios, fostering practical competence. Lesson Recordings for Review: Access recorded lessons for reinforcement and deeper AutoCAD Mac comprehension. Ongoing Email Support: Benefit from lifetime email support, ensuring assistance beyond course completion."
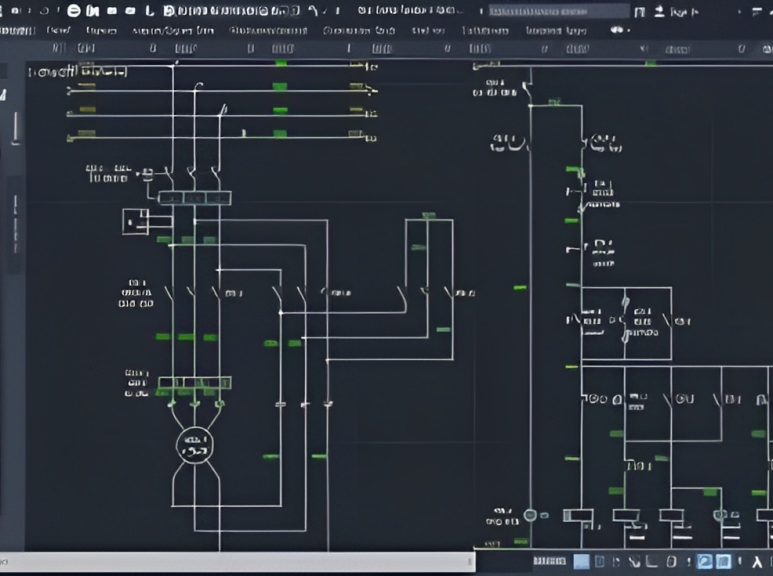
AutoCAD Training Course for Electrical
By ATL Autocad Training London
Exclusive to AutoCAD subscribers, the AutoCAD Electrical toolset simplifies electrical system creation. Click here for more info: Website Our course provides a strong foundation in 2D electrical design, covering essential tools. Flexible one-on-one sessions from 9 a.m. to 7 p.m., Monday to Saturday. Call 02077202581 or book online. The 16-hour course offers flexibility, divide hours across days. Benefit from individualized attention and tailored content. Enroll for in-person or Zoom sessions to excel in AutoCAD Electrical. AutoCAD Electrical Course Content: Introduction to AutoCAD Electrical Software: Overview and features of AutoCAD Electrical Understanding the software interface and tools Project file structure and management Layout and Navigation: Navigating the AutoCAD Electrical workspace Creating new project files and using attribute editors Understanding WDD, WDX, and WDF project files Exploring the Project Manager interface and attribute editors Electrical Diagram Drawing: Numbering and titling wires in diagrams Labelling components Utilizing diagram symbol libraries Creating and editing Electrical Control Circuits (ECC) Component dialog box and Circuit Scale dialog box Introduction to Programmable Logic Controllers (PLCs) and Integrated Systems: PLC Symbols and Concepts Inserting Programmable Logic Controllers (PLCs) into diagrams Adding PLC Units to diagrams Working with PLC Input and Output points and circuits Understanding PLC-based classification Using the Spreadsheet to PLC Input and Output Points utility Custom and Bespoke Symbols: Creating custom symbols for Switches, Wires, Contactors, Motors, Transformers, etc. Specifying symbol conventions and standards Offline and online usage of AutoCAD Electrical databases Drawing for Terminals and Plans: Implementing Terminal symbols in diagrams Handling terminal plans and locations Working with compound level terminals and locations Utilizing the Component command for single and multiple components Managing Jumpers and wiring Modifying Terminal Strips and Dual In-Line Packages (DIP) Understanding DIN Rail, Electrical Enclosure, Circuit Breakers, and Electrical Equipment Generating PDFs and Reports: Exporting drawings to PDF format Organizing report templates Automating the generation of reports Creating Electrical Audit Reports This AutoCAD Electrical course provides comprehensive knowledge of the software, focusing on electrical diagram drawing, symbol creation, PLC integration, terminal planning, and report generation. Participants will gain the skills needed to efficiently design electrical systems using AutoCAD Electrical software. Upon completion, participants will proficiently use AutoCAD Electrical to create precise electrical diagrams, integrate PLCs, design custom symbols, plan terminals, and generate reports efficiently. They will possess the skills needed to confidently design electrical systems and enhance their expertise in electrical design and drawing. AutoCAD Electrical Training Course: Master precision in specialized electrical design skills. Optimize your design process with streamlined workflows. Ensure compliance with industry standards consistently. Boost productivity in electrical design tasks. Facilitate seamless collaboration with fellow professionals. Benefit from recorded lessons for convenient review. Enjoy continuous support with lifetime email assistance. Unleash the complete power of AutoCAD for your electrical design needs. Enroll today and craft precise, professional electrical drawings confidently. Select between in-person and live online sessions to suit your preference. Flexible Evening Sessions: Learn AutoCAD at your own pace with evening sessions designed for busy individuals. Boost your career opportunities in computer-aided design. Comprehensive Skill Development: Gain a strong foundation in AutoCAD's core features and advance to 3D modeling and rendering techniques, enhancing your design capabilities. Industry-Standard Knowledge: Become proficient in AutoCAD, a widely used CAD software in architecture, engineering, and construction fields, making you highly sought after by employers. Practical Application: Apply AutoCAD skills to real-world design scenarios, creating detailed plans for professional projects in architecture, engineering, and mechanical fields. Recorded Lessons for Review: Access lesson recordings to reinforce learning and review specific topics or techniques whenever needed. Lifetime Email Support: Enjoy ongoing support with lifetime email assistance, even after completing the course, for guidance and clarification.
Vectorworks Intermediate Training Course
By ATL Autocad Training London
Who is this course for? Vectorworks Intermediate Training Course. This intermediate course empowers designers with Vectorworks skills, enhancing productivity and enabling the creation of intricate, high-quality designs. Design career with this essential training. Vectorworks courses cater to individuals of all skill levels. Click here for more info: Website Scheduling: 1-on-1 training, your schedule. Book any hour, Mon to Sat, 9 am - 7 pm. Call 02077202581 to reserve. Duration: 16 hours. Method: In-person sessions and live online. Comprehensive Course Outline Please note that the following is a general outline, and the specific topics covered during your training will be tailored to your student level, available time, and course preferences. Essential Foundations Navigating the Interface and User-Friendly Navigation Document Settings Adjustment and Template File Creation Effective File Navigation: Zooming, Panning, and Page Fitting Object Selection Techniques and Deletion Creating Basic Drawings with Precision Utilizing Object Snaps for Accurate Drawing Understanding the Object Info Palette Exploring Fundamental 2D Tools and Tool Modes Crafting Complex Lines and Shapes Project Organization Efficiently Organizing Your Drawings Using Classes Customizing Colors, Line Types, and Line Thickness Views Management: Saving and Editing Views Annotating and Printing Your Designs Adding Text and Annotations Incorporating Dimensions for Clarity Preparing and Printing Your Drawings Advanced Presentation Techniques Leveraging the Power of Sheets and Viewports Creating Standard and Cropped Viewports Annotating and Editing Viewports Exploring Viewport Display Overrides and Sheet Layer Printing Streamlining Workflows Between Viewports and Design Layers Efficiently Saving and Editing Views for Navigation Enhancement Importing DWG and File Formats Importing and Effectively Working with DWG Files Integrating Sketches and Photos into Your Drawings Enhancing Efficiency Creating and Editing Symbols Resource Browser: Management and Organization of Symbols Maximizing Productivity with Worksheets, Schedules, and Reports Custom Attribute Creation and Management (Hatches, Gradients, and Image Fills) Designing Custom Title Blocks Free 30-day Trial Vectorworks https://www.vectorworks.net/trial After completing this course, you will: Master Vectorworks: Gain proficiency in Vectorworks software, including its interface and essential design tools. Precise Drawing: Create accurate drawings with dimensions and object snaps. Project Management: Efficiently organize and manage design projects using classes and views. Clear Presentation: Annotate and dimension your drawings for professional presentations and printing. Advanced Presentation: Learn advanced presentation techniques, including sheets and viewports. File Integration: Work with DWG files, sketches, and photos to enhance your designs. Efficiency Boost: Discover time-saving workflows, symbol creation, and customization. Top Job Opportunities for Designers: Architectural Drafter Interior Designer Landscape Designer CAD Technician Graphic Designer Construction Estimator Product Designer Set Designer Event Planner Urban Planner These roles span various industries and offer career growth for Vectorworks-trained designers in fields like architecture, engineering, entertainment, and more. Tailored Vectorworks Training Our Vectorworks courses are customized to your needs, offering 1-2-1 sessions that adapt content to your expertise, experience, and project requirements. Whether in class, onsite, or via live online sessions, these bespoke courses ensure optimal learning outcomes. Course Overview Begin your journey into Vectorworks, unlocking the potential for digital 2D and 3D visualization in interior design, architecture, 3D modeling, and landscaping. Vectorworks, a user-friendly industry-standard software, is suitable for both PC and Mac users. Course Highlights Master proper drawing setup and utilize 2D drawing tools for professional plans and elevations. Navigate and leverage the built-in symbol library effectively. Transform 2D plans into fully rendered 3D perspectives with textures and lighting. Create a comprehensive project presentation print. (Note: This course does not cover complex curved shapes.) Tailored Training | Vectorworks Personalized One-on-One Guidance Flexible Learning Schedule Ongoing Post-Course Support Access to Extensive Learning Materials Recognition with a Certificate of Attendance Affordable Training Rates Assistance with Software Configuration Rewards for Referrals Special Group Training Discounts Convenient Hours to Suit Your Schedule Customized Courses for Your Animation Needs

3ds Max Essential Training Course
By ATL Autocad Training London
Course Title: 3ds Max Essential Training Course Perfect for novice 3ds Max users, our Essentials Training Course, hosted by an Autodesk Certified Trainer, equips you with core skills for creating 3D models and animations. Click here for more info: Website Duration: 16 hours Method: 1-on-1, Personalized Attention, Tailored Content, Flexible Pace, Individual Support Schedule: Tailor your own schedule by pre-booking a convenient hours, available from Mon to Sat between 9 am and 7 pm. Course Highlights: Comprehensive Learning: Covering 3ds Max from the basics, including interface navigation and customization, to essential skills for professional 3D modeling and animations. Expert Guidance: Certified tutors and industry experts provide personalized attention, ensuring a deep understanding of 3D concepts. Flexible Scheduling: Tailor the learning experience to your pace and preferences, with one-on-one sessions available from Monday to Sunday. Interactive Learning: Engage in hands-on exercises and practical projects, enhancing your skills in a real-world context. Job Opportunities: Upon completion, students can pursue careers as: 3D Modelers: Creating detailed 3D models for games, movies, or architectural visualization. Animation Artists: Designing engaging animations for various media platforms. Visual Effects (VFX) Artists: Working on special effects for films, TV shows, and commercials. Architectural Visualizers: Producing realistic architectural renders for construction and design projects. Game Designers: Developing immersive game environments and characters. Recommended Reading: "3ds Max 2022 for Beginners" by CADFolks: A beginner-friendly guide covering fundamental concepts and techniques in 3ds Max. "Mastering Autodesk 3ds Max 2022" by Nicholas Boughen: A comprehensive resource for mastering advanced features and workflows in 3ds Max. "The Animator's Survival Kit" by Richard Williams: A classic animation guide providing valuable insights for aspiring animators. These books offer valuable knowledge and techniques, complementing the skills learned in the course and aiding in future career endeavors. Upon completing the 3ds Max Basic to Fundamentals Training Course, participants will: Master 3ds Max Tools: Gain a deep understanding of the software interface, tools, and navigation, enabling efficient 3D modeling and animation. Create Complex Models: Develop proficiency in creating intricate 3D models, including objects, characters, and architectural elements, using various modeling techniques. Apply Realistic Textures: Learn to apply textures, maps, and materials to enhance the realism of 3D models, understanding diffuse, bump, and reflective materials. Perfect Lighting and Rendering: Acquire skills in setting up various lights, environment lighting, and global illumination for realistic renderings, optimizing rendering settings for quality output. Animate with Precision: Master keyframe animation, path animation, and constraints, bringing 3D scenes to life with smooth and accurate motion. Understand Dynamics and Simulations: Explore basic dynamics and simulations, including particle systems, creating dynamic and interactive 3D environments. Problem-Solve Creatively: Develop problem-solving skills for common challenges in 3D design, using innovative techniques and tools. Professional Project Execution: Apply learned skills to real-world projects, ensuring a professional approach to 3D modeling, animation, and visualization. By the end of the course, participants will be equipped with the knowledge and skills to confidently create visually stunning 3D models, animations, and visualizations, making them proficient 3ds Max users ready for diverse industry applications. Course Highlights: Comprehensive Learning: Covering 3ds Max from the basics, including interface navigation and customization, to essential skills for professional 3D modeling and animations. Expert Guidance: Certified tutors and industry experts provide personalized attention, ensuring a deep understanding of 3D concepts. Flexible Scheduling: Tailor the learning experience to your pace and preferences, with one-on-one sessions available from Monday to Sunday. Interactive Learning: Engage in hands-on exercises and practical projects, enhancing your skills in a real-world context. Job Opportunities: Upon completion, students can pursue careers as: 3D Modelers: Creating detailed 3D models for games, movies, or architectural visualization. Animation Artists: Designing engaging animations for various media platforms. Visual Effects (VFX) Artists: Working on special effects for films, TV shows, and commercials. Architectural Visualizers: Producing realistic architectural renders for construction and design projects. Game Designers: Developing immersive game environments and characters. Recommended Reading: "3ds Max 2022 for Beginners" by CADFolks: A beginner-friendly guide covering fundamental concepts and techniques in 3ds Max. "Mastering Autodesk 3ds Max 2022" by Nicholas Boughen: A comprehensive resource for mastering advanced features and workflows in 3ds Max. "The Animator's Survival Kit" by Richard Williams: A classic animation guide providing valuable insights for aspiring animators. These books offer valuable knowledge and techniques, complementing the skills learned in the course and aiding in future career endeavors. Receive ongoing email support for a lifetime. Access comprehensive handouts and valuable documents. Explore flexible financial support choices, including installment plans and funding through job center plus and DWP (Contact us for specifics). Rest assured with our money-back guarantee: If you're dissatisfied after your initial session, we address your concerns and provide a refund if necessary (Terms and conditions may apply). Get help with computer optimization to enhance software performance in Autocad, 3ds Max, and Photoshop on both PC platforms. Benefit from our industry connections, facilitating portfolio promotion and job opportunities.
M.D.D BREAKUP PACKAGE: I CAN’T GET OVER MY EX (BREAKUP)
(27)By Miss Date Doctor Dating Coach London, Couples Therapy
Assess what happened Support you Create moving on recovery plan Coaching and advice Whats app and phone support 45 mins x 4 https://relationshipsmdd.com/product/i-cant-get-over-my-ex/


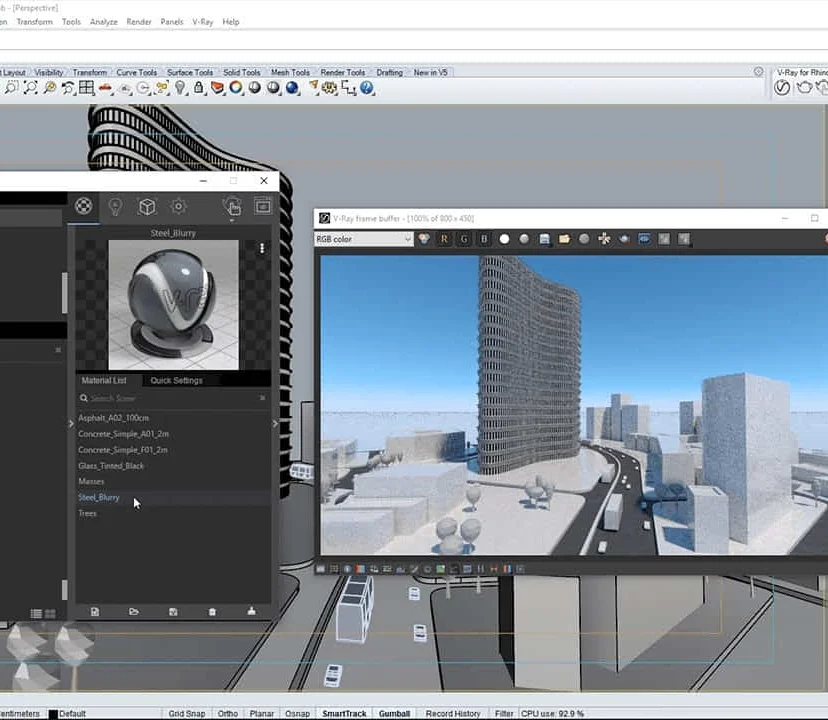
Complete Rhino 3D and V-Ray Training Program: Basic to Intermediate
By ATL Autocad Training London
Why Choose Complete Rhino 3D and V-Ray Training Program: Basic to Intermediate? Learn Rhino 3D and V-Ray for Rhino Basic to Intermediate Training Course. Suitable for beginners and experienced users alike, this program equips you with vital modeling and rendering skills. Opt for in-person or live online sessions. Click here for more info: Website Duration: 16 hours. Approach: 1-on-1 Sessions, Customized Content and Flexible Learning. Scheduling Flexibility: Tailor your sessions from Mon to Sat between 9 am and 7 pm. Course Title: Complete Rhino 3D and V-Ray Training Program: Basic to Intermediate - 16 Hours Session 1-2: Introduction to Rhino 3D Basics (2 hours) Understanding Rhino Interface: Navigating toolbars, command line, and properties panel. Basic Geometric Shapes: Creating lines, circles, and polygons with precision. Editing Tools: Mastering move, rotate, scale, and mirror commands. Session 3-4: Advanced Rhino 3D Modeling Techniques (2 hours) Curves and Surfaces: Delving into NURBS curves, creating complex surfaces, and blending techniques. Modeling Aids: Utilizing grids, snaps, and construction planes for accuracy. Organizing with Layers: Managing complex projects efficiently. Session 5-6: Introduction to V-Ray for Rhino (2 hours) V-Ray Interface: Understanding V-Ray toolbar and settings. Basic Lighting: Exploring different light types and their effects on scenes. Materials: Creating realistic materials, understanding diffuse, reflection, and transparency. Session 7-8: Intermediate V-Ray Concepts (2 hours) Advanced Lighting: Mastering HDRI lighting, creating natural outdoor lighting scenarios. Texture Mapping: Understanding UV mapping, applying textures seamlessly. Rendering Optimization: Reducing noise, optimizing settings for quicker, high-quality renders. Session 9-10: Rhino-V-Ray Integration (2 hours) Model Preparation: Optimizing Rhino models for V-Ray rendering. Advanced Material Manipulation: Creating complex materials, incorporating textures. Interactive Rendering: Real-time adjustments for immediate feedback. Session 11-12: Advanced Modeling Techniques in Rhino (2 hours) Advanced Surface Modeling: Creating organic shapes, advanced surfacing techniques. Precision Modeling: Advanced curve editing, filleting, and trimming. Working with 3D Text: Creating custom 3D text for design projects. Session 13-14: Scene Composition and Presentation (2 hours) Camera Settings: Understanding focal length, depth of field, and perspective. Scene Composition: Design principles, rule of thirds, focal points, and balance. Post-Processing: Enhancing renders in Photoshop, adding atmosphere and context. Session 15-16: Final Project and Portfolio Review (2 hours) Final Project Work: Participants apply learned skills to create a complex 3D scene. Instructor-led Critique: Feedback session for final projects. Portfolio Guidance: Tips for selecting the best works for a professional portfolio. By the end of this 16-hour course, participants will have a deep understanding of both Rhino 3D and V-Ray, allowing them to create intricate 3D models and produce high-quality, realistic renders for various applications. Upon completing the Rhino 3D and V-Ray Basic to Intermediate Training Course, participants can expect to achieve the following learning outcomes: Proficiency in Rhino 3D and V-Ray: Develop a comprehensive understanding of Rhino 3D and V-Ray interfaces, tools, and functionalities, enabling participants to navigate and utilize the software effectively. 3D Modeling Skills: Master the art of creating captivating 3D objects and shapes using Rhino 3D, including editing, transforming, and refining designs for diverse applications. Material Application: Acquire the ability to apply and customize materials and textures to enhance the visual appeal and realism of 3D models, elevating the quality of designs. Lighting Techniques: Gain expertise in utilizing V-Ray lighting tools, such as V-Ray lights and HDRI maps, to achieve striking lighting effects in rendered scenes. Rendering Excellence: Learn to optimize V-Ray render settings, control global illumination, and apply dynamic effects like depth of field and motion blur for high-quality and impressive renders. Advanced Modeling: Develop skills in advanced modeling techniques, including handling curves, surfaces, and solids, enabling participants to tackle complex design challenges. Lighting Mastery: Acquire the knowledge and expertise to create and adjust artificial lights, utilize the Sun and Sky system, and craft custom HDR images for realistic lighting setups. Seamless File Management: Understand various file formats for exporting and importing 3D models, facilitating efficient collaboration and preparation for 3D printing. Creative Problem-Solving: Enhance creative thinking and problem-solving abilities through hands-on practice and exploration of diverse design scenarios. Professional Presentation: Learn post-production techniques in Photoshop to enhance renders and create visually appealing design presentations for effective communication. Continuous Learning: Access valuable resources and tips to encourage continuous learning and professional growth in Rhino 3D and V-Ray. Skills You'll Gain: Master Rhino 3D basics: Curves, surfaces, modeling aids, and precision techniques. Explore intermediate V-Ray concepts: Advanced lighting, material manipulation, and texture mapping. Understand Rhino-V-Ray integration for seamless 3D modeling and rendering workflows. Optimize render settings for high-quality output and reduced rendering times. Career Opportunities: Upon completing this program, you'll be prepared for various roles in the design and visualization industry, such as: 3D Modeler: Create detailed 3D models for diverse industries, including architecture and product design. Architectural Visualizer: Produce realistic architectural visualizations for presentations and marketing materials. Product Designer: Develop visually appealing product prototypes and visualizations for marketing and manufacturing. Visualization Specialist: Work in design studios, advertising agencies, or game development companies, creating immersive visual content. Freelance Designer: Offer your skills on platforms like Upwork or Fiverr, providing 3D modeling and rendering services to clients worldwide. Solidify Rhino 3D Expertise: Master foundational modeling skills, including intricate geometries and surface manipulation, establishing a robust foundation for your 3D design journey. Unlock V-Ray for Rhino: Explore the potential of V-Ray for Rhino, learning to create mesmerizing visualizations and achieve lifelike rendering results that bring vitality to your designs. Enhance Visual Appeal: Grasp advanced lighting techniques, material application, and texture methods to elevate the visual allure of your 3D creations, making them more immersive and authentic. Explore Advanced Concepts: Delve into optimizing rendering settings, post-production tactics, and efficient workflows, advancing your design proficiency to higher levels. Hands-On Experience: Engage in practical exercises and real-world projects, applying your skills in practical contexts to enrich your portfolio and showcase your capabilities effectively. Certification of Achievement: Receive a valuable Certificate of Completion, confirming your expertise in Rhino 3D and V-Ray for Rhino, enhancing your professional credibility as a skilled designer. Flexible Learning Paths: In-Person or Live Online: Opt for in-person sessions, fostering collaborative learning, or choose live online classes for convenience and accessibility, tailoring your learning experience to your preferences. Personalized Guidance: Regardless of your chosen format, benefit from tailored instruction and guidance, ensuring optimal learning outcomes and continuous support throughout the course.
Iridology Diploma
By Plaskett International
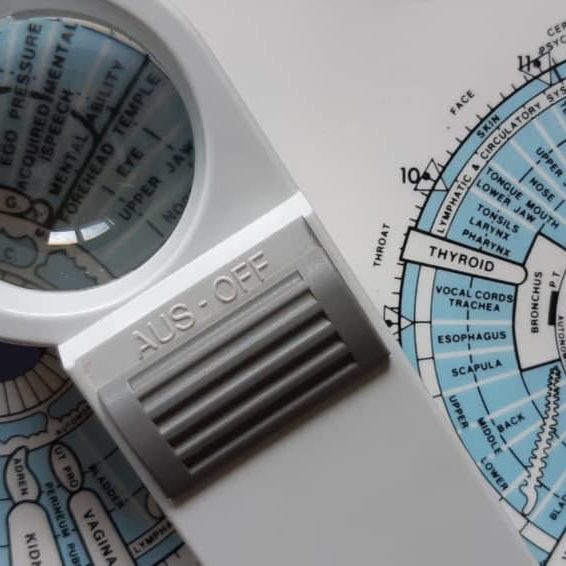
LEARN HOW IRIDOLOGY CAN MAKE A HUGE CONTRIBUTION TO ANY COMPLEMENTARY PRACTICE A MESSAGE FROM THE AUTHOR I want to welcome you most warmly to the study of Iridology. Students of our course have taken their knowledge out into the world of practice and they have been able to see more penetratingly into the health of their patients. They have seen many truths about causes and effects in health and disease - that is what allows you to understand those extra things that make you into an even better healer. I think you are going to find this the most intriguing and absorbing study and, certainly, that is my sincere hope. As you precede, much of what you learn will amaze you and inspire wonder at the ways of the human body and mind. As you tread this very special road, I pass on to you the words that Bernard Jensen gave me years ago when I was his student, inscribed upon the inside cover of his book: “Seek the Higher Values in Life”. DR. LAWRENCE PLASKETT WHAT IS IRIDOLOGY? Iridology is the art of iris analysis. The iris is connected to the brain via the hypothalamus and can give naturopathic read outs on tissue conditions in various parts of the body. With training and practice it is possible to read signs indicative of biochemical, emotional and environmental influences that are hard to determine by other means. We can thus interpret health (and even aspects of personality) by close examination of the eyes, using suitable illumination and a magnifying glass. The close relationship between naturopathic iridology as an assessment tool and nutritional therapy and other naturopathic disciplines continues and grows closer. Now Iridology can make a huge contribution to complementary therapeutic practice and enhanced by our wonderful digital collection of eye photographs, the learning process with the Plaskett International College is a profound and exciting one. We teach Iridology quite separately from other topics and anyone who possesses, or expects to possess, a practitioner's qualification in any therapeutic discipline, may join the course. Course Duration 12 months Study Hours 200 hours Course Content 9 sections Course Fee £495 How Can Iridology Help Practitioners? Examples of how iridology can help practitioners Did you know that some iris features are so very plain that you can see them with the naked eye in ordinary social contact? You can see from two or three feet away in many cases that the person has a toxic digestive system (a strong wide dark ring around the pupil margin). You can often tell that the person has an overactive stomach (a narrow bright white ring very close to the pupil). You can tell when the skin is overlaid with toxins so that the skin's function in excreting toxins from the body is jeopardised (very narrow dark ring around the iris margin). You can tell in some people (rather advanced cases) that they suffer badly from sodium and potassium imbalance and have placed themselves at potential risk from cholesterol accumulation (the so-called corneal arcus, a white or off-white cloudy deposit, usually fairly thick, around the iris margin). Another example is the ring of spots or 'tophi' represented by the lymphatic rosary. Its mere presence tells one that there is sluggishness in the lymphatic system. When these tophi are darkly pigmented, the situation gives rise to concern for the possible generation of lymphatic illness. Using the precise positioning of iris reflex areas contained on the iris chart, one may distinguish many key points of analysis. Areas of stress and tension can be pinpointed by identifying 'contraction furrows’. Past injuries and adhesions show themselves as contortions of the normally regular and even iris fibres. You can answer questions like:- Is it the pancreas or the liver that is responsible for the trouble? Is the patient's hypertension caused by a defect of or toxic deposits in the particular brain area that is geared to control blood pressure? One of Jensen's rather dramatic illustrations is of the iris of a man who has just been shot. It shows the precise areas of tissue damage within the body and the response is very fast. The number of potential examples is almost without limit. The above may suffice to show the types of things that iridology can do for practitioners. We hope it will help you decide to study Iridology with the Plaskett International College. Course Overview The course covers the nature of iris observation, the nutritive zone, the iris chart, the chronic and acute, the intestinal and stomach zones and nerve collarette, the constitution type, respiratory system, lacunae, open lacuna, inherent weaknesses, the organs of elimination, other organs, special signs, complete diagnosis of a subject. The treatment of the topic follows the principles of Bernard Jensen in the USA. Once the basics have been learnt, the course teachings then extend considerably by bringing in the work of Dorothy Hall and of Dr Josef Deck, both of which are the subject of a special presentation during the course. The published insights of Farida Sharan and Harri Wolf, while not separately presented, also influence the presentation of the course material. Both the Australian School, (Dorothy Hall) and the German School, (Dr Deck/Harri Wolf), offer an added dimension to the study and interpretation of the constitution. PERSONALITY ASPECTS & CONSTITUTIONAL TYPES The study focuses upon the different personality aspects, which show up in different constitutional types. Dorothy Hall gives insights into what contributes to various different types of personality and their emotional and mental responses and their pre-dispositions to health or disease. Different sorts of people can have different priorities, preferences and imperatives built into their very nature from or before birth, sometimes determining the course of their entire lives and their attitudes to the world and to other people. AN EMPATHY BETWEEN PATIENT & PRACTITIONER The course teaches an understanding of these types and facilitates an empathy between patient and practitioner. It shows how people of the differing constitutional types are likely to go out of balance either mentally or emotionally and how their vulnerability to various physical ailments varies. The German School offers a very exciting and precise approach to the constitutional types, which is really quite different, but no less helpful. It highlights variations in the susceptibility to diseases of different organs and systems. THE 3 SCHOOLS OF THOUGHT It is a prime purpose of this course, not only to teach these differing positions, but also to demonstrate how it is that all three of these major schools of Iridology embody different aspects of the truth, how each is individually valuable and how a full and deep understanding of the meaning of 'constitution' can be gained through a sympathetic synthesis of the contributions from all three of these schools. BREAKDOWN OF THE COURSE SECTIONS In total there are 9 sections comprising of text, videos and iris images to study: SECTION 1 GENERAL PRACTICE AND AN ACCOUNT OF THE NUTRITIVE ZONE Areas Covered Iris colour Information that iridology can give us The structure of the eye and the iris Using the iris as an assessment tool The principle of reflex areas The Nutritive Zone Abnormality in the colon The Collarette (autonomic nerve wreath or anw) Diagnosis of the constitution based upon fibre structure Studies on images of real eyes SECTION 2 FEATURES OF THE FIBRES OUTSIDE THE COLLARETTE Areas Covered The general layout of fibres outside the collarette Inherent weaknesses First stage in further deterioration of an inherent weakness The meaning of darkness in the iris The development of discrete – open lacunae Lacunae Further notes about lightness and darkness amongst the fibres Healing lines Crypts Round the iris chart – the left iris Round the iris chart – the right iris Checking which structures and inside and which outside the collarette The organ systems The neural arc reflex SECTION 3 SPECIAL SIGNS Areas covered The corneal arcus (sodium ring, cholesterol ring, lipemic ring) The tophi (also lymphatic tophi or lymphatic rosary) Corneal Arcus The anaemia sign The catarrhal sign Acidity Grey background Scurf rim Circulatory ring Sphincter muscle (also called pupillary sphincter) Pigments (topastible or topolabile) Psoric spots Contrcation furrows Radial furrows SECTION 4 THE CONSTITUTIONS IN RELATION TO PERSONALITY TYPE AND DISEASE DISPOSITION Areas covered Very resilient Resilient average Moderately resilient Mildly resilient SECTION 5 MORE ABOUT WHITE SIGNS Areas covered Revision of distinctions between the different white signs Pictures of irises with white signs, with commentaries Further interpretation of the corneal arcus Further interpretation of the lytophi More general interpretation of the colour white SECTION 6 COLOURS IN THE IRIS AND OTHER SPECIAL SIGNS Areas Covered Yellow pigment in the iris Orange pigment Brown pigment Contraction furrows Radial furrows Psoric spots Pupillary border The “friendly fibrils” sign Summary of remedies SECTION 7 THE CONSTITUTION AND SIGNS ACCORDING TO THE GERMAN SCHOOL Areas Covered The German school of iridology Our approach to teaching the German school Introduction to the German constitutional types The lymphatic constitutions Mixed biliary constitution or biliary constitution Haematogenic (or haematogenous) constitution The way to use information on the German constitutions New signs that are specific to the German school Treatment recommendations for constitutional types SECTION 8 ADVANCED STUDIES OF THE IRIS Areas Covered Further details of the iris chart – its layout and its implications Neural arc reflex Deformation of pupil shape and position Advanced study of fibre separations, sinuosity, injuries & adhesions Lacunae of different shape and appearance The b3 bulge and the pterygium Working with genetically brown eyes SECTION 9 THE CONSULTATION & THE PRACTICALITIES Areas Covered Diagnosing pathology of individual critical organs Personality interpretations based upon the German school Conducting an iridology consultation Practical aspects of iris examination Making drawings of the iris and recording the data The uses, advantages and limitations of iris photography and its place in iridology practice Equipments and techniques of iris photography Using the computer to store and process digital images The interaction of signs Interpreting the whole iris in conjunction with the case study Pointers to treatment Carrying out case histories TESTIMONIALS Here's what students have to say about the course Emma Rubio, Health Coach Spain "As a Health Coach I decided to pursue my studies with the Plaskett College to become a Nutritional Therapist. For that, I am also studying Iridology. I am happy to have a tutor to answer my doubts and I like the flexibility that the College offers me. I love the subject of Iridology and the way it is explained, I also like having some videos of Dr Plaskett teaching Iridology as I admire him." Dr Ezequiel Lafontaine, Iridologist Puerto Rico "I LOVE IRIDOLOGY. I have over 30 iridology books, Italian, French, German, Spanish and English, plus over 4,000 photos from my own practice. I took this course for a refresher course and found the material was second to none." Mrs D. Moothy, Nutritional Therapist Mauritius “The distance learning courses have given me the opportunity to pursue my dreams through a program that was not only flexible and convenient for my schedule, but was also challenging and rewarding. I thoroughly enjoyed the readings and the assignments but most importantly, I enjoyed being able to do things at my pace. I must say that the most exciting and challenging course was the Iridology Diploma, and I am happy that I was able to do well in all the courses."