- Professional Development
- Medicine & Nursing
- Arts & Crafts
- Health & Wellbeing
- Personal Development
384 Outdoor courses
Based at our ancient woodland camp in Kent, our 1 Day Spoon Carving course has been put together for anyone who would like to understand how to use simple tools to create beautiful items from greenwood. Whilst we are certain that you will leave us with a great hand carved spoon, you will also leave us with new found confidence and ability having mastered the use of the knife and axe. We'll start the day by looking at a variety of carving techniques using an axe and knife. Safety and being able to work with minimum of effort will be the main focus of the session. You will also learn to identify which strokes are best suited for different kinds of cuts. After this session you will be ready for a days carving. You will also learn about: • Properties of different woods • Selecting your wood and splitting techniques • Swedish spoon design • How to sharpen your carving tools. A really great chance to begin a lifetime of carving beautiful things! About us and the venue: Jack Raven Bushcraft was founded in 2011 and we've been delivering bushcraft, craft and foraging courses since then from our 30 acre private ancient woodland on the Kent Downs in an area of outstanding natural beauty. Courses in the summer are held outdoors in our woodland camp complete with covered work areas, an outdoor kitchen and a composting loo. Courses in the winter are held in our workshop in a converted barn. Whilst we don't have many reviews on Craft Courses, we have hundreds on our website, Facebook page and Google Business page, take a look for yourself! What's included in the price? We'll supply all tools and materials for the course, so carving knives, draw knives, axes and crook knives will be provided. We'll make sure the kettle is on the go and supply tea, coffee and biscuits. Cancellation policy Strict - Cancellation and a full refund can be obtained up to 8 weeks before the course starts

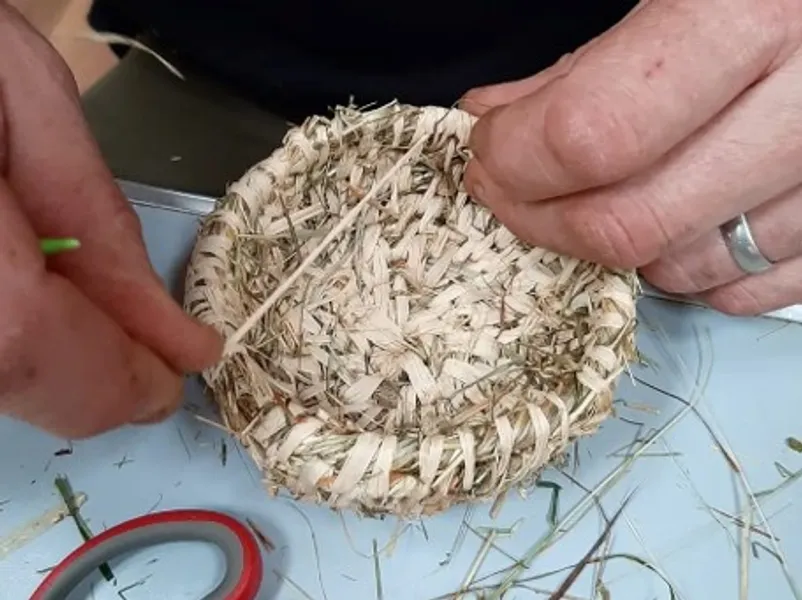
Located between Canterbury and Ashford, join us on the beautiful Kent Downs for this introductory 1 day coiled basket course. Coiled baskets are baskets made from bunches of plant fibres such as straw or hay, Those fibres are wound in a continuous spiral around themselves. The coils are kept in place using thread, the work being done stitch by stitch and coil by coil. Coiled basketry was practiced by our hunter-gatherer ancestors all around the world. They were commonplace in the British Isles, although more so in Scotland; in England they were often referred to as lip work baskets. We’ve put together this coiled basketry course for anyone who likes to use their hands and would like to learn this fabulous ancestral skill. You will be introduced to the materials and tools required and then be guided through the process to make your own round, coiled basket. Throughout the day you will: Learn how to create all the elements of a coiled basket, so the base, the sides, stitching and how to finish it all off with a border. We will discuss care of your basket, making different basket shapes, and alternative materials that can be used as well as hay. At the end of the day you will come away with the satisfaction of having created a wonderful basket that’s unique and has a wide range of practical uses. About us and the venue: Jack Raven Bushcraft was founded in 2011 and we've been delivering bushcraft, craft and foraging courses since then from our 30 acre private ancient woodland on the Kent Downs in an area of outstanding natural beauty. Courses in the summer are held outdoors in our woodland camp complete with covered work areas, an outdoor kitchen and a composting loo. Courses in the winter are held in our workshop in a converted barn. What's included in the price? We'll supply all tools and materials for the course. We'll make sure the kettle is on the go and supply tea, coffee and biscuits. Cancellation policy Medium - Cancellation and a full refund can be obtained up to 4 weeks before the course starts
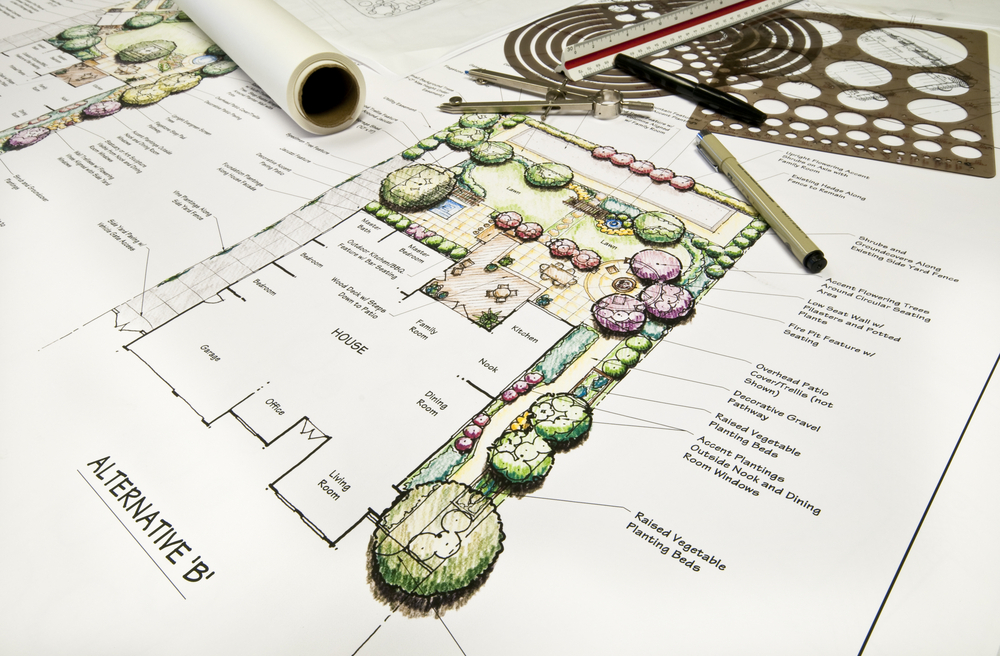
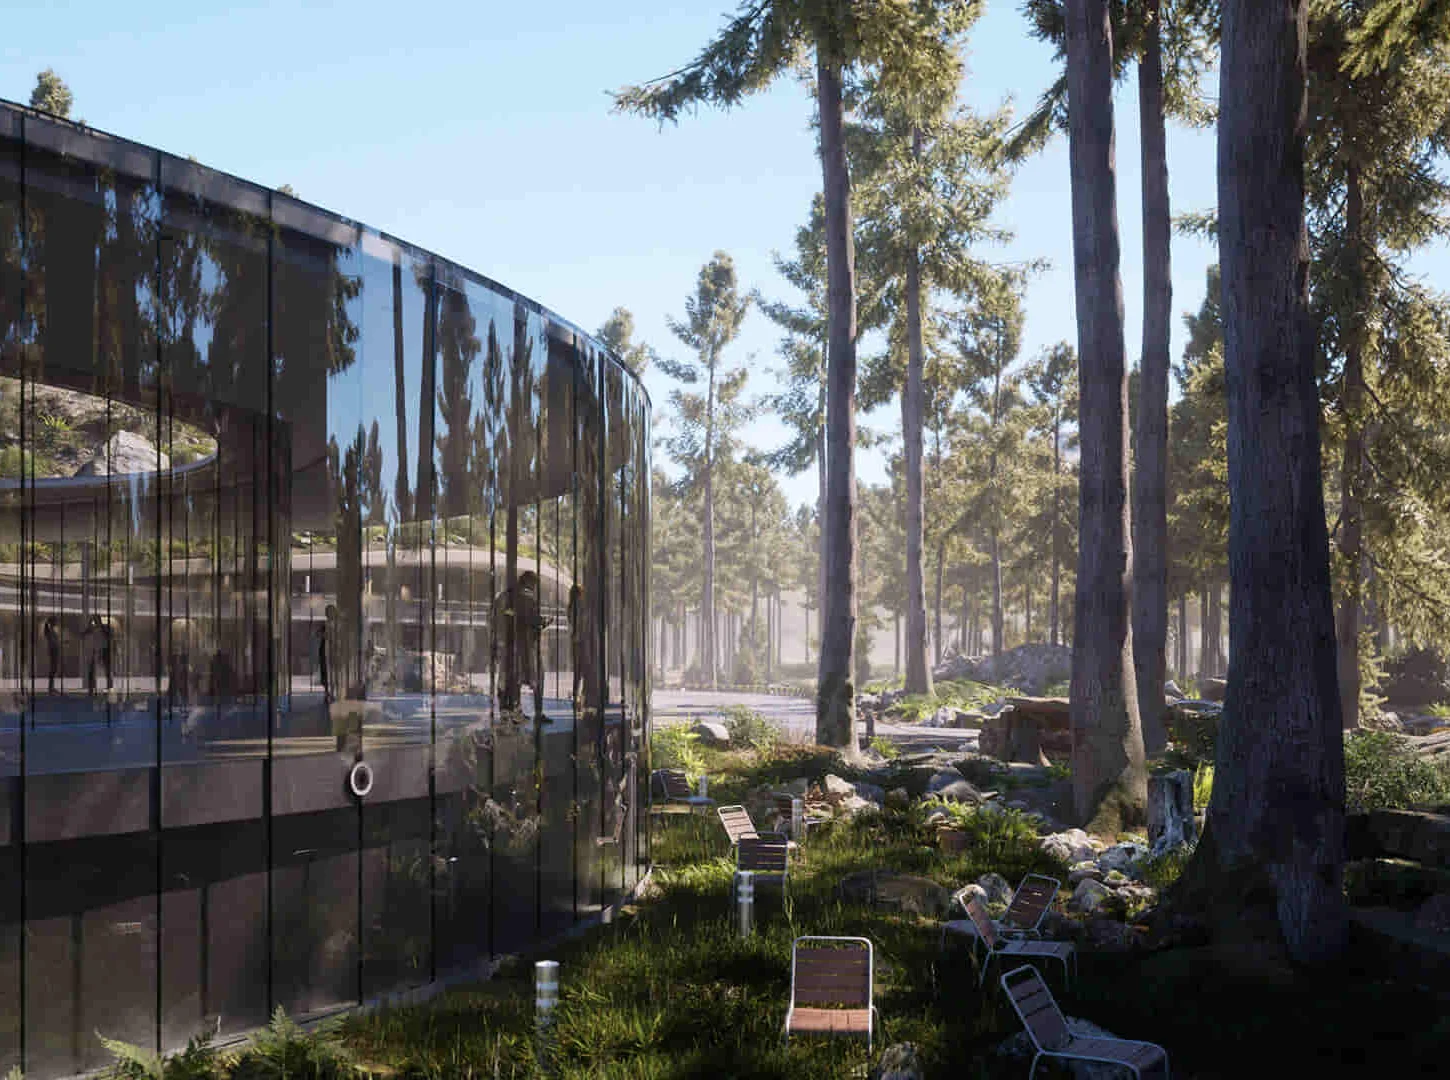
Explore the intricate world of Landscape Architecture with our comprehensive course, mastering design and drawing techniques. From hard and soft landscape elements to planning, legislation, and water feature design, delve into the principles and practical skills essential for shaping stunning outdoor environments. Join us to hone your expertise and embark on a rewarding journey in sustainable landscape design.
Vray for 3ds max Training
By London Design Training Courses
Why Learn Vray for 3ds max Training Course? Course Link 3ds Max - Rendering with V-Ray training offers an extensive master class in utilizing V-Ray, a widely used tool in architecture, interior design, film, and various industries. Topics covered include lighting techniques for interiors using both natural and artificial light sources. Duration: 10 hrs Method: 1-2-1, Personalized attention. Schedule: Tailor your own hours of your choice, available from Mon to Sat between 9 am and 7 pm. Module 1: Introduction to Vray for 3ds Max (2 hours) Learn the purpose and advantages of Vray for 3ds Max. Install and set up Vray for 3ds Max. Get familiar with the Vray interface and workflow. Understand Vray materials and their usage in 3ds Max. Module 2: Lighting with Vray (2 hours) Explore lighting techniques using Vray in 3ds Max. Work with different types of Vray lights and their settings. Create and control Vray sun and sky for outdoor scenes. Utilize Vray dome lighting for interior scenes. Learn about IES lights in Vray and their usage. Establish an efficient lighting workflow with Vray. Module 3: Vray Camera (2 hours) Understand Vray camera settings and their impact on renders. Control exposure and use Vray depth of field. Create camera animations with Vray for dynamic shots. Explore Vray frame buffer functionalities for post-processing. Module 4: Vray Materials (2 hours) Learn about properties and settings of Vray materials. Create realistic and visually appealing materials with Vray. Save and organize custom Vray material libraries. Use Vray material overrides for efficient material changes. Module 5: Vray Rendering and Post Production (2 hours) Get an overview of Vray rendering settings for high-quality output. Render still images and animations using Vray. Enhance Vray renders in Photoshop with post-production techniques. Utilize Vray frame buffer for fine-tuning renders. Composit Vray render elements in Photoshop for added control. Work with Vray denoiser for noise reduction in renders. You can access the free trial of Vray for 3ds Max here: (https://www.chaosgroup.com/vray/sketchup/free-trial), material libraries here: (https://www.vray-materials.de/), and textures here: (https://textures.com/).
Twinmotion Training Course
By ATL Autocad Training London
Who is this course for? Twinmotion Training Course. The Twinmotion course is designed for architects, interior designers and urban planners. Learn how to create architectural visualizations and real-time animations. Students interested in exploring the world of architectural rendering and visualization using Twinmotion software. Click here for more info: Website Duration: 10 hours Approach: 1-on-1 training with tailored content. Schedule: Book a time that suits you, Mon to Sat, from 9 am to 7 pm, and create your own schedule. Course Outline for Twinmotion Real-time 3D Architecture Visualization: Module 1: Twinmotion Introduction Explore the real-time 3D visualization capabilities of Twinmotion Master efficient scene manipulation through the Twinmotion interface Prepare 3D files for import and manage the workflow effectively Module 2: Materials and Realism Enhancement Enhance scenes with realistic materials and elevate visual quality Utilize videos as materials and apply glowing effects Create grunge materials to add texture and realism Employ the X-ray material for specific visualization needs Module 3: Landscape and Vegetation Integration Integrate vegetation using Twinmotion's scatter, HQ trees, and growth features Customize grass and utilize HQ vegetation assets for realistic landscapes Create time-lapse effects for dynamic vegetation growth Module 4: Library and Object Management Access the Twinmotion library for furniture and objects Seamlessly import external 3D objects into your scenes Obtain high-quality 3D assets from the internet and add them to your user library Utilize BIM-objects for additional assets Module 5: Lighting and Animation Techniques Work with various lighting options, including area light and volumetric light, to enhance scenes Add animated characters and vehicles to infuse dynamism into your visuals Incorporate construction vehicles and aircraft for realistic scenes Module 6: Volumes and Interactive Elements Utilize volumes and the animator feature to create dynamic scenes Implement urban elements and measurement tools for precision and accuracy Module 7: Nature and Weather Effects Utilization Harness Twinmotion's nature features, such as physical sky and weather effects, to create lifelike outdoor scenes Establish realistic lighting for outdoor environments Add ocean effects to enhance water elements in your scenes Module 8: Advanced Rendering Techniques Master rendering processes, from creating images to exporting panoramas and animations Implement depth of field improvements to create visually captivating scenes Create BIM motion virtual reality phases for immersive experiences Utilize the Twinmotion presenter feature for seamless presentations Module 9: Final Project Apply acquired knowledge and skills to complete a final rendering project in Twinmotion Download Twinmotion https://www.twinmotion.com ⺠download Learn how to download and install Twinmotion, the fast, easy real-time archvis tool. Learning Outcomes of Real-Time Rendering: Efficient Scene Creation: Rapid development of immersive 3D environments using essential tools and techniques. Realistic Material Application: Expertise in applying authentic textures and shaders for visually convincing scenes. Dynamic Lighting: Understanding dynamic lighting effects for visually compelling, realistic scenes. Interactive Elements: Integration of animations and dynamic objects for engaging user experiences. Performance Optimization: Optimizing assets and scenes for smooth real-time rendering across diverse hardware. Library Utilization: Efficient use of asset libraries to enhance scene complexity without compromising performance. Visual Effects: Application of weather conditions, particle systems, and post-processing effects for stunning environments. Collaborative Rendering: Mastering real-time collaborative rendering techniques for teamwork and live interactions. Future Trends in Real-Time Rendering: Ray Tracing Advancements: Real-time ray tracing for realistic lighting, shadows, and reflections. AI-Powered Rendering: AI-driven predictive rendering for faster, high-quality outcomes. Immersive Experiences: Real-time rendering enabling immersive simulations in gaming, education, and architecture. Cross-Platform Compatibility: Seamless experiences across devices, from gaming consoles to VR headsets. Blockchain Integration: Blockchain tech ensuring asset authenticity and ownership verification. Real-Time Cinematography: Revolutionizing film and animation with efficient real-time visual effects. Environmental Sustainability: Focus on energy-efficient algorithms for reduced environmental impact. Collaborative Design: Real-time rendering facilitating interactive design reviews and creative collaboration. Twinmotion Course: Expertise in Real-Time Visualization: Develop mastery in Twinmotion, enabling the creation of captivating architectural environments in real-time. Improved Design Communication: Enhance concept communication by utilizing dynamic visualizations, elevating the quality of design presentations. Access to High-Quality Assets: Utilize an extensive library of premium assets to enrich scenes, adding realism and creativity to your projects. Crafting Lifelike Environments: Learn to create realistic landscapes, water effects, weather conditions, and special effects, providing immersive and lifelike experiences. Flexible Learning Options: Choose between in-person or live online sessions, ensuring a personalized and convenient learning experience tailored to your needs. Lifetime Access and Support: Benefit from perpetual access to lesson recordings and receive continuous support through lifetime email assistance, allowing you to stay connected with knowledgeable instructors for ongoing guidance. Course Advantages: Mastery of Real-Time Visualization: Acquire expertise in Twinmotion for creating captivating architectural environments. Enhanced Design Communication: Improve concept communication through dynamic visualizations, elevating design presentations. Abundant High-Quality Assets: Utilize an extensive library of top-notch assets, enriching scenes with realism and creativity. Creation of Lifelike Environments: Craft realistic landscapes, water effects, weather conditions, and special effects for immersive experiences. Flexible Learning Options: Choose between in-person or live online sessions, ensuring a personalized and convenient learning experience. Lifetime Access and Support: Enjoy perpetual access to lesson recordings and receive continuous support through lifetime email assistance, staying connected with knowledgeable instructors.
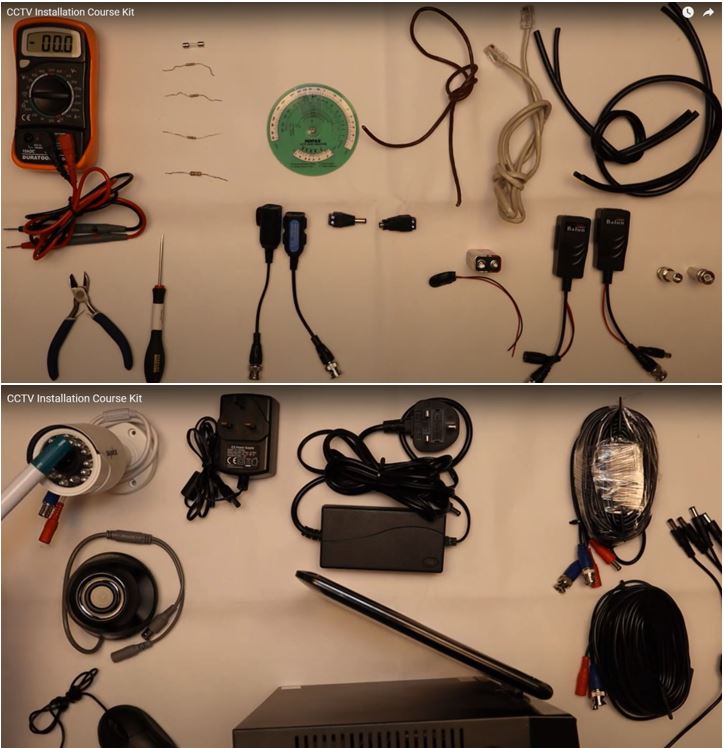
CCTV Installation Course
By Hi-Tech Training
Hi-Tech Training Closed Circuit Television (CCTV) Installation Course is designed to give participants a practical knowledge of the operation and installation of CCTV systems at a foundation level.
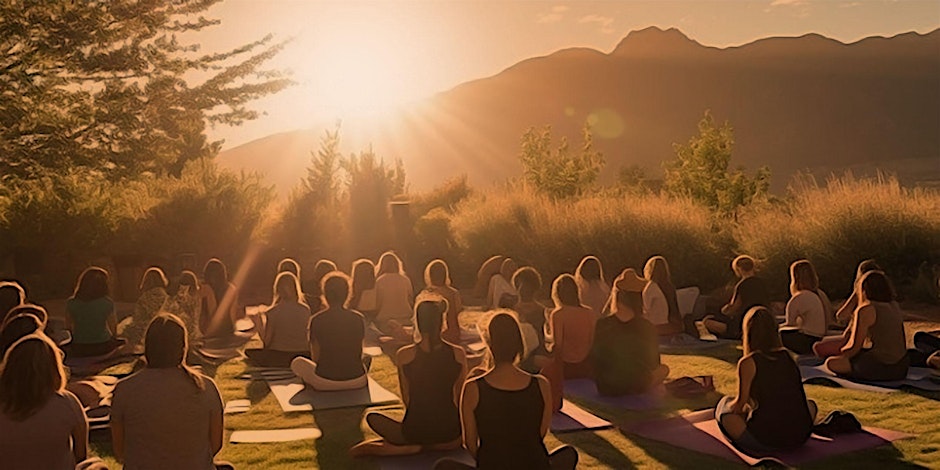
Yoga & Picnic in the Park
By Power Flow Yoga
Join us for an energising & relaxing afternoon of yoga with a 5* vegan picnic in the park! Agenda 11:00 - 11:30 Meet & find a good spot 11:30 - 12:30 Yoga class 12:30 - 13:00 Relax, Chat & Chill 13:00 - 14:00 Picnic 14:00 Stay as long as you wish About this event 4 hours Yoga & Picnic in the Park Come join us for a relaxing afternoon of yoga with a delicious vegan picnic in Clapham Common Park! Finish your weekend with a rejuvenating yoga session surrounded by nature. Afterwards, enjoy a delicious 5* vegan picnic with like minded yogis. Don't forget to bring your yoga mat and maybe picnic blanket. The perfect way to unwind and connect with others in a beautiful outdoor setting. See you there!
[vc_row][vc_column][vc_column_text]Description: Want to learn how to use wood burning instruments correctly? Are you looking for a technique that will help you burn wood without creating much air pollution? If yes, then this Wood Burning Course is for you. If you are thinking about utilising wood fuel for home warming or outdoor camping, this course will give you the knowledge you need to get started. Heating with wood can be challenging and physically demanding. You need to be a competent person with practical skills to be able to start a fire professionally and safely. In this course, you will explore the various ways of heating with wood while ensuring your wood-heat system is safe. You will also discover helpful tips and step-by-step instructions on how to operate and maintain an indoor or outdoor fire. Who is the course for? Anyone interested in the art of Wood-burn. Individuals who have high manual capabilities. Installers and sales people. Entry Requirement: This course is available to all learners, of all academic backgrounds. Learners should be aged 16 or over to undertake the qualification. Good understanding of English language, numeracy and ICT are required to attend this course. Assessment: At the end of the course, you will be required to sit an online multiple-choice test. Your test will be assessed automatically and immediately so that you will instantly know whether you have been successful. Before sitting for your final exam you will have the opportunity to test your proficiency with a mock exam. Certification: After you have successfully passed the test, you will be able to obtain an Accredited Certificate of Achievement. You can however also obtain a Course Completion Certificate following the course completion without sitting for the test. Certificates can be obtained either in hardcopy at a cost of £39 or in PDF format at a cost of £24. PDF certificate's turnaround time is 24 hours and for the hardcopy certificate, it is 3-9 working days. Why choose us? Affordable, engaging & high-quality e-learning study materials; Tutorial videos/materials from the industry leading experts; Study in a user-friendly, advanced online learning platform; Efficient exam systems for the assessment and instant result; The UK & internationally recognised accredited qualification; Access to course content on mobile, tablet or desktop from anywhere anytime; The benefit of career advancement opportunities; 24/7 student support via email. Career Path: The Wood Burning Course will be very beneficial and helpful, especially to the following professionals: Wood burn installer. Welder. Start your own business. [/vc_column_text][/vc_column][/vc_row] Wood Burning Course The Woodburner's Guide: Practical Ways of Heating with Wood 01:00:00 Wood Burning Stoves and Portable Fireplaces 01:00:00 How to find fireplaces and wood burning stoves 01:00:00 Wood Burning Stoves and Fireplaces Safety 01:00:00 Wood Burning Stoves and EPA Approved Fireplaces 00:15:00 Fireplaces and Wood Burning Stoves 02:00:00 How to Maintenance First in Wood Burning Stoves and Fireplaces 01:00:00 Direct Fireplaces and Wood Burning Stoves 01:00:00 Wood Burning Stoves and Fireplaces Tested and Approved 01:00:00 Wood Burning Stoves and Western Fireplaces 01:00:00 Wood Burning Stoves and Georgian Fireplaces 01:00:00 Warming up to Wood Burning Stoves and Fireplaces 02:00:00 Wood Burning Stoves and Fireplaces Safety Upheld Safety in Wood Burners 01:00:00 Victorian Wood Burning Stoves and Fireplaces 01:00:00 Wood EPA Burning Stoves and Fireplaces 00:30:00 WOOD BURNING STOVES AND FIRE PLACES 02:00:00 How many types of fireplaces are there? 01:00:00 Harman Cast Iron Woodstove and Fireplace 01:00:00 Enhancements in WOOD BURNING STOVES AND FIRE PLACES 00:15:00 Safer WOOD BURNING STOVES AND FIRE PLACES 01:00:00 Concepts in Wood Burning Stoves and Fireplaces 00:15:00 Choosing what wood burning stoves and fireplaces to purchase 00:30:00 Preparing Your Home for Your New Wood-Burning Fireplace or Stove 00:30:00 Remodeling your wood-burning fireplace or stove 00:15:00 Conclusion 00:15:00 Mock Exam Mock Exam- Wood Burning Course 00:20:00 Final Exam Final Exam- Wood Burning Course 00:20:00 Order Your Certificates and Transcripts Order Your Certificates and Transcripts 00:00:00

3ds Max and Photoshop Training
By London Design Training Courses
Why Choose 3ds Max and Photoshop Training Course? Click here for more info 3D modeling and rendering potential with our specialized 3ds Max and Photoshop Training Course! Learn from modeling to rendering in 3ds Max and enhance visuals with Photoshop. Personalized, live online sessions with an experienced instructor. Enroll now and bring your 3D visualizations to life. Duration: 20 hrs Method: 1-on-1, Personalized attention. Schedule: Tailor your own hours of your choice, available from Mon to Sat between 9 am and 7 pm. The 3ds Max and Photoshop Training Course offers comprehensive learning for beginners, focusing on core skills to create 3D models, rendered images, animations, and games using 3ds Max and Photoshop. Led by Autodesk Certified Instructors with expertise in 3D design, CGI, and visualizations, the course provides hands-on and practical training. 20-hour 3ds Max and Photoshop Training Course Course Description: 20-hour 3ds Max and Photoshop Training Course to master 3D modeling, rendering, and post-production. Learn to create 3D models, apply textures, animate objects, and utilize lighting techniques in 3ds Max. Gain expertise in Photoshop for post-processing and creating photorealistic textures. Ideal for 3D artists of all levels. Course Outline: Part 1: Introduction to 3ds Max (6 hours) - Understanding the user interface and workspace of 3ds Max - Navigating the viewport and utilizing basic tools for modeling - Creating and manipulating primitive objects for design purposes - Modifying objects with modifiers to achieve specific effects - Working with materials and textures to add realistic detail to 3D models - Basic lighting and rendering techniques to present the 3D scenes Part 2: Intermediate 3ds Max Techniques (6 hours) - Modeling using splines and polygons for more complex shapes - Creating and animating cameras to simulate real-world perspectives - Rigging and animating characters with bones for animation projects - Utilizing particle systems for visual effects and dynamic simulations - Designing realistic environments using landscape tools for outdoor scenes - Exploring advanced lighting and rendering techniques for enhanced visuals Part 3: Introduction to Photoshop for 3D Artists (4 hours) - Understanding the Photoshop workspace and essential tools for editing - Importing and exporting 3D models and textures between 3ds Max and Photoshop - Creating and editing textures and materials in Photoshop for realistic surfaces - Utilizing Photoshop for post-production and compositing to enhance 3D renders Part 4: Advanced Photoshop Techniques for 3D Artists (4 hours) - Creating custom brushes and textures for unique artistic elements - Using layer masks and adjustment layers for non-destructive editing - Exploring advanced compositing techniques for seamless integration of 3D elements - Creating photorealistic textures and materials for stunning 3D visuals Part 5: Project-Based Learning (4 hours) - Applying 3ds Max and Photoshop techniques to a real-world project - Creating a 3D model, texturing it in Photoshop, and rendering the final image - Receiving instructor feedback for critiquing and refining the project - Final presentation of the completed project showcasing skills learned.