- Professional Development
- Medicine & Nursing
- Arts & Crafts
- Health & Wellbeing
- Personal Development
Java Evenings Course. Basic Java syntax and principles of object-oriented programming. Our Style: Hands-on, Practical Course, Instructor-led Course. Level: From basics to fully functional. Who would benefit from the course: basics to Java, attend after work. Duration: one lesson of 2 hours per week for 6 weeks, from 6pm to 8pm.

SDH training course description Our SDH training course is designed for those with a basic knowledge of the principles of telecommunication digital transmission techniques. An overview of the existing transmission hierarchies and their limitations is provided with an introduction to the Synchronous Digital Hierarchy (SDH). The advantages of SDH are explained fully. What will you learn Identify the major limitations of the PDH network. Outline the advantages of using the SDH. Illustrate the various SDH equipment and network topologies. Describe the principles of the SDH multiplexing structure. SDH training course details Who will benefit: Anyone working with SDH. Prerequisites: It should be noted that this course will assume some basic telecommunication transmission knowledge from the delegates attending. This may be accomplished by attending the Introduction to Telecommunications course. Duration 2 days SDH training course contents Introduction to SDH Timing and synchronisation of digital signals, the plesiochronous digital hierarchy (PDH), the synchronous digital hierarchy (SDH), service protection with SDH SDH Multiplexing Techniques The multiplexing principles of SDH, mapping and aligning a 2Mbit/s tributary into a TU-12, aligning the VC-12 in a TU-12, multiplexing TU-12's into a TUG-2, multiplexing TUG-2's into a TUG-3, multiplexing TUG-3's into a VC-4, the VC-4 path overhead, the STM-1 frame, the AU-4 pointer, the STM-1 section overheads, multiplexer section protection, transmission at rates higher than STM-1, concatenation line transmission functions in SDH SONET Multiplexing Techniques Mapping a DS1 tributary into a virtual tributary, aligning the VT-SPE into a VT frame, mapping the VTGs into a STS-1 SPE, the STS-1 synchronous payload envelope, the STS-1 frame SONET network sections and lines transmissions at higher rates than STS-1 SDH Functions and Facilities SDH network topologies, structure of SDH equipment, synchronisation of SDH networks, protection switching in SDH networks, SDH alarm structure, SDH performance monitoring, testing of SDH, equipment and systems, network management and SDH, asynchronous transfer mode (ATM), future services and technologies OSI Telecommunications Network Management Definition of network management, managing telecom equipment, the managed object library, the management information base, the telecommunications management network (TMN), the Q3 protocol.

Business Process Modeling
By IIL Europe Ltd
Business Process Modeling This course is part of IIL's Business Analysis Certificate Program (BACP), a program designed to help prepare individuals pass the IIBA® Certification exam to become a Certified Business Analysis Professional (CBAP®). Learn more at www.iil.com/bacp A process model is a description of a process in terms of its steps or actions, the data flowing between them and participants in the process, machines, systems, and organizations involved. Modeling is a critical business analysis skill. It applies graphical and text communication techniques to describe the actions, objects, and relationships acted upon in the process and the steps that act upon them. This course teaches the technique of process modeling and ties together the core methods of process, behavior, and data modeling to enable business analysts to fully describe business processes in levels of detail from multiple perspectives. What you will Learn Upon completion, participants will be able to: Identify business processes and their components Work with UML diagrams Use process modeling in business diagramming Diagram and model business processes Foundation Concepts The role of the business analyst The IIBA® BABOK® Knowledge Areas Business Process Modeling (BPM) and the business analyst A practical approach to business process modeling The Context for Modeling Business Processes Overview of context for business process modeling Analyzing stakeholder information Modeling best practices Critical inputs for BPM: Business Rules Critical inputs for BPM: Context Diagrams Data Models Overview of data modeling Entity relationship diagrams Object-oriented approach Class diagrams Other data models Process Models - Part I (Non-UML) Overview of process modeling Data flow diagrams Workflow diagrams Flowcharts Process Models - Part II (UML) Overview of UML Process Models UML Activity Diagrams UML Sequence Diagrams Usage Models - Part I (Non-UML) Overview of usage modeling Prototyping options Static prototyping and storyboards Dynamic prototyping User Interface Design and user stories Usage Models - Part II (UML Use Cases) Overview of Use Cases Use Case diagrams Use Case descriptions Use Cases and the product life cycle Integrating the Models Overview of integrating the models General analysis best practices Specific analysis techniques summary Best practices for transition to design Summary and Next Steps What did we learn and how can we implement this in our work environments?


Business Process Modeling: In-House Training
By IIL Europe Ltd
Business Process Modeling: In-House Training This course is part of IIL's Business Analysis Certificate Program (BACP), a program designed to help prepare individuals pass the IIBA® Certification exam to become a Certified Business Analysis Professional (CBAP®). Learn more at www.iil.com/bacp A process model is a description of a process in terms of its steps or actions, the data flowing between them and participants in the process, machines, systems, and organizations involved. Modeling is a critical business analysis skill. It applies graphical and text communication techniques to describe the actions, objects, and relationships acted upon in the process and the steps that act upon them. This course teaches the technique of process modeling and ties together the core methods of process, behavior, and data modeling to enable business analysts to fully describe business processes in levels of detail from multiple perspectives. What you will Learn Upon completion, participants will be able to: Identify business processes and their components Work with UML diagrams Use process modeling in business diagramming Diagram and model business processes Foundation Concepts The role of the business analyst The IIBA® BABOK® Knowledge Areas Business Process Modeling (BPM) and the business analyst A practical approach to business process modeling The Context for Modeling Business Processes Overview of context for business process modeling Analyzing stakeholder information Modeling best practices Critical inputs for BPM: Business Rules Critical inputs for BPM: Context Diagrams Data Models Overview of data modeling Entity relationship diagrams Object-oriented approach Class diagrams Other data models Process Models - Part I (Non-UML) Overview of process modeling Data flow diagrams Workflow diagrams Flowcharts Process Models - Part II (UML) Overview of UML Process Models UML Activity Diagrams UML Sequence Diagrams Usage Models - Part I (Non-UML) Overview of usage modeling Prototyping options Static prototyping and storyboards Dynamic prototyping User Interface Design and user stories Usage Models - Part II (UML Use Cases) Overview of Use Cases Use Case diagrams Use Case descriptions Use Cases and the product life cycle Integrating the Models Overview of integrating the models General analysis best practices Specific analysis techniques summary Best practices for transition to design Summary and Next Steps What did we learn and how can we implement this in our work environments?
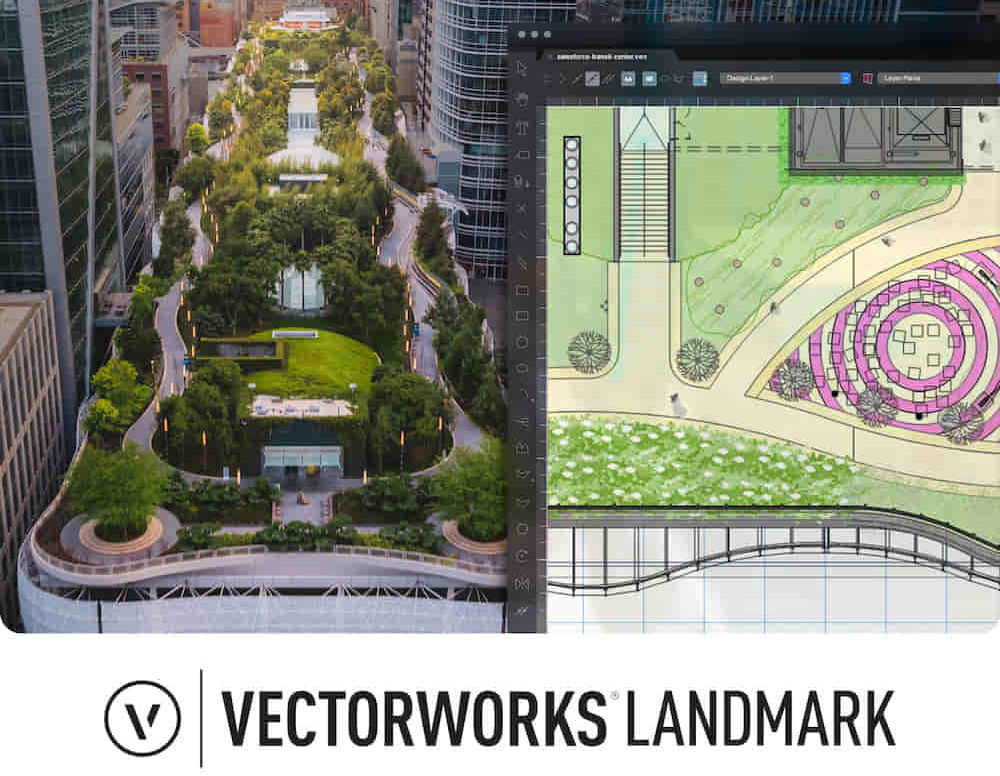
Landmark Training Course With Vectorworks
By ATL Autocad Training London
Who is this course for? Landmark Training Course With Vectorworks. Dive into terrain modeling, planting, irrigation, and site analysis guided by certified tutors. Master these tools for precise landscape designs and effective documentation. Check our Website Enrollment : 1-on-1 Landmark Training. Tailor your schedule. Mon to Sat between 9 am and 7 pm Call 02077202581 to book your slot. Duration: 16 hours. "Split these hours over multiple days as needed for your ideal schedule." Approach: In-person or live online. Landmark Training Course with Vectorworks: Basic to Intermediate Level Course Duration: 16 Hours Embark on a transformative journey with our Landmark Training Course tailored for landscape architects and designers. Over 16 intensive hours, dive deep into Vectorworks Landmark, mastering fundamental and intermediate techniques crucial for comprehensive 2D and 3D landscape design. Craft intricate site analyses, plans, irrigation systems, and elevate your designs with mesmerizing 3D visualizations. Explore custom plant symbols, detailed planting plans, and learn the art of efficient collaboration and customization. Course Highlights: I. Introduction to Vectorworks Landmark (1 hour) Explore Vectorworks Landmark for landscape design Master interface, tool usage, and project management II. Site Analysis and Site Plans (3 hours) Craft detailed site analyses and hardscape designs Work with contours, elevations, and terrain models III. Planting Plans (5 hours) Utilize the plant database for region-specific plant selection Create personalized plant symbols and comprehensive planting plans IV. Irrigation Design (2 hours) Design and edit efficient irrigation systems and zones Integrate irrigation components into site plans V. 3D Visualization (3 hours) Create captivating 3D models with realistic textures and materials Enhance designs with advanced lighting and special effects VI. Customization (1 hour) Tailor the interface for efficient landscape design Create custom object styles and resource libraries VII. Collaboration and Sharing (1 hour) Seamlessly import/export data from other platforms Share designs effectively with colleagues and collaborators VIII. Conclusion and Next Steps (1 hour) Review course content comprehensively Receive guidance on further learning resources Engage in a Q&A session and provide valuable feedback Enhance your landscape design expertise and unleash your creativity. Enroll now in our Vectorworks Landmark Basic to Intermediate Training and transform your designs. Download Vectorworks Landmark By the end of the Vectorworks Landmark Training Course, participants will: Understand the key features and functionalities of Vectorworks Landmark for landscape design. Demonstrate proficiency in using essential tools for site analysis, site plans, and hardscape design. Create detailed planting plans, selecting appropriate plants, and understanding their compatibility and growth patterns. Design efficient and effective irrigation systems, including generating irrigation reports. Create 3D visualizations of landscape designs, applying textures, materials, lighting, and special effects. Customize the interface and create personalized object styles and resources. Collaborate and share landscape design drawings with other software users. Have the foundation to pursue further learning and exploration in landscape design using Vectorworks Landmark. Mastering Foundations Begin your project by organizing your files and importing survey data. Learn to sketch existing buildings using Building Shell tools and model neighboring structures with Massing Model. Explore different methods for laying out survey points and marking existing features with precision. Objectives: Review File Organization Techniques Import Survey Data (DWG Import) Create Building Structures with Building Shell Tools Utilize Triangulation and Arc Tool for Precision Master Various Tape Measurement Techniques Elevating Your Design Enhance your survey with detailed ground, existing trees, and fences. Conduct shadow analysis to optimize planting locations. Dive into the Vectorworks Plant tool, your key design companion. Objectives: Develop Detailed Ground Surfaces Incorporate Existing Trees and Fences Design with Railing Fence Tool Conduct Shadow Analysis using Heliodon Tool Utilize Plant Tool Modes for Plant Placement Access Existing Plant Libraries and Customize Plants in 2D/3D Crafting Landscapes Create vibrant plant mixes using Landscape Area tool and apply them across your site models. Design intricate hardscapes, aligning them effortlessly even in complex paving scenarios. Learn to use components for detailed reporting, cut and fill calculations, and precise detailing. Explore custom object creation and site furniture placement. Objectives: Design Landscape Areas and Define Custom Plant Mixes Create Hardscapes and Define Custom Paving Constructions Generate Reports and Tags for Landscape Areas and Hardscapes Access and Manage Objects in Resource Manager Craft Custom Objects and Site Furniture Polished Presentation Present your designs professionally using Sheet layers and viewports. Create Section viewports to cut through your model and Detail viewports to focus on specific areas. Enhance visual appeal with mood boards and annotations, ensuring a refined, detailed presentation. Objectives: Craft Sheet Layers for Presentation Create Plan, Elevation, and Perspective Viewports Generate Section and Detail Viewports Annotate Viewports for Clear Communication Incorporate Images and Plant Reports for Comprehensive Presentations Master Vectorworks Landmark: Gain expertise in essential and advanced 2D/3D landscape design tools for precision and efficiency. Boost Efficiency: Learn time-saving techniques and workflows tailored to Vectorworks Landmark, enhancing productivity. Versatile Landscape Skills: Develop proficiency in site analysis, planting plans, hardscapes, and irrigation systems for diverse projects. Industry-Ready Expertise: Acquire sought-after skills in landscape architecture, paving the way for career growth. Flexible Learning: Access recorded lessons for convenient review and receive lifetime email support for ongoing guidance.
Complete C# programming training course description This training course teaches developers the programming skills that are required for developers to create Windows applications using the C# language. Students review the basics of C# program structure, language syntax, and implementation details, and then consolidate their knowledge throughout the week as they build an application that incorporates several features of the .NET Framework. What will you learn Use the syntax and features of C#. Create and call methods, catch and handle exceptions, and describe the monitoring requirements of large-scale applications. Implement a typical desktop application. Create class, define and implement interfaces, and create and generic collections. Read and write data to/from files. Build a GUI using XAML. Complete C# programming training course details Who will benefit: Programmers wishing to learn C#. Prerequisites: Developers attending this course should already have gained some limited experience using C# to complete basic programming tasks. Duration 5 days Complete C# programming training course contents Review of C# Syntax Overview of Writing Applications using C#, Datatypes, Operators, and Expressions. C# Programming Language Constructs. Hands on Developing the Class Enrolment Application. Methods, exceptions and monitoring apps Creating and Invoking Methods. Creating Overloaded Methods and Using Optional and Output Parameters. Handling Exceptions. Monitoring Applications. Hands on Extending the Class Enrolment Application Functionality. Developing a graphical application Implementing Structs and Enums. Organizing Data into Collections. Handling Events. Hands on Writing the Grades Prototype Application. Classes and Type-safe collections Creating Classes. Defining and Implementing Interfaces. Implementing Type-safe Collections. Hands on Adding Data Validation and Type-safety to the Grades Application. Class hierarchy using Inheritance Class hierarchies. Extending .NET framework classes. Creating generic types. Hands on Refactoring common functionality into the User Class. Reading and writing local data Reading and Writing Files. Serializing and Deserializing Data. Performing I/O Using Streams. Hands on Generating the Grades Report. Accessing a Database Creating and using entity data models. Querying and updating data by using LINQ. Hands on Retrieving and modifying grade data. Accessing remote data Accessing data across the web and in the cloud. Hands on Modifying grade data in the Cloud. Designing the UI for a graphical applicatione Using XAML to design a User Interface. Binding controls to data. Styling a UI. Hands on Customizing Student Photographs and Styling the Application. Improving performance and responsiveness Implementing Multitasking by using tasks and Lambda Expressions. Performing operations asynchronously. Synchronizing concurrent data access. Hands on Improving the responsiveness and performance of the application. Integrating with unmanaged code Creating and using dynamic objects. Managing the Lifetime of objects and controlling unmanaged resources. Hands on Upgrading the grades report. Creating reusable types and assemblies Examining Object Metadata. Creating and Using Custom Attributes. Generating Managed Code. Versioning, Signing and Deploying Assemblies. Hands on Specifying the Data to Include in the Grades Report. Encrypting and Decrypting Data Implementing Symmetric Encryption. Implementing Asymmetric Encryption. Hands on Encrypting and Decrypting Grades Reports.
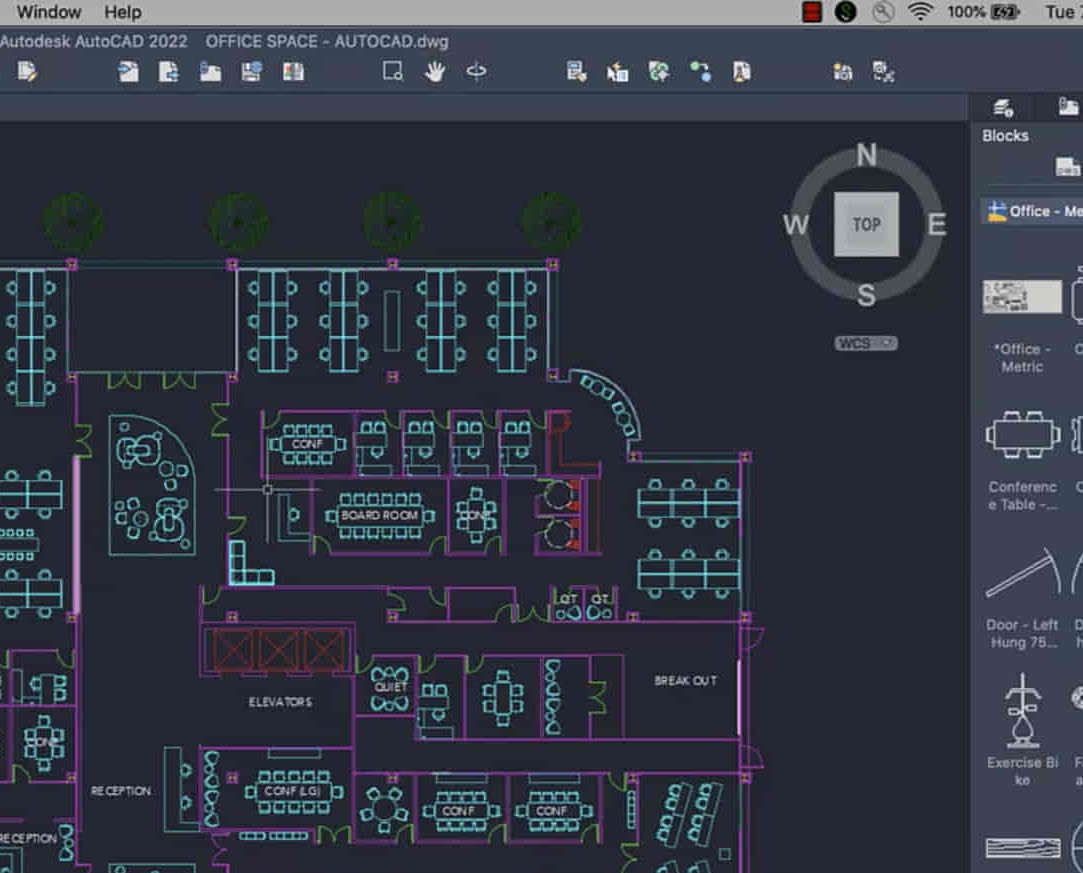
AutoCAD-Mac Introduction to Advanced Training Course
By ATL Autocad Training London
AutoCAD-Mac Introduction to Advanced Training Course This project-based course is tailored for AutoCAD Mac users, architecture and interior design students and professionals. Click here for more info: Website When Can I Book This Training Course? Personalized experience with 1-on-1 sessions designed to fit your unique needs. Available from Monday to Saturday, 9 am to 7 am Or Call to Book 02077202581. Duration of Training: 16 hours. Training Method: 1-on-1, providing the option for in-person sessions or live online training. Course Content Section 1: Introduction Course Overview Section 2: Basic Concepts Status Bar and The Units Drawing Commands Control Points - Vertex or Verteces Modifying Commands Snap Settings Drawing An Outline Section 3: Dimensions and Customization Adding Dimensions and Dimension Style Manager Importing Dimension Styles Customizing Shortcuts Section 4: Advanced Techniques Adding Walls Thickness with Offset Command Adding interior layout Cleaning Layout lines with Trim Section 5: Text and Styling Text Editing and Importing Text Styles Main File Formats in AutoCAD Section 6: Design Elements Creating Openings in the Floor Plan Adding Openings - Part 2 Adding Openings - Part 3 Drawing Doors & Windows Using Line Types & Linetype Scale Group and Ungroup Commands Using Blocks Using Blocks Library & Dynamic Blocks Section 7: Layers and Furnishing Layers - Part 2 Layers - Part 3 Furnishing Bedrooms & Bathrooms - Part 1 Adding Furniture, Fixtures, and Equipments | part 2 Adding Furniture, Fixtures, and Equipments | part 3 Drawing the Kitchen Drawing the Living Room Drawing Dining Room & Adding Casework Adding Steps and Railings Using Stretch Command Finishing Steps and patio areas Hatch command Hatch Customization Adding Plants & Finishing Floor Plan Section 8: Layout and Printing Paper Space & Page Setup Manager Working with Viewport & Using Print Command Scale & Using Multiple Viewports Locking Viewport Scale Drawing A Titleblock - Part 1 Drawing A Titleblock - Part 2 Copying the Titleblock Using Titleblock with Attributes Section 9: Roof Plan and Organization Drawing The Roof Plan Placing Roof Plan on Sheet Organizing Project Drawings & Using Layer Freeze AutoCAD Crashing And What To Do Section 10: Elevations Exterior elevations - Drawing the Outline Exterior elevations - Drawing the Openings Elevations - Detailing - Part 1 Elevations - Detailing - Part 2 Elevations - Repeating the workflow Elevations - Finishing 3rd Elevation Elevations - Drawing the final elevation Section 11: Sections Sections: Drawing Cut Lines & the Outline Sections: Placing 1st Section on Sheet Sections: Drawing Section #2 - Different Technique Sections: Adding Final Detail Section 12: Interior Elevations Interior Elevations: Drawing the Outline Interior Elevations: Placing on Sheet Interior Elevations: Using Block Clip Interior Elevations: Final Drawing Section 13: Conclusion Putting the Final Set Together Proficient AutoCAD Skills: Master essential tools for efficient drawing creation and manipulation. Accurate 2D Designs: Create precise and high-quality layouts with attention to detail. Effective Object Handling: Excel in selecting, moving, copying, and scaling objects. File Management: Organize drawings efficiently and understand different file formats. Precise Measurements: Utilize inquiry commands for accurate design analysis. Annotations and Hatching: Apply text, dimensions, and hatching to enhance drawings. Object Organization: Manage layers and object properties for organized designs. Reusable Content: Efficiently use blocks, tool palettes, and groups for productivity. Layout Optimization: Create layouts with viewports for optimal design presentation. Professional Output: Generate professional plots and PDF output for polished results. Enhanced Productivity: Explore AutoCAD toolsets and web/mobile apps for streamlined workflow. Course Overview: Learn versatile AutoCAD for Mac drawing techniques, applicable across all industries, enabling you to excel in the application. Our trainers incorporate exercises from various disciplines. Who Should Attend: Ideal for newcomers to AutoCAD for Mac, self-taught users seeking correct techniques, and those transitioning from other CAD tools. Requirements: A solid Mac OS understanding is essential, while prior CAD knowledge is not required. Pre-course preparation guidance is provided for new AutoCAD users. Highlights: Perfect for AutoCAD for Mac beginners. Gain skills for precise 2D layouts and designs. Versatile drawing techniques for all industries. Choose between in-class or live online training. Autodesk Certified Tutors: AutoCAD 1-2-1 courses. Hands-on learning with expert trainers. Lifetime post-course email support. Tailored on-request training available. Certificate: Digital certificate included. Tailored Mac Training: Excel in AutoCAD with specialized Mac training, leveraging its distinct features and interface for heightened efficiency. Comprehensive Skill Enhancement: Advance from fundamental to intermediate AutoCAD Mac proficiency, creating precise and professional 2D drawings. Industry-Relevant Expertise: Attain in-demand skills valued by employers in architecture, engineering, and design sectors. Hands-On Project Exposure: Immerse yourself in practical exercises mirroring real-world design scenarios, fostering practical competence. Lesson Recordings for Review: Access recorded lessons for reinforcement and deeper AutoCAD Mac comprehension. Ongoing Email Support: Benefit from lifetime email support, ensuring assistance beyond course completion."