- Professional Development
- Medicine & Nursing
- Arts & Crafts
- Health & Wellbeing
- Personal Development
1679 Management courses in London
Basic Photoshop Training Course
By ATL Autocad Training London
Learn the Basic PhotoshopTraining Course Learn retouching, layers, color, correction, shapes, and symbols. Delve into graphic design, photo editing, and digital art. From beginner to pro, gaining expertise in UX strategies, ensuring your websites are impactful and user-friendly. Click here for more info: Website Duration: 10 hours Approach: 1-on1 sessions and Personalized guidance. Schedule: Customize your schedule by booking a convenient hour, available from Monday to Saturday between 9 am and 7 pm. Module 1: Interface and Preferences Familiarize yourself with the Photoshop Interface Customize Panels and Toolbars to match your workflow Explore Photoshop Preferences to optimize settings Discover various Photoshop CC Workspaces tailored for different tasks Begin with essential Keyboard Shortcuts Module 2: Image File Formats Understand diverse image file formats such as PSD, JPEG, PNG, and PDF Delve into File Compression and its influence on image quality Module 3: Creating a New Document Set dimensions and size for new documents Grasp media units for accurate design specifications Explore Color Profiles and their significance Save presets for swift document setups Module 4: Placing Images Differentiate Embedded vs. Linked images Introduction to Smart Objects for non-destructive editing Master the Selection tool for precise image placement Module 5: Image Size and Resolution Save images using various formats and compression settings Understand Image Size and Resolution for diverse output needs Module 6: Layers Introduction Organize your work with Layer management Master layer tasks such as reordering, renaming, grouping, locking, and hiding Module 7: Selection Tools Explore Selection Tools like Marquee, Magic Wand, Quick Selection, and Lasso Grasp Inverse Selection and Deselect for efficient editing Module 8: Layer Effects Apply captivating Layer Effects such as Drop Shadow, Stroke, and Outer Glow Save and replicate Effects Styles for quick application Combine multiple effects for creative designs Module 9: Introduction to Shapes Utilize the Shapes tool for fundamental design elements Create Custom Shapes for unique designs Understand Color principles and use the Properties Panel for adjustments Master the Direct Selection tool for precise shape editing Create a basic poster using provided examples Module 10: Type and Typography Work with Type and explore the Character and Paragraph Panel Utilize Styles Panel for consistent text formatting Save favorite fonts for easy access Apply Effects and Layer Styles on Type for impactful typography Learn about Leading, Tracking, and Kerning for optimal text spacing Module 11: Colors Understand RGB vs. CMYK color modes Select colors using the Eyedropper tool Save colors as Swatches for reuse Create gradients using the Gradient Tool Module 12: Creating a Clipping Mask Master the concept of Clipping Masks and their application Apply Clipping Masks to Type, Images, and Shapes Combine Layer Effects with Clipping Masks for creative designs Module 13: Introduction to Masking Understand Masking and its importance in image editing Utilize the Brush tool for mask creation Learn Masking shortcuts and use Gradient Mask for smooth transitions Module 14: Adjustment Layers Explore Color and Gradient Adjustment Layers for image enhancements Master Curves, Levels, and Hue/Saturation Adjustment Layers for precise color control Convert images to Black and White using Adjustment Layers Combine Adjustment Layer Masks for targeted edits Module 15: Image Touch Up Master various touch-up techniques, including Red Eye Removal, Spot Healing Brush, and Patch Tool Utilize Content Aware Removal for seamless object removal Restore old photos using Clone Stamp and Dodge/Burn tools Enhance portraits by removing blemishes and whitening teeth Module 16: Filters Introduction Understand Smart Objects and Filter usage for non-destructive editing Explore the Filters Gallery and experiment with Blur and Vantage filters Module 17: Blending Modes Introduction Master the concept of Blending Modes and their effects on layer overlays Understand different Blending Modes like Darken, Lighten, and Overlay Layer Mastery: Develop expertise in working with layers, mastering advanced techniques for seamless editing and design organization in Adobe Photoshop. Precision Editing: Skillfully employ a variety of selection tools, ensuring precise and meticulous editing, manipulation, and composition of images and elements. Creative Layer Effects: Apply captivating Layer Effects with finesse, enhancing your designs and visuals to achieve professional-grade aesthetics. Advanced Editing Techniques: Understand the functionalities of Adjustment Layers, Masking, and Clipping Masks, enabling you to perform advanced editing and compositing tasks with confidence and precision. Effective Photo Restoration: Acquire techniques to touch up and restore photographs effectively, ensuring professional-quality results in photo editing and retouching. Typography Expertise: Explore advanced typography techniques, enabling you to create visually appealing text designs that complement your overall compositions. Filter Applications: Gain an introductory understanding of Filters and their creative applications, enhancing your ability to add artistic effects and refine visuals. Practical Color Theory: Grasp the fundamental principles of Color Theory and apply them practically in your designs, ensuring harmonious and visually pleasing color schemes in your work. Course Highlights: Advanced Photoshop Skills: Learn intricate techniques for professional image editing, retouching, and manipulation. Creative Design Projects: Engage in hands-on projects to enhance your practical skills in real-world scenarios. Mastering Special Effects: Dive into advanced topics like layer effects, filters, and blending modes to create stunning visual effects. Typography and Design Principles: Explore typography styles, layout design, and color theory for compelling compositions. Professional Portfolio Development: Receive guidance on creating a professional portfolio showcasing your Photoshop expertise. Potential Job Roles: Graphic Designer: Craft visually appealing graphics for print and digital media. Digital Artist: Create digital artwork for various applications, from illustrations to advertisements. Photo Retoucher: Enhance and manipulate photos for professional use, including portrait retouching. UI/UX Designer: Design user interfaces and experiences for websites and applications. Web Designer: Develop visually engaging websites with expertise in Photoshop for web design. Marketing Content Creator: Produce marketing materials such as banners, brochures, and social media visuals. Freelance Designer: Work independently, offering design services to clients across different industries. Advertising Creative: Contribute to creative campaigns by designing impactful ad visuals. Print Production Specialist: Prepare print-ready materials, ensuring quality in printed products. Photography Post-Processing Specialist: Enhance and retouch photographs, optimizing them for professional use. Comprehensive Photoshop Proficiency: Develop a solid foundation in Photoshop, mastering essential tools and techniques vital for image editing and manipulation. Creative Editing Expertise: Learn advanced retouching, image enhancement, digital artwork creation, and graphic design using Photoshop's powerful features. Professional-Grade Results: Acquire skills for achieving professional-level outcomes in image editing, ensuring precise color correction, seamless retouching, and visually appealing compositions. Optimized Workflow: Discover time-saving tips, shortcuts, and efficient techniques to enhance your Photoshop workflow. Learn layer management, non-destructive editing, and automation for streamlined processes. Versatile Design Skills: Unlock creative possibilities by mastering text effects, digital collages, filters, and graphic design for diverse mediums. Access to Recorded Lessons: Revisit course material and reinforce learning through recorded lessons. Review specific techniques at your own pace, deepening your understanding of Photoshop. Lifetime Email Assistance: Benefit from continuous support with lifetime email assistance. Seek guidance, get answers to questions, and seek clarification even after completing the course.

Sound Healing Training
By Mystic Sisters
#healing #soundhealing #healwithsound #wellbeingworkshop #mysticsisters

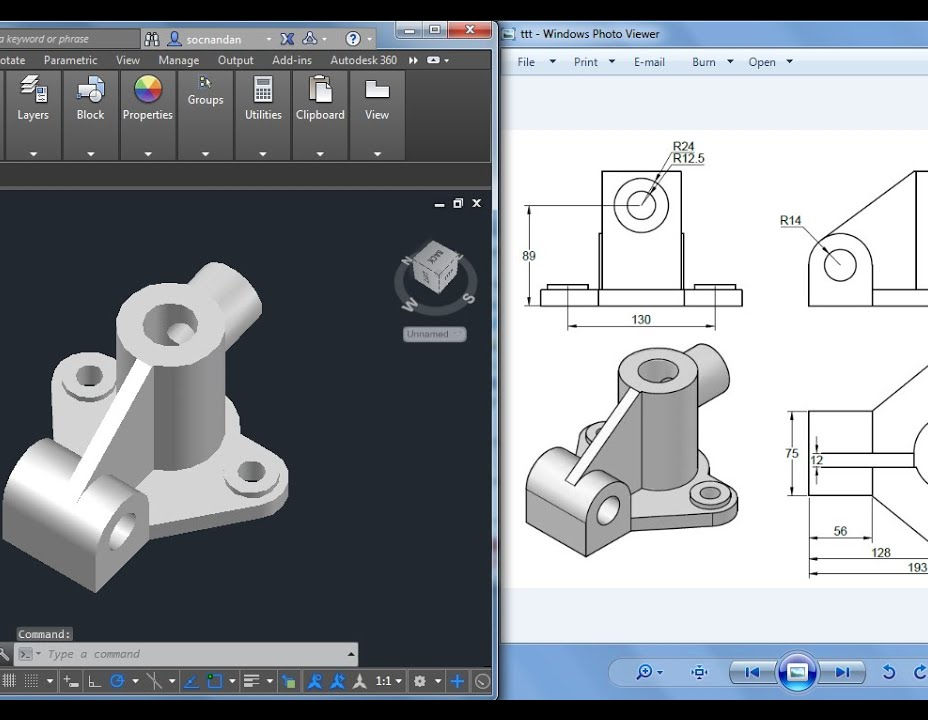
3D AutoCAD Basics to Advanced Training Course
By ATL Autocad Training London
Why Choose 3D AutoCAD Basics to Advanced Training Course? Students learn how to create and modify both solid and surface models. This AutoCAD Training course also teaches students how to present their designs in 3D products and designs. Check our Website Duration: 16 hours Approach: 1-on-1, Book your own day and time. We are open Monday to Saturday 9 am to 7 pm. How to Book this course? Call us on 02077202581 and we will book the dates and times you like. Flexible Schedule: 1-on-1 Face to Face or Live Online. AutoCAD 3D Training: Comprehensive Course Overview Exploration of 3D Modeling and Imaging Generating 3D Drawings Navigating the 3D Modeling Workspace Crafting 3D Shapes using Solid Tools Extruding Polylines into 3D Forms Isolating Coordinates with Point Filters Navigating and Orienting Your Model Achieving Visual Effects Converting 3D Views into 2D AutoCAD Drawings Advanced 3D Techniques Setting Up AutoCAD for 3D Mastering the User Coordinate System Leveraging UCS Options Utilizing Viewports for 3D Drawing Employing Array Tools Crafting Complex 3D Surfaces Constructing Spiral Forms Developing Surface Models Manipulating Objects in 3D Space Rendering and Visualization of 3D Drawings Introduction to Rendering Rapid Rendering Techniques Simulating Sunlight and Shadows Application and Adjustment of Materials Creating Effects with Lights and Materials Texture Mapping and Adjustments Exploration of Rendering Options Enhancing Views with Cameras Printing Rendered Drawings Simulating Natural Lighting Editing and Visualizing 3D Solids Overview of Solid Modeling Creation of Basic and Complex Solids Editing Solid Forms Improving the 2D Drawing Process Visualization and Analysis of Solids Exploration of 3D Mesh and Surface Modeling Introduction to 3D Meshes and Surfaces Creation and Editing of 3D Meshes Crafting Mesh Surfaces Conversion of Meshes to Solids Understanding and Editing 3D Surfaces Customization of Interface and Tools Customization of Workspaces Personalization of the User Interface Creation of Macros in Tools and Menus Working with Expanded Text Boxes Saving and Managing Customizations Exploration of the Diesel Macro Language Designing Custom Linetypes and Hatch Patterns Management and Sharing of Your Drawings Sharing Drawings Online ePublishing Your Work Managing Drawings with DesignCenter and Tool Palettes Exploring the Drawing Library with Content Explorer Establishment of Office Standards Conversion of Layer Settings https://www.autodesk.co.uk Download a free 30-day trial of AutoCAD Learning outcomes after completing the AutoCAD 3D course. Professional Presentation: Create dynamic walkthroughs and presentations that effectively communicate your 3D models and designs. Certification: Obtain a certification as proof of your proficiency in AutoCAD 3D modeling, validating your skills in the industry. Mastery of 3D Modeling: Possess comprehensive skills, from fundamental concepts to advanced techniques in 3D modeling. Enhanced Career Prospects: Improve your career opportunities and prospects in various design-related fields such as architecture, engineering, and product design. Realistic Rendering: Be able to create highly realistic visualizations that enhance the quality of your designs. Practical Hands-On Experience: Gain practical experience and confidence in 3D modeling through extensive hands-on practice. Personalized Learning: Benefit from one-on-one attention and tailored training to meet your specific learning needs and pace. Lifetime Email Support: Continue to receive assistance and guidance through lifetime email support, ensuring you are supported even after completing the course. 3D AutoCAD Training Courses Gain confidence and proficiency in AutoCAD. Discover the fundamentals of 3D modeling and object creation in this introductory AutoCAD 3D course. Booking Your Training Course: Experience personalized training with our adaptable 1-on-1 sessions. You have the freedom to customize your schedule by reserving a convenient hour at your discretion. Our booking slots are available from Monday to Saturday, spanning from 9 a.m. to 7 p.m. You can also reach us at 02077202581 to make a booking over the phone. Course Duration: 10 hours "You have the flexibility to divide these 10 hours across multiple days to suit your ideal schedule." Training Method: 1-on-1 (In-person face-to-face or Live Online) Expect personalized attention, tailor-made content, a flexible learning pace, and dedicated individual support throughout your training journey. This hands-on course provides ample opportunities to experiment with newly acquired techniques and seek answers to your questions. Key Features: An introductory course tailored to AutoCAD 3D's essential features. Abundant one-on-one guidance and dedicated question time. Friendly expert trainers, small class sizes, and a comfortable learning environment. Comprehensive course materials and additional resources. Ongoing support and assistance with post-course challenges. What Will You Learn? This course will equip you with the foundational knowledge and workflows necessary to create 3D models within AutoCAD 3D. You will delve into the creation and modification of both solid and surface models. Upon completion, you will be able to: Effortlessly fashion intricate shapes by combining simple elements. Precisely extract geometries and dimensions from your creations. Easily customize the view and presentation style of your objects. Is This Course Right for You? No prior experience with AutoCAD 3D is required. This course caters to individuals proficient in working with 2D objects who aspire to construct 3D models of their designs. Gain proficiency in the fundamental tools and functionalities to create precise and professional 2D and 3D drawings, advancing to more complex techniques. Enhanced Efficiency: Discover time-saving strategies, tips, and workflows that will boost your productivity and streamline your design process within AutoCAD 3D. Versatility in Design: Develop the skills needed to undertake a wide range of projects, from architectural plans and engineering drawings to mechanical components and electrical schematics. Industry-Recognized Expertise: Cultivate in-demand skills relevant to architecture, engineering, construction, and manufacturing, paving the way for career advancement and professional development. Accessible Lesson Recordings: Access recorded lessons at your convenience to review and reinforce course material whenever necessary. Continuous Email Support: Benefit from ongoing assistance with lifetime email support, ensuring you have access to guidance, answers, and clarifications even beyond the completion of the course.
First Aid For Mental Health (1 Day)
By Training Legs First Aid
This 6-hour qualification provides learners with the knowledge to recognise a range of mental health conditions, how to start a supportive conversation and when and how to signpost a person to seek appropriate professional help.

Facilitation Skills Training Course (£1450 total for this 2-day course for a group of 4-10 participants)
By Buon Consultancy
Facilitation Skills Training

Lumion 3d Realtime Rendering Training
By London Design Training Courses
Why Choose Lumion 3d Realtime Rendering Training Course? Course Link Our Lumion Course is best for materials, lighting, and animation skills. Learn high-quality rendering using Lumion's asset library. In-person or live online sessions with lifetime access to recordings and email support. Unleash Lumion's potential for immersive architectural visualizations. Duration: 10 hrs Method: 1-on-1, Personalized attention Schedule: Tailor your own hours of your choice, available from Mon to Sat between 9 am and 7 pm What is Lumion? Lumion is specialized 3D rendering software designed for architects and designers. With Lumion, you can quickly bring your 3D design models to life, add materials, furnish interiors and exteriors, and showcase the impact of lighting and shadows without the need for specialized training. Objectives of the Course The course aims to teach you how to start Lumion projects, add environments, cameras, illuminations, populate scenes with various elements, create terrains, and produce animations. Lumion 3D Course Outline Module 1: Introduction to Lumion 3D Discovering Lumion 3D's capabilities and interface navigation. Learning shortcut keys for efficient workflow. Customizing settings for optimal performance. Module 2: 3D Models and Materials Importing 3D models in various formats. Applying and tweaking materials. Creating procedural materials and glass effects. Troubleshooting common issues. Module 3: Creating a Project in Lumion Building scenes and sculpting terrain. Enhancing realism with alpha and height maps. Module 4: 3D World Managing multiple 3D objects and their properties. Implementing grass and scattering elements. Module 5: Lighting in Lumion 3D Utilizing weather settings for dynamic scenes. Understanding Lumion lights and interior/exterior illumination. Creating 3D reflections and spotlights. Module 6: Realistic Visualizations Incorporating special effects like fire, smoke, and fog. Achieving realism with camera effects and shadows. Rendering still images and animations. Module 7: NPR Visualizations Creating non-photorealistic visualizations with artistic effects. Implementing unique styles for enhanced visuals. Module 8: Artistic Effects in Lumion 3D Exploring conceptual visualizations with painting and sketch effects. Creating cartoon effects and understanding perspectives. Module 9: Animation in Lumion 3D Timing and working with cameras for dynamic shots. Composing animation clips and adding effects. Utilizing layers and control objects for precise control. Module 10: Advanced Features Import and output formats in Lumion. Expanding assets with the 3D model library. Adding animated characters and sound effects. Utilizing the advanced material library. Controlling environment and weather for dynamic scenes. Scene management and movie editing within Lumion 3D. Lumion for Students | Unleash Your Creativity https://lumion.com› product › students Unlock the full potential of your designs with Lumion for students. Request your free 1-year Student license now and bring your visions to life!

The Essentials of EAP Training Workshop (£750 per course for up to 10 people)
By Buon Consultancy
Employee Assistance Programme Training
Introduction to Apple Final Cut Pro
By Platform Training
Apple Final Cut Pro X is a revolutionary video editing application that makes it possible for beginners and seasoned professionals to achieve stunning results. This one day workshop introduces students to the primary feature set and functionality of Final Cut Pro X. Students will learn to perform a range of editing functions while familiarising themselves with the user interface.

Project Communication Skills: In-House Training
By IIL Europe Ltd
Project Communication Skills: In-House Training Communication is the single most critical project success factor. When effective, projects get executed on time, within budget, and with objectives being met. But that isn't all. Strong communication also nurtures healthy team relationships. And in today's highly diverse world, where projects are often fast-paced, complex, and virtual, that is more important than ever. Strong communication skills foster cultural awareness, trust, and empathy. Together, they contribute greatly to project success-and ultimately, to future project success. In this course, participants will actively explore best communication practices from a variety of perspectives: in-person, virtual, electronic, and via formal project documentation. In order to be transformative, however, those perspectives will be filtered further through the lens of their formal, personalized assessment. It is a powerful tool which identifies individuals' internal needs and priorities. It translates those into descriptive profiles and reports, gifting users with valuable information about themselves and others. Paired with the course's real-world activities, it will provide uniquely strategic opportunities for communicating effectively and meaningfully-and with less conflict, both personally and professionally. What You Will Learn At the end of this program, you will be able to: Identify basic elements of communication and explain how they affect teams Explore how your assessment style impacts you and how you communicate with people of other styles Infer how your style impacts the way(s) you send and interpret emails and instant messages Analyze real world email and instant messaging practices to determine how they affect communication and relationships Explore best practices for formal project communications and presentations Analyze how your assessment style and global diversity can contribute to both strong team communication and conflict Identify solutions for virtual team work communication challenges Getting Started Foundation Concepts Communication as a foundation skill Elements of communication Communicating across media Targeting your audience How communication impacts team performance The Assessment Framework Overview of the assessment's approach Exploring assessment report Increasing your effectiveness with other assessment styles Email and Instant Messages Preferred communications and assessment styles The email brands we create Assessment styles and email Emotion and email Email guidelines and best practices Anatomy of an email The seven deadly email sins Instant messages and other interfaces Project Communications and Presentations Communicating across the project lifecycle Project templates Structuring a presentation Delivering a presentation Interpersonal and Team Communication Skills Communication styles and techniques Managing conflict in a project environment Styles and conflict Communication and global team leadership Virtual Communication Leading global virtual teams Virtual processes and technology Virtual team leadership

Microsoft Project White Belt 2013
By IIL Europe Ltd
Microsoft Project White Belt® 2013 This workshop serves as an introduction to the interface and features of Microsoft® Project 2013. This course will be led by an IIL-certified instructor who will outline the benefits of Microsoft Project, provide tips on using various features and common shortcuts, recommend guidelines, and discuss the application of scheduling concepts to manage project work This workshop serves as an introduction to the interface and features of Microsoft® Project 2013. This course will be led by an IIL-certified instructor who will outline the benefits of Microsoft Project, provide tips on using various features and common shortcuts, recommend guidelines, and discuss the application of scheduling concepts to manage project work. What you Will Learn You'll learn how to: Define key scheduling concepts and terms Effectively navigate the user interface and interpret common views Configure essential elements of a new schedule Enter and modify a task list Set dependencies between tasks Create a basic resource list and generate assignments Format targeted areas of the Gantt Chart view Prepare the schedule for printing Getting Started Introductions Course objectives Course outline Navigating the User Interface and Views Navigate and use the Ribbon Use and customize the Quick Access Toolbar Modify general and display options Become familiar with major elements on the Project screen Navigate Gantt Chart, calendar, and network diagram views Search for a help topic Setting up a New Schedule Create new schedules Create a new schedule using existing information Enter and modify the schedule start date Enter and modify exception days in the calendar Entering, Modifying, and Outlining Task Data Enter, edit, correct, and clear information Enter unscheduled tasks Enter duration estimates for a single task or multiple tasks Organize tasks Set up a multi-level outline Add notes to tasks Creating Dependencies by Setting Links Identify a critical path in a simple schedule Understand how scheduling software calculates a critical path Describe dynamic schedules and dependencies Create links using various methods Display the critical path Entering and Assigning Resources Plan for resources Create a list of available resources Assign resources Formatting Gantt Chart View Format text and Gantt Chart bars Format a collection of items Configure print options