- Professional Development
- Medicine & Nursing
- Arts & Crafts
- Health & Wellbeing
- Personal Development
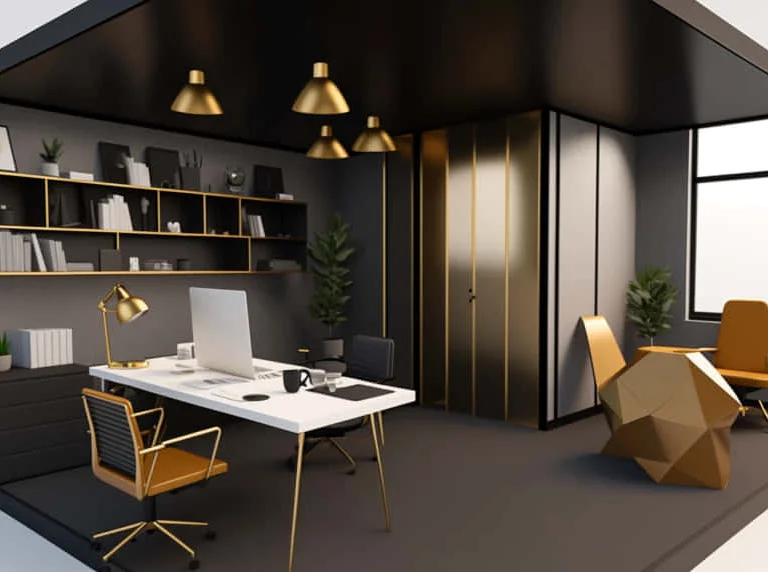
V-Ray Course For Architects
By ATL Autocad Training London
Why learn V-Ray for architects and designers? Realistic Visuals: V-Ray produces lifelike renderings for precise design visualization. Enhanced Presentations: Stunning visuals secure approvals and investments effectively. Time and Cost Efficiency: Streamlines design iterations, cutting down prototyping expenses. Click here for more info: Website Scheduling Your Training: You can also call 02077202581 to book. Training Duration: 10 hours Method: In-person face-to-face sessions or live online. Course Title: V-Ray Essentials for Architects and Designers Course Duration: 10 Hours Course Overview: Unlock the power of V-Ray, the industry-standard rendering software, and elevate your architectural and design projects to new heights. In this comprehensive 10-hour course, you'll dive deep into V-Ray and gain the skills needed to create stunning visualizations. Whether you're an architect or designer, this course will equip you with the knowledge and techniques to bring your ideas to life. Module 1: Introduction to V-Ray (1 hour) Understanding the V-Ray interface Navigating the V-Ray toolbar Setting up your first V-Ray project Module 2: Lighting Mastery (2 hours) Utilizing various light sources Achieving realistic daylight simulations Creating artificial lighting setups Mastering V-Ray's advanced lighting tools Module 3: Material Magic (2 hours) Exploring V-Ray materials Creating realistic textures and finishes Understanding material properties Working with material libraries Module 4: Perfecting Render Settings (1 hour) Configuring render settings for optimal results Setting up render elements for post-processing Achieving photorealistic renderings Module 5: Advanced Rendering Techniques (2 hours) Fine-tuning render settings for specific scenarios Creating stunning visual effects Optimizing render times Rendering animations and walkthroughs Module 6: Realistic Environments (1 hour) Incorporating background images and environments Adding context to your architectural scenes Achieving seamless integration of 3D models and backgrounds Module 7: Portfolio-Ready Projects (1 hour) Applying V-Ray skills to complete a professional project Assembling a portfolio showcasing your work Course Benefits: Master V-Ray for architectural and design projects. Create photorealistic renderings with confidence. Customize lighting, materials, and textures for your designs. Optimize render settings for efficiency and quality. Enhance your portfolio with impressive visualizations. Receive lifetime email support for continued guidance. Explore career opportunities as a rendering specialist. Who Should Attend: Architects Interior Designers 3D Artists Visualization Specialists CGI Artists Architectural Renderers Game Environment Artists Virtual Reality (VR) Developers Anyone passionate about architectural rendering and design Method of Instruction: 1-on-1 personalized training In-person or live online sessions Hands-on exercises and practical projects Upon completing the "V-Ray Essentials for Architects and Designers" course, participants will: V-Ray Proficiency: Master V-Ray rendering for photorealistic visualizations. Advanced Lighting Skills: Create dynamic and realistic lighting scenarios. Material Expertise: Customize textures and materials for enhanced visuals. Optimized Renders: Configure settings for efficient workflows. Advanced Techniques: Learn rendering tricks for stunning effects. Realistic Environments: Integrate 3D models seamlessly into real-world settings. Portfolio Development: Build a competitive portfolio showcasing advanced rendering skills. Benefits for Interior Designers and Architects: Enhanced Visualization: Improve design communication with realistic visualizations. Competitive Edge: Stand out with high-quality renderings. Efficient Decision-Making: Experiment and refine designs before execution. Streamlined Workflows: Produce quality renders efficiently. Career Opportunities: Explore roles in architectural visualization, 3D art, and CGI. In short, this course equips interior designers and architects with V-Ray skills to create impressive visualizations, improve communication, gain a competitive edge, streamline workflows, and expand career options. Master Vray Rendering: Achieve proficiency in Vray rendering for architectural and interior design projects. Industry Excellence: Learn industry-standard practices and workflows to produce high-quality results. Flexible Learning: Choose between in-person or live online training to suit your schedule. Resourceful Learning: Access recorded lessons for convenient review and reinforcement. Ongoing Support: Benefit from lifetime email support, ensuring you receive guidance beyond the course. Career Guidance: Receive free career advice to make informed decisions about your professional growth. Upon completion, our Vray for Architects and Interior Designers Training Course opens doors to various career opportunities in the architecture and design industry. Graduates with advanced rendering skills can explore roles such as: Architectural Visualizer Interior Designer 3D Artist Rendering Specialist Visualization Specialist CGI Artist Architectural Renderer Game Environment Artist Virtual Reality (VR) Developer Freelance Rendering Professional Vray Mastery: Gain expertise in Vray rendering for architectural and interior design projects. Industry-Approved Methods: Learn tried-and-true workflows for exceptional results. Flexible Learning: Opt for in-person or live online training at your convenience. Easy Review: Access recorded lessons to reinforce your knowledge conveniently. Lifelong Support: Receive ongoing guidance even after course completion. Career Consultation: Make informed decisions about your professional growth. Career Opportunities: Unlock doors to diverse roles in architecture and design, including Architectural Visualizer, Interior Designer, 3D Artist, Rendering Specialist, and more.


3ds Max Night Training Courses
By ATL Autocad Training London
Course Title: 3ds Max Night Training Program. Join our 3ds Max Evening Course for after-work convenience and guidance in 3D modeling. Personalized attention, and build an impressive portfolio. 3ds Max Courses & Classes Online and in-person in London. Click here for more info: Website Training Duration: 10 hours Learning Approach: 1-on-1 sessions and Customized content. Course Schedule: Reserve a convenient hour from 9 am to 7 pm, Monday to Saturday, to suit your schedule. I. Introduction to 3ds Max Course Overview Familiarization with the User Interface Basic Navigation and Settings II. Creating 3D Objects Formation of Primitive Objects Crafting Complex Shapes using Editable Poly Application of Modifiers to Objects Implementing Materials and Textures III. Lighting Introducing Light Sources in a Scene Different Types of Lighting Adjustment of Light Properties Creating Shadows IV. Camera Establishing Cameras and Camera Views Fine-Tuning Camera Settings Camera Animation Techniques V. Animation Fundamentals Keyframe Animation Techniques Utilizing the Time Slider and Track View Animation of Object Transformations Animated Materials and Textures VI. Rendering Configuration of Render Settings Selection of Output Format Batch Rendering Procedures Post-Processing Effects VII. Project-Based Learning Application of Learned Techniques in a Final Project Creative Problem-Solving for Project Completion In-Depth Course Outline: Modeling Techniques Edit Poly Modeling Extrusion, Chamfer, Cut, and Slicing Techniques Symmetry Mirror Modeling Designing Furniture (Tables and Chairs) Basic House Model Design Creating Lines and Shapes Importing Plans from AutoCAD/Vectorworks Interior Space Design Doors, Windows, Railings, Trees, and Stairs Modifiers Compound Objects (Connect, Scatter, Pro Boolean, Loft, Terrain) Bend, Taper, Twist, Stretch, Skew, FFD, Wave, and Ripple Lattice and Lathe Techniques 3ds Max Basic Lighting Omni Light Spot Light Direct Light 3ds Max Camera Techniques Free Camera Target Camera Texturing and Rendering Diffuse and Bump Mapping Incorporating Environment and Background Images Rendering Images with Advanced Lighting in 3ds Max For a hands-on experience, access a free 30-day trial of 3ds Max, a robust 3D modeling and rendering software for design visualization, games, and animation, via Autodesk's official website. Download 3ds max. Autodesk Download a free 30 day trial of 3ds Max, 3D modelling and rendering software. Learning Outcomes after 3ds Max: Advanced 3D Skills: Master intricate 3D modeling, animation, and rendering techniques. Project Experience: Apply skills to real-world projects, building a professional portfolio. Problem-Solving: Develop critical thinking for complex design challenges. Potential Jobs: 3D Modeler: Create detailed 3D models for various industries. Character Animator: Animate lifelike characters for entertainment media. Architectural Visualizer: Produce realistic architectural renders. Interior Designer: Visualize and present interior designs. Game Environment Artist: Design immersive game environments. Product Visualization Specialist: Render detailed product visuals. Visual Effects Artist: Create stunning visual effects for film/TV. Freelance 3D Artist: Take on diverse projects as an independent professional. Details: Duration: 10 Hours of Comprehensive Training Focus: Advanced 3D Modeling, Animation, and Rendering Techniques Learning Format: Personalized One-on-One Sessions for Maximum Attention Availability: Flexible Scheduling, Monday to Saturday, 9 am to 7 pm Instructors: Certified Experts and Industry Professionals Materials: Certificate of Completion and Extensive Training Guides Interactive Learning: Live Feedback Sessions and Access to Recorded Classes Support: Lifetime Email and Phone Assistance for Continued Learning Special Benefits: Competitive Rates, Referral Discounts, and Assistance with Software Installation This intensive 3ds Max Masterclass provides advanced training in 3D design and animation, ensuring personalized attention, interactive learning, and lifelong support for your creative journey. Personalized Instruction: Skilled trainers provide tailored one-on-one coaching, meeting your unique learning requirements. Practical Learning: Participate in hands-on demonstrations, strengthening skills applicable in design, gaming, and film industries. Comprehensive Materials: Obtain a Certificate of Attendance and detailed guides for continuous reference. Interactive Engagement: Engage in live sessions with tutors, gaining valuable feedback and access to session recordings. Flexible Learning: Choose between online or in-person sessions, aligning with your schedule and preferences. Value and Support: Benefit from competitive rates, referral discounts, and lifelong assistance via email and phone. Seamless Start: Get help with software installation, ensuring a smooth and hassle-free learning experience.
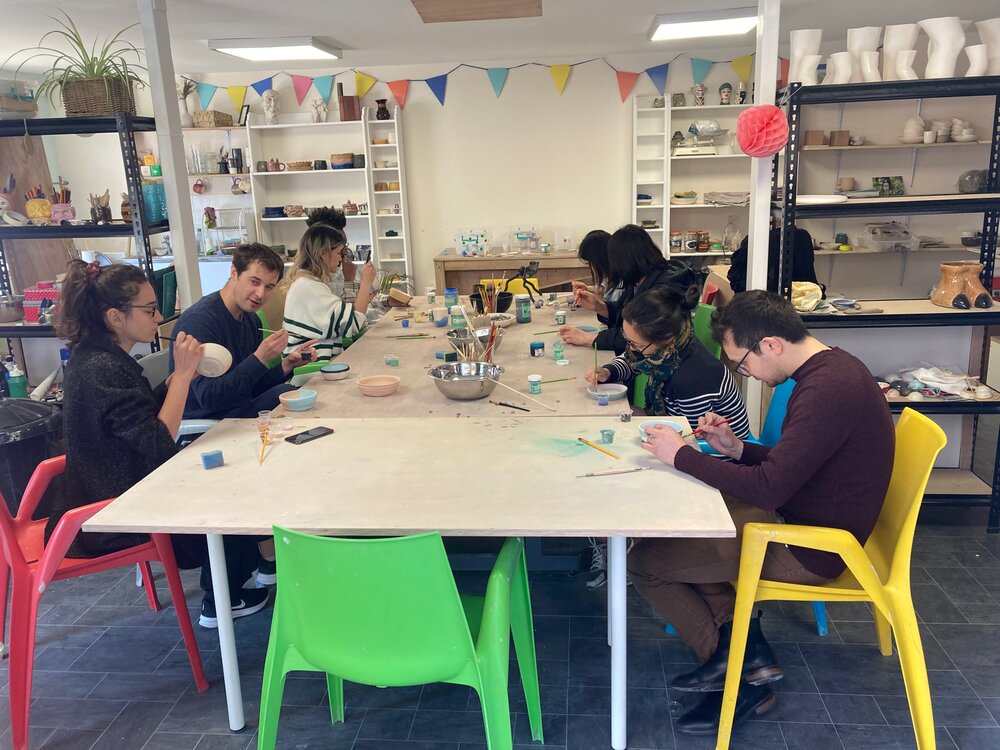
Painting Pottery & Glazing Workshop
By Art Craft Studios
Painting & 'glazing' means to add colour & patterns to your pottery. Kicking off with a practical demonstration, we will take you on a step-by-step journey of the fundamental ceramic techniques of glazing (surprisingly there are a few). Each step requires practice but you'll be hands-on in no time learning each step of the journey as we go. We have pre-made pots to choose from, inlcuding cups, bowls and planters. With your newly learned skills, you'll have what it takes to paint pottery and you can collect your finished works a few weeks later. We'll discuss when you can collect at the end of the workshop. All you need to do now is start thinking about your favourite colours and designs!
Maya Essentials Basic to Fundamental Training Program
By ATL Autocad Training London
Autodesk Maya Basic to Fundamentals Training. Ideal for beginners, learn to navigate Maya's interface, create models, apply textures, animate objects, and delve into advanced topics. Engage in interactive in-person or online sessions. Access recorded lessons for review and receive lifelong email support. Learn 3D modeling and animation - enroll today! Click here for more info: Website Duration: 10 hours of immersive learning. Method: Personalized 1-to-1 sessions and Choose your own day and time Monday to Saturday 9 am to 7 pm. Course Overview: I. Introduction to Maya (1 hour) Maya overview and applications Basic interface and navigation tools Project creation and management II. 3D Modeling Techniques (2 hours) Polygon modeling fundamentals Creating, editing, and refining objects Advanced techniques like extrusions and bevels III. Texturing and Materials (1 hour) Introduction to texturing concepts Material creation and application Texture mapping, UV unwrapping, and image importing IV. Lighting and Rendering (1.5 hours) Basic lighting techniques and composition setup Rendering images and animations effectively Output options and file formats V. Animation Skills (2.5 hours) Keyframe animation and animation curves Character rigging and animation Special effects: particles, fluids, explosions, and smoke VI. Intermediate Modeling Techniques (1 hour) NURBS modeling basics and advanced curves/surfaces manipulation Creating organic shapes with NURBS and sculpting tools VII. Conclusion and Next Steps (0.5 hours) Course review and recap Further learning resources and tips Q&A and feedback session Autodesk Maya Basic to Fundamentals Training Course Key Learning Areas: Advanced modeling techniques: Surfaces, Polygons, Subdiv Modeling, etc. Deformation methods: Twist, Lattice, Flare, Bend Shape manipulation: Lines, Pen tools, Revolve, Loft, Planer, Text in Maya Animation: Keyframes, Path animations, Timeline Texturing and Rendering: Diffuse, Reflections, Transparency, Shaders, Resolution settings Lighting and Camera: Basic & advanced lights, Shadows, Camera effects, Path animation Note: The course content and duration are adaptable to cater to learners' needs and proficiency levels. Maya Interface Proficiency: Participants will develop a comprehensive understanding of Maya's interface, tools, and workflow, allowing them to navigate seamlessly and manage projects efficiently. 3D Modeling Skills: Students will be equipped with polygon modeling techniques to create both basic and complex 3D models with precision. They will master the art of shaping and refining objects, elevating their creativity in 3D design. Texturing and Materials Mastery: Learners will gain expertise in texturing, applying materials, and incorporating images to enhance the visual appeal of their 3D models. They will create captivating surfaces with colors, textures, and reflectivity. Lighting and Rendering Expertise: Participants will learn essential lighting techniques to illuminate their scenes effectively. They will set up cameras and produce high-quality still images and dynamic animations with Maya's powerful rendering capabilities. Animation Techniques: Students will explore the world of animation, utilizing keyframe techniques and animation curves to bring their creations to life. They will delve into character rigging, animating characters with sophistication and realism. Special Effects and Dynamics: Learners will unleash their creativity with mesmerizing particle systems, fluid simulations, and dynamic effects. They will craft captivating visuals, such as explosions and smoke, adding depth and excitement to their projects. Intermediate Modeling Techniques: Participants will refine their skills with NURBS modeling, mastering curve and surface manipulation. They will create intricate organic shapes, pushing the boundaries of their artistic expression. Creative Problem-Solving: Throughout the course, students will tackle real-world projects, facing challenges that foster creative problem-solving skills. They will gain confidence in overcoming obstacles in 3D modeling and animation. Maya Essentials Basic to Fundamental Training Program: Course Focus: Autodesk Maya Essentials, covering fundamental concepts and techniques. Duration: Flexible scheduling, tailored to individual learning pace. Method: Personalized 1-1 training, interactive sessions, hands-on projects. Curriculum Highlights: Introduction to Maya (1 hour): Interface overview, navigation, project management. 3D Modeling Techniques (2 hours): Polygon basics, object creation, advanced editing. Texturing and Materials (1 hour): Texture mapping, material application, UV unwrapping. Lighting and Rendering (1.5 hours): Lighting fundamentals, composition setup, effective rendering. Animation Skills (2.5 hours): Keyframe animation, character rigging, special effects. Intermediate Modeling (1 hour): NURBS modeling, organic shapes, sculpting tools. Conclusion and Next Steps (0.5 hours): Course review, learning resources, Q&A session. These resources will complement your training, providing additional support and insights as you explore the world of Autodesk Maya. Explore the World of 3D Animation: Master the intricacies of 3D computer graphics and animation using Autodesk Maya. Delve into modeling, texturing, animation, and rendering to bring your creative visions to life. Practical Learning Experience: Dive into hands-on projects refining your skills. Craft 3D models, apply textures, animate characters, and produce polished renders. Recognized Industry Expertise: Gain proficiency in Autodesk Maya, a leading software in entertainment, gaming, and animation. Enhance your employability with highly sought-after skills, opening doors to diverse career paths. Endless Applications: Uncover Maya's versatility in entertainment, architectural visualization, product design, and more. Tailor your expertise to align with your passions and career aspirations. Reinforcement through Recordings: Access comprehensive lesson recordings for thorough review. Revisit specific topics, reinforcing your grasp of Autodesk Maya at your own pace. Continuous Guidance: Receive lifetime email support for ongoing mentorship. Seek answers, clarifications, and expert advice, ensuring your continuous growth even after completing the course.

Wood Therapy aka Maderoterapia in person
By KBH Training Academy
Wood Therapy aka Maderoterapia What is wood therapy? Wood therapy is a technique in which a rigorous and complete massage is performed with the help of various utensils made of wood. Each of these instruments has a specific shape and size since they adapt to different areas of the body to fulfil a function. Benefits: Redaction of cellulite Body contouring Bum Lift Helps to reduce stress and muscle tension Increases blood circulation Lymphatic drainage support Course Content: What is wood therapy History of wood therapy Benefits of wood therapy Contraindications Tools and their usage Anatomy Lymphatic system Health and Safety Consultation Step by step process Aftercare Training kit Contouring board Swiss cup Diamnod Roller Cube Roller How does the course work? The course is divided into 2 parts, the first part is theoretical which you have to complete before you come for your practical training, and the second one is a practical assignment. The practical assignment is done on the day which will be agreed upon course purchase. You will spend around 2-3 hours practising on a model in our venue in London E106RA. Will I require a model? Yes, usually 1 model is required Do I Need Experience Before Booking a Course? We’re pleased to offer courses to people with lots of different experiences. However, previous experience nor qualifications are not necessary if you would like to enrol on our Course. Certificate You will receive an end of course certificate which is accredited by the cpd group and allows you to work on public Payment By paying for the course you agree to our terms and conditions.

Online and phone therapy training
By Human Givens College
– essential guidance for safe and effective remote working Join our expert tutors to discover how you can make online therapy work for your practice Accredited CPD Certificate: 4 hours Length: 9am – 1.15pm (BST) LIVE ONLINE – Specialist training in delivering effective therapy online or over the phone – Join Ros Townsend live online on Tuesday 11th June 24 for this jam-packed, informative session. You will receive your Zoom link the day before the event. NB. Spaces are limited and tend to go quickly. Register your interest here if you can’t make this date, and we’ll let you know when there’s another one. BONUS RECORDING – the training is recorded, in case of technical difficulties, so you will also get a recording for 2 weeks afterwards to maximise your learning. Delivering online therapy, or counselling clients on the phone, requires a particular set of skills and brings with it specific considerations. This live online workshop will help you gain confidence in working safely and ethically, examining the advantages, potential drawbacks and adjustments you need to make to work remotely successfully. There will be plenty of time for questions, and helpful discussions with your peers and experienced tutors. Why take this course Whether you are a new practitioner wanting to develop your online practice, or an experienced therapist who has decided to start offering services online or on the phone, this course will help you gain the skills and understanding you need to do so safely and effectively. Unlike other online courses, this practical live online CPD training gives you the opportunity to ask our experienced tutors questions about any aspects that concern you, as well as learning from their case histories about what has worked – and what hasn’t – for them. Covering essential areas such as managing client expectations, setting up a therapeutic online environment, risk management, and the use and adaptation of various skills and techniques for online or telephone work, this course gives you the essential information you need to deliver therapeutic interventions remotely. Both Jo Baker and Ros Townsend, the course tutors, have extensive experience of working with clients online, with Ros now running her entire therapy practice remotely. Jo works using a blended approach (combining face-to-face counselling and online psychotherapy), and both bring a wealth of practical tips, hands on experience and real-life examples to the training. During the day, there will be ample opportunity to discuss and share ideas with both tutors and peers, and to enter into both structured and more free-ranging discussions about both the benefits and potential difficulties that one might encounter when working therapeutically through remote mediums. What the training covers: The importance of aligning client and therapist expectations for online therapy, or therapy over the phone How to set-up successfully for work on the phone or online – including template agreements to use with your clients Managing your technology and ensuring good communication – key things to ascertain, plus troubleshooting tips What to do when the call won’t connect The importance of confidentiality and privacy – and the potential problems you need be aware of when working online Agreeing safe communication methods between sessions How to successfully manage dual therapy spaces The importance of setting and maintaining professional boundaries Discussion regarding what is / is not acceptable in a home therapy space How to manage transitions before and after the session – for clients and therapists The key differences between online and face to face therapy work How to adapt and work successfully with a range of key therapeutic skills – such as Guided Imagery and The Rewind technique Assessing suitability of client presentations – including guidance on cases that are not suitable for online therapy How to manage risk effectively in an online or telephone environment How to put in place effective contingency plans for when technology fails Developing flexibility: dealing with the unexpected – including what to do if a session is interrupted When to refer a client on The additional pressures and potential stressors of online and telephone working Working in a blended way – combining remote and face-to-face sessions Key differences for the client of receiving therapy online or over the telephone The particular considerations of working with a wider client group from different geographical locations The importance of self-care and self-awareness Insurance and GDPR considerations when delivering online therapy or counselling, or working via the phone The importance of appropriate supervision Course Programme The ‘Online and phone therapy training’ course starts at 9.00am and runs until 1.15pm. (BST). 9.00am Join the Zoom meeting 9.15am First session starts 11.00am Comfort break and discussion 11.30am Second session 1.15pm Day ends Who is this course suitable for? This course is designed for both trainee and fully-qualified therapists, psychotherapists and counsellors It is recommended to all HG practitioners by the Human Givens Institute – trainee HG Therapists are expected to take this training if they are considering working online. This course has been independently accredited by the internationally recognised CPD Standards Office for 4 hours of CPD training. On completion of this training you’ll receive CPD certificates from the College and the CPD Standards Office.

Vectorworks Evening Training
By London Design Training Courses
Why choose Vectorworks Evening Training Course? Course Link. This course led by certified expert, this course offers flexibility for evening learning. Choose in-person or live online sessions to master Vectorworks in architecture, interior design, and landscaping. Enroll now even after business hours! Duration: 10 hrs. Method: 1-on-1, Personalized attention. Schedule: Tailor your own schedule by pre-booking a convenient hour of your choice, available from Mon to Sat between 9 am and 7 pm. The Vectorworks course provides comprehensive training in computer-aided design (CAD) and Building Information Modeling (BIM) using the powerful Vectorworks software. This hands-on, instructor-led course covers 2D drafting, technical drawing, and 3D modeling, enabling participants to apply Vectorworks effectively in real-world projects. Key Features: Hands-on, instructor-led classroom training. Practical Vectorworks CAD projects for real-world application. Part-time evening or weekend options available. 1-2-1 Private learning experience. Module 1: Grasping CAD and Vectorworks Understanding the Role of CAD in Design Getting Acquainted with Vectorworks Software Module 2: Configuring Your Workspace Customizing Your Workspace Essential Options and Preferences Module 3: Mastering Foundational Drawing Skills Techniques for Drawing Object Selection Methods Module 4: Advanced Object Manipulation Merging Shapes Reflecting Objects Rotating Objects Grouping Elements Module 5: Precision Drawing and Scaling Techniques Working with Scale Setting Preferences for Accuracy Creating and Saving Templates Module 6: Achieving Accurate Object Placement Ensuring Drawing Precision Precise Object Movement Module 7: Advanced Editing Methods Utilizing Fillet Tool Applying Offset Function Module 8: Understanding Object Attributes and Groups Basic Attribute Management Editing Object Groups Module 9: Object Duplication Techniques Linear Duplicates Rectangular Duplicates Circular Duplicates Module 10: Crafting Room Plans Designing Walls Incorporating Windows and Doors Module 11: Development of Room Plans Methods for Room Plan Drawing Module 12: Exploring Additional Attributes Hatch Patterns Gradients Image Fills Module 13: Creating Elevation Drawings Elevation Drawing Techniques Effective Approaches Module 14: Importing Images for Graphic Use Graphic Illustration Integrating Images Module 15: Symbols and Resource Handling Symbol Creation Introduction to Resource Browser Module 16: Organizing Drawings Using Design Layers Optimizing Design Layer Utilization Module 17: Labeling Drawings and Title Blocks Drawing Labels Title Block Text Placement Module 18: Plotting and Printing Methods User Interface Navigation and Terminology Printing Approaches Module 19: Generating Drawing Sheets A1, A2, and A3 Sheet Formats Module 20: Utilizing Viewports Effectively Managing Multiple Views Module 21: Professional Model Presentation Techniques Paper Space Presentation Conversion to PDF Formats Module 22: File and Project Management Module 23: Object Display and Terminology Module 24: Objects and Data Management Module 25: Precise Object Placement Object Snapping Quick Selection Module 26: Dividing and Measuring Objects Module 27: Dimensioning and Annotations Module 28: Working with Text Elements Module 29: Customizing Tool Palettes Module 30: Organizing Tool Palettes Module 31: Efficient Tool Palette Usage Module 32: Standard Views and Drawing Techniques Module 33: Drawing Curved Shapes Arcs, Donuts, and Ellipses Drawing Module 34: Real-World Units and Measurements Module 35: Object Manipulation Adjusting Object Angles Module 36: File Handling and Management Saving, Exiting, and Opening Projects Module 37: Creating Mirrored Images Module 38: Introduction to 3D Modeling By the end of the Vectorworks Evening Training Course, participants will: Demonstrate proficiency in using the Vectorworks interface, tools, and navigation. Create and edit 2D drawings, including walls, doors, windows, floors, ceilings, stairs, and railings. Effectively manage layers, classes, and views for organized and controlled object placement. Create and edit dimensions and annotations for accurate measurements and documentation. Develop skills in creating, modifying, and utilizing symbols for increased efficiency. Generate and edit 3D geometry, apply textures, and create sections and elevations from 3D models. Create polished presentation drawings using viewports, annotations, and text for clarity. Summarize course content and confidently apply learned skills in Vectorworks projects. Utilize available resources for further learning and professional development.
Paediatric First Aid (2 Days)
By Training Legs First Aid
Paediatric first aid training: What will you learn? The course covers everything listed below. There will be practical demonstrations, role playing and several activities to keep things moving along. You’ll use the whole range of paediatric first equipment, and will try out your newly learned techniques on my adult, child and baby mannequins. I’m happy to tailor the content with additions. If you want me to focus on a specific area of paediatric first aid, that’s fine. Here’s what you’ll learn: Responsibilities and reporting requirements Assessing a medical situation How to perform CPR Resuscitation and using a defibrillator Treatment of an unconscious casualty, and the recovery position Choking Head injuries Seizures, including febrile convulsions Bleeding and shock Burns and scalds Fainting Anaphylaxis, and using an EpiPen Diabetes and asthma emergencies Foreign objects Eye injuries Sprains, strains and fractures Heat and cold Sickle cell anaemia and meningitis
