- Professional Development
- Medicine & Nursing
- Arts & Crafts
- Health & Wellbeing
- Personal Development
inGenius Memory
By inGeniusly
If you have the desire to memorise anything incredibly quickly, and retain it for as long as you need, this course is for you! In a fun, dynamic way, where we purposefully combine different teaching approaches to get you to a level of mastery in the shortest possible time, we will teach you the ins and outs of memory. You will be amazed by how powerful your own brain can be!

Revit Basic to Fundamentals
By London Design Training Courses
Why Choose Revit Basic to Fundamentals Course Course Link In this course you will learn Revit skills for BIM modeling. In-person or live online. Autodesk Revit Architecture training for students to create full 3D architectural project models and set them up in working drawings. Duration: 10hours Method: 1-on-1 method with tailored content and flexible pace, backed by individual support. Schedule: Choose a convenient hour from Mon to Sat between 9 am and 7 pm to create your own schedule. Revit Essentials Training: Learn Revit fundamentals for architecture and structural design, supporting efficient building construction with BIM workflows. Delivery Options: In-class at our center Live online sessions I. Introduction to Revit Overview of Revit and its uses Revit interface and basic tools Navigation and viewport controls Creating and saving projects II. Setting up a Project Creating a new project Setting up project levels and grids Adding site and building information Setting up project units III. Creating Building Elements Creating and modifying walls Adding doors and windows Creating and modifying floors and ceilings Creating roofs and modifying roof shapes Creating stairs and railings IV. Views and Sheets Creating and managing views Creating and managing sheets Adding schedules and tags Creating construction documents V. Annotation and Detailing Adding text and dimensions Creating and modifying detail components Adding symbols and keynote legends Adding annotations to construction documents VI. Conclusion and Next Steps Review of course content Tips for further learning and resources Q&A and feedback Note: The above course outline is just a suggestion, and the course content and duration can be adjusted according to the needs and level of the learners. Detailed Course Outline. 1. Starting a Project Creating a new project and the importance of a template. Understanding project settings and scales Adding levels Adding grids Adding columns 2. Modeling Basics Adding walls Using snaps Wall properties and wall types Using the modified tools Adding doors and windows Using constraints See: Autodesk Seek and Revit City websites 3. Links, Imports, and Groups Working with DWG files Creating topography from a DWG link Understanding CAD inserts Using import tips Creating a group Working with Revit links Managing links 4. Sketch-Based Modeling Components Working with floors Working with roofs Adding openings Working with stairs Working with railings Working with ceilings 5. Complex Walls Creating a custom basic wall type Adding curtain walls Adding curtain grids and mullions 6. Visibility and Graphics Controls Using object styles Working with visibility/graphic overrides Using Hide/Isolate Understanding view range Using the Linework Using cutaway views 7. Rooms Adding rooms Controlling room numbering Understanding room bounding elements 8. Schedules and Tags Understanding tags Adding schedules Modifying schedules Creating a key schedule 9. Annotation and Details Adding text Adding dimensions Adding symbols Adding legend views Creating a detail callout Using detail components Adding filled and masking regions 10. The Basics of Families Understanding familiesUsing reference planes, parameters, and constraints Adding solid geometry Adding void geometry Completing the family 11. Sheets, Plotting, and Publishing Adding sheets Exporting to AutoCAD and JPG
Infection Control
By Prima Cura Training
Infection prevention and control is essential for all businesses, particularly where the working environment or work activities could put employees and those around them at risk of infection. This includes those working in healthcare, in close contact with people or animals, and those involved in the cleaning of human and animal waste. Infections can be easily spread, but by understanding the correct steps to take, the risk of their occurrence can be both prevented and controlled.

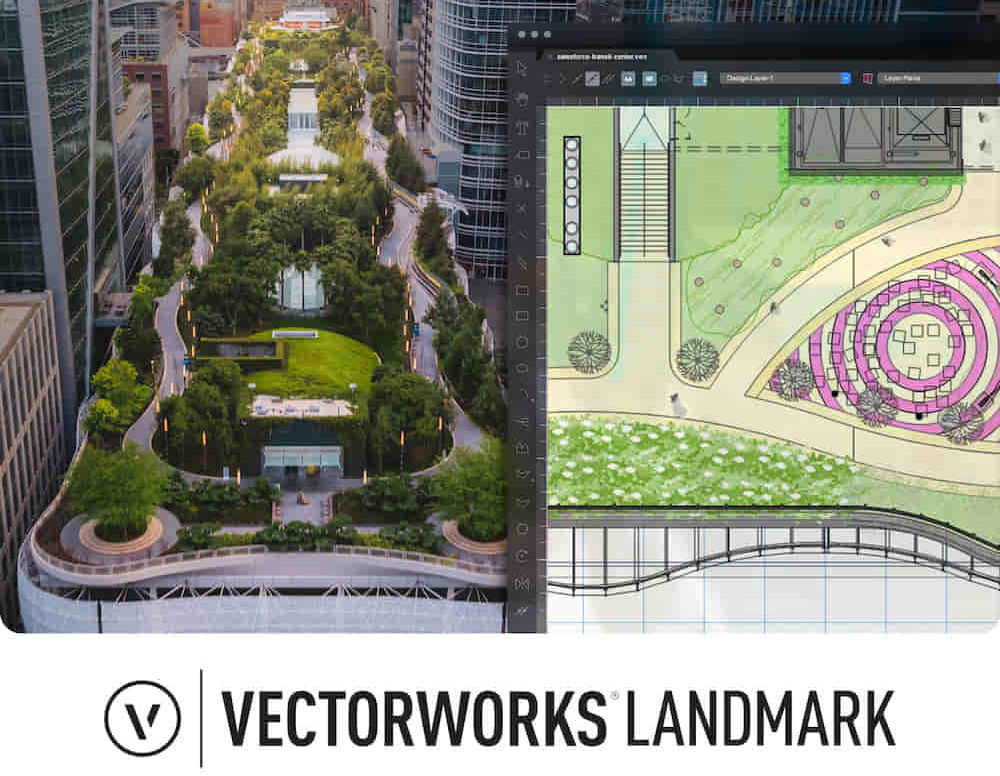
Landmark Training Course With Vectorworks
By ATL Autocad Training London
Who is this course for? Landmark Training Course With Vectorworks. Dive into terrain modeling, planting, irrigation, and site analysis guided by certified tutors. Master these tools for precise landscape designs and effective documentation. Check our Website Enrollment : 1-on-1 Landmark Training. Tailor your schedule. Mon to Sat between 9 am and 7 pm Call 02077202581 to book your slot. Duration: 16 hours. "Split these hours over multiple days as needed for your ideal schedule." Approach: In-person or live online. Landmark Training Course with Vectorworks: Basic to Intermediate Level Course Duration: 16 Hours Embark on a transformative journey with our Landmark Training Course tailored for landscape architects and designers. Over 16 intensive hours, dive deep into Vectorworks Landmark, mastering fundamental and intermediate techniques crucial for comprehensive 2D and 3D landscape design. Craft intricate site analyses, plans, irrigation systems, and elevate your designs with mesmerizing 3D visualizations. Explore custom plant symbols, detailed planting plans, and learn the art of efficient collaboration and customization. Course Highlights: I. Introduction to Vectorworks Landmark (1 hour) Explore Vectorworks Landmark for landscape design Master interface, tool usage, and project management II. Site Analysis and Site Plans (3 hours) Craft detailed site analyses and hardscape designs Work with contours, elevations, and terrain models III. Planting Plans (5 hours) Utilize the plant database for region-specific plant selection Create personalized plant symbols and comprehensive planting plans IV. Irrigation Design (2 hours) Design and edit efficient irrigation systems and zones Integrate irrigation components into site plans V. 3D Visualization (3 hours) Create captivating 3D models with realistic textures and materials Enhance designs with advanced lighting and special effects VI. Customization (1 hour) Tailor the interface for efficient landscape design Create custom object styles and resource libraries VII. Collaboration and Sharing (1 hour) Seamlessly import/export data from other platforms Share designs effectively with colleagues and collaborators VIII. Conclusion and Next Steps (1 hour) Review course content comprehensively Receive guidance on further learning resources Engage in a Q&A session and provide valuable feedback Enhance your landscape design expertise and unleash your creativity. Enroll now in our Vectorworks Landmark Basic to Intermediate Training and transform your designs. Download Vectorworks Landmark By the end of the Vectorworks Landmark Training Course, participants will: Understand the key features and functionalities of Vectorworks Landmark for landscape design. Demonstrate proficiency in using essential tools for site analysis, site plans, and hardscape design. Create detailed planting plans, selecting appropriate plants, and understanding their compatibility and growth patterns. Design efficient and effective irrigation systems, including generating irrigation reports. Create 3D visualizations of landscape designs, applying textures, materials, lighting, and special effects. Customize the interface and create personalized object styles and resources. Collaborate and share landscape design drawings with other software users. Have the foundation to pursue further learning and exploration in landscape design using Vectorworks Landmark. Mastering Foundations Begin your project by organizing your files and importing survey data. Learn to sketch existing buildings using Building Shell tools and model neighboring structures with Massing Model. Explore different methods for laying out survey points and marking existing features with precision. Objectives: Review File Organization Techniques Import Survey Data (DWG Import) Create Building Structures with Building Shell Tools Utilize Triangulation and Arc Tool for Precision Master Various Tape Measurement Techniques Elevating Your Design Enhance your survey with detailed ground, existing trees, and fences. Conduct shadow analysis to optimize planting locations. Dive into the Vectorworks Plant tool, your key design companion. Objectives: Develop Detailed Ground Surfaces Incorporate Existing Trees and Fences Design with Railing Fence Tool Conduct Shadow Analysis using Heliodon Tool Utilize Plant Tool Modes for Plant Placement Access Existing Plant Libraries and Customize Plants in 2D/3D Crafting Landscapes Create vibrant plant mixes using Landscape Area tool and apply them across your site models. Design intricate hardscapes, aligning them effortlessly even in complex paving scenarios. Learn to use components for detailed reporting, cut and fill calculations, and precise detailing. Explore custom object creation and site furniture placement. Objectives: Design Landscape Areas and Define Custom Plant Mixes Create Hardscapes and Define Custom Paving Constructions Generate Reports and Tags for Landscape Areas and Hardscapes Access and Manage Objects in Resource Manager Craft Custom Objects and Site Furniture Polished Presentation Present your designs professionally using Sheet layers and viewports. Create Section viewports to cut through your model and Detail viewports to focus on specific areas. Enhance visual appeal with mood boards and annotations, ensuring a refined, detailed presentation. Objectives: Craft Sheet Layers for Presentation Create Plan, Elevation, and Perspective Viewports Generate Section and Detail Viewports Annotate Viewports for Clear Communication Incorporate Images and Plant Reports for Comprehensive Presentations Master Vectorworks Landmark: Gain expertise in essential and advanced 2D/3D landscape design tools for precision and efficiency. Boost Efficiency: Learn time-saving techniques and workflows tailored to Vectorworks Landmark, enhancing productivity. Versatile Landscape Skills: Develop proficiency in site analysis, planting plans, hardscapes, and irrigation systems for diverse projects. Industry-Ready Expertise: Acquire sought-after skills in landscape architecture, paving the way for career growth. Flexible Learning: Access recorded lessons for convenient review and receive lifetime email support for ongoing guidance.

Rhino 3d and V-ray for Rhino Basic to Intermediate Training
By London Design Training Courses
Why Learn Rhino 3d and V-ray for Rhino Basic to Intermediate Training Course? Course Link Learn Rhino 3D and V-Ray for Rhino Basic to Intermediate Training Course. Designed for beginners and experienced users, this course empowers you with essential modeling and rendering techniques. Choose between in-person or live online sessions. Duration: 16 hrs. Method: 1-on-1, Personalized attention. Schedule: Tailor your own schedule by pre-booking hours of your choice, available from Mon to Sat between 9 am and 7 pm. London Design Training Course Certified tutors for Rhino 3D and Vray Training - Online, On-Site, or In-Class one to one. Choose from a diverse range of Rhino courses conducted by expert trainers with extensive production experience. Rhino 3D and V-Ray Comprehensive Training Course Duration: 16 hours Course Overview: Learn Rhino 3D and V-Ray with our Basic to Intermediate Training Course. Perfect for beginners, this course equips you with the skills to navigate Rhino's interface, create captivating 3D models, apply textures, and utilize V-Ray for stunning renders. Course Outline: I. Introduction to Rhino 3D and V-Ray (1 hour) Get familiar with Rhino 3D and V-Ray interfaces and essential tools Master viewport navigation with expert controls Understand units and tolerance for precise designs Customize your workspace for seamless workflow II. Creating Basic 3D Objects (3 hours) Craft captivating 3D shapes and objects Edit objects and work with curves for refined designs Explore surfaces and solids for advanced modeling Utilize transformations and copying techniques for enhancements III. Materials and Textures (2 hours) Unleash the power of materials and textures on your designs Apply stunning materials to bring your creations to life Enhance your designs with custom materials for an aesthetic boost IV. Basic Lighting Techniques in V-Ray (2 hours) Discover the magic of lighting with V-Ray for impactful renders Utilize V-Ray lights and HDRI maps for striking lighting effects Adjust lighting settings for impeccable results V. Enhancing Renders with V-Ray Settings (3 hours) Optimize V-Ray render settings for the best output Adjust global illumination and reflection settings for desired looks Elevate renders with dynamic effects like depth of field and motion blur VI. Advanced Modeling Techniques (2 hours) Master advanced modeling tools for intricate shapes Refine curve and surface creation and editing skills Handle solids with Boolean operations and trimming techniques VII. Advanced Lighting Techniques in V-Ray (2 hours) Create and adjust artificial lights for perfect illumination Utilize V-Ray's Sun and Sky system for realism Craft custom HDR images for enhanced lighting VIII. Exporting and Importing (1 hour) Learn file formats for seamless sharing and collaboration Prepare models for 3D printing with best practices Integrate models from other software for a unified workflow IX. Conclusion and Next Steps (30 minutes) Recap course knowledge and highlights Access valuable tips and resources for continuous learning Engage in interactive Q&A for feedback and support Resources: Explore V-Ray with a free trial at: https://www.chaosgroup.com/vray/sketchup/free-trial Access material library at: https://www.vray-materials.de/ Discover textures at: https://textures.com/ Downloads: Download Rhino 7 for Windows for a full 90-day evaluation at: https://www.rhino3d.com Experience Rhino 7 for Mac Evaluation with a user-friendly interface and seamless performance for 90 days. Upon completing the Rhino 3D and V-Ray Basic to Intermediate Training Course, participants can expect to achieve the following learning outcomes: Proficiency in Rhino 3D and V-Ray: Develop a comprehensive understanding of Rhino 3D and V-Ray interfaces, tools, and functionalities, enabling participants to navigate and utilize the software effectively. 3D Modeling Skills: Master the art of creating captivating 3D objects and shapes using Rhino 3D, including editing, transforming, and refining designs for diverse applications. Material Application: Acquire the ability to apply and customize materials and textures to enhance the visual appeal and realism of 3D models, elevating the quality of designs. Lighting Techniques: Gain expertise in utilizing V-Ray lighting tools, such as V-Ray lights and HDRI maps, to achieve striking lighting effects in rendered scenes. Rendering Excellence: Learn to optimize V-Ray render settings, control global illumination, and apply dynamic effects like depth of field and motion blur for high-quality and impressive renders. Advanced Modeling: Develop skills in advanced modeling techniques, including handling curves, surfaces, and solids, enabling participants to tackle complex design challenges. Lighting Mastery: Acquire the knowledge and expertise to create and adjust artificial lights, utilize the Sun and Sky system, and craft custom HDR images for realistic lighting setups. Seamless File Management: Understand various file formats for exporting and importing 3D models, facilitating efficient collaboration and preparation for 3D printing. Creative Problem-Solving: Enhance creative thinking and problem-solving abilities through hands-on practice and exploration of diverse design scenarios. Professional Presentation: Learn post-production techniques in Photoshop to enhance renders and create visually appealing design presentations for effective communication. Continuous Learning: Access valuable resources and tips to encourage continuous learning and professional growth in Rhino 3D and V-Ray.


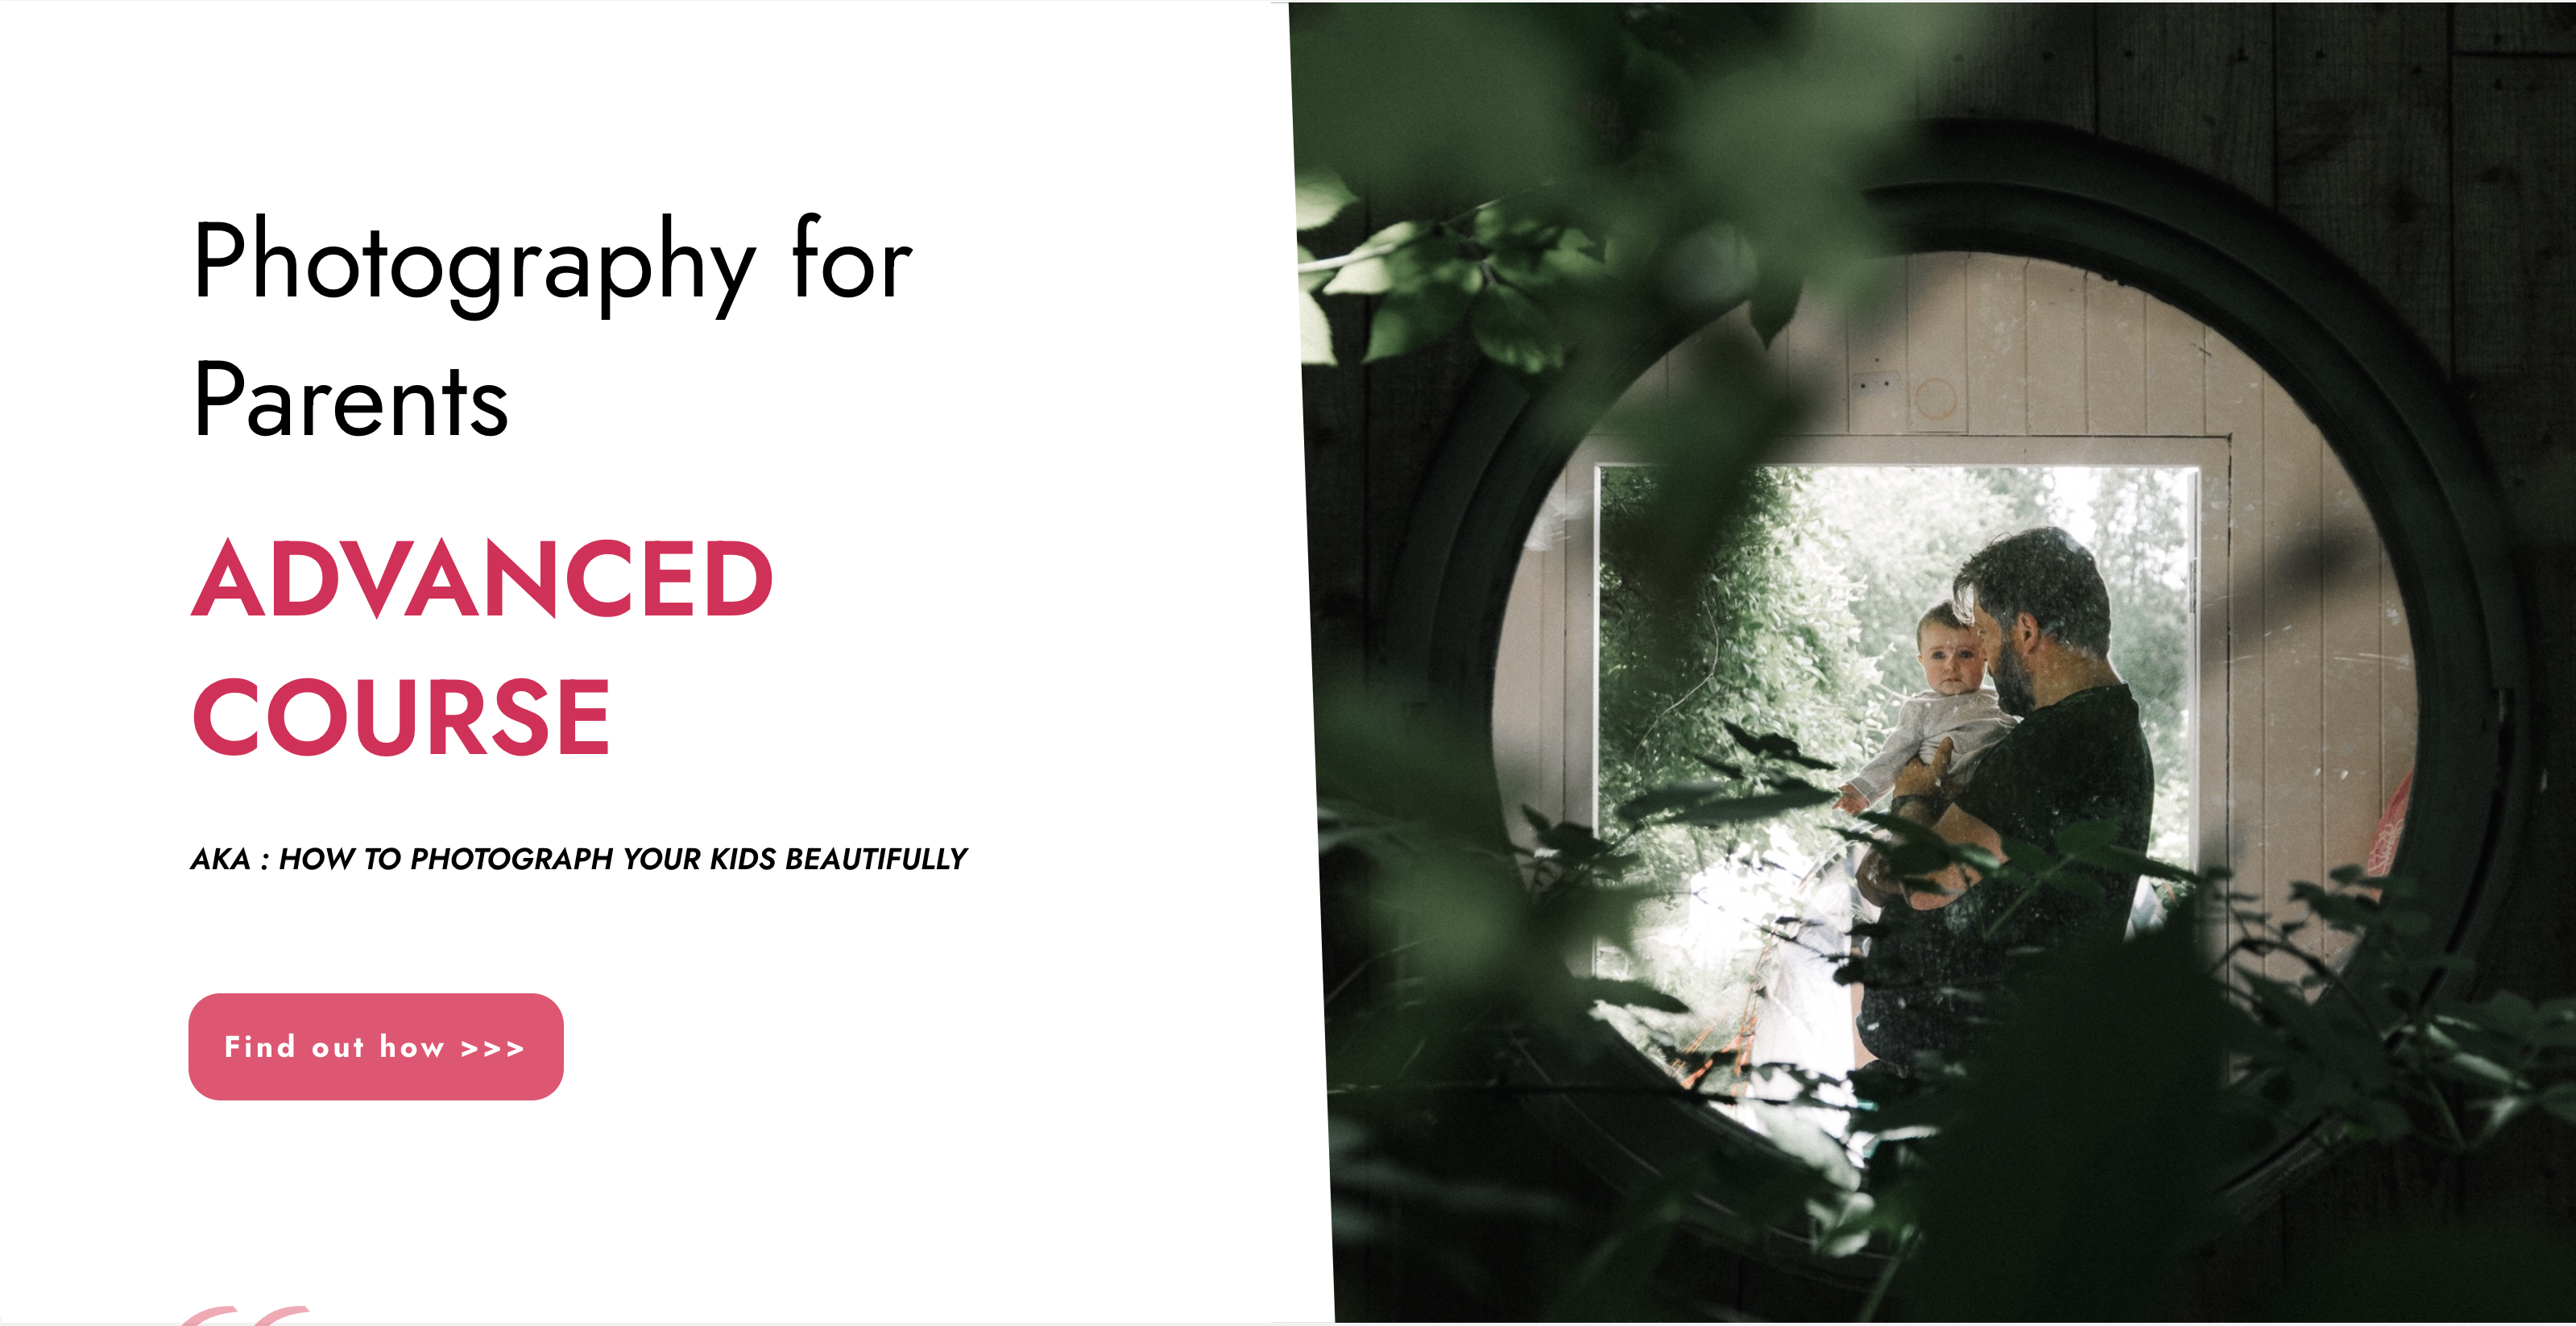
“Photography is my way of bearing witness to the joy I find in seeing the extraordinary in ordinary.” -Harold Feinstein Photography For Parents - Advanced Course Next course starts on 15th April 2024 6 week Photography course designed to help further advance your photography skill and move beyond simply capturing what's in front of you. Choose this course if you are already friends with your camera but want to learn how to shoot creatively in full manual, how to go beyond the basic composition rules and start expressing yourself through photography KEY COURSE INFO: Course type: Instructor-led or self paced Course duration: 6 weeks Course format: Online course with Interactive weekly live classes, personal photo feedback and support group WHAT YOU LEARN: In this course we build on the key photo skills we introduce in the Fundamentals Course and learn some new ones ( although completing the Fundamentals course is not a pre-requisite) You will love this course if you want to keep growing your photographic eye, truly control your camera and start making your photos reflect who you are and who your family are. This is the course where your photography really picks up the pace. We will support and challenge you to help you find your own voice in photography. creative use of manual mode creating strong compositions low light shooting capturing emotions introduction to flash using colour in photography THIS IS THE COURSE FOR YOU IF : Are already familiar with your camera - but want to get better at using it in full manual - with no overwhelm or frantic guesswork You want to take photographs that look more polished and that truly show you what you pictured in your head - still true to your kids and who they are You want to be able to capture true emotions and express yourself through photography You want to get more creative with light and colour to elevate your images and make them shine Next course starts on 15th April 2024 The bookings for this course are not open yet - request to be added to the waiting list to be offered priority booking and Early Bird prices when the course registration opens 5 core course modules Support Facebook group Weekly online Live class Personal Feedback on your images BONUS: extra module with ideas to keep your creativity flowing BONUS: PDF course workbook HERE IS WHAT YOU WILL LEARN in this course : This course was designed to help you grow your photography skills beyond just being able to take "nice looking photos". You will love this course if you want to keep growing your photographic eye, truly control your camera and start making your photos reflect who you are and who your family are. This is the course where your photography really picks up the pace. We will support and challenge you to help you find your own voice in photography. How do I get FULL control of my camera? - shooting in full manual - but with clarity and purpose When is the ‘correct’ exposure not the RIGHT one and why is my camera confused? And more importantly, how to fix it in camera? How do you capture genuine emotion and NOT just fake smiles? No more 'smile for Mummy' How to make your light AND SHADOWS work for you? and capture stunning images even if you think you have barely any light What makes a ‘strong image’ and how do I begin to get them more consistently? INSIDE THE MODULES - aka WHAT DO YOU LEARN? Module 1: Getting started in Manual mode First steps into shooting in full manual – understanding your exposure and metering, finding correct exposure for your subject, handling over and under exposure and adjusting your settings without even taking your camera away from your eyes. Major Takeaways: At the end of the module you will have gained full control of your camera - no more guessing game and unpredictable results with all the control going firmly to you. You will be able to understand your jump off points for different situations and how to adjust them to the changing light or environment Module 2: More on manual exposure and why your camera is often wrong Learning when the ‘correct’ exposure is not the “right exposure”, understanding and interpreting your histograms, learning how your environment can help you get the right exposure even in tricky light, dealing with challenging light situations. Major Takeaways: Knowing when to trust and not trust your camera's exposure assessment. Knowing exactly how to adjust things when the images don't turn out looking right out of the camera. Having a method to help you capture different colour accurately - especially when it comes to skin tones, or elements that are bright or dark Module 3: Powerful composition Learning what makes a strong image and learning to create your own, consistently, with the help of our advanced composition techniques – beyond the rule of thirds. Visual storytelling and creating connection to create images which go beyond just pretty. Major Takeaways: Learning new concepts in composition - things that will help you create exiting visual flow, help with impactful storytelling and draw the viewer's eye into the image rather than away from it. Next course starts on 15th April 2024Get your space now Module 4: No such thing as bad light There is no such thing as bad light - even with just a sliver of it you can make a statement in your images. In this module we teach you how to work with low light - through low key photography - playing with light and shadows. And we give you an introduction to Flash - for when you want to boost your existing natural light that little bit more. Major Takeaways: You will learn how to use light and shadows to your advantage, literally learning to paint with light - letting it uncover your subject, and hide what you want to stay out of light. Much like the light module in our Fundamentals course this is very much an AH-HA lesson that will shake your photography to its core. Module 5: Photographing emotions In this module we get under our subject's skin and focus on photographing emotions. We show you how to reply on more than facial expression to show emotions and how to use your creative toolkit, including colour theory to make the viewer see and understand the emotion felt in the moment. Major Takeaways: Learning how to capture genuine connection with your subject and their true emotions – whether happy or mad! Going beyond the smiles or frowny faces to portray your children’s true selves and capturing the moment. Using body language and other creative means – from colour theory, editing style and more! BONUS Module 6: Your creative self Exploring various photographic styles and conventions. Learning to recognise your own strengths and weaknesses and taking steps to grow further. Bonus creative exercises to take you outof your rut and help you continue to grow your photography. In my opinion Advanced level 2 is absolute must as it expand the knowledge from level 1 to the point, that you can take photos confidently, and knowing what you do. I did it online and my teachers were superb, passionate, helpful and very flexible. Aga Stefaniak Photography for Parents ADVANCED Book your space now: COURSE STARTS : 15th April 2024( 6 weeks incl 1 week break)COURSE COST : £279 (payment plans available) What’s included: 6 weekly modules covering all key aspects of children’s photography, weekly live online class ( also recorded) - on Wednesday evenings personal feedback and advice on your images private support group PDF workbook Photography for Parents ADVANCED But will it work for me? - our guarantee: We know our course works. We have seen a few thousands of students go through our courses and really improve. BUT, if you find that after the first couple of modules that it just doesn't work for you, you haven't learnt anything new, it's the wrong level for you, you haven't improved, or you simply don't get on or engage with it - we will simply refund you in full. Simple as that!
Introduction to Sketchup Course 1-2-1
By Real Animation Works
Sketchup face to face training customised and bespoke.
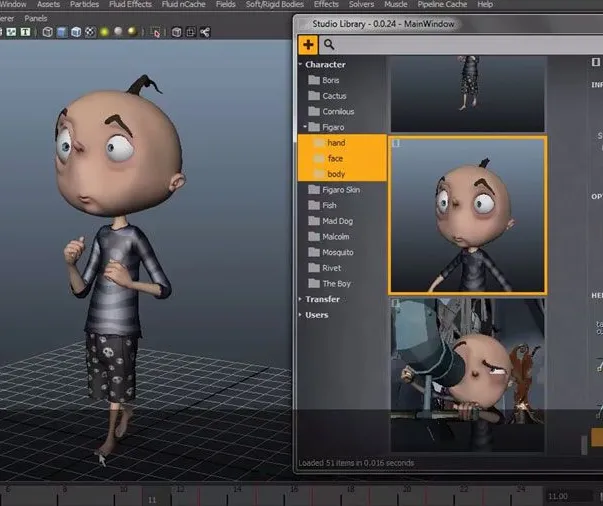
Mastering Maya Basics to Intermediate Course
By ATL Autocad Training London
Why Choose Mastering Maya Basics to Intermediate Course? Click here for more info: Website Our courses cater to graphic designers, animators, and beginners, providing industry-standard animation skills. Dive into 3D animation, modeling, simulation, and rendering for film, TV, games, and ads. Duration: 20 hours Approach: 1-on-1 Sessions. Schedule: Design your own schedule by pre-booking a convenient hour of your choice, available Mon to Sat between 9 am and 7 pm. I. Introduction to Maya (1.5 hours) Understanding Maya and its Applications Navigating the Maya Interface and Basic Tools Creating and Managing Projects II. 3D Modeling (3 hours) Basics of Polygon Modeling Creating Simple and Complex 3D Shapes Organic Shape Creation using NURBS Advanced Techniques: Extrusions, Bevels, and Editable Objects III. Texturing and Materials (1.5 hours) Introduction to Texturing and Material Creation UV Unwrapping and Texture Mapping Importing and Applying Textures and Images IV. Lighting and Rendering (2 hours) Fundamental Lighting Techniques Camera Setup and Composition Rendering Images and Animations Output Options and File Formats V. Animation (4 hours) Keyframe Animation and Animation Curves Rigging and Animating Characters Motion Paths and Animation Layers Editing Animation Clips VI. Rigging (2 hours) Introduction to Rigging and Skeletons Binding Skin and Weight Maps Creating Rigging Systems for Characters VII. Special Effects (1.5 hours) Particle Systems and Dynamics Creating Fluids, Fire, and Other Effects Special Effects Editing: Explosions, Smoke, and more VIII. Advanced Modeling Techniques (1.5 hours) Complex Objects using Booleans and Deformers Modifying Curves and Surfaces Organic Shape Creation with Sculpting Tools IX. Conclusion and Next Steps (0.5 hours) Course Review Further Learning Tips and Resources Q&A and Feedback Please note: The course content and duration are flexible, tailored to match learners' needs and skill levels. Throughout the course, lifetime email support ensures you receive guidance with any challenges you face. Embark on your Autodesk Maya journey, exploring 3D modeling and animation with confidence. Additional Topics Covered: Modeling: Surfaces, Control Vertex, Polygons, Extrusion, Vertices, Edges, Bridge Tool, Combining, Smooth, Mirror Geometry, Merging Vertices, Subdivision Modeling. Deformations: Twist, Lattice, Flare, Bend. Shapes: Lines, Pen Tools. Animations: Basic Keyframes, Vertex Animation, Clusters, Path Animations, Skeletons, Bones, IK Handle Tool, Skinning. Dynamics: Fire, Lighting, Soft and Rigid Bodies, Particles, Collisions, Gravity. Fur and Paint Effects: Fur Basics, Fur Color Corrections, Paint Effects, Paint Modifier, Brush Animations. Texturing: Diffuse and Bump Maps, Reflections, Transparency, Shaders, Toon Shaders, Glow Textures. Lighting: Basic and Advanced Lights, Shadows, Special Light Effects. Camera: Free and Aim Cameras, Camera Effects, Path Animations. Fluid Effects and Ncloth: 2D and 3D Containers, Collision Effects, Gravity, Wind Effects. Rendering: Images and Animations, Render Techniques, Resolution Settings, Batch Rendering. Download Maya Maya Proficiency: Master Maya's interface, tools, and functions, advancing from basic to intermediate levels. 3D Modeling Expertise: Create diverse 3D models using polygonal and NURBS techniques, from simple shapes to intricate designs. Texturing and Rendering Skills: Apply textures, create materials, and utilize advanced rendering techniques for high-quality visuals. Animation Techniques: Understand keyframe animation, rigging, and character animation, producing engaging animations and special effects. Special Effects and Dynamics: Explore particle systems, fluid dynamics, and advanced visual effects, enhancing realism in animations. Advanced Modeling and Sculpting: Master complex modeling techniques, including Booleans, deformers, and organic shape creation through sculpting tools. Professional Portfolio: Develop a diverse portfolio showcasing 3D modeling and animation skills, ready for presentation to employers or clients. Problem-Solving Skills: Learn creative approaches to solve complex 3D challenges effectively. Collaborative Abilities: Understand team dynamics and collaboration within the 3D production pipeline. Recommended Books: "Introducing Autodesk Maya 202X" by Dariush Derakhshani and Randi L. Derakhshani: Comprehensive beginner's guide to Maya's essential tools and techniques. "Mastering Autodesk Maya 20XX" by Todd Palamar: In-depth intermediate guide covering advanced features, modeling, animation, and rendering. "Maya Character Creation: Modeling and Animation Controls" by Chris Maraffi: Focuses on character creation, covering modeling, rigging, and animation. "Maya Secrets of the Pros" by Todd Palamar: Expert tips and techniques from professional Maya artists, detailing advanced workflows and best practices. "Stop Staring: Facial Modeling and Animation Done Right" by Jason Osipa: Specialized book on facial modeling and animation, perfect for character expression enthusiasts. "The Art of 3D Computer Animation and Effects" by Isaac Kerlow: Offers foundational knowledge in 3D computer animation principles, applicable to various software, including Maya. Mastering Maya Basics to Intermediate Course Benefits: Comprehensive Skill Development: Master essential tools and techniques, from basics to intermediate, with hands-on projects mirroring real industry scenarios. Industry-Grade Proficiency: Acquire expertise in Autodesk Maya, enhancing credibility in animation, visual effects, and gaming industries. Creative Exploration: Unlock creative potential through advanced shading, lighting, dynamics, and simulations, enabling imaginative project realization. Portfolio Enhancement: Build a strong portfolio showcasing skills in 3D modeling, animation, and rendering for career advancement. Individualized Support: Receive personalized guidance and feedback, ensuring tailored learning experiences and skill refinement. Potential Jobs After Course: 3D Animator: Create lifelike character animations for films, games, and advertisements. 3D Modeler: Design detailed 3D characters, environments, and objects for various applications. Visual Effects Artist: Produce stunning visual effects for movies, TV shows, and commercials. Texture/Lighting Artist: Develop intricate textures and set the mood with expert lighting. Rigging Specialist: Rig characters and objects for realistic movement in animations. Rendering Specialist: Optimize rendering capabilities for high-quality images and animations. Game Developer: Contribute to interactive game development using Maya's features. Freelance Artist/Animator: Work independently on diverse projects, collaborating with studios and agencies. Skill Advancement: Progressive Mastery: Develop from basics to intermediate levels in Autodesk Maya, honing essential tools for stunning 3D visuals and animations. Hands-On Learning: Interactive Practice: Engage in practical projects, refining your skills in 3D modeling, advanced materials, character animation, and high-quality renders. Industry-Ready Proficiency: In-Demand Skills: Acquire proficiency in Autodesk Maya, a key software in animation and gaming, enhancing your employability. Creative Exploration: Unlock Creativity: Experiment with advanced shading, lighting, and dynamic animations, unleashing your creative potential in Maya. Flexible Support: Tailored Learning: Access recorded lessons for review, deepening your understanding, with lifetime email support for continuous guidance.