- Professional Development
- Medicine & Nursing
- Arts & Crafts
- Health & Wellbeing
- Personal Development
2187 Courses in London delivered Live Online
Autodesk Maya Evening Training
By London Design Training Courses
Training duration: 10 hrs Click here for info Method: 1-2-1, Personalized attention, Tailored content, Flexible pace, Individual support. Schedule: Personalized training experience with our flexible 1-2-1 sessions. Tailor your own schedule by pre-booking a convenient hour of your choice, available from Monday to Saturday between 9 am and 7 pm. Autodesk Maya Training Course with our flexible evening training course. Designed to accommodate busy schedules, this course allows you to learn Maya at your convenience, either in-person or through live online sessions. Master essential features and workflows to create captivating 3D models, animations, and visual effects. Benefit from expert guidance, hands-on projects, and lifetime email support, ensuring a rewarding learning experience. Enroll now to ignite your creativity and open doors to exciting opportunities in the animation and visual effects industry. The Autodesk Maya Evening Training Course offers a flexible learning option for busy professionals and students with daytime commitments. Master the powerful tools and capabilities of Autodesk Maya during convenient evening sessions. Participants will receive comprehensive training in 3D modeling, materials, animation, lighting, and rendering. The course progresses to advanced topics, including dynamics, character rigging, shading, and compositing. Enroll in this course to develop valuable skills in 3D computer graphics and animation. Benefit from interactive learning experiences and expert guidance, whether attending in-person or joining live online sessions. Maya Evening Training Courses Duration: 10 hours Course Outline: I. Introduction to Maya (1 hour) Gain insights into Maya's versatile applications and interface. Master navigation and project management. II. Creating 3D Models (2 hours) Learn polygon modeling basics and refine objects with precision. III. Texturing and Materials (1 hour) Apply and customize materials for enhanced visuals. IV. Lighting and Rendering (1.5 hours) Explore lighting techniques and rendering. V. Animation (2.5 hours) Understand animation principles and rig characters. VI. Special Effects (1 hour) Harness particle systems and create captivating effects. VII. Intermediate Modeling Techniques (1 hour) Venture into NURBS modeling and sculpting tools. VIII. Conclusion and Next Steps (0.5 hour) Recap and explore further learning resources. Autodesk Maya Evening Training Course Topics Covered: Modeling, Texturing, Animation, Lighting, Rendering, and more. Download Autodesk Maya! Create expansive worlds, characters, and effects. Subscribe now for a year and start your 3D model and animation journey. Visit https://www.autodesk.co.uk/maya for a free trial. Upon completing the Autodesk Maya Evening Training Course, participants will gain proficiency in 3D modeling, texturing, animation, lighting, and rendering using Autodesk Maya. They will acquire the skills to create captivating visuals and animations, opening up opportunities in diverse industries such as entertainment, gaming, and architectural visualization. The flexible evening schedule allows for convenient learning, accommodating busy professionals and students.

Intermediate Adobe Illustrator Online
By Platform Training
Adobe authorised live online course with study materials and certificate of completion included During this 1 day intermediate level Adobe Illustrator course you will learn how to use Illustrator's tools to create stunning illustrations and type effects. Building on our Introduction to Illustrator (or your exisiting basic knowledge) you will learn how to work with colours, create printable documents, use gradients, layers, fonts, text effects, work with page and product design along with many other more advanced features. Description Professional Drawing with Illustrator Scale and Resizing Use Guides and Rulers Work with Colours in Illustrator Work with Clipping Masks Use Text copy and Typography in Illustrator Modify Objects Import and work with Textures Work with Opacity Work with 3D Elements Output your Artwork Bring a Fluorescent Transparency to Life Create Layouts for Product Placement and Packaging Save for Web & Devices For the full course content please download the course information pdf listed above. Who is this course for? This is a great course for existing Adobe Illustrator users who want to learn how to make use of more of the applications powerful features and improve their workflow. Requirements Attendees should have a basic knowledge of Illustrator. You will need a broadband internet connection to participate in this live online course. Certificates Certificate of completion Digital certificate - Included

Microsoft Powerpoint Advanced (live online classes)
By Microsoft Office Training
Course Objectives At the end of this course you will be able to: Modify the PowerPoint environment Using Master View in order to customise a design template Add and customize SmartArt graphics Add animations and change its effect options Add action buttons to control the flow of the presentation Use various options to customise slide shows Use different PowerPoint file types to distribute presentations ' 1 year email support service Take a closer look at the consistent excellent feedback from our growing corporate clients visiting our site ms-officetraining co uk Customer Feedback Very clearly explained Good pace. Lucy Tailor - ACER ' With more than 20 years experience, we deliver courses on all levels of the Desktop version of Microsoft Office and Office 365; ranging from Beginner, Intermediate, Advanced to the VBA level. Our trainers are Microsoft certified professionals with a proven track record with several years experience in delivering public, one to one, tailored and bespoke courses. Tailored in company training courses: You can choose to run the course exactly as they are outlined by us or we can customise it so that it meets your specific needs. A tailored or bespoke course will follow the standard outline but may be adapted to your specific organisational needs. Customising the PowerPoint Environment Customise the User Interface Set PowerPoint Options Customising Design Templates Modify Slide Masters and Slide Layouts Add Headers and Footers Modify the Notes Master and the Handout Master Adding SmartArt to a Presentation Create SmartArt Modify SmartArt Working with Media Add Audio to a Presentation Add Video to a Presentation Working with Animations Entrance, Emphasis and Exit Animations Animate Charts by Category and Series Customise Animations and Transitions Collaborating on a Presentation Review a Presentation Store and Share Presentations on the Web Customising a Slide Show Annotate a Presentation Set Up a Slide Show Create a Custom Slide Show Add Hyperlinks Add Action Buttons Record a Presentation Securing and Distributing a Presentation Secure a Presentation Create a Video or a CD Distribute the Presentation in different File Formats Who is this course for? Who is this course for? This course is designed for delegates who want to gain the skills necessary to work with design templates, various types of diagrams, special effects, custom slide shows, collaboration functionality, and advanced presentation delivery. Requirements Requirements Preferably, delegates should have attended the Powerpoint Introduction course. Career path Career path Microsoft Office know-how can instantly increase your job prospects as well as your salary. 80 percent of job openings require spreadsheet and word-processing software skills

Twinmotion Realtime Rendering Training
By London Design Training Courses
Why Choose Twinmotion Realtime Rendering Training Course? Click here for info Empower architects, designers, and visualization experts with our Twinmotion training. Learn tools, materials, lighting, animation, and rendering. Explore advanced techniques for lifelike landscape and special effects using Twinmotion's asset library. Opt for in-person or live online sessions. Duration: 10 hrs Method: 1-on-1, Personalized attention Schedule: Tailor your own hours of your choice, available from Mon to Sat between 9 am and 7 pm Twinmotion Real-time 3D Architecture Visualization Course Outline: Module 1: Introduction to Twinmotion Explore Twinmotion's real-time 3D visualization capabilities Master the Twinmotion interface for efficient scene manipulation Prepare 3D files for import and manage the workflow Module 2: Materials and Realism Enhance scenes with realistic materials and visual quality Utilize videos as materials and apply glow effects Create grunge materials for added texture and realism Employ the X-ray material for specific visualization needs Module 3: Landscape and Vegetation Integrate vegetation using Twinmotion's scatter, HQ trees, and growth features Customize grass and utilize HQ vegetation assets for realism Create time-lapse effects for vegetation growth Module 4: Library and Object Import Access the Twinmotion library for furniture and objects Seamlessly import external 3D objects Obtain high-quality 3D assets from the internet and add to the user library Utilize BIM-objects for additional assets Module 5: Lighting and Animation Work with various lighting options, including area light and volumetric light Add animated characters and vehicles for dynamism Incorporate construction vehicles and aircraft for realism Module 6: Volumes and Interactivity Utilize volumes and the animator feature for dynamic scenes Implement urban elements and measurement tools for accuracy Module 7: Nature and Weather Effects Utilize Twinmotion's nature features, including physical sky and weather effects Create realistic lighting for outdoor scenes Add ocean effects for water elements Module 8: Rendering Techniques Master rendering processes, from creating images to exporting panoramas and animations Implement depth of field improvements for captivating visuals Create BIM motion virtual reality phases for immersive experiences Utilize the Twinmotion presenter feature for streamlined presentations Module 9: Final Project Apply knowledge and skills to complete a final render project in Twinmotion Download Twinmotion https://www.twinmotion.com › download Learn how to download and install Twinmotion, the fast, easy real-time archvis tool.

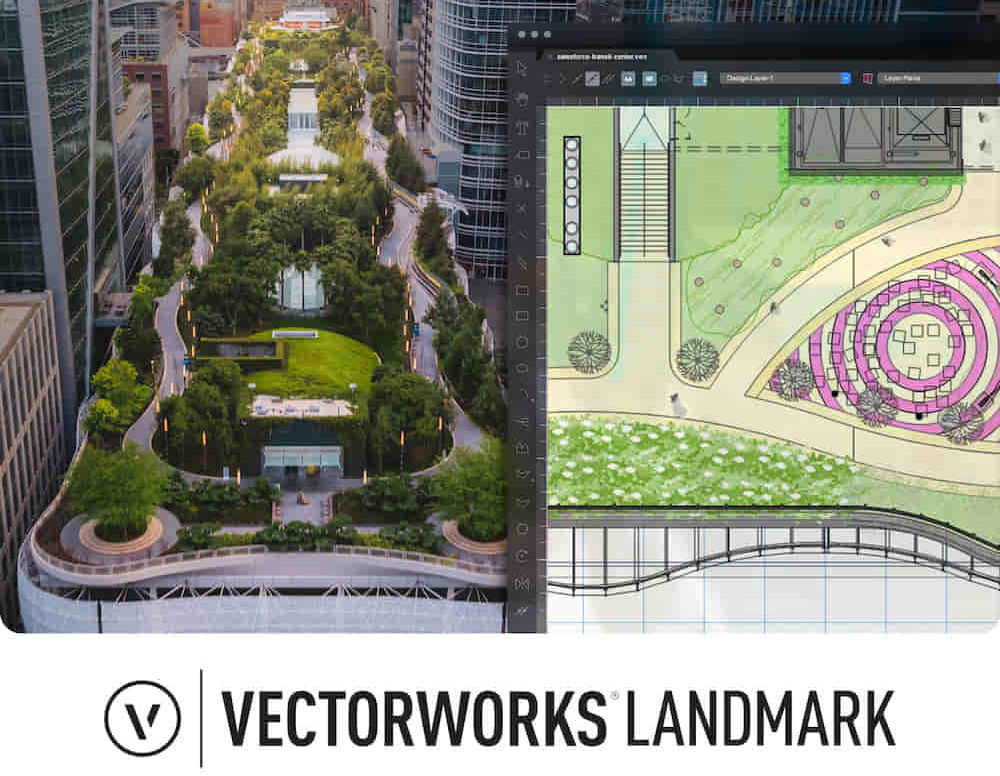
Landmark Training Course With Vectorworks
By ATL Autocad Training London
Who is this course for? Landmark Training Course With Vectorworks. Dive into terrain modeling, planting, irrigation, and site analysis guided by certified tutors. Master these tools for precise landscape designs and effective documentation. Check our Website Enrollment : 1-on-1 Landmark Training. Tailor your schedule. Mon to Sat between 9 am and 7 pm Call 02077202581 to book your slot. Duration: 16 hours. "Split these hours over multiple days as needed for your ideal schedule." Approach: In-person or live online. Landmark Training Course with Vectorworks: Basic to Intermediate Level Course Duration: 16 Hours Embark on a transformative journey with our Landmark Training Course tailored for landscape architects and designers. Over 16 intensive hours, dive deep into Vectorworks Landmark, mastering fundamental and intermediate techniques crucial for comprehensive 2D and 3D landscape design. Craft intricate site analyses, plans, irrigation systems, and elevate your designs with mesmerizing 3D visualizations. Explore custom plant symbols, detailed planting plans, and learn the art of efficient collaboration and customization. Course Highlights: I. Introduction to Vectorworks Landmark (1 hour) Explore Vectorworks Landmark for landscape design Master interface, tool usage, and project management II. Site Analysis and Site Plans (3 hours) Craft detailed site analyses and hardscape designs Work with contours, elevations, and terrain models III. Planting Plans (5 hours) Utilize the plant database for region-specific plant selection Create personalized plant symbols and comprehensive planting plans IV. Irrigation Design (2 hours) Design and edit efficient irrigation systems and zones Integrate irrigation components into site plans V. 3D Visualization (3 hours) Create captivating 3D models with realistic textures and materials Enhance designs with advanced lighting and special effects VI. Customization (1 hour) Tailor the interface for efficient landscape design Create custom object styles and resource libraries VII. Collaboration and Sharing (1 hour) Seamlessly import/export data from other platforms Share designs effectively with colleagues and collaborators VIII. Conclusion and Next Steps (1 hour) Review course content comprehensively Receive guidance on further learning resources Engage in a Q&A session and provide valuable feedback Enhance your landscape design expertise and unleash your creativity. Enroll now in our Vectorworks Landmark Basic to Intermediate Training and transform your designs. Download Vectorworks Landmark By the end of the Vectorworks Landmark Training Course, participants will: Understand the key features and functionalities of Vectorworks Landmark for landscape design. Demonstrate proficiency in using essential tools for site analysis, site plans, and hardscape design. Create detailed planting plans, selecting appropriate plants, and understanding their compatibility and growth patterns. Design efficient and effective irrigation systems, including generating irrigation reports. Create 3D visualizations of landscape designs, applying textures, materials, lighting, and special effects. Customize the interface and create personalized object styles and resources. Collaborate and share landscape design drawings with other software users. Have the foundation to pursue further learning and exploration in landscape design using Vectorworks Landmark. Mastering Foundations Begin your project by organizing your files and importing survey data. Learn to sketch existing buildings using Building Shell tools and model neighboring structures with Massing Model. Explore different methods for laying out survey points and marking existing features with precision. Objectives: Review File Organization Techniques Import Survey Data (DWG Import) Create Building Structures with Building Shell Tools Utilize Triangulation and Arc Tool for Precision Master Various Tape Measurement Techniques Elevating Your Design Enhance your survey with detailed ground, existing trees, and fences. Conduct shadow analysis to optimize planting locations. Dive into the Vectorworks Plant tool, your key design companion. Objectives: Develop Detailed Ground Surfaces Incorporate Existing Trees and Fences Design with Railing Fence Tool Conduct Shadow Analysis using Heliodon Tool Utilize Plant Tool Modes for Plant Placement Access Existing Plant Libraries and Customize Plants in 2D/3D Crafting Landscapes Create vibrant plant mixes using Landscape Area tool and apply them across your site models. Design intricate hardscapes, aligning them effortlessly even in complex paving scenarios. Learn to use components for detailed reporting, cut and fill calculations, and precise detailing. Explore custom object creation and site furniture placement. Objectives: Design Landscape Areas and Define Custom Plant Mixes Create Hardscapes and Define Custom Paving Constructions Generate Reports and Tags for Landscape Areas and Hardscapes Access and Manage Objects in Resource Manager Craft Custom Objects and Site Furniture Polished Presentation Present your designs professionally using Sheet layers and viewports. Create Section viewports to cut through your model and Detail viewports to focus on specific areas. Enhance visual appeal with mood boards and annotations, ensuring a refined, detailed presentation. Objectives: Craft Sheet Layers for Presentation Create Plan, Elevation, and Perspective Viewports Generate Section and Detail Viewports Annotate Viewports for Clear Communication Incorporate Images and Plant Reports for Comprehensive Presentations Master Vectorworks Landmark: Gain expertise in essential and advanced 2D/3D landscape design tools for precision and efficiency. Boost Efficiency: Learn time-saving techniques and workflows tailored to Vectorworks Landmark, enhancing productivity. Versatile Landscape Skills: Develop proficiency in site analysis, planting plans, hardscapes, and irrigation systems for diverse projects. Industry-Ready Expertise: Acquire sought-after skills in landscape architecture, paving the way for career growth. Flexible Learning: Access recorded lessons for convenient review and receive lifetime email support for ongoing guidance.
3ds Max Character Animation Training Course
By ATL Autocad Training London
Who is this course for? 3ds Max Character Animation Training Course. Master character animation in our 3ds Max course. All levels welcome. Learn from certified tutors in flexible in-person or online sessions. Create unique 3D characters from scratch, gaining personalized techniques to fuel your creativity. Click here for more info: Website Duration: 20 hours Method: 1-on-1 personalized attention Schedule: Flexible 1-on-1 sessions. Schedule your sessions at your convenience, choosing any hour between 9 am and 7 pm from Mon to Sat. Course Title: 3ds Max Character Animation Workshop Duration: 20 Hours Course Overview: This workshop is meticulously crafted to instill the foundational principles of character animation utilizing 3ds Max. Whether you're a novice or possess some background in 3D modeling and animation, this course caters to your learning needs. You'll delve into the art of character rigging, grasp animation essentials, and employ advanced methods to breathe life into your characters. Course Outline: Module 1: Introduction to Character Animation Grasping animation principles Exploring 3ds Max animation tools Mastering character rig creation Understanding the intricacies of the timeline Module 2: Basic Animation Principles Embracing keyframe dynamics Crafting fundamental animation cycles Applying the 12 principles of animation Navigating the graph editor Utilizing ease-in and ease-out techniques Module 3: Advanced Animation Techniques Harnessing the power of the reaction manager Crafting non-linear animations Implementing inverse kinematics for dynamic movements Designing custom controllers Exploring expressions and scripts Module 4: Character Creation Sculpting a character model from scratch Grasping the nuances of topology Perfecting UV maps and texturing techniques Preparing characters for seamless rigging Module 5: Facial Animation Mastering facial animation principles Creating expressive blend shapes Utilizing morph targets for nuanced expressions Achieving flawless lip syncing Module 6: Body Animation Crafting seamless walk cycles Animating characters in motion Creating authentic and believable poses Employing character physics for lifelike movements Module 7: Advanced Character Animation Implementing motion capture data for realistic animations Leveraging CAT and Biped for intricate movements Understanding motion blur nuances Adding special effects for enhanced realism Fine-tuning rendering and outputting animations Module 8: Character Animation Projects Synthesizing knowledge into practical applications Creating a fundamental character animation Crafting a nuanced walk cycle Executing complex character animations Course Requirements: Access to a computer with 3ds Max installed Basic proficiency in computer operations Enthusiasm for delving into the world of character animation Course Goals: Upon completion, you will possess a profound understanding of character animation in 3ds Max. You'll be equipped with the expertise to create intricate, lifelike character animations using advanced techniques. Moreover, you'll gain the skills necessary to continue honing your craft, ensuring a solid foundation for your future endeavors in the realm of character animation. Upon successful completion of the 3ds Max Character Animation Workshop, participants will: Master Fundamental Principles: Understand the core principles of character animation, including keyframe dynamics, timing, and the 12 principles of animation, laying a strong foundation for advanced techniques. Proficient Software Usage: Navigate 3ds Max confidently, utilizing animation tools, character rigging techniques, and specialized editors for precise control over character movements. Advanced Animation Techniques: Apply advanced techniques such as non-linear animations, inverse kinematics, and custom controller design to create dynamic and realistic character movements. Facial Animation Mastery: Demonstrate expertise in facial animation by creating expressive blend shapes, morph targets, and achieving seamless lip syncing for realistic character emotions. Body Language Proficiency: Create fluid and natural body movements, including walk cycles, dynamic poses, and character motions, capturing the essence of lifelike animations. Special Effects Integration: Integrate special effects seamlessly into character animations, enhancing visual appeal and realism in the final output. Project Implementation: Apply acquired knowledge and skills in practical projects, including basic character animations, walk cycles, and complex character animations, demonstrating proficiency in real-world scenarios. Problem-Solving Skills: Develop problem-solving abilities related to character animation challenges, employing creative solutions to achieve desired results. Collaborative Skills: Engage in collaborative projects, demonstrating effective communication and teamwork while integrating animations into broader creative contexts. Portfolio Enhancement: Build a robust portfolio showcasing diverse character animations, reflecting both technical prowess and creative expression, essential for career advancement in the animation industry. Continued Learning: Acquire the skills and confidence necessary to pursue further learning and self-improvement in the field of character animation, enabling a continuous growth trajectory in the industry. Course Title: 3ds Max Character Animation Workshop Duration: 20 Hours Key Details: Course Focus: Comprehensive training in character animation using 3ds Max, covering fundamental principles, advanced techniques, facial animation, body language, special effects integration, and project-based learning. Audience: Ideal for beginners and individuals with some background in 3D modeling and animation, aiming to enhance their skills in character animation for industries such as animation studios, gaming, and film production. Instruction Method: Interactive, instructor-led sessions combining theoretical knowledge with hands-on practical exercises, fostering a dynamic learning environment. Flexible Learning Options: Participants can choose between in-person and live online sessions, accommodating diverse schedules and geographical locations. Certified Instructors: Experienced tutors and industry professionals with certification in 3ds Max and character animation, ensuring high-quality instruction and personalized guidance. Project-Based Learning: Engage in real-world projects, applying learned skills to create character animations, walk cycles, and intricate character movements, fostering practical expertise. Software Proficiency: Gain proficiency in 3ds Max, including animation tools, character rigging, and specialized editors, enabling participants to confidently navigate the software. Collaborative Learning: Opportunities for teamwork and collaborative projects, encouraging effective communication and networking within the class. Career Development: Build a diverse and impressive portfolio, receive guidance on industry best practices, and develop problem-solving skills crucial for a successful career in character animation. Post-Course Support: Access to resources, tutorials, and community forums, allowing participants to continue learning and stay updated with industry trends even after the course completion. Certification: Participants receive a certificate of completion, recognizing their proficiency in 3ds Max character animation, enhancing their professional credibility in the job market. By enrolling in this course, you'll enjoy the following advantages: Comprehensive Learning: Master the art of character animation in 3ds Max, covering fundamental concepts and advanced techniques. Certified Tutors and Industry Experts: Learn from experienced professionals with extensive knowledge of character animation, providing valuable insights. Personalized Instruction: Receive one-to-one training tailored to your specific learning needs, ensuring individual attention and effective progress. Flexible Learning Options: Choose between in-person or live online training, offering convenience and accessibility to suit your schedule. Recorded Lessons: Access recorded sessions to review content and reinforce your learning at your own pace and convenience. Lifetime Email Support: Benefit from ongoing assistance and guidance through email, even after completing the course. Free Career Advice: Tap into our industry expertise and receive valuable career guidance to excel in the field of character animation.

This Python Machine Learning online instructor led course is an excellent introduction to popular machine learning algorithms. Python Machine Learning 2-day Course Prerequisites: Basic knowledge of Python coding is a pre-requisite. Who Should Attend? This course is an overview of machine learning and machine learning algorithms in Python SciKitLearn. Practical: We cover the below listed algorithms, which is only a small collection of what is available. However, it will give you a good understanding, to plan your Machine Learning project We create, experiment and run machine learning sample code to implement a short selected but representative list of available the algorithms. Course Outline: Supervised Machine Learning: Classification Algorithms: Naive Bayes, Decision Tree, Logistic Regression, K-Nearest Neighbors, Support Vector Machine Regression Algorithms: Linear, Polynomial Unsupervised Machine Learning: Clustering Algorithms: K-means clustering, Hierarchical Clustering Dimension Reduction Algorithms: Principal Component Analysis Latent Dirichlet allocation (LDA) Association Machine Learning Algorithms: Apriori, Euclat Other machine learning Algorithms: Ensemble Methods ( Stacking, bagging, boosting ) Algorithms: Random Forest, Gradient Boosting Reinforcement learning Algorithms: Q-Learning Neural Networks and Deep Leaning Algorithms: Convolutional Network (CNN) Data Exploration and Preprocessing: The first part of a Machine Learning project understands the data and the problem at hand. Data cleaning, data transformation and data pre-processing are covered using Python functions to make data exploration and preprocessing relatively easy. What is included in this Python Machine Learning: Python Machine Learning Certificate on completion Python Machine Learning notes Practical Python Machine Learning exercises and code examples After the course, 1 free, online session for questions or revision Python Machine Learning. Max group size on this Python Machine Learning is 4. Refund Policy No Refunds


FAMILY CIRCLES
By Inclusive Solutions
Click to read more about this training, in which we demonstrate a live problem solving approach which is based on the active participation of family members. Course Category Inclusion Parents and Carers Behaviour and relationships Problem Solving Description In this training we demonstrate a live problem solving approach which is based on the active participation of family members. ‘Family Circles’ is an evolving new approach to problem solving with families and is based on our years of family work and the development and use of the Circle of Adults process. Inspired by our own Parent Solutions work and the Circle of Adults process as well as Family Group Conferencing and other Restorative Interventions we bring you Family Circles. Essentially the approach involves gathering a family together for a process that is facilitated but majors on the family members offering each other their wisdom and ideas. The approach is capacity focused, person centred approach to working with families rather than the dominant deficit oriented and ‘medical model’ of viewing and planning for or doing things to families. This training can be modelled with a group of professionals or better still with a family. In our work with families we develop the importance of naming stories or theories and seeking linkages and synthesis between what is found out and explored about the family situation and its history. We like participants to sit with the uncertainty, to reflect on the question ‘why’ but without judgement of each other. Deeper reflections may span a whole range of perspectives from ‘within person’ considerations, to situational or systemic possibilities. Health or emotional issues can be reflected on alongside organisational or transactional aspects of what is going on for the family. The better the shared understanding the better the strategy or actions which emerge from these meetings. Quality hypotheses with a close fit to reality lead to more effective implementation in the real world. We encourage ‘loose’ thinking, a search for connections, deeper listening, an ‘open mind’, speculation and exploration without moral judgements. From this stance self-reflection as well as reflection on the situation can produce remarkable insights. The quality of theories or new stories generated is directly influenced by family members’ experiences and the models of learning, behaviour and emotion, systems, educational development, change and so on that they have been exposed to. Learning Objectives To provide opportunities for: Shared problem solving in a safe exploratory climate in which the family will find its own solutions. Individuals to reflect on their own actions and strategies An exploration of whole-family processes and their impact Emotional support and shared understandings of issues at a child, parent, family, school and community level. Feed back to each other on issues, ideas and strategies that are agreed to be worth sharing with them. Who Is It For? Anyone interested in working with families in a way that builds and makes use of their capacities rather than focus on their challenges and difficulties. Social Care teams School staff Community organisers Educational Psychologists Course Content True family empowerment Deepening shared stories and understandings Facilitating groups Problem solving process Handling family group communication Allowing direct feedback and challenge between participants in a safe way Building relationships Process: Family members are welcomed: Introductions are carried out, ground rules and aims clarified whilst coffee is drunk. A recap from the last session is carried out: To follow up developments and reflections after the last meeting. One issue is selected for the main focus Issue presentation: The family member who raised the concern is asked questions to tell the ‘story’ of the issue or problem. Additional questions/information from the group about the problem are gathered: Ground rules may need to be observed carefully here. Individual participants need to be kept focused and prevented from leaping to premature conclusions or to making ‘helpful’ suggestions about strategy. Relationship aspects to the problem are explored. Metaphors and analogies are invited. How would a fly on the wall see your relationship? If you were alone together on a desert island, what would it be like? Impact of previous relationships/spillage from one relationship to another are explored. Eg what situation they are reminded of? For instance, does this situation remind you of any of those angry but helpless feelings you had with your other son when he was an adolescent? This provides opportunities to reflect on how emotions rub off on other people. The parent feels really frustrated, and on reflection we can see that so does the child System/Organisation factors (Family system/school and community systems and so on): What aspects help or hinder the problem? For instance, does the pastoral system of the local school provide space, or time and skilled personnel able to counsel this young person and work actively with their parents? Synthesis. At this stage the Graphic facilitator summarises what they have heard. They then go on to describe linkages and patterns in what they have heard. This can be very powerful. The person doing the graphic work has been able to listen throughout the presentation process and will have been struck by strong messages, emotions and images as they have arisen. The story and meaning of what is happening in the situation may become a little clearer at this point. Typical links may be ‘mirrored emotions’ strong themes such as loss and separation issues, or repeated processes such as actions triggering rejection. This step provides an excellent grounding for the next process of deepening understanding. What alternative strategies/interventions are open to be used? Brainstormed and recorded. ’Either/ors’ need to be avoided at this time also. This needs to be a shared session in which the family member who is presenting the concern contributes as much as anyone. Care is needed to ensure that this person is not overloaded with other people’s strategies. The final selection of strategy or strategies from the brainstormed list is the problem presenter’s choice. Strategies might include: a special time for the young person, a meeting with the child’s parents to explore how she is being managed at home and to share tactics, a home-school diary, counselling, or an agreed action plan that all are aware of, agreed sanctions and rewards and so forth. Strategies may productively involve processes of restitution and restoration, when ‘sorry’ is not enough. Making it right, rather than punishments or rewards, may then becomes the focus. First Steps. The problem presenter is finally asked to agree one or two first steps which they can carry out over the next 3-7 days. It can help to assign a ‘coach’ who will check in with them to ensure they have carried out the action they have named. This is a time to be very specific. Steps should be small and achievable. The person is just ‘making a start’. A phone call, or making an agreement with a key other person not present at the meeting would be ideal examples. Final reflections. Sometimes referred to as a ‘round of words’ help with closure for all involved. Reflections are on the process not the problem. In large families this is best done standing in a circle. In smaller groups all can remain sitting. Passing around a ‘listening stick’ or something similar such as a stone or light heighten the significance of the process ending and improve listening. Finally the problem presenter is handed the ‘Graphic’ this is their record of the meeting and can be rolled and presented ceremoniously by the facilitators for maximum effect! If you liked this course you may well like: Parent Solutions
