- Professional Development
- Medicine & Nursing
- Arts & Crafts
- Health & Wellbeing
- Personal Development
5215 Courses in Cardiff delivered Live Online
Peering at LINX training course description A one or two day induction course covering the technical procedures of LINX along with correct interaction with LINX and LINX members. This course focuses on the implementation of the technologies within the LINX network. For those already competent in BGP the one day version of this course is sufficient. What will you learn Explain the role of LINX in the Internet. Correctly connect to LINX. Recognise the correct procedures for peering at LINX. Use the current Best Current Practices. Peering at LINX training course details Who will benefit: Technical staff of new LINX members. Technical staff of companies preparing to join LINX. Non technical staff may also benefit from this course. Prerequisites: None. (For technical staff with BGP knowledge 1 day) Duration 1 to 2 days Peering at LINX training course contents Introduction and review Networks, The Internet, IP, routers, Autonomous systems, the structure of the Internet, the role of Internet Exchanges. BGP and peering. LINX, EuroIX, RIPE. What you get when you join LINX. LINX products: Connexions, Virtual PoPs, Colocation resales, LINX from anywhere. LINX infrastructure The original architecture, The growth of LINX, the current topology. LINX London locations. Dual LAN topology. LON1, LON2. Use of MPLS to connect London sites. Regional peering: LINX NoVa, LINX Manchester, LINX Wales, LINX Scotland, ManxIX, JEDIX. Connecting with LINX nnecting with LINX Locations. 1/10/100/400G. Interface specifications. Link aggregation. The racks and space provided, access to the racks, connecting WAN circuits into LINX. The connection form, How to link your ISP with LINX, switch assignments, limits on traffic, average measured traffic, getting statistics from LINX, Using looking glass. Allowed traffic. Port security Configuration hints LINX IP details, IPv4, IPv6, PTR records, Cisco base configuration, Juniper base configuration. Peering with other LINX members Preparing for peering, the peering template, setting up the peering, RFC 2142, the RIPE database, contacts, peeringdb.net, solving downed BGP sessions, escalation procedures. Peering configuration hints Cisco BGP configuration, Juniper BGP configuration. LINX additional services Private interconnect, LINX time service. NTP, Strata. The LINX route server Bi lateral peering, Multi lateral peering. How the LINX route server is configured. Use of communities on the route server, template for peering with the route server. Summary Getting further information, the LINX website, the LINX mailing lists.

AutoCAD Architecture 1 on 1 Course
By ATL Autocad Training London
Why Choose AutoCAD Architecture 1 on 1 Course? Our courses for AutoCAD and AutoCAD Architecture. AutoCAD conveys design intent through Lines and Circles, AutoCAD Architecture enhances these elements with walls, doors, windows and AEC. Click here for more info: Website When Can I Reserve My Spot? 1 on 1 training and available from Monday to Saturday, 9 am to 7 pm Duration: 16 hours, which you can flexibly book. Training Method: 1-on-1, in-person face-to-face or live online training. AutoCAD Architecture 3D Course Overview: AutoCAD Architecture Introduction Distinguishing AutoCAD Architecture from AutoCAD LT Exploring the User Interface and 3D Viewing Wall Construction and Customization: Adding Walls to the Model Creating Specialized Curtain Walls Modifying Walls for Specific Needs Joining Walls for Complex Structures Incorporating Wall Openings for Doors and Windows Ceiling Plans (Reflected): Establishing Ceiling Grids and Construction Details Customizing Ceiling Grids for Design Consistency Inserting Ceiling Fixtures and Detailed Construction Structural Design and Analysis: Utilizing Structural Elements and Online Resources Constructing Column Grids and Annotating Columns Adjusting Column Grids and Annotations Enhancing Clarity with Column Grid Annotations Stairs: Designing and Customizing Stairs Adding Railings and Detailed Construction Refining Railings and Detailed Construction Floors and Slabs: Creating Floor Slabs with Construction Details Aligning Floor Slabs with Design Specifications Editing Slabs Using Slab Tools and Construction Details Roofs and Roof Detailing: Roof Creation for the Building Designing Roof Slabs for Specific Areas Modifying Roofs and Roof Slabs as Needed Precise Roof Detailing with Roof Slab Tools Annotation: Scaling Detail Drawings and Annotations Incorporating Text, Leaders, and Comments Accurate Dimensioning in AutoCAD Architecture Enhancing Clarity with Various Annotation Tools Equipment and Furnishings: Integrating Interior and Exterior Furnishings Incorporating Blocks and 3D Models for Realism Leveraging Tool Palettes and Autodesk Seek Resources Model Views Ready for Printing PDF: Creating Callouts for Specific Views Designing Elevations, Sections, and Construction Details Modifying Callout Objects for Improved Visualization Implementing Live Sections and Elevations Generating Reports and Managing Project Resources Schedules: Adding Door and Window Labels Editing Label Data for Accuracy Creating Schedules for Efficient Project Management Customizing Schedules to Meet Specific Requirements This comprehensive AutoCAD Architecture 3D course equips participants with the skills needed to create intricate 3D architectural models, implement construction details, and efficiently manage project resources. It empowers participants to produce professional-grade architectural designs using AutoCAD Architecture software." Upon completion of the AutoCAD Architecture 1-on-1 Course, participants will demonstrate proficiency in architectural design using the application. They will have mastered essential techniques, gained expertise in drawing management, refined their model visualization skills, and earned an accredited certificate. This tailored learning experience, coupled with post-course support and practical exercises, will significantly boost career prospects in the field. Download Autocad Architecture Training Choices: Personalized in-person or Live online courses. Tailored courses designed to meet your specific knowledge and project needs. Customized Learning: Adapt the course to match your existing skills and project requirements. Certifications: Instructors certified by Autodesk. AutoCAD Architecture training Certificate of Attendance. Expert Guidance: Learn from Autodesk Certified Instructors with extensive professional experience. Interactive Learning: Engage in practical, hands-on training. Follow step-by-step demonstrations and practice in real-time. Keep your course-created files for future reference. Comprehensive Resources: Receive a detailed training guide for ongoing reference. Earn an e-certificate upon successful course completion. Post-Course Assistance: Access lifetime email support from your instructor. Prerequisites: Basic familiarity with standard AutoCAD or equivalent knowledge. Version Versatility: Training available for any AutoCAD Architecture version to suit your requirements." Thorough Learning Experience: Establish a robust 3ds Max foundation and master vital skills for crafting impressive 3D models and visualizations. Customized Instruction: Benefit from one-on-one guidance provided by seasoned instructors, ensuring focused and tailored learning. Flexible Learning Paths: Select between in-person or live online sessions, granting you the flexibility to learn from any location. Lesson Recordings: Gain access to recorded lessons for future reference, facilitating self-paced review of course content. Ongoing Email Assistance: Access continuous email support from our experts to address any queries or seek clarifications. Complimentary Career Guidance: Receive valuable career advice from industry professionals, assisting you in charting a successful course in the realm of 3D modeling and visualization."
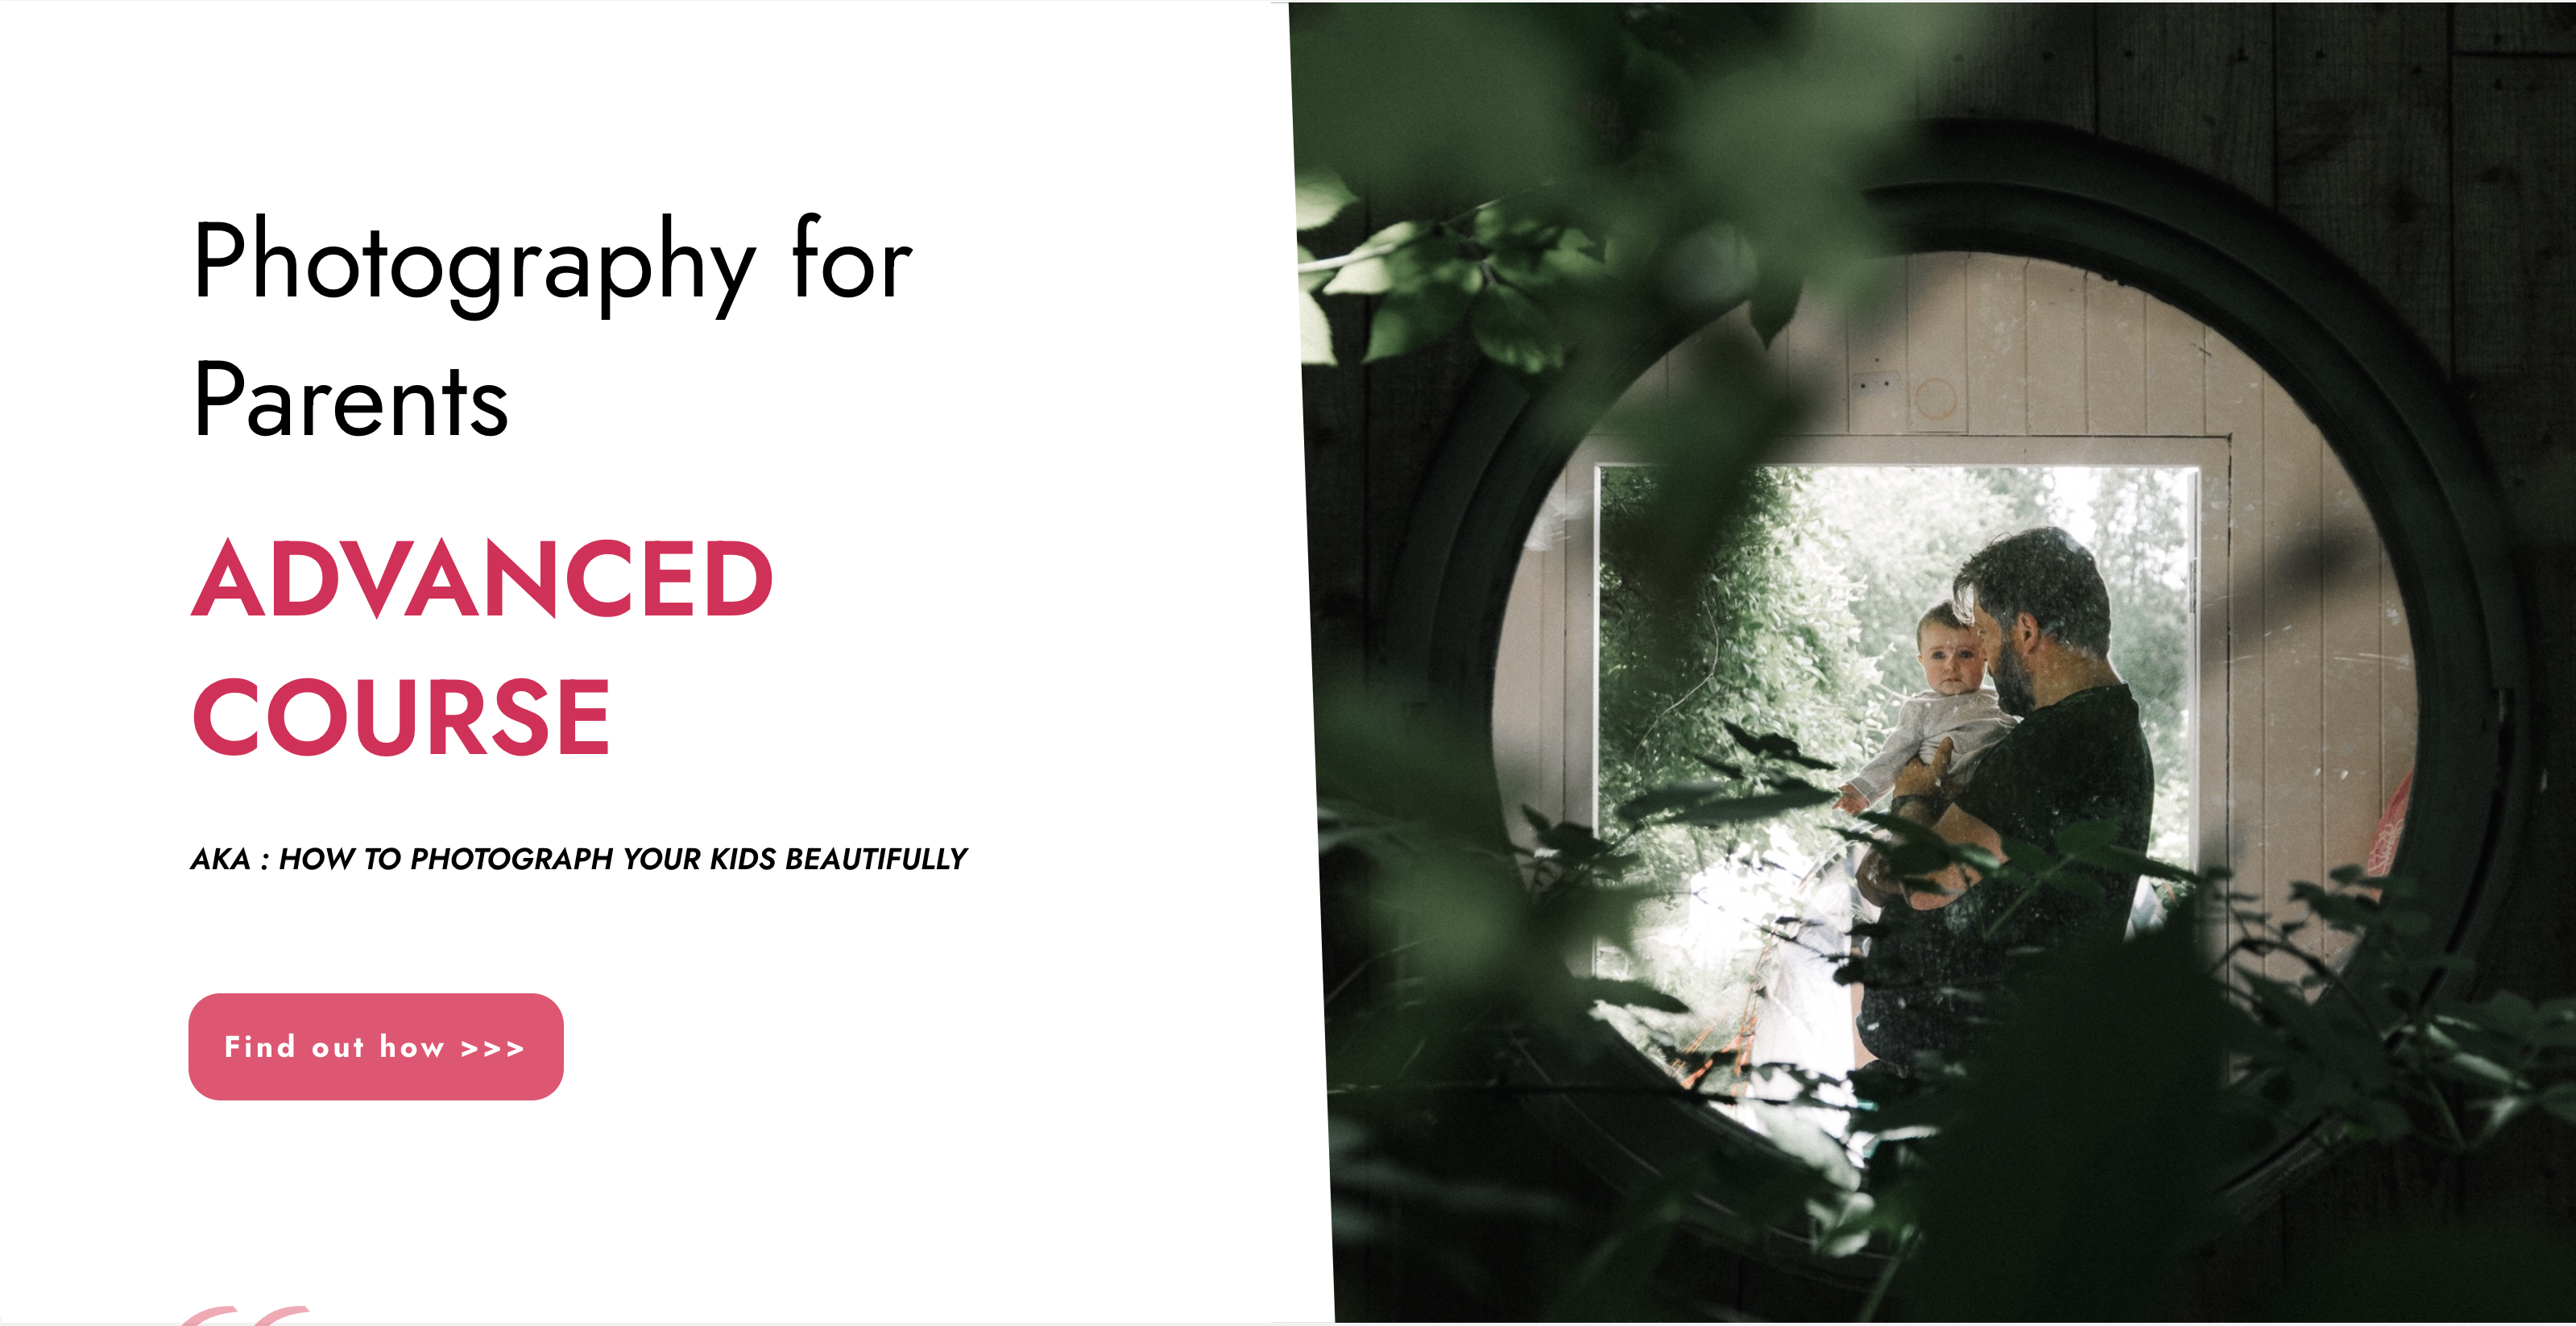
“Photography is my way of bearing witness to the joy I find in seeing the extraordinary in ordinary.” -Harold Feinstein Photography For Parents - Advanced Course Next course starts on 15th April 2024 6 week Photography course designed to help further advance your photography skill and move beyond simply capturing what's in front of you. Choose this course if you are already friends with your camera but want to learn how to shoot creatively in full manual, how to go beyond the basic composition rules and start expressing yourself through photography KEY COURSE INFO: Course type: Instructor-led or self paced Course duration: 6 weeks Course format: Online course with Interactive weekly live classes, personal photo feedback and support group WHAT YOU LEARN: In this course we build on the key photo skills we introduce in the Fundamentals Course and learn some new ones ( although completing the Fundamentals course is not a pre-requisite) You will love this course if you want to keep growing your photographic eye, truly control your camera and start making your photos reflect who you are and who your family are. This is the course where your photography really picks up the pace. We will support and challenge you to help you find your own voice in photography. creative use of manual mode creating strong compositions low light shooting capturing emotions introduction to flash using colour in photography THIS IS THE COURSE FOR YOU IF : Are already familiar with your camera - but want to get better at using it in full manual - with no overwhelm or frantic guesswork You want to take photographs that look more polished and that truly show you what you pictured in your head - still true to your kids and who they are You want to be able to capture true emotions and express yourself through photography You want to get more creative with light and colour to elevate your images and make them shine Next course starts on 15th April 2024 The bookings for this course are not open yet - request to be added to the waiting list to be offered priority booking and Early Bird prices when the course registration opens 5 core course modules Support Facebook group Weekly online Live class Personal Feedback on your images BONUS: extra module with ideas to keep your creativity flowing BONUS: PDF course workbook HERE IS WHAT YOU WILL LEARN in this course : This course was designed to help you grow your photography skills beyond just being able to take "nice looking photos". You will love this course if you want to keep growing your photographic eye, truly control your camera and start making your photos reflect who you are and who your family are. This is the course where your photography really picks up the pace. We will support and challenge you to help you find your own voice in photography. How do I get FULL control of my camera? - shooting in full manual - but with clarity and purpose When is the ‘correct’ exposure not the RIGHT one and why is my camera confused? And more importantly, how to fix it in camera? How do you capture genuine emotion and NOT just fake smiles? No more 'smile for Mummy' How to make your light AND SHADOWS work for you? and capture stunning images even if you think you have barely any light What makes a ‘strong image’ and how do I begin to get them more consistently? INSIDE THE MODULES - aka WHAT DO YOU LEARN? Module 1: Getting started in Manual mode First steps into shooting in full manual – understanding your exposure and metering, finding correct exposure for your subject, handling over and under exposure and adjusting your settings without even taking your camera away from your eyes. Major Takeaways: At the end of the module you will have gained full control of your camera - no more guessing game and unpredictable results with all the control going firmly to you. You will be able to understand your jump off points for different situations and how to adjust them to the changing light or environment Module 2: More on manual exposure and why your camera is often wrong Learning when the ‘correct’ exposure is not the “right exposure”, understanding and interpreting your histograms, learning how your environment can help you get the right exposure even in tricky light, dealing with challenging light situations. Major Takeaways: Knowing when to trust and not trust your camera's exposure assessment. Knowing exactly how to adjust things when the images don't turn out looking right out of the camera. Having a method to help you capture different colour accurately - especially when it comes to skin tones, or elements that are bright or dark Module 3: Powerful composition Learning what makes a strong image and learning to create your own, consistently, with the help of our advanced composition techniques – beyond the rule of thirds. Visual storytelling and creating connection to create images which go beyond just pretty. Major Takeaways: Learning new concepts in composition - things that will help you create exiting visual flow, help with impactful storytelling and draw the viewer's eye into the image rather than away from it. Next course starts on 15th April 2024Get your space now Module 4: No such thing as bad light There is no such thing as bad light - even with just a sliver of it you can make a statement in your images. In this module we teach you how to work with low light - through low key photography - playing with light and shadows. And we give you an introduction to Flash - for when you want to boost your existing natural light that little bit more. Major Takeaways: You will learn how to use light and shadows to your advantage, literally learning to paint with light - letting it uncover your subject, and hide what you want to stay out of light. Much like the light module in our Fundamentals course this is very much an AH-HA lesson that will shake your photography to its core. Module 5: Photographing emotions In this module we get under our subject's skin and focus on photographing emotions. We show you how to reply on more than facial expression to show emotions and how to use your creative toolkit, including colour theory to make the viewer see and understand the emotion felt in the moment. Major Takeaways: Learning how to capture genuine connection with your subject and their true emotions – whether happy or mad! Going beyond the smiles or frowny faces to portray your children’s true selves and capturing the moment. Using body language and other creative means – from colour theory, editing style and more! BONUS Module 6: Your creative self Exploring various photographic styles and conventions. Learning to recognise your own strengths and weaknesses and taking steps to grow further. Bonus creative exercises to take you outof your rut and help you continue to grow your photography. In my opinion Advanced level 2 is absolute must as it expand the knowledge from level 1 to the point, that you can take photos confidently, and knowing what you do. I did it online and my teachers were superb, passionate, helpful and very flexible. Aga Stefaniak Photography for Parents ADVANCED Book your space now: COURSE STARTS : 15th April 2024( 6 weeks incl 1 week break)COURSE COST : £279 (payment plans available) What’s included: 6 weekly modules covering all key aspects of children’s photography, weekly live online class ( also recorded) - on Wednesday evenings personal feedback and advice on your images private support group PDF workbook Photography for Parents ADVANCED But will it work for me? - our guarantee: We know our course works. We have seen a few thousands of students go through our courses and really improve. BUT, if you find that after the first couple of modules that it just doesn't work for you, you haven't learnt anything new, it's the wrong level for you, you haven't improved, or you simply don't get on or engage with it - we will simply refund you in full. Simple as that!
“Light makes photography. Embrace light. Admire it. Love it. But above all, know light. Know it for all you are worth, and you will know the key to photography.” – George Eastman" - Photography For Parents - Shooting With Flash Next course starts on Monday 12th Feb 2024 Scared of Flash? Never got good results from it? Not sure how it works with your camera? Thinking it’s bound to be complicated and just for studio work? This is the course for you! We show you how to work your flash and your camera – on and off camera! - to get great, natural looking results. In this course you'll discover how to use flash not just to supplement light in dim spaces, but to use it creatively, to help you create images you wouldn't be able to capture with just natural light. KEY COURSE INFO: Course type: Instructor-led Course duration: 4 weeks Course format: Online course with interactive live webinar classes, feedback on your learning and support group WHAT YOU LEARN: You will learn how to make your flash work with your camera and how to control it so that it gives you beautiful, natural looking light You will learn to work with the flash off camera - giving you the freedom to position your light wherever it will most suit your subject rather than relying on what you have with natural or indoor light You will learn to play with flash to capture a variety of creative outcomes and apply it to lots of shooting situations - from learning to fake pretty window light to freezing motion with Flash understanding flash equipment learning to shoot with on-camera flash earning to shoot with off-camera flash learning to bounce the light for natural looking results using flash as a sole or supplementary light source freezing movement with flash where the shutter speed wont allow it THIS IS THE COURSE FOR YOU IF : You find yourself struggling with light especially in the darker autumn / winter months, and there never seems to be enough ISO or aperture to get you what you want You can already use your camera in manual and want to add mastery of detachable flash to your skillset - so you can never worry about insufficient or poor light wherever you are, or whatever unknown space you go into You want to be able to make flash images look natural rather than sporting that famous 'deer in the headlights look. A good flash image never 'looks' like a flash image You want to learn how to capture creative images using a flash - such as freezing motion, creating dramatic shadows, or adding a splash of light to specific areas of the frame. You want to add this versatile skill to your toolbox so you can adapt it to different shooting scenarios. ESPECIALLY if you're considering taking up photography professionally or semi professionally, this is an immensely useful skill to have. Next Shooting with Flash course starts on 12 Feb 2024 4 core course modules Support Facebook group Weekly live webinar Weekly practice assignment Feedback on your images Why shoot with flash in the first place? “Don’t use Flash – it will wash out your child”“Flash will make your photos look horrible”‘You can’t control flash – no control over what your photos will look like” You may have heard those statements, maybe even uttered them yourself. And to a degree – they can be true – but only because, if you don’t know how to control and work any tool, it’s likely to give you terrible outcomes – remember how much poorer your photos were when you first started with your camera on full auto? Here is how I see Flash, and what this course is about: Flash lets me bring light where there would normally be not enough light available to take a well exposed photo – and let me tell you – in glorious British weather, that’s more often that I would like! Flash lets me shape the light to suit my needs – I can make it moody or bright, I can even make it look like natural light ( yes really) Flash lets me neutralise ugly light and make it look good ( anybody else cursed with ugly spotlight lights in their home? no? just me? ) Flash lets me be in control, especially in unknown venues and locations, spaces where I won’t get a chance at that second shot. Flash helps me fill in shadows when shooting in very bright light – the goal is not to stop using natural light, but to help create a balanced image where natual light alone can't cut it COURSE PREREQUISITES YOUR SKILLS: We recommend that you are comfortable in shooting in full manual mode. It's possible to use flash in priority modes of course, but you don't have full control of its strength and level. YOUR EQUIPMENT: You will need to have a detachable flash for your camera make. This could be the same brand as your camera or a compatible third party flash manufacturer. You will also need a way of triggering your flash OFF camera - in some cases, you may be able to do this directly from camera or via an additional remote trigger / controller. Click here to see our Flash buying guide below Shooting with FLASH Book your space now: COURSE STARTS : 12th Feb 2024 ( 4 weeks)COURSE COST : £179 ( payment plans available )What’s included: 4 weekly modules with step by step tutorials weekly live class online class ( also recorded) - on Tuesday evenings feedback and advice on your photos private support group PDF workbook Join our next group to learn how to never have to deal with insufficient light and discover a whole new area of photography! INSIDE THE MODULES - aka WHAT DO YOU LEARN? Module 1: Getting Started with Flash In this module we introduce you to the principles of making your flash work with your camera. We show you how the two work together in layering exposures, how you can control both the flash and natural light side and how to achieve predictable outcomes from your flash. This is the biggest learning curve because the way you work your camera with flash is very different to how you do this with just natural light and understanding the control side of things will let you get creative afterwards. Major Takeaways: At the end of the module you will have gained an understanding of how to work your flash ON your camera. With that, you will have learned how to balance your key light and your fill light, how to combine flash exposure with a natural light exposure, how to supplement or even replace light with flash light. You will also make first steps into bouncing the light to give it a more natural appearance. Module 2: Taking your flash OFF camera In this module we teach you how to make your flash work when detached from your camera. We look at different techniques and methods or shooting off camera as well as any additional equipment you may need for this. We teach you how to use that off camera flash for a number of practical and creative examples Major Takeaways: You will be able to use the flash off camera - whatever your preferred off camera methos. We will explore using off camera flash as the key light - creating low key and high key images, as fill light and as a supplementary light to provide additional dimension to the images. Module 3: Making flash look natural In this module we learn to recognise how you can adjust the very quality of your flash to create natural looking images. We learn how to bend - or bounce the light - on and off camera, to create the kind of images that noone would ever suspect of being taken with flash. We also introduce you to a number of light modifiers and show you what you can expect from them as well as what might work in the way you take the photos. Major Takeaways: Learn how to modify your flash to achieve soft or hard light look. Discover how to bounce your flash and where from and how the angle of those flash bounces will give your subject very different looks. Learn about light fall-off and how to apply this principle to achieve more or less contrast filled images when using flash/ Module 4:Flash and motion In this module we show you how to use flash when trying to freeze your subject - whether it is your child bouncing on the soufe in dim Novemeber light or an inanimate object making a splash. We also introduce you to a few way you can play with flash and your shutter speed to achieve fun and creative outcomes. Major Takeaways: You will learn how to freeze movement with flash - even on very slow shutter speeds or in very poor light. You will learn how shutter and flash work together and how you can achieve great creative outcomes such as high speed photography or freezing rain. Next course starts on 12 Feb 2024

Microsoft Word Advanced (live online classes)
By Microsoft Office Training
Course Objectives At the end of this course you will be able to: Collaborate on documents Add reference marks and notes Make long documents easier to use Secure a document Work with forms '1 year email support service Take a closer look at the consistent excellent feedback from our growing corporate clients visiting our site ms-officetraining co uk With more than 20 years experience, we deliver courses on all levels of the Desktop version of Microsoft Office and Office 365; ranging from Beginner, Intermediate, Advanced to the VBA level. Our trainers are Microsoft certified professionals with a proven track record with several years experience in delivering public, one to one, tailored and bespoke courses. Tailored in company training courses: You can choose to run the course exactly as they are outlined by us or we can customise it so that it meets your specific needs. A tailored or bespoke course will follow the standard outline but may be adapted to your specific organisational needs. Collaborating on Documents Modify User Information Share a Document Compare Document Changes Review a Document Merge Document Changes Review Tracked Changes Coauthor Documents Adding Reference Marks and Notes Add Captions Add Cross-References Add Bookmarks Add Hyperlinks Insert Footnotes and Endnotes Add Citations and a Bibliography Simplifying and Managing Long Documents Insert Blank and Cover Pages Insert an Index Insert a Table of Contents Insert an Ancillary Table Manage Outlines Create a Master Document Securing a Document Suppress Information Set Formatting and Editing Restrictions Add a Digital Signature to a Document Restrict Document Access Forms Create Forms Manipulate Forms Who is this course for? Who is this course for? This course is designed for users who would like to create and work with lengthy and well structured documents, collaborate with others on documents, and create forms in Microsoft Word Requirements Requirements Preferably, delegates should have attended the Word Introduction course. Career path Career path Microsoft Office know-how can instantly increase your job prospects as well as your salary. 80 percent of job openings require spreadsheet and word-processing software skills

PL300 Revision Day (PL300REV)
By Online Productivity Training
OVERVIEW Prerequisites—this is a day of supervised revision for anyone who wishes to take the PL-300 exam so we expect you to have attended a PL-300 course, either taught or on your own, before attending this day of revision. We are happy for attendees to join the course if you have taken the PL-300 with us or with another provider. In the morning we look at questions from the PL-300 exam, grouped by subject area. For each question we show you the correct answer and then explain why that is the correct answer. After lunch everyone tries a practice exam under exam conditions and we finish the day with clarification on the subjects or specific questions that the class is finding hard. The cost of the course includes a free voucher to take the exam, so please don’t buy your own separately. If you do so we cannot reimburse you with the cost of the exam. COURSE BENEFITS: Discover the parts of the course on which to focus most attention Become familiar with the styles and formats of the exam questions Alert yourself to some of the particularly tricky questions Familiarise yourself with the style of the 'case study' question Practice an exam under real exam conditions Get a feel for the time you need to devote to the normal questions and to the case study WHO IS THE COURSE FOR? Power BI report developers who need PL-300 Certification to apply for a job Business Intelligence specialists who wish to enhance their career prospects with a PL-300 Certification Anyone who wishes to maximise their chances of passing the PL-300 Power BI Data Analyst exam COURSE OUTLINE Module 1 Structure Of The Exam Registration for the exam and setup of your workspace The percentage of marks devoted to each subject area Types of questions used in the exam Advised timing for the normal questions and for the case study question Module 2 Individual Exam Question Practice The exam questions are divided into subject areas and for each question… We consider the question and try to answer it We view the answer Where necessary, we look at an in-depth explanation of why that is the correct answer Examine case study questions and how to treat these differently from the normal questions Module 3 Practice Exam Under Exam Conditions Attendees take a practice exam Attendees receive a mark, broken down into subject areas Module 4 Exam Question Practice Focussed On Tricky Areas Together, based on the results of attendees’ exam results we decide which areas on which to focus More practice on individual exam questions using the same style as in Module 2

Mastering the Dynamics of the Colour Energies
By colour-energies.com
Gain insights into how to master the dynamics of the opposite colour energies and see the dynamics within your team shift towards healthy relationships. Watch as your bottom line improves as suddenly more is getting done in a smarter way.

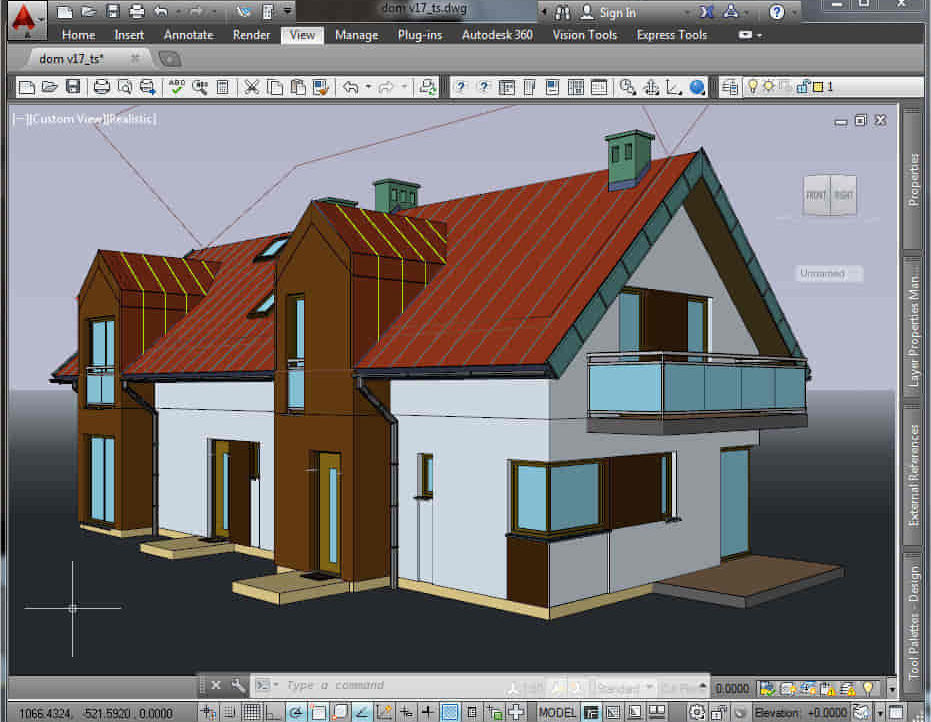
Autocad and Sketchup Help in Interior Design projects
By Real Animation Works
Autocad and Sketchup face to face training customised and bespoke.


GLOBALIZATION AND THE GLOBAL POLITICAL ECONOMY | Live Online | Learning University-Level Course (Non-Credit)
By Gada Academy
Master Globalization and the Global Economy 🌍💡 Discover the forces driving our interconnected world in this live online course. Explore the interplay of politics and economics through key theories, global trade, finance, and governance. Perfect for aspiring policymakers, business leaders, and global thinkers—enroll today to unlock the skills to navigate the global political economy!