- Professional Development
- Medicine & Nursing
- Arts & Crafts
- Health & Wellbeing
- Personal Development
109 Courses in Bristol delivered Live Online
Vray for Architects and Interior Designers 3ds max or Sketchup Training
By London Design Training Courses
Why Choose Vray for Architects and Interior Designers 3ds max or Sketchup Training Course? Click here for info Achieve stunningly realistic renders with our tailored course in V-Ray. Designed for experienced SketchUp and 3ds max users, this advanced training covers model preparation and rendering techniques, customized to your skill level and preferences. Duration: 10 hrs. Method: 1-on-1, Personalized attention. Schedule: Tailor your own hours of your choice, available from Mon to Sat between 9 am and 7 pm. SketchUp is renowned for its user-friendly interface and widespread usage in 3D modeling. Now, with V-Ray for SketchUp, users can take advantage of a powerful rendering tool for unparalleled visualization quality and realism. V-Ray seamlessly integrates into the SketchUp environment, allowing for efficient rendering within your existing workflows. Our course is ideal for those seeking to enhance their SketchUp proficiency by incorporating V-Ray's potent rendering capabilities for 3D models. We adapt the training to your current skill levels in both SketchUp and V-Ray and tailor the content to your modeling requirements and desired rendering quality. V-Ray Rendering Training Course. Course Duration: 10 hours Course Description: This 10-hour course enhances rendering skills with V-Ray, a leading 3D visualization engine. Participants master photorealistic renders, focusing on lighting, materials, and post-production. Covering key concepts, workflow, lighting techniques, material creation, rendering settings, and post-processing, the course ensures stunning visual results. Course Outline: Module 1: Introduction to V-Ray Rendering (1 hour) Overview of V-Ray and its role in 3D rendering Understanding the rendering workflow Setting up V-Ray for your 3D software platform Module 2: Essential Rendering Concepts (1 hour) Understanding global illumination and its impact on renders Exploring image sampling and antialiasing techniques Introduction to render elements for post-processing Module 3: Lighting Techniques (2 hours) Mastering various lighting types in V-Ray Creating natural lighting with HDRI maps Implementing artificial lighting with V-Ray lights Achieving realistic daylight with V-Ray sun and sky Module 4: Material Creation (2 hours) Creating realistic materials using V-Ray material editor Applying textures and procedural maps for added realism Understanding material reflections and refractions Advanced techniques for materials like glass, metal, and fabric Module 5: Rendering Settings and Optimization (1.5 hours) Exploring V-Ray rendering settings for different scenarios Understanding render output options and resolution settings Efficiently using V-Ray distributed rendering for faster results Module 6: Post-Processing with Photoshop (1.5 hours) Enhancing renders through post-processing techniques Compositing render elements for added control Adjusting colors, contrast, and lighting in Photoshop Adding effects and final touches to achieve photorealism Module 7: Advanced Rendering Techniques (1 hour) Working with V-Ray proxies and instancing for complex scenes Utilizing V-Ray displacement for intricate detailing Understanding depth of field and motion blur effects Module 8: Real-World Project (1 hour) Applying the skills learned to complete a real-world rendering project Guidance and feedback from the instructor

Adobe InDesign and Photoshop Training Courses 1-2-1
By Real Animation Works
Face to Face training customised and bespoke. One to One Online or Face to Face
Rhino 3D Evening Training
By London Design Training Courses
Who Should Attend Rhino 3D Evening Training Course? Click here for info. This Evening Course is for individuals seeking to learn 2D and 3D modeling skills in a supportive and creative learning environment. Whether you are new to Rhino or want to expand your existing knowledge, this course is for product, furniture, architectural, and jewelry design industries. Duration: 10 hrs Method: 1-on-1, Personalized attention Schedule: Tailor your own schedule hours of your choice, available from Mon to Sat between 9 am and 7 pm Course Inclusions: Free Lifetime email support: Enjoy the flexibility of a free lifetime email support. Expert Instruction: Learn from experienced architects, designers, and software professionals, ensuring top-notch teaching. Hands-On Learning: Engage in practical, hands-on lessons with personalized project work to apply your skills effectively. Digital Reference: Access valuable video tutorials and a digital reference book for convenient revision and continuous development. London Design Training Course Certificate of Completion: Receive a certificate upon course completion, enhancing your CV and LinkedIn profile. Free Career Guidance: Benefit from career guidance, including tips on job applications and setting up a creative business, to stand out in the competitive design industry. Rhino 3D Basic to Intermediate Training Course Course Duration: 10 hours Introduction to Rhino and Interface: Familiarizing with Rhino's command system and toolbar usage. Navigating the geometry menus, command line, and status bar efficiently. Understanding the Properties window and its functionalities. Managing file operations, including opening and saving files. Grasping the three entity types: curves, surfaces, and solids. Exploring various geometric elements, such as Bezier curves, B-splines, NURBS objects, isocurve surfaces, and mesh surfaces. Setting measurement units for accurate modeling. Navigation: Introducing the viewport and its features. Using construction planes to aid in modeling. Utilizing shading modes for better visualization. Learning essential viewport controls: pan, zoom, rotate, and reset. Workflow Basics: Creating basic objects like curves, surfaces, and solids. Performing fundamental transformations to manipulate objects. Organizing projects efficiently using layers. Drawing: 2D Geometry: Understanding the creation of lines, polylines, rectangles, polygons, arcs, circles, and ellipses. Drawing freeform curves for more creative designs. Modeling: 3D Surfaces: Comparing various 3D surface types. Utilizing extrusion to add features to models. Creating surfaces with loft, revolve, rail revolve, sweep rail, and network surface commands. Constructing complex surfaces with the Network Surface tool. Modeling: 3D Solids: Introducing solid modeling techniques. Creating solids with primitives and curves. Applying Boolean operators to create unique shapes. Editing solids using the solid edit tool. Transforming solids and incorporating modeling aids like Grid Snap, Ortho, and Planar. Editing and Transforming Objects: Using Fillet and Chamfer to edit corners. Employing curve Booleans for trimming and splitting. Mastering the Drag and Nudge tools for object movement and rotation. Copying, pasting, and grouping objects effectively. Scaling and duplicating objects with the Mirror command. Analysis and Degrees: Understanding degrees of curves and surfaces. Creating screen captures for quick proofs. Generating 2D views and rendering projects. Preparation for 3D Printing and Manufacturing: Preparing models for prototyping by ensuring closed gaps. Using the shell technique to create wall thickness suitable for 3D printing.

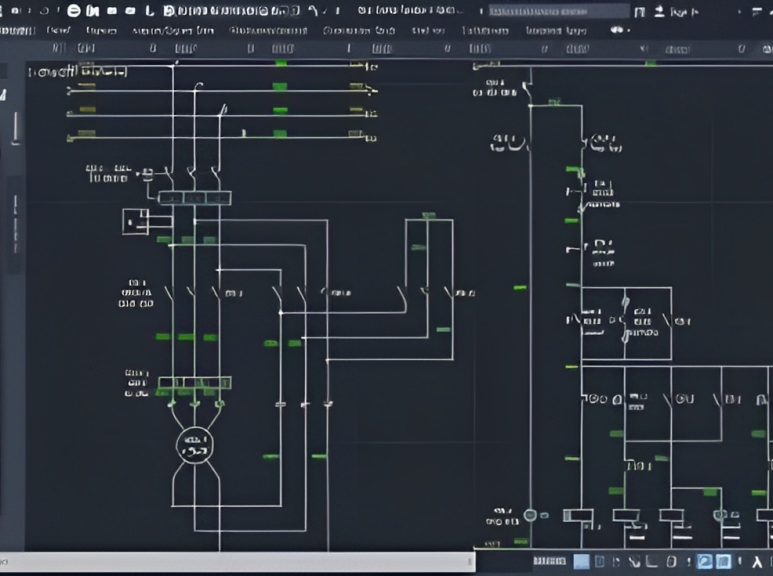
AutoCAD Training Course for Electrical
By ATL Autocad Training London
Exclusive to AutoCAD subscribers, the AutoCAD Electrical toolset simplifies electrical system creation. Click here for more info: Website Our course provides a strong foundation in 2D electrical design, covering essential tools. Flexible one-on-one sessions from 9 a.m. to 7 p.m., Monday to Saturday. Call 02077202581 or book online. The 16-hour course offers flexibility, divide hours across days. Benefit from individualized attention and tailored content. Enroll for in-person or Zoom sessions to excel in AutoCAD Electrical. AutoCAD Electrical Course Content: Introduction to AutoCAD Electrical Software: Overview and features of AutoCAD Electrical Understanding the software interface and tools Project file structure and management Layout and Navigation: Navigating the AutoCAD Electrical workspace Creating new project files and using attribute editors Understanding WDD, WDX, and WDF project files Exploring the Project Manager interface and attribute editors Electrical Diagram Drawing: Numbering and titling wires in diagrams Labelling components Utilizing diagram symbol libraries Creating and editing Electrical Control Circuits (ECC) Component dialog box and Circuit Scale dialog box Introduction to Programmable Logic Controllers (PLCs) and Integrated Systems: PLC Symbols and Concepts Inserting Programmable Logic Controllers (PLCs) into diagrams Adding PLC Units to diagrams Working with PLC Input and Output points and circuits Understanding PLC-based classification Using the Spreadsheet to PLC Input and Output Points utility Custom and Bespoke Symbols: Creating custom symbols for Switches, Wires, Contactors, Motors, Transformers, etc. Specifying symbol conventions and standards Offline and online usage of AutoCAD Electrical databases Drawing for Terminals and Plans: Implementing Terminal symbols in diagrams Handling terminal plans and locations Working with compound level terminals and locations Utilizing the Component command for single and multiple components Managing Jumpers and wiring Modifying Terminal Strips and Dual In-Line Packages (DIP) Understanding DIN Rail, Electrical Enclosure, Circuit Breakers, and Electrical Equipment Generating PDFs and Reports: Exporting drawings to PDF format Organizing report templates Automating the generation of reports Creating Electrical Audit Reports This AutoCAD Electrical course provides comprehensive knowledge of the software, focusing on electrical diagram drawing, symbol creation, PLC integration, terminal planning, and report generation. Participants will gain the skills needed to efficiently design electrical systems using AutoCAD Electrical software. Upon completion, participants will proficiently use AutoCAD Electrical to create precise electrical diagrams, integrate PLCs, design custom symbols, plan terminals, and generate reports efficiently. They will possess the skills needed to confidently design electrical systems and enhance their expertise in electrical design and drawing. AutoCAD Electrical Training Course: Master precision in specialized electrical design skills. Optimize your design process with streamlined workflows. Ensure compliance with industry standards consistently. Boost productivity in electrical design tasks. Facilitate seamless collaboration with fellow professionals. Benefit from recorded lessons for convenient review. Enjoy continuous support with lifetime email assistance. Unleash the complete power of AutoCAD for your electrical design needs. Enroll today and craft precise, professional electrical drawings confidently. Select between in-person and live online sessions to suit your preference. Flexible Evening Sessions: Learn AutoCAD at your own pace with evening sessions designed for busy individuals. Boost your career opportunities in computer-aided design. Comprehensive Skill Development: Gain a strong foundation in AutoCAD's core features and advance to 3D modeling and rendering techniques, enhancing your design capabilities. Industry-Standard Knowledge: Become proficient in AutoCAD, a widely used CAD software in architecture, engineering, and construction fields, making you highly sought after by employers. Practical Application: Apply AutoCAD skills to real-world design scenarios, creating detailed plans for professional projects in architecture, engineering, and mechanical fields. Recorded Lessons for Review: Access lesson recordings to reinforce learning and review specific topics or techniques whenever needed. Lifetime Email Support: Enjoy ongoing support with lifetime email assistance, even after completing the course, for guidance and clarification.
Professional Vectorworks Tutoring: Flexible Pay-Per-Hour Sessions
By Real Animation Works
Introducing Vectorworks Flex Learning: A Comprehensive Pay-As-You-Go Training Course

Interior Design Visualization Professional Certificate
By ATL Autocad Training London
Who is this course for? The Interior Design Visualization Professional Certificate is perfect for individuals aspiring to launch their interior design business. Learn essential skills in AutoCAD, SketchUp, Photoshop, InDesign, Vray, and 3ds Max. If you prefer to book over the phone, simply call 02077202581. Click here for more info: Website Duration: 120 hours. 1-on-1 Training. When can I book: (Choose your preferred day and time once a week). Monday to Saturday: 9 am - 7 pm (Flexible timing with advance booking). Module 1: Introduction to Interior Design Visualization (4 hours) Understanding the Significance of Visualization in Interior Design Familiarity with Software Used: AutoCAD, 3ds Max, SketchUp, V-Ray, Photoshop, and InDesign Workflow Overview and Best Practices for Interior Design Visualization Module 2: AutoCAD for Interior Design (16 hours) Basics of AutoCAD and Its Interface Utilizing Drawing and Editing Tools for Accurate Floor Plans and Elevations Creating and Modifying 2D and 3D Objects Application of Layers, Line Types, and Hatches for Clarity Precision in Measurements and Annotations Module 3: 3ds Max for Interior Design (16 hours) Introduction to 3ds Max Interface Furniture, Fixtures, and Architectural Element Modeling Techniques Material and Texture Application for Realism Lighting Strategies for Interior Scenes V-Ray Introduction for High-Quality Rendering Scene Setup and Camera Placement for Effective Visualization Module 4: SketchUp for Interior Design (12 hours) Introduction to SketchUp and Its Interface Creating 3D Models of Interiors, Furniture, and Objects Enhancing Visuals with Materials and Textures Efficient Use of SketchUp Plugins and Extensions Seamless File Exchange Between SketchUp and Other Software Module 5: V-Ray for Interior Design Rendering (12 hours) Principles of Photorealistic Rendering Installation and Setup of V-Ray in 3ds Max and SketchUp Configuring V-Ray Settings for Optimal Rendering Advanced Material Application for Realistic Surfaces Lighting Techniques for Atmosphere and Mood Creation Module 6: Photoshop for Interior Design Visualization (12 hours) Introduction to Photoshop Interface Image Enhancement: Color, Contrast, and Saturation Adjustments Post-Processing Effects for a Polished Look Integration of 2D Elements like Textures and Patterns Creating Composite Images Using Multiple Render Passes Module 7: InDesign for Portfolio Presentation (8 hours) Introduction to InDesign Interface Designing a Visually Appealing Portfolio Layout Effective Organization and Presentation of Interior Design Visualizations Integration of Images, Text, and Graphics for Cohesive Portfolios Portfolio Export for Print and Digital Distribution Module 8: Project Work and Final Presentation (4 hours) Application of Learned Skills on a Comprehensive Interior Design Visualization Project Refinement and Polish under Instructor's Guidance Preparation and Delivery of Final Presentation Showcasing the Project Note: The course outline encompasses 80 instructional hours. The actual duration may vary based on class pace and additional practice and project work. Final Project (With Full-Time Tutor Assistance): Students will develop and present their best work in a final presentation at the end of the course. Projects are to be submitted via email to training@realanimationworks.com, and timely submission is crucial to avoid delays or interruption of sessions. Please be aware: Failure to attend a session or notify us of absence within 48 hours of the session time results in session loss and full class fee charges due to the personalized nature of the sessions. Students can request breaks or extended pauses by providing written notice through email. Benifits and Jobs after this course: Master Design Tools: Proficiency in AutoCAD, 3ds Max, SketchUp, V-Ray, Photoshop, and InDesign for interior design visualizations. Advanced 3D Skills: Expertise in detailed 3D modeling, realistic rendering, and precise lighting techniques. Portfolio Development: Create compelling portfolios using InDesign, blending images and text professionally. Career Opportunities: Interior Visualization Specialist 3D Modeler Architectural Visualizer Interior Design Consultant Digital Content Creator Freelance Interior Visualizer Virtual Reality Designer Educator/Trainer Certificate Program in Interior Design Visualization: Maintain a dedicated notebook for effective organization of study notes. Schedule makeup sessions for missed coursework, subject to available time slots. Keep detailed records and create a specialized design folder to monitor progress and nurture creative ideas. Allocate focused time for self-guided practice and project work. Receive certification from our esteemed professional design team upon successful completion of the program. Post-Program Achievements: Upon completion of the certificate program, you will: Gain confidence in software proficiency and a strong understanding of underlying principles. Demonstrate the ability to create high-quality visual representations for architectural and interior design projects. Feel well-prepared for career opportunities, backed by your software expertise. Ongoing Support: We are pleased to offer lifelong complimentary email and phone support, ensuring swift assistance with any inquiries or challenges you may face. Software Access: Access to necessary software is available via download from the developer's website or at student-friendly rates. Please note that student software usage is limited to non-commercial projects. Payment Flexibility: Choose from various payment options including internet bank transfers, credit cards, debit cards, and PayPal. Additionally, we offer installment plans tailored to our students' needs.

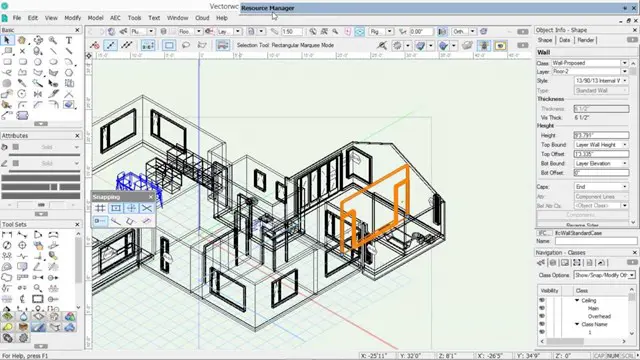
Vectorworks Intermediate Training Course
By ATL Autocad Training London
Who is this course for? Vectorworks Intermediate Training Course. This intermediate course empowers designers with Vectorworks skills, enhancing productivity and enabling the creation of intricate, high-quality designs. Design career with this essential training. Vectorworks courses cater to individuals of all skill levels. Click here for more info: Website Scheduling: 1-on-1 training, your schedule. Book any hour, Mon to Sat, 9 am - 7 pm. Call 02077202581 to reserve. Duration: 16 hours. Method: In-person sessions and live online. Comprehensive Course Outline Please note that the following is a general outline, and the specific topics covered during your training will be tailored to your student level, available time, and course preferences. Essential Foundations Navigating the Interface and User-Friendly Navigation Document Settings Adjustment and Template File Creation Effective File Navigation: Zooming, Panning, and Page Fitting Object Selection Techniques and Deletion Creating Basic Drawings with Precision Utilizing Object Snaps for Accurate Drawing Understanding the Object Info Palette Exploring Fundamental 2D Tools and Tool Modes Crafting Complex Lines and Shapes Project Organization Efficiently Organizing Your Drawings Using Classes Customizing Colors, Line Types, and Line Thickness Views Management: Saving and Editing Views Annotating and Printing Your Designs Adding Text and Annotations Incorporating Dimensions for Clarity Preparing and Printing Your Drawings Advanced Presentation Techniques Leveraging the Power of Sheets and Viewports Creating Standard and Cropped Viewports Annotating and Editing Viewports Exploring Viewport Display Overrides and Sheet Layer Printing Streamlining Workflows Between Viewports and Design Layers Efficiently Saving and Editing Views for Navigation Enhancement Importing DWG and File Formats Importing and Effectively Working with DWG Files Integrating Sketches and Photos into Your Drawings Enhancing Efficiency Creating and Editing Symbols Resource Browser: Management and Organization of Symbols Maximizing Productivity with Worksheets, Schedules, and Reports Custom Attribute Creation and Management (Hatches, Gradients, and Image Fills) Designing Custom Title Blocks Free 30-day Trial Vectorworks https://www.vectorworks.net/trial After completing this course, you will: Master Vectorworks: Gain proficiency in Vectorworks software, including its interface and essential design tools. Precise Drawing: Create accurate drawings with dimensions and object snaps. Project Management: Efficiently organize and manage design projects using classes and views. Clear Presentation: Annotate and dimension your drawings for professional presentations and printing. Advanced Presentation: Learn advanced presentation techniques, including sheets and viewports. File Integration: Work with DWG files, sketches, and photos to enhance your designs. Efficiency Boost: Discover time-saving workflows, symbol creation, and customization. Top Job Opportunities for Designers: Architectural Drafter Interior Designer Landscape Designer CAD Technician Graphic Designer Construction Estimator Product Designer Set Designer Event Planner Urban Planner These roles span various industries and offer career growth for Vectorworks-trained designers in fields like architecture, engineering, entertainment, and more. Tailored Vectorworks Training Our Vectorworks courses are customized to your needs, offering 1-2-1 sessions that adapt content to your expertise, experience, and project requirements. Whether in class, onsite, or via live online sessions, these bespoke courses ensure optimal learning outcomes. Course Overview Begin your journey into Vectorworks, unlocking the potential for digital 2D and 3D visualization in interior design, architecture, 3D modeling, and landscaping. Vectorworks, a user-friendly industry-standard software, is suitable for both PC and Mac users. Course Highlights Master proper drawing setup and utilize 2D drawing tools for professional plans and elevations. Navigate and leverage the built-in symbol library effectively. Transform 2D plans into fully rendered 3D perspectives with textures and lighting. Create a comprehensive project presentation print. (Note: This course does not cover complex curved shapes.) Tailored Training | Vectorworks Personalized One-on-One Guidance Flexible Learning Schedule Ongoing Post-Course Support Access to Extensive Learning Materials Recognition with a Certificate of Attendance Affordable Training Rates Assistance with Software Configuration Rewards for Referrals Special Group Training Discounts Convenient Hours to Suit Your Schedule Customized Courses for Your Animation Needs

Game Design Training: 3ds Max and Unity 3D Personalized
By Real Animation Works
Game design training face to face training customised and bespoke.

Revit Courses Personalize Your Learning Schedule with On-Demand Options
By Real Animation Works
Personalized Revit Training: One-to-One Sessions with Pay-as-You-Go Flexibility

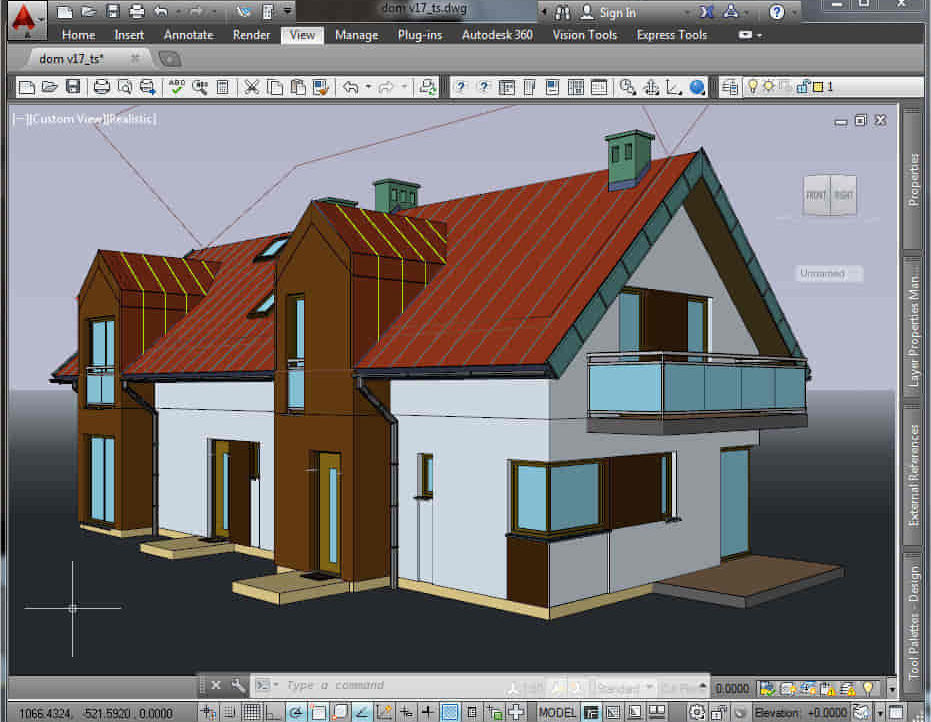
AutoCAD Architecture 1 on 1 Course
By ATL Autocad Training London
Why Choose AutoCAD Architecture 1 on 1 Course? Our courses for AutoCAD and AutoCAD Architecture. AutoCAD conveys design intent through Lines and Circles, AutoCAD Architecture enhances these elements with walls, doors, windows and AEC. Click here for more info: Website When Can I Reserve My Spot? 1 on 1 training and available from Monday to Saturday, 9 am to 7 pm Duration: 16 hours, which you can flexibly book. Training Method: 1-on-1, in-person face-to-face or live online training. AutoCAD Architecture 3D Course Overview: AutoCAD Architecture Introduction Distinguishing AutoCAD Architecture from AutoCAD LT Exploring the User Interface and 3D Viewing Wall Construction and Customization: Adding Walls to the Model Creating Specialized Curtain Walls Modifying Walls for Specific Needs Joining Walls for Complex Structures Incorporating Wall Openings for Doors and Windows Ceiling Plans (Reflected): Establishing Ceiling Grids and Construction Details Customizing Ceiling Grids for Design Consistency Inserting Ceiling Fixtures and Detailed Construction Structural Design and Analysis: Utilizing Structural Elements and Online Resources Constructing Column Grids and Annotating Columns Adjusting Column Grids and Annotations Enhancing Clarity with Column Grid Annotations Stairs: Designing and Customizing Stairs Adding Railings and Detailed Construction Refining Railings and Detailed Construction Floors and Slabs: Creating Floor Slabs with Construction Details Aligning Floor Slabs with Design Specifications Editing Slabs Using Slab Tools and Construction Details Roofs and Roof Detailing: Roof Creation for the Building Designing Roof Slabs for Specific Areas Modifying Roofs and Roof Slabs as Needed Precise Roof Detailing with Roof Slab Tools Annotation: Scaling Detail Drawings and Annotations Incorporating Text, Leaders, and Comments Accurate Dimensioning in AutoCAD Architecture Enhancing Clarity with Various Annotation Tools Equipment and Furnishings: Integrating Interior and Exterior Furnishings Incorporating Blocks and 3D Models for Realism Leveraging Tool Palettes and Autodesk Seek Resources Model Views Ready for Printing PDF: Creating Callouts for Specific Views Designing Elevations, Sections, and Construction Details Modifying Callout Objects for Improved Visualization Implementing Live Sections and Elevations Generating Reports and Managing Project Resources Schedules: Adding Door and Window Labels Editing Label Data for Accuracy Creating Schedules for Efficient Project Management Customizing Schedules to Meet Specific Requirements This comprehensive AutoCAD Architecture 3D course equips participants with the skills needed to create intricate 3D architectural models, implement construction details, and efficiently manage project resources. It empowers participants to produce professional-grade architectural designs using AutoCAD Architecture software." Upon completion of the AutoCAD Architecture 1-on-1 Course, participants will demonstrate proficiency in architectural design using the application. They will have mastered essential techniques, gained expertise in drawing management, refined their model visualization skills, and earned an accredited certificate. This tailored learning experience, coupled with post-course support and practical exercises, will significantly boost career prospects in the field. Download Autocad Architecture Training Choices: Personalized in-person or Live online courses. Tailored courses designed to meet your specific knowledge and project needs. Customized Learning: Adapt the course to match your existing skills and project requirements. Certifications: Instructors certified by Autodesk. AutoCAD Architecture training Certificate of Attendance. Expert Guidance: Learn from Autodesk Certified Instructors with extensive professional experience. Interactive Learning: Engage in practical, hands-on training. Follow step-by-step demonstrations and practice in real-time. Keep your course-created files for future reference. Comprehensive Resources: Receive a detailed training guide for ongoing reference. Earn an e-certificate upon successful course completion. Post-Course Assistance: Access lifetime email support from your instructor. Prerequisites: Basic familiarity with standard AutoCAD or equivalent knowledge. Version Versatility: Training available for any AutoCAD Architecture version to suit your requirements." Thorough Learning Experience: Establish a robust 3ds Max foundation and master vital skills for crafting impressive 3D models and visualizations. Customized Instruction: Benefit from one-on-one guidance provided by seasoned instructors, ensuring focused and tailored learning. Flexible Learning Paths: Select between in-person or live online sessions, granting you the flexibility to learn from any location. Lesson Recordings: Gain access to recorded lessons for future reference, facilitating self-paced review of course content. Ongoing Email Assistance: Access continuous email support from our experts to address any queries or seek clarifications. Complimentary Career Guidance: Receive valuable career advice from industry professionals, assisting you in charting a successful course in the realm of 3D modeling and visualization."