- Professional Development
- Medicine & Nursing
- Arts & Crafts
- Health & Wellbeing
- Personal Development
545 Courses
A System Approach to Good Pharmacovigilance Practice
By Research Quality Association
Course Information In today's evolving landscape, pharmacovigilance (PV) systems face ongoing challenges due to global, national, and company-specific events. This course focuses on developing personnel equipped to navigate these complexities and improve the safe use of medicinal products. We emphasise continuous global thinking, communication, and strategic planning, ensuring adaptability across various levels. The course explores maintaining PV system functionality while adhering to regulatory requirements. Participants will apply European regulatory standards to enhance and sustain PV system effectiveness, contributing to improvement initiatives and ensuring operational integrity. The course covers PV system intricacies, regulatory compliance, and a 'systems approach' for auditors, quality assurance personnel, and PV practitioners. Through presentations and workshops, attendees gain insights into implementing and maintaining an effective PV system. Who should attend? Auditors Pharmacovigilance Quality System Managers Pharmacovigilance scientists The QPPV. Course benefits Throughout the course delegates will explore application of the legal requirements for the PV system and quality system and how to assure these systems. They will demonstrate their ability to contribute to: A systematic investigation of the pharmacovigilance system and its quality system Examination of how the pharmacovigilance system and quality system interact to achieve compliance. The risk-based approach to auditing the PV system and quality system The maintenance of 'inspection readiness' Explore how to investigate the complex PV system Discussions about how to monitor and maintain the PV system and assure compliance. Course Objectives Clarify what has to be done: Explore application of the legal requirements. Explore how to do what has to be done: Adopt a systemic approach to systematically investigate or implement and maintain the PV system and quality system Examine how a compliant PV system and a compliant quality system interact to achieve compliance with regulatory requirements for PV Explore how to investigate the complexity of the PV system. Discus how to identify what is missing or what needs to be improved: Discuss how to monitor and maintain the PV system and assure compliance. This course will assist delegates with: An understanding of key system principles, A practical approach to implementing, maintaining and monitoring the PV system and its quality system A procedure to share expertise to increase efficiency and confidence. This course is structured to encourage delegates to: Discuss and develop ideas - Share knowledge and experiences - Solve specific problems. By the end of the course delegates will be able to: Understand better the pharmacovigilance system, its quality system and how the components interact to achieve the objectives of pharmacovigilance Investigate, and analyse the pharmacovigilance system and to identify what is missing and what needs to be improved. Tutors Tutors will be comprised of (click the photos for biographies): Jana Hyankova Head of PV Department, IVIGEE Services a.s. Programme Please note timings may be subject to alteration. Day 1 08:30 Welcome, registration, course objectives and introduction to work groups Housekeeping notices, meet other delegates, explore how to work in your work group, course objectives. Clarify the definition and objectives of Pharmacovigilance. 09:30 The Regulatory Framework for Pharmacovigilance Identify the relevant regulations and directives. Explore GVP guidance, structure of the modules and standard format of each module. 10:00 The Pharmacovigilance System Exploration of how to organise what has to be done, communications. Exploration of the structures and processes for pharmacovigilance. 10:30 Break 11:00 Workshop 1 and Feedback Exploring an organisational model of the pharmaceutical company- cooperation between PV and other stakeholders. 12:00 The Quality System for pharmacovigilance Exploration of the structures, processes for the PV quality system and discussion of how it interacts with the pharmacovigilance system to meet the objectives of pharmacovigilance effectively and efficiently. 13:00 Lunch 14:00 Workshop 2 and Feedback The quality system puzzle. Explore the organisation of the PV quality system and how it interacts with the PV system. 14:30 The Quality System for pharmacovigilance Exploration of the structures processes for the PV quality system and discussion of how it interacts with the pharmacovigilance system to meet the objectives of pharmacovigilance effectively and efficiently. 15:00 Description of PV System 15:30 Break 15:30 Workshop 3 and Feedback The quality system puzzle Explore the organisation of the PV quality system and how it interacts with the PV system. 16:00 The Pharmacovigilance Safety Master File Construction of the Pharmacovigilance System Master File and its purpose. 17:00 Workshop 3 and Feedback Description of PV System. 18:00 End of Day Day 2 08:30 Drug Safety in the Clinical Trial Environment - Part 1 Information flow and responsibilities of the sponsor. 09:30 Workshop 4 and Feedback Drug Safety in the Clinical Trial environment: Information flow and responsibilities of the sponsor. 10:30 Break 11:00 Drug Safety in the Clinical Trial Environment - Part 2 Information flow and responsibilities of the sponsor. 12:00 Lunch 13:00 Workshop 5 and Feedback Drug Safety in the clinical trial environment: Information flow and responsibilities of the sponsor. 13:30 Processing of Safety Data Exploration of safety data processing, verification, validation, follow up, formatting and collation, reporting requirements, quality and data management. 15:00 Break 15:30 EudraVigilance Exploration of how EudraVigilance supports the PV system. 16:15 Signal Detection and Evaluation/Risk Benefit Assessment: Pharmacovigilance Risk Assessment Committee (PRAC): What is a signal? What are the regulatory requirements? How is signal detection and evaluation conducted? Qualitative and quantitative methods of signal detection. Risk benefit assessment. 17:00 Risk Management Plans A cornerstone of Pharmacovigilance safety communications, direct healthcare professional communication 18:00 End of Day Day 3 08:30 The Pharmacovigilance Risk Assessment Committee (PRAC) Exploration of how good practice is achieved. Composition, role and responsibilities. Examples of referrals. 09:15 Development Safety Update Reports (DSURs): Regulatory requirements, exploring good practice, report format, reference safety information, schedule of submission, analysis evaluations and distribution. 10:00 Periodic Safety Update Reports (PSURs)/Periodic Benefit Risk Evaluation Reports (PBRERs) Regulatory requirements, exploring good practice, report format, reference safety information, schedule of submission, analysis evaluations and distribution. 10:30 Break 11:00 Periodic Safety Update Reports (PSURs)/Periodic Benefit Risk Evaluation Reports (PBRERs) Regulatory requirements, exploring good practice, report format, reference safety information, schedule of submission, analysis evaluations and distribution. 12:00 Workshop 6 and Feedback To explore the compilation and submission of the PSUR. 13:00 Lunch 13:30 Role of the QPPV Exploration of the legal responsibilities of the QPPV and the MAH. 14:30 Break 15:00 Workshop 7 and Feedback To explore the challenges faced by the QPPV. 15:30 End of course Extra Information Face-to-Face Course Course material This course will be run completely online. You will receive an email with a link to our online system, which will house your licensed course materials and access to the remote event. Please note this course will run in UK timezone. The advantages of this include: Ability for delegates to keep material on a mobile device< Ability to review material at any time pre and post course Environmental benefits – less paper being used per course Access to an online course group to enhance networking You will need a stable internet connection, a microphone and a webcam. CPD Points 23 Points Development Level Develop
Supported loving Network
By Supported Loving
This time for our network meeting we are taking it back old school style! Back to our roots in Choice Support's meeting room where it all began back in 2017. The programme is still in production but I wanted to make sure we all got the date saved in the diary - you can expect interesting and inspiring work going across all 2000 (!!) of you. A fun and engaging mixture of presentations, practical stuff and discussion. Also we thought lets go truly original and go back to a shared lunch- please do bring something to share (homemade cakes are always welcome).

V-Ray Course For Architects
By ATL Autocad Training London
Why learn V-Ray for architects and designers? Realistic Visuals: V-Ray produces lifelike renderings for precise design visualization. Enhanced Presentations: Stunning visuals secure approvals and investments effectively. Time and Cost Efficiency: Streamlines design iterations, cutting down prototyping expenses. Click here for more info: Website Scheduling Your Training: You can also call 02077202581 to book. Training Duration: 10 hours Method: In-person face-to-face sessions or live online. Course Title: V-Ray Essentials for Architects and Designers Course Duration: 10 Hours Course Overview: Unlock the power of V-Ray, the industry-standard rendering software, and elevate your architectural and design projects to new heights. In this comprehensive 10-hour course, you'll dive deep into V-Ray and gain the skills needed to create stunning visualizations. Whether you're an architect or designer, this course will equip you with the knowledge and techniques to bring your ideas to life. Module 1: Introduction to V-Ray (1 hour) Understanding the V-Ray interface Navigating the V-Ray toolbar Setting up your first V-Ray project Module 2: Lighting Mastery (2 hours) Utilizing various light sources Achieving realistic daylight simulations Creating artificial lighting setups Mastering V-Ray's advanced lighting tools Module 3: Material Magic (2 hours) Exploring V-Ray materials Creating realistic textures and finishes Understanding material properties Working with material libraries Module 4: Perfecting Render Settings (1 hour) Configuring render settings for optimal results Setting up render elements for post-processing Achieving photorealistic renderings Module 5: Advanced Rendering Techniques (2 hours) Fine-tuning render settings for specific scenarios Creating stunning visual effects Optimizing render times Rendering animations and walkthroughs Module 6: Realistic Environments (1 hour) Incorporating background images and environments Adding context to your architectural scenes Achieving seamless integration of 3D models and backgrounds Module 7: Portfolio-Ready Projects (1 hour) Applying V-Ray skills to complete a professional project Assembling a portfolio showcasing your work Course Benefits: Master V-Ray for architectural and design projects. Create photorealistic renderings with confidence. Customize lighting, materials, and textures for your designs. Optimize render settings for efficiency and quality. Enhance your portfolio with impressive visualizations. Receive lifetime email support for continued guidance. Explore career opportunities as a rendering specialist. Who Should Attend: Architects Interior Designers 3D Artists Visualization Specialists CGI Artists Architectural Renderers Game Environment Artists Virtual Reality (VR) Developers Anyone passionate about architectural rendering and design Method of Instruction: 1-on-1 personalized training In-person or live online sessions Hands-on exercises and practical projects Upon completing the "V-Ray Essentials for Architects and Designers" course, participants will: V-Ray Proficiency: Master V-Ray rendering for photorealistic visualizations. Advanced Lighting Skills: Create dynamic and realistic lighting scenarios. Material Expertise: Customize textures and materials for enhanced visuals. Optimized Renders: Configure settings for efficient workflows. Advanced Techniques: Learn rendering tricks for stunning effects. Realistic Environments: Integrate 3D models seamlessly into real-world settings. Portfolio Development: Build a competitive portfolio showcasing advanced rendering skills. Benefits for Interior Designers and Architects: Enhanced Visualization: Improve design communication with realistic visualizations. Competitive Edge: Stand out with high-quality renderings. Efficient Decision-Making: Experiment and refine designs before execution. Streamlined Workflows: Produce quality renders efficiently. Career Opportunities: Explore roles in architectural visualization, 3D art, and CGI. In short, this course equips interior designers and architects with V-Ray skills to create impressive visualizations, improve communication, gain a competitive edge, streamline workflows, and expand career options. Master Vray Rendering: Achieve proficiency in Vray rendering for architectural and interior design projects. Industry Excellence: Learn industry-standard practices and workflows to produce high-quality results. Flexible Learning: Choose between in-person or live online training to suit your schedule. Resourceful Learning: Access recorded lessons for convenient review and reinforcement. Ongoing Support: Benefit from lifetime email support, ensuring you receive guidance beyond the course. Career Guidance: Receive free career advice to make informed decisions about your professional growth. Upon completion, our Vray for Architects and Interior Designers Training Course opens doors to various career opportunities in the architecture and design industry. Graduates with advanced rendering skills can explore roles such as: Architectural Visualizer Interior Designer 3D Artist Rendering Specialist Visualization Specialist CGI Artist Architectural Renderer Game Environment Artist Virtual Reality (VR) Developer Freelance Rendering Professional Vray Mastery: Gain expertise in Vray rendering for architectural and interior design projects. Industry-Approved Methods: Learn tried-and-true workflows for exceptional results. Flexible Learning: Opt for in-person or live online training at your convenience. Easy Review: Access recorded lessons to reinforce your knowledge conveniently. Lifelong Support: Receive ongoing guidance even after course completion. Career Consultation: Make informed decisions about your professional growth. Career Opportunities: Unlock doors to diverse roles in architecture and design, including Architectural Visualizer, Interior Designer, 3D Artist, Rendering Specialist, and more.

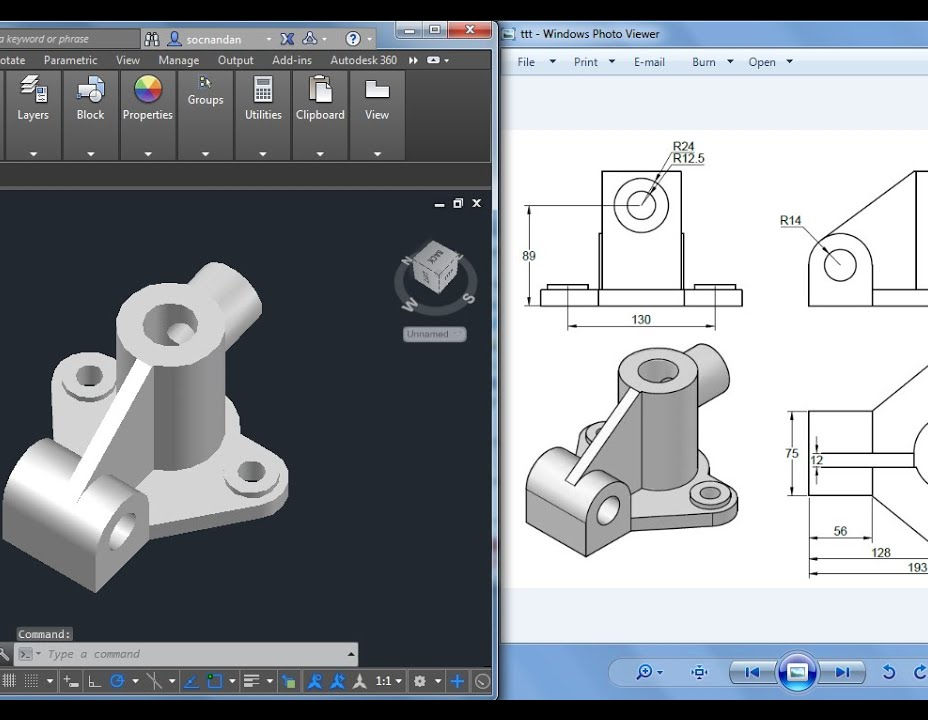
3D AutoCAD Basics to Advanced Training Course
By ATL Autocad Training London
Why Choose 3D AutoCAD Basics to Advanced Training Course? Students learn how to create and modify both solid and surface models. This AutoCAD Training course also teaches students how to present their designs in 3D products and designs. Check our Website Duration: 16 hours Approach: 1-on-1, Book your own day and time. We are open Monday to Saturday 9 am to 7 pm. How to Book this course? Call us on 02077202581 and we will book the dates and times you like. Flexible Schedule: 1-on-1 Face to Face or Live Online. AutoCAD 3D Training: Comprehensive Course Overview Exploration of 3D Modeling and Imaging Generating 3D Drawings Navigating the 3D Modeling Workspace Crafting 3D Shapes using Solid Tools Extruding Polylines into 3D Forms Isolating Coordinates with Point Filters Navigating and Orienting Your Model Achieving Visual Effects Converting 3D Views into 2D AutoCAD Drawings Advanced 3D Techniques Setting Up AutoCAD for 3D Mastering the User Coordinate System Leveraging UCS Options Utilizing Viewports for 3D Drawing Employing Array Tools Crafting Complex 3D Surfaces Constructing Spiral Forms Developing Surface Models Manipulating Objects in 3D Space Rendering and Visualization of 3D Drawings Introduction to Rendering Rapid Rendering Techniques Simulating Sunlight and Shadows Application and Adjustment of Materials Creating Effects with Lights and Materials Texture Mapping and Adjustments Exploration of Rendering Options Enhancing Views with Cameras Printing Rendered Drawings Simulating Natural Lighting Editing and Visualizing 3D Solids Overview of Solid Modeling Creation of Basic and Complex Solids Editing Solid Forms Improving the 2D Drawing Process Visualization and Analysis of Solids Exploration of 3D Mesh and Surface Modeling Introduction to 3D Meshes and Surfaces Creation and Editing of 3D Meshes Crafting Mesh Surfaces Conversion of Meshes to Solids Understanding and Editing 3D Surfaces Customization of Interface and Tools Customization of Workspaces Personalization of the User Interface Creation of Macros in Tools and Menus Working with Expanded Text Boxes Saving and Managing Customizations Exploration of the Diesel Macro Language Designing Custom Linetypes and Hatch Patterns Management and Sharing of Your Drawings Sharing Drawings Online ePublishing Your Work Managing Drawings with DesignCenter and Tool Palettes Exploring the Drawing Library with Content Explorer Establishment of Office Standards Conversion of Layer Settings https://www.autodesk.co.uk Download a free 30-day trial of AutoCAD Learning outcomes after completing the AutoCAD 3D course. Professional Presentation: Create dynamic walkthroughs and presentations that effectively communicate your 3D models and designs. Certification: Obtain a certification as proof of your proficiency in AutoCAD 3D modeling, validating your skills in the industry. Mastery of 3D Modeling: Possess comprehensive skills, from fundamental concepts to advanced techniques in 3D modeling. Enhanced Career Prospects: Improve your career opportunities and prospects in various design-related fields such as architecture, engineering, and product design. Realistic Rendering: Be able to create highly realistic visualizations that enhance the quality of your designs. Practical Hands-On Experience: Gain practical experience and confidence in 3D modeling through extensive hands-on practice. Personalized Learning: Benefit from one-on-one attention and tailored training to meet your specific learning needs and pace. Lifetime Email Support: Continue to receive assistance and guidance through lifetime email support, ensuring you are supported even after completing the course. 3D AutoCAD Training Courses Gain confidence and proficiency in AutoCAD. Discover the fundamentals of 3D modeling and object creation in this introductory AutoCAD 3D course. Booking Your Training Course: Experience personalized training with our adaptable 1-on-1 sessions. You have the freedom to customize your schedule by reserving a convenient hour at your discretion. Our booking slots are available from Monday to Saturday, spanning from 9 a.m. to 7 p.m. You can also reach us at 02077202581 to make a booking over the phone. Course Duration: 10 hours "You have the flexibility to divide these 10 hours across multiple days to suit your ideal schedule." Training Method: 1-on-1 (In-person face-to-face or Live Online) Expect personalized attention, tailor-made content, a flexible learning pace, and dedicated individual support throughout your training journey. This hands-on course provides ample opportunities to experiment with newly acquired techniques and seek answers to your questions. Key Features: An introductory course tailored to AutoCAD 3D's essential features. Abundant one-on-one guidance and dedicated question time. Friendly expert trainers, small class sizes, and a comfortable learning environment. Comprehensive course materials and additional resources. Ongoing support and assistance with post-course challenges. What Will You Learn? This course will equip you with the foundational knowledge and workflows necessary to create 3D models within AutoCAD 3D. You will delve into the creation and modification of both solid and surface models. Upon completion, you will be able to: Effortlessly fashion intricate shapes by combining simple elements. Precisely extract geometries and dimensions from your creations. Easily customize the view and presentation style of your objects. Is This Course Right for You? No prior experience with AutoCAD 3D is required. This course caters to individuals proficient in working with 2D objects who aspire to construct 3D models of their designs. Gain proficiency in the fundamental tools and functionalities to create precise and professional 2D and 3D drawings, advancing to more complex techniques. Enhanced Efficiency: Discover time-saving strategies, tips, and workflows that will boost your productivity and streamline your design process within AutoCAD 3D. Versatility in Design: Develop the skills needed to undertake a wide range of projects, from architectural plans and engineering drawings to mechanical components and electrical schematics. Industry-Recognized Expertise: Cultivate in-demand skills relevant to architecture, engineering, construction, and manufacturing, paving the way for career advancement and professional development. Accessible Lesson Recordings: Access recorded lessons at your convenience to review and reinforce course material whenever necessary. Continuous Email Support: Benefit from ongoing assistance with lifetime email support, ensuring you have access to guidance, answers, and clarifications even beyond the completion of the course.
Breakthrough Confidence Course - overcome shyness and social anxiety
(6)By The Sunflower Effect Confidence Courses
Build confidence, overcome shyness and social anxiety to improve your career prospects. Breakthrough is a powerful course which will enable you to break out of your shell – no matter how inhibited or stuck you feel you are and to build an effortless self-confidence. The Breakthrough Course is based on Claire Schrader's experiences of being an introvert and what really worked in getting her out of her shell so she could express herself powerfully in the world. As a result, she has achieved things in her personal and professional life, she never would have dreamed possible. Claire has helped many thousand quiet, shy and introverted people transform their lives through her unique confidence-building system, the Sunflower Effect, since 1997.

AutoCAD and Photoshop Training Course 1-2-1
By Real Animation Works
Autocad face to face training customised and bespoke.
Vectorworks Spotlight Training Courses
By ATL Autocad Training London
Why Learn Vectorworks Spotlight Training Courses? VectorWorks Spotlight Course offers strong 2D drawing tools and lighting skills. while. Spotlight goes beyond fundamentals, offering solution for designing, modeling, and sharing entertainment projects. It's the industry standard for lighting, scenery, sets, corporate events, theater, and exhibits. Click here for more info: Website When can I book this course? 1-on-1 training. Duration: 16 hrs, Flexible scheduling (Mon to Sat, 9 am - 7 pm). Choose your own day and time. Training Course: Vectorworks Spotlight Duration: 16 hours Course Overview: I. Introduction to Vectorworks (1 hour) Overview of Vectorworks software and its diverse applications Familiarization with the user interface and navigation Customizing preferences and settings to optimize workflow II. 2D Drawing Tools (2 hours) Utilizing basic drawing tools for creating lines, rectangles, circles, and polygons Implementing text and dimension tools for annotations Applying modify tools for object editing and transformation Organizing elements using layers and classes III. 3D Modeling Tools (3 hours) Introduction to extrude, revolve, sweep, and loft tools for 3D modeling Creating 3D objects from 2D shapes for spatial representation Modifying and refining 3D models Exploration of the 3D modeling environment IV. Advanced 3D Modeling Tools (2 hours) Utilization of solid modeling tools for complex geometry creation Performing Boolean operations to combine or subtract shapes Creation and use of symbols for efficient workflow V. Introduction to Spotlight (1 hour) Overview of the Spotlight workspace and its features Adding and configuring lighting devices for stage and event design Creation and modification of lighting positions for precise placement VI. Spotlight Tools and Techniques (3 hours) Creation and editing of lighting instruments for customized setups Use of visualization tools for lighting simulations Creation and application of labels and legends for documentation Generation of worksheets and reports for lighting analysis VII. Advanced Spotlight Techniques (2 hours) Utilization of video and projection tools for multimedia presentations Incorporation of audio and sound systems for immersive experiences Understanding rigging and hoisting for stage setup Management of paperwork and documentation for effective planning VIII. Integration with Other Software (1 hour) Importing and exporting files for collaborative work with other software Utilizing Vectorworks in CAD and BIM workflows for seamless interoperability Exploration of plugins and add-ons for expanded functionality IX. Project-based Exercises (1 hour) Application of learned techniques to real-world scenarios Creation of a lighting plan for a concert or theater production Designing a 3D model of a building or interior space Free 30-day BIM & CAD Software Trial Request: Vectorworks After completing Vectorworks 2D | 3D and Spotlight Training Course? Vectorworks Proficiency: Master Vectorworks software, including interface and tools. 2D Drafting: Create precise technical drawings using fundamental 2D tools. 3D Modeling: Develop skills in 3D modeling, modification, and spatial representation. Spotlight Expertise: Learn stage and event design tools, focusing on lighting setups. Advanced Techniques: Explore complex 3D modeling and Spotlight features. Interdisciplinary Integration: Integrate Vectorworks with other software in CAD and BIM workflows. Project Application: Apply skills to real-world scenarios, creating plans and models. Job Opportunities: CAD Technician: Draft detailed plans for architecture and engineering firms. Stage Designer: Plan lighting, sound, and multimedia setups for events. Event Planner: Design event layouts with lighting and audio-visual setups. Architectural Drafter: Create accurate architectural plans and models. Interior Designer: Visualize interior spaces in 2D and 3D for clients. Lighting Designer: Specialize in various lighting applications, from buildings to stages. BIM Specialist: Work with architectural firms on Building Information Modeling projects. Freelance Designer: Offer services in 2D/3D modeling, event planning, or architectural visualization. What is Vectorworks Spotlight? Vectorworks Spotlight is a specialized package tailored for entertainment design professionals, offering both 2D and 3D capabilities. It is the industry-standard CAD software for entertainment design, ideal for lighting, scenery, sets, events, theater, and exhibits. Training Details: Duration: 16 hrs (flexible scheduling) Method: Personalized 1-on-1 training (In-person or Live Online over Zoom) Tailored content, adaptable pace, individual support Differences from Vectorworks Fundamentals: Vectorworks Fundamentals serves general modeling and drawing needs, while Spotlight provides comprehensive solutions for design, modeling, documentation, and collaborative project sharing, catering specifically to industry experts. Applications of Spotlight: Spotlights have diverse uses, including emergency situations and when a powerful light source surpassing a flashlight is required. Interior Designers and Vectorworks: Yes, interior designers use Vectorworks software, particularly Vectorworks Architect, for efficient workflow and effective realization of creative visions. Course Structure: Individualized Instruction (1-2-1) Customized Content Adaptable Learning Pace Flexible Scheduling: Monday to Saturday, 9 am to 7 pm Get Vectorworks: For more information and to download Vectorworks, visit Vectorworks Website. Individualized Training: Get personalized attention and tailored guidance during your training sessions. Flexible Timings: Select your preferred schedule and training days to fit your convenience. Post-Training Assistance: Access complimentary online support even after course completion. Comprehensive Resources: Receive detailed PDF notes and handouts for effective learning. Certification of Completion: Receive a recognition certificate upon successfully finishing the course. Affordable Pricing: Take advantage of budget-friendly training rates. Software Setup Support: Receive assistance in configuring the software on your device. Referral Benefits: Recommend a friend and enjoy discounts on upcoming courses. Group Training Offers: Benefit from special discounts for group training programs. Convenient Hours: Attend sessions from Monday to Sunday, with extended operating hours. Tailored Learning: Experience customized training designed to meet your specific requirements.
Elevate Your Grades with Expert Assistance: The Ultimate Assignment Desk
By dissertationhelp
assignment desk provides assignment writing services

V-Ray for Rhino Essentials Training
By ATL Autocad Training London
Why Choose V-Ray for Rhino Essentials Training? Master photorealistic rendering in Rhino with our intensive V-Ray training. Led by certified experts, learn lighting, material manipulation, rendering configurations, textures, and global illumination. Check our Website Training Duration: 10 hours Approach: 1-on-1, in-Person and Live online and Customized Content. Flexibility: 1-on-1 sessions scheduled at your convenience, from Mon to Sat between 9 am and 7 pm. Vray for Rhino Essentials - 10 Hours Course Session 1: Introduction to Vray and Rhino Integration Overview of Vray: Understanding its importance in architectural and product visualization. Setting up Vray in Rhino: Installation, basic configurations, and interface exploration. Understanding the Rhino-Vray workflow: Navigating between Rhino and Vray seamlessly. Session 2: Basic Lighting Techniques Exploring different light sources: Domes, spotlights, and area lights. Adjusting light intensity and color temperature for realistic ambiance. Creating natural lighting scenarios: Daylight, twilight, and night scenes. Session 3: Mastering Material Creation Introduction to Vray materials: Diffuse, reflection, refraction, and bump maps. Crafting realistic materials: Wood, glass, metal, and fabrics. Utilizing the material editor efficiently for precise adjustments. Session 4: Advanced Rendering Configurations Global Illumination: Understanding photon mapping and irradiance mapping. Fine-tuning render settings: Quality vs. speed, resolution, and anti-aliasing. Exploring Vray frame buffer: Post-processing and image enhancement. Session 5: Texture Manipulation and Mapping Understanding UV mapping: Unwrapping complex geometries for accurate textures. Applying textures in Vray: Diffuse, bump, displacement, and normal maps. Realistic texture manipulation: Scaling, rotation, and blending textures seamlessly. Session 6: Camera Settings and Scene Composition Camera configurations: Focal length, depth of field, and exposure settings. Composing visually appealing scenes: Rule of thirds, focal points, and balance. Rendering interior and exterior scenes: Managing lighting challenges and reflections. Session 7: Real-Time Feedback and Interactive Rendering Introduction to Vray interactive rendering: Real-time feedback for quick adjustments. Utilizing Vray's denoiser for noise reduction in interactive mode. Enhancing productivity with interactive rendering: Modifying materials and lighting on the fly. Session 8: Optimizing Render Times Efficient render optimization techniques: Reducing noise and enhancing quality. Distributed rendering: Utilizing multiple machines for faster rendering. Troubleshooting common rendering issues: Flickering, artifacts, and texture problems. Session 9: Post-Processing and Presentation Post-production in Photoshop: Enhancing renders, adding depth, and adjusting colors. Creating compelling visual narratives: Adding people, context, and atmosphere. Designing professional presentation boards: Layout, annotations, and graphic elements. Session 10: Final Project and Portfolio Review Participants showcase their final Vray-rendered projects. Instructor-led critique and feedback session. Tips for building a strong portfolio: Choosing the best renderings and presenting your work effectively. By the end of this 10-hour course, participants will have a comprehensive understanding of Vray for Rhino, enabling them to create photorealistic renderings and significantly enhance their design visualization skills. Upon completing the Vray for Rhino Essentials course, participants will: Master Lighting Techniques: Expertly utilize various light sources. Create realistic lighting scenarios for diverse scenes. Advanced Material Proficiency: Manipulate complex materials and textures for lifelike renders. Understand reflective surfaces and material interaction. Optimize Rendering Settings: Fine-tune render configurations for optimal quality and speed. Implement noise reduction techniques for cleaner renders. Texture Mapping Mastery: Perfect UV mapping methods for accurate texture application. Seamlessly blend textures for realistic surface mapping. Effective Camera Use and Composition: Configure camera settings, depth of field, and exposure. Compose visually appealing scenes for impactful renders. Real-Time Rendering Skills: Utilize interactive rendering for immediate feedback and adjustments. Enhance scenes in real time for efficient workflow. Post-Processing Expertise: Enhance renders in post-production using software tools. Add depth, adjust colors, and create visually compelling final images. Professional Presentation Techniques: Design layouts, annotations, and context to create impactful visual narratives. Curate a strong portfolio with the best-rendered projects. By honing these skills, participants will produce photorealistic renders and significantly enhance their architectural and product visualization capabilities. Skills You'll Gain: Master lighting techniques for realistic visualization. Learn material manipulation and texture enhancement in Vray. Understand advanced rendering configurations for high-quality results. Explore global illumination concepts for lifelike scenes. Career Opportunities: Upon completing Vray for Rhino Essentials, you'll be well-equipped for various roles in the design and visualization industry, including: Architectural Visualizer: Create stunning architectural visualizations for presentations and client approvals. Product Designer: Enhance product design by creating photorealistic prototypes and visualizations. Interior Designer: Craft immersive interior spaces with realistic lighting and material textures. 3D Visualization Artist: Work in animation studios, gaming companies, or marketing agencies, producing high-quality 3D visualizations. Freelance Rendering Specialist: Offer your skills on platforms like Upwork or Fiverr, providing rendering services to clients worldwide. Course Highlights: Acquire fundamental skills in V-Ray for Rhino, covering lighting, materials, and rendering setups. Explore advanced techniques for lifelike textures, reflections, and global illumination effects. Master the workflow for crafting architectural renderings, both interior and exterior. Harness the power of V-Ray features like proxies, fur, and particle systems for dynamic visuals. Optimize render times and quality using efficient techniques and expert tips. Validate your expertise with a Certificate of Completion, showcasing your V-Ray proficiency. Access recorded lessons for future reference, enabling self-paced learning and continuous improvement. Professional Guidance: Learn from certified tutors and industry experts with extensive practical experience. Gain valuable insights and personalized feedback as you progress through the course, ensuring a comprehensive understanding of V-Ray for Rhino.

ESOL: Conversational & Speaking English (modular), In Person Tuition, In Person, London, Lambeth, Wandsworth, Merton, Southwark, Kensington & Chelsea
(8)By GLA Tutors Home or Online
This course is designed to enhance the speaking and conversational skills of adult learners in English. Through a combination of interactive activities, discussions, and real-life scenarios, participants will develop the confidence and fluency needed to engage in various social and professional situations. Emphasis will be placed on improving pronunciation, expanding vocabulary, and refining grammar structures to communicate effectively in English. Course Duration: 10 weeks (20 sessions) Course Objectives: By the end of this course, participants will: 1. Improve their overall speaking fluency and accuracy in English. 2. Enhance their listening skills to understand and respond appropriately in conversations. 3. Expand their vocabulary and idiomatic expressions for effective communication. 4. Develop confidence in speaking English in social and professional settings. 5. Gain a deeper understanding of cultural nuances and non-verbal communication in English-speaking countries. Course Outline: Week 1: Introduction to Conversational English - Icebreaker activities to get to know each other - Assessing participants' current speaking level - Setting personal goals for the course Week 2: Pronunciation and Intonation - Identifying common pronunciation challenges - Practicing correct stress and intonation patterns - Role-playing exercises for clear communication Week 3: Everyday Conversations - Engaging in small talk and greetings - Discussing personal interests and hobbies - Describing daily routines and activities Week 4: Travel and Tourism - Asking for directions and recommendations - Role-playing scenarios at airports, hotels, and tourist attractions - Vocabulary related to travel and cultural experiences Week 5: Socialising and Networking - Discussing personal and professional backgrounds - Participating in group discussions and debates - Practicing active listening and turn-taking in conversations Week 6: Business Communication - Presenting ideas and opinions in a professional setting - Negotiating and persuading effectively - Writing and delivering effective elevator pitches Week 7: Job Interviews and Resume Building - Preparing for job interviews in English - Practicing common interview questions and answers - Crafting a compelling resume and cover letter Week 8: Public Speaking and Presentation Skills - Overcoming public speaking anxiety - Structuring and delivering engaging presentations - Using visual aids and body language effectively Week 9: Cultural Awareness and Non-verbal Communication - Understanding cultural differences in communication - Interpreting body language and gestures - Role-playing cross-cultural scenarios Week 10: Real-life Simulations - Applying all learned skills in real-life scenarios - Group discussions and feedback sessions - Reviewing progress and setting future language goals Note: This syllabus is a guideline and can be customised based on the specific needs and preferences of the participants. You can opt in and out of different modules.