- Professional Development
- Medicine & Nursing
- Arts & Crafts
- Health & Wellbeing
- Personal Development
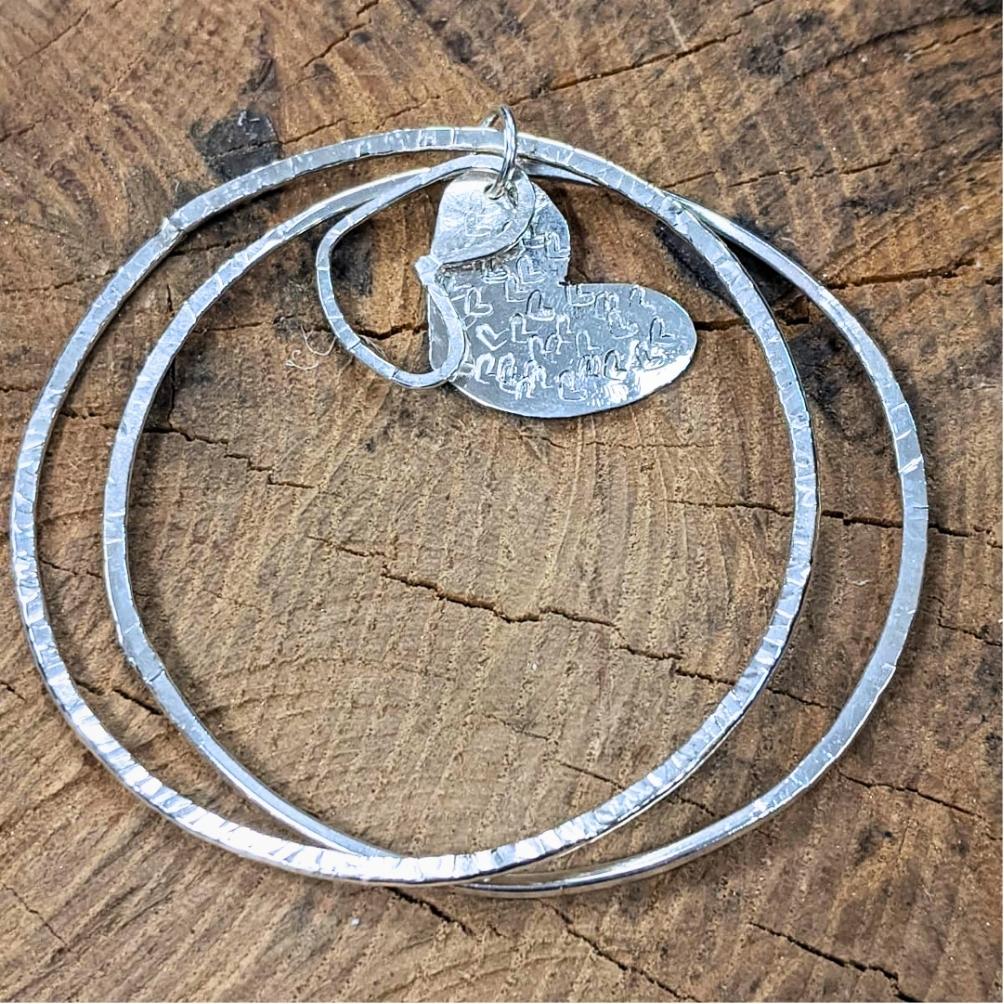
Create your very own silver chain bracelet during this day workshop. We will guide you through all the processes involved in creating your own design. From cutting, shaping and texturing the silver, through to soldering and polishing. You will create each link and a T bar clasp. This is a fantastic project to help you learn or improve your soldering skills, and a great introduction to jewellery making. WHEN: Saturday 16th November 10-5pm WHERE: Workshop 925 based at The Mayford Centre, just outside of Woking and very close to Guildford. Unit F9 The Mayford Centre, Mayford Green Woking, Surrey GU22 0PP TUTOR: Kirsten Hendrich WHAT DOES THE DAY INVOLVE? Create your very own silver chain bracelet during this day workshop. We will guide you through all the processes involved in creating your own design. From cutting, shaping and texturing the silver, through to soldering and polishing. You will create each link and a T bar clasp. This is a fantastic project to help you learn or improve your soldering skills. If you are looking for some inspiration, we have created a Pinterest board to help inspire some ideas. You will be provided with 1.2mm thick wire for your links. We work really hard to make sure our students love what they create, so if you have a chunkier design idea in mind, please get in touch as the material costs increase and it can be more difficult to create thicker links, so we just need to check it is achievable within the time frame. EXPERIENCE REQUIRED: None, all abilities are welcomed. We support you throughout the session and provide demonstrations to show you the techniques and steps needed to create your own chain bracelet from start to finish. Our small classes mean we are able to provide each student with the support they require. Students must be 16+ Students aged 14 or 15 are able to attend if accompanied by an adult. CLASS SIZE: 7 WHAT IS INCLUDED? All tools and consumables are supplied. The cost of this course includes materials. YOU WILL BE PROVIDED WITH: 10cm of 2mm round wire to create your clasp 1.5 metres of 1.2mm silver round wire for your bracelet links If you wish to purchase additional silver to create alternative link thicknesses (should time allow), we stock silver which you are able to purchase on the day but please run your ideas through with us first by emailing hello@workshop925.com WHAT TO BRING: For safety reasons, during each class, you are required to wear appropriate footwear, we request that no open toed shoes are worn within Workshop 925. Long hair should also be tied back when working with the equipment. You may also wish to bring a notebook. We have handouts for many demonstrations, but there are always many tips and tricks given verbally by the tutor, which some might like to keep note of. Please bring any PPE, snacks and drinks to each session. We have a microwave, kettle and fridge to store or cook your lunch choices. PAYMENT OPTIONS: You can pay via our website or in our workshop in person using our card machine. If you prefer to pay directly, you can email us on hello@workshop925.com and we can invoice you manually to arrange a bank transfer. For classes over £80, instalment options are also available. Please email us on hello@workshop925.com to arrange. Gift Voucher – if you have a voucher to redeem, please email us before booking on hello@workshop925.com Please check your dates carefully before booking a class as we are unable to offer refunds. See our Terms & Conditions for full details.
This is a full day intensive workshop which will teach you the processes involved in photo etching, including preparing the metal for etching, transferring the designs onto the metal using press and peel (P&P) paper and how to use specific etching solutions to cut the designs into the metal. This course will allow you to broaden your design process so that you can add some intricate textures to your copper and silver jewellery designs. You will be provided with a set amount of materials including copper sheet to practice the process and a 4cm by 4cm piece of silver sheet to create a silver textured pendant during your session. WHEN: Sunday 13th October 10-5pm WHERE: Workshop 925 based at The Mayford Centre, just outside of Woking and very close to Guildford. Unit F9 The Mayford Centre, Mayford Green Woking, Surrey GU22 0PP TUTOR: Krista Thomson WHAT DOES THE DAY INVOLVE? This is a full day intensive workshop which will teach you the processes involved in photo etching, including preparing the metal for etching, transferring the designs onto the metal using press and peel (P&P) paper and how to use specific etching solutions to cut the designs into the metal. This course will allow you to broaden your design process so that you can add some intricate textures to your copper and silver jewellery designs. You will be provided with a set amount of materials including copper sheet to practice the process and a 4cm by 4cm piece of silver sheet to create a silver textured pendant during your session. If you would like to create additional designs, you are welcome to bring along your own additional flat silver sheet, it must be no thinner than 0.6mm. This is a great opportunity to stock pile some great patterned silver for us with future projects. On the day you will be provided with some patterns to etch, if you have a set pattern in mind, please send us the artwork in good time for your class. Designs must be black and white only and please note smaller patterns work better than larger ones. Please email it to us at hello@workshop925.com. Alternatively instruction on where to purchase P&P paper and how to print your own designs onto it will be sent out prior to your course date to those of you who wish to etch your own designs. You will be etching the majority of the day, however if you would like to create a finished design, we can accommodate this, you can do some etching in the morning and create a design in the afternoon. EXPERIENCE REQUIRED: None, all abilities are welcomed. This course is a great introduction to etching for those who have a vast experience in jewellery making but have not yet tried this technique as well as beginners looking to create beautiful textural pieces of jewellery. Our small classes mean we are able to provide each student with the support they require. CLASS SIZE: 6 WHAT IS INCLUDED? All tools and consumables are supplied Please bring refreshments as we are no longer able to provide them The cost of this course includes copper sheet to practice the technique and a 4cm by 4cm section of silver sheet. The price also includes a selection of patterns printed on P&P paper to use during your course. WHAT TO BRING: For safety reasons, during each class, you are required to wear appropriate footwear, we request that no open toed shoes are worn within Workshop 925. Long hair should also be tied back when working with the equipment. You may also wish to bring a notebook. We have handouts for many demonstrations, but there are always many tips and tricks given verbally by the tutor, which some might like to keep note of. Please bring any PPE, snacks and drinks to each session. We regret we can’t offer tea and coffee at the moment due to Coronavirus. PAYMENT OPTIONS: You can pay via our website or in our workshop in person using our card machine. If you prefer to pay directly, you can email us on hello@workshop925.com and we can invoice you manually to arrange a bank transfer. For classes over £80, instalment options are also available. Please email us on hello@workshop925.com to arrange. Gift Voucher – if you have a voucher to redeem, please email us before booking on hello@workshop925.com Please check your dates carefully before booking a class as we are unable to offer refunds. See our Terms & Conditions for full details.
This is a full day intensive workshop which will teach you the processes involved in photo etching, including preparing the metal for etching, transferring the designs onto the metal using press and peel (P&P) paper and how to use specific etching solutions to cut the designs into the metal. This course will allow you to broaden your design process so that you can add some intricate textures to your copper and silver jewellery designs. You will be provided with a set amount of materials including copper sheet to practice the process and a 4cm by 4cm piece of silver sheet to create a silver textured pendant during your session. WHEN: Sunday 3rd November 10-5pm WHERE: Workshop 925 based at The Mayford Centre, just outside of Woking and very close to Guildford. Unit F9 The Mayford Centre, Mayford Green Woking, Surrey GU22 0PP TUTOR: Krista Thomson WHAT DOES THE DAY INVOLVE? This is a full day intensive workshop which will teach you the processes involved in photo etching, including preparing the metal for etching, transferring the designs onto the metal using press and peel (P&P) paper and how to use specific etching solutions to cut the designs into the metal. This course will allow you to broaden your design process so that you can add some intricate textures to your copper and silver jewellery designs. You will be provided with a set amount of materials including copper sheet to practice the process and a 4cm by 4cm piece of silver sheet to create a silver textured pendant during your session. If you would like to create additional designs, you are welcome to bring along your own additional flat silver sheet, it must be no thinner than 0.6mm. This is a great opportunity to stock pile some great patterned silver for us with future projects. On the day you will be provided with some patterns to etch, if you have a set pattern in mind, please send us the artwork in good time for your class. Designs must be black and white only and please note smaller patterns work better than larger ones. Please email it to us at hello@workshop925.com. Alternatively instruction on where to purchase P&P paper and how to print your own designs onto it will be sent out prior to your course date to those of you who wish to etch your own designs. You will be etching the majority of the day, however if you would like to create a finished design, we can accommodate this, you can do some etching in the morning and create a design in the afternoon. EXPERIENCE REQUIRED: None, all abilities are welcomed. This course is a great introduction to etching for those who have a vast experience in jewellery making but have not yet tried this technique as well as beginners looking to create beautiful textural pieces of jewellery. Our small classes mean we are able to provide each student with the support they require. CLASS SIZE: 6 WHAT IS INCLUDED? All tools and consumables are supplied Please bring refreshments as we are no longer able to provide them The cost of this course includes copper sheet to practice the technique and a 4cm by 4cm section of silver sheet. The price also includes a selection of patterns printed on P&P paper to use during your course. WHAT TO BRING: For safety reasons, during each class, you are required to wear appropriate footwear, we request that no open toed shoes are worn within Workshop 925. Long hair should also be tied back when working with the equipment. You may also wish to bring a notebook. We have handouts for many demonstrations, but there are always many tips and tricks given verbally by the tutor, which some might like to keep note of. Please bring any PPE, snacks and drinks to each session. We regret we can’t offer tea and coffee at the moment due to Coronavirus. PAYMENT OPTIONS: You can pay via our website or in our workshop in person using our card machine. If you prefer to pay directly, you can email us on hello@workshop925.com and we can invoice you manually to arrange a bank transfer. For classes over £80, instalment options are also available. Please email us on hello@workshop925.com to arrange. Gift Voucher – if you have a voucher to redeem, please email us before booking on hello@workshop925.com Please check your dates carefully before booking a class as we are unable to offer refunds. See our Terms & Conditions for full details.
Essential to Intermediate Adobe Illustrator Training
By ATL Autocad Training London
Whio is this Course for? Essential to Intermediate Adobe Illustrator Training Ideal for beginners, this course covers vector graphics, logos, icons, and illustrations. Learn typography, color theory, and compositions. Our certified tutors offer personalized guidance, and flexible scheduling options are available to accommodate your needs. Click here for more info: Website Duration: 6 hours Approach: 1-on-1 sessions and custom-tailored content. Schedule: Available Mon to Sat from 9 am to 7 pm, designed to fit your convenience. Course Title: Essential Adobe Illustrator Training Duration: 6 Hours Session 1: Introduction to Adobe Illustrator (1 hour) Overview of Illustrator interface and tools Understanding vector graphics and their advantages Creating and managing artboards Basic shape creation and editing techniques Session 2: Mastering Shapes and Paths (1 hour) Advanced shape manipulation: Pathfinder and Shape Builder tools Working with the Pen tool: curves, anchor points, and handles Creating complex shapes and compound paths Understanding the Appearance panel for object styling Session 3: Typography and Text Effects (1 hour) Text formatting: fonts, styles, and spacing Working with text on paths and shapes Applying text effects and blending modes Creating stylized typography and lettering Session 4: Image Tracing and Live Paint (1 hour) Image tracing techniques: converting raster to vector Live Paint feature for intuitive coloring of objects Creating detailed illustrations using traced images Incorporating images into your vector artwork Session 5: Advanced Illustration Techniques (1 hour) Gradient and pattern fills: customization and application Advanced brush techniques for artistic effects Using the Appearance panel for intricate object styling Incorporating 3D effects and perspective tools Session 6: Project-Based Learning and Q&A (1 hour) Guided hands-on project incorporating learned techniques Instructor-led review and feedback on projects Open Q&A session to address participant queries and challenges Upon completing this course, participants will have gained proficiency in essential and advanced Illustrator techniques, empowering them to create intricate vector graphics, logos, icons, and illustrations efficiently and creatively. Learning Outcomes: Upon completing the course, participants will: Master Illustrator Tools: Proficiency in essential Illustrator tools for vector graphic creation. Creative Expertise: Advanced skills in typography, image tracing, coloring, and intricate illustration techniques. Problem-Solving: Develop problem-solving abilities for complex design challenges. Job Opportunities: Graphic Designer: Create branding materials, logos, and marketing collateral. Illustrator Artist: Produce detailed digital artwork and illustrations for various media. UI/UX Designer: Design user interfaces for websites and mobile applications. Freelance Illustrator: Offer custom vector illustrations for clients and projects. Logo Design Specialist: Craft unique and memorable logos for businesses and brands. Skills Acquired: Participants in the Essential to Intermediate Adobe Illustrator Training will acquire fundamental to intermediate skills in vector graphic design, drawing, and illustration using Adobe Illustrator. Key skills include: Basic to Intermediate Vector Graphic Design Drawing and Illustration Techniques Precision Path Editing and Typography Skills Job Opportunities: Upon completion, individuals can pursue roles such as: Junior Graphic Designer Illustrator Assistant Layout Designer Marketing Material Creator This training lays the foundation for a career in graphic design, enabling participants to contribute effectively to design teams, advertising agencies, and creative projects. Featuring certified instructors with extensive professional expertise in the application. Attend in-person sessions at our center or join live online classes. The training is interactive and practical, blending theory with step-by-step demonstrations on Illustrator software. Delegates practice techniques on both Windows and Mac computers, ensuring universal compatibility. Upon completion, receive a comprehensive Illustrator training guide in your preferred format: printed or PDF. Earn an e-certificate as proof of completing the accredited course. Enjoy lifelong email support for any post-training queries. No prior Illustrator knowledge is needed. Our commitment includes delivering exceptional value, ensuring comprehensive learning, and accommodating both the 2023 version and recent releases of Illustrator.

SketchUp Pro Training Course For Kitchen Designers
By ATL Autocad Training London
Who is this course for? SketchUp Pro Training Course For Kitchen Designers. This course is designed for kitchen designers aiming to elevate their skills in SketchUp Pro. Learn creating stunning kitchen worktops, cabinets, and designs tailored to perfection. Perfect your skills and bring 3d kitchen to life. Click here for more info: Website Duration: 6 hours. Method: 1-on-1, available in-person or Live Online sessions. Monday to Saturday between 9 am and 7 pm Alternatively, contact us at 02077202581 to book over the phone. Course Outline: SketchUp Pro Training Course For Kitchen Designers (6 hours) Module 1: Exploring 3D Warehouse for Appliance Selection Navigating 3D Warehouse for Appliance Models Selecting and Importing Appliances for Your Kitchen Design Module 2: Cabinetry Layout Introduction to Cabinetry Layout Planning and Arranging Cabinets for Functional Kitchens Module 3: Innovative Approaches to Cabinet Design Creative Strategies for Unique Cabinet Designs Incorporating Special Features and Functions Module 4: Creating Countertops and Sink Arrangements Designing Functional Countertops Integrating Sinks and Faucets Effectively Module 5: Enhancing Kitchen Spaces with Backsplashes Utilizing Backsplashes for Aesthetic and Practical Purposes Designing Custom Backsplash Solutions Module 6: Designing Efficient Range Hoods Range Hood Design Principles Ensuring Proper Ventilation and Aesthetics Module 7: Crafting Upper Cabinet Solutions Maximizing Storage and Style with Upper Cabinets Incorporating Upper Cabinet Design Variations Module 8: Perfecting Crown Moulding Applications Enhancing Cabinet and Wall Transitions Achieving a Polished Look with Crown Moulding Module 9: Optimizing Kitchen Islands Designing Functional and Stylish Kitchen Islands Utilizing Islands for Storage and Dining Module 10: Elevating the Ambiance with Wall Design Details Enhancing Walls with Creative Design Elements Adding Character and Texture to Kitchen Spaces Module 11: Ensuring Precise Dimensions Mastering Dimensioning Techniques Achieving Accuracy in Your Kitchen Design Module 12: Mastering Shadows and Style Customization Controlling Shadows for Realistic Renderings Customizing Styles to Enhance Visualization Upon completing the SketchUp Pro Training Course for Kitchen Designers, you will: Master SketchUp for comprehensive kitchen design. Efficiently select appliances from 3D Warehouse. Plan innovative cabinet layouts. Design functional countertops and sinks. Enhance kitchens with stylish backsplashes. Create efficient range hoods. Maximize storage with upper cabinets. Perfect crown moulding applications. Optimize kitchen islands. Elevate ambiance with wall design details. Ensure precision in dimensions. Customize realistic renderings. Job Opportunities: Kitchen designers can pursue roles such as Kitchen Designer, Interior Designer, Cabinet Designer, CAD Specialist, 3D Modeler, Home Renovation Consultant, and more. Freelance opportunities are also available. Skills Acquired: Advanced Kitchen Modeling: Master the art of creating detailed kitchen worktops, cabinets, and layouts using SketchUp Pro. Texture Mapping and Material Application: Learn to apply realistic textures and materials to enhance kitchen designs. Lighting and Rendering Techniques: Explore lighting setups and rendering tools for lifelike visualizations. Collaborative Design: Enhance skills in collaborative design, enabling seamless communication with clients and colleagues. Job Opportunities: Kitchen Designer: Design custom kitchen spaces, work closely with clients, and bring their visions to life. Interior Designer: Specialize in kitchen interior design, working with a focus on functionality and aesthetics. Furniture Designer: Create bespoke kitchen furniture pieces and optimize space for practical use. Freelance Kitchen Design Consultant: Offer specialized kitchen design services on a freelance basis, catering to various clients and projects. Personalized Learning! Why Choose Us? Tailored One-on-One Training: Exclusive coaching from skilled architects and designers, in-person or live online, Monday to Saturday. Customized Tutorials: Enhance your skills with tailored video tutorials to take home. Comprehensive Learning: Receive digital resources for thorough understanding and revision. Free Ongoing Support: Enjoy continuous assistance via phone or email, ensuring your success beyond the course. Flexible Syllabus: Adapted to your needs for focused learning. Official Certificate: Validate your expertise with our prestigious certification. Why Us? Supported Individual Learning: Personalized guidance, homework assignments, and post-course assistance for mastery. Personal Attention: Experience one-on-one learning for focused and confident progress. Financial Flexibility: Explore payment options tailored to your budget. Expert Instructors: Learn from industry experts dedicated to your success.


Acrylgel Course
By Majestic Academy
Acrylgel is a fusion between builder gel and acrylic powder tailored to create durable and extremely natural looking nail enchantments. Acrylgel is a revolutionary product for nail design. It convinces with an easy and quick application and its very long durability. Because of the extremely high viscosity you can model all nails on one hand and cure them at once without getting any gel in the nail edges. Our Acrylgel is very easy to file. - Stable as acrylic, flexible as a gel. - Quick and easy application, max. saving of time.This course will take you through the application procedure, ‘French Pink and White’ techniques, sculpting with forms and maintenance procedure, including aftercare advice. THE REQUIREMENTS Salon attire must be worn during the course. Student must have clean nail without enhancements and long hair tied back. To ensure maximum practice, students will be required to work on each other throughout the day or on own hands. THE CONTENT Health, safety & hygiene Consultation techniques Contraindications Nail preparation Introduction to tip application Extend nail bed using sculpting techniques French Pink and White techniques Maintenance procedure Removal procedure Aftercare advice DURATION This is one day course which runs from 10am to 5pm PRICE INCLUDES Acrylgel training kit . Upon successful completion an course certificate will be awarded
One to One Stone Cutting Workshop: Cabochons and Rough Form Stones (Farnham Workshop) Weekends or Weekdays – Flexible Booking (4 hour session)
(21)By Workshop 925
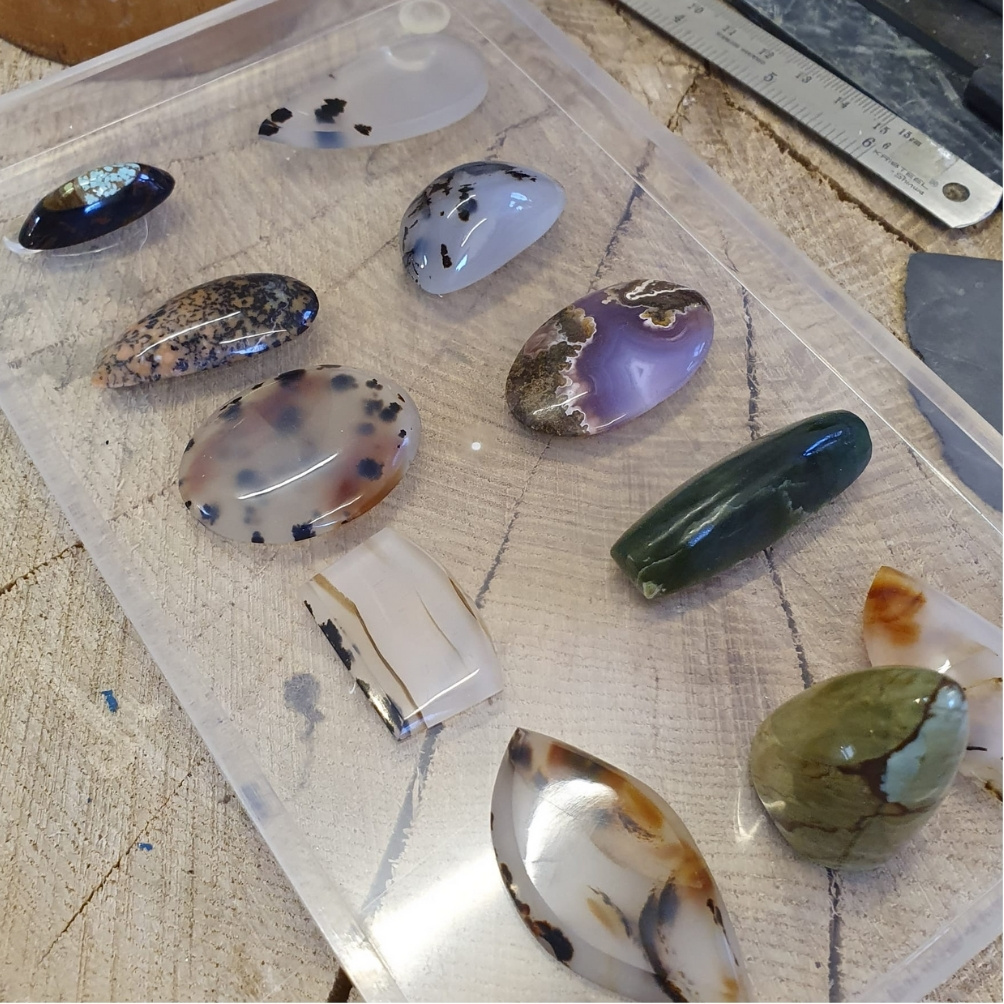
In this unique course with tutor Sarah Reece you will learn how to cut two shapes of stones: The first will be a free form shape with a flat edges as shown in the images. The second the focus will be how to create a traditional cabochon. This stone will be have a flat base with a rounded top. This will be cut from rough stone which you can each select from Sarahs beautiful collection. You can decide the shape and size and which part of the stone you wish to use. The class size is limited to just 1 student. So you do not breathe in harmful rock dust during the process, you will be cutting the stone while it is in water. With this in mind, please wear older clothes, and waterproof shoes – wellies are advised as it is not a clean or dry activity. Water sprays from the rotating wheels as you are working. We will provide you with a waterproof apron. This course is an excellent introduction to stone cutting. It allows you to step into the world of Lapidary where you can cut and create any shaped stone you desire, you won’t be beholden to the shop bought stone. This means your projects and settings can become completely unique as per your designs. You will be working with a Cab King 6″ and the Diamond Pacific Pixie Cabbing Machine. We have factored in a 30 minute break for lunch during our Saturday sessions. Full info below… When: Sarah is available at weekends and during the week. If you decide to book a stone cutting course, there is flexibility for your booking. We will contact you to find a suitable session. Length: The session will last 4 hours Where: THIS WORKSHOP COURSE IS BASED IN FARNHAM NOT OUR WOKING WORKSHOP Weydon Farm House Weydon Farm Lane GU9 8QJ There is parking on site. Tutor: Sarah Reece What does the session involve? In this unique course with tutor Sarah Reece you will learn how to cut two shapes of stones: The first will be a free form shape with flat edges (as shown in the images). The second the focus will be how to create a traditional cabochon. This stone will have a flat base with a rounded top. This will be cut from rough stone which you can select from Sarah’s beautiful collection. You can decide the shape and size and which part of the stone you wish to use. You will be cutting the stone while it is in water so you do not inhale harmful dusts. With this in mind, please wear older clothes, and waterproof shoes – wellies are advised as it is not a clean or dry activity. Water sprays from the rotating wheels as you are working. We will provide you with a waterproof apron. This course is an excellent introduction to stone cutting. It allows you to step into the world of Lapidary where you can cut and create any shaped stone you desire, you won’t be beholden to the shop bought stone. This means your projects and settings can become completely unique as per your designs. You will be working with a Cab King 6″ and the Diamond Pacific Pixie Cabbing Machine. The class size is limited to just 1 student. This Instagram post gives you a preview of what to expect from your session Experience required: None, all abilities are welcomed. We support you throughout the session and provide demonstrations to show you the techniques and steps needed to create your project. With one to one sessions, you will gain a large amount of support in this intensive introduction to stone cutting Class size: 1 What is included? All tools and consumables are supplied The stones you will carve are NOT INCLUDED in the price of the course – This is something you can choose on the day so you can select something you would like to work with. Sarah has priced up different varies in generous sizes ranging from £3-£20. If you would rather not buy stone to work with, no problem, Sarah has plenty of beautiful flint that you can use instead. What to bring: For safety reasons, during each class, you are required to wear appropriate footwear, we request that no open toed shoes are worn within the workshop. Wellies or older waterproof shoes advised. Long hair should also be tied back when working with the equipment. You may also wish to bring a notebook. There are always many tips and tricks given verbally by the tutor, which some might like to keep note of. Also pack your own snacks and drinks for the session if required.
Catheterisation Training
By Lead Academy
Do you wish to advance your professional development in healthcare by gaining the necessary skills and knowledge relevant to catheterisation? This comprehensive catheterisation training course is ideal for you! This course will help you learn about the entire process of catheterisation and the best practices for handling, inserting, and changing catheters securely. Whether you are a beginner or an experienced individual looking to advance your career in the healthcare sector, this course will set you up with the appropriate training required to excel in your role. This extensive catheter training online course covers the following credentials: Catheterisation process and methods Male and female catheterisation Various types of catheters Placement of the catheter after surgery Aseptic method Female and male urethral catheterisation Course Highlights Designed by healthcare professionals Accredited by the CPD Certification Recognised and Valuable Certification Self-Paced Online Theoretical Learning High-Quality E-Learning Study Materials Interactive practical training Remote Theoretical Learning Classroom-Based Catheterisation Training Course To ensure effective catheter training, our classroom-based learning is divided into two parts: Remote theoretical learning (online) We offer comprehensive theoretical instruction for the first portion of our catheterization training course, which you can finish at your own convenience. After successfully completing the courses and assessments, you can go on to the practical learning phase. Practical learning As part of the practical training, you will receive practical demonstrations and hands-on experience to justify your role. Who is this Catheterisation Training Course for? This catheterisation course is primarily aimed at: Health Visitors Healthcare professionals Nurses, midwives, pharmacists and doctors Freshers looking to begin their career in the healthcare sector Anyone looking to enhance their catheterisation skills Whether you are a fresher looking to kickstart your career in the field of healthcare and searching for catheterisation training for nurses or practising healthcare looking to enhance your catheterisation skills, this course will help you achieve your professional aspirations by all means. Aims and Learning Outcomes of this Catheterisation Training Course By the end of this catheterisation training course, you will: Grasp the entire process and methods of catheterisation Recognise the basic types of catheters Gain knowledge about the process of female and male urethral catheterisation Know where the post-procedure catheter should be placed Learn how to change and handle catheters properly Understand how to maintain catheter systems on a daily basis Know how to keep and maintain records Entry Requirements There are no academic entry requirements for this catheterisation training course, and it is open to students of all academic backgrounds. However, you are required to have a laptop/desktop/tablet or smartphone and a good internet connection. Assessment Method This Female and Male Catheterisation training course assesses learners through multiple-choice questions (MCQs). Upon successful completion of the modules, learners must answer MCQs to complete the assessment procedure. Through the MCQs, it is measured how much a learner could grasp from each section. In the assessment pass mark is 60%. Upon successful completion of the coursework and assessments, you will be directed to the practical learning part which will be conducted face-to-face. The practical training is taken during weekends to ensure maximum attendance. You will be required to attend the training from our London-based office which will be specified to you during enrolment. Upon successful demonstration of catheterisation, you will be awarded a certificate that is accepted by thousands of professional bodies and government regulators here in the UK and around the world. Course Curriculum 1. Introduction to Catheterisation 2. Anatomy and Physiology of Urinary System 3. Methods of Catheterisation 4. Size of Catheters 5. Reasons for Catheterisation 6. Causes and Types of Incontinence 7. Male Catheterisation Procedure 8. Female Catheterisation Procedure 9. Post Catheterisation Care 10. Removing an Indwelling Urethral Catheter 11. Risks Involved with an Indwelling Catheter 12. Infection Control and Prevention 13. Record Keeping 14. Conclusion Recognised Accreditation This course is accredited by continuing professional development (CPD). CPD UK is globally recognised by employers, professional organisations, and academic institutions, thus a certificate from CPD Certification Service creates value towards your professional goal and achievement. CPD certificates are accepted by thousands of professional bodies and government regulators here in the UK and around the world. Many organisations look for employees with CPD requirements, which means, that by doing this course, you would be a potential candidate in your respective field. Certificate of Achievement Competency Certificate and Certificate of Achievement from Lead Academy You will receive a competency certificate after successfully completing the Part 2 of the phlebotomy course, which serves as confirmation that you are qualified to function as a phlebotomist without the need for close supervision. Also, on successful completion of the phlebotomy course, you will be eligible to obtain a CPD accredited PDF and Hardcopy certificate of achievement as proof of your new skill. The certificate of achievement is an official credential that confirms that you successfully finished a course with Lead Academy.