- Professional Development
- Medicine & Nursing
- Arts & Crafts
- Health & Wellbeing
- Personal Development

3ds Max Night Training Courses
By ATL Autocad Training London
Course Title: 3ds Max Night Training Program. Join our 3ds Max Evening Course for after-work convenience and guidance in 3D modeling. Personalized attention, and build an impressive portfolio. 3ds Max Courses & Classes Online and in-person in London. Click here for more info: Website Training Duration: 10 hours Learning Approach: 1-on-1 sessions and Customized content. Course Schedule: Reserve a convenient hour from 9 am to 7 pm, Monday to Saturday, to suit your schedule. I. Introduction to 3ds Max Course Overview Familiarization with the User Interface Basic Navigation and Settings II. Creating 3D Objects Formation of Primitive Objects Crafting Complex Shapes using Editable Poly Application of Modifiers to Objects Implementing Materials and Textures III. Lighting Introducing Light Sources in a Scene Different Types of Lighting Adjustment of Light Properties Creating Shadows IV. Camera Establishing Cameras and Camera Views Fine-Tuning Camera Settings Camera Animation Techniques V. Animation Fundamentals Keyframe Animation Techniques Utilizing the Time Slider and Track View Animation of Object Transformations Animated Materials and Textures VI. Rendering Configuration of Render Settings Selection of Output Format Batch Rendering Procedures Post-Processing Effects VII. Project-Based Learning Application of Learned Techniques in a Final Project Creative Problem-Solving for Project Completion In-Depth Course Outline: Modeling Techniques Edit Poly Modeling Extrusion, Chamfer, Cut, and Slicing Techniques Symmetry Mirror Modeling Designing Furniture (Tables and Chairs) Basic House Model Design Creating Lines and Shapes Importing Plans from AutoCAD/Vectorworks Interior Space Design Doors, Windows, Railings, Trees, and Stairs Modifiers Compound Objects (Connect, Scatter, Pro Boolean, Loft, Terrain) Bend, Taper, Twist, Stretch, Skew, FFD, Wave, and Ripple Lattice and Lathe Techniques 3ds Max Basic Lighting Omni Light Spot Light Direct Light 3ds Max Camera Techniques Free Camera Target Camera Texturing and Rendering Diffuse and Bump Mapping Incorporating Environment and Background Images Rendering Images with Advanced Lighting in 3ds Max For a hands-on experience, access a free 30-day trial of 3ds Max, a robust 3D modeling and rendering software for design visualization, games, and animation, via Autodesk's official website. Download 3ds max. Autodesk Download a free 30 day trial of 3ds Max, 3D modelling and rendering software. Learning Outcomes after 3ds Max: Advanced 3D Skills: Master intricate 3D modeling, animation, and rendering techniques. Project Experience: Apply skills to real-world projects, building a professional portfolio. Problem-Solving: Develop critical thinking for complex design challenges. Potential Jobs: 3D Modeler: Create detailed 3D models for various industries. Character Animator: Animate lifelike characters for entertainment media. Architectural Visualizer: Produce realistic architectural renders. Interior Designer: Visualize and present interior designs. Game Environment Artist: Design immersive game environments. Product Visualization Specialist: Render detailed product visuals. Visual Effects Artist: Create stunning visual effects for film/TV. Freelance 3D Artist: Take on diverse projects as an independent professional. Details: Duration: 10 Hours of Comprehensive Training Focus: Advanced 3D Modeling, Animation, and Rendering Techniques Learning Format: Personalized One-on-One Sessions for Maximum Attention Availability: Flexible Scheduling, Monday to Saturday, 9 am to 7 pm Instructors: Certified Experts and Industry Professionals Materials: Certificate of Completion and Extensive Training Guides Interactive Learning: Live Feedback Sessions and Access to Recorded Classes Support: Lifetime Email and Phone Assistance for Continued Learning Special Benefits: Competitive Rates, Referral Discounts, and Assistance with Software Installation This intensive 3ds Max Masterclass provides advanced training in 3D design and animation, ensuring personalized attention, interactive learning, and lifelong support for your creative journey. Personalized Instruction: Skilled trainers provide tailored one-on-one coaching, meeting your unique learning requirements. Practical Learning: Participate in hands-on demonstrations, strengthening skills applicable in design, gaming, and film industries. Comprehensive Materials: Obtain a Certificate of Attendance and detailed guides for continuous reference. Interactive Engagement: Engage in live sessions with tutors, gaining valuable feedback and access to session recordings. Flexible Learning: Choose between online or in-person sessions, aligning with your schedule and preferences. Value and Support: Benefit from competitive rates, referral discounts, and lifelong assistance via email and phone. Seamless Start: Get help with software installation, ensuring a smooth and hassle-free learning experience.

SketchUp Pro Training Course For Kitchen Designers
By ATL Autocad Training London
Who is this course for? SketchUp Pro Training Course For Kitchen Designers. This course is designed for kitchen designers aiming to elevate their skills in SketchUp Pro. Learn creating stunning kitchen worktops, cabinets, and designs tailored to perfection. Perfect your skills and bring 3d kitchen to life. Click here for more info: Website Duration: 6 hours. Method: 1-on-1, available in-person or Live Online sessions. Monday to Saturday between 9 am and 7 pm Alternatively, contact us at 02077202581 to book over the phone. Course Outline: SketchUp Pro Training Course For Kitchen Designers (6 hours) Module 1: Exploring 3D Warehouse for Appliance Selection Navigating 3D Warehouse for Appliance Models Selecting and Importing Appliances for Your Kitchen Design Module 2: Cabinetry Layout Introduction to Cabinetry Layout Planning and Arranging Cabinets for Functional Kitchens Module 3: Innovative Approaches to Cabinet Design Creative Strategies for Unique Cabinet Designs Incorporating Special Features and Functions Module 4: Creating Countertops and Sink Arrangements Designing Functional Countertops Integrating Sinks and Faucets Effectively Module 5: Enhancing Kitchen Spaces with Backsplashes Utilizing Backsplashes for Aesthetic and Practical Purposes Designing Custom Backsplash Solutions Module 6: Designing Efficient Range Hoods Range Hood Design Principles Ensuring Proper Ventilation and Aesthetics Module 7: Crafting Upper Cabinet Solutions Maximizing Storage and Style with Upper Cabinets Incorporating Upper Cabinet Design Variations Module 8: Perfecting Crown Moulding Applications Enhancing Cabinet and Wall Transitions Achieving a Polished Look with Crown Moulding Module 9: Optimizing Kitchen Islands Designing Functional and Stylish Kitchen Islands Utilizing Islands for Storage and Dining Module 10: Elevating the Ambiance with Wall Design Details Enhancing Walls with Creative Design Elements Adding Character and Texture to Kitchen Spaces Module 11: Ensuring Precise Dimensions Mastering Dimensioning Techniques Achieving Accuracy in Your Kitchen Design Module 12: Mastering Shadows and Style Customization Controlling Shadows for Realistic Renderings Customizing Styles to Enhance Visualization Upon completing the SketchUp Pro Training Course for Kitchen Designers, you will: Master SketchUp for comprehensive kitchen design. Efficiently select appliances from 3D Warehouse. Plan innovative cabinet layouts. Design functional countertops and sinks. Enhance kitchens with stylish backsplashes. Create efficient range hoods. Maximize storage with upper cabinets. Perfect crown moulding applications. Optimize kitchen islands. Elevate ambiance with wall design details. Ensure precision in dimensions. Customize realistic renderings. Job Opportunities: Kitchen designers can pursue roles such as Kitchen Designer, Interior Designer, Cabinet Designer, CAD Specialist, 3D Modeler, Home Renovation Consultant, and more. Freelance opportunities are also available. Skills Acquired: Advanced Kitchen Modeling: Master the art of creating detailed kitchen worktops, cabinets, and layouts using SketchUp Pro. Texture Mapping and Material Application: Learn to apply realistic textures and materials to enhance kitchen designs. Lighting and Rendering Techniques: Explore lighting setups and rendering tools for lifelike visualizations. Collaborative Design: Enhance skills in collaborative design, enabling seamless communication with clients and colleagues. Job Opportunities: Kitchen Designer: Design custom kitchen spaces, work closely with clients, and bring their visions to life. Interior Designer: Specialize in kitchen interior design, working with a focus on functionality and aesthetics. Furniture Designer: Create bespoke kitchen furniture pieces and optimize space for practical use. Freelance Kitchen Design Consultant: Offer specialized kitchen design services on a freelance basis, catering to various clients and projects. Personalized Learning! Why Choose Us? Tailored One-on-One Training: Exclusive coaching from skilled architects and designers, in-person or live online, Monday to Saturday. Customized Tutorials: Enhance your skills with tailored video tutorials to take home. Comprehensive Learning: Receive digital resources for thorough understanding and revision. Free Ongoing Support: Enjoy continuous assistance via phone or email, ensuring your success beyond the course. Flexible Syllabus: Adapted to your needs for focused learning. Official Certificate: Validate your expertise with our prestigious certification. Why Us? Supported Individual Learning: Personalized guidance, homework assignments, and post-course assistance for mastery. Personal Attention: Experience one-on-one learning for focused and confident progress. Financial Flexibility: Explore payment options tailored to your budget. Expert Instructors: Learn from industry experts dedicated to your success.

Process Mapping and Standard Operating Procedure (SOP) Writing
By Research Quality Association
Course Information This course aims to empower you with the expertise to proficiently navigate process mapping and master the art of crafting Standard Operating Procedures (SOPs) within regulated environments. Whether you're engaged in activities that demand process improvement, continual enhancement, or SOP creation, this course offers invaluable insights tailored to your needs. It caters to individuals tasked with managing, documenting, and implementing processes and SOPs, irrespective of prior experience or skills. Our curriculum does not focus on specific software or approaches, focusing instead on fundamental principles and adaptable concepts applicable across diverse organisational landscapes. Benefits include: Hands-on experience in mapping processes An understanding of how process maps can be used to define, communicate and continually improve complex processes An understanding of best practice for SOPs using of process maps/process flow diagrams and process mind maps to complement text An insight into the preparation of concise and user friendly SOPs. This course is structured to encourage delegates to: Discuss and develop ideas Develop a practical approach for creating process maps and writing SOPs Understand how to use process maps in SOPs effectively Discuss how process mapping for preparing SOPs can be applied to process improvement for SOPs. Is this course for you? The course is designed for all those with responsibility for managing, documenting and implementing processes and SOPs. It assumes no prior experience or skills. The course does not recommend any specific software or approach, but explores the principles and ideas that can be applied in any organisation. What will you learn? Hands-on experience in mapping processes An understanding of how process maps can be used to define, communicate and continually improve complex processes An understanding of best practice for SOPs using of process maps/process flow diagrams and process mind maps to complement text An insight into the preparation of concise and user friendly SOPs. By the end of the course you will be able to: Create process maps and write clearer more concise SOPs Understand how to use process maps in SOPs effectively Understand how process mapping can be applied to process improvement and better SOPs. Tutors Tutors will be comprised of (click the photos for biographies): Laura Brown Director, Laura Brown Training and Development David Butler VP of Quality, Resolian Programme Please note timings may be subject to alteration. Day 1 09:00 Welcome, Introductions and Course Objectives Why Companies manage by process. 10:00 Exercise 1 - First Steps Mechanisms for process mapping, levels at which it can be applied, and the roles and responsibilities of process owners. 10:30 Exercise 1 - Feedback 10:45 Break 11:00 Mapping Processes The stages involved in mapping processes including how to construct a SIPOC chart. 11:45 Exercise 2 - Mapping A Process A first opportunity to practice your new process mapping skills. 12:30 Exercise 2 - Feedback 13:00 Lunch 14:00 Exercise 3 - Discussion of Options for Format, Structure and Layout What Makes A Good SOP? Discussion of options for format, structure, level of detail of SOPs and the use of process maps for SOP writing. A case study example of a good SOP which uses a flow chart/process map. 14:45 Exercise 3 - Feedback 15:00 Break 15:15 A Case Study example of a good SOP that uses a flow chart / process map 15:30 Exercise 4 Discussion of the content of an SOP using a Process Map 15:35 Exercise 4 - Feedback 15:45 Key Writing Considerations 16:15 Exercise 5 16:45 Exercise 5 - Feedback 17:00 Close of Day Day 2 09:00 Review of Day 1 09:15 Using Metrics Selecting and using metrics to monitor and improve processes. 10:00 Exercise 6 - Practice in Process Mapping Creating Process Maps from multi-source information. 11:00 Break 11:15 Exercise 6 - Feedback 11:45 Common Pitfalls Common problems and tips for good Process Mapping. 12:15 Demonstration of Process Mapping on a PC 12:45 Lunch 13:30 Exercise 7 - Mind Mapping 14:30 Exercise 7 - Feedback 15:00 Break 15:15 Exercise 8 - Using Process Maps to Write an SOP Applying your process mapping skills as part of writing an SOP 15:30 Exercise 8 - Feedback 15:45 Course Review and Follow-up 16:00 Close of Course Extra Information Face-to-face course Course Material Course material will be available in PDF format for delegates attending this course. The advantages of this include: Ability for delegates to keep material on a mobile device Ability to review material at any time pre and post course Environmental benefits – less paper being used per course. The material will be emailed in advance of the course and RQA will not be providing any printed copies of the course notes during the training itself. Delegates wishing to have a hard copy of the notes should print these in advance to bring with them. Alternatively delegates are welcome to bring along their own portable devices to view the material during the training sessions. Remote course Course Material This course will be run completely online. You will receive an email with a link to our online system, which will house your licensed course materials and access to the remote event. Please note this course will run in UK timezone. The advantages of this include: Ability for delegates to keep material on a mobile device Ability to review material at any time pre and post course Environmental benefits – less paper being used per course Access to an online course group to enhance networking. You will need a stable internet connection, a microphone and a webcam. Development Level Learn

CHRISTMAS ARTISAN WREATH MAKING WORKSHOPS - Eco-friendly, creative and Fun!
(2)By Jenni Wren Creative - Floristry Arts & Crafts
Christmas Wreath Making Workshops in Didcot,, Faringdon, Henley on Thames Oxfordshire and surrounding areas. Gorgeous handcrafted eco-friendly wreaths created at these classes.

Revit Courses Personalize Your Learning Schedule with On-Demand Options
By Real Animation Works
Personalized Revit Training: One-to-One Sessions with Pay-as-You-Go Flexibility

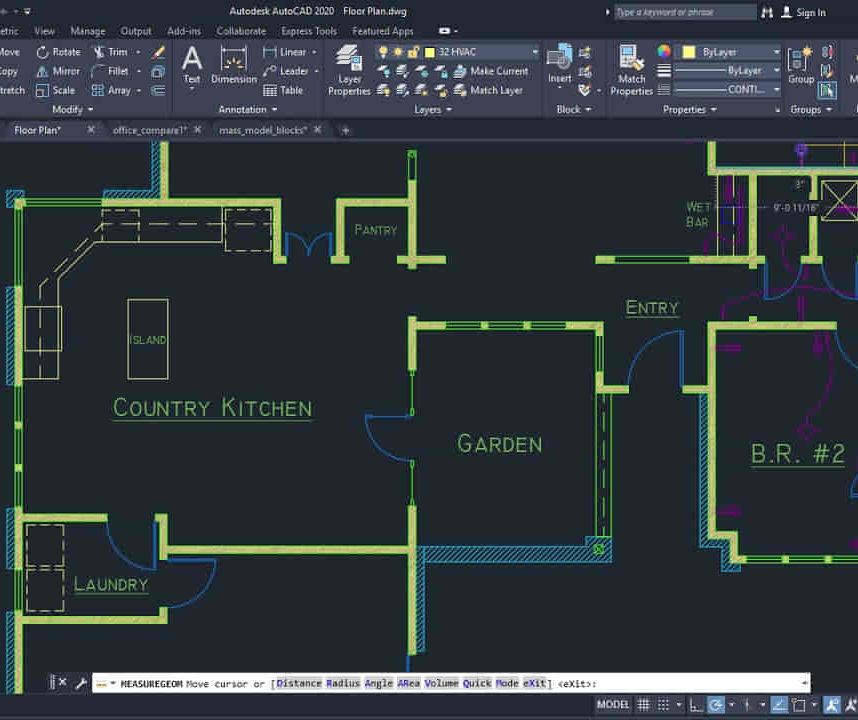
Bespoke AutoCAD Mac Basic-Intermediate Course
By ATL Autocad Training London
Why Learn Bespoke AutoCAD Mac Basic-Intermediate Course? Learn AutoCAD using your projects and learn how to use powerful tools and techniques for drawing, dimensioning, and printing 2D drawings with our Intermediate AutoCAD course. Check our Website How long is the training? 10 hours, Choose and split 10 hrs Mon to Sat 9 am to 7 pm. Book online or call 02077202581 or 07970325184. Method? 1-on-1, available in both in-person and Live Online. Course Topics Include: Building Fundamental Shapes Working with Lines, Arcs, and Polylines Utilizing Grip Tools Precision Object Alignment Data Management and Backups Exploring File Formats Ensuring Disaster Recovery Mastering Object Creation Handling Measurement Units Dynamic Input Techniques Inquiring Commands and Measurement Tools Effective Object Viewing Navigating Zoom and Pan Object Manipulation Strategies Object Selection Methods Swift Object Management Object Transformation Techniques Scaling and Altering Objects Trim, Extend, and Offset Functions Creating Geometric Variations Object Joining and Editing Corner Filleting and Chamfering Stretching Objects Organizing Your Drawings Layer Management Customizing Object Properties Applying Linetypes Layout Design and Setup Efficient Page Configurations Scaling Drawing Views Adding Annotations Multiline and Single-Line Text Creation Text Styling and Editing Dimensioning Concepts Customizing Dimension Styles Dimension Editing Implementing Multileaders Object Hatching Hatching Editing Reusable Content Management Blocks and Symbols Tool Palette Usage Working with Groups Model Space and Paper Space Understanding Layout Creation and Viewports Viewport Scaling Plotting and PDF Output Managing Multiple Sheet Drawings Utilizing Plotstyles Crafting Custom Drawing Templates Download AutoCAD Mac https://www.autodesk.co.uk After completing the AutoCAD for Mac course, learners can expect the following learning outcomes: Proficiency in AutoCAD: Participants will acquire the skills and knowledge needed to confidently use AutoCAD for Mac, including creating and editing drawings, managing objects, and applying precision techniques. Effective Design Skills: They will gain the ability to produce accurate 2D drawings, making them valuable assets in design-related professions. Jobs that individuals can pursue after completing this course include: Draftsperson: Working in architectural, engineering, or construction firms to create technical drawings and plans. CAD Technician: Assisting in the development of designs for various projects, such as product design or urban planning. Interior Designer: Using AutoCAD for space planning and layout design in the interior design industry. Architectural Designer: Collaborating on architectural projects, including creating floor plans and elevations. Mechanical Designer: Participating in the design and development of mechanical components and systems. Civil Engineering Technician: Supporting civil engineers in designing infrastructure projects, such as roads and bridges. Electrical or Electronics Designer: Assisting in the creation of electrical schematics and electronic circuit diagrams. Landscape Designer: Planning and visualizing outdoor spaces, gardens, and landscapes. Completing this AutoCAD course opens doors to various industries where precise and detailed 2D drawing skills are highly valued. The AutoCAD Mac Bespoke 1 on 1 Basics to Intermediate Level Training Course provides participants with a comprehensive skill set, enabling them to attain proficiency in using AutoCAD Mac. This course covers a wide range of functionalities and caters to individuals at all skill levels, whether they are beginners or experienced users. Participants will begin by learning fundamental features such as drawing, editing, annotations, and dimensioning. As they progress, they will delve into more advanced topics like object manipulation, customizing workspaces, and streamlining workflows. Key Benefits of the Course: Mastery of Mac-AutoCAD: Acquire expertise in both essential and advanced techniques for creating precise 2D drawings. Enhanced Productivity: Increase efficiency by implementing time-saving tips and optimizing your work processes. Versatile Design Abilities: Develop the skills to undertake diverse projects in fields such as architecture, engineering, and more. Industry-Relevant Competencies: Elevate your career prospects across various industries by gaining in-demand AutoCAD skills. Access to Recorded Lessons: Review and reinforce your learning at your convenience with access to recorded lesson sessions. Ongoing Email Support: Receive continuous assistance and guidance via email even after completing the course. Enroll today to benefit from interactive learning experiences guided by experienced instructors. Choose between flexible in-person or online sessions, gain access to lesson recordings, and enjoy a lifetime of email support. Tailored Guidance: Get personalized coaching and instruction tailored to your unique learning needs and objectives. Convenient Scheduling: Choose from flexible training slots available Monday to Saturday from 9 am to 7 pm, accommodating your busy schedule. Versatile Learning Options: Select between in-person training at our location, conveniently situated just 5 minutes away from Oval Tube Station, or participate in live online sessions from anywhere. Engaging Interactions: Participate in interactive sessions designed for questions, discussions, and problem-solving, creating an immersive learning experience. Effective Progression: Accelerate your learning with focused guidance, allowing you to advance at your own pace while mastering the material. Tailored Curriculum: Customize the course content to align with your prior knowledge and specific areas of interest, ensuring a relevant and engaging learning experience. Real-Time Guidance: Receive immediate feedback from the instructor, enhancing your comprehension and skill development. Comprehensive Support: Enjoy ongoing assistance and clarification opportunities through email or additional sessions beyond the course for an in-depth learning experience.

AutoCAD 2D Introduction to Intermediate Course
By ATL Autocad Training London
Why Learn AutoCAD 2D Introduction to Intermediate Course? Click here for more info: Website Whether you're starting a career, enhancing skills, or exploring creativity, this course is tailored for you. Learn on Windows or Mac, transform into a confident AutoCAD user. Transition to our Intermediate to Advanced Course post-completion. Duration: 10 hrs. Personalized 1-on-1 training. Perfect for beginners, this course offers flexible scheduling (Mon-Sat, 9 am-7 pm) and covers 2D plan and elevation creation in AutoCAD. AutoCAD 2D Course Outline Workspace Exploring the working environment Managing files Displaying objects Constructing fundamental drawings Inputting data Constructing basic objects Utilizing object snaps Utilizing Polar Tracking and PolarSnap Implementing object snap tracking Handling units Manipulating objects Selecting objects in the drawing Adjusting an object's position Generating new objects based on existing ones Modifying an object's orientation Creating mirrored versions of existing objects Designing object patterns Altering an object's dimensions Organizing and querying drawings Utilizing layers Modifying object attributes Matching object attributes Utilizing the properties palette Applying linetypes Using inquiry commands Modifying objects Trimming and extending objects to specified boundaries Generating parallel and offset geometries Merging objects Dividing an object into two separate entities Applying rounded corners to objects Producing angled corners between objects Modifying an object's shape Layouts and viewports Harnessing layouts Creating layout configurations Modifying layouts and employing page setups Working with viewports Creating layout viewports Managing layout viewports Controlling object visibility within layout viewports Annotating a drawing Generating multiline text Creating single-line text Implementing text styles Editing text Dimensioning Creating dimensions Utilizing dimension styles Adjusting dimensions Implementing multileaders Hatching objects Hatching elements Editing hatch patterns Managing reusable content Working with blocks Exploring DesignCenter Utilizing tool palettes Designing additional drawing elements Managing polylines Generating splines Crafting ellipses Working with tables Producing plotted drawings Employing page setups Utilizing plotter configuration files Creating and applying plot styles Plotting drawings Plot style tables Publishing drawings Generating drawing templates Leveraging drawing templates Download AutoCAD AutoCAD Trial https://www.autodesk.co.uk After completing the AutoCAD 2D Introduction to Intermediate Course, you will: Master Fundamentals: Understand AutoCAD basics, including navigation and terminology. Create Precise Drawings: Develop the skills to create accurate 2D drawings like plans and elevations. Manipulate Objects: Learn object selection, modification, and pattern creation. Dimension Proficiency: Create and edit dimensions and use text styles effectively. Layer Control: Organize drawings with layer management. Annotation Skills: Handle text and annotations with ease. Layouts and Viewports: Work with layouts and viewports for presentation. Plotting Expertise: Plot and publish drawings confidently. Customization Options: Explore advanced features for efficiency. Intermediate-Level Competency: Transition from beginner to an intermediate level of AutoCAD proficiency. This course equips you with essential skills for various industries, including architecture and engineering. This one-on-one CAD course is perfect for students who are either entirely new to the software or possess limited self-taught knowledge. Regardless of your starting point, our goal is to get you drawing plans within the very first hour of your class. We'll begin by building a strong foundation in AutoCAD, ensuring that you understand its core principles before delving into more advanced topics. If you have specific preferences, we can customize your AutoCAD learning experience to align with your goals. On the initial day of the course, we'll cover fundamental aspects such as user interface and terminology. Subsequently, you'll engage in a diverse range of lessons designed to deepen your understanding of AutoCAD and its creative processes. Topics covered will include introductory drawing techniques, editing functions, drawing aids, working with layers, managing text, and handling dimensions. Throughout the course, you'll practice through various drawing exercises and explore the intricacies of plotting. By the course's conclusion, you'll possess the skills needed to create your own simple drawings, suitable for applications in architectural, interior, engineering, events, furniture, or product design. Included in the course price are the following: Lifetime Email Support: Enjoy unlimited access to our support via email throughout your learning journey. Expert Instruction: Benefit from expert teaching provided by practicing architects, designers, and software professionals. Hands-On Learning: Engage in practical, hands-on lessons that can be customized to match your project requirements. Comprehensive Resources: Access video recordings and a digital reference PDF book for revision and continuous development. Certification: Receive a certificate of completion from us to enhance your CV and LinkedIn profile. Career Guidance: Gain valuable insights into pursuing design roles or establishing a creative business. Our experienced tutors will help you acquire the technical skills needed to make your CV and portfolio stand out. Our instructors, who are accomplished interior designers, animators, architects, and software experts, will not only impart technical expertise but also provide guidance on achieving success in the design industry or entrepreneurial endeavors.
Vectorworks Basics to Essentials Training
By London Design Training Courses
Why Learn Vectorworks Basics to Essentials Training Course? Our Vectorworks training is meticulously crafted to educate and inspire designers of all levels. Whether you're a beginner or an experienced designer, our courses will equip you with new skills, refine your workflows, and teach Plans, sections and elevations. Course Link Duration: 10 hrs. Method: 1-on-1, Personalized attention. Schedule: Tailor your own schedule by pre-booking hours of your choice, available from Mon to Sat between 9 am and 7 pm. Vectorworks Basics to Essentials Training Course Discover and Enhance Your Design Skills Our Vectorworks training is meticulously crafted to educate and inspire designers of all levels. Whether you're a beginner or an experienced designer, our courses will equip you with new skills, refine your workflows, and unlock the full potential of your Vectorworks software. Online Training Options Customized Online Sessions: Tailored training sessions for your specific needs and expertise level. Virtual Classroom: Join interactive virtual classes from the comfort of your office. Getting Started Guides: Comprehensive guides to help you navigate the fundamentals of Vectorworks. In-Person Training Opportunities Customized On-Site Sessions: Hands-on training delivered directly to your office or regional event. One to One: Engage in interactive learning at our training locations. Get Vectorworks https://www.vectorworks.net ⺠downloads ⺠ServicePack Vectorworks, Inc. 2D 3D CAD BIM software for Mac or Windows allows designers to transform the world. Project sharing makes it easy. Download or try today. Module 1: Grasping CAD and Vectorworks Understanding the Role of CAD in Design Getting Acquainted with Vectorworks Software Module 2: Configuring Your Workspace Customizing Your Workspace Essential Options and Preferences Module 3: Mastering Foundational Drawing Skills Techniques for Drawing Object Selection Methods Module 4: Advanced Object Manipulation Merging Shapes Reflecting Objects Rotating Objects Grouping Elements Module 5: Precision Drawing and Scaling Techniques Working with Scale Setting Preferences for Accuracy Creating and Saving Templates Module 6: Achieving Accurate Object Placement Ensuring Drawing Precision Precise Object Movement Module 7: Advanced Editing Methods Utilizing Fillet Tool Applying Offset Function Module 8: Understanding Object Attributes and Groups Basic Attribute Management Editing Object Groups Module 9: Object Duplication Techniques Linear Duplicates Rectangular Duplicates Circular Duplicates Module 10: Crafting Room Plans Designing Walls Incorporating Windows and Doors Module 11: Development of Room Plans Methods for Room Plan Drawing Module 12: Exploring Additional Attributes Hatch Patterns Gradients Image Fills Module 13: Creating Elevation Drawings Elevation Drawing Techniques Effective Approaches Module 14: Importing Images for Graphic Use Graphic Illustration Integrating Images Module 15: Symbols and Resource Handling Symbol Creation Introduction to Resource Browser Module 16: Organizing Drawings Using Design Layers Optimizing Design Layer Utilization Module 17: Labeling Drawings and Title Blocks Drawing Labels Title Block Text Placement Module 18: Plotting and Printing Methods User Interface Navigation and Terminology Printing Approaches Module 19: Generating Drawing Sheets A1, A2, and A3 Sheet Formats Module 20: Utilizing Viewports Effectively Managing Multiple Views Module 21: Professional Model Presentation Techniques Paper Space Presentation Conversion to PDF Formats Module 22: File and Project Management Module 23: Object Display and Terminology Module 24: Objects and Data Management Module 25: Precise Object Placement Object Snapping Quick Selection Module 26: Dividing and Measuring Objects Module 27: Dimensioning and Annotations Module 28: Working with Text Elements Module 29: Customizing Tool Palettes Module 30: Organizing Tool Palettes Module 31: Efficient Tool Palette Usage Module 32: Standard Views and Drawing Techniques Module 33: Drawing Curved Shapes Arcs, Donuts, and Ellipses Drawing Module 34: Real-World Units and Measurements Module 35: Object Manipulation Adjusting Object Angles Module 36: File Handling and Management Saving, Exiting, and Opening Projects Module 37: Creating Mirrored Images Module 38: Introduction to 3D Modeling Creating Extrusions Basic 3D Concepts Understanding For a free 30-day trial of Vectorworks, request an evaluation serial number at the provided link. https://www.vectorworks.net/trial Learning Outcomes of the Vectorworks Basics to Essentials Training Course: Proficiency in Vectorworks software, mastering its basic and essential features. Enhanced design skills and efficient workflows for architectural, landscape, and entertainment projects. Customized training based on individual needs and expertise levels. Flexibility with online and on-site options for convenient learning. Access to Vectorworks University with a wealth of resources for continuous learning. Interactive virtual classrooms and immersive hands-on training for practical experience.
ESOL: Conversational & Speaking English (modular), In Person Tuition, In Person, London, Lambeth, Wandsworth, Merton, Southwark, Kensington & Chelsea
(8)By GLA Tutors Home or Online
This course is designed to enhance the speaking and conversational skills of adult learners in English. Through a combination of interactive activities, discussions, and real-life scenarios, participants will develop the confidence and fluency needed to engage in various social and professional situations. Emphasis will be placed on improving pronunciation, expanding vocabulary, and refining grammar structures to communicate effectively in English. Course Duration: 10 weeks (20 sessions) Course Objectives: By the end of this course, participants will: 1. Improve their overall speaking fluency and accuracy in English. 2. Enhance their listening skills to understand and respond appropriately in conversations. 3. Expand their vocabulary and idiomatic expressions for effective communication. 4. Develop confidence in speaking English in social and professional settings. 5. Gain a deeper understanding of cultural nuances and non-verbal communication in English-speaking countries. Course Outline: Week 1: Introduction to Conversational English - Icebreaker activities to get to know each other - Assessing participants' current speaking level - Setting personal goals for the course Week 2: Pronunciation and Intonation - Identifying common pronunciation challenges - Practicing correct stress and intonation patterns - Role-playing exercises for clear communication Week 3: Everyday Conversations - Engaging in small talk and greetings - Discussing personal interests and hobbies - Describing daily routines and activities Week 4: Travel and Tourism - Asking for directions and recommendations - Role-playing scenarios at airports, hotels, and tourist attractions - Vocabulary related to travel and cultural experiences Week 5: Socialising and Networking - Discussing personal and professional backgrounds - Participating in group discussions and debates - Practicing active listening and turn-taking in conversations Week 6: Business Communication - Presenting ideas and opinions in a professional setting - Negotiating and persuading effectively - Writing and delivering effective elevator pitches Week 7: Job Interviews and Resume Building - Preparing for job interviews in English - Practicing common interview questions and answers - Crafting a compelling resume and cover letter Week 8: Public Speaking and Presentation Skills - Overcoming public speaking anxiety - Structuring and delivering engaging presentations - Using visual aids and body language effectively Week 9: Cultural Awareness and Non-verbal Communication - Understanding cultural differences in communication - Interpreting body language and gestures - Role-playing cross-cultural scenarios Week 10: Real-life Simulations - Applying all learned skills in real-life scenarios - Group discussions and feedback sessions - Reviewing progress and setting future language goals Note: This syllabus is a guideline and can be customised based on the specific needs and preferences of the participants. You can opt in and out of different modules.