- Professional Development
- Medicine & Nursing
- Arts & Crafts
- Health & Wellbeing
- Personal Development
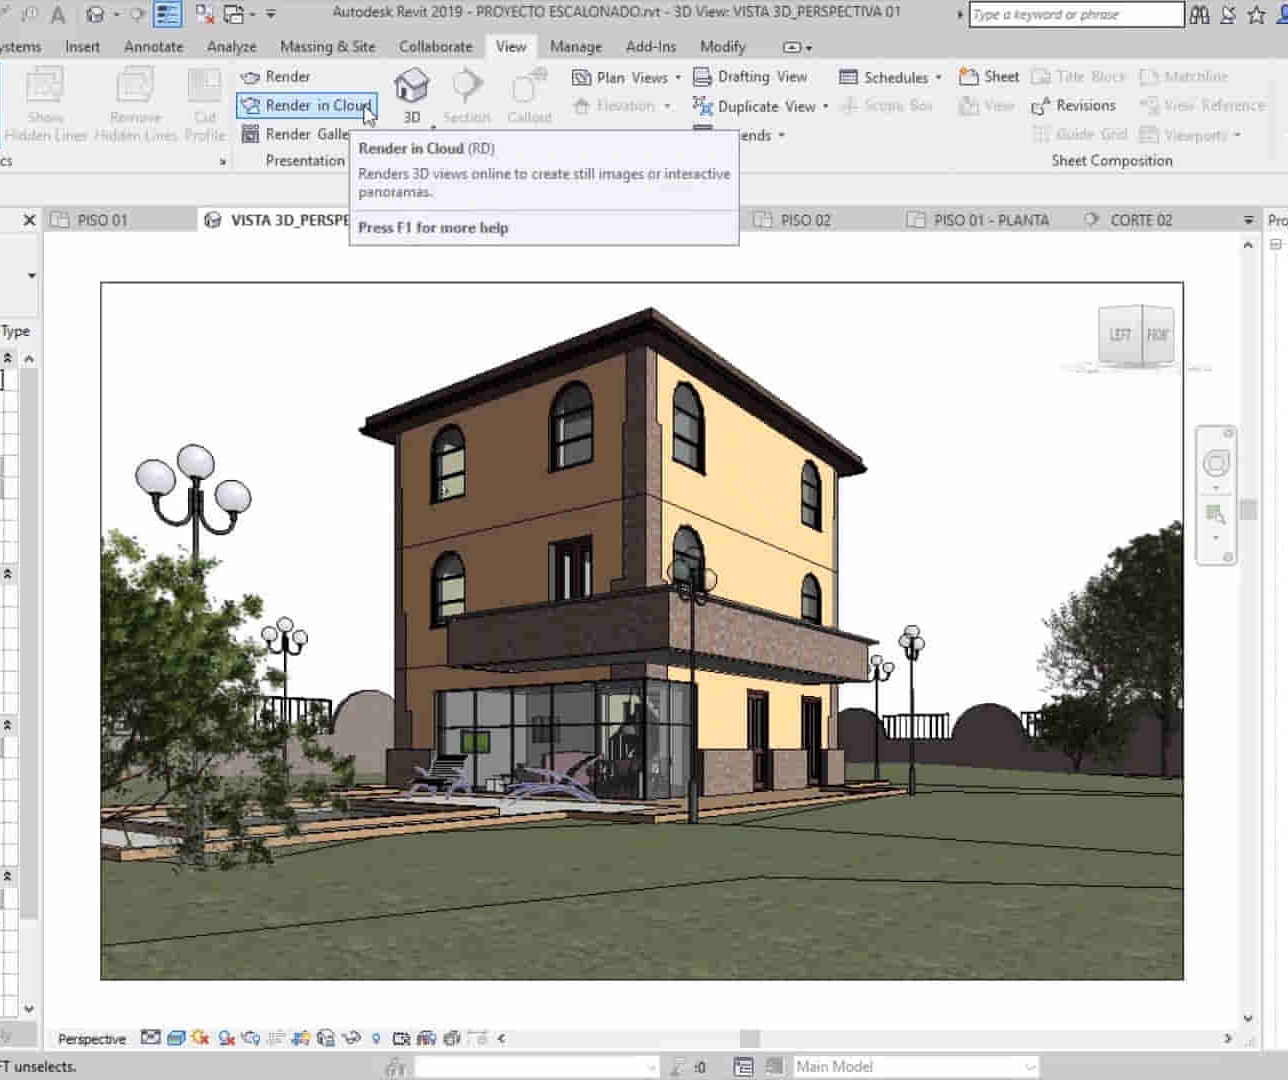
Revit Basic to Advanced Training Course
By ATL Autocad Training London
Why Book Revit Basic to Advanced Training Course? Learn BIM and Revit for engineers and architects, supporting 2-D and 3-D design for large-scale projects and combing with AutoCAD. Check our Website How to Book? 1-on-1 training tailored to your schedule. Book your sessions from Monday to Saturday between 9 am and 7 pm or call 02077202581 to book over the phone. Training Details: Duration: 16 hours Flexible scheduling, split across multiple days Method: 1-on-1 (In-person or Live Online) and Personalized attention Course Overview: I. Revit Fundamentals (1 hour) Understanding Revit's Purpose and Applications Navigating the Revit Interface and Essential Tools Mastering Navigation and Viewport Controls Creating and Managing Projects II. Project Setup (1 hour) Initiating a New Project Configuring Project Levels, Grids, and Site Information Defining Project Units for Precision III. Basic Modeling Techniques (2 hours) Building Walls, Doors, and Windows Designing Floors, Ceilings, Roofs, Stairs, and Railings IV. Advanced Modeling Skills (4 hours) Crafting Custom Parametric Families Utilizing Conceptual Modeling Tools Designing Complex Forms and Shapes Enhancing Models with Lighting and Materials Achieving Realism through 3D Rendering V. Views, Sheets, and Annotations (2 hours) Managing Views and Sheets Effectively Incorporating Schedules and Tags Crafting Detail Annotations for Construction Documents VI. Phasing, Worksharing, and Collaboration (2 hours) Understanding Phasing and Design Options Mastering Work Sharing and Collaboration Techniques VII. Project Collaboration and Management (1 hour) Establishing Work Sharing Environments Monitoring Worksets and User Activities Synchronizing Worksets for Seamless Collaboration VIII. Advanced Documentation Skills (2 hours) Creating Advanced Schedules and Legends Developing Construction Documents with Sheets and Title Blocks Customizing Schedules and Keynotes for Precision IX. Course Conclusion and Next Steps (1 hour) Reviewing Course Highlights Exploring Further Learning Resources and Tips Interactive Q&A Session and Feedback Opportunities Download Revit Master Revit Proficiency: Acquire advanced skills in Revit for 3D modeling, parametric design, and efficient project management. Craft Complex Architectural Designs: Create intricate building components, custom families, and detailed construction documents. Seamless Collaboration: Expertise in project collaboration, phasing, and work sharing, ensuring smooth teamwork and synchronization. Enhanced Visualization: Learn advanced rendering techniques for realistic 3D visualizations of architectural concepts. Customize Workflows: Adapt Revit tools, optimize workflows, and enhance efficiency in project execution. Career Opportunities: Architectural Designer: Create architectural plans, 3D models, and construction documents. BIM Specialist: Develop detailed digital models in collaboration with architects and engineers. Construction Documenter: Prepare comprehensive construction documents, including plans and schedules. Project Manager: Oversee projects, ensuring timely completion and adherence to design specifications. Revit Specialist/Trainer: Provide Revit training and support services to individuals, firms, or educational institutions. Elevate Your Revit Skills with Our Advanced Training! Our Revit Basic to Advanced Training Course is tailored to enhance your expertise in Autodesk Revit. Delivered through in-person or live online sessions, this program covers advanced modeling, parametric families, collaboration tools, and project phasing. Course Benefits: Master Advanced Skills: Learn intricate 3D modeling, design complex building components, and implement advanced BIM workflows. Expert Instruction: Industry professionals guide you through advanced concepts via engaging demonstrations and hands-on exercises. Flexible Learning: Choose in-person or live online sessions with interactive instruction and personalized guidance. Lesson Recordings: Access class recordings for convenient review and practice, reinforcing your learning. Lifetime Support: Benefit from lifetime email support for ongoing guidance from our experienced instructors. Enhance your Revit proficiency, streamline design processes, and boost project efficiency. Whether you're an architect, engineer, or design professional, this course unlocks advanced Revit skills. Join our training for comprehensive learning and expert support! Individualized Training: Experience personalized attention and tailored guidance. Flexible Learning Hours: Select your preferred schedule for training sessions. Ongoing Support: Access complimentary online assistance even after course completion. Comprehensive Learning Materials: Receive detailed PDF resources for effective learning. Certificate of Attendance: Earn a certificate acknowledging your course completion. Affordable Pricing: Enjoy budget-friendly training rates. Software Setup Help: Get assistance with software configuration on your device. Referral Benefits: Receive discounts on future courses by referring a friend. Group Discounts: Avail special rates for group training sessions. Extended Availability: Access training sessions every day with extended operating hours. Customized Curriculum: Engage in tailored training designed to meet your specific requirements.
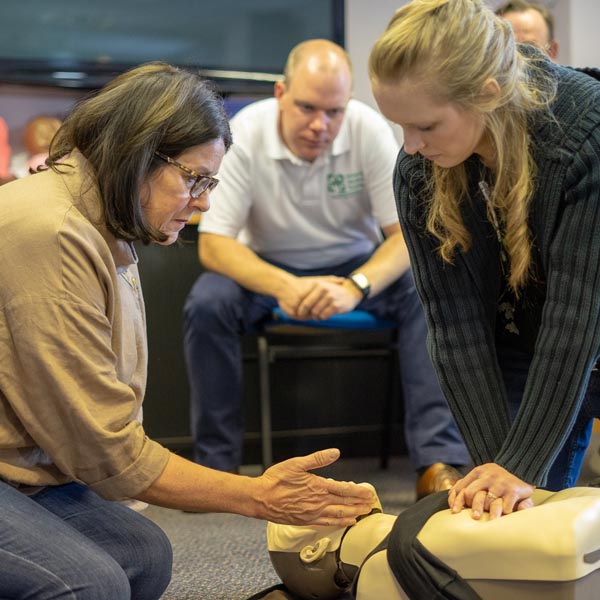
Basic Life Support and Safe Use on AEDs
By Immerse Medical
This 4 hour course outlines a range of knowledge and practical skills in providing basic life support (BLS) and using an automated external defibrillator (AED) safely. Learners will practise assessing and managing a casualty who needs BLS and the safe use of an AED. Our course outlines a range of knowledge and practical skills in providing basic life support (BLS) and using an automated external defibrillator (AED) safely. Learners will practise assessing and managing a casualty who needs BLS and the safe use of an AED. For more information click on the tabs below, or get in touch, we’d be more than happy to answer any queries. At Immerse Training we pride ourselves on offering First Aid and Pre-Hospital Care Training that meets your specific needs. All our courses meet the requirements of the relevant awarding body. On top of that, we are more than happy to create bespoke elements that tailor each programme to suit your first aid or care responsibilities. Qualification Information This qualification and learning outcomes are based on the recommendations of: The Resuscitation Council (UK) Skills for Health Assessment Principles for First Aid Qualifications Course Content Following this course students will: Be able to manage an unresponsive casualty who is breathing normally. Be able to manage an unresponsive casualty who is not breathing normally. Know how to safely use an automated external defibrillator. Be able to safely use an automated external defibrillator. Who should attend? This qualification is for people who have a specific interest or responsibility at work, or in voluntary and community activities, in being able to provide BLS when dealing with an emergency situation which may involve using an AED. Pre-requisites Students must be at least 16 years old on the first day of training. Assessment and Certifications Assessment for this course is continuous. Successful students will receive an Immerse Training Certificate, which is valid for one year. This certificate will be issued by Qualsafe, the awarding body for Immerse Training. Additional Information Completion of the Level 2 Award in Basic Life Support and Safe Use of an Automated External Defibrillator includes 1 credit at Level 2 of the Qualification Credit Framework (QCF). The Level 2 Award in Basic Life Support and Safe Use of an automated External Defibrillator is also recommended as an annual refresher for student who have successfully completed the QA Level 3 Award in First Aid at Work (QCF). Workplace First Aid Courses First Aid courses for employers and employees. Our workplace courses are fully accredited, registered and meet Health and Safety Executive (HSE) guidelines. From 1 day Emergency First Aid at Work (previously appointed person) to 3 day First Aid at Work courses. We specialise in on-site courses at your workplace, tailored to the specific risks associated with your business. All courses can be delivered at our training centre in Poole, Dorset or we can deliver on-site across Bournemouth, Poole, Dorset, Hampshire and the South of England.
Autodesk Maya Basic to Fundamentals Training
By London Design Training Courses
Training duration: 10 hrs. Click here for more info Method: 1-2-1, Personalized attention, Tailored content, Flexible pace, Individual support. Schedule: Personalized training experience with our flexible 1-2-1 sessions. Tailor your own schedule by pre-booking a convenient hour of your choice, available from Monday to Saturday between 9 am and 7 pm. Discover the world of 3D computer graphics and animation with our Autodesk Maya Basic to Fundamentals Training Course. Whether you're a beginner or aspiring artist, this comprehensive program equips you with essential skills in modeling, animation, and rendering. Benefit from interactive learning, experienced instructors, and the option to choose in-person or live online sessions. Enroll now to gain industry-standard knowledge and unleash your creativity in the field of animation and visual effects. Maya Basic to Intermediate Course Course Duration: 10 hours Course Outline: I. Introduction to Maya (1 hour) - Gain an insightful overview of Maya and its diverse applications - Familiarize yourself with the Maya interface and essential tools - Master navigation and viewport controls with ease - Learn the art of creating and managing projects proficiently II. Creating 3D Models (2 hours) - Lay a strong foundation in polygon modeling basics - Craft and shape basic objects and shapes adeptly - Refine and modify objects with precision and creativity - Unlock the art of constructing complex objects using extrusions and bevels III. Texturing and Materials (1 hour) - Venture into the realm of texturing and its significance - Create and skillfully apply materials to enhance visual appeal - Master the art of texture mapping and UV unwrapping techniques - Seamlessly import and incorporate textures and images into your projects IV. Lighting and Rendering (1.5 hours) - Illuminate your creations with fundamental lighting techniques - Set up cameras and compose visually captivating scenes - Master the art of rendering still images and dynamic animations - Explore diverse output options and file formats for professional results V. Animation (2.5 hours) - Embark on an enthralling journey into the world of animation - Effectively utilize keyframe animation and animation curves - Create and edit animation clips for seamless and captivating motion - Dive into the intricacies of rigging and animating a simple character VI. Special Effects (1 hour) - Unleash the potential of particle systems and dynamics - Create and manipulate mesmerizing fluid and fire effects - Craft and refine awe-inspiring special effects such as explosions and smoke VII. Intermediate Modeling Techniques (1 hour) - Elevate your skills with NURBS modeling essentials - Create and modify curves and surfaces with finesse - Dive into the world of crafting organic shapes using NURBS techniques - Employ sculpting tools to create high-resolution and detailed models VIII. Conclusion and Next Steps (0.5 hours) - Recap the wealth of knowledge from the course content - Discover valuable tips and resources for further learning and growth - Engage in a dynamic Q&A session and provide valuable feedback

SketchUp Basic Level Training Course
By ATL Autocad Training London
Who is this course for? SketchUp Basic Level Training Course. Click here for more info: Website Ideal for newcomers to 3D modeling, it suits students, hobbyists, and professionals. Gain a strong foundation in SketchUp, perfect for careers in architecture and interior design. Our flexible 1-on-1 sessions let you tailor your learning schedule. Schedule sessions Monday to Saturday, 9 am to 7 pm. The 5-hour course adapts to your timeline, ensuring a personalized, supportive, and adaptable learning experience. Course Title: SketchUp Basic Course. Course Duration: 5 hours Understanding the Basics of SketchUp Introduction to SketchUp Navigating the SketchUp Environment Exploring Zoom, Pan, and Rotate Functions Familiarizing Yourself with the XYZ Axis Mastering SketchUp Tools Efficient Toolbar Selections Utilizing Templates for Projects Drawing with Precision Using the Pencil Tool Working with Fundamental Geometric Shapes Taking Accurate Measurements Advanced SketchUp Techniques Creating Circles and Arcs Harnessing Sticky Geometry Solutions Unveiling the Power of Tags (Formerly Layers) Streamlining Workflow with Keyboard Shortcuts Accurate Object Measurement within SketchUp Information Management and Database Usage Moving and Copying Objects Simple Array Techniques Mastering Rotational Manipulations Effortless Rotational Copying Fractional and Relative Scaling Component and Group Creation Constructing Components for Reusability Creating Efficient Groups Comparing the Advantages of Components and Groups Saving and Reusing Components Importing Components from Digital Repositories Advanced Modeling and Geometry Leveraging Push-Pull Operations Creating Complex Shapes with the Follow Me Tool Exploring Geometry Intersections Duplicating and Offsetting Faces, Edges, and Polygons Incorporating 2D Polygons into Your Drawings Skillful Use of the Paint Bucket Tool Materials and Textures Proficiency with the Materials Editor Applying High-Quality Textures Sourcing and Positioning Textures Graphics and Bitmap Considerations Crafting Scenes and Styles Generating and Customizing Scenes Managing Scenes and Styles Introduction to Animation and Presentation Animation Concepts Adding Dimensions to Your SketchUp Models Annotating Designs for Clarity Preparing Models for Printing Exporting Images and PDFs in 2D Formats This comprehensive SketchUp Fundamentals course will equip you with essential skills to create, modify, and present 3D models effectively. After completing our 5-hour SketchUp training, you'll achieve the following learning outcomes: Basic SketchUp Proficiency: Gain essential skills to navigate the SketchUp interface and utilize its core features effectively. Geometry Creation: Learn to create 2D and 3D geometric shapes, lines, and curves with precision. Rendering Concepts: Understand the fundamentals of rendering and how to apply basic rendering techniques to enhance your designs. Model Organization: Discover techniques for organizing and structuring your SketchUp models efficiently. Visualization Skills: Develop the ability to visualize and plan architectural and interior design concepts in 3D. Efficient Workflows: Acquire time-saving tips and tricks for streamlining your design workflow. Personal Projects: Apply your newfound skills to your personal design projects or professional endeavors. By the end of this short training, you'll have a solid foundation in SketchUp, allowing you to create and present basic 3D models and designs effectively. After SketchUp Training, You'll Acquire: Advanced 3D Modeling: Master the art of creating intricate 3D models, architectural designs, and detailed structures using SketchUp. Texture Mapping and Material Application: Learn to apply realistic textures and materials, enhancing the visual appeal of your 3D creations. Rendering Techniques: Explore rendering plugins like V-Ray or Twilight Render to create lifelike visualizations of your designs. Collaboration and Presentation: Develop skills to effectively collaborate with teams and present your ideas in professional and compelling ways. Project Visualization: Enhance your ability to transform conceptual ideas into visually stunning and detailed 3D representations. Job Opportunities: Architectural Designer: Create detailed architectural models for residential and commercial projects. Interior Designer: Design interior spaces, visualizing furniture placements, colors, and decor elements. Landscape Architect: Develop 3D landscape designs, showcasing outdoor spaces and environmental elements. 3D Modeler: Work in various industries, creating 3D models for animations, games, or simulations. Visualization Specialist: Provide visualization services to real estate agencies, design firms, or marketing companies, transforming ideas into compelling visuals. Why Choose Us? Tailored One-on-One Training: Exclusive coaching from skilled architects and designers, in-person or live online, Monday to Saturday. Customized Tutorials: Enhance your skills with tailored video tutorials to take home. Comprehensive Learning: Receive digital resources for thorough understanding and revision. Free Ongoing Support: Enjoy continuous assistance via phone or email, ensuring your success beyond the course. Flexible Syllabus: Adapted to your needs for focused learning. Official Certificate: Validate your expertise with our prestigious certification.
Unity 3d Game design course Basic to advanced level 1-2-1
By Real Animation Works
Unity 3d face to face training customised and bespoke.
Mastering 3ds Max: Complete Basic to Advanced Training
By ATL Autocad Training London
Who is this course for? Mastering 3ds Max: Complete Basic to Advanced Training. Looking to learn 3D modelling and animation? Look no further than our comprehensive 3ds Max beginner course! Gain a strong foundation in 3ds Max and learn essential skills for creating stunning 3D models and visualizations. Check our Website Training Duration: 40 hours Method: 1-on1 Sessions and Customized Content. Schedule: Choose your preferred time slot between 9 am and 7 pm, Mon to Sat, tailored to fit your schedule. Course Title: 3ds Max and V-Ray Comprehensive Training Program (40 Hours) Course Overview: Dive deep into the world of 3D visualization and rendering with our intensive 3ds Max and V-Ray training program. Over the course of 40 hours, you'll master the fundamental concepts, advanced techniques, and practical applications of both 3ds Max and V-Ray, empowering you to create stunning, photorealistic visualizations for various industries. Course Outline: Module 1: Introduction to 3ds Max (8 hours) Understanding the 3ds Max interface and tools Basic 3D modeling techniques and workflows Material creation and texture mapping Lights and cameras setup for scenes Module 2: Advanced 3ds Max Techniques (8 hours) Character modeling and animation Particle systems and dynamics Advanced lighting and shading techniques Scene composition and camera animation Module 3: V-Ray Fundamentals (8 hours) Introduction to V-Ray rendering engine V-Ray materials and texture mapping Lighting with V-Ray lights and HDRI maps V-Ray camera settings and depth of field Module 4: Advanced V-Ray Rendering (8 hours) Global illumination and image-based lighting V-Ray proxies and instancing Advanced V-Ray shaders and displacement maps Render elements and post-production techniques Module 5: Architectural Visualization with V-Ray (8 hours) Interior and exterior scene setup Realistic materials for architectural elements Lighting strategies for different times of the day Creating lifelike environments and atmospheric effects Course Features: Hands-On Learning: Engage in practical exercises and real-world projects to reinforce your skills and knowledge. Industry-Standard Tools: Work with the latest versions of 3ds Max and V-Ray, widely used in the professional 3D visualization industry. Expert Instruction: Learn from certified trainers and industry professionals with extensive experience in 3D modeling and rendering. Project-Based Assessments: Apply learned techniques to comprehensive projects, receiving feedback and guidance to refine your skills. Flexible Learning: Choose between in-person and online sessions, accommodating various schedules and learning preferences. Upon completing this 40-hour course, you will be equipped with the expertise to create visually stunning 3D renderings and animations, making you proficient in both 3ds Max and V-Ray for a successful career in architectural visualization, gaming, film production, and more. Upon completion, participants will: Master 3ds Max & V-Ray: Acquire advanced skills in 3ds Max and V-Ray for creating realistic 3D visualizations. Expert in Architectural Visualization: Specialize in architectural visualization techniques, ideal for interior designers and architects. Project-Based Proficiency: Apply learned skills to real projects, developing a professional portfolio. Recommended Jobs: Architectural Visualization Artist 3D Animator Product Visualization Specialist Interior Designer VR Developer Freelance 3D Artist Game Environment Artist Visualization Consultant This training opens doors to diverse roles in architecture, gaming, design, and more. Duration: 40 Hours Focus: Master 3ds Max and V-Ray for advanced 3D visualizations and architectural rendering. Learning Format: One-on-One Training for personalized attention. Availability: Book your sessions Monday to Saturday, 9 am to 7 pm, tailored to your schedule. Outcome: Expertise in 3ds Max, V-Ray, and specialized architectural visualization skills. Practical Focus: Hands-on projects and real-world applications for skill reinforcement. Certification: Upon completion, receive a certificate showcasing your advanced 3D modeling and rendering skills. This one-on-one course offers tailored training sessions from Monday to Saturday, 9 am to 7 pm, ensuring personalized attention and flexibility to suit your schedule. Download 3ds max Ongoing Email Support: We offer continuous email assistance, ensuring your queries are promptly addressed even after the course completion. Comprehensive Resources: Access extensive handouts and valuable documents designed to reinforce your learning experience. Flexible Financial Options: Explore adaptable financial support options, including installment plans and assistance through job center plus and DWP. Reach out to us for specific details. Satisfaction Guarantee: Although it's highly improbable given our exceptional quality and skilled tutors, if you find dissatisfaction after your initial session, we will promptly address your concerns. If necessary, a refund may be provided (Terms and conditions apply). Optimized Software Experience: Receive guidance on optimizing your computer for enhanced software performance in applications like Autocad, 3ds Max, and Photoshop, whether you're on MAC or PC platforms. Industry Connections: Leverage our industry ties as we actively showcase your portfolio to potential employers. Many of our students have secured jobs through our recommendations, offering valuable career opportunities.

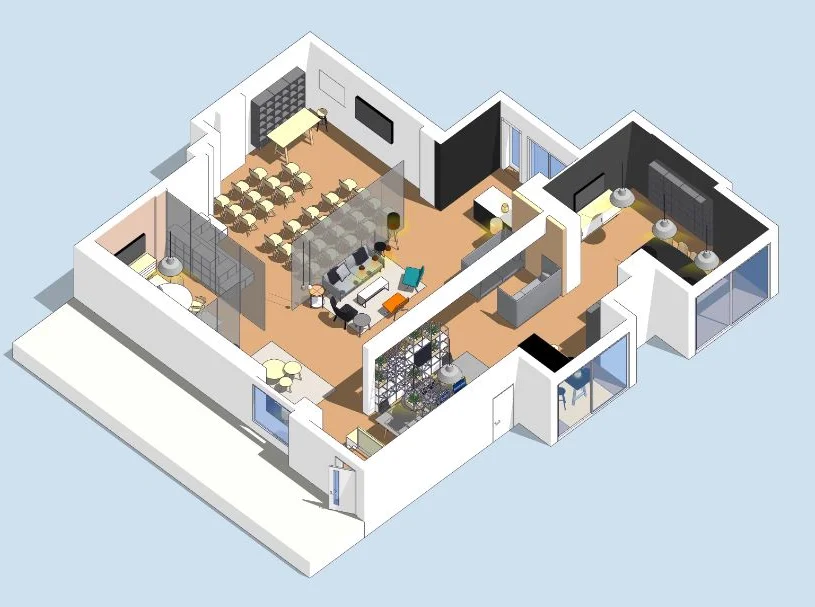
Autodesk Revit Basic to Advanced Training Course 1-2-1
By Real Animation Works
Virtual Revit face to face training customised and bespoke. One to One Online or Face to Face
SketchUp Basic to Intermediate Training
By London Design Training Courses
Why choose SketchUp Basic to Intermediate Training Course? Click for more info SketchUp offers a user-friendly experience with its intuitive interface, enabling beginners to start smoothly and professionals to work efficiently. The software provides straightforward tools and shortcuts, ensuring precise and speedy creation of 3D models. Duration: 5 hrs Method: 1-on-1, Personalized attention Schedule: Tailor your own schedule by pre-booking a convenient hour of your choice, available from Mon to Sat between 9 am and 7 pm SketchUp is a popular and robust CAD solution designed for engineers, designers, architects, and more. Its powerful suite of tools includes customizable palettes, lighting effects, animations, textures, and access to the Trimble 3D warehouse. SketchUp Basic Training Course. 1 on 1 Training. 5 hours Understanding the Basics of SketchUpIntroduction to SketchUpNavigating the SketchUp EnvironmentExploring Zoom, Pan, and Rotate FunctionsFamiliarizing Yourself with the XYZ Axis Mastering SketchUp ToolsEfficient Toolbar SelectionsUtilizing Templates for ProjectsDrawing with Precision Using the Pencil ToolWorking with Fundamental Geometric ShapesTaking Accurate Measurements Advanced SketchUp TechniquesCreating Circles and ArcsHarnessing Sticky Geometry SolutionsUnveiling the Power of Tags (Formerly Layers)Streamlining Workflow with Keyboard ShortcutsAccurate Object Measurement within SketchUpInformation Management and Database UsageMoving and Copying ObjectsSimple Array TechniquesMastering Rotational ManipulationsEffortless Rotational CopyingFractional and Relative Scaling Component and Group CreationConstructing Components for ReusabilityCreating Efficient GroupsComparing the Advantages of Components and GroupsSaving and Reusing ComponentsImporting Components from Digital Repositories Advanced Modeling and GeometryLeveraging Push-Pull OperationsCreating Complex Shapes with the Follow Me ToolExploring Geometry IntersectionsDuplicating and Offsetting Faces, Edges, and PolygonsIncorporating 2D Polygons into Your DrawingsSkillful Use of the Paint Bucket Tool Materials and TexturesProficiency with the Materials EditorApplying High-Quality TexturesSourcing and Positioning TexturesGraphics and Bitmap ConsiderationsCrafting Scenes and StylesGenerating and Customizing ScenesManaging Scenes and Styles Introduction to Animation and PresentationAnimation ConceptsAdding Dimensions to Your SketchUp ModelsAnnotating Designs for ClarityPreparing Models for PrintingExporting Images and PDFs in 2D Formats

Rhino 3d and V-ray for Rhino Basic to Intermediate Training
By London Design Training Courses
Why Learn Rhino 3d and V-ray for Rhino Basic to Intermediate Training Course? Course Link Learn Rhino 3D and V-Ray for Rhino Basic to Intermediate Training Course. Designed for beginners and experienced users, this course empowers you with essential modeling and rendering techniques. Choose between in-person or live online sessions. Duration: 16 hrs. Method: 1-on-1, Personalized attention. Schedule: Tailor your own schedule by pre-booking hours of your choice, available from Mon to Sat between 9 am and 7 pm. London Design Training Course Certified tutors for Rhino 3D and Vray Training - Online, On-Site, or In-Class one to one. Choose from a diverse range of Rhino courses conducted by expert trainers with extensive production experience. Rhino 3D and V-Ray Comprehensive Training Course Duration: 16 hours Course Overview: Learn Rhino 3D and V-Ray with our Basic to Intermediate Training Course. Perfect for beginners, this course equips you with the skills to navigate Rhino's interface, create captivating 3D models, apply textures, and utilize V-Ray for stunning renders. Course Outline: I. Introduction to Rhino 3D and V-Ray (1 hour) Get familiar with Rhino 3D and V-Ray interfaces and essential tools Master viewport navigation with expert controls Understand units and tolerance for precise designs Customize your workspace for seamless workflow II. Creating Basic 3D Objects (3 hours) Craft captivating 3D shapes and objects Edit objects and work with curves for refined designs Explore surfaces and solids for advanced modeling Utilize transformations and copying techniques for enhancements III. Materials and Textures (2 hours) Unleash the power of materials and textures on your designs Apply stunning materials to bring your creations to life Enhance your designs with custom materials for an aesthetic boost IV. Basic Lighting Techniques in V-Ray (2 hours) Discover the magic of lighting with V-Ray for impactful renders Utilize V-Ray lights and HDRI maps for striking lighting effects Adjust lighting settings for impeccable results V. Enhancing Renders with V-Ray Settings (3 hours) Optimize V-Ray render settings for the best output Adjust global illumination and reflection settings for desired looks Elevate renders with dynamic effects like depth of field and motion blur VI. Advanced Modeling Techniques (2 hours) Master advanced modeling tools for intricate shapes Refine curve and surface creation and editing skills Handle solids with Boolean operations and trimming techniques VII. Advanced Lighting Techniques in V-Ray (2 hours) Create and adjust artificial lights for perfect illumination Utilize V-Ray's Sun and Sky system for realism Craft custom HDR images for enhanced lighting VIII. Exporting and Importing (1 hour) Learn file formats for seamless sharing and collaboration Prepare models for 3D printing with best practices Integrate models from other software for a unified workflow IX. Conclusion and Next Steps (30 minutes) Recap course knowledge and highlights Access valuable tips and resources for continuous learning Engage in interactive Q&A for feedback and support Resources: Explore V-Ray with a free trial at: https://www.chaosgroup.com/vray/sketchup/free-trial Access material library at: https://www.vray-materials.de/ Discover textures at: https://textures.com/ Downloads: Download Rhino 7 for Windows for a full 90-day evaluation at: https://www.rhino3d.com Experience Rhino 7 for Mac Evaluation with a user-friendly interface and seamless performance for 90 days. Upon completing the Rhino 3D and V-Ray Basic to Intermediate Training Course, participants can expect to achieve the following learning outcomes: Proficiency in Rhino 3D and V-Ray: Develop a comprehensive understanding of Rhino 3D and V-Ray interfaces, tools, and functionalities, enabling participants to navigate and utilize the software effectively. 3D Modeling Skills: Master the art of creating captivating 3D objects and shapes using Rhino 3D, including editing, transforming, and refining designs for diverse applications. Material Application: Acquire the ability to apply and customize materials and textures to enhance the visual appeal and realism of 3D models, elevating the quality of designs. Lighting Techniques: Gain expertise in utilizing V-Ray lighting tools, such as V-Ray lights and HDRI maps, to achieve striking lighting effects in rendered scenes. Rendering Excellence: Learn to optimize V-Ray render settings, control global illumination, and apply dynamic effects like depth of field and motion blur for high-quality and impressive renders. Advanced Modeling: Develop skills in advanced modeling techniques, including handling curves, surfaces, and solids, enabling participants to tackle complex design challenges. Lighting Mastery: Acquire the knowledge and expertise to create and adjust artificial lights, utilize the Sun and Sky system, and craft custom HDR images for realistic lighting setups. Seamless File Management: Understand various file formats for exporting and importing 3D models, facilitating efficient collaboration and preparation for 3D printing. Creative Problem-Solving: Enhance creative thinking and problem-solving abilities through hands-on practice and exploration of diverse design scenarios. Professional Presentation: Learn post-production techniques in Photoshop to enhance renders and create visually appealing design presentations for effective communication. Continuous Learning: Access valuable resources and tips to encourage continuous learning and professional growth in Rhino 3D and V-Ray.