- Professional Development
- Medicine & Nursing
- Arts & Crafts
- Health & Wellbeing
- Personal Development
InDesign Basic to Essential Training Course
By Real Animation Works
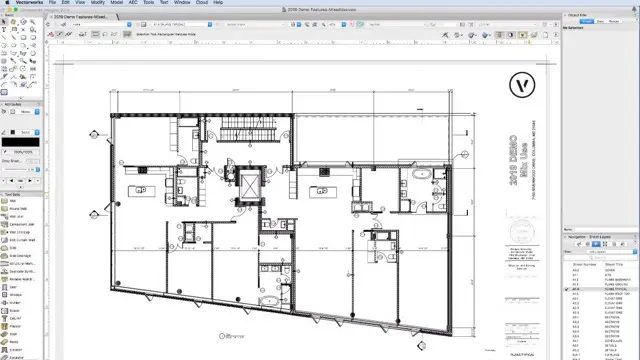
Vectorworks Evening Course face to face One to one
Adobe InDesign Course One-to-One Online or In-Person
By Real Animation Works
Indesign face to face training customised and bespoke. One to One Online or Face to Face

Vectorworks Basic to Intermediate Course
By Real Animation Works
Revit face to face training customised and bespoke.
Vectorworks One to One Fast Track course One day 10 hrs
By Real Animation Works
Vectorworks One to One Fast Track Course Master Vectorworks in Just One Day (10 Hours)
Autodesk Maya Evening Training
By London Design Training Courses
Training duration: 10 hrs Click here for info Method: 1-2-1, Personalized attention, Tailored content, Flexible pace, Individual support. Schedule: Personalized training experience with our flexible 1-2-1 sessions. Tailor your own schedule by pre-booking a convenient hour of your choice, available from Monday to Saturday between 9 am and 7 pm. Autodesk Maya Training Course with our flexible evening training course. Designed to accommodate busy schedules, this course allows you to learn Maya at your convenience, either in-person or through live online sessions. Master essential features and workflows to create captivating 3D models, animations, and visual effects. Benefit from expert guidance, hands-on projects, and lifetime email support, ensuring a rewarding learning experience. Enroll now to ignite your creativity and open doors to exciting opportunities in the animation and visual effects industry. The Autodesk Maya Evening Training Course offers a flexible learning option for busy professionals and students with daytime commitments. Master the powerful tools and capabilities of Autodesk Maya during convenient evening sessions. Participants will receive comprehensive training in 3D modeling, materials, animation, lighting, and rendering. The course progresses to advanced topics, including dynamics, character rigging, shading, and compositing. Enroll in this course to develop valuable skills in 3D computer graphics and animation. Benefit from interactive learning experiences and expert guidance, whether attending in-person or joining live online sessions. Maya Evening Training Courses Duration: 10 hours Course Outline: I. Introduction to Maya (1 hour) Gain insights into Maya's versatile applications and interface. Master navigation and project management. II. Creating 3D Models (2 hours) Learn polygon modeling basics and refine objects with precision. III. Texturing and Materials (1 hour) Apply and customize materials for enhanced visuals. IV. Lighting and Rendering (1.5 hours) Explore lighting techniques and rendering. V. Animation (2.5 hours) Understand animation principles and rig characters. VI. Special Effects (1 hour) Harness particle systems and create captivating effects. VII. Intermediate Modeling Techniques (1 hour) Venture into NURBS modeling and sculpting tools. VIII. Conclusion and Next Steps (0.5 hour) Recap and explore further learning resources. Autodesk Maya Evening Training Course Topics Covered: Modeling, Texturing, Animation, Lighting, Rendering, and more. Download Autodesk Maya! Create expansive worlds, characters, and effects. Subscribe now for a year and start your 3D model and animation journey. Visit https://www.autodesk.co.uk/maya for a free trial. Upon completing the Autodesk Maya Evening Training Course, participants will gain proficiency in 3D modeling, texturing, animation, lighting, and rendering using Autodesk Maya. They will acquire the skills to create captivating visuals and animations, opening up opportunities in diverse industries such as entertainment, gaming, and architectural visualization. The flexible evening schedule allows for convenient learning, accommodating busy professionals and students.

Lumion 3d Realtime Rendering Training
By London Design Training Courses
Why Choose Lumion 3d Realtime Rendering Training Course? Course Link Our Lumion Course is best for materials, lighting, and animation skills. Learn high-quality rendering using Lumion's asset library. In-person or live online sessions with lifetime access to recordings and email support. Unleash Lumion's potential for immersive architectural visualizations. Duration: 10 hrs Method: 1-on-1, Personalized attention Schedule: Tailor your own hours of your choice, available from Mon to Sat between 9 am and 7 pm What is Lumion? Lumion is specialized 3D rendering software designed for architects and designers. With Lumion, you can quickly bring your 3D design models to life, add materials, furnish interiors and exteriors, and showcase the impact of lighting and shadows without the need for specialized training. Objectives of the Course The course aims to teach you how to start Lumion projects, add environments, cameras, illuminations, populate scenes with various elements, create terrains, and produce animations. Lumion 3D Course Outline Module 1: Introduction to Lumion 3D Discovering Lumion 3D's capabilities and interface navigation. Learning shortcut keys for efficient workflow. Customizing settings for optimal performance. Module 2: 3D Models and Materials Importing 3D models in various formats. Applying and tweaking materials. Creating procedural materials and glass effects. Troubleshooting common issues. Module 3: Creating a Project in Lumion Building scenes and sculpting terrain. Enhancing realism with alpha and height maps. Module 4: 3D World Managing multiple 3D objects and their properties. Implementing grass and scattering elements. Module 5: Lighting in Lumion 3D Utilizing weather settings for dynamic scenes. Understanding Lumion lights and interior/exterior illumination. Creating 3D reflections and spotlights. Module 6: Realistic Visualizations Incorporating special effects like fire, smoke, and fog. Achieving realism with camera effects and shadows. Rendering still images and animations. Module 7: NPR Visualizations Creating non-photorealistic visualizations with artistic effects. Implementing unique styles for enhanced visuals. Module 8: Artistic Effects in Lumion 3D Exploring conceptual visualizations with painting and sketch effects. Creating cartoon effects and understanding perspectives. Module 9: Animation in Lumion 3D Timing and working with cameras for dynamic shots. Composing animation clips and adding effects. Utilizing layers and control objects for precise control. Module 10: Advanced Features Import and output formats in Lumion. Expanding assets with the 3D model library. Adding animated characters and sound effects. Utilizing the advanced material library. Controlling environment and weather for dynamic scenes. Scene management and movie editing within Lumion 3D. Lumion for Students | Unleash Your Creativity https://lumion.com› product › students Unlock the full potential of your designs with Lumion for students. Request your free 1-year Student license now and bring your visions to life!
Revit Basic to Fundamentals
By London Design Training Courses
Why Choose Revit Basic to Fundamentals Course Course Link In this course you will learn Revit skills for BIM modeling. In-person or live online. Autodesk Revit Architecture training for students to create full 3D architectural project models and set them up in working drawings. Duration: 10hours Method: 1-on-1 method with tailored content and flexible pace, backed by individual support. Schedule: Choose a convenient hour from Mon to Sat between 9 am and 7 pm to create your own schedule. Revit Essentials Training: Learn Revit fundamentals for architecture and structural design, supporting efficient building construction with BIM workflows. Delivery Options: In-class at our center Live online sessions I. Introduction to Revit Overview of Revit and its uses Revit interface and basic tools Navigation and viewport controls Creating and saving projects II. Setting up a Project Creating a new project Setting up project levels and grids Adding site and building information Setting up project units III. Creating Building Elements Creating and modifying walls Adding doors and windows Creating and modifying floors and ceilings Creating roofs and modifying roof shapes Creating stairs and railings IV. Views and Sheets Creating and managing views Creating and managing sheets Adding schedules and tags Creating construction documents V. Annotation and Detailing Adding text and dimensions Creating and modifying detail components Adding symbols and keynote legends Adding annotations to construction documents VI. Conclusion and Next Steps Review of course content Tips for further learning and resources Q&A and feedback Note: The above course outline is just a suggestion, and the course content and duration can be adjusted according to the needs and level of the learners. Detailed Course Outline. 1. Starting a Project Creating a new project and the importance of a template. Understanding project settings and scales Adding levels Adding grids Adding columns 2. Modeling Basics Adding walls Using snaps Wall properties and wall types Using the modified tools Adding doors and windows Using constraints See: Autodesk Seek and Revit City websites 3. Links, Imports, and Groups Working with DWG files Creating topography from a DWG link Understanding CAD inserts Using import tips Creating a group Working with Revit links Managing links 4. Sketch-Based Modeling Components Working with floors Working with roofs Adding openings Working with stairs Working with railings Working with ceilings 5. Complex Walls Creating a custom basic wall type Adding curtain walls Adding curtain grids and mullions 6. Visibility and Graphics Controls Using object styles Working with visibility/graphic overrides Using Hide/Isolate Understanding view range Using the Linework Using cutaway views 7. Rooms Adding rooms Controlling room numbering Understanding room bounding elements 8. Schedules and Tags Understanding tags Adding schedules Modifying schedules Creating a key schedule 9. Annotation and Details Adding text Adding dimensions Adding symbols Adding legend views Creating a detail callout Using detail components Adding filled and masking regions 10. The Basics of Families Understanding familiesUsing reference planes, parameters, and constraints Adding solid geometry Adding void geometry Completing the family 11. Sheets, Plotting, and Publishing Adding sheets Exporting to AutoCAD and JPG
Nail Tech Trio(GTi Manicure, Gel Polish & Acrylic Nails)
By The Beauty Click Academy
Manicures can be found on nearly every treatment menu and are often the bread and butter of many businesses. The manicure offers the therapist or technician a whole range of options to suit nearly every client. This course will teach you everything you need to know about offering a professional manicure and includes a practical training session and assessment. Gel Polish treatments are an increasingly popular treatment within the professional beauty industry. Gel Polish is applied to the client’s nail and then cured using an LED or UV lamp to create a longer lasting nail treatment (up to 3 weeks) than a standard manicure. The GTi Gel Polish course covers how to complete gel polish application and demonstrates the correct removal techniques. The course also covers reception and consultation, contra-indications to treatment and aftercare advice. The GTi Tips With Acrylic Overlay course will teach you how to apply the Acrylic System (Liquid and Powder) in conjunction with nail tips. The course covers how to complete the application and demonstrates the correct removal techniques. It also covers reception and consultation, contra-indications to treatment and aftercare advice. On completion of the course you will receive three recognised and insurable qualifications. Includes: 3 Hard copy take home training manuals. Duration – Fast track two-day practical classroom-based training plus online theory work. Theory work to be completed in your own time via The Guild student portal before your practical course date. Practical day – 10am – 6pm & 10am – 4.30pm inc short lunch break. It is advisable that students arrive 15 mins early to ensure a prompt start. In a lot of cases the practical training can be finished earlier than expected depending on how many students there are, and the time taken on practical work. Widely recognisable and insurable qualification, allowing you to deliver this treatment on the paying general public. Class size - Maximum 8 students in a class

Vectorworks Evening Introduction Training Course
By Real Animation Works
Vectorworks Evening Course face to face One to one