- Professional Development
- Medicine & Nursing
- Arts & Crafts
- Health & Wellbeing
- Personal Development
The Essentials of EAP Training Workshop (£750 per course for up to 10 people)
By Buon Consultancy
Employee Assistance Programme Training
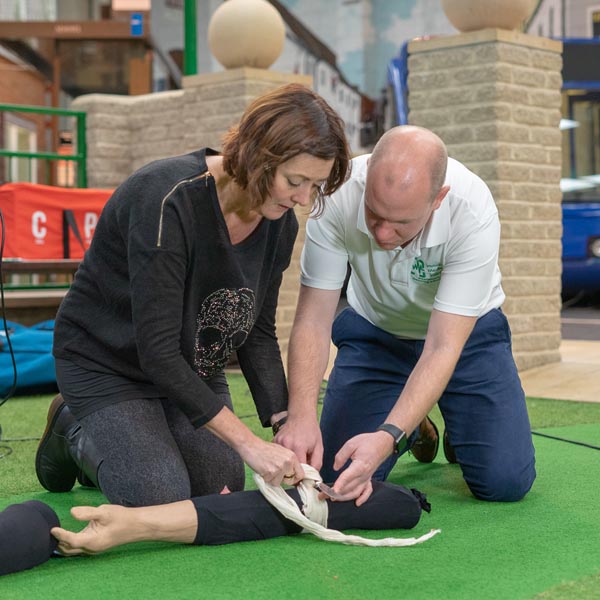
Emergency First Aid at Work 6 hours (VTQ) Level 3 - EFAW - Group booking up to 12 participants
(27)By PETM
Embark on a journey to become a workplace hero with our comprehensive one-day First Aid course. This dynamic and engaging training program is designed to equip you with the essential skills and knowledge needed to handle emergency situations confidently and effectively.

Photoshop Basics to Essentials Training
By London Design Training Courses
Why Choose Photoshop Basics to Essentials Training Course? Course Link Mastering Photoshop is crucial for securing positions in creative fields such as graphic design, digital design, and user interface (UI) design. Acquiring this skill serves as a foundation to excel in various design programs essential for creative professionals. Duration: 16 hrs. Method: 1-on-1, Personalized attention. Schedule: Tailor your own hours of your choice, available from Monday to Saturday between 9 am and 7 pm. Photoshop Course: Total 16 hrs Module 1: Keyboard and Toolbar Shortcuts Customize toolbars and keyboard shortcuts for efficient workflow Learn essential keyboard shortcuts for faster navigation Module 2: Advanced Layer Management Filter, search, and color code layers for better organization Group and merge layers to streamline your design process Explore Blending Modes for creative effects Module 3: Blending Modes Understand Blending Modes and their usage within layers and effects Apply Blending Modes to enhance your designs Module 4: Layer Comps Discover Layer Comps and their benefits in managing complex designs Create, edit, and update Layer Comps for different design versions Export Layer Comps to PSD, PDF, and JPEG formats Module 5: Drawing Vectors Work with Vector images using shapes and the Pen Tool Use the Direct Selection Tool for precise editing Apply colors and create Clipping Masks with vectors Module 6: Advanced Type Techniques Convert text into Shapes and utilize font style changes with the Pen Tool Use text as a Clipping Mask and create text Outlines Design 3D text for impactful typography Module 7: Advanced Adjustment Layers Master advanced adjustments like Curves, Levels, and Black and White Utilize Selective Color and Gradient Maps for creative color control Module 8: Advanced Selection Techniques Use Smart Radius and Select and Mask for precise selections Learn to select complex objects like hair using Color Range and the Pen Tool Save and manage selections using the Path Panel Module 9: Colorizing Black and White Images Module 10: Displacement Maps Module 11: Advanced Filters Create Trees, Frames, Clouds, and Fire with filters Use Polarized, Wave, and Extrusion for artistic effects like "Japanese Sun" Explore Vanishing Point Filter, Camera RAW, Blur for depth of field, and Filter Gallery Combine 3D text with Vanishing Point for stunning designs Use Liquify for image manipulation Module 12: Introduction to Actions Automate tasks using Photoshop's preset Actions Create your own Actions to save time and effort Module 13: Creating an Animated GIF Learn frame by frame animation Utilize the Timeline to create engaging animated GIFs Learning Outcomes: Master advanced selection techniques, including the Path and Pen Tool, for precise editing. Gain proficiency in advanced layer management and utilize Layer Comps for efficient design organization. Enhance your designs with a deeper understanding and application of Blending Modes. Create visually appealing 3D text and text outlines to add depth and impact to your artwork. Explore advanced Filters like Displacement Maps, Blurs, and Distortion for creative effects. Automate tasks with actions and batch processing, streamlining your workflow. Craft engaging animated GIFs to add dynamic elements to your designs. Skillfully set project requirements by identifying the purpose, target audience, copyright considerations, and project management tasks for successful project execution.

Revit Courses Personalize Your Learning Schedule with On-Demand Options
By Real Animation Works
Personalized Revit Training: One-to-One Sessions with Pay-as-You-Go Flexibility

InDesign Basic to Essential Training Course
By Real Animation Works
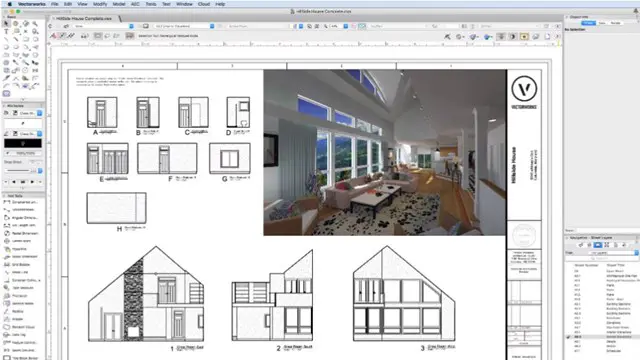
Vectorworks Evening Course face to face One to one
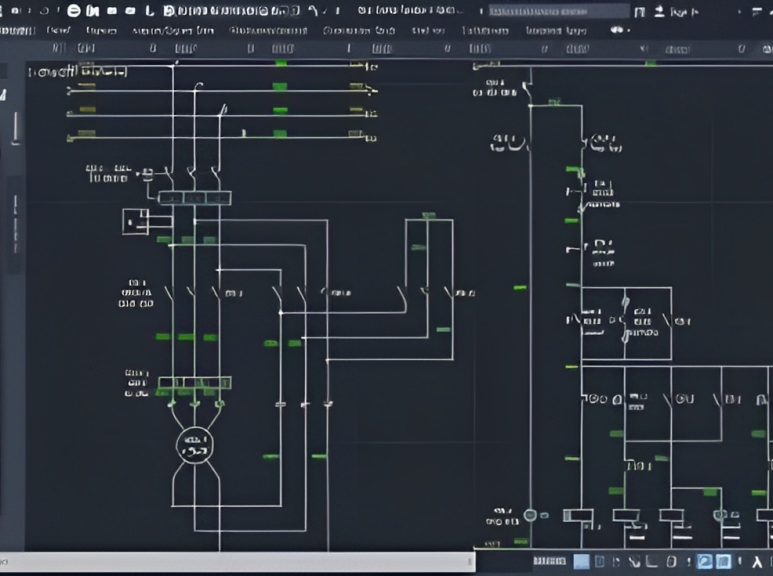
AutoCAD Training Course for Electrical
By ATL Autocad Training London
Exclusive to AutoCAD subscribers, the AutoCAD Electrical toolset simplifies electrical system creation. Click here for more info: Website Our course provides a strong foundation in 2D electrical design, covering essential tools. Flexible one-on-one sessions from 9 a.m. to 7 p.m., Monday to Saturday. Call 02077202581 or book online. The 16-hour course offers flexibility, divide hours across days. Benefit from individualized attention and tailored content. Enroll for in-person or Zoom sessions to excel in AutoCAD Electrical. AutoCAD Electrical Course Content: Introduction to AutoCAD Electrical Software: Overview and features of AutoCAD Electrical Understanding the software interface and tools Project file structure and management Layout and Navigation: Navigating the AutoCAD Electrical workspace Creating new project files and using attribute editors Understanding WDD, WDX, and WDF project files Exploring the Project Manager interface and attribute editors Electrical Diagram Drawing: Numbering and titling wires in diagrams Labelling components Utilizing diagram symbol libraries Creating and editing Electrical Control Circuits (ECC) Component dialog box and Circuit Scale dialog box Introduction to Programmable Logic Controllers (PLCs) and Integrated Systems: PLC Symbols and Concepts Inserting Programmable Logic Controllers (PLCs) into diagrams Adding PLC Units to diagrams Working with PLC Input and Output points and circuits Understanding PLC-based classification Using the Spreadsheet to PLC Input and Output Points utility Custom and Bespoke Symbols: Creating custom symbols for Switches, Wires, Contactors, Motors, Transformers, etc. Specifying symbol conventions and standards Offline and online usage of AutoCAD Electrical databases Drawing for Terminals and Plans: Implementing Terminal symbols in diagrams Handling terminal plans and locations Working with compound level terminals and locations Utilizing the Component command for single and multiple components Managing Jumpers and wiring Modifying Terminal Strips and Dual In-Line Packages (DIP) Understanding DIN Rail, Electrical Enclosure, Circuit Breakers, and Electrical Equipment Generating PDFs and Reports: Exporting drawings to PDF format Organizing report templates Automating the generation of reports Creating Electrical Audit Reports This AutoCAD Electrical course provides comprehensive knowledge of the software, focusing on electrical diagram drawing, symbol creation, PLC integration, terminal planning, and report generation. Participants will gain the skills needed to efficiently design electrical systems using AutoCAD Electrical software. Upon completion, participants will proficiently use AutoCAD Electrical to create precise electrical diagrams, integrate PLCs, design custom symbols, plan terminals, and generate reports efficiently. They will possess the skills needed to confidently design electrical systems and enhance their expertise in electrical design and drawing. AutoCAD Electrical Training Course: Master precision in specialized electrical design skills. Optimize your design process with streamlined workflows. Ensure compliance with industry standards consistently. Boost productivity in electrical design tasks. Facilitate seamless collaboration with fellow professionals. Benefit from recorded lessons for convenient review. Enjoy continuous support with lifetime email assistance. Unleash the complete power of AutoCAD for your electrical design needs. Enroll today and craft precise, professional electrical drawings confidently. Select between in-person and live online sessions to suit your preference. Flexible Evening Sessions: Learn AutoCAD at your own pace with evening sessions designed for busy individuals. Boost your career opportunities in computer-aided design. Comprehensive Skill Development: Gain a strong foundation in AutoCAD's core features and advance to 3D modeling and rendering techniques, enhancing your design capabilities. Industry-Standard Knowledge: Become proficient in AutoCAD, a widely used CAD software in architecture, engineering, and construction fields, making you highly sought after by employers. Practical Application: Apply AutoCAD skills to real-world design scenarios, creating detailed plans for professional projects in architecture, engineering, and mechanical fields. Recorded Lessons for Review: Access lesson recordings to reinforce learning and review specific topics or techniques whenever needed. Lifetime Email Support: Enjoy ongoing support with lifetime email assistance, even after completing the course, for guidance and clarification.
Arnold for 3dsMax Basic to Advanced Training
By London Design Training Courses
Training duration: 10 hrs. Click here for more info Method: 1-2-1, Personalized attention, Tailored content, Flexible pace, Individual support. Schedule: Personalized training experience with our flexible 1-2-1 sessions. Tailor your own schedule by pre-booking a convenient hour of your choice, available from Monday to Saturday between 9 am and 7 pm. Learn Arnold for 3ds Max and make breath-taking renders with our comprehensive training course. Led by certified tutors and industry experts, you'll master the basics to advanced techniques of creating stunning visual effects and lifelike renderings. Course Duration: 10 hours Course Outline: Session 1: Introduction to Arnold Renderer (1 hour) Unveiling Arnold Renderer's features and capabilities Understanding the benefits of Arnold in 3ds Max Setting up Arnold renderer and exploring its interface Mastering the workflow for exceptional results Session 2: Basic Arnold Shading (1 hour) Navigating the Arnold shading network Creating essential materials with Arnold shaders Working with diverse shader types (standard, Lambert, etc.) Elevating visuals with maps and textures in Arnold's materials Session 3: Arnold Lighting Techniques (1.5 hours) Embracing the art of lighting with Arnold Lights Implementing various light types (area lights, spotlights, etc.) Creating ambiance with Arnold skydome and environment lighting Illuminating scenes using physical sky and image-based lighting Session 4: Arnold Cameras and Rendering Settings (1.5 hours) Mastering Arnold cameras and their settings Achieving depth of field and motion blur effects in Arnold Configuring optimal rendering settings for superior results Fine-tuning rendering with the Arnold Render Setup dialog Session 5: Advanced Arnold Shading (1.5 hours) Creating intricate materials with advanced Arnold shaders Realistic surfaces with Arnold's procedural textures Harnessing the power of advanced shading nodes (bump, displacement, etc.) Unleashing specialized effects with Arnold shaders (subsurface scattering, hair, etc.) Session 6: Arnold Rendering Optimization (1 hour) Streamlining rendering settings for enhanced efficiency Leveraging Arnold features like adaptive sampling and denoising Noise reduction techniques for smoother Arnold renders Troubleshooting common rendering issues and their solutions Session 7: Advanced Lighting Techniques (1 hour) Crafting lifelike lighting setups with Arnold's prowess Exploring advanced lighting properties (exposure, color temperature, etc.) Enhancing lighting with Arnold light filters and modifiers Implementing captivating effects like volumetric lighting and caustics Session 8: Arnold AOVs and Compositing (1 hour) Understanding Arnold AOVs (Arbitrary Output Variables) Configuring and rendering AOVs for post-production control Compositing AOVs for artistic adjustments in post-production Leveraging AOVs for fine-tuning the final image Session 9: Arnold for Animation and Motion Graphics (1 hour) Integrating Arnold seamlessly into animation and motion graphics projects Rendering animation sequences with finesse Managing motion blur and time-based effects with Arnold Unveiling Arnold's potential for particle rendering and dynamic effects Session 10: Arnold Tips, Tricks, and Best Practices (1 hour) Exploring advanced techniques and workflows for exceptional results Optimizing scene setup for enhanced rendering performance Troubleshooting tips for common issues and errors in Arnold Q&A session and final review to consolidate knowledge

PROFESSIONAL TRAINING: MODULE 3 – INDUSTRIAL MACHINE SEWING TRAINING FOR LEATHER BAGS, ACCESSORIES, AND GARMENTS
(52)By The London Leather Workshop
LEARN HOW TO SEW LEATHER USING INDUSTRIAL MACHINES FOR BAGS, ACCESSORIES, AND GARMENTS This is the third module of a series designed to provide thorough, professional training in leatherworking, sewing and accessory making. Each module has been carefully designed to equip individuals with key skills for starting a career in this sector, broadening their industry knowledge, or embarking on their own journey with solid foundational skills. During the class, you will learn how to correctly sew with the most common machines used in the leather industry and understand their differences. You will gain knowledge about threads, needles, feet, machine components, and useful sewing tricks. You will learn how to set the machine correctly to obtain suitable tension and successfully work with a variety of leather thicknesses and textures. Additionally, you will acquire skills to troubleshoot sewing issues and effectively handle challenges like sewing curves, working with multiple layers of leather, and managing stretchy, rough, or slippery surfaces. Moreover, you will receive valuable handouts, curated lists of leather and tool suppliers for future reference, and create personalised samples for your own use. By the end of the tuition, you will have: – Understood how to set and operate common leather industrial sewing machines, comprehended their differences and main features – Effectively threaded and operated a lock stitch walking foot machine, ensuring correct tension in your sewing – Utilised various tools, equipment and industry tricks proficiently in sewing – Identified thread types and needle sizes for different applications – Learned to sew leather accurately, distinguishing it from other materials, and mastered sewing thin versus thick leather – Sewn straight lines, curves, and parallel lines with confidence – Produced a variety of basic seams, seam finishes, constructions, continuous, and reinforced seams – Handled sewing multiple layers of leather -Successfully obtained fundamental knowledge to sew simple products independently Included in the course: You will receive useful paper handouts containing: – An illustrated guide providing essential information about types of sewing machines and their components. – A glossary containing information about needles, thread types and essential key words related to the topics of the lesson – A list of recommended suppliers for leather and fittings, both in London and online Find all modules here: https://the-london-leather-workshop.cademy.co.uk/

Certified Internet of Things Practitioner
By Mpi Learning - Professional Learning And Development Provider
In this course, students will learn general strategies for planning, designing, developing, implementing, and maintaining an IoT system through various case studies and by assembling and configuring an IoT device to work in a sensor network.

citizenAID
By Immerse Medical
When there is a shooting, stabbing or bomb explosion the initial priority will be public safety. This can delay the time before the emergency services are able to reach the injured. Our 3 hour citizenAID course enables the general public to be effective in these situations before the emergency services are available to provide professional medical support. This course can be delivered on-site or at our training centre in Poole, Dorset. Qualification Information This qualification and learning outcomes are based on the blended recommendations of: European Resuscitation Council, Section 9. First Aid British Army, Battlefield Casualty Drills Course Content Following this course students will: Be able to use the citizenAID app/pocket guide in an emergency situation. Be able to provide immediate first aid to an unresponsive casualty who is breathing. Be able to provide first aid to a casualty with severe external bleeding. Who should attend? This qualification is for all members of the public who wish to learn lifesaving skills and techniques in the event of a deliberate multiple casualty incident. Pre-requisites Students must be at least 14 years old on the first day of training. Assessment and Certifications Assessment of this course is continuous and will take place through knowledge and skills observations. Successful students will receive an Immerse Training Certificate, which is valid for three years. This certificate will be issued by Qualsafe, the awarding body for Immerse Training. Additional Information Course fees include a copy of the citizenAID pocket guide. What makes us different? Fun & Engaging – Gone are the days of boring first aid training. Although professional, our trainers teach in an informal way that encourages student interaction and retention of knowledge. Technology Enhanced Learning – We utilise a range of technologies to make our courses memorable fun and effective. Bespoke Courses – Our on-site courses are designed with the specific risks of your business in mind. Training by doctors, nurses and paramedics – We have years of experience working on the front line of emergency medicine; giving us real world knowledge and skills in managing injured or unwell people.