- Professional Development
- Medicine & Nursing
- Arts & Crafts
- Health & Wellbeing
- Personal Development
Revit Basic to Fundamentals
By London Design Training Courses
Why Choose Revit Basic to Fundamentals Course Course Link In this course you will learn Revit skills for BIM modeling. In-person or live online. Autodesk Revit Architecture training for students to create full 3D architectural project models and set them up in working drawings. Duration: 10hours Method: 1-on-1 method with tailored content and flexible pace, backed by individual support. Schedule: Choose a convenient hour from Mon to Sat between 9 am and 7 pm to create your own schedule. Revit Essentials Training: Learn Revit fundamentals for architecture and structural design, supporting efficient building construction with BIM workflows. Delivery Options: In-class at our center Live online sessions I. Introduction to Revit Overview of Revit and its uses Revit interface and basic tools Navigation and viewport controls Creating and saving projects II. Setting up a Project Creating a new project Setting up project levels and grids Adding site and building information Setting up project units III. Creating Building Elements Creating and modifying walls Adding doors and windows Creating and modifying floors and ceilings Creating roofs and modifying roof shapes Creating stairs and railings IV. Views and Sheets Creating and managing views Creating and managing sheets Adding schedules and tags Creating construction documents V. Annotation and Detailing Adding text and dimensions Creating and modifying detail components Adding symbols and keynote legends Adding annotations to construction documents VI. Conclusion and Next Steps Review of course content Tips for further learning and resources Q&A and feedback Note: The above course outline is just a suggestion, and the course content and duration can be adjusted according to the needs and level of the learners. Detailed Course Outline. 1. Starting a Project Creating a new project and the importance of a template. Understanding project settings and scales Adding levels Adding grids Adding columns 2. Modeling Basics Adding walls Using snaps Wall properties and wall types Using the modified tools Adding doors and windows Using constraints See: Autodesk Seek and Revit City websites 3. Links, Imports, and Groups Working with DWG files Creating topography from a DWG link Understanding CAD inserts Using import tips Creating a group Working with Revit links Managing links 4. Sketch-Based Modeling Components Working with floors Working with roofs Adding openings Working with stairs Working with railings Working with ceilings 5. Complex Walls Creating a custom basic wall type Adding curtain walls Adding curtain grids and mullions 6. Visibility and Graphics Controls Using object styles Working with visibility/graphic overrides Using Hide/Isolate Understanding view range Using the Linework Using cutaway views 7. Rooms Adding rooms Controlling room numbering Understanding room bounding elements 8. Schedules and Tags Understanding tags Adding schedules Modifying schedules Creating a key schedule 9. Annotation and Details Adding text Adding dimensions Adding symbols Adding legend views Creating a detail callout Using detail components Adding filled and masking regions 10. The Basics of Families Understanding familiesUsing reference planes, parameters, and constraints Adding solid geometry Adding void geometry Completing the family 11. Sheets, Plotting, and Publishing Adding sheets Exporting to AutoCAD and JPG

Introduction to Adobe Illustrator
By Platform Training
Our beginners Adobe Illustrator course provides effective training in the use of Illustrator's tools to create stunning illustrations and type effects. From our London studios you will learn to design logos and printable documents, work with colours, gradients, layers, fonts, and photos to create eye-catching illustrations and text effects.
Adobe Illustrator Fashion Design
By Platform Training
This one day course was developed in conjunction with industry experts specifically for the needs of fashion and textile designers. It focuses on the drawing and repeating pattern capabilities of illustrator. It would also be useful for tile designers or for anyone interested in learning how to create incredible drawings and repeating patterns with Illustrator.

Advanced Adobe Photoshop
By Platform Training
Our advanced Adobe Photoshop course has been developed especially for Photoshop users who want to harness the full potential of the programme. You will learn advanced techniques for replacing colour, professional image retouching methods and complex blending techniques for integrating textures. You will also discover power user keyboard shortcuts and the advantages of different techniques for masking complex objects, plus much more.

Advanced Adobe Illustrator
By Platform Training
Designed with the experienced user in mind, this one day course offers those already familiar with Illustrator the chance to explore more of its complex creative options, and increase their productivity and output. Creating 3D type and shapes, advanced use of colour and bespoke brushes are just some of the advanced techniques you will learn for creating professional print and web-ready artwork.

Intermediate Adobe Photoshop
By Platform Training
During this 1 day intermediate level course you will learn how to utilise the powerful image editing capabilities of Adobe Photoshop. Building on the topics covered in our Introduction to Photoshop, you will learn how to work with multiple layers, use layer masks, learn how to use smart objects, add sophisticated filters. Re-touching and repairing, montages and image correction techniques are also covered.

Building Great Teams
By Mpi Learning - Professional Learning And Development Provider
This is suitable for anyone managing teams or looking to manage teams in the future. Using the participants own experiences we will look at what drives team effectiveness and the traits of High Performing Teams.

Intermediate Adobe Illustrator
By Platform Training
During this 1 day intermediate level Adobe Illustrator course you will learn how to use Illustrator's tools to create stunning illustrations and type effects. Building on our Introduction to Illustrator (or your exisiting basic knowledge) you will learn how to work with colours, create printable documents, use gradients, layers, fonts, text effects, work with page and product design along with many other more advanced features.

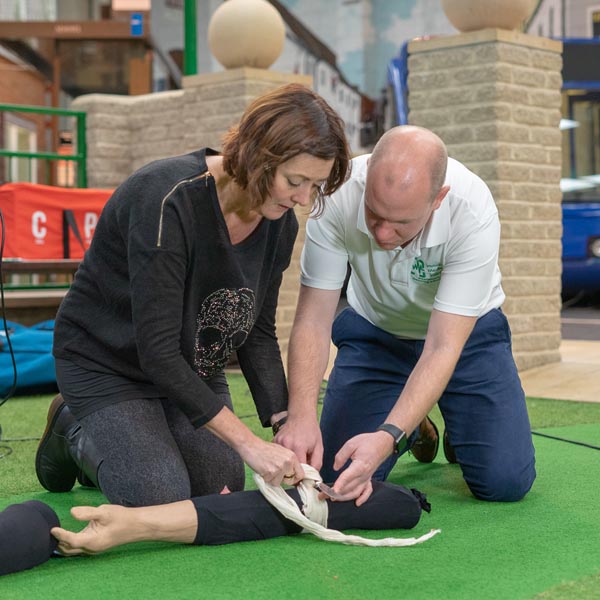
citizenAID
By Immerse Medical
When there is a shooting, stabbing or bomb explosion the initial priority will be public safety. This can delay the time before the emergency services are able to reach the injured. Our 3 hour citizenAID course enables the general public to be effective in these situations before the emergency services are available to provide professional medical support. This course can be delivered on-site or at our training centre in Poole, Dorset. Qualification Information This qualification and learning outcomes are based on the blended recommendations of: European Resuscitation Council, Section 9. First Aid British Army, Battlefield Casualty Drills Course Content Following this course students will: Be able to use the citizenAID app/pocket guide in an emergency situation. Be able to provide immediate first aid to an unresponsive casualty who is breathing. Be able to provide first aid to a casualty with severe external bleeding. Who should attend? This qualification is for all members of the public who wish to learn lifesaving skills and techniques in the event of a deliberate multiple casualty incident. Pre-requisites Students must be at least 14 years old on the first day of training. Assessment and Certifications Assessment of this course is continuous and will take place through knowledge and skills observations. Successful students will receive an Immerse Training Certificate, which is valid for three years. This certificate will be issued by Qualsafe, the awarding body for Immerse Training. Additional Information Course fees include a copy of the citizenAID pocket guide. What makes us different? Fun & Engaging – Gone are the days of boring first aid training. Although professional, our trainers teach in an informal way that encourages student interaction and retention of knowledge. Technology Enhanced Learning – We utilise a range of technologies to make our courses memorable fun and effective. Bespoke Courses – Our on-site courses are designed with the specific risks of your business in mind. Training by doctors, nurses and paramedics – We have years of experience working on the front line of emergency medicine; giving us real world knowledge and skills in managing injured or unwell people.