- Professional Development
- Medicine & Nursing
- Arts & Crafts
- Health & Wellbeing
- Personal Development
Eazzy Slim Hypnotherapy, Hypno-No-Jab and Hypnotic Gastic Band.
(26)By The Northern College Of Clinical Hypnotherapy
🌟 Hypnotherapists’ Workshop Day: The Eazzy Slim System & The Hypnotic Gastric Band 🌟 Date: 21st of June | Location: Online (Zoom) | Time: 10 am till 4 pm Are you ready to expand your weight-loss toolkit with powerful, non-invasive techniques that create real and lasting change? Join us for an immersive one-day workshop where we’ll explore the full potential of the Eazzy Slim Programme — a structured, proven system designed specifically for hypnotherapists to help clients achieve sustainable weight loss without the need for medication or surgery. 🔍 What You'll Learn: The Hypno-No-Jab Approach: Discover how to offer clients a highly effective hypnotic alternative to pharmaceutical weight-loss injections like Mounjaro or Ozempic especially important given rising concerns over side effects, long-term use, and the controversial decision to make these drugs available to children. Hypnotic Gastric Band: Learn how to safely and ethically guide clients through a hypnotic gastric band process, mimicking the physical sensation and psychological impact of surgery without any of the risks. The Psychology of Sustainable Change: Explore how to leverage hypnotherapy to reshape beliefs, habits, and identity around eating, self-worth, and health. 🧠 Why It Matters: While medications like Mounjaro can offer temporary results, they often come with side effects, dependency risks, and rebound weight gain once stopped. Likewise, gastric band surgery, once a popular bariatric option, has seen a sharp decline due to its high rate of complications, reoperations, and limited long-term success. Our clients are looking for something different. Something safe. Natural. Sustainable. Empowering. That’s where you come in. 💼 Leave with a Complete Toolkit: Whether you’re working in-person, online, or offering remote packages, this workshop will give you everything you need to start delivering Eazzy Slim straight away, including: Session structure & protocols Client scripts and resources Marketing guidance for positioning your service as a credible alternative to jabs and surgery Q&A and practitioner support 👥 Who This Is For: Qualified hypnotherapists looking to specialise in weight management Practitioners concerned about the long-term health impact of pharmacological weight loss Therapists passionate about offering clients empowering mind-body solutions 🎟️ Secure your place today and become part of the solution. Places are limited to ensure an interactive, high-value experience.

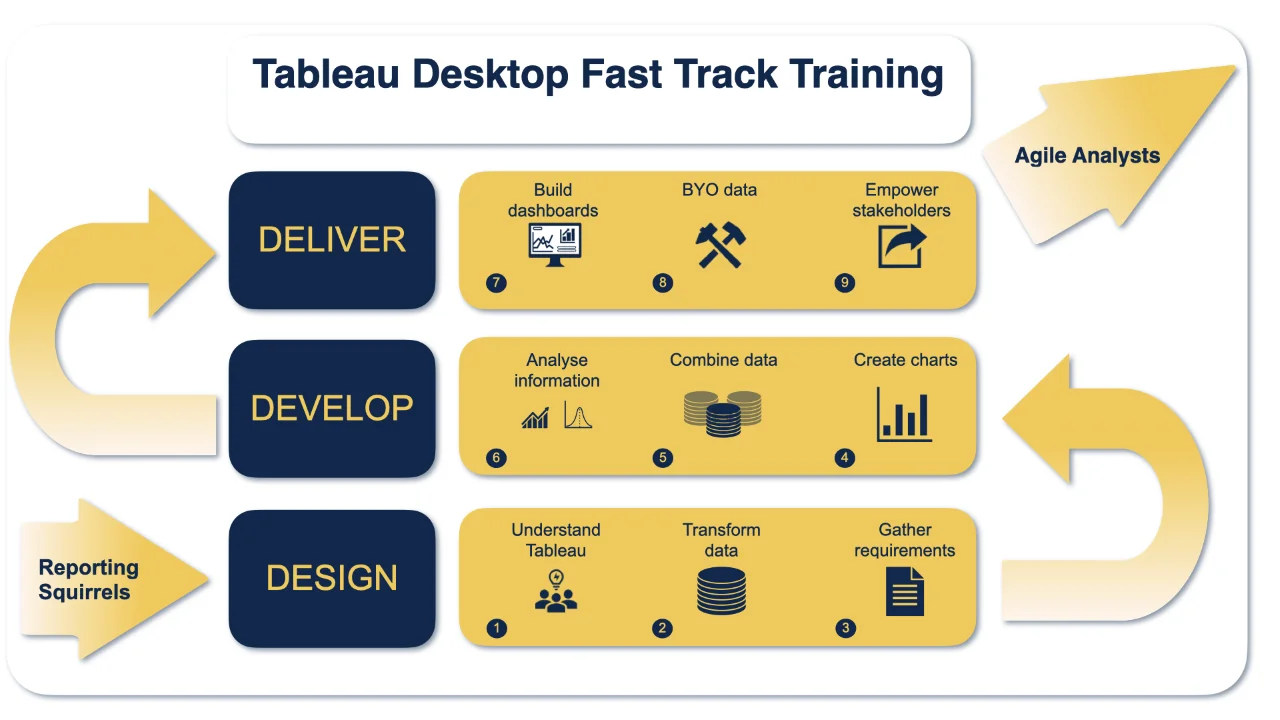
Tableau Training On Tap - Fast Track
By Tableau Training Uk
Tableau is an intuitive and simple tool to learn. This Tableau training course is a jumpstart to getting report writers and analysts who are self-taught or have no previous knowledge to being productive. It covers everything from connecting to data, through to creating interactive dashboards with a range of visualisations in three days. Having a quick turnaround from starting to use Tableau, to getting real, actionable insights means that you get a swift return on your investment. At the end of this course, you will be able to communicate insights more effectively, enabling your organisation to make better decisions, quickly. This accelerated approach is key to getting engagement from within your organisation so everyone can immediately see and feel the impact of the data and insights you create. Our Tableau Desktop Fast Track course combines all of our Foundation (Fundamentals) and Analyst (Intermediate) content into a 3 day live online course with added access to online bonus content of 3 additional modules. Gathering Requirements, Bring Your Own Data and Engaging Users. What do you get? This course is delivered live virtually and has all material provided through our online portal, together with email support and live coaching sessions. The full program includes all of the following elements: 3 days of live and interactive instructor-led sessions delivered by an expert Tableau Trainer 6 weeks access to our live coaching program delivered by expert Tableau coaches 50+ practical exercises to practice what you learn 12 months access to video’s that walk you through the theory and exercise solutions Practical advice, tools and resources for using Tableau in the real world The three additional online modules provide:Clarity on the approach to gathering dashboard requirements in a way that can be translated into dashboard designs.An agile and iterative development process that delivers products that meet user needs more quickly and effectively.An understanding of how end users will interact with dashboards to ensure that designers deliver actionable results. THE SYLLABUS PHASE 1: DESIGN MODULE 1: UNDERSTAND TABLEAU What is possible How does Tableau deal with data Know your way around Review of Type Conversions How do we format charts Dashboard basics – My first Dashboard MODULE 2: TRANSFORM DATA Connecting to and setting up data in Tableau Modifying data attributes How Do I Structure my Data – Groups & Hierarchies, Visual Groups How Tableau Deals with Dates – Using Discrete and Continuous Dates, Custom Dates How do I create calculated fields and why? – Creating Calculated Fields, Types of calculated fields, Row Level v Aggregations, Aggregating dimensions in calculations, Changing the Level of Detail (LOD) of calculations – What, Why, How MODULE 3: GATHER REQUIREMENTS(ONLINE CONTENT ONLY) Brainstorm and assess possible priorities Pitfalls to avoid Gather requirements PHASE 2: DEVELOP MODULE 4: CREATE CHARTS Charts that Compare Multiple Measures – Measure Names and Measure Values, Shared Axis Charts, Dual Axis Charts, Scatter Plots Showing progress over time Creating Tables – Creating Tables, Highlight Tables, Heat Maps Showing Relational & Proportional Data – Pie Charts, Donut Charts, Tree Maps Making things dynamic with parameters MODULE 5: COMBINE DATA Relationships Joining Tables – Join Types, Joining tables within the same database, cross database joins, join calculations Blending – How to create a blend with common fields, Custom defined Field relationships and mismatched element names, Calculated fields in blended data sources Unions – Manual Unions and mismatched columns, Wildcard unions Data Extracts – Creating & Editing Data extracts MODULE 6: ANALYSE INFORMATION Table Calculations Sets, Reference Lines, Trends and Forecasting Answering spatial questions – Mapping, Creating a choropleth (filled) map, Using your own images for spatial analysis, Mapping with spatial files Advanced charts Bar in Bar charts Bullet graphs Creating Bins and Histograms Creating a Box & Whisker plot Viz in Tooltips PHASE 3: DESIGN MODULE 7: BUILD DASHBOARDS Using the Dashboard Interface Device layouts Dashboard Actions – Set actions, Parameter actions Viz in Tooltips for Dashboards Dashboard containers – Horizontal & Vertical containers, Hidden containers Navigate between dashboards Telling data driven stories MODULE 8: BRING YOUR OWN DATA Design Best Practices & Resources Wireframe templates Questions Process Start building and testing MODULE 9: EMPOWER STAKEHOLDERS What is Tableau Server Publishing & permissions How can your users engage with content The Tableau ecosystem Review your progress Your next steps HOW MUCH OF YOUR TIME WILL THIS TAKE? Delegates are also provided 6 weeks access to our Tableau Coaching. We run Live Q&A sessions from 4pm-5pm on a Monday (Connecting to Data and Calculated Fields), 2pm-3pm Friday (Creating Charts) & 4pm-5pm Friday (Dashboard Design). The coaching helps delegates to transition from the theory of using Tableau to its practical use. We’d be expecting them to apply the exercises you’ll be doing during the course, onto your own data after the course. In our experience, this is the best way to increase both understanding and long term memory retention. The live coaching also acts as a troubleshooting platform for any practical issues that delegates need to overcome in the real world. Delegates also have 12 months access to all of the training material covered in the course in the form of an online portal (this includes theory videos, exercise solution videos, exercise materials and even quizzes). We have a growing LinkedIn community that delegates are encouraged to join and participate in. We regularly post useful blog posts and additional training that will enhance the Tableau journey and understanding. We help teams using Tableau to transform in the following ways : From a disjointed understanding of Tableau – To being familiar with Tableau terminology and capability From ad-hoc data uploads and error prone calculations – To reusable data connections and robust metrics From disjointed stakeholder questions – To clear and concise requirements that lead to decision making From being unsure how difficult Tableau will be to learn – To being able to develop standard charts and tables in Tableau with dynamic reporting capabilities From manually combining data for each analytical task – To dynamically combining data from multiple tables for analysis From being unsure how to answer analytical questions and what options there are – To being equipped with multiple actionable, dynamic, analytical use cases From not knowing Why, When and How to create Dashboards or Story’s – To being able to combine analysis to answer complex questions and tell data driven stories From using demo data theory – To Delivering value [Answering questions] on their own data From spending lots of time answering colleagues ad-hoc (data) questions – To empowering stakeholders in answering ad-hoc queries and reducing the time to analyse and steer the business
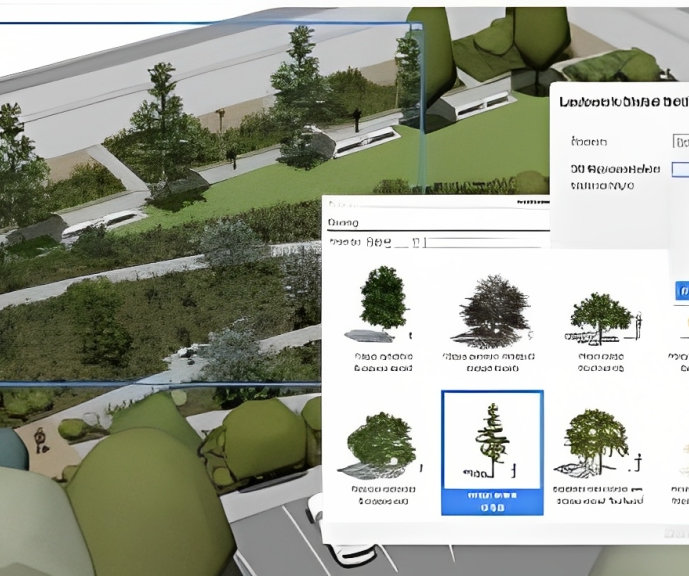
Vectorworks Landmark Training
By London Design Training Courses
Why choose Vectorworks Landmark Training Course? Course info Explore the Vectorworks Landmark Training Course! 1-on-1 Live Online sessions led by certified tutors and industry experts. Master Vectorworks Landmark for landscape and site design, creating captivating outdoor spaces. Enroll now to unleash your design skills. Duration: 16 hrs. Method: 1-on-1, Personalized attention. Schedule: Tailor your own schedule by pre-booking a convenient hour of your choice, available from Mon to Sat between 9 am and 7 pm. This course focuses on Vectorworks Landmark fundamentals, providing essential tools and techniques for landscape architecture, design, and related disciplines. Participants should have a basic understanding of Vectorworks software. The course covers 2D and 3D drawing, file organization, landscape plan/model creation, and more. Learning Objectives: Organize drawing files using industry standards and best practices for effective collaboration. Utilize imported files and field-collected data for base plans and site inventories. Integrate 2D and 3D elements for plan documentation and model analysis. Utilize worksheet features for material quantification and project efficiency. Course Prerequisites: Participants should be familiar with basic drafting concepts, computer operations, and keyboard shortcuts. This training demonstrates sustainable design principles and the use of CAD tools for erosion control, runoff calculations, plant tracking, and sun/shade analysis. Participants will learn to create a 3D site digital terrain model and assess proposed plantings' effects on solar heat gain and water usage. Vectorworks Landmark Basic to Intermediate Training Course Duration: 16 hours Join our comprehensive Vectorworks Landmark Basic to Intermediate Training, designed for landscape architects and designers. Master 2D and 3D landscape design with essential techniques, covering site analysis, plans, irrigation, and 3D visualization. Unleash your creativity with custom plant symbols and detailed planting plans using the plant database. Course Outline: I. Introduction to Vectorworks Landmark (1 hour) An overview of Vectorworks Landmark for landscape design Interface orientation and basic tool usage Navigation and viewport controls Landscape design project creation and management II. Site Analysis and Site Plans (3 hours) Collecting site information and producing site analysis drawings Crafting site plans and hardscape design Working with contours, elevations, and terrain models Incorporating site amenities like paths, fences, and walls III. Planting Plans (5 hours) Utilizing the plant database to select suitable plants for specific regions Creating personalized plant symbols Developing comprehensive planting plans and plant lists Understanding plant compatibility and growth patterns IV. Irrigation Design (2 hours) Designing and editing irrigation systems and zones Integrating irrigation components into the site plan Generating irrigation reports for efficient planning V. 3D Visualization (3 hours) Creating captivating 3D models of landscape designs Applying textures and materials to hardscape elements and plants Utilizing the Renderworks engine for high-quality rendering Enhancing designs with lighting and special effects VI. Customization (1 hour) Tailoring the interface for landscape design efficiency Creating custom object styles and resource libraries VII. Collaboration and Sharing (1 hour) Importing and exporting data from other software platforms Sharing landscape design drawings with colleagues and collaborators VIII. Conclusion and Next Steps (1 hour) Comprehensive review of course content Guidance on further learning resources Q&A session and feedback gathering Enroll in our Vectorworks Landmark Basic to Intermediate Training to enhance your landscape design expertise and unleash your creative prowess. Download Vectorworks Landmark https://www.vectorworks.net/en-GB/landmark By the end of the Vectorworks Landmark Training Course, participants will: Understand the key features and functionalities of Vectorworks Landmark for landscape design. Demonstrate proficiency in using essential tools for site analysis, site plans, and hardscape design. Create detailed planting plans, selecting appropriate plants, and understanding their compatibility and growth patterns. Design efficient and effective irrigation systems, including generating irrigation reports. Create 3D visualizations of landscape designs, applying textures, materials, lighting, and special effects. Customize the interface and create personalized object styles and resources. Collaborate and share landscape design drawings with other software users. Have the foundation to pursue further learning and exploration in landscape design using Vectorworks Landmark.
SketchUp Training Course for Interior Designers and Architects
By London Design Training Courses
Why choose SketchUp Training Course for Interior Designers and Architects? Course info During this training course, you will begin with an introduction to SketchUp, exploring its interface, fundamental concepts, including design tools, component, color and texture, and importing from 3D Warehouse related to interior design. Duration: 6 hrs. Method: 1-on-1, Personalized attention. Schedule: Tailor your own schedule by pre-booking a convenient hour of your choice, available from Mon to Sat between 9 am and 7 pm. Advantages of SketchUp: Intuitive and Fast: Compared to other 3D modeling software, SketchUp is simple, fast, and easy to use. Quick Learning Curve: Within a few hours, users can create simple models and get started with SketchUp. Efficient Modeling: SketchUp allows for the creation of models with fewer faces, optimizing performance. Versatility: Its non-parametric modeling principle makes SketchUp suitable for various applications. Rich Component Library: Access a vast collection of free components in the 3D Warehouse. Extensive Plugins: Benefit from numerous free plugins. Interior Designers' SketchUp Training Course Course Duration: 6 hours I. Introduction to SketchUp (1 hour) Overview of SketchUp for interior design Familiarization with the interface and essential tools Navigating the 3D environment efficiently Project creation and management II. Creating Floor Plans (1 hour) Importing and drawing floor plans accurately Wall, window, and door precision Effective floor level management Organizing designs with Layers and Scenes III. Furniture and Fixtures (2 hours) Accessing 3D Warehouse for furniture and fixtures Crafting custom elements for unique designs Strategic arrangement within the space Materials and textures customization IV. Advanced Modeling (1 hour) Utilizing advanced tools for intricate 3D models Organizing models with groups and components Adding details and finishes for high-quality design V. 3D Visualization (1 hour) Creating immersive 3D models Applying textures to walls, floors, ceilings Mastering rendering for realistic presentations VI. Importing and Exporting (30 minutes) Seamless collaboration with other software File formats and compatibility understanding Preparing models for 3D printing VII. Conclusion and Next Steps (30 minutes) Comprehensive review and key takeaways Further learning resources and improvement avenues Interactive Q&A and feedback collection SketchUp - SketchUp trial https://www.sketchup.com Unlock Your Design's Full Potential With SketchUp's Powerful 3D Software. VR Model Viewing. Free Trial Available. Secure Payment Options. Types: SketchUp Go, SketchUp Pro.

Microsoft Power BI Desktop In-company (now with live online classes)
By Microsoft Office Training
This course will allow you to explore the potential of self-service business intelligence using Power BI Desktop to analyse and connect to different sources of data, creating Relationships between those different datasets, Query the data using Shaping and data Modelling, to create Visualizations, and publish Reports to different platforms . Course Objectives At the end of this course you will be able to: Connect to data from different sources. Use the Query Editor Perform Power BI desktop data Shaping and Transformation. Create Power BI desktop Modelling. Create Power BI desktop Visualizations and Reports. ' 1 year email support service Take a closer look at the consistent excellent feedback from our growing corporate clients visiting our site ms-officetraining co uk With more than 20 years experience, we deliver courses on all levels of the Desktop version of Microsoft Office and Office 365; ranging from Beginner, Intermediate, Advanced to the VBA level and Business Intelligence. Our trainers are Microsoft certified professionals with a proven track record with several years experience in delivering public, one to one, tailored and bespoke courses. Our competitive rates start from £550.00 per day of training Tailored training courses: You can choose to run the course exactly as they are outlined by us or we can customise it so that it meets your specific needs. A tailored or bespoke course will follow the standard outline but may be adapted to your specific organisational needs. Please visit our site (ms-officetraining co uk) to get a feel of the excellent feedback our courses have had and look at other courses you might be interested in. Introduction to Power BI Power BI Jargon explained A quick look at Power BI Desktop A quick look at the Power BI service Helpful resources Power BI and Excel Introduction to using Excel data in Power BI Upload Excel data to Power BI Import Power View and Power Pivot to Power BI Getting started with Power BI Desktop Overview of Power BI Desktop Accessing Help and Helpful resources Connect to data sources in Power BI Desktop Shaping and Transforming Data with Query Editor Introduction to the Query Editor Data Sources Power BI Desktop can Connect to Introduction to Steps and M code Combining Data Using Merge and Append Queries Data Type Properties Working with Delimiters Clean and transform your data with the Query Editor Text Specific Transformation Tools Number Specific Transformation Tools Date Specific Transformation Tools Split and Merge columns Creating an Index Column Adding Conditional Columns Columns From Examples Grouping and Aggregating data Pivoting and Unpivoting Using filters Modeling the data Introduction to modeling your data How to manage your data relationships Create calculated columns Optimizing data models Create calculated measures Show Values As and Quick Measures Create calculated tables Explore your time-based data Introduction to DAX DAX calculation types DAX functions Visualizations Introduction to visuals in Power BI Create and customize simple visualizations Modify colors in charts and visuals Shapes, text boxes, and images Page layout and formatting Group interactions among visualizations Visual hierarchies and drill-down Using custom visualizations Create a KPI Visualization Geo-Data and Maps Reports, Publishing and Sharing Introduction to the Power BI service Quick insights in Power BI Create and configure a dashboard Ask questions of your data with natural language Create custom Q&A suggestions Share dashboards with your organization Introduction to content packs, security, and groups Publish Power BI Desktop reports Print and export dashboards and reports Create groups in Power BI Use content packs Update content packs Publish to web Who is this course for? Who is this course for? This course facilitates you with knowledge on the potential for Power BI Desktop to analyse and connect to different sources of data, creating Relationships between those different datasets, Query the data using Shaping and data Modelling, and to create Visualizations, and publish Reports to different platforms. Requirements Requirements Before attending this course, delegates should have: - A general knowledge of database concepts (fields, records and relationships) - Familiarity with Excel. Career path Career path Business Intelligence Data Analysis ETL & Data Warehousing

Revit Basic to Fundamentals
By London Design Training Courses
Why Choose Revit Basic to Fundamentals Course Course Link In this course you will learn Revit skills for BIM modeling. In-person or live online. Autodesk Revit Architecture training for students to create full 3D architectural project models and set them up in working drawings. Duration: 10hours Method: 1-on-1 method with tailored content and flexible pace, backed by individual support. Schedule: Choose a convenient hour from Mon to Sat between 9 am and 7 pm to create your own schedule. Revit Essentials Training: Learn Revit fundamentals for architecture and structural design, supporting efficient building construction with BIM workflows. Delivery Options: In-class at our center Live online sessions I. Introduction to Revit Overview of Revit and its uses Revit interface and basic tools Navigation and viewport controls Creating and saving projects II. Setting up a Project Creating a new project Setting up project levels and grids Adding site and building information Setting up project units III. Creating Building Elements Creating and modifying walls Adding doors and windows Creating and modifying floors and ceilings Creating roofs and modifying roof shapes Creating stairs and railings IV. Views and Sheets Creating and managing views Creating and managing sheets Adding schedules and tags Creating construction documents V. Annotation and Detailing Adding text and dimensions Creating and modifying detail components Adding symbols and keynote legends Adding annotations to construction documents VI. Conclusion and Next Steps Review of course content Tips for further learning and resources Q&A and feedback Note: The above course outline is just a suggestion, and the course content and duration can be adjusted according to the needs and level of the learners. Detailed Course Outline. 1. Starting a Project Creating a new project and the importance of a template. Understanding project settings and scales Adding levels Adding grids Adding columns 2. Modeling Basics Adding walls Using snaps Wall properties and wall types Using the modified tools Adding doors and windows Using constraints See: Autodesk Seek and Revit City websites 3. Links, Imports, and Groups Working with DWG files Creating topography from a DWG link Understanding CAD inserts Using import tips Creating a group Working with Revit links Managing links 4. Sketch-Based Modeling Components Working with floors Working with roofs Adding openings Working with stairs Working with railings Working with ceilings 5. Complex Walls Creating a custom basic wall type Adding curtain walls Adding curtain grids and mullions 6. Visibility and Graphics Controls Using object styles Working with visibility/graphic overrides Using Hide/Isolate Understanding view range Using the Linework Using cutaway views 7. Rooms Adding rooms Controlling room numbering Understanding room bounding elements 8. Schedules and Tags Understanding tags Adding schedules Modifying schedules Creating a key schedule 9. Annotation and Details Adding text Adding dimensions Adding symbols Adding legend views Creating a detail callout Using detail components Adding filled and masking regions 10. The Basics of Families Understanding familiesUsing reference planes, parameters, and constraints Adding solid geometry Adding void geometry Completing the family 11. Sheets, Plotting, and Publishing Adding sheets Exporting to AutoCAD and JPG

AutoCAD Basic-Intermediate Training Courses 1 on 1
By London Design Training Courses
Why choose AutoCAD Basic-Intermediate Training Courses 1 on 1? Course info. Designed for absolute beginners, this practical and interactive course offers comprehensive AutoCAD1-2-1 training, enabling participants to create 2D plans and elevations proficiently. "Call 02077202581 or WhatsApp 07970325184 to reserve your preferred dates and times. Duration: 10 hrs. Method: 1-2-1, Personalized attention. Schedule: Tailor your own schedule available from Mon to Sat between 9 am and 7 pm. Upon completion, you'll confidently navigate various AutoCAD features. Comprehensive beginners' course covering basics. Personalized attention, ample room for inquiries. Accomplished trainers, one-to-one sessions. All-inclusive course materials provided. Lifetime email support post-training. Gain the ability to: Effectively use AutoCAD features. Create, edit, manipulate plans and drawings. Utilize layers, templates, and dimensions efficiently. No prior AutoCAD experience needed. Basic computer skills are required. You'll receive a detailed PDF manual, free AutoCAD Blocks, and a Certificate of Attendance. AutoCAD Basic to Intermediate Training Course: Session 1: 1. Introduction to AutoCAD Interface, Commands, and Tools - Familiarization with the AutoCAD user interface on Mac - Overview of essential commands and tools 2. Creating and Managing Drawings - Starting a new drawing and setting up units - Saving, opening, and managing drawing files 3. Drawing Basic Shapes and Objects - Drawing lines, circles, arcs, rectangles, ellipses, and other basic shapes - Exploring the creation of precise geometries 4. Basic Modification Techniques - Erasing unwanted objects - Moving objects to new locations - Rotating objects to specific angles - Scaling objects uniformly Session 2: 5. Working with Layers and Properties - Creating layers and organizing objects - Assigning properties to objects based on layers 6. Creating and Modifying Text and Dimensions - Adding text annotations to the drawing - Inserting and customizing dimensions for accurate measurements 7. Introduction to Blocks and Attributes - Understanding the concept of blocks and their benefits - Adding attributes to blocks for dynamic data input Session 3: 8. Advanced Object Modification Techniques - Using fillet and chamfer to create smooth transitions - Trimming and extending objects to desired endpoints 9. Using Grips to Modify Objects - Leveraging grips for easy and intuitive object editing 10. Creating and Modifying Polylines and Splines - Drawing and editing complex shapes using polylines and splines Session 4: 11. Creating and Editing Tables - Generating tables to organize and present data - Modifying table content and appearance 12. Creating and Working with Layouts and Viewports - Setting up layout sheets for plotting and printing - Managing multiple viewports to display different parts of the drawing 13. Printing and Exporting Drawings - Configuring printing options and settings for output - Exporting drawings in different file formats Throughout the course, participants will actively engage in hands-on exercises and projects to practice their skills and reinforce their understanding of AutoCAD 2D for Mac. The training will also provide ample time for Q&A and troubleshooting to address specific concerns and challenges. Download AutoCAD 2024 | AutoCAD Free Trial Autodesk https://www.autodesk.co.uk › products › free-trial Download a free 30-day trial of AutoCAD or any of the toolsets that are included when you subscribe. Note: each trial must be downloaded separately.
Collaborative Selling Activator
By Fred Copestake
Designed for professional B2B salespeople to develop a modern approach to winning business

Collaborative Selling Academy
By Fred Copestake
Designed for professional B2B salespeople to develop a modern approach to winning business

This course provides a comprehensive introduction to foodborne viruses, focusing on their properties, transmission, and impact on food safety. Designed for professionals at all levels, it covers detection methods, contamination risks, and prevention strategies to help businesses mitigate viral threats in food supply chains. Delivered by an industry expert, the course includes an interactive Q&A session for deeper insights. No prior knowledge is required.
