- Professional Development
- Medicine & Nursing
- Arts & Crafts
- Health & Wellbeing
- Personal Development
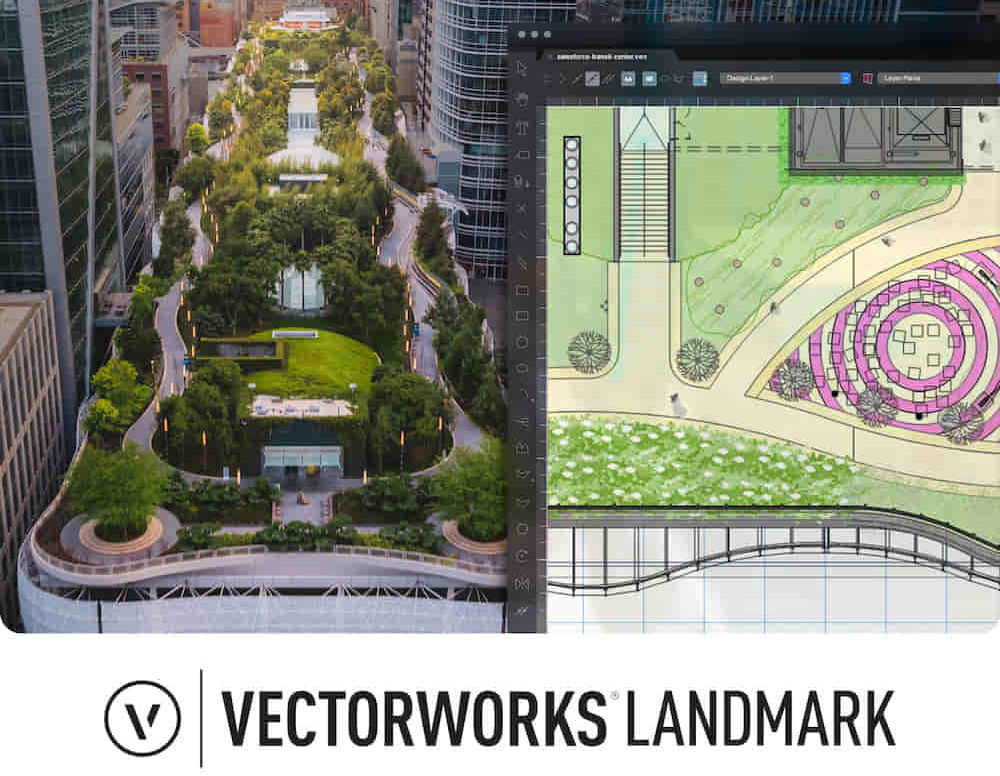
Landmark Training Course With Vectorworks
By ATL Autocad Training London
Who is this course for? Landmark Training Course With Vectorworks. Dive into terrain modeling, planting, irrigation, and site analysis guided by certified tutors. Master these tools for precise landscape designs and effective documentation. Check our Website Enrollment : 1-on-1 Landmark Training. Tailor your schedule. Mon to Sat between 9 am and 7 pm Call 02077202581 to book your slot. Duration: 16 hours. "Split these hours over multiple days as needed for your ideal schedule." Approach: In-person or live online. Landmark Training Course with Vectorworks: Basic to Intermediate Level Course Duration: 16 Hours Embark on a transformative journey with our Landmark Training Course tailored for landscape architects and designers. Over 16 intensive hours, dive deep into Vectorworks Landmark, mastering fundamental and intermediate techniques crucial for comprehensive 2D and 3D landscape design. Craft intricate site analyses, plans, irrigation systems, and elevate your designs with mesmerizing 3D visualizations. Explore custom plant symbols, detailed planting plans, and learn the art of efficient collaboration and customization. Course Highlights: I. Introduction to Vectorworks Landmark (1 hour) Explore Vectorworks Landmark for landscape design Master interface, tool usage, and project management II. Site Analysis and Site Plans (3 hours) Craft detailed site analyses and hardscape designs Work with contours, elevations, and terrain models III. Planting Plans (5 hours) Utilize the plant database for region-specific plant selection Create personalized plant symbols and comprehensive planting plans IV. Irrigation Design (2 hours) Design and edit efficient irrigation systems and zones Integrate irrigation components into site plans V. 3D Visualization (3 hours) Create captivating 3D models with realistic textures and materials Enhance designs with advanced lighting and special effects VI. Customization (1 hour) Tailor the interface for efficient landscape design Create custom object styles and resource libraries VII. Collaboration and Sharing (1 hour) Seamlessly import/export data from other platforms Share designs effectively with colleagues and collaborators VIII. Conclusion and Next Steps (1 hour) Review course content comprehensively Receive guidance on further learning resources Engage in a Q&A session and provide valuable feedback Enhance your landscape design expertise and unleash your creativity. Enroll now in our Vectorworks Landmark Basic to Intermediate Training and transform your designs. Download Vectorworks Landmark By the end of the Vectorworks Landmark Training Course, participants will: Understand the key features and functionalities of Vectorworks Landmark for landscape design. Demonstrate proficiency in using essential tools for site analysis, site plans, and hardscape design. Create detailed planting plans, selecting appropriate plants, and understanding their compatibility and growth patterns. Design efficient and effective irrigation systems, including generating irrigation reports. Create 3D visualizations of landscape designs, applying textures, materials, lighting, and special effects. Customize the interface and create personalized object styles and resources. Collaborate and share landscape design drawings with other software users. Have the foundation to pursue further learning and exploration in landscape design using Vectorworks Landmark. Mastering Foundations Begin your project by organizing your files and importing survey data. Learn to sketch existing buildings using Building Shell tools and model neighboring structures with Massing Model. Explore different methods for laying out survey points and marking existing features with precision. Objectives: Review File Organization Techniques Import Survey Data (DWG Import) Create Building Structures with Building Shell Tools Utilize Triangulation and Arc Tool for Precision Master Various Tape Measurement Techniques Elevating Your Design Enhance your survey with detailed ground, existing trees, and fences. Conduct shadow analysis to optimize planting locations. Dive into the Vectorworks Plant tool, your key design companion. Objectives: Develop Detailed Ground Surfaces Incorporate Existing Trees and Fences Design with Railing Fence Tool Conduct Shadow Analysis using Heliodon Tool Utilize Plant Tool Modes for Plant Placement Access Existing Plant Libraries and Customize Plants in 2D/3D Crafting Landscapes Create vibrant plant mixes using Landscape Area tool and apply them across your site models. Design intricate hardscapes, aligning them effortlessly even in complex paving scenarios. Learn to use components for detailed reporting, cut and fill calculations, and precise detailing. Explore custom object creation and site furniture placement. Objectives: Design Landscape Areas and Define Custom Plant Mixes Create Hardscapes and Define Custom Paving Constructions Generate Reports and Tags for Landscape Areas and Hardscapes Access and Manage Objects in Resource Manager Craft Custom Objects and Site Furniture Polished Presentation Present your designs professionally using Sheet layers and viewports. Create Section viewports to cut through your model and Detail viewports to focus on specific areas. Enhance visual appeal with mood boards and annotations, ensuring a refined, detailed presentation. Objectives: Craft Sheet Layers for Presentation Create Plan, Elevation, and Perspective Viewports Generate Section and Detail Viewports Annotate Viewports for Clear Communication Incorporate Images and Plant Reports for Comprehensive Presentations Master Vectorworks Landmark: Gain expertise in essential and advanced 2D/3D landscape design tools for precision and efficiency. Boost Efficiency: Learn time-saving techniques and workflows tailored to Vectorworks Landmark, enhancing productivity. Versatile Landscape Skills: Develop proficiency in site analysis, planting plans, hardscapes, and irrigation systems for diverse projects. Industry-Ready Expertise: Acquire sought-after skills in landscape architecture, paving the way for career growth. Flexible Learning: Access recorded lessons for convenient review and receive lifetime email support for ongoing guidance.

PMI-RMP Exam Prep: Virtual In-House Training
By IIL Europe Ltd
PMI-RMP® Exam Prep: Virtual In-House Training This course is aimed at preparing the participant to pass the PMI-RMP® (Risk Management Professional) exam. The course will also provide practical tips and tools that can be used in any organization's project management risk practices. In this expanded session, you will also have time to practice your exam taking skills with coaching from a credentialed instructor. The course includes the tool RMP-IQ, with sample exam questions to practice for the exam and allow participants to see their knowledge level in the various domains. What You Will Learn At the end of this course, participants will be able to: Explain the value and benefits of the PMI-RMP® credential Perform a self-assessment of your knowledge and skills Prepare a study plan that will allow you to pass the exam Foundation Concepts The Risk Management Professional (PMI-RMP®) Exam PMI's Standard for Risk Management Portfolios, Programs and Projects Key risk definitions Risk management life cycle Levels of Risk Management Enterprise Risk Management Portfolio Risk Management Program Risk Management Project Risk Management Risk Strategy and Planning: Part 1 Task 1: Perform a preliminary document analysis Task 2: Assess project environment for threats and opportunities Task 3: Confirm risk thresholds based on risk appetites Risk Strategy and Planning: Part 2 Task 4: Establish risk management strategy Task 5: Document the risk management plan Task 6: Plan and lead risk management activities with stakeholders Agile, programs, and portfolio aspects of risk strategy and planning Risk Identification: Part 1 Objectivity and bias Task 1: Conduct risk identification exercises Risk Identification: Part 2 Task 2: Examine assumption and constraint analysis Task 3: Document risk triggers and thresholds based on context / environment Task 4: Develop risk register Agile, programs, and portfolio aspects of risk identification Risk Analysis: Part 1 Task 1: Perform qualitative analysis Risk analysis in an agile environment Risk Analysis: Part 2 Task 2: Perform quantitative analysis Task 3: Identify threats and opportunities Program and portfolio aspects of risk analysis Risk Response Task 1: Plan risk responses Agile, programs, and portfolio aspects of risk response planning Task 2: Implement risk responses Monitor and Close Risks: Part 1 Task 1: Gather and analyze performance data Monitor and Close Risks: Part 2 Task 2: Monitor residual and secondary risks Task 4: Monitor project risk levels Task 3: Provide information required to update relevant project documents Agile, programs, and portfolio aspects of monitoring and closing risks

Risk Assessment Training
By The Teachers Training
Overview Risk Assessment Training Course is yet another 'Teacher's Choice' course from Teachers Training for a complete understanding of the fundamental topics. You are also entitled to exclusive tutor support and a professional CPD-accredited certificate in addition to the special discounted price for a limited time. Just like all our courses, this Risk Assessment Training Course and its curriculum have also been designed by expert teachers so that teachers of tomorrow can learn from the best and equip themselves with all the necessary skills. Consisting of several modules, the course teaches you everything you need to succeed in this profession. The course can be studied part-time. You can become accredited within 05 Hours studying at your own pace. Your qualification will be recognised and can be checked for validity on our dedicated website. Why Choose Teachers Training Some of our website features are: This is a dedicated website for teaching 24/7 tutor support Interactive Content Affordable price Courses accredited by the UK's top awarding bodies 100% online Flexible deadline Entry Requirements No formal entry requirements. You need to have: Passion for learning A good understanding of the English language Be motivated and hard-working Over the age of 16. Certification CPD Certification from The Teachers Training Successfully completing the MCQ exam of this course qualifies you for a CPD-accredited certificate from The Teachers Training. You will be eligible for both PDF copy and hard copy of the certificate to showcase your achievement however you wish. You can get your digital certificate (PDF) for £4.99 only Hard copy certificates are also available, and you can get one for only £10.99 You can get both PDF and Hard copy certificates for just £12.99! The certificate will add significant weight to your CV and will give you a competitive advantage when applying for jobs. Module 01: What is Risk Assessment? What is Risk Assessment? 00:10:00 Module 02: How to Manage Risks How to Manage Risks 00:14:00 Module 03: Risk Assessment Toolkit Risk Assessment Toolkit 00:09:00

ISTQB® Foundation Training Course for the team (BCS CTFL) - Manchester
By Day Consulting - ISTQBĀ® accredited training provider
ISTQB® FOUNDATION TRAINING COURSE (2 persons minimum) The aim of this course is to provide you with the knowledge and skills to pass an exam certifying you as an ISTQB® Certified Tester - Foundation Level. Most organisations require this certification as a minimum skill requirement for software testers. In this course you will learn a standardized approach to software testing that will be immediately applicable to your projects. In order to get the certification you will be required to pass a 60-minute exam. Our trainers will fully prepare you by employing scenarios that mirror the exam questions, and by focusing course delivery with a balance of theory and practice. Target group: Functional Tester, Agile Tester, User Acceptance Tester, Test Automation Specialist, Performance Testing Specialist, Testing Team Lead, Test Manager, Business analyst Prerequisites: There are no specific prerequisites for this course. This course is suitable for anyone involved in software testing. Duration: 3 days. Training objectives: Learn aspects of test planning, estimation, monitoring and control. Understand and use international standards and terminology. Understand and implement effective testing techniques. Be well prepared for the exam. Identify the missing testing skills for the career development purposes. This course covers the following areas: Fundamentals of software testing Testing throughout the life cycle (software development models, test levels, test types) Test design techniques (e.g. specification-based or black-box techniques, structure-based or white-box techniques) Static testing (static testing techniques, review process, tool-assisted static analysis) Test management (test organisation, test planning and estimation, test progress monitoring and control, risks) Tools to support testing (types, benefits and risks) Language: English
ITIL 4 Specialist: Drive Stakeholder Value: Virtual In-House Training
By IIL Europe Ltd
ITIL® 4 Specialist: Drive Stakeholder Value: Virtual In-House Training The ITIL® 4 Specialist: Drive Stakeholder Value module is part of the Managing Professional stream for ITIL 4. Candidates need to pass the related certification exam for working towards the Managing Professional (MP) designation. This course is based on the ITIL® 4 Specialist: Drive Stakeholder Value exam specifications from AXELOS. With the help of ITIL® 4 concepts and terminology, exercises, and examples included in the course, candidates acquire the relevant knowledge required to pass the certification exam. What You Will Learn The learning objectives of the course are based on the following learning outcomes of the ITIL® 4 Specialist: Drive Stakeholder Value exam specification: Understand how customer journeys are designed Know how to target markets and stakeholders Know how to foster stakeholder relationships Know how to shape demand and define service offerings Know how to align expectations and agree on details of services Know how to onboard and offboard customers and users Know how to act together to ensure continual value co-creation (service consumption / provisioning) Know how to realize and validate service value Customer Journey Purpose of the Module Purpose of Mastering the Customer Journey Touchpoints and Service Interactions Module Topics Mapping the Customer Journey Designing the Customer Journey Measuring and Improving the Customer Journey Customer Journey Step 1: Explore Purpose of the Module Purpose of the Explore Step Module Topics Understanding Service Consumers Understanding Service Providers Understanding and Targeting Markets Customer Journey Step 2: Engage Purpose of the Module Purpose of the Engage Step Aspects of Service Value Module Topics Service Relationship Types Building Service Relationships Building and Sustaining Trust and Relationships Analyzing Customer Needs Managing Suppliers and Partners Customer Journey Step 3: Offer Purpose of the Module Purpose of Shaping Demand and Service Offerings Module Topics Managing Demand and Opportunities Specifying and Managing Customer Requirements Designing Service Offerings and User Experience Selling and Obtaining Service Offerings Customer Journey Step 4: Agree Purpose of the Module Purpose of Aligning Expectations and Agreeing on Services Module Topics Agreeing on and Planning Value Co-Creation Negotiating and Agreeing on a Service Customer Journey Step 5: Onboard Purpose of the Module Purpose of Onboarding and Offboarding ITIL® Management Practices Module Topics Planning Onboarding Fostering Relationships with Users Providing User Engagement and Delivery Channels Enabling Users for Service Elevating Mutual Capabilities Offboarding Customer Journey Step 6: Co-create Purpose of the Module Purpose of Service Provision and Consumption Module Topics Service Mindset Ongoing Service Interactions Nurturing User Communities Customer Journey Step 7: Realize Purpose of the Module Measuring Service Value Purpose of Value Capturing and Customer Journey Improvement Realizing Service Value in Different Settings Module Topics Tracking Value Realization Assessing and Reporting Value Realization Evaluating Value Realization and Improving Customer Journeys Realizing Value for the Service Provider
Revit MEP Training for 15 hours - Live and Online
By FirstScale Revit Consultant and Training
The Revit MEP course (£525), offers you individual learning (One to One) to improve your skills in Revit, and this course extends to 15 hours.

IAAS: Casework Assistant Exam Preparation Course
By DG Legal
This half day online course will assist candidates in preparing for the forthcoming initial Casework Assistant exam.

MICRO & NANOFAT GRAFTING TRAINING COURSE
By Harley Elite Academy (HeLa)
EXPERT – MASTERCLASS 8 CPD POINTS 1 DAY INTENSIVE COURSE ONLINE or IN-CLINIC NOTE! After booking we will contact you for scheduling the exact course date! Courses dates are subject to change due to mentors availability. We will inform you via email if a date becomes available! DERMAGRAFT AND ENRICHED NANO-MICROFAT TRANSFER FOR FACE, NECK & HANDS – VOLUMIZATION & REJUVINATION WHAT IS MICROFAT AND NANOFAT GRAFTING FOR FACE AND NECK LIFT? Microfat and enriched nanofat graft transfer (also known as autologous fat transfer or lipoinjection), to the face and the neck is a minimally invasive, short-lasting procedure with rapid recovery, and can be done under local anaesthesia. Following completion of the procedure, the patient can return to the normal daily life activities. But firstly, we need to clearly explain what the terms microfat and nanofat grafts mean…. Microfat is defined a small-diameter fat particle and is used to improve the appearance of wrinkles, grooves and the lack of volume and sagginess of the skin of the face and neck, in response to the aging process. Similarly, nanofat, is referred to as the smallest diameter fat particle. The main advantage of the nanofat is that it contains cells that have the ability to differentiate in any type of body cell. Stem cells – as they are called- play a very important role in the process of rejuvenation, as they can differentiate into cells called fibroblasts which in turn produce collagen thus making the skin firmer and more youthful in appearance. The Course can be divided into two stages: 1. In the first stage, fat cells will be obtained from one or more parts of the body and are then purified and injected into the face and the neck. The doctor will identify an area in your body where the fat will be obtained from. This area is usually the flanks, but fat can also be obtained from other areas such as the abdomen, and the outer and inner thighs. You will be given enough local anaesthesia to numb the area where the fat will be harvested from. Then, a small-diameter cannula called microcannula connected to a special vacuum syringe will be gently introduced under the skin to obtain the fat. During this process, you should not feel any pain, the local anaesthetic will have made you numb. After the fat is harvested, it will contain a mixture of fat cells, blood, water, and local anaesthetic. Therefore, this fat will not be pure. This mixture of fat, blood, water and local anaesthetic will then become filtered into a special filtering and processing device whereby all the blood, water and local anaesthetic are being washed out, so that pure fat remains. This fat is then further processed by passing it through special filters whereby it becomes a smaller-sized fat particle known as microfat and nanofat graft. You need to be medically qualified as a doctor, dentist, nurse, pharmacist or paramedic with full governing body registration and have completed a Foundation Filler Course and to have administered a number of cases. Additional information ATTENDANCE ONLINE (theory), IN-CLINIC (Practice) COURSE LEVEL EXPERT | Masterclass Course

Early Years Teacher & Child Care - Training Courses
By Imperial Academy
Level 7 Diploma(FREE QLS Endorsed Certificate)| 11 CPD Courses+11 PDF Certificates| 140 CPD Points|CPD & CiQ Accredited