- Professional Development
- Medicine & Nursing
- Arts & Crafts
- Health & Wellbeing
- Personal Development
1993 Courses in Cardiff delivered Live Online
AutoCAD One to One Training Course
By Real Animation Works
Autocad face to face training customised and bespoke Online or Face to Face

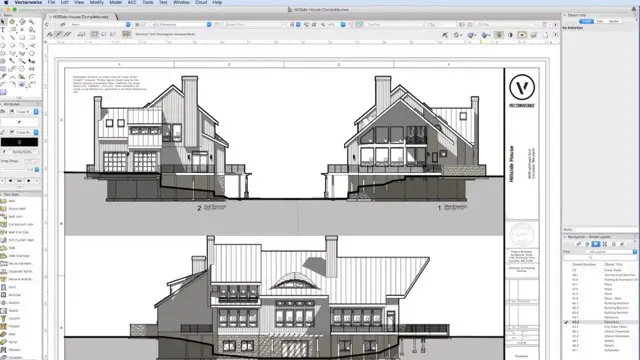
Vectorworks One to One training course for interior designers
By Real Animation Works
Vectorworks Evening Course face to face One to one
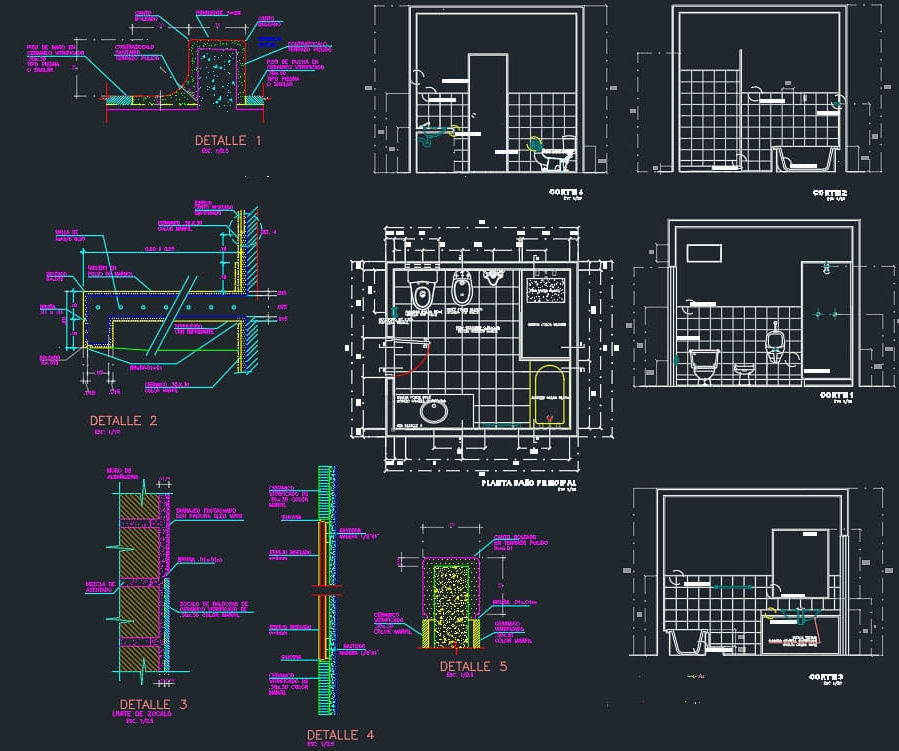
AutoCAD Basics-Advanced Training Classes
By London Design Training Courses
Why AutoCAD Basics-Advanced Training Classes? Click here for more info AutoCAD Basics to Advanced Level Training Master drawing, editing, and advanced techniques. Optimize productivity and customize workspace. Create precise 2D drawings for various industries. Access recorded lessons and lifetime email support. Duration: 16 hrs Method: 1-on-1, Personalized attention. Schedule: Tailor your own schedule by pre-booking a convenient hour of your choice, available from Mon to Sat between 9 am and 7 pm. The AutoCAD from Basics leading to Advanced Training Course offers a comprehensive learning experience for participants to become proficient in AutoCAD. Whether you're a beginner or an experienced user, this progressive program covers the full spectrum of AutoCAD functionality. Participants will learn core features like drawing, editing, annotations, and dimensioning, progressing to advanced topics such as object manipulation, workspace customization, and workflow optimization. Upon completion, participants will create precise 2D drawings and designs. Interactive learning experiences with experienced instructors are available in-person or through live online sessions. AutoCAD 2D Course Outline: Session 1: Introduction to AutoCAD interface, commands, and tools Managing drawings and drawing basic shapes Basic modification techniques (erase, move, rotate, scale) Session 2: Working with layers and properties Creating and modifying text and dimensions Introduction to blocks and attributes Session 3: Advanced object modification techniques (fillet, chamfer, trim, extend) Using grips to modify objects Creating and modifying polylines and splines Session 4: Creating and editing tables Working with layouts and viewports Printing and exporting drawings Construction detailing and Detailed sections Course Highlights: Engaging exercises and projects to reinforce skills. Q&A and troubleshooting support. Solid understanding of AutoCAD 2D for basic to intermediate drawings. List of Topics Covered: Drawing: Line, Polyline, Circle, Arc, Rectangle, Ellipse, Spline, Polygon, Ray, Hatching, Gradient. Inquiry: Measure and Select All. Modify: Move, Copy, Rotate, Mirror, Fillet, Trim, Extend, Erase, Offset, Explode, Array, Stretch, Break, Polyline Edit, Hatch Edit, Scale. Layers: Creating, Managing, Changing, Line Type, Line Weights. Annotation: Dimensions, Text, Dimension Style, Text Style, Leaders. Properties: Colors, Line weights, Line Types, Line Type Scaling. Blocks: Create, Insert, Edit, Explode, Export. Insert: Insert, Attach. View: Navigate, View, Windows. Plot/Print: Model Space, Layouts/Workspaces, Viewports, Layout Scaling, Paper Setup, What To Plot, Plot Scale, Plot Offset, Plot Options. Final Project: Create a Plan, Section, and Elevation drawing. Option for a personal project. Free Trial - Download AutoCAD Software & Toolsets: Participants can download a free trial of AutoCAD and industry-specific toolsets from Autodesk's official website: (https://www.autodesk.co.uk). Master AutoCAD Basics: Understand the interface, commands, and drawing tools. Create and Modify Drawings: Proficiently manage drawings and apply various modification techniques. Work with Layers and Annotations: Effectively use layers, text, and dimensions. Utilize Advanced Drawing Techniques: Apply advanced object modifications and work with polylines. Navigate Layouts and Viewports: Manage layouts, viewports, and printing/exporting. Hands-On Project Experience: Practice skills through exercises and a final project. Personalized Learning: Receive focused one-to-one attention. Convenient Options: Choose in-person or live online sessions. Lesson Recordings and Support: Access recorded lessons and receive ongoing email assistance. Enhance Career Opportunities: Develop valuable 2D drawing skills for career advancement.
Advanced Visualization with Power BI (AVIAD)
By Online Productivity Training
OVERVIEW Prerequisites—DIAD training or equivalent working experience This one-day course will cover Power BI report layouts and structure the agile process to creating Power BI data visualizations. It will help attendees to understand the art behind visualizations, the implications behind choosing the right charts, the impact of color, shape, and size, and finally the use of Power BI custom visuals. The course includes various design patterns of dashboards and reports, as well as best practices for authoring great reports and dashboards for business users. The course content is managed by the Power BI engineering team at Microsoft. There is no exam associated with the course. COURSE BENEFITS: Understand the need for storytelling with data Understand the agile process to creating Power BI data visualizations Understand the art behind visualizations Gain familiarity with Power BI report layouts and structure Understand implications behind choosing the right charts Gain familiarity with using Power BI custom visuals WHO IS THE COURSE FOR? Power BI report developers who wish to improve the aesthetic quality of their reports Power BI and other BI practitioners who would like to understand more about the theory of data visualization BI practitioners who wish to create reports that communicate the meaning behind the data more clearly Power BI users who would like to explore the types of chart and visual available that answer different types of business question COURSE OUTLINE Module 1 What Is Storytelling With Data? Volume, Velocity and Variety The importance of business questions What is a story in this context? Module 2 The Science Behind Data Visualization Basic problems to avoid Memory and visualization Ways to spark iconic, short-term and long-term memory Module 3 The Process Behind Data Visualization Using an agile approach to report development Data structure and data grain Converting the story to a data model Module 4 Dashboards And Reports Terminology and definitions Dashboard layout and structure Report layout and structure Storyboarding Drill-through, bookmarks, toggles and tooltips Module 5 Chart Selection Charts for comparison Time series Proportions Constructing effective tables, cards and slicers Scatterplots Module 6 Accessibility And Custom Visuals Report accessibility checklists Custom visuals Creating a custom R visual Charticulator Module 7 Publishing And Formatting Colour schemes Making a Power BI theme Use of fonts, icons and symbols Sizing dashboard and report tiles Sparklines, hyperlinks and images Module 8 Report Authoring - Best Practices Design thought process The audience Defining the platform environment The user experience Visualization Implementation and testing Optimization Module 9 Dashboard And Goals Design Tips and tricks Best practices for dashboard design Tracking business metrics with goals

Microsoft Project White Belt 2013: Virtual In-House Training
By IIL Europe Ltd
Microsoft Project White Belt® 2013: Virtual In-House Training This workshop serves as an introduction to the interface and features of Microsoft® Project 2013. This course will be led by an IIL-certified instructor who will outline the benefits of Microsoft Project, provide tips on using various features and common shortcuts, recommend guidelines, and discuss the application of scheduling concepts to manage project work This workshop serves as an introduction to the interface and features of Microsoft® Project 2013. This course will be led by an IIL-certified instructor who will outline the benefits of Microsoft Project, provide tips on using various features and common shortcuts, recommend guidelines, and discuss the application of scheduling concepts to manage project work. What you Will Learn You'll learn how to: Define key scheduling concepts and terms Effectively navigate the user interface and interpret common views Configure essential elements of a new schedule Enter and modify a task list Set dependencies between tasks Create a basic resource list and generate assignments Format targeted areas of the Gantt Chart view Prepare the schedule for printing Getting Started Introductions Course objectives Course outline Navigating the User Interface and Views Navigate and use the Ribbon Use and customize the Quick Access Toolbar Modify general and display options Become familiar with major elements on the Project screen Navigate Gantt Chart, calendar, and network diagram views Search for a help topic Setting up a New Schedule Create new schedules Create a new schedule using existing information Enter and modify the schedule start date Enter and modify exception days in the calendar Entering, Modifying, and Outlining Task Data Enter, edit, correct, and clear information Enter unscheduled tasks Enter duration estimates for a single task or multiple tasks Organize tasks Set up a multi-level outline Add notes to tasks Creating Dependencies by Setting Links Identify a critical path in a simple schedule Understand how scheduling software calculates a critical path Describe dynamic schedules and dependencies Create links using various methods Display the critical path Entering and Assigning Resources Plan for resources Create a list of available resources Assign resources Formatting Gantt Chart View Format text and Gantt Chart bars Format a collection of items Configure print options

M.D.D MY PARTNER IS NOT FINANCIALLY RESPONSIBLE PACKAGE (FINANCIAL ARGUMENTS)
(27)By Miss Date Doctor Dating Coach London, Couples Therapy
Couples therapy for a financial argument Implementation of honesty and financial openness Constant arguments over finances Different priorities for finances Discussion of different financial expectations Assessment of differences Resolution tactics Better communication training Financial planning discussion Future expectations ,financial future conclusion 3 sessions 45 mins https://relationshipsmdd.com/financial-arguments/

REVIT ADVANCED ONE-TO-ONE COURSE
By Real Animation Works
3ds max and Photoshop face to face training customised and bespoke.

Autodesk AutoCAD | 3ds Max Training
By London Design Training Courses
Why Learn Autodesk AutoCAD | 3ds Max Training Course? Course Link 3ds Max serves as a powerful tool in architectural modeling, product design, games and films. Engaging with 3ds Max tutorials proves invaluable, particularly for game designers, as it can significantly enhance their professional growth and career prospects. Duration: 16 hrs Method: 1-on-1, Personalized attention. Schedule: Tailor your own schedule by pre-booking a convenient hour of your choice, available from Mon to Sat between 9 am and 7 pm. AutoCAD and 3ds Max Training Course: Tailored Learning Experience: Benefit from personalized, one-on-one training tailored to your individual needs and learning pace. Flexibility in Learning: Choose between attending in-person sessions or participating in live online classes, granting you the flexibility to learn from anywhere at your convenience. Accessible Lesson Recordings: Access recorded lessons to revisit concepts, practice techniques, and reinforce your understanding whenever you need. Ongoing Email Support: Receive continuous assistance and expert guidance through lifetime email support, ensuring you never feel left behind in your learning journey. Learn from Certified Tutors and Industry Experts: Be educated by experienced professionals proficient in both Autodesk AutoCAD and 3ds Max, providing valuable insights into industry best practices. Complimentary Career Advice: Take advantage of our career advisory services to receive valuable guidance in navigating your professional path and making informed decisions. Download Autodesk Autocad and 3ds max AutoCAD and 3ds Max Training Course. Course Duration: 16 hours Course Overview: Join our training program to master AutoCAD and 3ds Max. Suitable for beginners and experienced 2D/3D modelers, this course equips you with essential skills to create stunning designs in both 2D and 3D. Course Outline: Part 1: Introduction to AutoCAD Familiarizing with the AutoCAD interface Understanding the drawing environment Mastering basic 2D geometry creation Exploring essential drawing tools and commands Introduction to blocks and symbols for efficient design Part 2: Advanced AutoCAD Techniques Delving into advanced drawing techniques Manipulating and editing 2D geometry like a pro Creating custom symbols and blocks for enhanced productivity Working with text and annotations for clear communication Utilizing layers and line types for organized design Part 3: Plans sections and Elevations Entering the realm of Plans sections and Elevations Crafting Plans and 2D construction detailing precision Modifying and manipulating 2D seamlessly Crafting custom materials and textures for realistic designs Part 4: Introduction to 3ds Max Embracing the 3ds Max interface and workspace setup Mastering navigation within 3ds Max Understanding the viewport for optimized design Exploring basic 3D modeling techniques in 3ds Max Part 5: Materials and Textures in 3ds Max Applying and modifying textures to elevate designs Unraveling the art of UVW mapping for precise texturing Utilizing the material editor for creative freedom Crafting custom materials to suit your design vision Harnessing the power of Vray materials for realistic renders Part 6: Lighting in 3ds Max Introducing various lighting techniques Understanding light properties for impactful designs Setting up lights strategically to enhance scenes Illuminating scenes using Vray lights Part 7: Cameras in 3ds Max Mastering camera systems in 3ds Max Exploring camera properties for cinematic effects Creating animation with cameras for dynamic scenes Utilizing Vray cameras to achieve stunning renders Part 8: Rendering in 3ds Max Unveiling the art of rendering Utilizing Vray Global Illumination for realistic lighting Leveraging Vray Physical Cameras for precise control Enhancing scenes with Vray HDRI Lighting Following a Vray Rendering Workflow for professional results Part 9: Advanced Modeling Techniques Crafting complex geometry with finesse Utilizing modifiers for intricate designs Exploring polygonal modeling for versatile creations Creating organic and inorganic models with expertise Unleashing the potential of advanced modeling techniques Part 10: Projects Applying all learned skills to create real-world scenes Designing a simple interior scene with attention to detail Crafting a captivating exterior scene for visual impact Creating a complex scene with multiple objects and materials Course Requirements: A computer with AutoCAD and 3ds Max installed Basic knowledge of computer operations An interest in 2D and 3D modeling and design
Rhino 3d and V-ray for Rhino Basic to Intermediate Training
By London Design Training Courses
Why Learn Rhino 3d and V-ray for Rhino Basic to Intermediate Training Course? Course Link Learn Rhino 3D and V-Ray for Rhino Basic to Intermediate Training Course. Designed for beginners and experienced users, this course empowers you with essential modeling and rendering techniques. Choose between in-person or live online sessions. Duration: 16 hrs. Method: 1-on-1, Personalized attention. Schedule: Tailor your own schedule by pre-booking hours of your choice, available from Mon to Sat between 9 am and 7 pm. London Design Training Course Certified tutors for Rhino 3D and Vray Training - Online, On-Site, or In-Class one to one. Choose from a diverse range of Rhino courses conducted by expert trainers with extensive production experience. Rhino 3D and V-Ray Comprehensive Training Course Duration: 16 hours Course Overview: Learn Rhino 3D and V-Ray with our Basic to Intermediate Training Course. Perfect for beginners, this course equips you with the skills to navigate Rhino's interface, create captivating 3D models, apply textures, and utilize V-Ray for stunning renders. Course Outline: I. Introduction to Rhino 3D and V-Ray (1 hour) Get familiar with Rhino 3D and V-Ray interfaces and essential tools Master viewport navigation with expert controls Understand units and tolerance for precise designs Customize your workspace for seamless workflow II. Creating Basic 3D Objects (3 hours) Craft captivating 3D shapes and objects Edit objects and work with curves for refined designs Explore surfaces and solids for advanced modeling Utilize transformations and copying techniques for enhancements III. Materials and Textures (2 hours) Unleash the power of materials and textures on your designs Apply stunning materials to bring your creations to life Enhance your designs with custom materials for an aesthetic boost IV. Basic Lighting Techniques in V-Ray (2 hours) Discover the magic of lighting with V-Ray for impactful renders Utilize V-Ray lights and HDRI maps for striking lighting effects Adjust lighting settings for impeccable results V. Enhancing Renders with V-Ray Settings (3 hours) Optimize V-Ray render settings for the best output Adjust global illumination and reflection settings for desired looks Elevate renders with dynamic effects like depth of field and motion blur VI. Advanced Modeling Techniques (2 hours) Master advanced modeling tools for intricate shapes Refine curve and surface creation and editing skills Handle solids with Boolean operations and trimming techniques VII. Advanced Lighting Techniques in V-Ray (2 hours) Create and adjust artificial lights for perfect illumination Utilize V-Ray's Sun and Sky system for realism Craft custom HDR images for enhanced lighting VIII. Exporting and Importing (1 hour) Learn file formats for seamless sharing and collaboration Prepare models for 3D printing with best practices Integrate models from other software for a unified workflow IX. Conclusion and Next Steps (30 minutes) Recap course knowledge and highlights Access valuable tips and resources for continuous learning Engage in interactive Q&A for feedback and support Resources: Explore V-Ray with a free trial at: https://www.chaosgroup.com/vray/sketchup/free-trial Access material library at: https://www.vray-materials.de/ Discover textures at: https://textures.com/ Downloads: Download Rhino 7 for Windows for a full 90-day evaluation at: https://www.rhino3d.com Experience Rhino 7 for Mac Evaluation with a user-friendly interface and seamless performance for 90 days. Upon completing the Rhino 3D and V-Ray Basic to Intermediate Training Course, participants can expect to achieve the following learning outcomes: Proficiency in Rhino 3D and V-Ray: Develop a comprehensive understanding of Rhino 3D and V-Ray interfaces, tools, and functionalities, enabling participants to navigate and utilize the software effectively. 3D Modeling Skills: Master the art of creating captivating 3D objects and shapes using Rhino 3D, including editing, transforming, and refining designs for diverse applications. Material Application: Acquire the ability to apply and customize materials and textures to enhance the visual appeal and realism of 3D models, elevating the quality of designs. Lighting Techniques: Gain expertise in utilizing V-Ray lighting tools, such as V-Ray lights and HDRI maps, to achieve striking lighting effects in rendered scenes. Rendering Excellence: Learn to optimize V-Ray render settings, control global illumination, and apply dynamic effects like depth of field and motion blur for high-quality and impressive renders. Advanced Modeling: Develop skills in advanced modeling techniques, including handling curves, surfaces, and solids, enabling participants to tackle complex design challenges. Lighting Mastery: Acquire the knowledge and expertise to create and adjust artificial lights, utilize the Sun and Sky system, and craft custom HDR images for realistic lighting setups. Seamless File Management: Understand various file formats for exporting and importing 3D models, facilitating efficient collaboration and preparation for 3D printing. Creative Problem-Solving: Enhance creative thinking and problem-solving abilities through hands-on practice and exploration of diverse design scenarios. Professional Presentation: Learn post-production techniques in Photoshop to enhance renders and create visually appealing design presentations for effective communication. Continuous Learning: Access valuable resources and tips to encourage continuous learning and professional growth in Rhino 3D and V-Ray.

Autodesk Maya One to One Basic to Advance Training
By Real Animation Works
Maya face to face training customised and bespoke.