- Professional Development
- Medicine & Nursing
- Arts & Crafts
- Health & Wellbeing
- Personal Development
3892 Courses in Cardiff delivered Live Online
TRANSITIONING FROM PECS TO SGDS
By Pyramid Educational Consultants Uk, Ltd.
Is your learner ready to transition to a Speech Generating Device? Do you need help selecting a device and/or preparing your learner for the transition? This training will help get your questions answered! With the current influx of communication devices and apps to the market how do we ensure that basic functional communication skills are maintained and taught right from the beginning? Speech Generating Devices (SGDs) were first introduced for people with motor difficulties like cerebral palsy and now these devices are being introduced to our learners with autism and other related communication difficulties. for these populations, language and cognition are often compromised and basic social and communication skills have not always been mastered prior to the introduction of a device. Because of this, the way we teach the use of SGDs needs to be specifically tailored to fit the needs of each individual paying attention to devices capabilities vs. user capabilities. This full-day workshop will describe procedures for analysing a learner's current PECS skills to determine candidacy for transitioning to a Speech Generating Device (SGD), choosing a device, and teaching functional use of the device, and why we must teach the basic principles of communication to our learner first to ensure positive outcomes are achieved. *Participants should bring a Speech Generating Device (SGD) to the training for use during a variety of activities. WATCH VIDEO TOPICS COVERED INCLUDE Review of the PECS Protocol The unique challenges of learners with complex communication needs Procedures for analysing current PECS skills Determining candidacy for transitioning from PECS to a Speech Generating Device The 5 criteria for appropriate device selection Preparing the learner for the transition Using elements of the PECS protocol to teach functional SGD use Problem solving SGD use Tuition Includes: Detailed Handout with space for note taking, Delegate Practise Bag and Certificate of Attendance. CEUs: 5.5 BACB CEUs; Satisfactory completion of this course requires participants to be present for the duration of the course and to participate in all student responding activities (e.g. questions, role play, quizzes, and surveys). Pyramid Educational Consultants is an approved BACB ACE Provider for Learning (Type 2) Continuing Education Credits. The BACB does not warrant, endorse, sponsor, approve, or partner with the event, organisation, or instructor.

Photoshop Basics to Essentials Training
By London Design Training Courses
Why Choose Photoshop Basics to Essentials Training Course? Course Link Mastering Photoshop is crucial for securing positions in creative fields such as graphic design, digital design, and user interface (UI) design. Acquiring this skill serves as a foundation to excel in various design programs essential for creative professionals. Duration: 16 hrs. Method: 1-on-1, Personalized attention. Schedule: Tailor your own hours of your choice, available from Monday to Saturday between 9 am and 7 pm. Photoshop Course: Total 16 hrs Module 1: Keyboard and Toolbar Shortcuts Customize toolbars and keyboard shortcuts for efficient workflow Learn essential keyboard shortcuts for faster navigation Module 2: Advanced Layer Management Filter, search, and color code layers for better organization Group and merge layers to streamline your design process Explore Blending Modes for creative effects Module 3: Blending Modes Understand Blending Modes and their usage within layers and effects Apply Blending Modes to enhance your designs Module 4: Layer Comps Discover Layer Comps and their benefits in managing complex designs Create, edit, and update Layer Comps for different design versions Export Layer Comps to PSD, PDF, and JPEG formats Module 5: Drawing Vectors Work with Vector images using shapes and the Pen Tool Use the Direct Selection Tool for precise editing Apply colors and create Clipping Masks with vectors Module 6: Advanced Type Techniques Convert text into Shapes and utilize font style changes with the Pen Tool Use text as a Clipping Mask and create text Outlines Design 3D text for impactful typography Module 7: Advanced Adjustment Layers Master advanced adjustments like Curves, Levels, and Black and White Utilize Selective Color and Gradient Maps for creative color control Module 8: Advanced Selection Techniques Use Smart Radius and Select and Mask for precise selections Learn to select complex objects like hair using Color Range and the Pen Tool Save and manage selections using the Path Panel Module 9: Colorizing Black and White Images Module 10: Displacement Maps Module 11: Advanced Filters Create Trees, Frames, Clouds, and Fire with filters Use Polarized, Wave, and Extrusion for artistic effects like "Japanese Sun" Explore Vanishing Point Filter, Camera RAW, Blur for depth of field, and Filter Gallery Combine 3D text with Vanishing Point for stunning designs Use Liquify for image manipulation Module 12: Introduction to Actions Automate tasks using Photoshop's preset Actions Create your own Actions to save time and effort Module 13: Creating an Animated GIF Learn frame by frame animation Utilize the Timeline to create engaging animated GIFs Learning Outcomes: Master advanced selection techniques, including the Path and Pen Tool, for precise editing. Gain proficiency in advanced layer management and utilize Layer Comps for efficient design organization. Enhance your designs with a deeper understanding and application of Blending Modes. Create visually appealing 3D text and text outlines to add depth and impact to your artwork. Explore advanced Filters like Displacement Maps, Blurs, and Distortion for creative effects. Automate tasks with actions and batch processing, streamlining your workflow. Craft engaging animated GIFs to add dynamic elements to your designs. Skillfully set project requirements by identifying the purpose, target audience, copyright considerations, and project management tasks for successful project execution.

DP-203T00 Data Engineering on Microsoft Azure
By Nexus Human
Duration 4 Days 24 CPD hours This course is intended for The primary audience for this course is data professionals, data architects, and business intelligence professionals who want to learn about data engineering and building analytical solutions using data platform technologies that exist on Microsoft Azure. The secondary audience for this course includes data analysts and data scientists who work with analytical solutions built on Microsoft Azure. In this course, the student will learn how to implement and manage data engineering workloads on Microsoft Azure, using Azure services such as Azure Synapse Analytics, Azure Data Lake Storage Gen2, Azure Stream Analytics, Azure Databricks, and others. The course focuses on common data engineering tasks such as orchestrating data transfer and transformation pipelines, working with data files in a data lake, creating and loading relational data warehouses, capturing and aggregating streams of real-time data, and tracking data assets and lineage. Prerequisites Successful students start this course with knowledge of cloud computing and core data concepts and professional experience with data solutions. AZ-900T00 Microsoft Azure Fundamentals DP-900T00 Microsoft Azure Data Fundamentals 1 - Introduction to data engineering on Azure What is data engineering Important data engineering concepts Data engineering in Microsoft Azure 2 - Introduction to Azure Data Lake Storage Gen2 Understand Azure Data Lake Storage Gen2 Enable Azure Data Lake Storage Gen2 in Azure Storage Compare Azure Data Lake Store to Azure Blob storage Understand the stages for processing big data Use Azure Data Lake Storage Gen2 in data analytics workloads 3 - Introduction to Azure Synapse Analytics What is Azure Synapse Analytics How Azure Synapse Analytics works When to use Azure Synapse Analytics 4 - Use Azure Synapse serverless SQL pool to query files in a data lake Understand Azure Synapse serverless SQL pool capabilities and use cases Query files using a serverless SQL pool Create external database objects 5 - Use Azure Synapse serverless SQL pools to transform data in a data lake Transform data files with the CREATE EXTERNAL TABLE AS SELECT statement Encapsulate data transformations in a stored procedure Include a data transformation stored procedure in a pipeline 6 - Create a lake database in Azure Synapse Analytics Understand lake database concepts Explore database templates Create a lake database Use a lake database 7 - Analyze data with Apache Spark in Azure Synapse Analytics Get to know Apache Spark Use Spark in Azure Synapse Analytics Analyze data with Spark Visualize data with Spark 8 - Transform data with Spark in Azure Synapse Analytics Modify and save dataframes Partition data files Transform data with SQL 9 - Use Delta Lake in Azure Synapse Analytics Understand Delta Lake Create Delta Lake tables Create catalog tables Use Delta Lake with streaming data Use Delta Lake in a SQL pool 10 - Analyze data in a relational data warehouse Design a data warehouse schema Create data warehouse tables Load data warehouse tables Query a data warehouse 11 - Load data into a relational data warehouse Load staging tables Load dimension tables Load time dimension tables Load slowly changing dimensions Load fact tables Perform post load optimization 12 - Build a data pipeline in Azure Synapse Analytics Understand pipelines in Azure Synapse Analytics Create a pipeline in Azure Synapse Studio Define data flows Run a pipeline 13 - Use Spark Notebooks in an Azure Synapse Pipeline Understand Synapse Notebooks and Pipelines Use a Synapse notebook activity in a pipeline Use parameters in a notebook 14 - Plan hybrid transactional and analytical processing using Azure Synapse Analytics Understand hybrid transactional and analytical processing patterns Describe Azure Synapse Link 15 - Implement Azure Synapse Link with Azure Cosmos DB Enable Cosmos DB account to use Azure Synapse Link Create an analytical store enabled container Create a linked service for Cosmos DB Query Cosmos DB data with Spark Query Cosmos DB with Synapse SQL 16 - Implement Azure Synapse Link for SQL What is Azure Synapse Link for SQL? Configure Azure Synapse Link for Azure SQL Database Configure Azure Synapse Link for SQL Server 2022 17 - Get started with Azure Stream Analytics Understand data streams Understand event processing Understand window functions 18 - Ingest streaming data using Azure Stream Analytics and Azure Synapse Analytics Stream ingestion scenarios Configure inputs and outputs Define a query to select, filter, and aggregate data Run a job to ingest data 19 - Visualize real-time data with Azure Stream Analytics and Power BI Use a Power BI output in Azure Stream Analytics Create a query for real-time visualization Create real-time data visualizations in Power BI 20 - Introduction to Microsoft Purview What is Microsoft Purview? How Microsoft Purview works When to use Microsoft Purview 21 - Integrate Microsoft Purview and Azure Synapse Analytics Catalog Azure Synapse Analytics data assets in Microsoft Purview Connect Microsoft Purview to an Azure Synapse Analytics workspace Search a Purview catalog in Synapse Studio Track data lineage in pipelines 22 - Explore Azure Databricks Get started with Azure Databricks Identify Azure Databricks workloads Understand key concepts 23 - Use Apache Spark in Azure Databricks Get to know Spark Create a Spark cluster Use Spark in notebooks Use Spark to work with data files Visualize data 24 - Run Azure Databricks Notebooks with Azure Data Factory Understand Azure Databricks notebooks and pipelines Create a linked service for Azure Databricks Use a Notebook activity in a pipeline Use parameters in a notebook Additional course details: Nexus Humans DP-203T00 Data Engineering on Microsoft Azure training program is a workshop that presents an invigorating mix of sessions, lessons, and masterclasses meticulously crafted to propel your learning expedition forward. This immersive bootcamp-style experience boasts interactive lectures, hands-on labs, and collaborative hackathons, all strategically designed to fortify fundamental concepts. Guided by seasoned coaches, each session offers priceless insights and practical skills crucial for honing your expertise. Whether you're stepping into the realm of professional skills or a seasoned professional, this comprehensive course ensures you're equipped with the knowledge and prowess necessary for success. While we feel this is the best course for the DP-203T00 Data Engineering on Microsoft Azure course and one of our Top 10 we encourage you to read the course outline to make sure it is the right content for you. Additionally, private sessions, closed classes or dedicated events are available both live online and at our training centres in Dublin and London, as well as at your offices anywhere in the UK, Ireland or across EMEA.

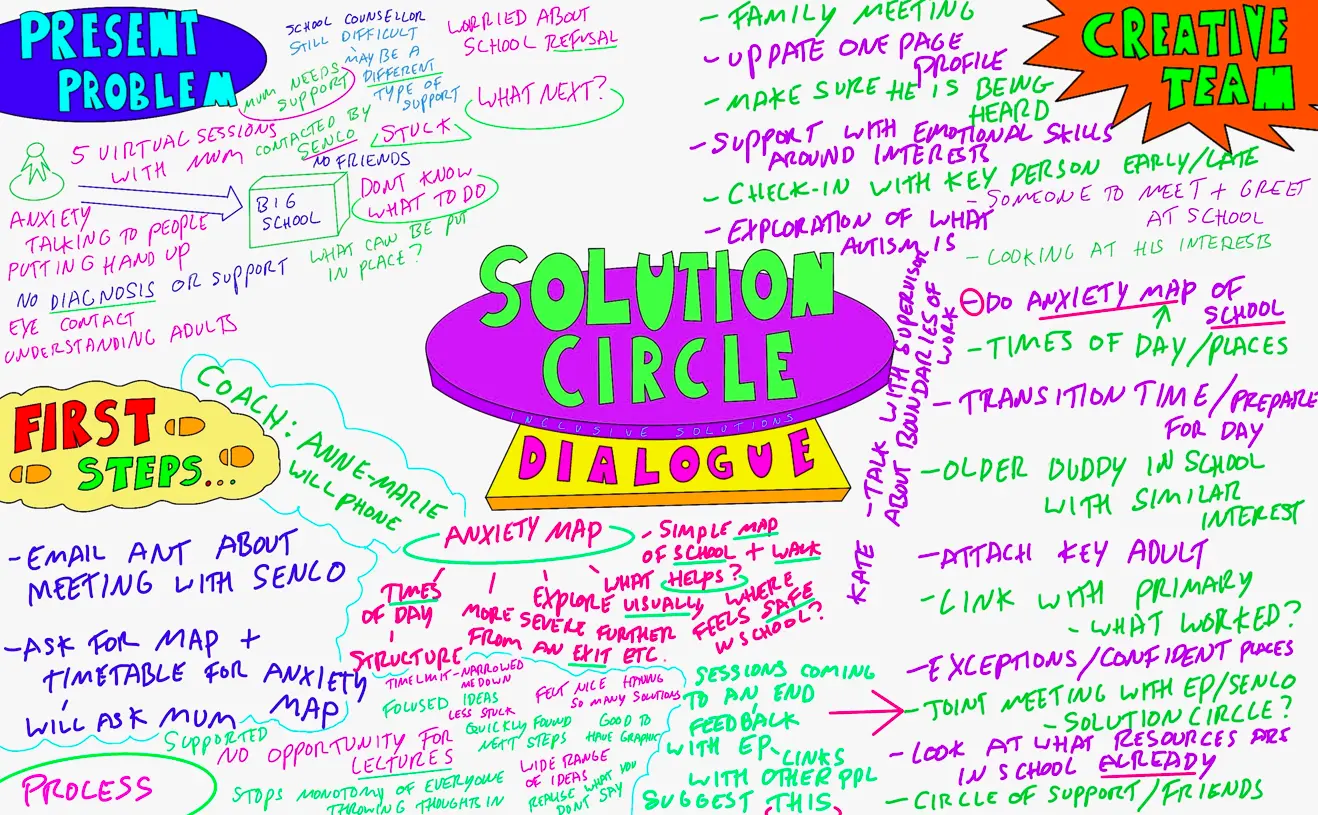
SOLUTION CIRCLES
By Inclusive Solutions
A Solution Circle is a 30 minute creative Problem Solving Process for getting unstuck…Ideal for busy people! lt was designed by Marsha Forest & Jack Pearpoint. This is a short and powerful tool. It is effective in getting “unstuck” from a problem in life or work. Solution Circles are tools of “community capacity”. It assumes and demonstrates that nearby people – in any community or work place have the capacity to help – if asked. It requires a person to ASK – not an easy thing in our culture of privacy and “do it alone”. This tool puts all the values we espouse into practice and demonstrates that TOGETHER WE’RE BETTER. Course Category Problem Solving Description A Solution Circle is a 30 minute creative Problem Solving Process for getting unstuck…Ideal for busy people! lt was designed by Marsha Forest & Jack Pearpoint. This is a short and powerful tool. It is effective in getting “unstuck” from a problem in life or work. Solution Circles are tools of “community capacity”. It assumes and demonstrates that nearby people – in any community or work place have the capacity to help – if asked. It requires a person to ASK – not an easy thing in our culture of privacy and “do it alone”. This tool puts all the values we espouse into practice and demonstrates that TOGETHER WE’RE BETTER. In this training you will learn how to set up and facilitate Solution Circles Learning Objectives For participants to learn how to facilitate a Solution Circle For participants to understand the underlying rationale and ethos of this way of working For participants to learn the power of team work and problem solving when including challenging individuals Who Is It For? Team Around the Child agencies Parents and Professional working together Families Multi Agency Teams Social workers CAMHS teams Year Managers Primary and secondary staff teams Early Years and School based Practitioners Heads and Deputies SENDCOs Advanced Skills Teachers Primary and secondary teachers Local Authority Support Services Course Content This can be introduced in a twilight, half day or even a full day workshop with individualised coaching. We will provide background context for this approach and will directly model the process with real live issues facing participants. So bring your most challenging concerns to this training. The course answers the questions: What to when you are stuck Can we find an alternative to permanent exclusion or special unit or school placement? Struggling with a child for whom praise is ineffective? Feeling isolated in your responses to a child’s needs? Worried about where your instinctive reactions are leading you? Cannot seem to get any consensus view of a young person’s behaviour/needs amongst all the family and professionals involved – is everyone pulling in different directions? We will cover: Setting the tone Background and detailed teaching of process Inclusion values underpinning this work Graphic and process facilitation skills Processes modelled and opportunities to try process out with coaching Practical setting up of insights and solutions circles Lessons learned
The Art of Negotiation: In-House Training
By IIL Europe Ltd
The Art of Negotiation: In-House Training Confidence, rapport, curiosity, and patience are essential ingredients to successfully handling a difficult conversation and negotiation. In this course, you will learn to identify and manage aspects of a negotiation, distinguish needs from wants, and manage expectations. The course will cover communication best practices, strategies for handling difficult conversations, and the basics of the art of negotiation. What you Will Learn Master the different ways to say 'no' Determine negotiation strategies based on typical client strategies Develop solutions to break deadlocks Getting Started Introductions Course structure Course goals and objectives Establishing personal learning objectives Foundation Concepts Exercise: Most Challenging Scenarios and Outcomes Debrief: Impact versus intent Addressing customer expectations Needs versus wants Key skills for managing customer relationships Elicitation (requirements gathering) Communication and active listening Sensitivity and empathy Handling Difficult Conversations Saying 'no' The Ladder of Inference 4-Step approach for handling difficult conversations Characteristics of a trusted advisor Communication Best Practices Attunement and active listening Exercise: Identifying Effective Techniques Communication pitfalls and best practices Building rapport and influence Words of wisdom Exercise: Reflection on Challenges Negotiation Strategies Negotiation basics Five phases of negotiation Identifying different strategies Traditional versus Progressive Hard - Soft - Principled Exercise: Your Preferred Techniques Selecting appropriate strategy for project negotiations Common pitfalls to avoid The impact of culture on negotiation Looking at conflict through the lens of negotiation Exercise: Mapping a Resolution

Rhino 2D | 3D Training Course for Jewellery Design
By London Design Training Courses
Why Opt for the Rhino 3D Training Course in Jewelry Design? Click here for more info Within a span of 10 hours, you'll master the interface and gain insights into how Rhino leverages points, lines, surfaces, and solids to fashion printable 3D objects. Moreover, you'll explore the art of crafting repetitive and intricate geometric shapes, perfect for creating minimalist and elegant jewelry. Flexible Scheduling: 1-on-1 training sessions tailored to your schedule. Pick any hour between 9 am and 7 pm from Mon to Sat. Course Duration: 10 hours. Training Methods: Choose between in-person sessions or live online training. Why Choose Our Rhino 3D Training Course for Jewelry Design? Rhino, also known as Rhinoceros, stands as a robust 3D computer graphics and computer-aided design software extensively utilized in various industries, including architecture, industrial design, and multimedia. LDTC offers meticulously crafted Rhino courses to empower you in mastering this software. Led by experienced instructors, our courses ensure a comprehensive understanding of Rhino, equipping you to create exceptional designs, specifically tailored for jewelry creation. Rhino 3D Training for Jewelry Design: Our Rhino 3D training caters to both beginners and those aspiring to acquire advanced techniques, emphasizing its application in jewelry design. Course Highlights: Precise 3D Modeling: Master the art of crafting free-form 3D NURBS models with utmost precision. Advanced Functionality: Explore Rhino's advanced surfacing commands and features tailored for jewelry design. User Interface Mastery: Navigate Rhino's interface seamlessly and refine your skills in curves, surfaces, and solids. Expert Guidance: Acquire expertise in Rhino's modeling environment under the guidance of seasoned professionals. Modeling Why Choose Our Rhino 3D Training Course for Jewelry Design? Rhino, also known as Rhinoceros, stands as a robust 3D computer graphics and computer-aided design software extensively utilized in various industries, including architecture, industrial design, and multimedia. LDTC offers meticulously crafted Rhino courses to empower you in mastering this software. Led by experienced instructors, our courses ensure a comprehensive understanding of Rhino, equipping you to create exceptional designs, specifically tailored for jewelry creation. Rhino for Jewelry Design - 16-Hour Course Module 1: Introduction and Navigation Get acquainted with Rhino's interface, menus, and screen layout. Navigate Rhino models with precision in 2D lines, polylines, and NURBS curves. Use modeling setup features like snap, ortho, and planar constraints for accuracy. Leverage object snaps and Smart Track functionality for enhanced precision. Module 2: Solid and Surface Modeling Fundamentals Rapidly develop 3D solids and surfaces using Rhino's organized layering system. Utilize coordinates and constraints for meticulous modeling in 3D space. Create diverse shapes, including rectangles, circles, arcs, ellipses, and polygon curves. Enhance models with Rhino render, render color, and free-form curves. Efficiently handle model views with pan, zoom, and view management tools. Implement various editing commands for curve manipulation and transforming curves into surfaces and solids. Utilize history tracking for advanced editing and execute general editing actions. Module 3: Intermediate Edit and Surfacing Techniques Introduce essential NURBS modeling concepts and terminologies. Edit curves and surfaces through control point manipulation and rebuilding for optimal refinement. Use the nudge modeling aid for precise adjustments and generate deformable shapes. Create curves through projection techniques and split surfaces using curves and surfaces. Blend surfaces seamlessly, utilizing symmetry tools, lighting, and rendering effects. Convert intricate 3D objects into detailed 2D drawings and craft page layouts. Module 4: Advanced Surfacing and Solid Modeling Techniques Construct model primitives and solid text using techniques such as pipe and extrusion. Efficiently modify solids using Boolean tools, expanding surface modeling capabilities. Utilize techniques like extrusion, lofting, and revolving for intricate surfaces. Create sweeps using 1 and 2 rail curves and master surface network techniques for complex shapes. Downlaod Rhino. Upon completion of the Rhino 3D Training Course for Jewelry Design, participants can expect the following learning outcomes: Mastering Rhino Interface: Gain a comprehensive understanding of Rhino's interface, menus, and screen layout. Precision in Modeling: Navigate Rhino models with precision using 2D lines, polylines, and NURBS curves. Modeling Setup Proficiency: Utilize modeling setup features such as snap, ortho, and planar constraints for accurate designs. Enhanced Navigation Techniques: Leverage object snaps and Smart Track functionality for enhanced precision during navigation. Solid and Surface Modeling Skills: Rapidly develop 3D solids and surfaces with Rhino's organized layering system. Coordination and Constraint Application: Utilize coordinates and constraints for meticulous modeling in 3D space. Diverse Shape Creation: Create diverse shapes, including rectangles, circles, arcs, ellipses, and polygon curves. Rendering and Enhancement Techniques: Enhance models with Rhino render, render color, and free-form curves. Efficient Model View Handling: Efficiently handle model views with pan, zoom, and view management tools. Intermediate Edit and Surfacing Techniques: Edit curves and surfaces through control point manipulation and rebuilding for optimal refinement. NURBS Modeling Mastery: Introduce essential NURBS modeling concepts and terminologies. Advanced Editing and Modeling Skills: Use the nudge modeling aid for precise adjustments and generate deformable shapes. Complex Shape Creation: Create sweeps using 1 and 2 rail curves and master surface network techniques for intricate shapes. Solid Modeling Proficiency: Construct model primitives and solid text using techniques such as pipe and extrusion. Application of Boolean Tools: Efficiently modify solids using Boolean tools, expanding surface modeling capabilities. Advanced Surfacing Techniques: Utilize techniques like extrusion, lofting, and revolving for intricate surfaces. Conversion and Crafting of 2D Drawings: Convert intricate 3D objects into detailed 2D drawings and craft page layouts. Hands-On Project Experience: Engage in practical exercises and hands-on projects tailored for jewelry design applications. Upon mastering these skills, participants will be well-equipped to create sophisticated jewelry designs using Rhino 3D modeling software.

Dashboard design
By Fire Plus Algebra
Data dashboards provide key information to stakeholders so that they can make informed decisions. While there are plenty of software solutions for building these essential data products, there is much less guidance on how to design dashboards to meet the diverse needs of users. This course is for anyone who is building or implementing dashboards, and wants to know more about design principles and best practice. You could be using business intelligence software (such as Power BI or Tableau), or implementing bespoke solutions. The course will give your team the ability to evaluate user needs and levels of understanding, make informed decisions about chart selections, and make effective use of interactivity dynamic data. We’ll work with you before the course to ensure that we understand your organisation and what you’re hoping to achieve. Sample learning content Session 1: Data with a purpose Understanding the different types of dashboard. Information overload and other common dashboard pitfalls. Assessing user needs and levels of data fluency. Session 2: Planning a dashboard Assessing diverse user needs and levels of data fluency. Taking a User Experience (UX) approach to design and navigation. Applying an interative and collaborative approach to onboarding. Session 3: Graphs, charts and dials Understanding how graphical perception informs chart choices. Making intelligent design choices to help users explore. Design principles for layout and navigation. Session 4: Using interactivity Making effective use of filters to slice and dice data sets. Using layers of information to enable drilldown data exploration. Complenting dashboards with automated alerts and queries. Delivery We deliver our courses over Zoom, to maximise flexibility. The training can be delivered in a single day, or across multiple sessions. All of our courses are live and interactive – every session includes a mix of formal tuition and hands-on exercises. To ensure this is possible, the number of attendees is capped at 16 people. Tutor Alan Rutter is the founder of Fire Plus Algebra. He is a specialist in communicating complex subjects through data visualisation, writing and design. He teaches for General Assembly and runs in-house training for public sector clients including the Home Office, the Department of Transport, the Biotechnology and Biological Sciences Research Council, the Health Foundation, and numerous local government and emergency services teams. He previously worked with Guardian Masterclasses on curating and delivering new course strands, including developing and teaching their B2B data visualisation courses. He oversaw the iPad edition launches of Wired, GQ, Vanity Fair and Vogue in the UK, and has worked with Condé Nast International as product owner on a bespoke digital asset management system for their 11 global markets. Testimonial “Alan was great to work with, he took us through the concepts behind data visualisation which means our team is now equipped for the future. He has a wide range of experience across the topic that is delivered in a clear, concise and friendly manner. We look forward to working with Alan again in the future.” John Masterson | Chief Product Officer | ImproveWell

Microsoft Project White Belt 2016: In-House Training
By IIL Europe Ltd
Microsoft® Project White Belt® 2016: In-House Training This workshop serves as an introduction to the interface and features of Microsoft® Project. This workshop serves as an introduction to the interface and features of Microsoft® Project. It is kept up to date with the framework outlined by Project Management Institute's A Guide to the Project Management Body of Knowledge (PMBOK® Guide). This course will be led by an IIL-certified instructor who will outline the benefits of Microsoft Project, provide tips on using various features and common shortcuts, recommend guidelines, and discuss the application of scheduling concepts to manage project work. What you Will Learn You'll learn how to: Define key scheduling concepts and terms Effectively navigate the user interface and interpret common views Configure essential elements of a new schedule Enter and modify a task list Set dependencies between tasks Create a basic resource list and generate assignments Format targeted areas of the Gantt Chart view Prepare the schedule for printing Getting Started Introductions Course objectives Course outline Navigating the User Interface and Views The ribbon The Quick Access Toolbar General and display options Major elements on the Project screen The Gantt chart, calendar, and network diagram views The help Setting up a New Schedule New schedules from blank, templates or other files The project starting date and forward scheduling The project standard calendar and exception days Entering, Modifying, and Outlining Task Data Task entering options and edition Unscheduled tasks Duration estimates for a single task or multiple tasks Tasks organization Multi-level outline Notes to detail tasks Creating Dependencies by Setting Links The critical path Critical path calculation in Project Dynamic schedules and dependencies Link tasks in Project Displaying the critical path Entering and Assigning Resources Resource planning Resource list Resource assignments Formatting Gantt Chart View Format options for text and Gantt charts Print options
CompTIA A+ Part 1
By Nexus Human
Duration 5 Days 30 CPD hours This course is intended for This course is designed for individuals who have basic computer user skills and who are interested in obtaining a job as an entry-level IT technician. This course is also designed for students who are seeking the CompTIA A+ certification. Overview Install and configure mobile devices Compare and contrast networking hardware Configure internet connections and wireless networking Troubleshoot hardware and networks Install motherboards, RAM, storage devices, CPUs and add-on cards Deploy and configure connected devices Summarize cloud-computing concepts and virtualization CompTIA A+ certified professionals are proven problem solvers. They support today's core technologies from security to cloud to data management and more. CompTIA A+ is the industry standard for launching IT careers into today's digital world. It is the only industry-recognized credential with performance-based items to prove pros can think on their feet to perform critical IT support tasks in the moment. It is trusted by employers around the world to identify the go-to person in end-point management and technical support roles. CompTIA A+ is regularly re-invented by IT experts to ensure that it validates core skills and abilities demanded in the workplace. Prerequisites While there are no prerequisites for this course, please ensure you have the right level of experience to be successful in this training. Lesson 1: Installing Motherboards and Connectors Topic 1A: Explain Cable Types and Connectors Topic 1B: Install and Configure Motherboards Topic 1C: Explain Legacy Cable Types Lesson 2: Installing System Devices Topic 2A: Install and Configure Power Supplies and Cooling Topic 2B: Select and Install Storage Devices Topic 2C: Install and Configure System Memory Topic 2D: Install and Configure CPUs Lesson 3: Troubleshooting PC Hardware Topic 3A: Apply Troubleshooting Methodology Topic 3B: Configure BIOS/UEFI Topic 3C: Troubleshoot Power and Disk Issues Topic 3D: Troubleshoot System and Display Issues Lesson 4: Comparing Local Networking Hardware Topic 4A: Compare Network Types Topic 4B: Compare Networking Hardware Topic 4C: Explain Network Cable Types Topic 4D: Compare Wireless Networking Types Lesson 5: Configuring Network Addressing and Internet Connections Topic 5A: Compare Internet Connection Types Topic 5B: Use Basic TCP/IP Concepts Topic 5C: Compare Protocols and Ports Topic 5D: Compare Network Configuration Concepts Lesson 6: Supporting Network Services Topic 6A: Summarize Services Provided by Networked Hosts Topic 6B: Compare Internet and Embedded Appliances Topic 6C: Troubleshoot Networks Lesson 7: Summarizing Virtualization and Cloud Concepts Topic 7A: Summarize Client-Side Virtualization Topic 7B: Summarize Cloud Concepts Lesson 8: Supporting Mobile Devices Topic 8A: Set Up Mobile Devices and Peripherals Topic 8B: Configure Mobile Device Apps Topic 8C: Install and Configure Laptop Hardware Topic 8D: Troubleshoot Mobile Device Issues Lesson 9: Supporting Print Devices Topic 9A: Deploy Printer and Multifunction Devices Topic 9B: Replace Print Device Consumables Topic 9C: Troubleshoot Print Device Issues
Tripod Beta Practitioner - Bronze Level
By EnergyEdge - Training for a Sustainable Energy Future
About this VILT Tripod can be used in any area of business where the organisation has a management system in place to prevent unwanted events e.g., health, safety, environment, quality, security, productivity, project management, and many more Tripod Beta is one of several tools based on Tripod's fundamental principles. Tripod Beta is based on proven theories, man years of academic research, and testing in the workplace. The Swiss Cheese Model originated from this work. Features of the methodology are: 1) the Tripod Beta diagram; it provides an easy-to-read summary of the entire investigation on a single page, 2) it accommodates deficiencies in leadership and worker participation, 3) it accommodates deficiencies in human behaviour, and 4) it highlights missing controls (not just controls that failed). Quality throughout all aspects of Tripod is assured by the Stichting Tripod Foundation (STF) and the Energy Institute. The participants will gain a theoretical understanding of the Tripod Beta methodology and terminology. They will be able to read Tripod diagrams and reports, and be able to assist incident investigation/analysis as a team member. This is the first step to becoming an accredited silver or gold practitioner. Tripod Beta Practitioner Accreditation is meant to build these skills, through a blend of support, coaching and assessments. Feedback is provided on Tripod incident investigation reports, giving the Practitioner the opportunity to hone their skills and become confident in their ability to use Tripod effectively. Training Objectives Upon completion of this course, participants will be able to: Pass the Tripod Beta Practitioner (Bronze Level) exam Act as a team member or Tripod facilitator on an incident investigation Plan and schedule activities for an incident investigation Focus line of enquiry during an investigation Engage with the most relevant people at each stage of the investigation Describe the incident causation paths in terms that align with their management system Consider issues relating to leadership, worker participation and human behaviour Assess the quality of an incident report Apply the process to any type of unwanted event that should have been prevented by a management system e.g., health, safety, environment, financial, security, productivity, quality, project management etc. Combine the findings from many incidents with data from other initiatives e.g., audits and inspections, to spot trends to prioritise actions and product a single improvement plan Target Audience The course is recommended for anyone who is expected to play a role in designing, reviewing, auditing, and following your organizations OH&S management system. Successful participants will be awarded the Stitching Tripod Foundation Tripod Beta Bronze certificate. The following oil & gas company personnel will benefit from the knowledge shared in this course: CEO Team Leaders Legal, insurance and finance departments Managers (Line and Function) Maintenance Engineers Quality Assurance Engineers Process Engineers Incident Investigators (Team member & Tripod facilitator) Project Managers System Custodians Technical Authorities Key Contractor's Management Contract Managers/Holders Safety Representatives Risk Management Engineers HSE Advisors Supervisors Auditors Regulators Course Level Basic or Foundation Trainer Your expert course leader has over 30 years of experience in construction, operations and maintenance with the upstream exploration and production sector. He joined Shell International E&P in 1971 and for 28 years worked in several locations around the world. Following the Piper Alpha incident he led Shell's two year, £10M major overhaul of their permit to work system. He first made use of the Tripod Beta principles during this period and since then he has delivered over 100 Tripod Beta courses in more than 25 locations around the world. He is a Chartered Engineer, a member of the Institution of Engineering and Technology and holds a postgraduate diploma from the University of Birmingham (UK). POST TRAINING COACHING SUPPORT (OPTIONAL) To further optimise your learning experience from our courses, we also offer individualized 'One to One' coaching support for 2 hours post training. We can help improve your competence in your chosen area of interest, based on your learning needs and available hours. This is a great opportunity to improve your capability and confidence in a particular area of expertise. It will be delivered over a secure video conference call by one of our senior trainers. They will work with you to create a tailor-made coaching program that will help you achieve your goals faster. Request for further information post training support and fees applicable Accreditions And Affliations
