- Professional Development
- Medicine & Nursing
- Arts & Crafts
- Health & Wellbeing
- Personal Development
207 Courses in Cardiff delivered Live Online
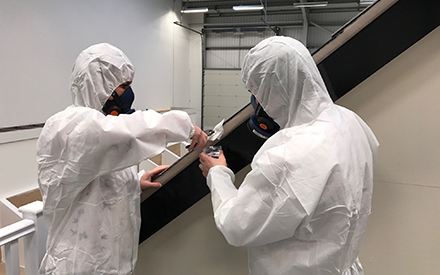
BOHS P405 - Management of Asbestos in Buildings (including Asbestos Removal)
By Airborne Environmental Consultants Ltd
The main subject areas of the course are: Legislation and guidance for asbestos practitioners. The properties of asbestos and health effects of exposure to asbestos fibres. The types of asbestos and its uses in buildings. The types of asbestos surveys. The asbestos register, risk assessment and management plan. Asbestos remediation. The role of asbestos analysts and laboratory procedures.
Vectorworks 2d | 3d and Spotlight training
By London Design Training Courses
Why Learn Vectorworks 2d | 3d and Spotlight training Course? Course info Led by experts, this comprehensive program equips you with skills in 2D drafting, immersive 3D modeling, and dynamic lighting design. Master Vectorworks' powerful features, including the Spotlight module tailored for entertainment and events. Duration: 16 hrs Method: 1-on-1, Personalized attention. Schedule: Tailor your own hours, available from Mon to Sat between 9 am and 7 pm. Or Call 02077202581 or WhatsApp 07970325184. Course Details: Format: 1-on-1 Training Schedule: Flexible, Any Day, Anytime (Monday to Saturday), 9 AM to 7 PM Duration: Customizable to Individual Learning Pace Content: Comprehensive training in Vectorworks, focusing on 2D Drafting, Immersive 3D Modeling, and Dynamic Lighting Design. Specialization: Spotlight Module for Entertainment and Events Instructors: Expert-led sessions ensuring personalized attention and effective learning. Outcome: Mastery of Vectorworks' Powerful Features, Proficiency in 2D and 3D Design, and Expertise in Dynamic Lighting Design for Entertainment Purposes. Note: Schedule and course duration are flexible to accommodate individual preferences and learning needs. Course Details: Format: 1-on-1 Training Schedule: Flexible, Any Day, Anytime (Monday to Saturday), 9 AM to 7 PM Duration: Customizable to Individual Learning Pace Content: Comprehensive training in Vectorworks, focusing on 2D Drafting, Immersive 3D Modeling, and Dynamic Lighting Design. Specialization: Spotlight Module for Entertainment and Events Instructors: Expert-led sessions ensuring personalized attention and effective learning. Outcome: Mastery of Vectorworks' Powerful Features, Proficiency in 2D and 3D Design, and Expertise in Dynamic Lighting Design for Entertainment Purposes. Note: Schedule and course duration are flexible to accommodate individual preferences and learning needs. Vectorworks 2D | 3D and Spotlight Training Course Course Duration: 16 hours Course Description: I. Introduction to Vectorworks (1 hour) Overview of Vectorworks software and its applications Familiarization with the user interface and navigation Customizing preferences and settings for optimal workflow II. 2D Drawing Tools (2 hours) Using basic drawing tools for creating lines, rectangles, circles, and polygons Utilizing text and dimension tools for annotations Applying modify tools for editing and transforming objects Organizing elements with layers and classes III. 3D Modeling Tools (3 hours) Introduction to extrude, revolve, sweep, and loft tools for 3D modeling Creating 3D objects from 2D shapes for spatial representation Modifying and refining 3D models Exploring the 3D modeling environment IV. Advanced 3D Modeling Tools (2 hours) Utilizing solid modeling tools for complex geometry creation Performing Boolean operations to combine or subtract shapes Creating and utilizing symbols for efficient workflow V. Introduction to Spotlight (1 hour) Overview of the Spotlight workspace and its features Adding and configuring lighting devices for stage and event design Creating and modifying lighting positions for accurate placement VI. Spotlight Tools and Techniques (3 hours) Creating and editing lighting instruments for customized setups Using visualization tools for lighting simulations Creating and applying labels and legends for documentation Generating worksheets and reports for lighting analysis VII. Advanced Spotlight Techniques (2 hours) Utilizing video and projection tools for multimedia presentations Incorporating audio and sound systems for immersive experiences Understanding rigging and hoisting for stage setup Managing paperwork and documentation for effective planning VIII. Integration with Other Software (1 hour) Importing and exporting files to collaborate with other software Utilizing Vectorworks in CAD and BIM workflows for interoperability Exploring plugins and add-ons for expanded functionality IX. Project-based Exercises (1 hour) Applying learned techniques to real-world scenarios Creating a lighting plan for a concert or theater production Designing a 3D model of a building or interior space Free 30-day, BIM & CAD Software Trial Request | Vectorworks https://www.vectorworks.net/trial Vectorworks Trial Version Request. Please fill out the following form. We will provide you with an evaluation serial number to activate your trial copy. Learning Outcomes of Vectorworks 2D | 3D and Spotlight Training Course: Master Vectorworks with 2D and 3D design skills. Create precise 2D drawings and detailed 3D models. Learn specialized tools for lighting and event planning in Spotlight. Optimize workflows and improve project coordination. Produce realistic renderings and visualizations. Apply skills to real-world projects in architecture and events.

CertNexus Certified CyberSec First Responder (CFR-410)
By Nexus Human
Duration 5 Days 30 CPD hours This course is intended for This course is designed primarily for cybersecurity practitioners preparing for or who currently perform job functions related to protecting information systems by ensuring their availability, integrity, authentication, confidentiality, and non-repudiation. It is ideal for those roles within federal contracting companies and private sector firms whose mission or strategic objectives require the execution of Defensive Cyber Operations (DCO) or DoD Information Network (DoDIN) operation and incident handling. This course focuses on the knowledge, ability, and skills necessary to provide for the defense of those information systems in a cybersecurity context, including protection, detection, analysis, investigation, and response processes. Overview In this course, you will identify, assess, respond to, and protect against security threats and operate a system and network security analysis platform. You will: Assess cybersecurity risks to the organization. Analyze the threat landscape. Analyze various reconnaissance threats to computing and network environments. Analyze various attacks on computing and network environments. Analyze various post-attack techniques. Assess the organization's security posture through auditing, vulnerability management, and penetration testing. Collect cybersecurity intelligence from various network-based and host-based sources. Analyze log data to reveal evidence of threats and incidents. Perform active asset and network analysis to detect incidents. Respond to cybersecurity incidents using containment, mitigation, and recovery tactics. Investigate cybersecurity incidents using forensic analysis techniques. This course covers network defense and incident response methods, tactics, and procedures that are in alignment with industry frameworks such as NIST 800-61r2 (Computer Security Incident Handling Guide), US-CERT's National Cyber Incident Response Plan (NCIRP), and Presidential Policy Directive (PPD)-41 on Cyber Incident Coordination. It is ideal for candidates who have been tasked with the responsibility of monitoring and detecting security incidents in information systems and networks, and for executing standardized responses to such incidents. The course introduces tools, tactics, and procedures to manage cybersecurity risks, defend cybersecurity assets, identify various types of common threats, evaluate the organization's security, collect and analyze cybersecurity intelligence, and remediate and report incidents as they occur. This course provides a comprehensive methodology for individuals responsible for defending the cybersecurity of their organization. This course is designed to assist students in preparing for the CertNexus CyberSec First Responder (Exam CFR-410) certification examination. What you learn and practice in this course can be a significant part of your preparation. In addition, this course and subsequent certification (CFR-410) meet all requirements for personnel requiring DoD directive 8570.01-M position certification baselines: CSSP Analyst CSSP Infrastructure Support CSSP Incident Responder CSSP Auditor The course and certification also meet all criteria for the following Cybersecurity Maturity Model Certification (CMMC) domains: Incident Response (IR) Audit and Accountability (AU) Risk Management (RM) Lesson 1: Assessing Cybersecurity Risk Topic A: Identify the Importance of Risk Management Topic B: Assess Risk Topic C: Mitigate Risk Topic D: Integrate Documentation into Risk Management Lesson 2: Analyzing the Threat Landscape Topic A: Classify Threats Topic B: Analyze Trends Affecting Security Posture Lesson 3: Analyzing Reconnaissance Threats to Computing and Network Environments Topic A: Implement Threat Modeling Topic B: Assess the Impact of Reconnaissance Topic C: Assess the Impact of Social Engineering Lesson 4: Analyzing Attacks on Computing and Network Environments Topic A: Assess the Impact of System Hacking Attacks Topic B: Assess the Impact of Web-Based Attacks Topic C: Assess the Impact of Malware Topic D: Assess the Impact of Hijacking and Impersonation Attacks Topic E: Assess the Impact of DoS Incidents Topic F: Assess the Impact of Threats to Mobile Security Topic G: Assess the Impact of Threats to Cloud Security Lesson 5: Analyzing Post-Attack Techniques Topic A: Assess Command and Control Techniques Topic B: Assess Persistence Techniques Topic C: Assess Lateral Movement and Pivoting Techniques Topic D: Assess Data Exfiltration Techniques Topic E: Assess Anti-Forensics Techniques Lesson 6: Assessing the Organization's Security Posture Topic A: Implement Cybersecurity Auditing Topic B: Implement a Vulnerability Management Plan Topic C: Assess Vulnerabilities Topic D: Conduct Penetration Testing Lesson 7: Collecting Cybersecurity Intelligence Topic A: Deploy a Security Intelligence Collection and Analysis Platform Topic B: Collect Data from Network-Based Intelligence Sources Topic C: Collect Data from Host-Based Intelligence Sources Lesson 8: Analyzing Log Data Topic A: Use Common Tools to Analyze Logs Topic B: Use SIEM Tools for Analysis Lesson 9: Performing Active Asset and Network Analysis Topic A: Analyze Incidents with Windows-Based Tools Topic B: Analyze Incidents with Linux-Based Tools Topic C: Analyze Indicators of Compromise Lesson 10: Responding to Cybersecurity Incidents Topic A: Deploy an Incident Handling and Response Architecture Topic B: Mitigate Incidents Topic C: Hand Over Incident Information to a Forensic Investigation Lesson 11: Investigating Cybersecurity Incidents Topic A: Apply a Forensic Investigation Plan Topic B: Securely Collect and Analyze Electronic Evidence Topic C: Follow Up on the Results of an Investigation Additional course details: Nexus Humans CertNexus Certified CyberSec First Responder (CFR-410) training program is a workshop that presents an invigorating mix of sessions, lessons, and masterclasses meticulously crafted to propel your learning expedition forward. This immersive bootcamp-style experience boasts interactive lectures, hands-on labs, and collaborative hackathons, all strategically designed to fortify fundamental concepts. Guided by seasoned coaches, each session offers priceless insights and practical skills crucial for honing your expertise. Whether you're stepping into the realm of professional skills or a seasoned professional, this comprehensive course ensures you're equipped with the knowledge and prowess necessary for success. While we feel this is the best course for the CertNexus Certified CyberSec First Responder (CFR-410) course and one of our Top 10 we encourage you to read the course outline to make sure it is the right content for you. Additionally, private sessions, closed classes or dedicated events are available both live online and at our training centres in Dublin and London, as well as at your offices anywhere in the UK, Ireland or across EMEA.

Use Cases for Business Analysis: In-House Training
By IIL Europe Ltd
Use Cases for Business Analysis: In-House Training The use case is a method for documenting the interactions between the user of a system and the system itself. Use cases have been in the software development lexicon for over twenty years, ever since it was introduced by Ivar Jacobson in the late 1980s. They were originally intended as aids to software design in object-oriented approaches. However, the method is now used throughout the Solution Development Life Cycle from elicitation through to specifying test cases, and is even applied to software development that is not object oriented. This course identifies how business analysts can apply use cases to the processes of defining the problem domain through elicitation, analyzing the problem, defining the solution, and confirming the validity and usability of the solution. What you will Learn You'll learn how to: Apply the use case method to define the problem domain and discover the conditions that need improvement in a business process Employ use cases in the analysis of requirements and information to create a solution to the business problem Translate use cases into requirements Getting Started Introductions Course structure Course goals and objectives Foundation Concepts Overview of use case modeling What is a use case model? The 'how and why' of use cases When to perform use case modeling Where use cases fit into the solution life cycle Use cases in the problem domain Use cases in the solution domain Use case strengths and weaknesses Use case variations Use case driven development Use case lexicon Use cases Actors and roles Associations Goals Boundaries Use cases though the life cycle Use cases in the life cycle Managing requirements with use cases The life cycle is use case driven Elicitation with Use Cases Overview of the basic mechanics and vocabulary of use cases Apply methods of use case elicitation to define the problem domain, or 'as is' process Use case diagrams Why diagram? Partitioning the domain Use case diagramming guidelines How to employ use case diagrams in elicitation Guidelines for use case elicitation sessions Eliciting the problem domain Use case descriptions Use case generic description template Alternative templates Elements Pre and post conditions Main Success Scenario The conversation Alternate paths Exception paths Writing good use case descriptions Eliciting the detailed workflow with use case descriptions Additional information about use cases Analyzing Requirements with Use Cases Use case analysis on existing requirements Confirming and validating requirements with use cases Confirming and validating information with use cases Defining the actors and use cases in a set of requirements Creating the scenarios Essential (requirements) use case Use case level of detail Use Case Analysis Techniques Generalization and Specialization When to use generalization or specialization Generalization and specialization of actors Generalization and specialization of use cases Examples Associating generalizations Subtleties and guidelines Use Case Extensions The <> association The <> association Applying the extensions Incorporating extension points into use case descriptions Why use these extensions? Extensions or separate use cases Guidelines for extensions Applying use case extensions Patterns and anomalies o Redundant actors Linking hierarchies Granularity issues Non-user interface use cases Quality considerations Use case modeling errors to avoid Evaluating use case descriptions Use case quality checklist Relationship between Use Cases and Business Requirements Creating a Requirements Specification from Use Cases Flowing the conversation into requirements Mapping to functional specifications Adding non-functional requirements Relating use cases to other artifacts Wire diagrams and user interface specifications Tying use cases to test cases and scenarios Project plans and project schedules Relationship between Use Cases and Functional Specifications System use cases Reviewing business use cases Balancing use cases Use case realizations Expanding and explaining complexity Activity diagrams State Machine diagrams Sequence diagrams Activity Diagrams Applying what we know Extension points Use case chaining Identifying decision points Use Case Good Practices The documentation trail for use cases Use case re-use Use case checklist Summary What did we learn, and how can we implement this in our work environment?

Garden Design Courses with Vectorworks Training Program
By ATL Autocad Training London
Why Choose Garden Design Courses with Vectorworks Training Program? Designed to enhance your skills in crafting stunning garden designs. Led by certified tutors. From 2D layouts to 3D landscapes and detailed plans and visualizations. Check our Website Details: 1-on-1 training. Customize your schedule, available Mon to Sat 9 am and 7 am Call 02077202581 to book your session over the phone. Duration: 16 hours. "You can divide this over multiple days to suit your schedule." Approach: 1-on-1 in-person or live online. Course Duration: 16 hours Course Description: This advanced Vectorworks course is tailored for individuals who already possess basic knowledge of the software and wish to enhance their skills to become proficient users. Participants will learn more advanced 2D and 3D techniques, including advanced 3D modeling, rendering, visualization, and customizing Vectorworks to suit their specific needs and workflows. The course will cover topics such as creating custom tools, working with planting plans, and integrating with AutoCAD. Course Outline: Module 1: Vectorworks Interface and Basic Concepts - Understanding the Vectorworks interface and palettes - Opening, saving, and managing files - Creating and editing objects and shapes - Utilizing Undo/Redo and Snaps for precision - Applying graphic attributes and working with dimensions Module 2: Modeling and Drawing Techniques - Exploring advanced tools and commands in detail - Integrating with AutoCAD and data exchange - Creating, modifying, and editing text - Utilizing callout text tool for annotations - Organizing information using design layers and classes Module 3: Working with Buildings and Models - Utilizing design layers and sheet layers for architectural projects - Assigning objects to layers and classes - Working with viewports and sheet layers for presentation - Drawing buildings, including walls and roofs - Setting up and rendering perspective views Module 4: Creating Site and Landscape Plans - Importing land surveys or architects' files - Drawing site surveys and working with hard landscape elements - Adding and customizing plantings using the plant tool - Editing plant definitions and creating custom plant symbols - Generating plant schedules and reports Module 5: Vectorworks Architect Features - Setting up files and scaling the drawing - Customizing text styles and dimension standards - Working with scanned images and creating site models - Designing floors, doors, and windows using standard Vectorworks elements - Creating and managing title blocks, labels, notes, and keynotes Module 6: Working Drawings and Final Project - Developing the final project with 2D and 3D elements - Applying site modifiers and stairs to the design - Generating printing layouts for presentations - Creating working drawings with detailed plans and elevations Download Vectorworks Trial https://www.vectorworks.net/trial Learning Outcomes: Master Vectorworks Tools: Proficiency in Vectorworks software, specializing in garden design features. Comprehensive Garden Design Skills: Expertise in 2D/3D modeling, plant selection, hardscapes, and irrigation systems. Professional Documentation: Create precise construction documents and visually compelling presentations. Collaboration and Project Management: Understand collaborative workflows, project management, and client communication. Job Opportunities: Landscape Designer/Architect: Design aesthetically pleasing and functional gardens for residential and commercial spaces. Garden Consultant/Horticulturist: Provide expert advice on plant selection, garden health, and sustainable practices. Entrepreneur/Educator: Start your own garden design business or teach garden design principles and techniques. Elevate your career with the Vectorworks Garden Design Course! Vectorworks Garden Design Mastery Course Course Enrollment Details: Unlock a personalized learning journey with our flexible 1-on-1 training sessions. Customize your schedule by reserving a time slot at your convenience, available Monday to Saturday between 9 a.m. and 7 p.m. Call 02077202581 to book your session over the phone. Training Duration: 16 hours. "You can divide these 16 hours over multiple days to suit your schedule." Training Approach: Experience tailored 1-on-1 sessions, either in-person or live online, providing individualized attention, customized content, flexible pacing, and comprehensive support. Live online 1-on-1 sessions via Zoom are also available. Course Overview: The Vectorworks Garden Design Mastery Course is meticulously crafted to empower participants with the expertise needed to craft exquisite garden designs using Vectorworks software. Guided by certified tutors and industry professionals, this program delivers a profound understanding of Vectorworks tools specifically tailored for garden design, enabling you to transform your landscaping ideas into breathtaking realities. Throughout the course, delve into the specialized features and functionalities of Vectorworks tailored for garden design. From 2D layouts to intricate 3D landscapes, master the art of utilizing Vectorworks to create detailed plans, visualize designs, and produce impeccable documentation for your garden projects. Tailored Training Excellence: Personalized One-to-One Guidance: Experience individualized coaching with undivided attention and customized instruction. Flexible Scheduling: Choose your preferred training slots, tailored to your schedule, even on weekends and late evenings. Post-Course Support and Comprehensive Materials: Access free online support post-training and receive detailed PDF notes and handouts for effective learning. Recognition of Achievement: Earn a Certificate of Attendance upon course completion, validating your expertise. Affordable Learning Solutions: Enjoy budget-friendly training rates without compromising on the quality of education. Tech Assistance and Referral Benefits: Receive software setup support and unlock referral discounts by recommending friends. Group Learning Perks and Tailored Courses: Avail special discounts for group sessions and experience customized training designed just for you. Elevate your skills affordably with our flexible schedules and personalized support.

CompTIA A+
By Nexus Human
Duration 5 Days 30 CPD hours This course is intended for This course is designed for individuals who have basic computer user skills and who are interested in obtaining a job as an entry-level IT technician. This course is also designed for students who are seeking the CompTIA A+ certification and who want to prepare for the CompTIA A+ Core 1 220-1101 Certification Exam and the CompTIA A+ Core 2 220-1102 Certification Exam. Overview On course completion, participants will be able to: Support operating systems. Install and configure PC system unit components and peripheral devices. Install, configure, and troubleshoot display and multimedia devices. Install, configure, and troubleshoot storage devices. Install, configure, and troubleshoot internal system components. Install, configure, and maintain operating systems. Maintain and troubleshoot Microsoft Windows. Explain network infrastructure concepts. Configure and troubleshoot network connections. Manage users, workstations, and shared resources. Implement client virtualization and cloud computing. Implement physical security. Secure workstations and data. Troubleshoot workstation security issues. Support and troubleshoot laptops. Support and troubleshoot mobile devices. Install, configure, and troubleshoot print devices. Implement operational procedures. CompTIA A+ certified professionals are proven problem solvers. They support today's core technologies from security to cloud to data management and more. CompTIA A+ is the industry standard for launching IT careers into today's digital world. It is the only industry recognized credential with performance-based items to prove pros can think on their feet to perform critical IT support tasks in the moment. It is trusted by employers around the world to identify the go-to person in end point management and technical support roles. CompTIA A+ is regularly re-invented by IT experts to ensure that it validates core skills and abilities demanded in the workplace. 1 - Installing Motherboards and Connectors Explain Cable Types and Connectors Install and Configure Motherboards Explain Legacy Cable Types 2 - Installing System Devices Install and Configure Power Supplies and Cooling Select and Install Storage Devices Install and Configure System Memory Install and Configure CPUs 3 - Troubleshooting PC Hardware Apply Troubleshooting Methodology Configure BIOS/UEFI Troubleshoot Power and Disk Issues Troubleshoot System and Display Issues 4 - Comparing Local Networking Hardware Compare Network Types Compare Networking Hardware Explain Network Cable Types Compare Wireless Networking Types 5 - Configuring Network Addressing and Internet Connections Compare Internet Connection Types Use Basic TCP/IP Concepts Compare Protocols and Ports Compare Network Configuration Concepts 6 - Supporting Network Services Summarize Services Provided by Networked Hosts Compare Internet and Embedded Appliances Troubleshoot Networks 7 - Summarizing Virtualization and Cloud Concepts Summarize Client-Side Virtualization Summarize Cloud Concepts 8 - Supporting Mobile Devices Set Up Mobile Devices and Peripherals Configure Mobile Device Apps Install and Configure Laptop Hardware Troubleshoot Mobile Device Issues 9 - Supporting Print Devices Deploy Printer and Multifunction Devices Replace Print Device Consumables Troubleshoot Print Device Issues 10 - Configuring Windows Configure Windows User Settings Configure Windows System Settings 11 - Managing Windows Use Management Consoles Use Performance and Troubleshooting Tools Use Command-line Tools 12 - Identifying OS Types and Features Explain OS Types Compare Windows Editions 13 - Supporting Windows Perform OS Installations and Upgrades Install and Configure Applications Troubleshoot Windows OS Problems 14 - Managing Windows Networking Manage Windows Networking Troubleshoot Windows Networking Configure Windows Security Settings Manage Windows Shares 15 - Managing Linux and macOS Identify Features of Linux Identify Features of macOS 16 - Configuring SOHO Network Security Explain Attacks, Threats, and Vulnerabilities Compare Wireless Security Protocols Configure SOHO Router Security Summarize Security Measures 17 - Managing Security Settings Configure Workstation Security Configure Browser Security Troubleshoot Workstation Security Issues 18 - Supporting Mobile Software Configure Mobile OS Security Troubleshoot Mobile OS and App Software Troubleshoot Mobile OS and App Security 19 - Using Support and Scripting Tools Use Remote Access Technologies Implement Backup and Recovery Explain Data Handling Best Practices Identify Basics of Scripting 20 - Implementing Operational Procedures Implement Best Practice Documentation Use Proper Communication Techniques Use Common Safety and Environmental Procedures
Global Mobility, High Potential & Scale Up Visa
By Immigration Advice Service
Our Global Mobility, High Potential & Scale Up Visa course is a half-day course dedicated to covering these three visas and latest updates. View the Global Mobility, High Potential and Scale Up Visa training course dates below, delivered via Microsoft Teams. Course Overview: This course is dedicated to providing you with a comprehensive understanding of these visa routes. We will cover the requirements for each new visa category, equipping you with the knowledge to navigate the application processes successfully. Our expert trainers will guide you through the intricacies of the Global Mobility, High Potential, and Scale Up Visa routes, ensuring you have a thorough grasp of the eligibility criteria and essential documentation. You will gain insights into each category, allowing you to assist your clients or organisation in making informed decisions regarding talent recruitment and business expansion. This course will shed light on the sponsor license requirements for the Global Mobility category. Understanding these requirements is crucial for organizations seeking to employ international talent. We’ll also explore the sponsor license application processes, enabling you to navigate the necessary steps with confidence. Course Topics: Latest Changes & Announcements The requirements of each new category Application processes The sponsor license requirements for Global Mobility Sponsor license application processes Course joining links, materials and instructions are sent out 24hours before the course starts.

The course is relevant to anyone requiring an understanding of the use of Agile or looking to adopt it. This includes, but is not limited to, organisational leaders and managers, marketing executives and managers, and/or all professionals working in an Agile environment, including software sesters, developers, business analysts, UX designers, project management office (PMO), project support and project coordinators.
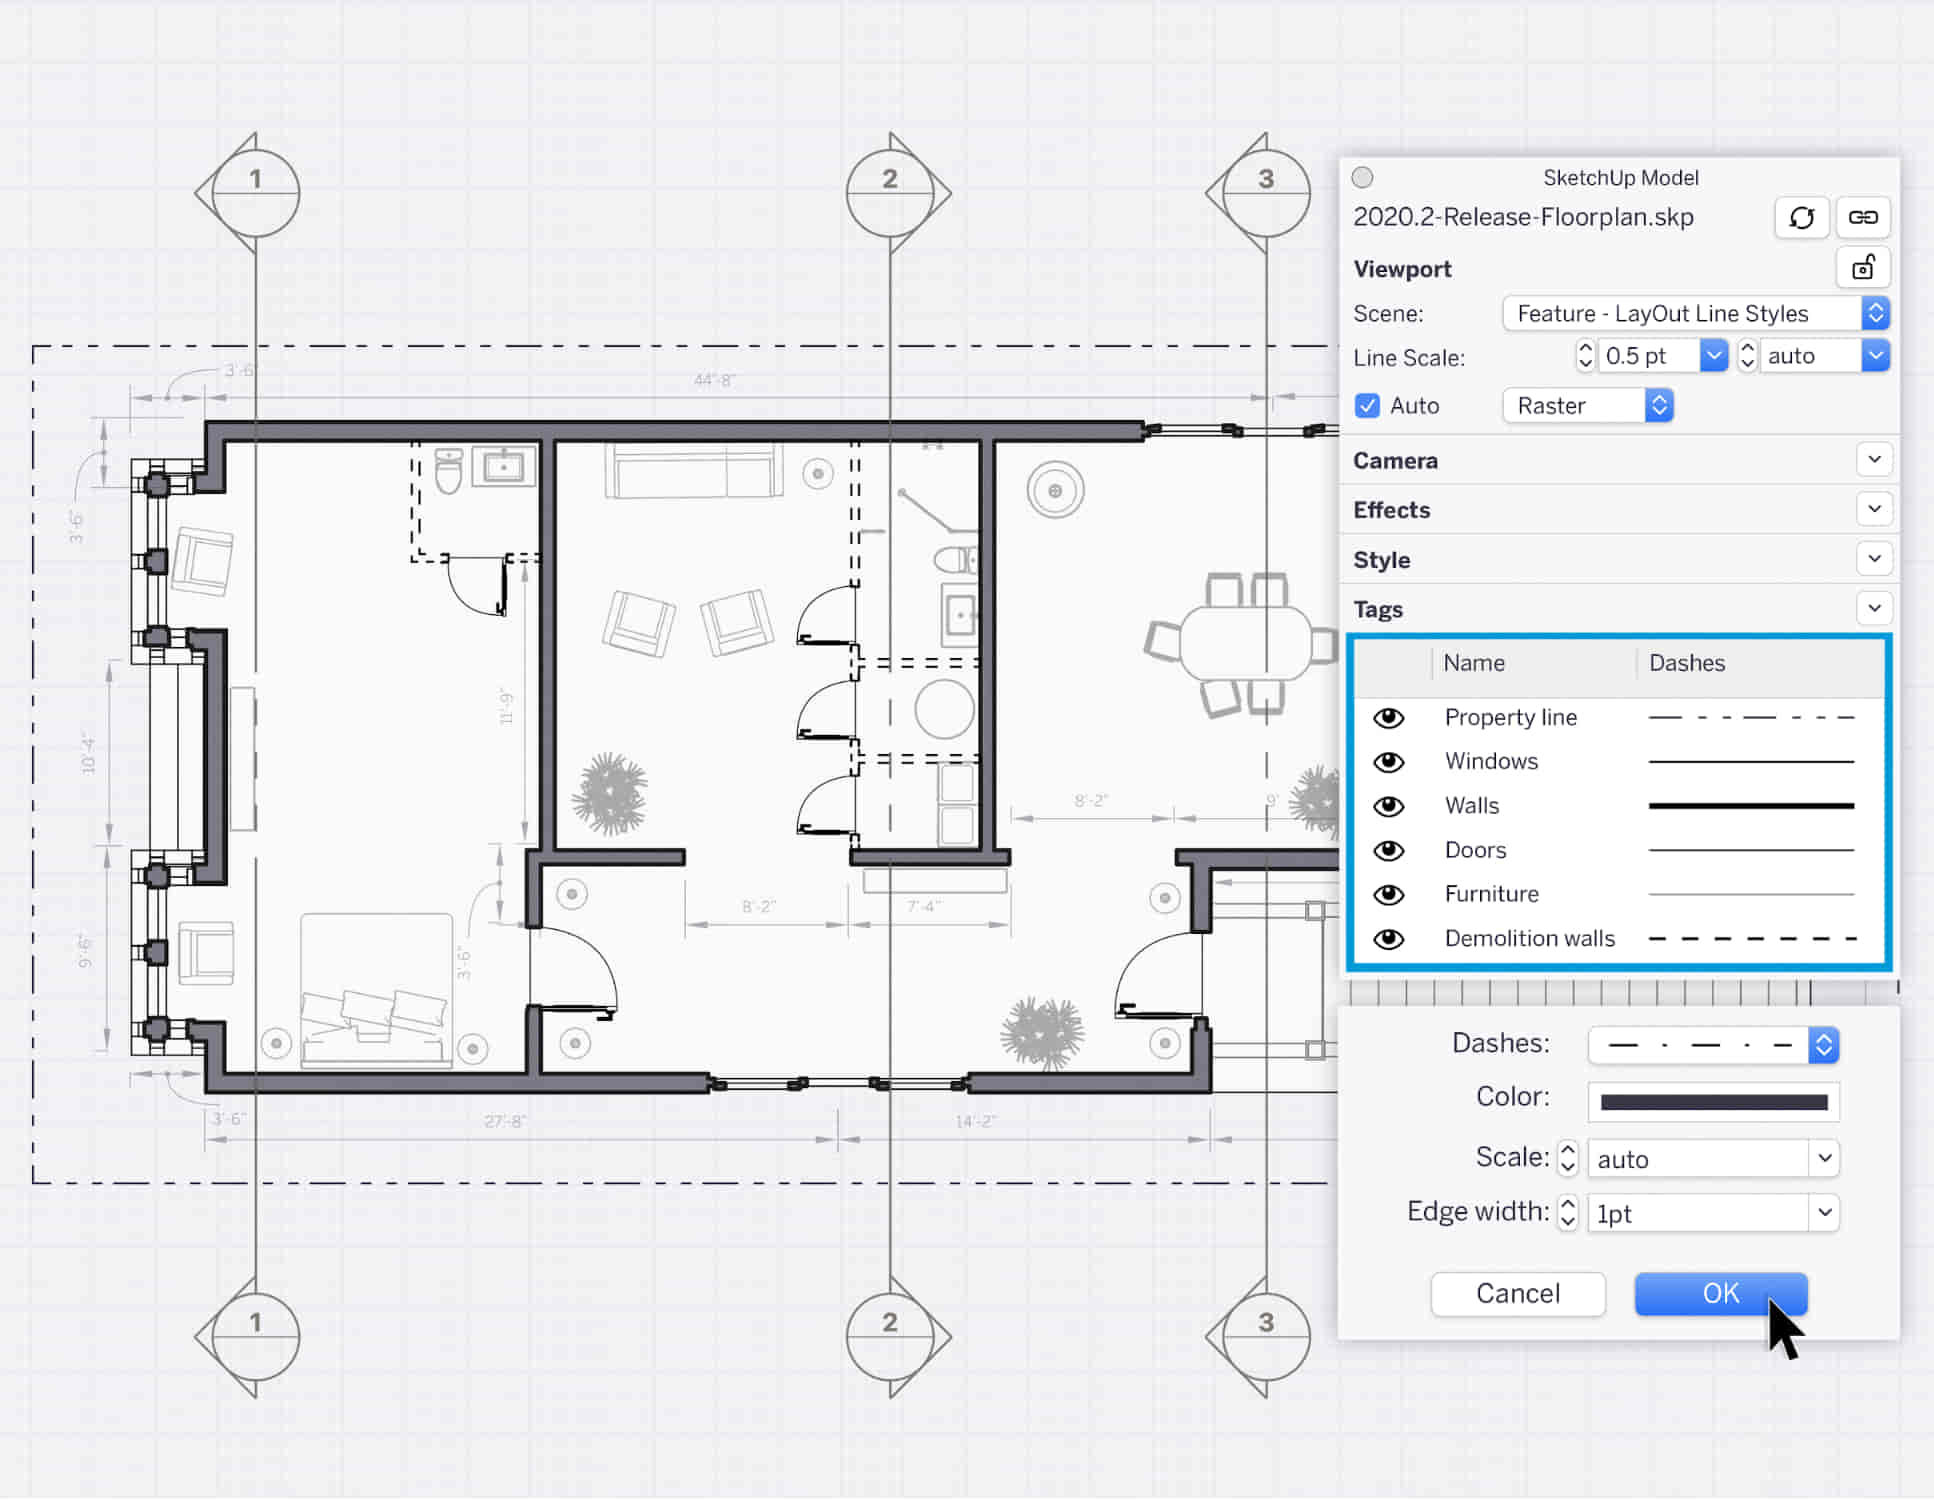
SketchUp Course With Layout and V-Ray
By ATL Autocad Training London
Why Opt for SketchUp Course With Layout and V-Ray? Learn SketchUp with Layout and V-Ray for professional 3D modeling, detailed modeling, and high-quality rendering. Essential for architects and designers for creating visualizations and precise presentations. Check our Website When can I Enrol? 1-on-1 training. Mon to Sat 9 am and 7 pm Book over the Phone 02077202581. Training Duration: 10 hours. You have the flexibility to split these hours over multiple days. Training Method: In-person or live online. Course Outline: SketchUp, Layout, and V-Ray - 10-Hour Training Module 1: Introduction to SketchUp (1 Hour) SketchUp Interface: Explore the basics of the SketchUp user interface. Navigation and View Tools: Learn how to navigate and manipulate 3D space. Module 2: SketchUp Fundamentals (1 Hour) Drawing and Modeling: Begin creating 3D objects and structures. Editing Tools: Manipulate and modify objects efficiently. Module 3: Advanced SketchUp Techniques (1 Hour) Components and Groups: Understand component and group organization. Layers and Scenes: Organize your model and create dynamic views. Module 4: SketchUp for Architectural Design (1 Hour) Architectural Modeling: Explore architectural modeling techniques. Interior Design: Apply SketchUp to interior space design. Module 5: Landscape Design with SketchUp (1 Hour) Landscape Modeling: Use SketchUp for outdoor environment design. Terrain and Topography: Model terrain and natural landscapes. Module 6: Introduction to Layout (1 Hour) Layout Basics: Get familiar with the Layout interface. Setting Up Viewports: Begin using viewports for presenting your SketchUp models. Module 7: Creating Layout Documents (2 Hours) Document Setup: Set up and customize your layout documents. Inserting SketchUp Models: Import SketchUp models into Layout viewports. Dimensioning and Labeling: Add dimensions and labels to your layout documents. Module 8: Presentation and Export (1 Hour) Styling and Rendering: Enhance your SketchUp models for presentations. Exporting and Printing: Learn how to export and print your Layout documents. Module 9: Introduction to V-Ray (1 Hour) V-Ray Interface: Get acquainted with the V-Ray user interface. Materials and Lighting: Learn the basics of materials and lighting in V-Ray. Module 10: Advanced V-Ray Rendering (1 Hour) Advanced Materials: Explore advanced material creation and customization. Realistic Lighting: Master V-Ray lighting techniques for photorealistic renders. By the end of this 10-hour course, you'll have a comprehensive understanding of SketchUp for 3D modeling, Layout for professional documentation, and V-Ray for rendering, empowering you to create stunning 3D designs and presentations. Upon completing this course, you will: Master SketchUp: Create 3D models with precision and creativity. Layout Proficiency: Produce professional design documentation. V-Ray Rendering Skills: Craft photorealistic visualizations. Advanced Techniques: Explore advanced modeling and rendering. Project Experience: Apply skills to real-world projects. Job Opportunities: Architectural Designer Interior Designer Landscape Designer CAD Technician 3D Modeler Rendering Specialist Visualization Artist Layout Specialist Freelance Designer Urban Planner Learning Objectives: Mastering SketchUp with Layout: Learn to create precise 2D floor plans, elevations, and construction documents using SketchUp's Layout tool. Advanced Rendering with V-Ray: Dive into V-Ray to create photorealistic renders, enhancing your visualizations with lighting, textures, and realistic materials. Collaborative Design: Develop skills for collaborative project planning and presentation, enabling effective communication with clients and teams. Job Opportunities: Architectural Visualization Specialist: Create detailed architectural visualizations and presentations for clients and marketing purposes. Interior Designer: Design interior spaces, produce detailed layouts, and create realistic renders for residential and commercial projects. 3D Visualization Artist: Work in the gaming or animation industry, creating 3D models and environments. Freelance Rendering Expert: Offer specialized rendering services to architectural firms, interior designers, or real estate developers. Layout Designer: Specialize in creating professional 2D layouts and construction documents for architectural projects. Why Choose Us? Tailored One-on-One Training: Personalized coaching from industry experts, in-person or online, Monday to Saturday. Customized Tutorials: Enhance skills with exclusive video tutorials designed for your learning journey. Comprehensive Resources: Access a digital reference book for thorough concept revision. Free Ongoing Support: Enjoy continuous assistance via phone or email even after the course ends. Flexible Syllabus: Adapted to your needs for focused and efficient learning. Official Certification: Ccertificate upon course completion. Why Us? Supported Individual Learning: Unwavering support with personalized homework and post-course assistance. Personalized Attention: Experience one-on-one learning, fostering a confident and comfortable environment. Financial Flexibility: Choose from various payment plans tailored to your budget. Expert Instructors: Learn from industry experts dedicated to your success.
VC inside out
By VC Inside Out
VC funding, tech startups, tech valuation, valuation, fund raising, pitch deck, investor data room, cash flow and modeling, VC interviews, how to break into VC, VC funding, angel funding