- Professional Development
- Medicine & Nursing
- Arts & Crafts
- Health & Wellbeing
- Personal Development
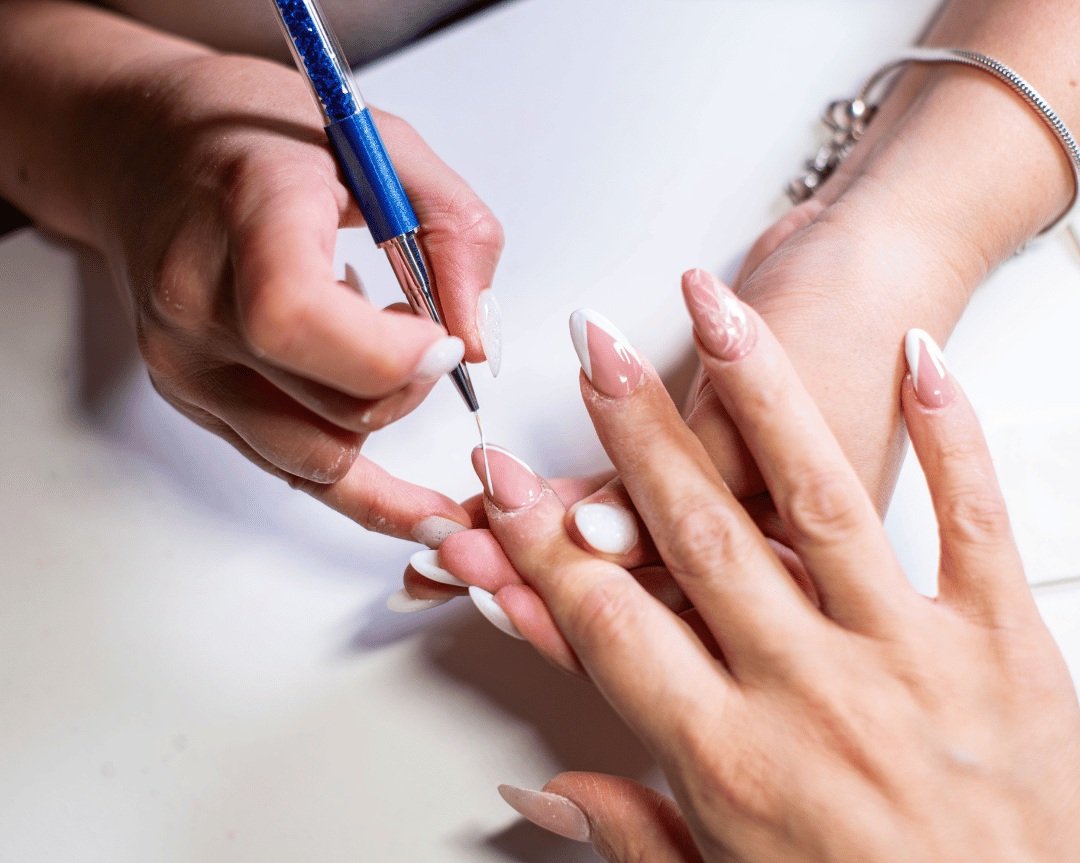
SCULPTING GEL COURSE
By Majestic Academy
Hard gel nail extension course is the most comprehensive UV gel extension course available in London. Our unique course structure and great teaching skills will help you to learn everything quickly and efficiently, all techniques are learnt in "hands-on" practical way. This course is a perfect balance of theory, demonstrations, and practice. Generation X - Sculpting Gels are specially formulated gels that complement a uniquely developed training Gel is one of the basic techniques in the world of professional nail enhancements, it is easier to apply than Acrylic and odour free. The product hardens in LED lamp and for that reason it gives you more time for creating a beautiful design, making it the ideal system for beginners. THE REQUIREMENTS Salon attire must be worn during the course. Student must have clean nail without enhancements and long hair tied back. To ensure maximum practice, students will be required to work on each other throughout the day or on own hands. To attend this course must you have diploma for manicure or Gel polish course. Model for the day 3 THE CONTENT Safety & hygiene Client consultation Record keeping Importance of sanitising and sterilising Aftercare advice How to organise a workspace Technical structure of a nail’s enhancement Troubleshooting gel Correct shape of extended nail Correct White & Pink application Troubleshooting gel Rules on nail design In-fills and removal Advice on products & suppliers Portfolio building process Getting models for practice Charges and loyalty schemes for clients Marketing advice, website, and brand building Organising advertising events Tool and Product introduction Clear overlay – practice on tip & hand Pink & White – practice on tip & hand Application of UV gel set of nails using sculpting technique Form& tips on real hands. Day 3 The 3rd day is a practice and exam day which you will book at the end of day 2. Price Include N2- David Collection Generation X - Sculpting Gels . Upon successful completion an course certificate will be awarded
Rhinoceros 3D Night Training Course
By ATL Autocad Training London
Why Choose Rhinoceros 3D Night Training Course? Learning Rhino 3D opens doors to advanced 3D modeling, making it essential for architects, designers, and engineers. Its versatility, ease of use, and powerful features make it an industry favorite for creating intricate designs, from architecture to product design. Click here for more info: Website Personalized Learning: 1-on-1 sessions tailored to your needs Flexible Timing: Convenient evening classes (5 pm - 7 pm) Mon to Sat Duration: 10 hours. Choose your own day and time Rhino 3D Training Overview Our Rhino 3D Training offers in-person or live sessions suitable for beginners and those aiming to optimize their workflow in Rhinoceros 3D. Course Highlights: Master precise free-form 3D NURBS modeling. Explore advanced surfacing commands and the Rhino interface. Develop skills in curve, surface, and solid modeling. Learn effective modeling practices for various industries, from industrial design to jewelry and graphic design. Who Should Attend? This course is perfect for individuals starting their Rhino journey or aiming to refine their modeling skills. If jewelry modeling is your focus, check out our specialized Rhino Training for Jewelry Design Course. Why Choose Us? Hands-on, instructor-led sessions with flexible scheduling (weekdays, evenings, or weekends from 9 am to 7 pm). Expert instruction from Rhino professionals. Real-time practice with industry-aligned projects. Comprehensive electronic notes and course completion certificate. Ongoing support and career advice from experienced trainers. Benefits of Rhino Training Ideal for enthusiasts in animation, modeling, NURBS curves, surfaces, or solids, Rhino Training empowers you with industry-standard skills. No prerequisites are required, ensuring accessibility for all learners. Upon completing this course, you will: Master Rhino's Interface: Gain proficiency in Rhino's commands, toolbars, and menus, enabling efficient 3D modeling. Create Complex 3D Models: Develop the skills to create intricate 3D objects using curves, surfaces, and solids with various techniques like lofts, sweeps, and revolves. Refine Modeling Techniques: Learn advanced editing methods, such as filleting, chamfering, and curve Booleans, to refine and modify objects. Navigate the 3D Space: Understand 3D navigation, viewports, and construction planes, enabling precise modeling in a virtual space. Prepare Models for Production: Master techniques for analyzing and preparing 3D models for manufacturing, prototyping, and 3D printing. Enhance Rendering and Visualization: Learn rendering techniques to create realistic visuals of your models for presentations and proofs. Job Opportunities: After completing this course, you can pursue a variety of careers, including: 3D Modeler: Create detailed 3D models for industries like gaming, animation, or virtual reality. Product Designer: Design and visualize products for manufacturing using 3D modeling software. Architectural Visualization Specialist: Develop detailed architectural models for presentations and client approvals. Industrial Designer: Design consumer products, furniture, or appliances for manufacturing companies. Jewelry Designer: Craft intricate jewelry designs with precise detailing using 3D modeling techniques. Prototyping Specialist: Work in industries like aerospace or automotive, creating prototypes for testing and development. Freelance 3D Artist: Offer your skills on platforms like Upwork or Fiverr, creating custom 3D models for clients worldwide. Rhino 3D Training Overview Our Rhino 3D Training offers in-person or live sessions suitable for beginners and those aiming to optimize their workflow in Rhinoceros 3D. Course Highlights: Master precise free-form 3D NURBS modeling. Explore advanced surfacing commands and the Rhino interface. Develop skills in curve, surface, and solid modeling. Learn effective modeling practices for various industries, from industrial design to jewelry and graphic design. Who Should Attend? This course is perfect for individuals starting their Rhino journey or aiming to refine their modeling skills. If jewelry modeling is your focus, check out our specialized Rhino Training for Jewelry Design Course. Why Choose Us? Hands-on, instructor-led sessions with flexible scheduling (weekdays, evenings, or weekends from 9 am to 7 pm). Expert instruction from Rhino professionals. Real-time practice with industry-aligned projects. Comprehensive electronic notes and course completion certificate. Ongoing support and career advice from experienced trainers. Benefits of Rhino Training Ideal for enthusiasts in animation, modeling, NURBS curves, surfaces, or solids, Rhino Training empowers you with industry-standard skills. No prerequisites are required, ensuring accessibility for all learners. Advantages: Personalized Rhino 3D Evening Training with individual attention. Flexibility to select your preferred time and day for the training. Access to free online support even after completing the course. Comprehensive PDF notes and handouts provided for effective learning. Receive a certificate upon completing the Rhino 3D Evening Training Course. Affordable pricing options tailored to your budget. Assistance in computer configuration for seamless software installation. Referral benefits: Recommend a friend and enjoy exclusive discounts. Special discounts available for group training sessions. Operating hours from Monday to Saturday, extending into the evening for convenience. Tailored training programs designed to meet your specific needs and requirements.
Advanced Applied Petroleum Geomechanics
By EnergyEdge - Training for a Sustainable Energy Future
Enhance your expertise in petroleum geomechanics with Energy Edge's advanced course. Gain practical skills and knowledge to tackle complex geomechanical challenges.

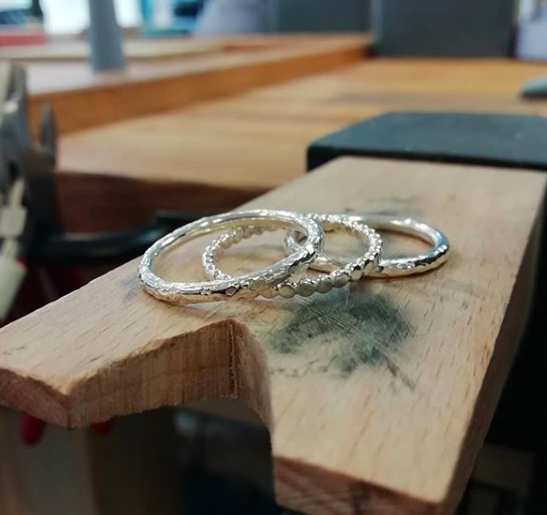
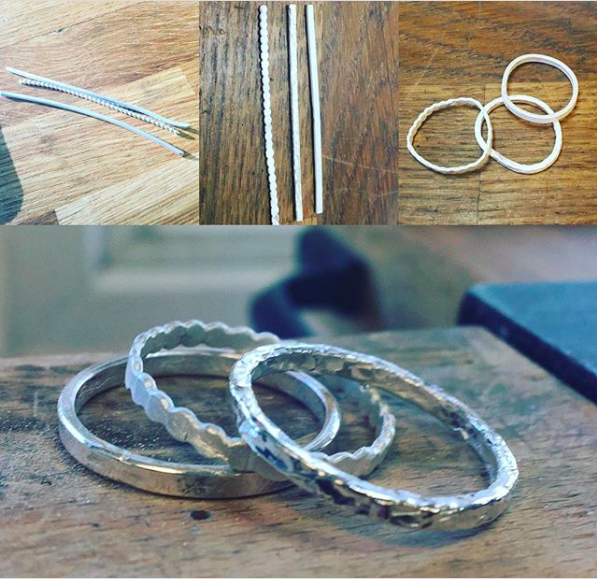
In this morning session, you will create your very own set of 3 silver stacking rings. You will learn how to calculate your finger size, solder, form the metal, and texture and polish the silver to create your lovely stack of rings. You can decide on their design to create your own individual set. This is an excellent starting project for a beginner. For those with more experience, it is an opportunity to develop your skills further. WHEN: Sunday 7th July 10-1pm WHERE: Workshop 925 based at The Mayford Centre, just outside of Woking and very close to Guildford. Unit F9 The Mayford Centre, Mayford Green Woking, Surrey GU22 0PP TUTOR: Kirsten Hendrich WHAT DOES THE DAY INVOLVE? In this morning session, you will create your very own set of 3 silver stacking rings. You will learn how to calculate your finger size, solder, form the metal, and texture and polish the silver to create your lovely stack of rings. You can decide on their design to create your own individual set. This is an excellent starting project for a beginner. For those with more experience, it is an opportunity to develop your skills further. EXPERIENCE REQUIRED: None, all abilities are welcomed. Our small classes mean we are able to provide each student with the support they require. Students must be 16+ CLASS SIZE: 7 WHAT IS INCLUDED? All tools and consumables are supplied The cost of this course includes materials. YOU WILL BE PROVIDED WITH: Two 7.5 cm lengths 2mm silver sterling round wire One 7.5 cm length 2mm beaded silver sterling wire If you wish to purchase additional silver to create more rings (should time allow), we stock silver which you are able to purchase on the day. WHAT TO BRING: For safety reasons, during each class, you are required to wear appropriate footwear, we request that no open toed shoes are worn within Workshop 925. Long hair should also be tied back when working with the equipment. You may also wish to bring a notebook. We have handouts for many demonstrations, but there are always many tips and tricks given verbally by the tutor, which some might like to keep note of. PAYMENT OPTIONS: You can pay via our website or in our workshop in person using our card machine. If you prefer to pay directly, you can email us on hello@workshop925.com and we can invoice you manually to arrange a bank transfer. For classes over £80, instalment options are also available. Please email us on hello@workshop925.com to arrange. Gift Voucher – if you have a voucher to redeem, please email us before booking on hello@workshop925.com Please check your dates carefully before booking a class as we are unable to offer refunds. See our Terms & Conditions for full details.
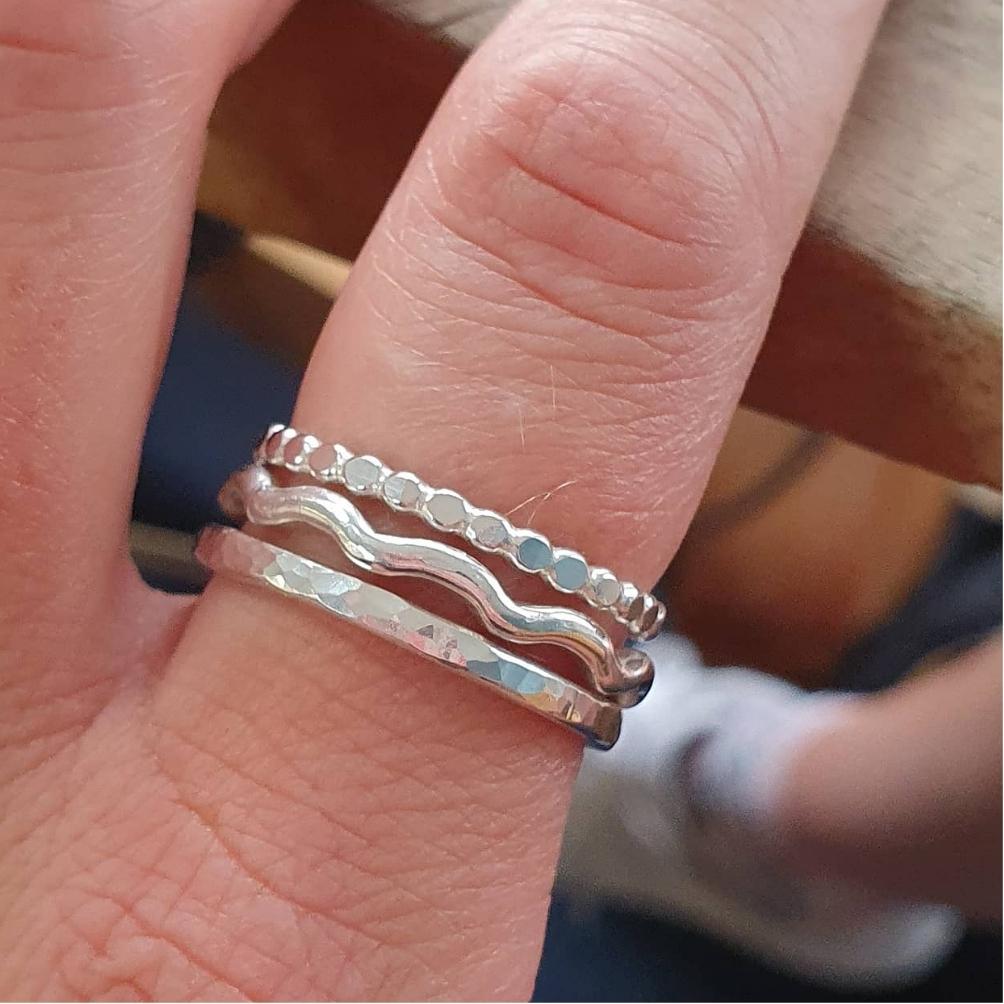
In this morning session, you will create your very own set of 3 silver stacking rings. You will learn how to calculate your finger size, solder, form the metal, and texture and polish the silver to create your lovely stack of rings. You can decide on their design to create your own individual set. This is an excellent starting project for a beginner. For those with more experience, it is an opportunity to develop your skills further. WHEN: Sunday 7th July 2-5pm WHERE: Workshop 925 based at The Mayford Centre, just outside of Woking and very close to Guildford. Unit F9 The Mayford Centre, Mayford Green Woking, Surrey GU22 0PP TUTOR: Kirsten Hendrich WHAT DOES THE DAY INVOLVE? In this morning session, you will create your very own set of 3 silver stacking rings. You will learn how to calculate your finger size, solder, form the metal, and texture and polish the silver to create your lovely stack of rings. You can decide on their design to create your own individual set. This is an excellent starting project for a beginner. For those with more experience, it is an opportunity to develop your skills further. EXPERIENCE REQUIRED: None, all abilities are welcomed. Our small classes mean we are able to provide each student with the support they require. Students must be 16+ CLASS SIZE: 7 WHAT IS INCLUDED? All tools and consumables are supplied The cost of this course includes materials. YOU WILL BE PROVIDED WITH: Two 7.5 cm lengths 2mm silver sterling round wire One 7.5 cm length 2mm beaded silver sterling wire If you wish to purchase additional silver to create more rings (should time allow), we stock silver which you are able to purchase on the day. WHAT TO BRING: For safety reasons, during each class, you are required to wear appropriate footwear, we request that no open toed shoes are worn within Workshop 925. Long hair should also be tied back when working with the equipment. You may also wish to bring a notebook. We have handouts for many demonstrations, but there are always many tips and tricks given verbally by the tutor, which some might like to keep note of. PAYMENT OPTIONS: You can pay via our website or in our workshop in person using our card machine. If you prefer to pay directly, you can email us on hello@workshop925.com and we can invoice you manually to arrange a bank transfer. For classes over £80, instalment options are also available. Please email us on hello@workshop925.com to arrange. Gift Voucher – if you have a voucher to redeem, please email us before booking on hello@workshop925.com Please check your dates carefully before booking a class as we are unable to offer refunds. See our Terms & Conditions for full details.
In this morning session, you will create your very own set of 3 silver stacking rings. You will learn how to calculate your finger size, solder, form the metal, and texture and polish the silver to create your lovely stack of rings. You can decide on their design to create your own individual set. This is an excellent starting project for a beginner. For those with more experience, it is an opportunity to develop your skills further. WHEN: Saturday 17th August 10-1pm WHERE: Workshop 925 based at The Mayford Centre, just outside of Woking and very close to Guildford. Unit F9 The Mayford Centre, Mayford Green Woking, Surrey GU22 0PP TUTOR: Kirsten Hendrich WHAT DOES THE DAY INVOLVE? In this afternoon session, you will create your very own set of 3 silver stacking rings. You will learn how to calculate your finger size, solder, form the metal, and texture and polish the silver to create your lovely stack of rings. You can decide on their design to create your own individual set. This is an excellent starting project for a beginner. For those with more experience, it is an opportunity to develop your skills further. EXPERIENCE REQUIRED: None, all abilities are welcomed. Our small classes mean we are able to provide each student with the support they require. Students must be 16+ CLASS SIZE: 7 WHAT IS INCLUDED? All tools and consumables are supplied The cost of this course includes materials. YOU WILL BE PROVIDED WITH: Two 7.5 cm lengths 2mm silver sterling round wire One 7.5 cm length 2mm beaded silver sterling wire If you wish to purchase additional silver to create more rings (should time allow), we stock silver which you are able to purchase on the day. WHAT TO BRING: For safety reasons, during each class, you are required to wear appropriate footwear, we request that no open toed shoes are worn within Workshop 925. Long hair should also be tied back when working with the equipment. You may also wish to bring a notebook. We have handouts for many demonstrations, but there are always many tips and tricks given verbally by the tutor, which some might like to keep note of. PAYMENT OPTIONS: You can pay via our website or in our workshop in person using our card machine. If you prefer to pay directly, you can email us on hello@workshop925.com and we can invoice you manually to arrange a bank transfer. For classes over £80, instalment options are also available. Please email us on hello@workshop925.com to arrange. Gift Voucher – if you have a voucher to redeem, please email us before booking on hello@workshop925.com Please check your dates carefully before booking a class as we are unable to offer refunds. See our Terms & Conditions for full details.
In this afternoon session, you will create your very own set of 3 silver stacking rings. You will learn how to calculate your finger size, solder, form the metal, and texture and polish the silver to create your lovely stack of rings. You can decide on their design to create your own individual set. This is an excellent starting project for a beginner. For those with more experience, it is an opportunity to develop your skills further. WHEN: Saturday 17th August 2-5pm WHERE: Workshop 925 based at The Mayford Centre, just outside of Woking and very close to Guildford. Unit F9 The Mayford Centre, Mayford Green Woking, Surrey GU22 0PP TUTOR: Kirsten Hendrich WHAT DOES THE DAY INVOLVE? In this afternoon session, you will create your very own set of 3 silver stacking rings. You will learn how to calculate your finger size, solder, form the metal, and texture and polish the silver to create your lovely stack of rings. You can decide on their design to create your own individual set. This is an excellent starting project for a beginner. For those with more experience, it is an opportunity to develop your skills further. EXPERIENCE REQUIRED: None, all abilities are welcomed. Our small classes mean we are able to provide each student with the support they require. Students must be 16+ CLASS SIZE: 7 WHAT IS INCLUDED? All tools and consumables are supplied The cost of this course includes materials. YOU WILL BE PROVIDED WITH: Two 7.5 cm lengths 2mm silver sterling round wire One 7.5 cm length 2mm beaded silver sterling wire If you wish to purchase additional silver to create more rings (should time allow), we stock silver which you are able to purchase on the day. WHAT TO BRING: For safety reasons, during each class, you are required to wear appropriate footwear, we request that no open toed shoes are worn within Workshop 925. Long hair should also be tied back when working with the equipment. You may also wish to bring a notebook. We have handouts for many demonstrations, but there are always many tips and tricks given verbally by the tutor, which some might like to keep note of. PAYMENT OPTIONS: You can pay via our website or in our workshop in person using our card machine. If you prefer to pay directly, you can email us on hello@workshop925.com and we can invoice you manually to arrange a bank transfer. For classes over £80, instalment options are also available. Please email us on hello@workshop925.com to arrange. Gift Voucher – if you have a voucher to redeem, please email us before booking on hello@workshop925.com Please check your dates carefully before booking a class as we are unable to offer refunds. See our Terms & Conditions for full details.
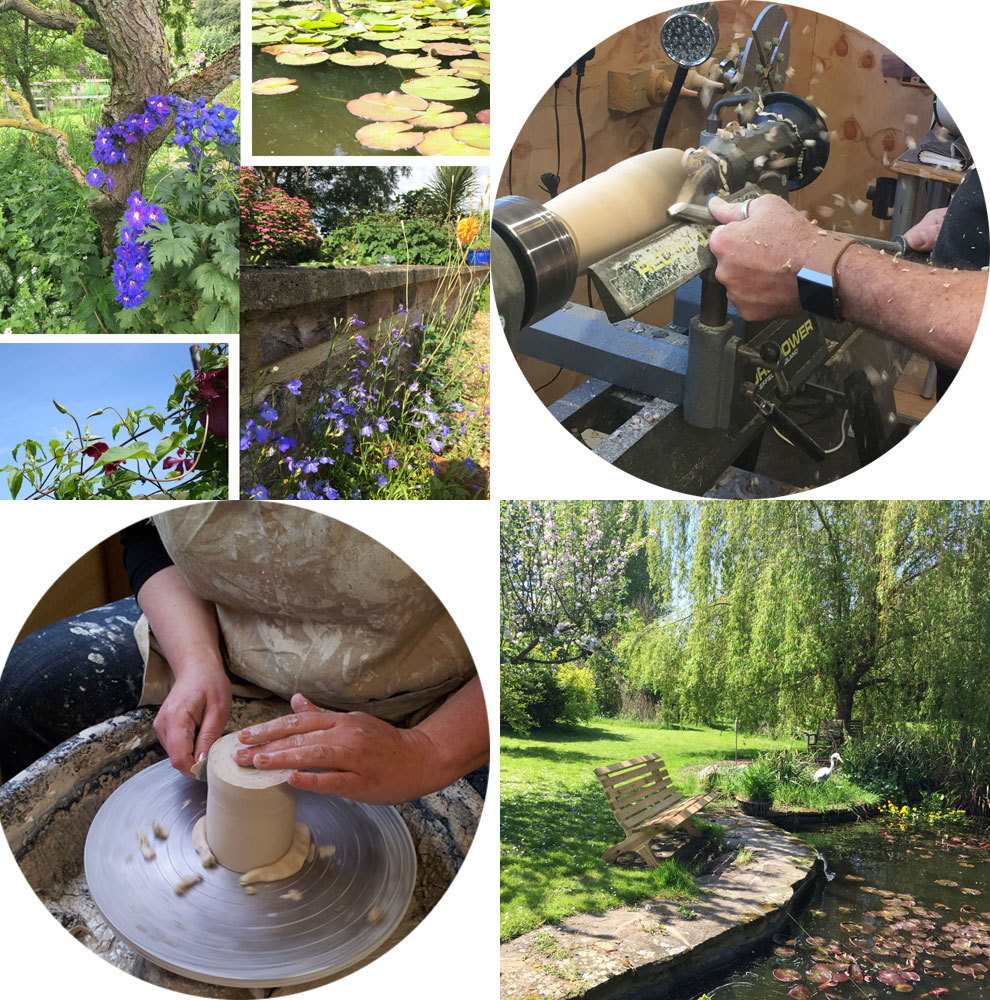
This workshop gives you the unique opportunity to experience the basics of two crafts in 1 day in your own personal workshop with one to one tuition. The studios are located in the cottage garden of our home on the Cambridgeshire/Norfolk border. Your experience is private to you and there will be no other students in the studios. The "2 crafts in 1 day" workshop is aimed at those who want to have a go at both of these fun crafts, and come away having learnt some basic techniques for both disciplines. As this is basically a private tuition experience, the course is focused but fun, so would make a fantastic gift. The day can also be experienced by two people (to book this, please refer to our other workshop ""2 Crafts in 1 Day!" 1-2-1 woodturning & pottery experience in 1 day for 2 people" where each person could experience the crafts singularly or together. This makes for a wonderful Valentine's or anniversary experience, and can also be enjoyed by a parent and child. The morning is spent learning the ropes of woodturning - how to cut and shape wood on the lathe, understanding a little about the different tools required, and making a few pieces to take home. After a light farmhouse-style lunch (which we provide and which we tailor to your dietary requirements), the afternoon then continues with a pottery session. Students can have fun with clay, focusing on some basic hand building methods to get them used to handling the material using the techniques of pinching, coiling, slab building and also throwing on the wheel. A total of 3 pieces can then be chosen for us to glaze and fire once they have dried sufficiently. When ready, they can either be collected by the student (if they live locally) or I can post them on (I have to charge postage & packaging). Refreshments are provided during both workshops, and a light, rustic farmhouse-style lunch is also included - catering to all dietary requirements. Depending on the weather/time of year, lunch can be taken either out in the cottage garden or in our country kitchen. The sessions are hands-on with expert 1-2-1 tuition - and the student will be able to use all the studio facilities. Each student will also be provided with a certificate of participation for both crafts. About a week before your workshop date, we'll e-mail you again with more details about parking etc. We also offer accommodation in the form of our Crafter's Retreat cabin (www.craftersretreat.co.uk) or we can advise of other local B&Bs.
8-Week World of Wine Course by Grape Variety
By Hampshire Wine School
Join us each evening as we taste several pairs of wines made from the same variety, but from different countries. Can you easily tell the difference between Syrah from the south of France and Shiraz from the Barossa Valley in Australia? By the end of the course you will!

Access - intermediate (In-House)
By The In House Training Company
This one-day workshop will give you a better understanding of the components and operations of an Access database. It is designed to build on a user's existing skills and includes useful action queries to allow greater manipulation of a database. This workshop will help participants: Ensure the integrity of their databases Manage field properties Use the query functions effectively Save time with the query expression builder Create different types of query more quickly Design better forms Link expressions in forms Create better and more useful reports Import and export tables more easily 1 Table relationship integrity Identifying relationships Identifying criteria for data integrity Applying referential integrity Managing relationship join types 2 Table field properties Field properties overview Using input mask field Using default value fields Using field validation rules 3 Query functions Running aggregate function calculations Running sum, average, count, max and min functions Grouping calculated data 4 Query calculations Using query operators and expressions Adding calculated fields to a query Using the query expression builder 5 Action queries Creating make table queries Creating append queries Creating update queries Creating delete queries 6 Designing forms Adding form controls Aligning and arranging form controls Adding pictures and labels to forms Adding new fields to a form Controlling tab order Adding command buttons Adding a combo box control Formatting data using conditional formatting 7 Form expressions (calculations) Using the form expression builder Working with a property sheet within a form Linking expressions within a form 8 Working with reports Creating reports with the report wizard Inserting report fields Formatting fields Inserting report headers and footers Working with a property sheet within a report 9 Grouped reports Creating groups with the report wizard Sorting grouped data Grouping alphabetically Grouping on date intervals Creating sub reports Adding calculations to groups 10 Importing and exporting tables Importing tables into Access Exporting tables from Access Importing and linking data in Access
