- Professional Development
- Medicine & Nursing
- Arts & Crafts
- Health & Wellbeing
- Personal Development
5089 Courses
Rhino 2D | 3D Training Course for Jewellery Design
By London Design Training Courses
Why Opt for the Rhino 3D Training Course in Jewelry Design? Click here for more info Within a span of 10 hours, you'll master the interface and gain insights into how Rhino leverages points, lines, surfaces, and solids to fashion printable 3D objects. Moreover, you'll explore the art of crafting repetitive and intricate geometric shapes, perfect for creating minimalist and elegant jewelry. Flexible Scheduling: 1-on-1 training sessions tailored to your schedule. Pick any hour between 9 am and 7 pm from Mon to Sat. Course Duration: 10 hours. Training Methods: Choose between in-person sessions or live online training. Why Choose Our Rhino 3D Training Course for Jewelry Design? Rhino, also known as Rhinoceros, stands as a robust 3D computer graphics and computer-aided design software extensively utilized in various industries, including architecture, industrial design, and multimedia. LDTC offers meticulously crafted Rhino courses to empower you in mastering this software. Led by experienced instructors, our courses ensure a comprehensive understanding of Rhino, equipping you to create exceptional designs, specifically tailored for jewelry creation. Rhino 3D Training for Jewelry Design: Our Rhino 3D training caters to both beginners and those aspiring to acquire advanced techniques, emphasizing its application in jewelry design. Course Highlights: Precise 3D Modeling: Master the art of crafting free-form 3D NURBS models with utmost precision. Advanced Functionality: Explore Rhino's advanced surfacing commands and features tailored for jewelry design. User Interface Mastery: Navigate Rhino's interface seamlessly and refine your skills in curves, surfaces, and solids. Expert Guidance: Acquire expertise in Rhino's modeling environment under the guidance of seasoned professionals. Modeling Why Choose Our Rhino 3D Training Course for Jewelry Design? Rhino, also known as Rhinoceros, stands as a robust 3D computer graphics and computer-aided design software extensively utilized in various industries, including architecture, industrial design, and multimedia. LDTC offers meticulously crafted Rhino courses to empower you in mastering this software. Led by experienced instructors, our courses ensure a comprehensive understanding of Rhino, equipping you to create exceptional designs, specifically tailored for jewelry creation. Rhino for Jewelry Design - 16-Hour Course Module 1: Introduction and Navigation Get acquainted with Rhino's interface, menus, and screen layout. Navigate Rhino models with precision in 2D lines, polylines, and NURBS curves. Use modeling setup features like snap, ortho, and planar constraints for accuracy. Leverage object snaps and Smart Track functionality for enhanced precision. Module 2: Solid and Surface Modeling Fundamentals Rapidly develop 3D solids and surfaces using Rhino's organized layering system. Utilize coordinates and constraints for meticulous modeling in 3D space. Create diverse shapes, including rectangles, circles, arcs, ellipses, and polygon curves. Enhance models with Rhino render, render color, and free-form curves. Efficiently handle model views with pan, zoom, and view management tools. Implement various editing commands for curve manipulation and transforming curves into surfaces and solids. Utilize history tracking for advanced editing and execute general editing actions. Module 3: Intermediate Edit and Surfacing Techniques Introduce essential NURBS modeling concepts and terminologies. Edit curves and surfaces through control point manipulation and rebuilding for optimal refinement. Use the nudge modeling aid for precise adjustments and generate deformable shapes. Create curves through projection techniques and split surfaces using curves and surfaces. Blend surfaces seamlessly, utilizing symmetry tools, lighting, and rendering effects. Convert intricate 3D objects into detailed 2D drawings and craft page layouts. Module 4: Advanced Surfacing and Solid Modeling Techniques Construct model primitives and solid text using techniques such as pipe and extrusion. Efficiently modify solids using Boolean tools, expanding surface modeling capabilities. Utilize techniques like extrusion, lofting, and revolving for intricate surfaces. Create sweeps using 1 and 2 rail curves and master surface network techniques for complex shapes. Downlaod Rhino. Upon completion of the Rhino 3D Training Course for Jewelry Design, participants can expect the following learning outcomes: Mastering Rhino Interface: Gain a comprehensive understanding of Rhino's interface, menus, and screen layout. Precision in Modeling: Navigate Rhino models with precision using 2D lines, polylines, and NURBS curves. Modeling Setup Proficiency: Utilize modeling setup features such as snap, ortho, and planar constraints for accurate designs. Enhanced Navigation Techniques: Leverage object snaps and Smart Track functionality for enhanced precision during navigation. Solid and Surface Modeling Skills: Rapidly develop 3D solids and surfaces with Rhino's organized layering system. Coordination and Constraint Application: Utilize coordinates and constraints for meticulous modeling in 3D space. Diverse Shape Creation: Create diverse shapes, including rectangles, circles, arcs, ellipses, and polygon curves. Rendering and Enhancement Techniques: Enhance models with Rhino render, render color, and free-form curves. Efficient Model View Handling: Efficiently handle model views with pan, zoom, and view management tools. Intermediate Edit and Surfacing Techniques: Edit curves and surfaces through control point manipulation and rebuilding for optimal refinement. NURBS Modeling Mastery: Introduce essential NURBS modeling concepts and terminologies. Advanced Editing and Modeling Skills: Use the nudge modeling aid for precise adjustments and generate deformable shapes. Complex Shape Creation: Create sweeps using 1 and 2 rail curves and master surface network techniques for intricate shapes. Solid Modeling Proficiency: Construct model primitives and solid text using techniques such as pipe and extrusion. Application of Boolean Tools: Efficiently modify solids using Boolean tools, expanding surface modeling capabilities. Advanced Surfacing Techniques: Utilize techniques like extrusion, lofting, and revolving for intricate surfaces. Conversion and Crafting of 2D Drawings: Convert intricate 3D objects into detailed 2D drawings and craft page layouts. Hands-On Project Experience: Engage in practical exercises and hands-on projects tailored for jewelry design applications. Upon mastering these skills, participants will be well-equipped to create sophisticated jewelry designs using Rhino 3D modeling software.

CITB Health & Safety Awareness
By Dynamic Training and Assessments Ltd
This course is aimed at people who are entering or are already working in the construction and civil engineering industry.

Introduction to Adobe Dreamweaver
By Platform Training
Adobe Dreamweaver is an industry leading web design and HTML editor software. First-time Dreamweaver users may feel overwhelmed by the amount of options, panels and menus across the interface, but our Dreamweaver course will quickly familiarise you with the layout giving you access to advanced controls over CSS elements, and the ability to view how a webpage will look when displayed on different size device screens. Our one day Adobe Dreamweaver course will enable you to build and manage professional, well designed and standards compliant websites using the software. HTML and CSS concepts are covered.

Basic Photoshop Training Course
By ATL Autocad Training London
Learn the Basic PhotoshopTraining Course Learn retouching, layers, color, correction, shapes, and symbols. Delve into graphic design, photo editing, and digital art. From beginner to pro, gaining expertise in UX strategies, ensuring your websites are impactful and user-friendly. Click here for more info: Website Duration: 10 hours Approach: 1-on1 sessions and Personalized guidance. Schedule: Customize your schedule by booking a convenient hour, available from Monday to Saturday between 9 am and 7 pm. Module 1: Interface and Preferences Familiarize yourself with the Photoshop Interface Customize Panels and Toolbars to match your workflow Explore Photoshop Preferences to optimize settings Discover various Photoshop CC Workspaces tailored for different tasks Begin with essential Keyboard Shortcuts Module 2: Image File Formats Understand diverse image file formats such as PSD, JPEG, PNG, and PDF Delve into File Compression and its influence on image quality Module 3: Creating a New Document Set dimensions and size for new documents Grasp media units for accurate design specifications Explore Color Profiles and their significance Save presets for swift document setups Module 4: Placing Images Differentiate Embedded vs. Linked images Introduction to Smart Objects for non-destructive editing Master the Selection tool for precise image placement Module 5: Image Size and Resolution Save images using various formats and compression settings Understand Image Size and Resolution for diverse output needs Module 6: Layers Introduction Organize your work with Layer management Master layer tasks such as reordering, renaming, grouping, locking, and hiding Module 7: Selection Tools Explore Selection Tools like Marquee, Magic Wand, Quick Selection, and Lasso Grasp Inverse Selection and Deselect for efficient editing Module 8: Layer Effects Apply captivating Layer Effects such as Drop Shadow, Stroke, and Outer Glow Save and replicate Effects Styles for quick application Combine multiple effects for creative designs Module 9: Introduction to Shapes Utilize the Shapes tool for fundamental design elements Create Custom Shapes for unique designs Understand Color principles and use the Properties Panel for adjustments Master the Direct Selection tool for precise shape editing Create a basic poster using provided examples Module 10: Type and Typography Work with Type and explore the Character and Paragraph Panel Utilize Styles Panel for consistent text formatting Save favorite fonts for easy access Apply Effects and Layer Styles on Type for impactful typography Learn about Leading, Tracking, and Kerning for optimal text spacing Module 11: Colors Understand RGB vs. CMYK color modes Select colors using the Eyedropper tool Save colors as Swatches for reuse Create gradients using the Gradient Tool Module 12: Creating a Clipping Mask Master the concept of Clipping Masks and their application Apply Clipping Masks to Type, Images, and Shapes Combine Layer Effects with Clipping Masks for creative designs Module 13: Introduction to Masking Understand Masking and its importance in image editing Utilize the Brush tool for mask creation Learn Masking shortcuts and use Gradient Mask for smooth transitions Module 14: Adjustment Layers Explore Color and Gradient Adjustment Layers for image enhancements Master Curves, Levels, and Hue/Saturation Adjustment Layers for precise color control Convert images to Black and White using Adjustment Layers Combine Adjustment Layer Masks for targeted edits Module 15: Image Touch Up Master various touch-up techniques, including Red Eye Removal, Spot Healing Brush, and Patch Tool Utilize Content Aware Removal for seamless object removal Restore old photos using Clone Stamp and Dodge/Burn tools Enhance portraits by removing blemishes and whitening teeth Module 16: Filters Introduction Understand Smart Objects and Filter usage for non-destructive editing Explore the Filters Gallery and experiment with Blur and Vantage filters Module 17: Blending Modes Introduction Master the concept of Blending Modes and their effects on layer overlays Understand different Blending Modes like Darken, Lighten, and Overlay Layer Mastery: Develop expertise in working with layers, mastering advanced techniques for seamless editing and design organization in Adobe Photoshop. Precision Editing: Skillfully employ a variety of selection tools, ensuring precise and meticulous editing, manipulation, and composition of images and elements. Creative Layer Effects: Apply captivating Layer Effects with finesse, enhancing your designs and visuals to achieve professional-grade aesthetics. Advanced Editing Techniques: Understand the functionalities of Adjustment Layers, Masking, and Clipping Masks, enabling you to perform advanced editing and compositing tasks with confidence and precision. Effective Photo Restoration: Acquire techniques to touch up and restore photographs effectively, ensuring professional-quality results in photo editing and retouching. Typography Expertise: Explore advanced typography techniques, enabling you to create visually appealing text designs that complement your overall compositions. Filter Applications: Gain an introductory understanding of Filters and their creative applications, enhancing your ability to add artistic effects and refine visuals. Practical Color Theory: Grasp the fundamental principles of Color Theory and apply them practically in your designs, ensuring harmonious and visually pleasing color schemes in your work. Course Highlights: Advanced Photoshop Skills: Learn intricate techniques for professional image editing, retouching, and manipulation. Creative Design Projects: Engage in hands-on projects to enhance your practical skills in real-world scenarios. Mastering Special Effects: Dive into advanced topics like layer effects, filters, and blending modes to create stunning visual effects. Typography and Design Principles: Explore typography styles, layout design, and color theory for compelling compositions. Professional Portfolio Development: Receive guidance on creating a professional portfolio showcasing your Photoshop expertise. Potential Job Roles: Graphic Designer: Craft visually appealing graphics for print and digital media. Digital Artist: Create digital artwork for various applications, from illustrations to advertisements. Photo Retoucher: Enhance and manipulate photos for professional use, including portrait retouching. UI/UX Designer: Design user interfaces and experiences for websites and applications. Web Designer: Develop visually engaging websites with expertise in Photoshop for web design. Marketing Content Creator: Produce marketing materials such as banners, brochures, and social media visuals. Freelance Designer: Work independently, offering design services to clients across different industries. Advertising Creative: Contribute to creative campaigns by designing impactful ad visuals. Print Production Specialist: Prepare print-ready materials, ensuring quality in printed products. Photography Post-Processing Specialist: Enhance and retouch photographs, optimizing them for professional use. Comprehensive Photoshop Proficiency: Develop a solid foundation in Photoshop, mastering essential tools and techniques vital for image editing and manipulation. Creative Editing Expertise: Learn advanced retouching, image enhancement, digital artwork creation, and graphic design using Photoshop's powerful features. Professional-Grade Results: Acquire skills for achieving professional-level outcomes in image editing, ensuring precise color correction, seamless retouching, and visually appealing compositions. Optimized Workflow: Discover time-saving tips, shortcuts, and efficient techniques to enhance your Photoshop workflow. Learn layer management, non-destructive editing, and automation for streamlined processes. Versatile Design Skills: Unlock creative possibilities by mastering text effects, digital collages, filters, and graphic design for diverse mediums. Access to Recorded Lessons: Revisit course material and reinforce learning through recorded lessons. Review specific techniques at your own pace, deepening your understanding of Photoshop. Lifetime Email Assistance: Benefit from continuous support with lifetime email assistance. Seek guidance, get answers to questions, and seek clarification even after completing the course.

Emotional Intelligence for Today’s Leadership and Management
By Dickson Training Ltd
EQ is a pattern of how people's biases in their thinking leads them to think one choice or thing is better than another, as well as their clarity in differentiating within those biases to exercise clear and sound judgement. Where your thinking and responses lie within your biases spectrum, and your ability in adjusting to the situation you find yourself in, will determine responses equating to poor or strong Emotional Intelligence (EI). This course will enhance and promote the skill set necessary for any working leader or manager, allowing our in-depth emotional intelligence knowledge to be applied into your working environment. From an employer's perspective, this award can be a significant long-term return on investment by further developing your leaders and managers. What Does This Course Offer? Our program offers an EQ-SWOT™ assessment and EI Model in detail, and through activity and discussion we explore how applying and possibly adjusting, you may offer an improved Emotional Intelligence. Our learning experiences are successful because the outcomes are quickly embedded and demonstrate an immediate visible impact on the day-to-day working environment. Our engaging learning inspires employees to want to personally add value to the companies they work for. We also offer our Paradigm EQ-SWOT™ online assessment and report as a frame of reference within the program. This assessment should be completed before attending the program, and will be expanded upon during the program delivery. Course Content The Emotional Intelligence for Today’s Leadership and Management course covers the following topics: What makes EI so important within the workplace Self-Awareness and your EQ Profile The EQ unpacked Unconscious Bias & EI How to develop your EI quotient Accreditation Activity Our accredited tutors deliver training that encourages delegates to confidently and practically apply all they have learnt as soon as they get back into the business. To achieve this award, delegates need to prepare and deliver a 3 minute presentation* on the highlights of their learning and immediate application avenues when back in their working environment. *Participants will be given 30 minutes during the program to prepare for their 3 min presentation at the end of the program. Scheduled Course Dates Unfortunately this course is not currently scheduled as an open course as it is primarily run as an in-house programme. For more information, please contact us. In-House Courses This is our own management training course which has been developed and refined over the many years we have been providing it to delegates from organisations in virtually every industry. This means that the course syllabus is extremely flexible and can be tailored to your specific requirements. If you would like to discuss how we can tailor this management training course for you and/or run it at your premises, please contact us.

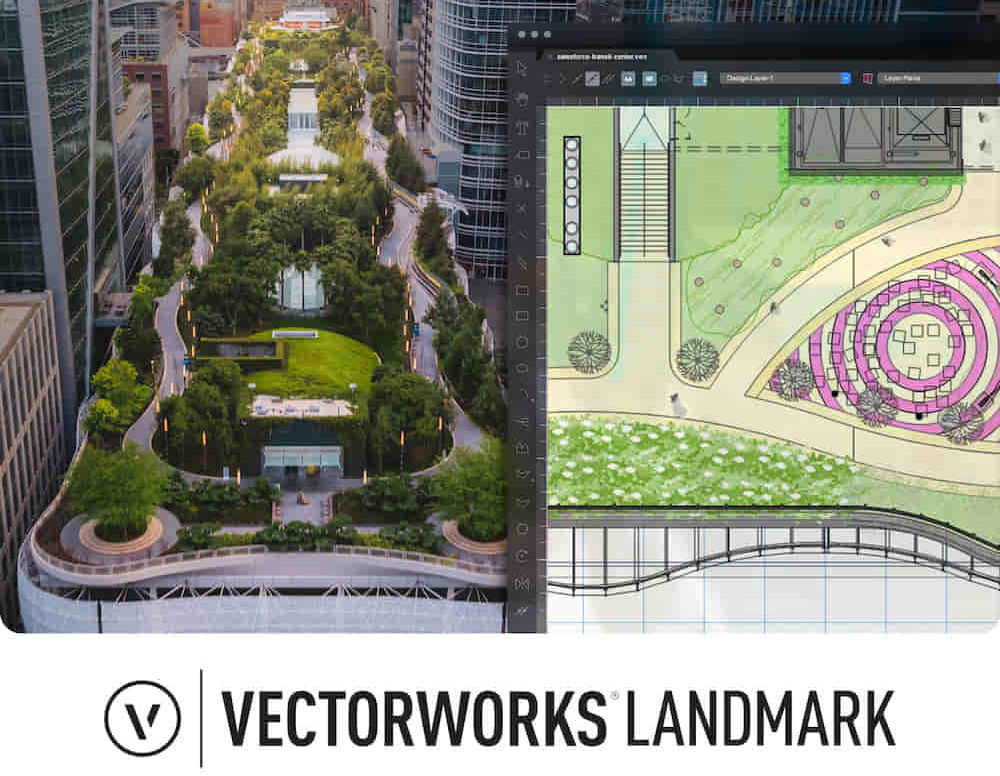
Landmark Training Course With Vectorworks
By ATL Autocad Training London
Who is this course for? Landmark Training Course With Vectorworks. Dive into terrain modeling, planting, irrigation, and site analysis guided by certified tutors. Master these tools for precise landscape designs and effective documentation. Check our Website Enrollment : 1-on-1 Landmark Training. Tailor your schedule. Mon to Sat between 9 am and 7 pm Call 02077202581 to book your slot. Duration: 16 hours. "Split these hours over multiple days as needed for your ideal schedule." Approach: In-person or live online. Landmark Training Course with Vectorworks: Basic to Intermediate Level Course Duration: 16 Hours Embark on a transformative journey with our Landmark Training Course tailored for landscape architects and designers. Over 16 intensive hours, dive deep into Vectorworks Landmark, mastering fundamental and intermediate techniques crucial for comprehensive 2D and 3D landscape design. Craft intricate site analyses, plans, irrigation systems, and elevate your designs with mesmerizing 3D visualizations. Explore custom plant symbols, detailed planting plans, and learn the art of efficient collaboration and customization. Course Highlights: I. Introduction to Vectorworks Landmark (1 hour) Explore Vectorworks Landmark for landscape design Master interface, tool usage, and project management II. Site Analysis and Site Plans (3 hours) Craft detailed site analyses and hardscape designs Work with contours, elevations, and terrain models III. Planting Plans (5 hours) Utilize the plant database for region-specific plant selection Create personalized plant symbols and comprehensive planting plans IV. Irrigation Design (2 hours) Design and edit efficient irrigation systems and zones Integrate irrigation components into site plans V. 3D Visualization (3 hours) Create captivating 3D models with realistic textures and materials Enhance designs with advanced lighting and special effects VI. Customization (1 hour) Tailor the interface for efficient landscape design Create custom object styles and resource libraries VII. Collaboration and Sharing (1 hour) Seamlessly import/export data from other platforms Share designs effectively with colleagues and collaborators VIII. Conclusion and Next Steps (1 hour) Review course content comprehensively Receive guidance on further learning resources Engage in a Q&A session and provide valuable feedback Enhance your landscape design expertise and unleash your creativity. Enroll now in our Vectorworks Landmark Basic to Intermediate Training and transform your designs. Download Vectorworks Landmark By the end of the Vectorworks Landmark Training Course, participants will: Understand the key features and functionalities of Vectorworks Landmark for landscape design. Demonstrate proficiency in using essential tools for site analysis, site plans, and hardscape design. Create detailed planting plans, selecting appropriate plants, and understanding their compatibility and growth patterns. Design efficient and effective irrigation systems, including generating irrigation reports. Create 3D visualizations of landscape designs, applying textures, materials, lighting, and special effects. Customize the interface and create personalized object styles and resources. Collaborate and share landscape design drawings with other software users. Have the foundation to pursue further learning and exploration in landscape design using Vectorworks Landmark. Mastering Foundations Begin your project by organizing your files and importing survey data. Learn to sketch existing buildings using Building Shell tools and model neighboring structures with Massing Model. Explore different methods for laying out survey points and marking existing features with precision. Objectives: Review File Organization Techniques Import Survey Data (DWG Import) Create Building Structures with Building Shell Tools Utilize Triangulation and Arc Tool for Precision Master Various Tape Measurement Techniques Elevating Your Design Enhance your survey with detailed ground, existing trees, and fences. Conduct shadow analysis to optimize planting locations. Dive into the Vectorworks Plant tool, your key design companion. Objectives: Develop Detailed Ground Surfaces Incorporate Existing Trees and Fences Design with Railing Fence Tool Conduct Shadow Analysis using Heliodon Tool Utilize Plant Tool Modes for Plant Placement Access Existing Plant Libraries and Customize Plants in 2D/3D Crafting Landscapes Create vibrant plant mixes using Landscape Area tool and apply them across your site models. Design intricate hardscapes, aligning them effortlessly even in complex paving scenarios. Learn to use components for detailed reporting, cut and fill calculations, and precise detailing. Explore custom object creation and site furniture placement. Objectives: Design Landscape Areas and Define Custom Plant Mixes Create Hardscapes and Define Custom Paving Constructions Generate Reports and Tags for Landscape Areas and Hardscapes Access and Manage Objects in Resource Manager Craft Custom Objects and Site Furniture Polished Presentation Present your designs professionally using Sheet layers and viewports. Create Section viewports to cut through your model and Detail viewports to focus on specific areas. Enhance visual appeal with mood boards and annotations, ensuring a refined, detailed presentation. Objectives: Craft Sheet Layers for Presentation Create Plan, Elevation, and Perspective Viewports Generate Section and Detail Viewports Annotate Viewports for Clear Communication Incorporate Images and Plant Reports for Comprehensive Presentations Master Vectorworks Landmark: Gain expertise in essential and advanced 2D/3D landscape design tools for precision and efficiency. Boost Efficiency: Learn time-saving techniques and workflows tailored to Vectorworks Landmark, enhancing productivity. Versatile Landscape Skills: Develop proficiency in site analysis, planting plans, hardscapes, and irrigation systems for diverse projects. Industry-Ready Expertise: Acquire sought-after skills in landscape architecture, paving the way for career growth. Flexible Learning: Access recorded lessons for convenient review and receive lifetime email support for ongoing guidance.
Success = Value + People + Process With innovation happening more than ever, the new agile project economy requires more and more people across organisations to manage projects successfully, leading to many of us quietly slipping into the role of the unofficial project manager! The problem is very few people receive formal training on how to do it. Stakeholders, scope creep, limited training, and a lack of process all combine to raise the probability of project failure costing organisations time, money, and employee morale Is it any wonder 65% of all projects fail* each year! The good news is—unofficial project managers can build confidence to lead high-value projects and engage teams in a way that inspires them to volunteer their best efforts. Source: *Nieto-Rodriguez, A. (2021). “The Project Economy Has Arrived.” Harvard Business Review; Nov/Dec 21. Outcomes Project Management for the Unofficial Project Manager™ combines best practices from agile and waterfall project management to equip learners with the mindset, skillset, and toolset to engage and inspire team members. Success starts with the core agile principle of value—a project must deliver value to Noble! Once value is established, it is people who make projects successful through a consistent process. Project management isn’t just about managing logistics and hoping the project team is ready to play to win. The skills of “informal authority” are more important than ever before, so team members are inspired to contribute to project success! This course will help learners: Build strong informal authority that inspires project teams to consistently volunteer their best efforts. Utilise a consistent process to start and finish high-value projects on time and with quality. Influence and engage others to define a clear project scope, including clear deliverables and risk strategies. Model openness and agility to apply proactive change management and deliver high-value projects. Project Management Framework The Project Management Framework guides you through five distinct elements in the life of any project. Coupled with the foundational behaviours taught in the programme, this framework can help you deliver highly successful projects again and again. Who Should Attend? This programme is for anyone who finds themselves leading projects at work, regardless of whether or not their job title says, Project Manager! It is NOT a deep dive into project management processes, nor is it a qualification based programme. Whilst it would be helpful to either be involved in or to be leading a project, during the programme, this is clearly not essential. However, it is advisable that the participants have had some experience, whether as a project member or as the person who is leading the project (officially or not)! Project Management Institute (PMI) FranklinCovey is a member of the Project Management Institute (PMI) Authorised Training Partners (ATP) Programme and this course has been designed to satisfy the project management education requirement for PMI Certifications as well as Professional Development Education units (PDUs) needed by PMI credential holders.

Introduction to Agile and Scrum
By IIL Europe Ltd
Introduction to Agile and Scrum This half-day course provides an overview of Agile principles and mindset, and the Scrum framework as a key Agile approach. It will provide you with the key benefits of an Agile approach, and its differences with the traditional Waterfall method. Lastly, as Agile is looked upon more frequently as an alternative delivery method, you will review situations where Agile can be adapted outside of software development, where it is most commonly used. What you will Learn At the end of this program, you will be able to: Explain the basics and benefits of using an Agile approach Describe the Scrum framework, its events, artifacts and roles and responsibilities Illustrate Agile approaches outside of Software Development Getting Started Introduction Course structure Course goals and objectives Agile Introduction What is Agile? Agile Benefits Agile Methods Overview of Scrum Scrum Overview Scrum Events Scrum Artifacts Scrum Roles Definition of Done Agile Approaches Outside of Software Development Agile in other environments Product Development Course Development Marketing Agile Project Candidates Summary What Agile is not... Concerns and Pitfalls

Lumion 3d Realtime Rendering Training
By London Design Training Courses
Why Choose Lumion 3d Realtime Rendering Training Course? Course Link Our Lumion Course is best for materials, lighting, and animation skills. Learn high-quality rendering using Lumion's asset library. In-person or live online sessions with lifetime access to recordings and email support. Unleash Lumion's potential for immersive architectural visualizations. Duration: 10 hrs Method: 1-on-1, Personalized attention Schedule: Tailor your own hours of your choice, available from Mon to Sat between 9 am and 7 pm What is Lumion? Lumion is specialized 3D rendering software designed for architects and designers. With Lumion, you can quickly bring your 3D design models to life, add materials, furnish interiors and exteriors, and showcase the impact of lighting and shadows without the need for specialized training. Objectives of the Course The course aims to teach you how to start Lumion projects, add environments, cameras, illuminations, populate scenes with various elements, create terrains, and produce animations. Lumion 3D Course Outline Module 1: Introduction to Lumion 3D Discovering Lumion 3D's capabilities and interface navigation. Learning shortcut keys for efficient workflow. Customizing settings for optimal performance. Module 2: 3D Models and Materials Importing 3D models in various formats. Applying and tweaking materials. Creating procedural materials and glass effects. Troubleshooting common issues. Module 3: Creating a Project in Lumion Building scenes and sculpting terrain. Enhancing realism with alpha and height maps. Module 4: 3D World Managing multiple 3D objects and their properties. Implementing grass and scattering elements. Module 5: Lighting in Lumion 3D Utilizing weather settings for dynamic scenes. Understanding Lumion lights and interior/exterior illumination. Creating 3D reflections and spotlights. Module 6: Realistic Visualizations Incorporating special effects like fire, smoke, and fog. Achieving realism with camera effects and shadows. Rendering still images and animations. Module 7: NPR Visualizations Creating non-photorealistic visualizations with artistic effects. Implementing unique styles for enhanced visuals. Module 8: Artistic Effects in Lumion 3D Exploring conceptual visualizations with painting and sketch effects. Creating cartoon effects and understanding perspectives. Module 9: Animation in Lumion 3D Timing and working with cameras for dynamic shots. Composing animation clips and adding effects. Utilizing layers and control objects for precise control. Module 10: Advanced Features Import and output formats in Lumion. Expanding assets with the 3D model library. Adding animated characters and sound effects. Utilizing the advanced material library. Controlling environment and weather for dynamic scenes. Scene management and movie editing within Lumion 3D. Lumion for Students | Unleash Your Creativity https://lumion.com› product › students Unlock the full potential of your designs with Lumion for students. Request your free 1-year Student license now and bring your visions to life!

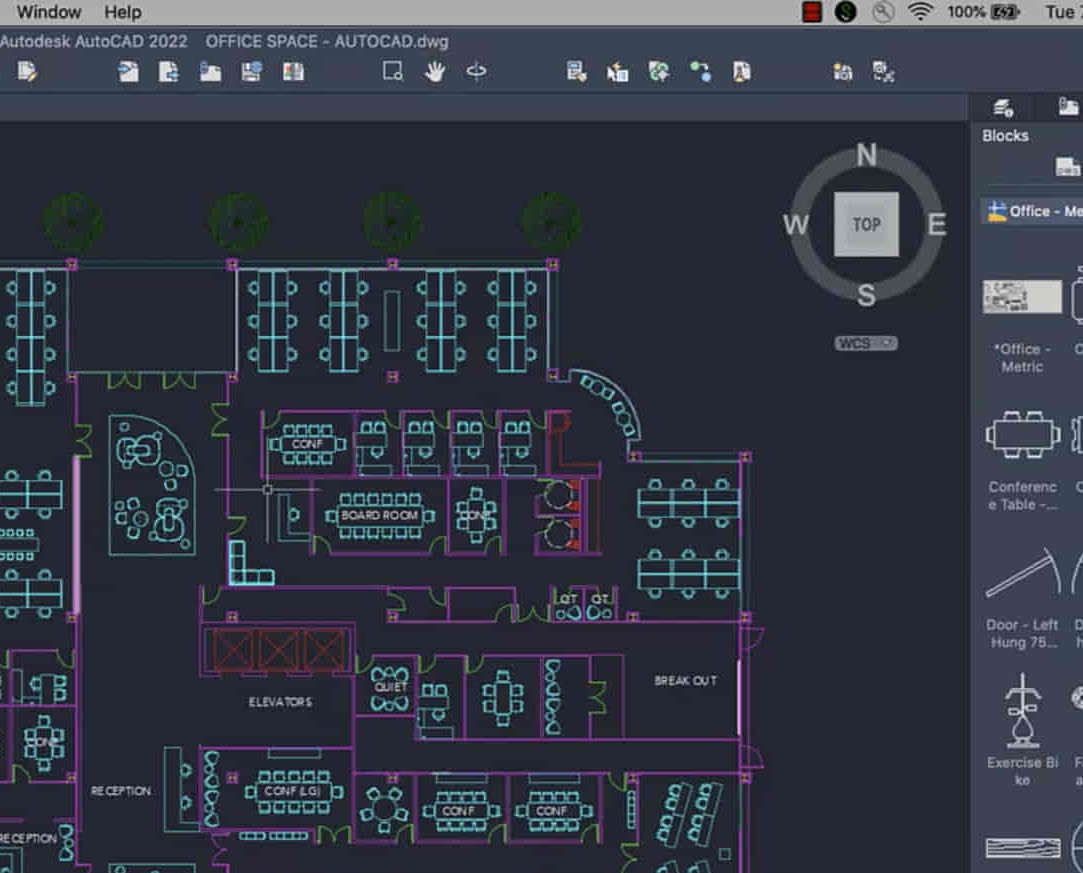
AutoCAD-Mac Introduction to Advanced Training Course
By ATL Autocad Training London
AutoCAD-Mac Introduction to Advanced Training Course This project-based course is tailored for AutoCAD Mac users, architecture and interior design students and professionals. Click here for more info: Website When Can I Book This Training Course? Personalized experience with 1-on-1 sessions designed to fit your unique needs. Available from Monday to Saturday, 9 am to 7 am Or Call to Book 02077202581. Duration of Training: 16 hours. Training Method: 1-on-1, providing the option for in-person sessions or live online training. Course Content Section 1: Introduction Course Overview Section 2: Basic Concepts Status Bar and The Units Drawing Commands Control Points - Vertex or Verteces Modifying Commands Snap Settings Drawing An Outline Section 3: Dimensions and Customization Adding Dimensions and Dimension Style Manager Importing Dimension Styles Customizing Shortcuts Section 4: Advanced Techniques Adding Walls Thickness with Offset Command Adding interior layout Cleaning Layout lines with Trim Section 5: Text and Styling Text Editing and Importing Text Styles Main File Formats in AutoCAD Section 6: Design Elements Creating Openings in the Floor Plan Adding Openings - Part 2 Adding Openings - Part 3 Drawing Doors & Windows Using Line Types & Linetype Scale Group and Ungroup Commands Using Blocks Using Blocks Library & Dynamic Blocks Section 7: Layers and Furnishing Layers - Part 2 Layers - Part 3 Furnishing Bedrooms & Bathrooms - Part 1 Adding Furniture, Fixtures, and Equipments | part 2 Adding Furniture, Fixtures, and Equipments | part 3 Drawing the Kitchen Drawing the Living Room Drawing Dining Room & Adding Casework Adding Steps and Railings Using Stretch Command Finishing Steps and patio areas Hatch command Hatch Customization Adding Plants & Finishing Floor Plan Section 8: Layout and Printing Paper Space & Page Setup Manager Working with Viewport & Using Print Command Scale & Using Multiple Viewports Locking Viewport Scale Drawing A Titleblock - Part 1 Drawing A Titleblock - Part 2 Copying the Titleblock Using Titleblock with Attributes Section 9: Roof Plan and Organization Drawing The Roof Plan Placing Roof Plan on Sheet Organizing Project Drawings & Using Layer Freeze AutoCAD Crashing And What To Do Section 10: Elevations Exterior elevations - Drawing the Outline Exterior elevations - Drawing the Openings Elevations - Detailing - Part 1 Elevations - Detailing - Part 2 Elevations - Repeating the workflow Elevations - Finishing 3rd Elevation Elevations - Drawing the final elevation Section 11: Sections Sections: Drawing Cut Lines & the Outline Sections: Placing 1st Section on Sheet Sections: Drawing Section #2 - Different Technique Sections: Adding Final Detail Section 12: Interior Elevations Interior Elevations: Drawing the Outline Interior Elevations: Placing on Sheet Interior Elevations: Using Block Clip Interior Elevations: Final Drawing Section 13: Conclusion Putting the Final Set Together Proficient AutoCAD Skills: Master essential tools for efficient drawing creation and manipulation. Accurate 2D Designs: Create precise and high-quality layouts with attention to detail. Effective Object Handling: Excel in selecting, moving, copying, and scaling objects. File Management: Organize drawings efficiently and understand different file formats. Precise Measurements: Utilize inquiry commands for accurate design analysis. Annotations and Hatching: Apply text, dimensions, and hatching to enhance drawings. Object Organization: Manage layers and object properties for organized designs. Reusable Content: Efficiently use blocks, tool palettes, and groups for productivity. Layout Optimization: Create layouts with viewports for optimal design presentation. Professional Output: Generate professional plots and PDF output for polished results. Enhanced Productivity: Explore AutoCAD toolsets and web/mobile apps for streamlined workflow. Course Overview: Learn versatile AutoCAD for Mac drawing techniques, applicable across all industries, enabling you to excel in the application. Our trainers incorporate exercises from various disciplines. Who Should Attend: Ideal for newcomers to AutoCAD for Mac, self-taught users seeking correct techniques, and those transitioning from other CAD tools. Requirements: A solid Mac OS understanding is essential, while prior CAD knowledge is not required. Pre-course preparation guidance is provided for new AutoCAD users. Highlights: Perfect for AutoCAD for Mac beginners. Gain skills for precise 2D layouts and designs. Versatile drawing techniques for all industries. Choose between in-class or live online training. Autodesk Certified Tutors: AutoCAD 1-2-1 courses. Hands-on learning with expert trainers. Lifetime post-course email support. Tailored on-request training available. Certificate: Digital certificate included. Tailored Mac Training: Excel in AutoCAD with specialized Mac training, leveraging its distinct features and interface for heightened efficiency. Comprehensive Skill Enhancement: Advance from fundamental to intermediate AutoCAD Mac proficiency, creating precise and professional 2D drawings. Industry-Relevant Expertise: Attain in-demand skills valued by employers in architecture, engineering, and design sectors. Hands-On Project Exposure: Immerse yourself in practical exercises mirroring real-world design scenarios, fostering practical competence. Lesson Recordings for Review: Access recorded lessons for reinforcement and deeper AutoCAD Mac comprehension. Ongoing Email Support: Benefit from lifetime email support, ensuring assistance beyond course completion."