- Professional Development
- Medicine & Nursing
- Arts & Crafts
- Health & Wellbeing
- Personal Development
4486 Courses
Tutor: Joseph Wilson During this 4-week course, we will use conventional black and white analogue materials in conjunction with non-conventional techniques to create images that stradle ordinary photographic representation and alternative vision. We will deviate from standard darkroom production through the practical exploration of a range of techniques such as Sabattier printing, bas relief printing, cameraless photography, and various methods for pushing and pulling film. These otherworldly techniques – many of which have been the basis for contemporary digital manipulation tools – offer abundant possibility for alternative photographic vision, where emphasis is placed on the transformative potential of darkroom work. This course would be the perfect follow up from our Intro to B&W or Colour Darkroom courses. All materials including photographic film and paper will be provided during this course. However, participants are encouraged to bring along some of their own black and white negatives. Camera know-how and prior darkroom experience are required for this course. Course Outline Week 1: Pushing and Pulling Film We will begin by considering non-conventional ways in which we can rate and process our films, and the various effects of doing so. Presentation and discussion on the uses of these techniques by artists. Shooting 5×4 film at various ISO ratings Using adjustments in time, temperature, dilution, and agitation to Push & Pull the film. Week 2: Possibilities in Print This week we will create prints from our negatives using alternative techniques. Review results in negatives and make contact prints. Sabattier effect printing Multiple exposure printing Bas Relief Printing Week 3: Cameraless Photography We will explore the possibilities of directly exposing through objects and ‘resists’ onto photographic paper. We will cover: Photograms Chemigrams Week 4: Lith Printing An introduction to Lith printing and the possibilities it affords us. A presentation on the history and uses of Lith printing Lith Printing from our negatives Combining non-conventional printing techniques with lith. Courses are subject to minimum enrolment. Please register early, within five days of the start date, to reduce the likelihood of course cancellation. Please read our cancellation policy before booking. Students, anyone over the age of 65, and those in receipt of any form of benefits can claim the concessionary price, offering a 10% discount on the full course price. Valid proof of eligibility must be produced on the first day of the course. Please use the code CONCESSION when prompted at checkout. Stills uses ILFORD PHOTO chemicals on this course that can potentially pose a risk to pregnant and breast feeding women and asthmatics. We take every care to ensure good working practices and adequate ventilation in our darkrooms. If you feel you may be adversely affected, please visit the Health and Safety section of Ilford’s website for further information. General Guidance Notes for Pregnant and Breast Feeding Women and Asthmatics: From a risk assessment standpoint, provided all necessary control measures (such as good working practices, adequate ventilation, and the use of appropriate PPE) are in place then pregnant and breastfeeding women should be able to continue to work safely with photochemical products.Inhalation is the main route by which fumes and gases enter the body, making good ventilation a high priority. Exposure to irritant chemicals that would not affect most people may provoke an asthma attack in a person who already has asthma. For example, low levels of the gas sulphur dioxide can be produced by some ILFORD PHOTO processes. Most individuals would be unaffected but asthmatics may suffer adverse affects. ILFORD PHOTO products include no known human carcinogens, and no substances to which phrase R46 (May cause heritable genetic damage) or R64 (May cause harm to breastfed babies) applies. Most ILFORD PHOTO developers use hydroquinone, and their classification therefore includes R40 (Limited evidence of a carcinogenic effect) and R68 (Possible risk of irreversible effects). Some ILFORD PHOTO chemicals use boric acid or borates. These substances are classified as toxic for reproduction. As a result, the classification of some of the powder developers includes R60 (May impair fertility) and R61 (May cause harm to the unborn child).

Stopping Addictions: effective treatment and recovery
By Human Givens College
Discover the highly effective psychological techniques that are helping people overcome all kinds of addictions and compulsive behaviours… Accredited CPD Certificate : 6 hours Length 1 day (9.30am - 4.00pm) Hugely informative - one of the best addiction training daysADDICTIONS COUNSELLOR NEXT available date: Tuesday 27th February, London – join Emily Gajewski for this popular addiction recovery training workshop – to ensure your place, book online now or call our friendly team on 01323 811690. Other dates and venues available. When combined with key insights into the addictive process and what drives it, the techniques covered on this day prove effective at helping people successfully quit a wide range of addictions. They also help to reduce withdrawal symptoms, minimise relapses and give people the best chance at effective, long-lasting recovery… What will you learn New insights into the addictive process and why people become addicted Common traps to avoid when treating addictions A range of psychological techniques for overcoming addiction How to develop a treatment plan and deepen a client’s commitment to change Ways to overcome resistance – and prevent relapses Also covered: Demonstrations – by a leading expert in addiction counselling – of the powerful skills that help to quickly break the patterns of addictive behaviour Guidance and practise in using some of these yourself How to break the cycle of shame involved in addictions, using self-compassion and generation of hope Essential motivational interviewing techniques – and how to incorporate them into the ‘cycle of change’ Up-to-date knowledge of the most useful ways to beat a wide variety of addictions – and prevent relapse Increased understanding of the addictive trance and its false promises How to use harm-reduction techniques Why the social-based model of addiction is more helpful than the disease-based model An understanding of the importance of guided imagery in overcoming addictions and substance abuse (particularly ‘counter-conditioning’ which is taught on Guided Imagery 2: additional techniques) Co-morbid conditions – the link with addiction and how to deal with them as effectively and quickly as possible A total revelation – very upliftingMENTAL HEALTH WORKER Why take this course The numbers of people affected by addictions and substance abuse continue to rise – causing immense mental, physical and financial suffering to individuals, their families and colleagues – while the resources to help are dwindling. But thankfully it is possible to help most addicts transform their lives – often in only a few sessions – as you will discover on this practical day which draws together, from various schools of solution-focused therapy, the most effective and proven techniques for treating addictions (including motivational interviewing and self compassion techniques) with essential neuroscientific insights into the addictive process to create powerful interventions. You will leave the day with renewed confidence knowing how it is possible to help most people with addictions, enabling them to transform their lives, often in a small number of sessions. The skills covered are essential to have (along with guided imagery) if you wish to improve your effectiveness when helping people quit any addiction, including: alcohol addiction, smoking, gambling addiction, shopping, social media addiction, sex, substance abuse, self-harm and eating disorders. Please note You will leave this workshop with essential information and a variety of skills that you can implement straight away. However, the key concepts and most effective ways of treating addictions, which you will see demonstrated and explained, incorporate guided imagery skills. We therefore recommend, if you aren’t proficient in these already, that you attend the Guided imagery and visualisation for therapeutic change workshop (either before or after this one). The counter-conditioning technique that you will see demonstrated and explained on ‘Stopping Addictions’, is taught in detail and practiced by workshop participants on Guided Imagery Day 2: additional techniques. ‘Stopping Addictions’ complements our online course Tackling Addiction and what you will learn on it will also be very useful if you support or work with people who self-harm. Course Programme The ‘Stopping Addictions: effective treatment and recovery’ course starts at 9.30am and runs until 4.00pm. From 8.30am Registration (Tea and coffee served until 9.25am) 9.30am How and why people develop addictions 11.00am Discussion over tea/coffee 11.30am Dealing with resistance 1.00pm Lunch (included) 1.45pm How to create the optimal environment for positive change 2.45pm Discussion over tea/coffee 3.00pm Utilising the imagination 4.00pm Day ends Who is this course suitable for? All members of the caring professions, including: psychotherapists, addiction counsellors, drug workers, youth workers, nurses and detox support specialists, doctors, sober companions and drug and alcohol workers, therapists, vocational counselors, clinical psychologists, occupational therapists, psychiatrists, cognitive behavioural therapists, teachers and education professionals, social workers, supervisors, physiotherapists, support workers and anyone wishing to improve their understanding of addictive behaviour and how to treat it. This course has been independently accredited by the internationally recognised CPD Standards Office for 6 hours of CPD training. On completion of this training you’ll receive CPD certificates from the College and the CPD Standards Office.

3D Printing Training Course for Product Designers
By ATL Autocad Training London
Who is this course for? The 3D Printing Bespoke 1-on-1 Training Course is designed for individuals seeking personalized instruction and hands-on experience in the field of 3D printing. Click here for more info: Website Training: 40 hrs, split as per your availability. When: 9 a.m. to 7 p.m., Mon-Sat. Call 02077202581 to reserve. Live online, or in-person. Option A: AutoCAD 10 hrs, Rhino 16 hrs, Vray 4 hrs, Photoshop 4 hrs, 3D Printing 6 hrs Option B: AutoCAD 12 hrs, 3ds Max 16 hrs, Vray 4 hrs, Photoshop 4 hrs, 3D Printing 4 hrs. Option A: AutoCAD, Rhino, Vray, Photoshop, 3D Printing (Total: 40 hours) AutoCAD (10 hours): Module 1: Introduction to AutoCAD (2 hours) Familiarization with AutoCAD interface and tools Creating, opening, and saving drawings Basic drawing and editing commands Module 2: Drawing and Editing (3 hours) Lines, circles, and arcs Polylines and polygons Modifying objects: Move, Copy, Rotate, and Scale Module 3: Precision Drawing (3 hours) Using coordinate systems Dimensioning and text Hatching and gradients Module 4: Advanced Tools (2 hours) Blocks and attributes Layers and object properties Creating layouts and plotting Rhino (16 hours): Module 1: Introduction to Rhino (2 hours) Navigating the Rhino interface Basic 2D and 3D modeling concepts Creating and manipulating objects Module 2: Advanced Modeling (6 hours) Modeling with curves and surfaces Editing and transforming geometry Building complex 3D structures Module 3: Visualization with Vray (4 hours) Understanding the Vray rendering engine Applying materials and textures Setting up lighting and cameras for realistic rendering Module 4: Presentation and Editing (2 hours) Exporting and sharing Rhino models Post-processing and enhancing designs Photoshop (4 hours): Module 1: Introduction to Photoshop (2 hours) Navigating Photoshop interface Image resolution and size Basic image editing tools Module 2: Image Editing and Enhancement (2 hours) Adjusting colors and tones Using layers and masks Retouching and image manipulation 3D Printing (6 hours): Module 1: Introduction to 3D Printing (2 hours) Basics of 3D printing technology Understanding file formats and requirements Module 2: Preparing 3D Models (2 hours) Model optimization for 3D printing Creating supports and rafts Ensuring successful prints Option B: AutoCAD, 3ds Max, Vray, Photoshop, 3D Printing (Total: 38 hours) AutoCAD (12 hours): Module 1: Introduction to AutoCAD (2 hours) Overview of AutoCAD interface and tools Creating, opening, and saving drawings Basic drawing and editing commands Module 2: Drawing and Editing (3 hours) Lines, circles, and arcs Polylines and polygons Modifying objects: Move, Copy, Rotate, and Scale Module 3: Precision Drawing (3 hours) Using coordinate systems Dimensioning and text Hatching and gradients Module 4: Advanced Tools (4 hours) Blocks and attributes Layers and object properties Creating layouts and plotting 3ds Max (16 hours): Module 1: Introduction to 3ds Max (2 hours) Exploring the 3ds Max interface Navigating viewports and objects Basic modeling techniques Module 2: 3D Modeling (6 hours) Creating and editing 3D objects Modifiers and deformations Working with shapes and splines Module 3: Visualization with Vray (4 hours) Setting up lights and cameras Rendering settings and options Post-production and compositing Photoshop (4 hours): Module 1: Introduction to Photoshop (2 hours) Navigating Photoshop interface Image resolution and size Basic image editing tools Module 2: Image Editing and Enhancement (2 hours) Adjusting colors and tones Using layers and masks Retouching and image manipulation 3D Printing (4 hours): Module 1: Introduction to 3D Printing (2 hours) Basics of 3D printing technology Understanding file formats and requirements Module 2: Preparing 3D Models (2 hours) Model optimization for 3D printing Creating supports and rafts Ensuring successful prints Training Duration: 40 hours Flexible Timings: Students can choose their preferred time slots based on our availability, operating from 9:00 am to 7:00 pm (Monday to Saturday). Pricing Details: Company Rate: £1200 (Plus 20% VAT) = £1440 inc VAT. Student, Self-Financed, and Live Online Rate: £1000 (Plus 20% VAT) = £1200 inc VAT. Who Should Enroll: This course caters to a wide range of individuals, including: Novices: Perfect for beginners unfamiliar with AutoCAD, 3ds Max, Adobe Photoshop, Rhino, Vray, and 3D printing, providing a solid foundational understanding. Architects and Interior Designers: Tailored insights for professionals seeking precision in enhancing their design skills, valuable for design firms. Industry Professionals: Establishes industry benchmarks, offering adaptable education applicable across sectors like interior design, architecture, and civil engineering. Learning Approach: Hands-On Practicality: Emphasizes practical, real-world skills through personalized one-on-one training, available in face-to-face or live online sessions. Step-by-Step Instruction: Experienced instructors guide you systematically through techniques using AutoDesk AutoCAD, Autodesk 3ds Max, Adobe Photoshop, and Trimble Sketchup. What You'll Receive: Certificate of Achievement: Upon completion, receive a certificate validating your expertise. Comprehensive Training Guide: Access an extensive PDF guide compatible with both Windows and MAC. Live Feedback: Connect with your tutor for real-time feedback during sessions and the option to record each session for future reference. Our Benefits: Price Assurance: Guaranteeing exceptional value for your career investment. Personalized Training: Tailored one-on-one sessions, adjusting to your learning pace and style. Flexible Scheduling: Choose your preferred training time and day, available Monday to Sunday, from 9 am to 8 pm. Lifetime Support: Ongoing email and phone support beyond the course completion. Computer Setup Assistance: We assist in configuring your computer for seamless software installation. Referral Benefits: Recommend a friend and enjoy discounts, including significant savings on group training courses. Advantages of Option A: Diverse Skill Enhancement: Acquire proficiency in AutoCAD, Rhino, Vray, Photoshop, and 3D Printing, expanding your skill repertoire. Career Opportunities: Access a wide range of career paths in design, architecture, and 3D printing fields, enhancing your professional prospects. Compelling Visualizations: Craft realistic and visually appealing 3D renderings using Vray, elevating the quality of your design presentations. Image Editing Expertise: Master the art of enhancing design projects with Photoshop, adding finesse to your creative work. Prototyping Prowess: Develop essential skills in 3D Printing, enabling you to create physical design prototypes for various applications. Advantages of Option B: Versatile Skill Mastery: Excel in AutoCAD, 3ds Max, Vray, Photoshop, and 3D Printing, gaining expertise in diverse areas of design and visualization. Career Advancement: Unlock opportunities in architecture, animation, and visualization fields, broadening your career horizons. High-Quality Renderings: Showcase your designs impressively with high-quality renderings generated through Vray, leaving a lasting impact on viewers. Image Editing Mastery: Polish your design concepts and presentations using advanced Photoshop techniques, ensuring your visuals are refined and professional. 3D Printing Expertise: Bring your digital designs to life across various industries, mastering the intricate art of 3D printing. Our training courses cater to both Mac and Windows operating systems and provide: Price Assurance: Ensuring the best value for your investment. Personalized Attention: Benefit from one-on-one training sessions tailored to your learning pace and style. Flexible Scheduling: Choose your preferred time and day for training sessions, available seven days a week from 9 am to 8 pm. Ongoing Support: Enjoy lifetime email and phone support, ensuring you're never alone on your learning journey. Technical Assistance: Receive guidance in configuring your computer for software installation, ensuring a seamless learning experience. Special Benefits: Avail special discounts when you refer a friend and significant savings on group training courses, maximizing the value of your training investment.

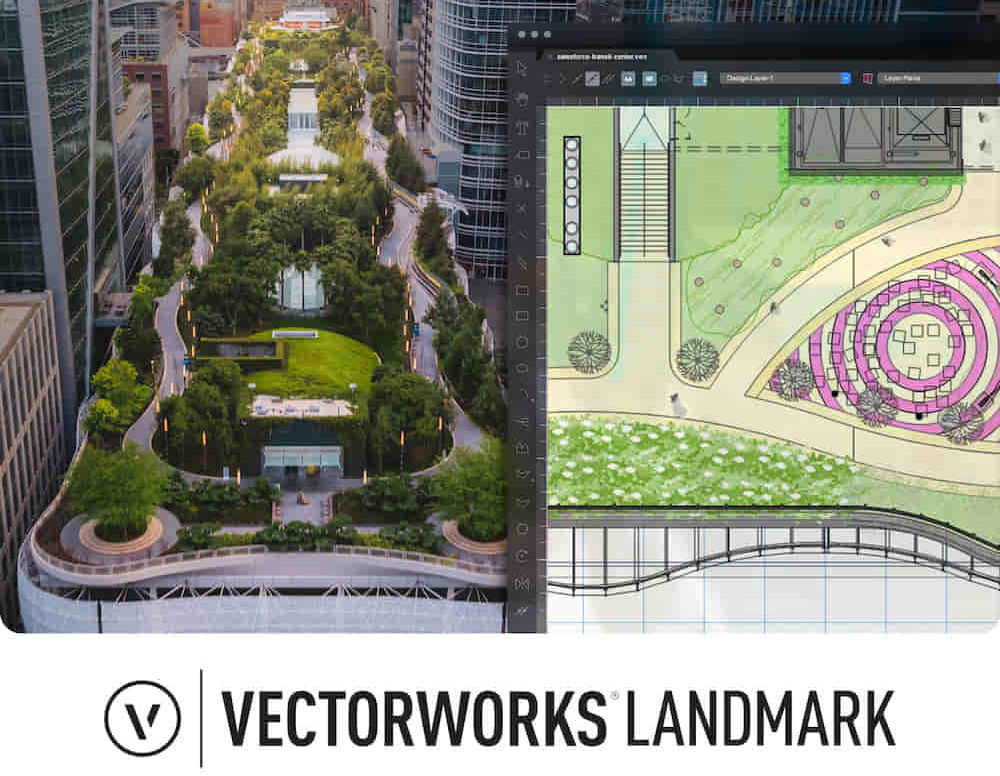
Landmark Training Course With Vectorworks
By ATL Autocad Training London
Who is this course for? Landmark Training Course With Vectorworks. Dive into terrain modeling, planting, irrigation, and site analysis guided by certified tutors. Master these tools for precise landscape designs and effective documentation. Check our Website Enrollment : 1-on-1 Landmark Training. Tailor your schedule. Mon to Sat between 9 am and 7 pm Call 02077202581 to book your slot. Duration: 16 hours. "Split these hours over multiple days as needed for your ideal schedule." Approach: In-person or live online. Landmark Training Course with Vectorworks: Basic to Intermediate Level Course Duration: 16 Hours Embark on a transformative journey with our Landmark Training Course tailored for landscape architects and designers. Over 16 intensive hours, dive deep into Vectorworks Landmark, mastering fundamental and intermediate techniques crucial for comprehensive 2D and 3D landscape design. Craft intricate site analyses, plans, irrigation systems, and elevate your designs with mesmerizing 3D visualizations. Explore custom plant symbols, detailed planting plans, and learn the art of efficient collaboration and customization. Course Highlights: I. Introduction to Vectorworks Landmark (1 hour) Explore Vectorworks Landmark for landscape design Master interface, tool usage, and project management II. Site Analysis and Site Plans (3 hours) Craft detailed site analyses and hardscape designs Work with contours, elevations, and terrain models III. Planting Plans (5 hours) Utilize the plant database for region-specific plant selection Create personalized plant symbols and comprehensive planting plans IV. Irrigation Design (2 hours) Design and edit efficient irrigation systems and zones Integrate irrigation components into site plans V. 3D Visualization (3 hours) Create captivating 3D models with realistic textures and materials Enhance designs with advanced lighting and special effects VI. Customization (1 hour) Tailor the interface for efficient landscape design Create custom object styles and resource libraries VII. Collaboration and Sharing (1 hour) Seamlessly import/export data from other platforms Share designs effectively with colleagues and collaborators VIII. Conclusion and Next Steps (1 hour) Review course content comprehensively Receive guidance on further learning resources Engage in a Q&A session and provide valuable feedback Enhance your landscape design expertise and unleash your creativity. Enroll now in our Vectorworks Landmark Basic to Intermediate Training and transform your designs. Download Vectorworks Landmark By the end of the Vectorworks Landmark Training Course, participants will: Understand the key features and functionalities of Vectorworks Landmark for landscape design. Demonstrate proficiency in using essential tools for site analysis, site plans, and hardscape design. Create detailed planting plans, selecting appropriate plants, and understanding their compatibility and growth patterns. Design efficient and effective irrigation systems, including generating irrigation reports. Create 3D visualizations of landscape designs, applying textures, materials, lighting, and special effects. Customize the interface and create personalized object styles and resources. Collaborate and share landscape design drawings with other software users. Have the foundation to pursue further learning and exploration in landscape design using Vectorworks Landmark. Mastering Foundations Begin your project by organizing your files and importing survey data. Learn to sketch existing buildings using Building Shell tools and model neighboring structures with Massing Model. Explore different methods for laying out survey points and marking existing features with precision. Objectives: Review File Organization Techniques Import Survey Data (DWG Import) Create Building Structures with Building Shell Tools Utilize Triangulation and Arc Tool for Precision Master Various Tape Measurement Techniques Elevating Your Design Enhance your survey with detailed ground, existing trees, and fences. Conduct shadow analysis to optimize planting locations. Dive into the Vectorworks Plant tool, your key design companion. Objectives: Develop Detailed Ground Surfaces Incorporate Existing Trees and Fences Design with Railing Fence Tool Conduct Shadow Analysis using Heliodon Tool Utilize Plant Tool Modes for Plant Placement Access Existing Plant Libraries and Customize Plants in 2D/3D Crafting Landscapes Create vibrant plant mixes using Landscape Area tool and apply them across your site models. Design intricate hardscapes, aligning them effortlessly even in complex paving scenarios. Learn to use components for detailed reporting, cut and fill calculations, and precise detailing. Explore custom object creation and site furniture placement. Objectives: Design Landscape Areas and Define Custom Plant Mixes Create Hardscapes and Define Custom Paving Constructions Generate Reports and Tags for Landscape Areas and Hardscapes Access and Manage Objects in Resource Manager Craft Custom Objects and Site Furniture Polished Presentation Present your designs professionally using Sheet layers and viewports. Create Section viewports to cut through your model and Detail viewports to focus on specific areas. Enhance visual appeal with mood boards and annotations, ensuring a refined, detailed presentation. Objectives: Craft Sheet Layers for Presentation Create Plan, Elevation, and Perspective Viewports Generate Section and Detail Viewports Annotate Viewports for Clear Communication Incorporate Images and Plant Reports for Comprehensive Presentations Master Vectorworks Landmark: Gain expertise in essential and advanced 2D/3D landscape design tools for precision and efficiency. Boost Efficiency: Learn time-saving techniques and workflows tailored to Vectorworks Landmark, enhancing productivity. Versatile Landscape Skills: Develop proficiency in site analysis, planting plans, hardscapes, and irrigation systems for diverse projects. Industry-Ready Expertise: Acquire sought-after skills in landscape architecture, paving the way for career growth. Flexible Learning: Access recorded lessons for convenient review and receive lifetime email support for ongoing guidance.
DASA DevOps Professional: Enable and Scale: In-House Training
By IIL Europe Ltd
DASA DevOps Professional: Enable and Scale: In-House Training DevOps embodies both cultural changes and practices through which organizations can facilitate the IT functions of software development (Dev) and software operation (Ops). The DevOps movement advocates automation and phase-based monitoring practices. Its objectives include: Decreasing development cycles · Increasing deployment frequency Improving the reliability of releases Developing a closer alignment with business objectives The DASA DevOps Professional: Enable and Scale course (formerly known as DevOps Practitioner) is designed to provide individuals with the core education necessary to put DevOps into practice. With the help of DevOps theory, pragmatic examples and exercises, and interactive group discussions, the course will help you understand how to apply the necessary skills to practice DevOps. Building on the knowledge learned on theFundamentals course (the 'why'), you will learn the 'how'. The DevOps Professional: Enable and Scale course focuses on improving the skill set of the DASA competency model, which includes competencies like Courage, Teambuilding, DevOps Leadership, and Continuous Improvement. On completion of the DASA DevOps Professional: Enable and Scale training and passing the exam, the certification is awarded. What you will Learn At the end of this program, you will be able to: Explain the importance of DevOps culture and the aspects that can influence it Explain why courage, teambuilding, leadership, and continuous improvement are required in a DevOps environment Explain why courage is essential to enable trust, honesty, and experimentation Identify and evaluate different types of behavior in a DevOps environment Recognize the signals indicating impediments and/or team dysfunctions Describe how to form good DevOps teams and assess their maturity List the effects of happiness and motivation on team performance Identify how leaders encourage feedback and transparency Discuss the factors that leaders can influence to build trust Explain how and why leaders promote a 'safe to fail' environment Analyze value streams to improve throughput and flow Facilitate the tools for continuous improvement: structured problem-solving workshops, Story Mapping sessions, and retrospectives TEAMBUILDING Teambuilding is about understanding the other's point of view, collaboration, mutual accountability, common purpose, and the ability to integrally support the service/product. Design Teams Characteristics of a DevOps team Skills of a DevOps Team Self-organization and autonomy Rules to consider when designing DevOps teams Build Teams Effects of happiness and motivation on performance Feedback Creating high-performance teams Governance Governance within teams and between multiple teams Governance between organizations DevOps contracts DEVOPS LEADERSHIP This module describes how to facilitate teams to high performance, DevOps behavior, transparency, and a service lifecycle mindset. Build Culture Creating the right environment and providing vision and purpose Stimulating the right behavior Servant leadership: giving control, supporting, and inspiring Create Purpose Defining and aligning purpose Purpose of having a purpose Alignment versus autonomy Be a Servant Leader Give control to the team Inspire and support the team Focus on Success Output versus outcome Measuring and steering COURAGE The Courage module is about coaching courageous behavior, proactivity, reflection, trust, open discussions, experimentation, fail fast, and the courage to change. Build Courage The importance of courage Courage in relationship with leadership and feedback Enabling courage at the team level Dealing with failure Think Different Courage day to day Encourage critical thinking Techniques to promote courageous behavior VALUE CUSTOMER-CENTRIC ACTION This module describes the important aspects that are relevant to identify and deliver the required and expected value for all relevant stakeholders. Aspects of Value and Managing Expectations The different aspects of value Stakeholder management Customer collaboration and using customer feedback How to do prioritization CONTINUOUS IMPROVEMENT Continuous improvement describes the importance of a Kaizen mindset, quality at the source, first time right, knowledge-sharing, and the ability to adapt. Build Flow Understanding the importance of flow Using Lean to optimize flow Kaizen as a mindset Radical change versus Kaizen Using Pull to optimize flow Continuous Improvement Tools Kaizen Event Value Stream Mapping Visual Management Retrospective Daily Standup Five Times Why

M.D.D INTEGRATIVE BEHAVIOURAL COUPLES THERAPY PACKAGE (COUPLES)
(27)By Miss Date Doctor Dating Coach London, Couples Therapy
The package includes the following: Enhancing communication in relationships with IBCT Building acceptance and tolerance in couples therapy Promoting positive behaviour change in partnerships Managing conflicts through Integrative Behavioural Therapy Deepening emotional intimacy in relationships Trust-building techniques in couples therapy Overcoming recurrent patterns in relationships Foster harmony and connection with IBCT Transformative couples therapy program Invest in the future of your relationship today and experience the power of Integrative Behavioural Couples Therapy. Our compassionate therapists are dedicated to guiding you and your partner towards lasting harmony and connection. Take the first step towards transformative change by scheduling a session with us now. 3 sessions x 1 hour https://relationshipsmdd.com/product/integrative-behavioural-couples-therapy-package/


SketchUp Course for Interior Designers and Architects with Layout and Vray
By London Design Training Courses
Why choose SketchUp Course for Interior Designers and Architects with Layout and Vray? Introducing SketchUp Training Course tailored for Interior Designers and Architects. This comprehensive course is designed for interior designers and architects who want to master SketchUp for 3D modeling, Layout for creating construction documents, and V-Ray for rendering. Course info Duration: 10 hrs Method: 1-2-1, Personalized attention Schedule: Tailor your own hours, available from Mon to Sat between 9 am and 7 pm Explore the world of 3D drawing with Sketchup in this beginner-friendly course. With its user-friendly interface, Sketchup offers a gentle learning curve, allowing you to quickly grasp 3D geometries. As you become acquainted with the basic drawing tools, you'll uncover a plethora of advanced techniques to create intricate and complex 3D objects. Who Should Take This Course? This course is ideal for individuals seeking to utilize a 3D drawing tool to solve three-dimensional problems or engage in more advanced design endeavors. Our experienced tutors communicate in accessible English, avoiding complex jargon and ensuring clarity throughout the course. We offer a wealth of learning resources for you to access beyond live lessons. Stay up-to-date, practice, and review key concepts essential to your growth. Course Title: SketchUp Training for Interior Designers and Architects with Layout and V-Ray Course Course Duration: 10 hours Course Description: This comprehensive course is designed for interior designers and architects who want to master SketchUp for 3D modeling, Layout for creating construction documents, and V-Ray for advanced rendering. Participants will learn how to create stunning 3D models for their projects, produce detailed construction documents, and apply professional-grade rendering techniques to bring their designs to life. Course Outline: Module 1: Introduction to SketchUp (1 hour) - Overview of SketchUp for interior design and architecture - Interface and basic tools - Navigation and viewport controls - Creating and saving interior design and architecture projects Module 2: Creating Floor Plans (1 hour) - Importing floor plans and site plans - Drawing walls, windows, and doors - Creating and editing floor levels - Understanding Layers and Scenes Module 3: Adding Furniture and Fixtures (2 hours) - Importing furniture and fixtures from the 3D Warehouse - Creating custom furniture and fixtures - Placing and arranging furniture and fixtures in the space - Creating and editing custom materials Module 4: Advanced Modeling Techniques (2 hours) - Creating more complex 3D models using advanced tools - Using groups and components for model organization - Adding custom details and finishes Module 5: Layout for Construction Documents (2 hours) - Creating construction documents in Layout - Importing SketchUp models into Layout - Creating floor plans, elevations, and sections - Adding annotations and dimensions to construction documents Module 6: Introduction to V-Ray (1 hour) - Overview of V-Ray for SketchUp - Basic V-Ray interface and tools - Understanding V-Ray materials and textures Module 7: Advanced Rendering Techniques (1 hour) - Applying advanced rendering techniques to SketchUp models - Creating artificial lighting and using natural lighting - Adding entourage and landscaping to designs Module 8: Importing and Exporting (30 minutes) - Importing and exporting files from other software - Understanding file formats and compatibility - Exporting models for 3D printing Module 9: Conclusion and Next Steps (30 minutes) - Review of course content - Tips for further learning and resources - Q&A and feedback

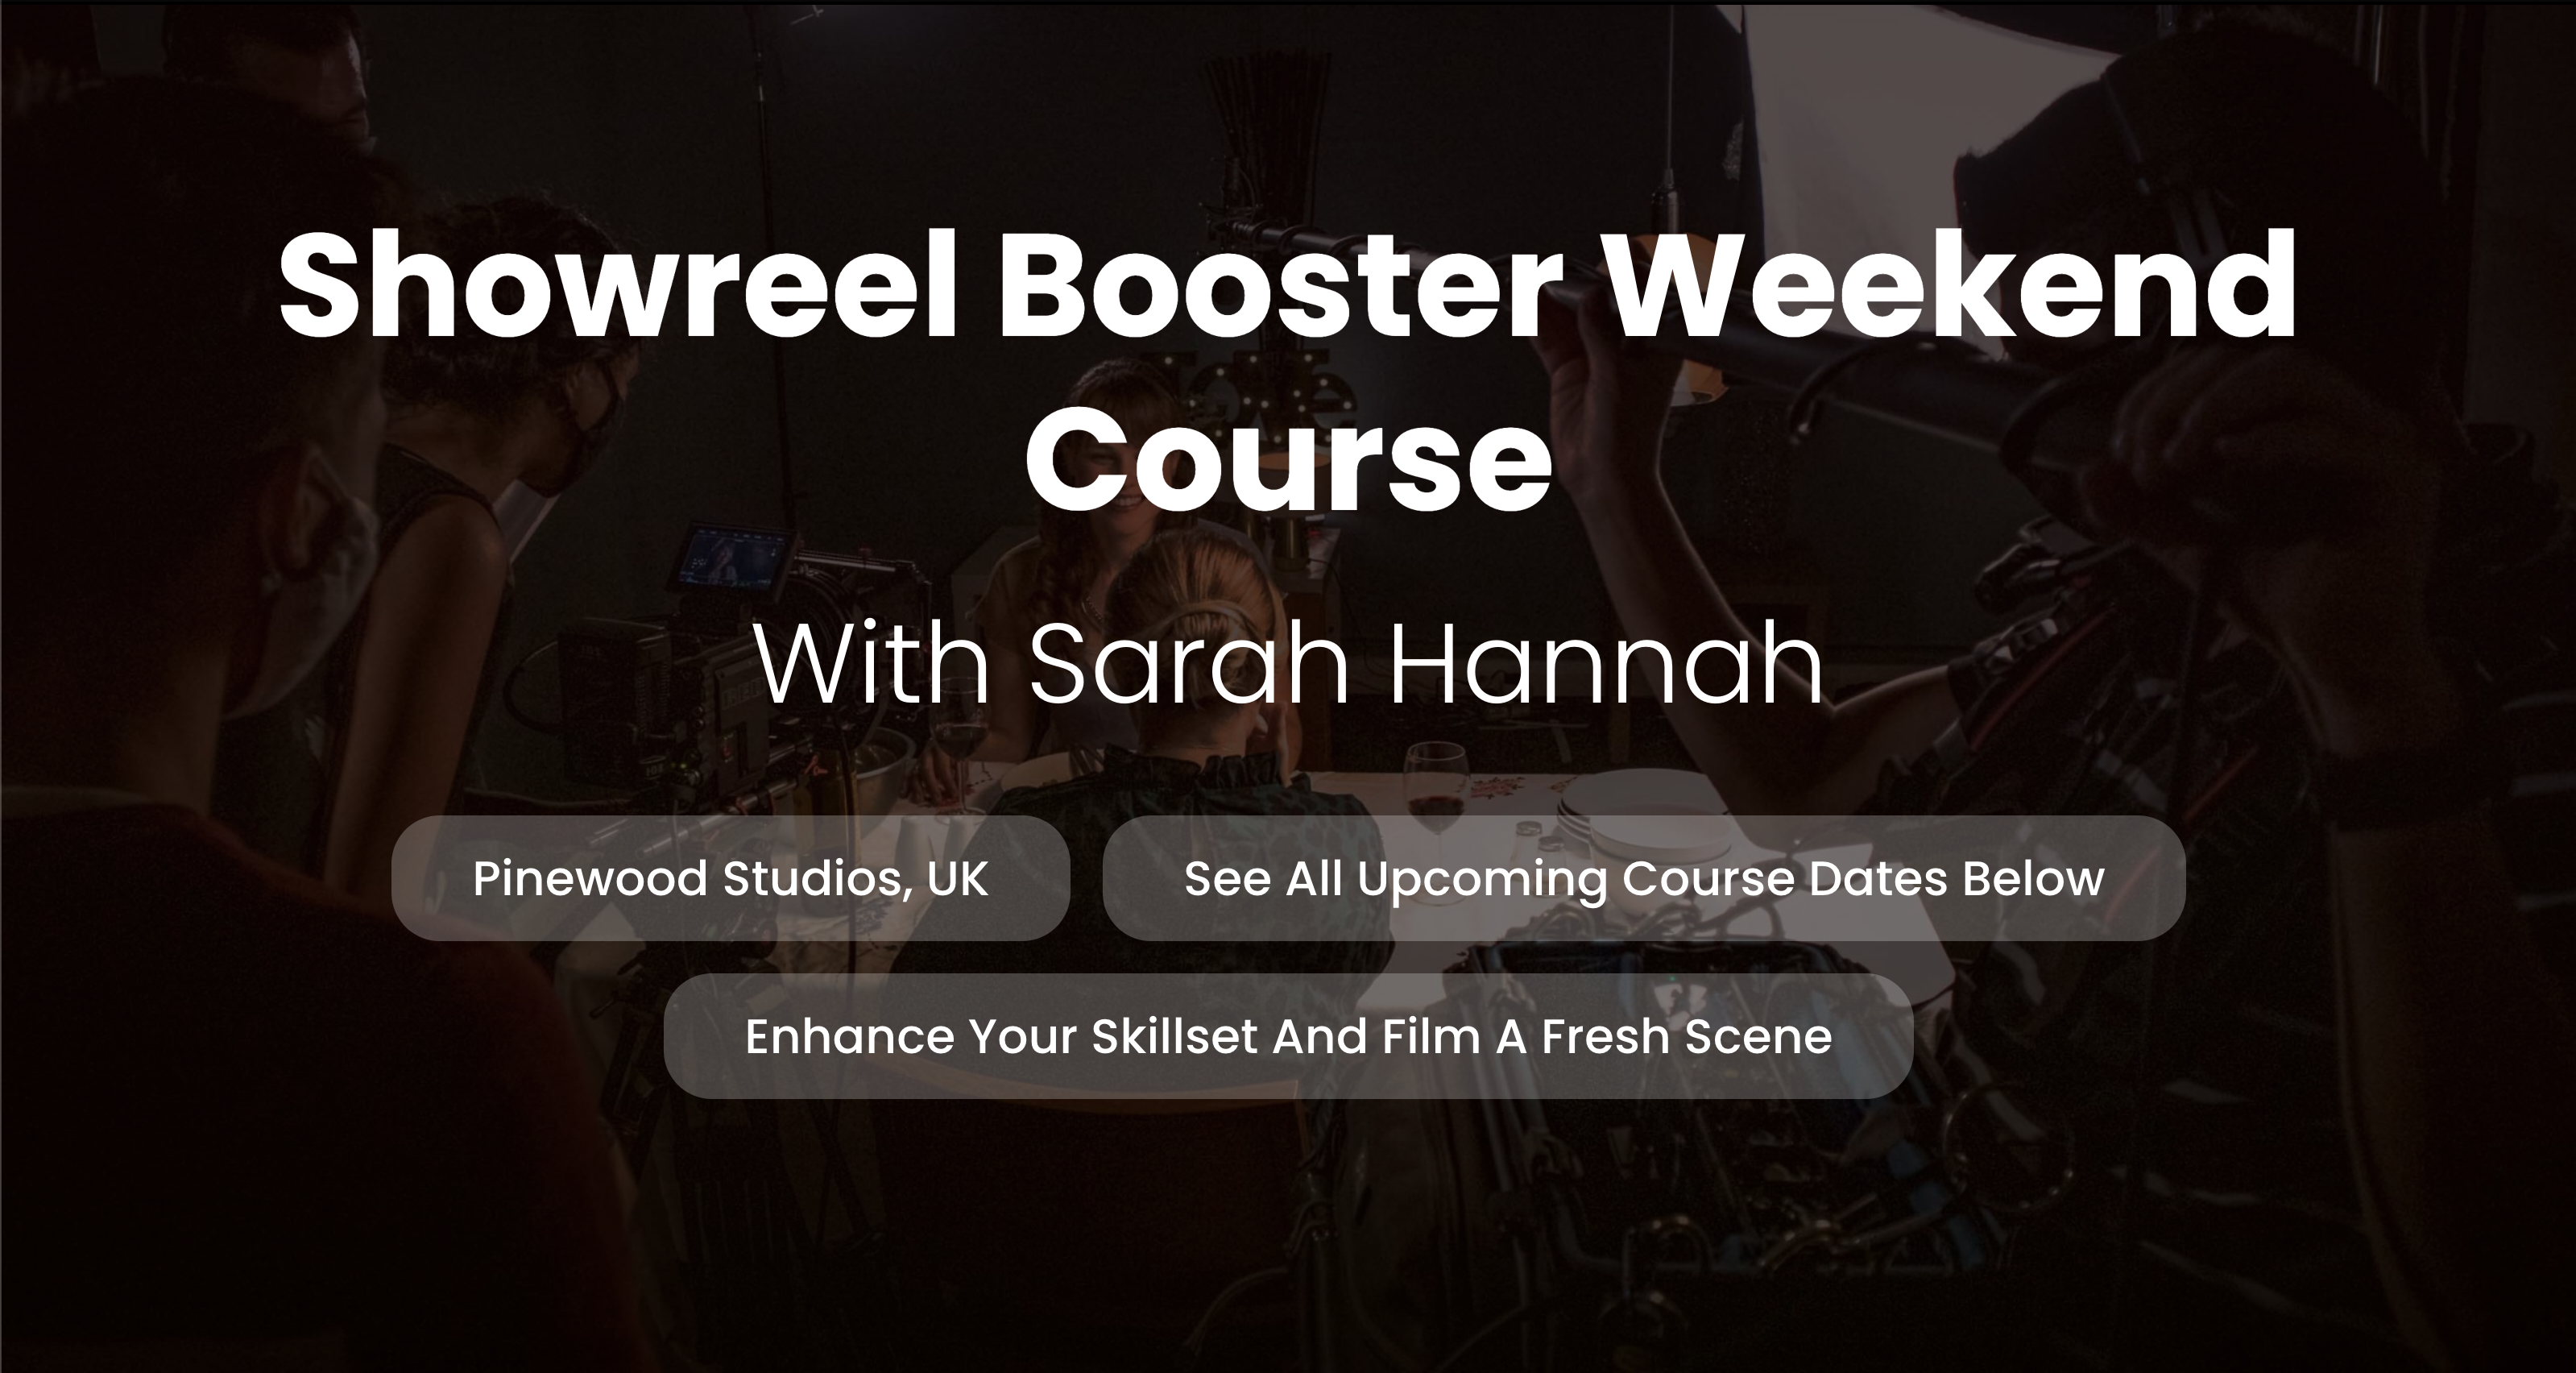
Showreel Booster Weekend Course
By Actors Studio
With Sarah Hannah Introduction Looking to film a fresh scene for your acting showreel but want to improve your confidence on camera before shooting? Look no further! Join our weekend intensive screen acting course designed to push you further, increase your knowledge, and elevate your screen acting techniques. Meet Your Tutor Sarah Hannah Actress, Acting and Audition Coach Sarah Hannah is a highly experienced Professional Actress, Acting and Audition Coach. Bringing her extensive experience of working on stage and on screen, Sarah will focus on enhancing your presence on camera and cover the technical skills required of a professional screen actor. Course Outline This immersive experience goes beyond the basics, increasing your knowledge and enhancing your toolbox of screen acting techniques. Following a day of filming with a professional crew, you’ll receive a digital copy of your edited scene—an impressive addition to your showreel, showcasing your refined skills. This course is suitable if you have had previous acting training are a drama school graduate or professional actor. Additional Information Features Suitable if you are (17 yrs+) and have had previous acting training, drama school graduate or professional actor Attracts a varied age range from 17 yrs+. International Students Welcome The course is taught in English, so it is important that you have proficient English language skills Small Class Size Create a truthful and technically confident on screen performance In-depth exploration of screen acting techniques Film a scene that will be edited for your acting showreel Suitable follow-on course if you have completed our Crash Course Weekend Beginners Course Learning Outcomes Create a truthful and technically confident on screen performance In-depth exploration of screen acting techniques Film a scene that will be edited for your acting showreel Improve your collaboration skills within a group Course Location Actors Studio, Pinewood Studios, Pinewood Road, Iver Heath, Buckinghamshire, SL0 0NH Free parking available at Pinewood Studios Nearest Train Stations: Uxbridge Tube Station, Slough and Gerrards Cross. Transfer from station to Pinewood Studios – 10 minutes Coffee shop on site (may not be open at weekends) Excellent transport links from London
Photoshop Essentials Evening Training Sessions
By ATL Autocad Training London
Photoshop Essentials Evening Training Sessions, where you'll master the basics and elevate your photography and Photoshop rendering skills. Enhance your photos significantly, learning everything from color correction to retouching techniques. Expertly retouch and repair images during our comprehensive Photoshop training courses. Click here for more info: Website Duration: 10 hours Approach: 1-on1 guidance, Customized instruction and Tailored content. Choose your own time and day Monday to Saturday 9 am to 7 pm Becoming Proficient in Adobe Photoshop - 10-Hour Training Program Module 1: Introduction to Photoshop (1 hour) Familiarization with Photoshop interface and tools Understanding file formats and resolution concepts Navigation within the workspace and customization of preferences Mastering essential keyboard shortcuts for efficient workflow Module 2: Working with Layers (1 hour) Grasping the significance of layers and their efficient organization Application of layer styles to enhance creativity Utilization of blend modes for striking compositions Module 3: Selection Techniques (1 hour) Understanding diverse selection tools and their specific applications Precision in selections using Marquee, Lasso, Magic Wand, Quick Selection, and Refine Edge tools Creation of masks for non-destructive editing Module 4: Image Editing and Retouching (1 hour) Essential techniques for retouching portraits and landscapes Corrections in exposure, color, and tone using Adjustment Layers Seamless repairs with Healing Brush, Clone Stamp, and Content-Aware tools Module 5: Typography and Text Effects (1 hour) Working with text layers and formatting options Crafting captivating text effects using Layer Styles Manipulating text along paths and shapes for creative compositions Module 6: Advanced Image Manipulation (1 hour) Merging images with layer masks and blending modes Crafting composite images and surreal artwork Applying transformations and distortions creatively using Smart Objects Module 7: Filters and Special Effects (1 hour) Exploration of various filters for artistic and practical applications Application of blur, sharpening, distortion filters, and creative effects using the Filter Gallery Flexible editing with smart filters Module 8: Drawing and Vector Graphics (1 hour) Working with shape layers and vector tools Creation of custom shapes, icons, and logos Precision in illustrations using the Pen tool Module 9: Advanced Color Correction (1 hour) Expertise in color adjustments with Curves and Levels Selective color control using Adjustment Layers Understanding color spaces, profiles, and creating duotones and split-tones Module 10: Designing for Web and Print (1 hour) Image preparation for web and social media platforms Understanding resolution and color modes for print File exportation in various formats catering to diverse needs Final Project: Crafting a digital artwork or print-ready composition to showcase acquired skills. Upon completing this 10-hour Adobe Photoshop course, participants will: Master Photoshop Tools: Navigate the interface efficiently, apply advanced tools, and utilize essential shortcuts for streamlined work. Perfect Layer Techniques: Organize layers, use blend modes, and apply styles for visually appealing compositions. Refine Selection Skills: Make precise selections, create masks, and employ advanced selection tools for accuracy. Enhance Images Professionally: Learn advanced retouching, correction, and repair techniques for seamless photo editing. Create Captivating Text: Work with text layers, apply styles, and design typographic compositions creatively. Master Image Manipulation: Merge images seamlessly, apply transformations, and create surreal artwork with Smart Objects. Apply Filters and Effects: Utilize a range of artistic filters and effects for creative enhancements. Professional Vector Graphics: Craft custom shapes, logos, and icons with precision using vector tools. Advanced Color Correction: Master color adjustments, selective color control, and create captivating duotones and split-tones. Produce Print and Web Designs: Prepare images for various platforms, understand resolution, and export files in diverse formats. Hands-On Project Proficiency: Apply skills in real-world projects, demonstrating professional design expertise. Upon completion, participants will have the confidence and proficiency to excel in Photoshop, enabling high-quality, professional design work in both digital and print media. Adobe Photoshop Course: Adobe Photoshop course, hosted at the UK's top Adobe Training Centre. Develop expertise in Adobe's premier digital imaging software, crucial for crafting compelling visuals across a multitude of digital platforms. Our Photoshop training programs focus on interactive, real-life exercises, ensuring a hands-on and practical learning environment. Whether you are a novice aiming for a robust foundation or a proficient user striving for increased efficiency, our wide-ranging Photoshop courses are tailored to meet your specific requirements. Enroll today to master Photoshop and tap into a world of creative possibilities. Jobs You Can Pursue: Graphic Designer: Create visually appealing graphics for print and digital media. Digital Artist: Craft digital artwork for various applications, from illustrations to advertisements. Photo Retoucher: Enhance and manipulate photos to achieve desired visual effects. UI/UX Designer: Design user interfaces and experiences for websites and applications. Web Designer: Develop visually engaging websites by incorporating Photoshop skills into web design. Marketing Content Creator: Produce marketing materials like banners, brochures, and social media visuals. Freelance Designer: Work independently, offering design services to clients across different industries. Advertising Creative: Contribute to creative campaigns by designing impactful ad visuals. Print Production Specialist: Prepare print-ready materials, ensuring quality in printed products. Photography Post-Processing Specialist: Enhance and retouch photographs, optimizing them for professional use. Course Advantages: Master Vital Photoshop Skills: Gain expertise in essential image editing and manipulation techniques. Craft Striking Digital Artwork: Create visually appealing digital art and design graphics with finesse. Attain Professional-Quality Results: Achieve high-quality outcomes with accuracy and speed in your work. Unleash Creative Potential: Explore versatile design capabilities, tapping into your full creative spectrum. Flexible Learning: Access recorded lessons for convenient learning and revision. Continuous Assistance: Benefit from lifetime email support, ensuring ongoing guidance and support.