- Professional Development
- Medicine & Nursing
- Arts & Crafts
- Health & Wellbeing
- Personal Development
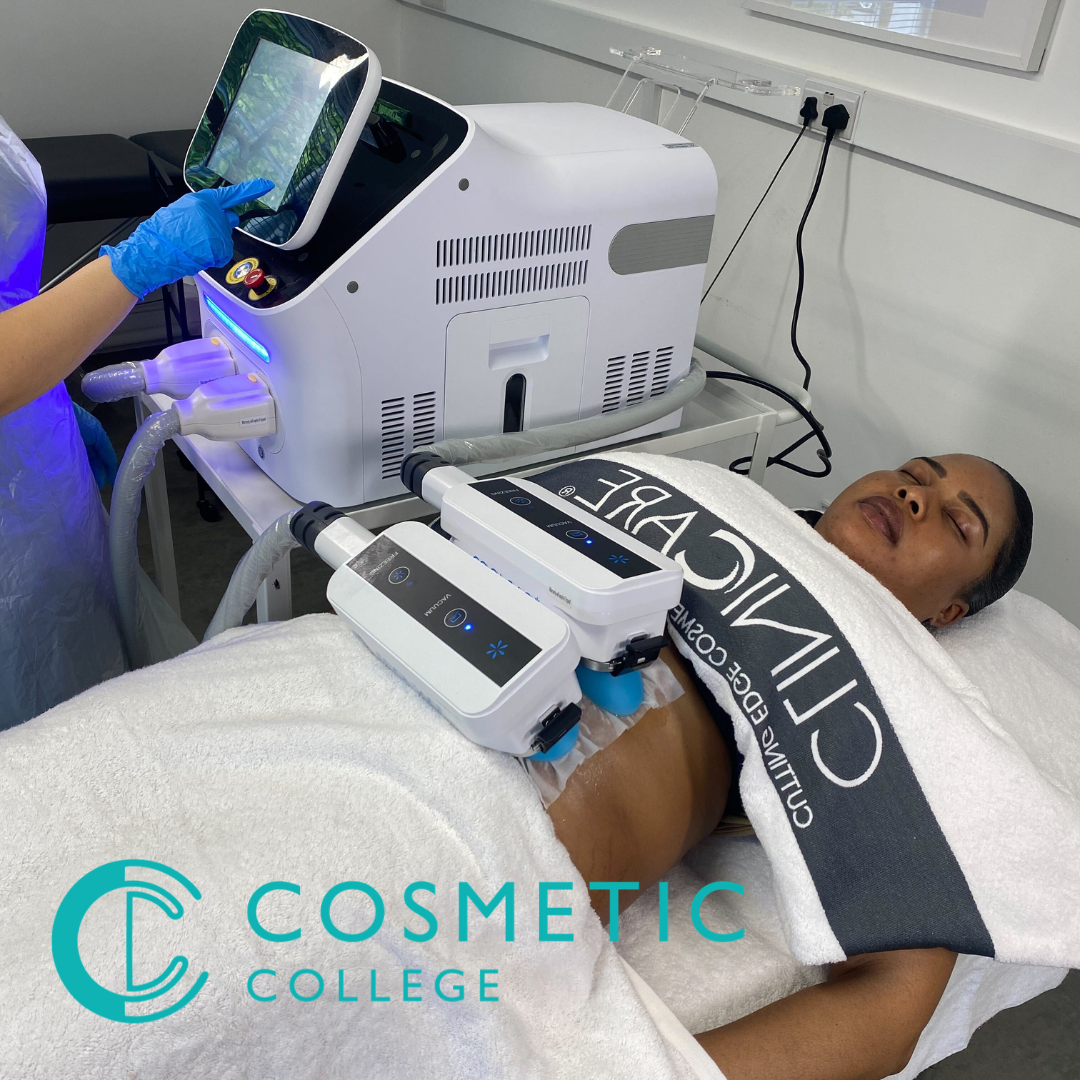
Cryotherapy (Fat Freezing) Training Course
By Cosmetic College
Our accredited Cryotherapy (fat freezing) training course will give you in-depth training on what Cryotherapy is and how to safely and effectively perform the treatment on clients. Our Cryotherapy (fat freezing) training course will give you in-depth training on what Cryotherapy is and how to safely and effectively perform the treatment on clients. The CPD Group accredits our course. Course Entry Requirements: This course is suitable for both medics and non-medics. Level 3 in Beauty Therapy or equivalent is desirable Good command of English A minimum of 18 years Training is complimentary when you purchase the Beautier Cryo Pro machine. Contact us for the course and machine package prices. Course Pre-Study/Practical & Length: Training includes online theory plus 1-day face-to-face practical training and ongoing support. Course Agenda: During the training day, you will learn: - What Cryotherapy is - How our weight affects our health - How Cryotherapy works - Introduction to the operation of your machine - Client Consultation - Client Safety - Contraindications to treatment - Areas that can be treated - How to perform a treatment - Handset positioning for all areas - Side Effects - Pre and Post-treatment advice - Machine Maintenance - General Troubleshooting - FAQs Course Benefits Student Benefits Comprehensive Knowledge: By enrolling in this course, you will gain a comprehensive understanding of cryotherapy and its application in fat reduction and body contouring. You will learn about the science behind fat freezing, the technology involved, treatment protocols, and safety considerations. This knowledge will make you a confident and competent practitioner in cryotherapy. Practical Hands-on Experience: Our training course emphasises practical training, allowing you to gain hands-on experience in performing cryotherapy treatments. Under the guidance of experienced instructors, you will learn the correct application techniques, treatment planning, and client assessment. This practical experience will enhance your skills and prepare you to deliver effective treatments. Diversify Your Skill Set: Cryotherapy is a popular non-surgical body sculpting technique that is in high demand. By enrolling in this course, you will expand your skill set and offer a sought-after treatment to your clients. Diversifying your services can attract new clients and increase your earning potential. Client Satisfaction: Cryotherapy provides clients with a non-invasive and non-surgical option for fat reduction and body contouring. By learning the techniques and protocols of cryotherapy, you can help clients achieve their desired body goals and boost their self-confidence. Client satisfaction will contribute to your professional reputation and potentially lead to referrals. Client Benefits Effective Fat Reduction: Cryotherapy treatments can selectively target and eliminate unwanted fat cells in specific areas of the body, such as the abdomen, thighs, arms, and love handles. By providing cryotherapy services, you can help clients achieve noticeable and long-lasting fat reduction results. Non-Invasive and Safe: Cryotherapy is a non-invasive alternative to surgical procedures, offering clients a safe and comfortable treatment option. Clients can benefit from fat reduction without the risks, downtime, or scarring associated with invasive methods. Body Contouring and Improved Confidence: Cryotherapy can help clients contour their bodies and achieve a more sculpted appearance. By reducing stubborn fat deposits, cryotherapy can enhance body shape and proportions, leading to improved confidence and self-esteem. Earning Potential Expanded Service Offerings: Offering cryotherapy services can attract new clients and increase your revenue streams. By diversifying your services to include fat freezing, you can cater to clients seeking non-surgical body sculpting solutions. Repeat Clients and Referrals: Satisfied clients who achieve their desired fat reduction results are more likely to become repeat customers. They may also refer their friends, family, and acquaintances to experience cryotherapy treatments with you. This can significantly contribute to your earning potential. Growing Demand: Cryotherapy for fat reduction and body contouring has gained significant popularity in recent years. As more individuals seek non-invasive alternatives to surgical procedures, the demand for cryotherapy services continues to grow. By becoming a skilled cryotherapy practitioner, you position yourself to meet this demand and increase your earning potential. Frequently Asked Questions How can I book? We have a few options for you to book. You can book by selecting an available training date above here on our website, by contacting us through email at hello@cosmetic.college or by contacting us on 0333 015 5117. Where is the Cosmetic College The Cosmetic College is located at: 3 Locks Court, 429 Crofton Road, Orpington, BR6 8NL Is a deposit required to book? All enrolments are charged an administration fee which is non-refundable. When you enrol you can elect to pay a deposit of 10% plus the administration fee or pay the total training course in full. We have full details of the terms and conditions of training course enrolments here What is the course duration? 1 day + pre-study via our online learning platform. What will I learn in this training course? In this course, you will learn about the principles of cryotherapy, the science behind fat freezing, and the technology used in the process. You will also gain practical knowledge and hands-on experience in performing cryotherapy treatments, including client assessment, treatment planning, application techniques, and post-treatment care. Are there any prerequisites for enrolling in the course? No specific prerequisites are required to enrol in the Cryotherapy (Fat Freezing) Training Course. However, having a basic understanding of anatomy and physiology can be beneficial. We welcome individuals from various backgrounds, including beauty professionals, aestheticians, and those interested in entering the field of non-surgical body sculpting. Will I receive a certification upon completion of the course? Yes, upon successful completion of the Cryotherapy (Fat Freezing) Training Course, you will receive a certification. This certification will validate your training and demonstrate your competence in performing cryotherapy treatments for fat reduction and body contouring. Is hands-on training included in the course? Absolutely! Our training course includes hands-on training to ensure that you gain practical experience in performing cryotherapy treatments. Under the guidance of our experienced instructors, you will have the opportunity to practice the techniques on models, allowing you to develop confidence and proficiency in delivering effective treatments. What equipment and technology will be used during the training? We use state-of-the-art cryotherapy equipment and technology in our training course. You will learn how to operate and utilise the specific equipment used for fat freezing treatments. Our instructors will guide you on the correct usage and ensure your understanding of the technology involved. Can I start offering cryotherapy services after completing the course? Yes, upon completion of the Cryotherapy (Fat Freezing) Training Course, you will have the knowledge and skills to start offering cryotherapy services to your clients. You will be equipped to provide safe and effective treatments, helping clients achieve their desired fat reduction and body contouring goals.
Photoshop Basics to Essentials Training
By London Design Training Courses
Why Choose Photoshop Basics to Essentials Training Course? Course Link Mastering Photoshop is crucial for securing positions in creative fields such as graphic design, digital design, and user interface (UI) design. Acquiring this skill serves as a foundation to excel in various design programs essential for creative professionals. Duration: 16 hrs. Method: 1-on-1, Personalized attention. Schedule: Tailor your own hours of your choice, available from Monday to Saturday between 9 am and 7 pm. Photoshop Course: Total 16 hrs Module 1: Keyboard and Toolbar Shortcuts Customize toolbars and keyboard shortcuts for efficient workflow Learn essential keyboard shortcuts for faster navigation Module 2: Advanced Layer Management Filter, search, and color code layers for better organization Group and merge layers to streamline your design process Explore Blending Modes for creative effects Module 3: Blending Modes Understand Blending Modes and their usage within layers and effects Apply Blending Modes to enhance your designs Module 4: Layer Comps Discover Layer Comps and their benefits in managing complex designs Create, edit, and update Layer Comps for different design versions Export Layer Comps to PSD, PDF, and JPEG formats Module 5: Drawing Vectors Work with Vector images using shapes and the Pen Tool Use the Direct Selection Tool for precise editing Apply colors and create Clipping Masks with vectors Module 6: Advanced Type Techniques Convert text into Shapes and utilize font style changes with the Pen Tool Use text as a Clipping Mask and create text Outlines Design 3D text for impactful typography Module 7: Advanced Adjustment Layers Master advanced adjustments like Curves, Levels, and Black and White Utilize Selective Color and Gradient Maps for creative color control Module 8: Advanced Selection Techniques Use Smart Radius and Select and Mask for precise selections Learn to select complex objects like hair using Color Range and the Pen Tool Save and manage selections using the Path Panel Module 9: Colorizing Black and White Images Module 10: Displacement Maps Module 11: Advanced Filters Create Trees, Frames, Clouds, and Fire with filters Use Polarized, Wave, and Extrusion for artistic effects like "Japanese Sun" Explore Vanishing Point Filter, Camera RAW, Blur for depth of field, and Filter Gallery Combine 3D text with Vanishing Point for stunning designs Use Liquify for image manipulation Module 12: Introduction to Actions Automate tasks using Photoshop's preset Actions Create your own Actions to save time and effort Module 13: Creating an Animated GIF Learn frame by frame animation Utilize the Timeline to create engaging animated GIFs Learning Outcomes: Master advanced selection techniques, including the Path and Pen Tool, for precise editing. Gain proficiency in advanced layer management and utilize Layer Comps for efficient design organization. Enhance your designs with a deeper understanding and application of Blending Modes. Create visually appealing 3D text and text outlines to add depth and impact to your artwork. Explore advanced Filters like Displacement Maps, Blurs, and Distortion for creative effects. Automate tasks with actions and batch processing, streamlining your workflow. Craft engaging animated GIFs to add dynamic elements to your designs. Skillfully set project requirements by identifying the purpose, target audience, copyright considerations, and project management tasks for successful project execution.

3ds max and V-Ray Training Course
By ATL Autocad Training London
Why 3ds max and V-Ray Training Course? This course is ideal for 3D artists and professionals in various industries seeking advanced rendering skills. If you work with 3ds Max and want to master superior photorealistic rendering using V-Ray, this course is tailored for you. V-Ray, a third-party engine compatible with 3ds Max, Click here for more info: Website Duration: 10 hours. Approach: Personalized 1-on-1 Sessions and Flexible Learning. Scheduling Flexibility: Mon to Sat between 9 am and 7 pm. Choose your own day and time. 10-hour Vray for 3ds Max Training Course Outline: Module 1: Introduction to Vray for 3ds Max (2 hours) What is Vray and its integration with 3ds Max? Installation and setup of Vray for 3ds Max Understanding Vray interface and workflow Overview of Vray materials Module 2: Lighting with Vray (2 hours) Various lighting techniques in Vray Types of Vray lights and their configurations Creating and managing Vray sun and sky Vray dome lighting and IES light usage Efficient lighting workflows in Vray Module 3: Vray Camera (2 hours) Understanding Vray camera settings Controlling exposure with Vray camera Working with Vray depth of field Creating Vray camera animations Utilizing Vray frame buffer Module 4: Vray Materials (2 hours) Understanding Vray material properties Creating realistic materials using Vray Building and storing custom Vray material libraries Implementing Vray material overrides Module 5: Vray Rendering and Post Production (2 hours) Overview of Vray rendering settings Rendering images and animations with Vray Post-production techniques in Photoshop Understanding and utilizing Vray frame buffer Compositing Vray render elements in Photoshop Working with Vray denoiser Modeling Techniques: Edit Poly Modeling Extrude, Chamfer, Cut, and Slices Symmetry Mirror Modeling Designing furniture and basic architectural models Lines, Shapes, and Plan Import from AutoCAD/Vectorworks Modifiers: Compound objects (Connect, Scatter, Pro Boolean, Loft, Terrain) Bend and Taper Basic Lights: Omni Light, Spot Light, Direct Light Camera Control: Free Camera, Target Camera Texturing and Rendering: Diffuse and Bump Mapping Environment and Background Images Advanced Rendering Techniques (Interior and Exterior Scenes) Vray Specifics: VRay Lights (Plane, Dome, Sphere, Sun, Shadow) VRay Camera Settings (Focal Length, Film Speed, Shutter Speed) VRay Materials (Diffuse Color, Reflection, Refraction, Blurry Reflections) Upon completing the 10-hour Vray for 3ds Max Training Course, participants will: Master Vray Integration: Understand setup, interface, and tools for effective usage. Excel in Vray Lighting Techniques: Learn diverse Vray lighting methods, enhancing scene realism. Vray Camera Control: Manipulate camera settings, exposure, and create dynamic animations. Vray Material Skills: Create realistic materials, manage libraries, and override material properties. Perfect Rendering and Post-Production: Optimize rendering, produce high-quality images, and enhance results in post-production. Advanced 3D Modeling Expertise: Develop complex shapes, utilize modifiers, and import plans effectively. Recommended Resources: "V-Ray My Way: A Practical Designer's Guide to Creating Realistic Imagery Using V-Ray & 3ds Max" by Lee Wylde "3ds Max Modeling for Games: Insider's Guide to Game Character, Vehicle, and Environment Modeling" by Andrew Gahan "Photoshop for 3D Artists, Volume 1" by 3DTotal Publishing Job Opportunities: Students can pursue careers as: 3D Visualization Artists: Creating realistic visuals for architecture, products, and entertainment. Game Designers: Developing game environments and assets for interactive experiences. Architectural Visualizers: Producing high-quality architectural renders for firms and clients. Product Designers: Crafting detailed product visualizations for marketing and prototyping. Freelance 3D Artists: Offering services on platforms like Upwork, catering to diverse client needs. Opportunities exist in architecture, gaming, animation, advertising, and freelancing. A strong portfolio and networking enhance job prospects. Skills Acquired: Vray Advanced Lighting: HDRI, Global Illumination Mastery. Vray Material Expertise: Shaders, Textures, Realistic Material Replication. Scene Optimization: Large-scale Scene Handling, Speed Optimization. Post-Production Skills: Vray and Photoshop Enhancement, Atmosphere Addition. Career Opportunities: Architectural Visualization Specialist Product Design Visualizer 3D Visualization Artist Freelance Rendering Expert In-House Rendering Consultant Learn the advanced Vray rendering skills, 1-on-1 training courses, boost your career prospects in architectural visualization, product design, and animation industries. Download 3ds max. Autodesk Download a free 30 day trial of 3ds Max, 3D modelling and rendering software for design visualisation, games and animation to create with full artistic Download Vray V-Ray for 3ds max is an integral rendering software for SketchUp, enabling designers to experience their designs in real-time. Say Goodbye to Group Courses: Welcome to our Personalized Learning Experience! Why Choose Us? Our Course Benefits Include: â One-on-One Training: Experience personalized coaching from practicing architects and designers tailored exclusively for you. 1-on-1, Face to Face at (SW96DE) or Live online. Open: Monday to Saturday 9 am to 7 pm. Customized Tutorials: Take home bespoke video tutorials designed to enhance your learning journey. Comprehensive Resources: Receive a digital reference book for thorough revision, ensuring you grasp every concept. Free Ongoing Support: Enjoy continuous after-course support via phone or email, guaranteeing your success even after the class ends. Flexible Syllabus: We adapt syllabus and projects to match your needs, ensuring you learn precisely what matters most to you. Official Certificate: Certificate upon course completion. Why Us? Supported Individual Learning: Our courses, ranging from 10 hours to 120 hrs Diploma training Courses, offer unwavering support at every step. With personalized homework assignments and free after-course assistance, we pave the way to mastering software with unparalleled guidance. Personalized Attention, Not Crowded Classrooms: Bid farewell to crowded classrooms. Experience the intimacy of one-on-one learning. This ensures you receive the undivided attention you deserve, fostering a confident and comfortable learning environment. Financial Flexibility: Embarking on your educational journey shouldn't be a financial burden. We offer a variety of payment plans tailored to your needs. Discover the options available to you and start your learning adventure today. Expert Instructors, Real-world Insight: Our instructors are experts meticulously chosen for their extensive industry knowledge and passion for teaching. They are dedicated to imparting invaluable skills to anyone eager to learn.

Vectorworks 2D Basics Level Training Course
By ATL Autocad Training London
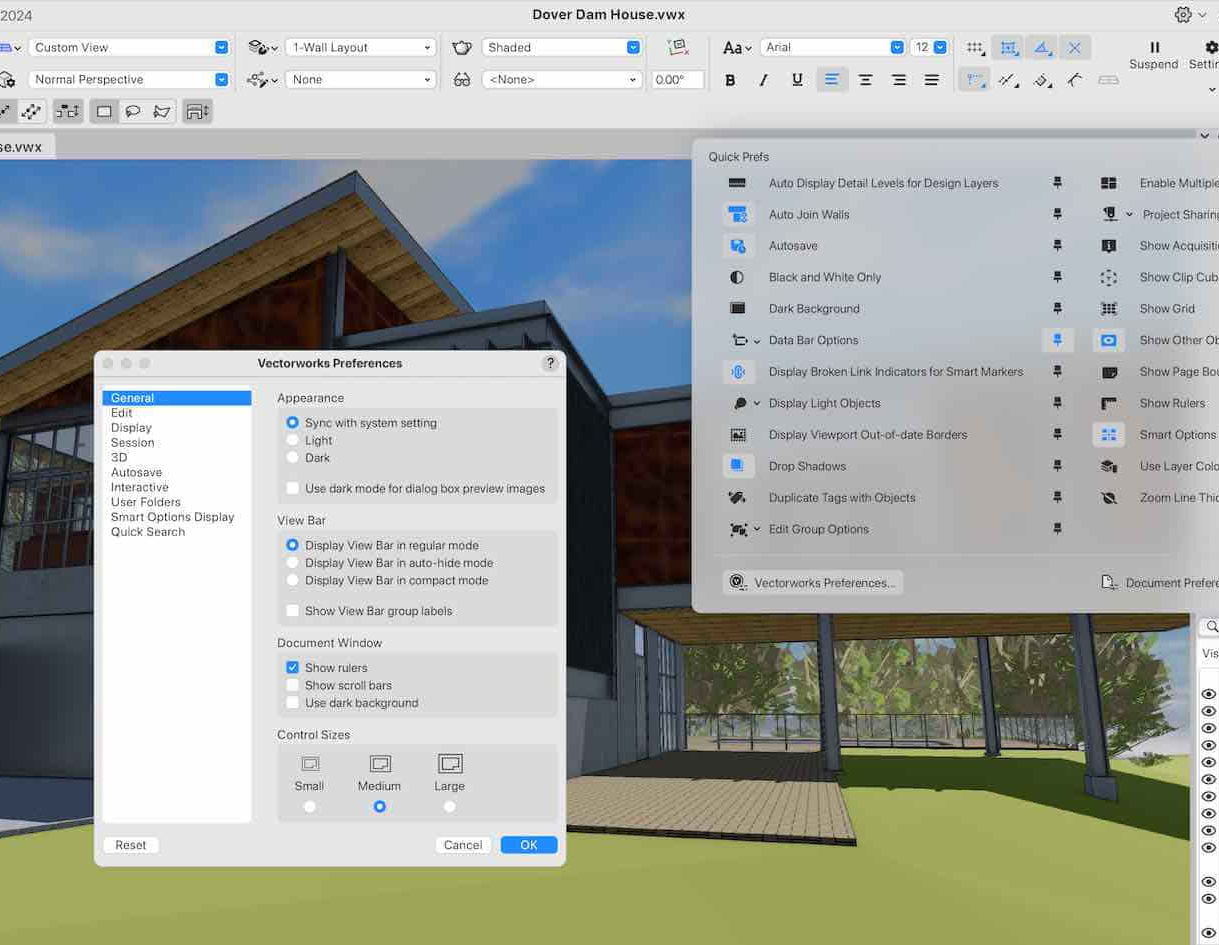
Why Vectorworks 2D Basics Level Training Course? Vectorworks excels in 2D design, delivering exceptional results and serving as a robust 2D design tool. The Fundamentals course provides customizable tools for precise 2D drawings, while VectorWorks Architect streamlines the process with user-friendly, easy-to-learn tools. Click here for more info: Website Course Details: 10 hrs, Flexible 1-on-1 sessions, in-person or online. 9 am and 7 pm (Mon-Sat).10 hours, split as needed for your schedule. Module 1: Understanding CAD and Vectorworks The Role of CAD in Design Introduction to Vectorworks Software Module 2: Setting Up Your Workspace Workspace Configuration Basic Options and Preferences Module 3: Foundational Drawing Skills Drawing Techniques Selecting Objects Module 4: Advanced Object Editing Combining Shapes Mirroring Objects Rotating Objects Grouping Objects Module 5: Precision Drawing and Scaling Working with Scale Setting Preferences Saving Templates Module 6: Accurate Object Placement Drawing Precision Moving Objects Precisely Module 7: Advanced Editing Techniques Using Fillet Employing Offset Module 8: Introduction to Object Attributes and Groups Basic Attributes Editing Object Groups Module 9: Duplicating Objects Linear Duplicates Rectangular Duplicates Circular Duplicates Module 10: Creating Room Plans Designing Walls Incorporating Windows and Doors Module 11: Room Plan Development Room Plan Drawing Methods Module 12: Utilizing Additional Attributes Hatch Patterns Gradients Image Fills Module 13: Drawing Elevations Elevation Techniques Effective Methods Module 14: Importing Images for Graphics Graphic Illustration Image Integration Module 15: Symbols and Resource Management Creating Symbols Introduction to Resource Browser Module 16: Organizing Drawings with Design Layers Design Layer Usage Module 17: Labeling Drawings and Title Blocks Drawing Labels Title Block Text Module 18: Plotting and Printing User Interface and Terminology Printing Techniques Module 19: Creating Drawing Sheets A1, A2, and A3 Sheets Module 20: Utilizing Viewports Multiple Views Module 21: Professional Model Presentation Paper Space Presentation Converting to PDFs Module 22: Managing Files and Projects Module 23: Displaying Objects and Terminology Module 24: Objects and Data Management Module 25: Precise Object Placement Object Snaps Quick Select Module 26: Dividing and Measuring Objects Module 27: Dimensioning and Annotation Module 28: Working with Text Module 29: Custom Tool Palettes Module 30: Organizing Tool Palettes Module 31: Effective Tool Palette Usage Module 32: Standard Views and Drawing Techniques Module 33: Drawing Curves Arcs, Donuts, and Ellipses Module 34: Real-World Units and Measurements Module 35: Object Manipulation Changing Object Angles Module 36: File Management Saving, Exiting, and Opening Projects Module 37: Creating Mirror Images Module 38: Introduction to 3D Modeling Creating Extrusions Basic 3D Concepts Outcomes and Vectorworks Jobs: Vectorworks Proficiency: Gain expertise in using Vectorworks software for design tasks. 2D Design Skills: Create accurate 2D drawings and architectural plans. Advanced Editing: Efficiently manipulate and edit objects in your designs. Precision Drawing: Develop skills for precise scaling and drawing. These skills open doors to careers in design, architecture, engineering, entertainment, and more. Potential Jobs: Architectural Drafter Interior Designer Landscape Designer AD Technician Graphic Designer Construction Estimator Product Designer Set Designer Event Planner Urban Planner Vectorworks 2D Training Course Our Vectorworks training is thoughtfully designed to educate and inspire designers at every skill level. Whether you're just starting or a seasoned pro, our courses will furnish you with fresh skills, streamline your workflows, and unleash the full potential of your Vectorworks software. Online Training Choices Tailored Online Sessions: Customized training sessions tailored to your specific requirements and skill level. Virtual Classroom: Participate in interactive virtual classes from the convenience of your workspace. Getting Started Guides: Comprehensive guides to assist you in navigating the fundamentals of Vectorworks. In-Person Training Opportunities Customized On-Site Sessions: Hands-on training delivered directly to your office or at regional events. One-to-One: Engage in interactive learning at our training locations. Download Vectorworks https://www.vectorworks.net Personalized One-on-One Training: Get individualized attention and customized instruction. Flexible Scheduling: Choose your preferred training time and day to suit your schedule. Post-Course Assistance: Access free online support after course completion. Comprehensive Learning Materials: Receive PDF notes and handouts to enhance your learning. Certificate of Completion: Earn a recognition certificate upon successfully finishing the course. Affordable Rates: Enjoy cost-effective training rates. Software Setup Assistance: Receive help setting up the software on your computer. Referral Benefits: Recommend a friend and receive discounts on future courses. Group Training Discounts: Special discounts available for group training sessions. Convenient Availability: Access training sessions from Monday to Sunday, with extended hours. Tailored Training: Receive customized, bespoke training tailored to your specific requirements.
Vray for 3ds max Training
By London Design Training Courses
Why Learn Vray for 3ds max Training Course? Course Link 3ds Max - Rendering with V-Ray training offers an extensive master class in utilizing V-Ray, a widely used tool in architecture, interior design, film, and various industries. Topics covered include lighting techniques for interiors using both natural and artificial light sources. Duration: 10 hrs Method: 1-2-1, Personalized attention. Schedule: Tailor your own hours of your choice, available from Mon to Sat between 9 am and 7 pm. Module 1: Introduction to Vray for 3ds Max (2 hours) Learn the purpose and advantages of Vray for 3ds Max. Install and set up Vray for 3ds Max. Get familiar with the Vray interface and workflow. Understand Vray materials and their usage in 3ds Max. Module 2: Lighting with Vray (2 hours) Explore lighting techniques using Vray in 3ds Max. Work with different types of Vray lights and their settings. Create and control Vray sun and sky for outdoor scenes. Utilize Vray dome lighting for interior scenes. Learn about IES lights in Vray and their usage. Establish an efficient lighting workflow with Vray. Module 3: Vray Camera (2 hours) Understand Vray camera settings and their impact on renders. Control exposure and use Vray depth of field. Create camera animations with Vray for dynamic shots. Explore Vray frame buffer functionalities for post-processing. Module 4: Vray Materials (2 hours) Learn about properties and settings of Vray materials. Create realistic and visually appealing materials with Vray. Save and organize custom Vray material libraries. Use Vray material overrides for efficient material changes. Module 5: Vray Rendering and Post Production (2 hours) Get an overview of Vray rendering settings for high-quality output. Render still images and animations using Vray. Enhance Vray renders in Photoshop with post-production techniques. Utilize Vray frame buffer for fine-tuning renders. Composit Vray render elements in Photoshop for added control. Work with Vray denoiser for noise reduction in renders. You can access the free trial of Vray for 3ds Max here: (https://www.chaosgroup.com/vray/sketchup/free-trial), material libraries here: (https://www.vray-materials.de/), and textures here: (https://textures.com/).

Vray for Architects and Interior Designers 3ds max or Sketchup Training
By London Design Training Courses
Why Choose Vray for Architects and Interior Designers 3ds max or Sketchup Training Course? Click here for info Achieve stunningly realistic renders with our tailored course in V-Ray. Designed for experienced SketchUp and 3ds max users, this advanced training covers model preparation and rendering techniques, customized to your skill level and preferences. Duration: 10 hrs. Method: 1-on-1, Personalized attention. Schedule: Tailor your own hours of your choice, available from Mon to Sat between 9 am and 7 pm. SketchUp is renowned for its user-friendly interface and widespread usage in 3D modeling. Now, with V-Ray for SketchUp, users can take advantage of a powerful rendering tool for unparalleled visualization quality and realism. V-Ray seamlessly integrates into the SketchUp environment, allowing for efficient rendering within your existing workflows. Our course is ideal for those seeking to enhance their SketchUp proficiency by incorporating V-Ray's potent rendering capabilities for 3D models. We adapt the training to your current skill levels in both SketchUp and V-Ray and tailor the content to your modeling requirements and desired rendering quality. V-Ray Rendering Training Course. Course Duration: 10 hours Course Description: This 10-hour course enhances rendering skills with V-Ray, a leading 3D visualization engine. Participants master photorealistic renders, focusing on lighting, materials, and post-production. Covering key concepts, workflow, lighting techniques, material creation, rendering settings, and post-processing, the course ensures stunning visual results. Course Outline: Module 1: Introduction to V-Ray Rendering (1 hour) Overview of V-Ray and its role in 3D rendering Understanding the rendering workflow Setting up V-Ray for your 3D software platform Module 2: Essential Rendering Concepts (1 hour) Understanding global illumination and its impact on renders Exploring image sampling and antialiasing techniques Introduction to render elements for post-processing Module 3: Lighting Techniques (2 hours) Mastering various lighting types in V-Ray Creating natural lighting with HDRI maps Implementing artificial lighting with V-Ray lights Achieving realistic daylight with V-Ray sun and sky Module 4: Material Creation (2 hours) Creating realistic materials using V-Ray material editor Applying textures and procedural maps for added realism Understanding material reflections and refractions Advanced techniques for materials like glass, metal, and fabric Module 5: Rendering Settings and Optimization (1.5 hours) Exploring V-Ray rendering settings for different scenarios Understanding render output options and resolution settings Efficiently using V-Ray distributed rendering for faster results Module 6: Post-Processing with Photoshop (1.5 hours) Enhancing renders through post-processing techniques Compositing render elements for added control Adjusting colors, contrast, and lighting in Photoshop Adding effects and final touches to achieve photorealism Module 7: Advanced Rendering Techniques (1 hour) Working with V-Ray proxies and instancing for complex scenes Utilizing V-Ray displacement for intricate detailing Understanding depth of field and motion blur effects Module 8: Real-World Project (1 hour) Applying the skills learned to complete a real-world rendering project Guidance and feedback from the instructor

Hand embroidery has been practiced for centuries and remains a hugely popular and fulfilling craft today. As with most crafts, hand embroidery is wide and varied in technique, style and usage. Traditional crewel embroidery, fine and delicate silk work, contemporary mixed media or modern folk art to name just a few.

Bespoke AutoCAD Mac Basic-Intermediate Course
By ATL Autocad Training London
Why Learn Bespoke AutoCAD Mac Basic-Intermediate Course? Learn AutoCAD using your projects and learn how to use powerful tools and techniques for drawing, dimensioning, and printing 2D drawings with our Intermediate AutoCAD course. Check our Website How long is the training? 10 hours, Choose and split 10 hrs Mon to Sat 9 am to 7 pm. Book online or call 02077202581 or 07970325184. Method? 1-on-1, available in both in-person and Live Online. Course Topics Include: Building Fundamental Shapes Working with Lines, Arcs, and Polylines Utilizing Grip Tools Precision Object Alignment Data Management and Backups Exploring File Formats Ensuring Disaster Recovery Mastering Object Creation Handling Measurement Units Dynamic Input Techniques Inquiring Commands and Measurement Tools Effective Object Viewing Navigating Zoom and Pan Object Manipulation Strategies Object Selection Methods Swift Object Management Object Transformation Techniques Scaling and Altering Objects Trim, Extend, and Offset Functions Creating Geometric Variations Object Joining and Editing Corner Filleting and Chamfering Stretching Objects Organizing Your Drawings Layer Management Customizing Object Properties Applying Linetypes Layout Design and Setup Efficient Page Configurations Scaling Drawing Views Adding Annotations Multiline and Single-Line Text Creation Text Styling and Editing Dimensioning Concepts Customizing Dimension Styles Dimension Editing Implementing Multileaders Object Hatching Hatching Editing Reusable Content Management Blocks and Symbols Tool Palette Usage Working with Groups Model Space and Paper Space Understanding Layout Creation and Viewports Viewport Scaling Plotting and PDF Output Managing Multiple Sheet Drawings Utilizing Plotstyles Crafting Custom Drawing Templates Download AutoCAD Mac https://www.autodesk.co.uk After completing the AutoCAD for Mac course, learners can expect the following learning outcomes: Proficiency in AutoCAD: Participants will acquire the skills and knowledge needed to confidently use AutoCAD for Mac, including creating and editing drawings, managing objects, and applying precision techniques. Effective Design Skills: They will gain the ability to produce accurate 2D drawings, making them valuable assets in design-related professions. Jobs that individuals can pursue after completing this course include: Draftsperson: Working in architectural, engineering, or construction firms to create technical drawings and plans. CAD Technician: Assisting in the development of designs for various projects, such as product design or urban planning. Interior Designer: Using AutoCAD for space planning and layout design in the interior design industry. Architectural Designer: Collaborating on architectural projects, including creating floor plans and elevations. Mechanical Designer: Participating in the design and development of mechanical components and systems. Civil Engineering Technician: Supporting civil engineers in designing infrastructure projects, such as roads and bridges. Electrical or Electronics Designer: Assisting in the creation of electrical schematics and electronic circuit diagrams. Landscape Designer: Planning and visualizing outdoor spaces, gardens, and landscapes. Completing this AutoCAD course opens doors to various industries where precise and detailed 2D drawing skills are highly valued. The AutoCAD Mac Bespoke 1 on 1 Basics to Intermediate Level Training Course provides participants with a comprehensive skill set, enabling them to attain proficiency in using AutoCAD Mac. This course covers a wide range of functionalities and caters to individuals at all skill levels, whether they are beginners or experienced users. Participants will begin by learning fundamental features such as drawing, editing, annotations, and dimensioning. As they progress, they will delve into more advanced topics like object manipulation, customizing workspaces, and streamlining workflows. Key Benefits of the Course: Mastery of Mac-AutoCAD: Acquire expertise in both essential and advanced techniques for creating precise 2D drawings. Enhanced Productivity: Increase efficiency by implementing time-saving tips and optimizing your work processes. Versatile Design Abilities: Develop the skills to undertake diverse projects in fields such as architecture, engineering, and more. Industry-Relevant Competencies: Elevate your career prospects across various industries by gaining in-demand AutoCAD skills. Access to Recorded Lessons: Review and reinforce your learning at your convenience with access to recorded lesson sessions. Ongoing Email Support: Receive continuous assistance and guidance via email even after completing the course. Enroll today to benefit from interactive learning experiences guided by experienced instructors. Choose between flexible in-person or online sessions, gain access to lesson recordings, and enjoy a lifetime of email support. Tailored Guidance: Get personalized coaching and instruction tailored to your unique learning needs and objectives. Convenient Scheduling: Choose from flexible training slots available Monday to Saturday from 9 am to 7 pm, accommodating your busy schedule. Versatile Learning Options: Select between in-person training at our location, conveniently situated just 5 minutes away from Oval Tube Station, or participate in live online sessions from anywhere. Engaging Interactions: Participate in interactive sessions designed for questions, discussions, and problem-solving, creating an immersive learning experience. Effective Progression: Accelerate your learning with focused guidance, allowing you to advance at your own pace while mastering the material. Tailored Curriculum: Customize the course content to align with your prior knowledge and specific areas of interest, ensuring a relevant and engaging learning experience. Real-Time Guidance: Receive immediate feedback from the instructor, enhancing your comprehension and skill development. Comprehensive Support: Enjoy ongoing assistance and clarification opportunities through email or additional sessions beyond the course for an in-depth learning experience.

Basic Photoshop Training Course
By ATL Autocad Training London
Learn the Basic PhotoshopTraining Course Learn retouching, layers, color, correction, shapes, and symbols. Delve into graphic design, photo editing, and digital art. From beginner to pro, gaining expertise in UX strategies, ensuring your websites are impactful and user-friendly. Click here for more info: Website Duration: 10 hours Approach: 1-on1 sessions and Personalized guidance. Schedule: Customize your schedule by booking a convenient hour, available from Monday to Saturday between 9 am and 7 pm. Module 1: Interface and Preferences Familiarize yourself with the Photoshop Interface Customize Panels and Toolbars to match your workflow Explore Photoshop Preferences to optimize settings Discover various Photoshop CC Workspaces tailored for different tasks Begin with essential Keyboard Shortcuts Module 2: Image File Formats Understand diverse image file formats such as PSD, JPEG, PNG, and PDF Delve into File Compression and its influence on image quality Module 3: Creating a New Document Set dimensions and size for new documents Grasp media units for accurate design specifications Explore Color Profiles and their significance Save presets for swift document setups Module 4: Placing Images Differentiate Embedded vs. Linked images Introduction to Smart Objects for non-destructive editing Master the Selection tool for precise image placement Module 5: Image Size and Resolution Save images using various formats and compression settings Understand Image Size and Resolution for diverse output needs Module 6: Layers Introduction Organize your work with Layer management Master layer tasks such as reordering, renaming, grouping, locking, and hiding Module 7: Selection Tools Explore Selection Tools like Marquee, Magic Wand, Quick Selection, and Lasso Grasp Inverse Selection and Deselect for efficient editing Module 8: Layer Effects Apply captivating Layer Effects such as Drop Shadow, Stroke, and Outer Glow Save and replicate Effects Styles for quick application Combine multiple effects for creative designs Module 9: Introduction to Shapes Utilize the Shapes tool for fundamental design elements Create Custom Shapes for unique designs Understand Color principles and use the Properties Panel for adjustments Master the Direct Selection tool for precise shape editing Create a basic poster using provided examples Module 10: Type and Typography Work with Type and explore the Character and Paragraph Panel Utilize Styles Panel for consistent text formatting Save favorite fonts for easy access Apply Effects and Layer Styles on Type for impactful typography Learn about Leading, Tracking, and Kerning for optimal text spacing Module 11: Colors Understand RGB vs. CMYK color modes Select colors using the Eyedropper tool Save colors as Swatches for reuse Create gradients using the Gradient Tool Module 12: Creating a Clipping Mask Master the concept of Clipping Masks and their application Apply Clipping Masks to Type, Images, and Shapes Combine Layer Effects with Clipping Masks for creative designs Module 13: Introduction to Masking Understand Masking and its importance in image editing Utilize the Brush tool for mask creation Learn Masking shortcuts and use Gradient Mask for smooth transitions Module 14: Adjustment Layers Explore Color and Gradient Adjustment Layers for image enhancements Master Curves, Levels, and Hue/Saturation Adjustment Layers for precise color control Convert images to Black and White using Adjustment Layers Combine Adjustment Layer Masks for targeted edits Module 15: Image Touch Up Master various touch-up techniques, including Red Eye Removal, Spot Healing Brush, and Patch Tool Utilize Content Aware Removal for seamless object removal Restore old photos using Clone Stamp and Dodge/Burn tools Enhance portraits by removing blemishes and whitening teeth Module 16: Filters Introduction Understand Smart Objects and Filter usage for non-destructive editing Explore the Filters Gallery and experiment with Blur and Vantage filters Module 17: Blending Modes Introduction Master the concept of Blending Modes and their effects on layer overlays Understand different Blending Modes like Darken, Lighten, and Overlay Layer Mastery: Develop expertise in working with layers, mastering advanced techniques for seamless editing and design organization in Adobe Photoshop. Precision Editing: Skillfully employ a variety of selection tools, ensuring precise and meticulous editing, manipulation, and composition of images and elements. Creative Layer Effects: Apply captivating Layer Effects with finesse, enhancing your designs and visuals to achieve professional-grade aesthetics. Advanced Editing Techniques: Understand the functionalities of Adjustment Layers, Masking, and Clipping Masks, enabling you to perform advanced editing and compositing tasks with confidence and precision. Effective Photo Restoration: Acquire techniques to touch up and restore photographs effectively, ensuring professional-quality results in photo editing and retouching. Typography Expertise: Explore advanced typography techniques, enabling you to create visually appealing text designs that complement your overall compositions. Filter Applications: Gain an introductory understanding of Filters and their creative applications, enhancing your ability to add artistic effects and refine visuals. Practical Color Theory: Grasp the fundamental principles of Color Theory and apply them practically in your designs, ensuring harmonious and visually pleasing color schemes in your work. Course Highlights: Advanced Photoshop Skills: Learn intricate techniques for professional image editing, retouching, and manipulation. Creative Design Projects: Engage in hands-on projects to enhance your practical skills in real-world scenarios. Mastering Special Effects: Dive into advanced topics like layer effects, filters, and blending modes to create stunning visual effects. Typography and Design Principles: Explore typography styles, layout design, and color theory for compelling compositions. Professional Portfolio Development: Receive guidance on creating a professional portfolio showcasing your Photoshop expertise. Potential Job Roles: Graphic Designer: Craft visually appealing graphics for print and digital media. Digital Artist: Create digital artwork for various applications, from illustrations to advertisements. Photo Retoucher: Enhance and manipulate photos for professional use, including portrait retouching. UI/UX Designer: Design user interfaces and experiences for websites and applications. Web Designer: Develop visually engaging websites with expertise in Photoshop for web design. Marketing Content Creator: Produce marketing materials such as banners, brochures, and social media visuals. Freelance Designer: Work independently, offering design services to clients across different industries. Advertising Creative: Contribute to creative campaigns by designing impactful ad visuals. Print Production Specialist: Prepare print-ready materials, ensuring quality in printed products. Photography Post-Processing Specialist: Enhance and retouch photographs, optimizing them for professional use. Comprehensive Photoshop Proficiency: Develop a solid foundation in Photoshop, mastering essential tools and techniques vital for image editing and manipulation. Creative Editing Expertise: Learn advanced retouching, image enhancement, digital artwork creation, and graphic design using Photoshop's powerful features. Professional-Grade Results: Acquire skills for achieving professional-level outcomes in image editing, ensuring precise color correction, seamless retouching, and visually appealing compositions. Optimized Workflow: Discover time-saving tips, shortcuts, and efficient techniques to enhance your Photoshop workflow. Learn layer management, non-destructive editing, and automation for streamlined processes. Versatile Design Skills: Unlock creative possibilities by mastering text effects, digital collages, filters, and graphic design for diverse mediums. Access to Recorded Lessons: Revisit course material and reinforce learning through recorded lessons. Review specific techniques at your own pace, deepening your understanding of Photoshop. Lifetime Email Assistance: Benefit from continuous support with lifetime email assistance. Seek guidance, get answers to questions, and seek clarification even after completing the course.